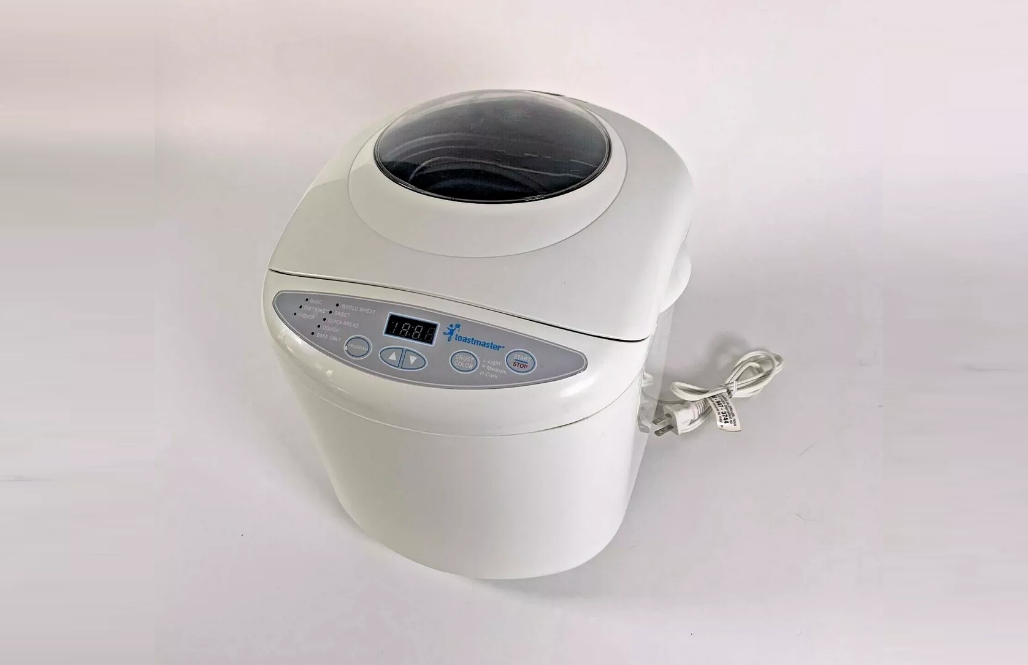
Toastmaker Bread Maker TBR15CAN User Guide
Content
Introduction
Wonderful homemade bread with the Toastmaster Bread Maker TBR15CAN, a multipurpose and easy-to-use appliance. Its adjustable settings accommodate different kinds of bread and tastes, providing ease and uniformity with each loaf. With its user-friendly controls and dependable performance, the TBR15CAN is perfect for novice and experienced bakers alike, streamlining the bread-making process.
Specifications
| Specifications | Details |
|---|---|
| Power Supply | 120 V ~ 60 Hz |
| Power Consumption | |
| - Heater | 400W |
| - Kneading Motor | 25W |
| Dimension (WxDxH) | Approx. 9.5”x12”x12.3” |
| Weight | Approx. 9.5 lb. |
PARTS

The illustrations in this use and care guide are for informational purposes only. You may find your bread maker and parts look different, however, the steps for operation are the same.
Toastmaster Bread Maker TBR15CAN Control Panel

NOTE: When using the touchpad controls, be sure to press the pad until you hear a beep.
NOTE: When a bread maker is packaged for shipment, a clear plastic film is placed over the control panel; carefully peel it off.
| DISPLAY | Indicates the Program number selected, 1 to 8. |
|---|---|
| WINDOW | Indicates the CRUST COLOR selected. |
| Indicates minute-by-minute baking time countdown. | |
| Indicates delay, baking time selected. | |
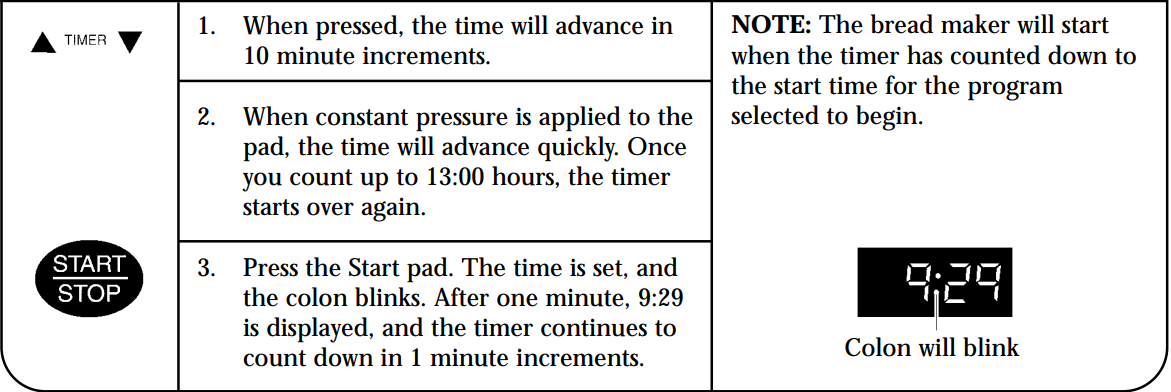
| TIMER | Use when setting the TIMER to delay baking. |
| Press ▲ and ▼ arrows to set timer for delayed completion up to 13 hours later. | |
| Arrows will move time up or down in 10-minute increments. Press and hold button for faster movement. | |
| TIMER is not available on some cycles, please check the Total Time in the PROGRAM SPECIFICATION CHART. | |
| PROGRAM | Press to select the baking cycle of your choice. The indicator light will be on next to the program selected. |
| The selected cycle automatically assigns the time needed to complete the process. | |
| CRUST COLOR | Press to select the CRUST COLOR for most programs. |
| Light “L”, Medium “P”, Dark “H”. | |
| Bread maker will automatically bake on the medium setting (“P”) unless another is selected. | |
| START/STOP | Press to start operation or begin TIMER countdown for delayed completion. |
| Press and hold until you hear a beep to stop operation or to cancel a TIMER setting. | |
| Note: Do not press “STOP” when checking the progress of bread. |
Features
PROGRAM SELECT
The control panel will let you choose different program and crust color for some programs.
All programs except QUICK BREAD, DOUGH and BAKE contain a beep to check the dough ball, to add additional ingredients (i.e., raisins, nuts, and spices) or to stir ingredients.
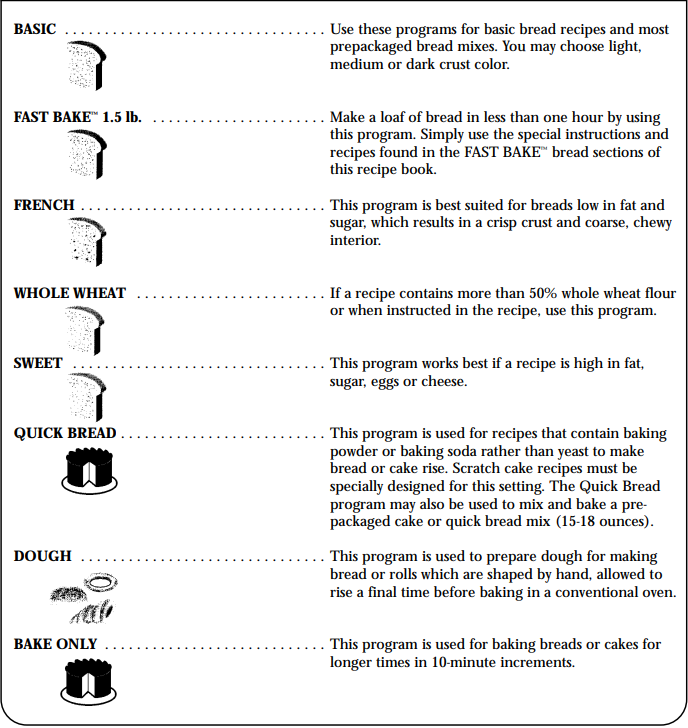
Program Specifications Chart (approximate times)
| Process | Total Time | Delay Timer Min. | 1st Knead Min. | 1st Rise Min. | Display time for beep** | 2nd Knead Min. | 2nd Rise Min. | Rest Sec. | Final Rise Min. | Bake Min. | Keep Warm Min. |
|---|---|---|---|---|---|---|---|---|---|---|---|
| BASIC | 3:00 | 13:00 | 10 | 20 | 2:25 | 15 | 20 | 30 | 55 | 60 | 60 |
| WHOLE WHEAT | 3:40 | 13:00 | 10 | 25 | 3:00 | 20 | 30 | 30 | 70 | 65 | 60 |
| FRENCH | 3:50 | 13:00 | 18 | 40 | 2:47 | 22 | 20 | 30 | 60 | 70 | 60 |
| SWEET | 2:50 | 13:00 | 10 | 5 | 2:30 | 20 | 30 | 30 | 57 | 48 | 60 |
| FAST BAKE | :58 | N/A | 13 | :57 | 10 | 35 | 60 | ||||
| QUICK BREAD | 1:34 | N/A | 14 | N/A | 5 | 80 | 60 | ||||
| DOUGH | 1:20 | 13:00 | 7 | 5 | 18 | 50 | |||||
| BAKE | :10-1:00 | N/A | 60 | 60 |
**Display time for beep tells you when to add additional ingredients, i.e. raisins or nuts, during all programs except QUICK BREAD, DOUGH and BAKE. Use this time to check dough ball and scrape ingredients from sides of pan.
The beeper sounds when baking is complete. If you want to serve bread that has just been baked, press STOP pad and remove. You may remove the bread or leave it in the bread maker. If left, it will automatically be kept warm for up to 1 hour during the keep warm process on all bake cycles except DOUGH. The display window will show 0:00, and the colon will flash. At the end of keep warm, the display window will indicate last program selected.
Display Information at Start
| No. | Setting | Time |
|---|---|---|
| 1P | Basic | 3:00 |
| 2 | Rapid | 0:58 |
| 3P | French | 3:50 |
| 4P | Wheat | 3:40 |
| 5P | Sweet | 2:50 |
| 6 | Quick Bread | 1:34 |
| 7 | Dough | 1:20 |
| 8 | Bake Only | 1:00 |
Description
With the robust and dependable Toastmaster Bread Maker TBR15CAN, baking bread no longer requires guesswork. You can simply choose the type of bread you want to make with its 12 pre-programmed baking settings, then let the machine take care of the rest. You can also adjust the baking time and crust color with the TBR15CAN to suit your tastes. Even for new users, the LCD display and simple controls make it easy to use. The long-lasting and elegant stainless steel housing guarantees that your bread maker will be around for many years to come. The included measuring cup and spoon add to the convenience, and the non-stick baking pan makes cleanup a breeze. Plus, to get you started, the TBR15CAN comes with a recipe book with fifty delectable bread recipes.
Programming
PROGRAMMING BREAD MAKER PROGRAMS
The following are the general steps for using the bread maker. Depending on the program or recipe that you choose, some steps may not apply or there may be additional steps. Refer to the BASIC Breads, FAST BAKE™ Breads, QUICK BREADS and DOUGH sections.
Add all ingredients to the pan in the order listed in the recipe.
The illustrations in this use and care guide are for information purposes only. You may find your bread maker looks different, however, the steps for operation are the same.
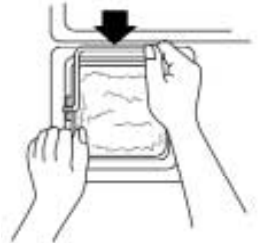
Open the lid and remove the bread pan by pulling straight up, using the handle.

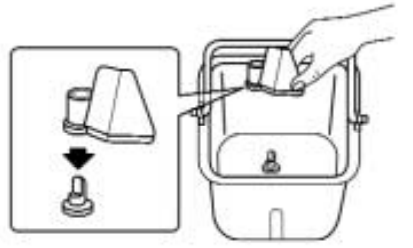
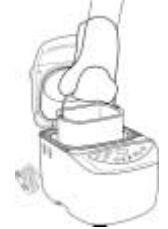
Mount the kneading blade on the shaft, flat side down.
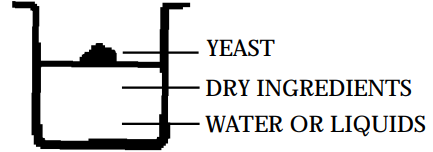
Place all ingredients, except yeast, in bread pan in the order listed. Use a rubber spatula to smooth the dry ingredients in the bread pan; be sure to spread into all corners. Lightly tap the pan 3 times on the counter top to settle the ingredients. Add yeast on top.
Insert bread pan and push down on rim until it snaps securely into place. Fold handle down.
If the pan does not snap securely into place, remove bread pan. Wearing oven mitts, place fingers behind bread pan clips and gently pull away from oven wall. Insert bread pan again.
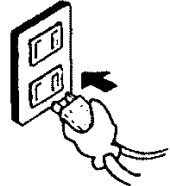
Close the lid. Plug into 120 V ~ 60 Hz outlet. The bread maker display indicator will default to 1P and then 3:00.
- Press the PROGRAM button to choose the desired program. Each time the PROGRAM button is pressed, you will hear a beep and the number in the display window will advance to the next program. The indicator light next to the program selected will be on.
Press the CRUST COLOR button to choose crust color desired (except for the FAST BAKE™ and QUICK BREAD programs). When you press the button, you will hear a beep and the display window will show the color selected.
L = Light color P = Medium color B- Dark color Press the START/STOP button. The time left for the program to be finished is displayed. The timer will count down in one minute increments. All programs except QUICK BREAD, DOUGH and BAKE will beep to add additional ingredients during the second knead. Opening the lid will not stop the kneading. Add ingredients quickly and evenly over dough. Quickly close the lid to prevent heat loss. At this time also check the dough ball and use a rubber spatula to scrape ingredients from the sides of the pan.

The beeper will sound when the bread is done. Press the START/STOP button and hold it until you hear a beep. Hold the lid open while you remove the bread pan using oven mitts. If you do not stop the unit and remove the bread, it will automatically go into the keep warm process on all programs except for DOUGH. Your bread will be kept warm for 1 hour. You may remove the bread pan at any time during the keep warm cycle. To turn off the keep warm feature before the 1 hour is up, press the START/STOP button and hold it until you hear a beep.
NOTE: If you wish to make another loaf of bread right away, allow the bread maker to cool down for 10 to 15 minutes with the cover open and pan removed. If you attempt to use the unit too soon, it will signal and display will read E:01. Press Start/Stop until screen reverts to setting display and wait until unit has cooled.Turn the bread pan upside down and shake to release the bread.
Place the bread upright on a wire rack to cool 20-30 minutes before cutting. This allows the steam to escape. Be sure to remove the kneading blade from the bread.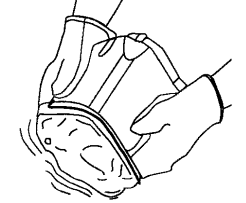
CAUTION:
The bread pan, kneading blade and bread will be very hot.
Always unplug after use.
Programming Delay Timer
- The delay timer can be set to delay bread making up to 13 hours. At the selected time, delicious bread will be ready. The delay works for all programs except FAST BAKE™, DOUGH and BAKE.
- Add all ingredients to the bread pan in the order listed. It is critical to add the yeast last on top of the flour, and away from liquid. This will keep the yeast from activating until the bread maker starts to mix.
- Select the PROGRAM and CRUST COLOR. Before pressing START, set the TIMER for the amount of time you want to wait before the bread is done.
EXAMPLE: It is 9:00 p.m. now. The bread is to be ready at 6:30 a.m. the next morning. Set the timer for 9:30, because there are 9 hours and 30 minutes between 9:00 p.m. and 6:30 a.m.
Setup Guide
Setting up the Toastmaster Bread Maker TBR15CAN is simple and straightforward. Here are the steps to follow:
- Plug in the bread maker and select the desired baking setting, crust color, and baking time.
- Add the ingredients to the bread pan in the order listed in the recipe.
- Close the lid and press the start button.
- Monitor the baking process through the viewing window and wait for the machine to beep when the bread is finished baking.
- Remove the bread pan from the machine and let the bread cool on a wire rack for a few minutes before slicing and serving.
Cleaning & Storing
ALWAYS UNPLUG THE UNIT AND ALLOW TO COOL COMPLETELY BEFORE CLEANING. CAREFULLY UNPACK THE BREAD MAKER AND REMOVE ALL PACKAGING MATERIALS.
Any service requiring disassembly, other than the cleaning described below, must be performed by an authorized service center. Unauthorized service will void your warranty.
Cleaning
CLEAN-UP OF BREAD MAKER
- Unplug and allow to cool before cleaning.
- Remove bread pan from inside the bread maker.
- Clean exterior of bread maker with a damp cloth and plastic scouring pad if necessary. Do not rub too hard as the surface may be scratched.
- Remove any flour, bread crumbs or other food from the inside of the oven cavity using a damp sponge, cloth or a small portable vacuum cleaner. A plastic scouring pad may be used if necessary. Do not rub too hard as the surface may be scratched.
- To clean the glass in the lid, use a glass cleaner or mild detergent and a damp cloth or plastic scouring pad. Do not use an abrasive cleaner or pad as they might scratch the glass.
- Rinse with a damp cloth and dry thoroughly.
CLEAN-UP FOR OVER-RISING
- If the bread should over-rise and hit the cover, extra cleaning will be necessary. Unplug the bread maker and gently remove cover. Using a nylon spatula or wooden utensil, scrape all loose dough from inside the cover. Then wash the cover in warm, soapy water.
- Move bread maker to countertop next to kitchen sink; place on backside. You may want to place it on a towel to avoid scratching it. Use a pastry brush to “sweep” crumbs from inside the bread maker and around the hinges. Wipe inside of bread maker with a damp cloth.
- Using a wet dishcloth or sponge, soak all remaining dry or burned-on dough to loosen. Use a plastic scrub pad to remove any stubborn spots. Do not use abrasive cleaners or metal scouring pad which could damage the finish. Rinse well with a damp dishcloth or sponge and dry thoroughly. If any water has accumulated in the vent of the cover, wipe with a dishcloth or sponge to prevent it from running down the inside or outside of the bread maker when you stand the unit upright. Carefully insert cover tabs into the slots and snap into place.
CLEAN-UP OF BREAD PAN AND KNEADING BLADE
DO NOT IMMERSE BREAD PAN OR WASH IN DISHWASHER
- Allow to cool before cleaning.
- Fill with hot soapy water and remove kneading blade. If necessary to remove the kneading blade from the bread pan, allow the soapy water to remain in the pan for up to 30 minutes (longer times may damage the non-stick surface). It is not necessary to remove the kneading blade for cleaning. However, if you wish to, it is necessary to do so after each use or it will become increasingly difficult to release.
- Wash bread pan and kneading blade with a nylon bristle brush. Do not use steel wool, abrasive cleaners, or metal utensils on the bread pan or kneading blade as they will damage the non-stick surface. Normal wear is to be expected. The non-stick may discolor over time and in no way affects performance.
STORING
- All removable parts should be thoroughly cleaned and dried.
- Store with lid closed and kneading blade inside bread pan.
Display Information
Always use the bread maker in a room that is free of drafts and is at least 55°F/13°C, but not warmer than 90°F/32°C. Do not use bread maker in an unheated garage, outdoors, near a heat vent, or in direct sunlight.
Generally the display window will tell you what is happening with your bread maker. Here are some points to consider.
| Messages | Reason | Solution |
|---|---|---|
| 0:00 (Colon flashing) | Cycle is complete. Keep Warm is engaged. | Press Start/Stop button to cancel. |
| E:01 signal beeping | Unit is too hot. | Press Start/Stop button to cancel. Open cover, remove bread pan and allow unit to cool with cover open. |
| Lsignal beeping | Room temperature is too low. (Below 59°F) | Press Start/Stop button to cancel. Place bread maker in a warm room and allow to warm up. |
| Display Blank | Power has been interrupted. | Unplug unit and plug back into outlet. Unit must be reset. |
| Hsignal beeping | Short circuit of sensor | Send bread maker into Salton, Inc. for repair or replacement. |
READ AND SAVE THESE INSTRUCTIONS
WARNING: A risk of fire and electrical shock exists in all electrical appliances and may cause personal injury or death. Please follow all safety instructions.
IMPORTANT SAFEGUARDS
When using electrical appliances, basic safety precautions should always be followed to reduce the risk of fire, electric shock and injury to persons, including the following:
- Read all instructions before using this appliance.
- Do not immerse cord, plug, or appliance in water or other liquid (see instructions for cleaning).
- Do not touch hot surfaces. Always use oven mitts when handling the hot bread pan or bread.
- Close supervision is necessary when this appliance is used near children.
- This appliance is not for use by children. Keep out of reach of children.
- Unplug from outlet when not in use and before cleaning. Allow to cool before attaching or removing parts.
- Avoid touching moving parts. Do not remove the bread pan during operation. Stop pad must be pressed if bread pan is to be removed before completion.
- Do not operate the appliance with a damaged cord or plug, or after the appliance malfunctions, or has been dropped or damaged in any manner. Return appliance to the nearest authorized service facility for examination, repair, electrical or mechanical adjustment.
- Do not use outdoors or while standing in damp area.
- Do not let cord hang over edge of table or counter or touch hot surfaces.
- Do not place on or near a hot gas or electric burner or in a heated oven.
- To unplug, grip the plug and pull out from the wall outlet. Never pull on the cord.
- Do not unplug while unit is in operation.
- Do not use appliance except as indicated in these instructions.
- Use accessory attachments only if recommended by Toastmaster Inc.
- Do not clean with metal scouring pads. Pieces can break off the pad and touch electrical parts.
- Bread maker must be placed at least 4 inches (10.2 cm) from walls and edge of counter.
- Do not cover bread maker with anything which would prevent the steam from escaping. This may cause warpage, discoloration, malfunction or even fire.
SAVE THESE INSTRUCTIONS
CAUTION: A short power supply cord is provided to reduce the risk of personal injury resulting from becoming entangled in or tripping over a longer cord. Extension cords are available from local hardware stores and may be used if care is exercised in their use. If an extension cord is required, special care and caution is necessary. Also the cord must be: (1) marked with an electrical rating of 125 V, and at least 10 A., 1250 W., and (2) the cord must be arranged so that it will not drape over the countertop or tabletop where it can be pulled on by children or tripped over accidentally.
If the appliance is of the grounded type, the extension cord should be a grounding-type 3-wire cord.
ELECTRIC POWER: If electric circuit is overloaded with other appliances, your bread maker may not operate properly. The bread maker should be operated on a separate electrical circuit from other operating appliances.
Polarized Plug (Model TBR15)
The model TBR15 appliance has a polarized plug, (one blade is wider than the other). To reduce the risk of electric shock, this plug is intended to fit into a polarized outlet only one way. If the plug does not fit fully in the outlet, reverse the plug. If it still does not fit, contact a qualified electrician. Do not attempt to modify the plug in any way.
Grounded 3-Conductor Plug (Model TBR15CAN)
The model TBR15CAN appliance is equipped with a grounded-type 3-wire cord (3-prong plug). This plug will only fit into an electrical outlet made for a 3-prong plug. This is a safety feature. If the plug should fail to fit the outlet, contact an electrician to replace the obsolete outlet. Do not attempt to defeat this safety feature.
This product is for household use only.
Before Your First Use
- Please fill out information that follows warranty.
- Unpack and clean bread maker; see CLEANING AND STORING.
- Place bread maker on a dry, stable surface away from burners and away from areas where cooking grease or water may splatter onto it.
- Avoid placing it where it may tip over during use. Place on back of counter top.
- The bread maker will bake up to a 11⁄2 pound loaf of bread. Do not put a larger quantity of ingredients into the bread pan than recommended. If you do so, the bread may not mix or bake correctly and the bread maker may be damaged.
The maximum amount of ingredients to be used is as follows.
- Bread programs — 3 - 31⁄2 cups
- Quick Bread programs – 2 - 3 cups
- Dough program — 4 - 41⁄2 cups
During first use, this product may smoke and/or emit an odor from mineral oils used in manufacturing. This is normal for a newly manufactured appliance. Before first use, operate with empty bread pan inside the bread machine on the FAST BAKE program to burn off the manufacturing oils. Leave the lid up during the process.
POWER OUTAGE
- Your bread maker has a 10-minute power interrupt feature. If the electricity goes off, the memory will store the course in process for up to 10 minutes. If the power comes back on within this time, the course will resume where it left off. If the bread maker loses power for more than this time and you are using any dairy products, perishables or meat in your bread, you should discard the contents of the recipe and start again with new fresh ingredients due to health and sanitary considerations.
- For non-perishable recipes you may try starting the bread maker at the beginning of the course again for all courses except FAST BAKE™. This may not always produce an acceptable loaf. If you are not sure when the outage occurred, remove the dough ball from the bread pan and place in an oven-safe baking container. Allow to double in size and place in a preheated 350°F/177°C oven for 30-45 minutes or until done. The bread will sound hollow when tapped on top of the loaf if it is done.
- If you are using the FAST BAKE™ course or if the bread has already begun to bake when the outage occurs, you must begin with new ingredients.
- The power interrupt will not cover power surges. If you experience frequent power surges, use a surge protector.
Troubleshooting
Here are some common problems and solutions for the Toastmaster Bread Maker TBR15CAN:
- The bread is not rising: Make sure you are using the correct amount of yeast and that the yeast is not expired. Also, check that the temperature of the liquid ingredients is not too hot or too cold.
- The bread is sticking to the pan: Make sure the pan is properly greased or use a non-stick spray. Also, wait until the bread is cool before removing it from the pan.
- The bread is over or undercooked: Adjust the baking time and temperature according to the recipe. Use the delay timer if you prefer a longer or shorter baking time.
- The machine is beeping but the bread is not done: Check that the bread is not stuck to the sides of the pan and that the paddle is properly attached to the machine.
ONE YEAR WARRANTY
Warranty: This Toastmaster® product is warranted to be free from defects in materials or workmanship for a period of (1) year from the original purchase date. This product warranty covers only the original consumer purchaser of the product.
Pros & Cons
- Pros:
- User-friendly and easy to use
- 12 pre-programmed baking settings
- Customizable crust color and baking time
- Non-stick baking pan for easy cleaning
- Cons:
- May be too small for large families or frequent bread baking
- Does not have a gluten-free setting
Customer Reviews
Customers love the Toastmaster Bread Maker TBR15CAN for its ease of use and versatility. They appreciate the variety of baking settings and the ability to customize the crust color and baking time. Some users have reported that the machine is a bit noisy, but this is a minor issue compared to the delicious bread it produces. The most common complaint is that the machine is a bit small for large families or frequent bread baking, but this is to be expected from a countertop appliance.
Faqs
What is the capacity of the Toastmaster Bread Maker TBR15CAN?
Can I add nuts or seeds to the bread while it is baking?
How do I clean the TBR15CAN?
How long does it take to bake a loaf of bread in the Toastmaster Bread Maker TBR15CAN?
What is the warranty on the Toastmaster Bread Maker?
Can I make rolls or buns in the Toastmaster Bread Maker?
Leave a Comment