Tp-Link Kasa Wi-Fi Plug EP10 Setup Guide
Content

Introduction of Kasa Wi-Fi Plug EP10
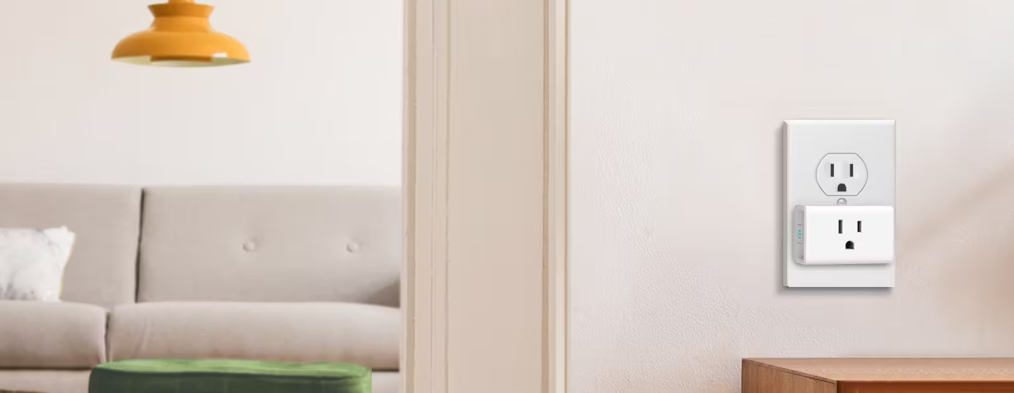
Kasa Smart Wi-Fi Plug Mini is a compact home device that turns your typical electrical wall outlet into a controllable, customizable and multi-functional outlet, enabling you to easily control your lights and household electronic devices via Kasa Smart app on your iOS or Android devices, no matter where you find yourself.
Control from Anywhere

Compact Design

No Hub Required

Home Automation

Detailed Specifications
The TP-Link Kasa Wi-Fi Plug EP10 is a smart plug with the following specifications:
- Voice control with Amazon Alexa, Google Assistant, and Microsoft Cortana
- Remote control and scheduling with the Kasa app
- Compact design that won't block other outlets
- Maximum load of 15A and voltage range of 100-120V
- Energy monitoring to track power usage
- Wi-Fi enabled with 2.4GHz compatibility
- Dimensions of 2.6 x 1.5 x 2.2 inches
Kasa Wi-Fi Plug EP10 Appearance
Smart Wi-Fi Plug Mini has a control button to turn on/off devices plugged in: It is super easy to use. *EP10 (US version) is used for demonstration in this guide.
- Blinking orange & blue: Ready to be set up.
Solid blue: Setup is completed.

- Press to turn the socket ON or OFF.
- Press for 5s to reset Wi-Fi connection.
- Press for 10s to restore to factory default settings.
Description
The TP-Link Kasa Wi-Fi Plug EP10 is a smart plug that allows you to control your devices with your voice or remotely using the Kasa app. With voice control, you can turn your devices on and off using Amazon Alexa, Google Assistant, or Microsoft Cortana. The compact design of the plug won't block other outlets, making it a convenient option for any space. The Kasa app allows you to schedule your devices to turn on and off at specific times, making it easy to manage your daily routine. The plug also features energy monitoring, so you can track your power usage and stay on top of your energy costs.
About This Guide
This guide provides a brief introduction to Kasa Smart Wi-Fi Plug Mini and the Kasa Smart app, as well as regulatory information. Please note that features of Kasa Smart Wi-Fi Plug Mini may vary slightly depending on the model and software version you have, and on your location, language and internet service provider. All images, steps, and descriptions in this guide are only examples and may not reflect your actual experience.
Conventions
In this guide, the following convention is used:
| Convention | Description |
| Teal | Key information appears in teal, including management page text such as menus, items, buttons and so on. |
| Underline | Hyperlinks are in teal and underlined. You can click to redirect to a website. |
More Info
Operating temperature, storage temperature, and other specifications can be found on the product page at https://www.tp-link.com.
Our Technical Support and troubleshooting information can be found at https://www.tp-link.com/support/.
A TP-Link Community is provided for you to discuss our products at https://community.tp-link.com.
Supported Load Types
Heater: ≤1500 W
Toaster: ≤850 W
Humidifier: ≤260 W
Tower Fan: ≤50 W
Iron: ≤1500 W
Kasa Wi-Fi Plug EP10 Setup Guide
To set up the TP-Link Kasa, follow these steps:
- Download and open the Kasa app on your smartphone.
- Create a TP-Link account or log in with an existing account.
- Plug the Kasa Wi-Fi Plug into an outlet and turn it on.
- In the Kasa app, tap on the "+" button to add a new device.
- Follow the on-screen instructions to connect the plug to your Wi-Fi network.
- Once the plug is connected, you can rename it and add it to a room for easy organization.
Set Up Your Smart Wi-Fi Plug Mini
Follow the steps below to set up your smart plug via Kasa Smart app.
Install Kasa Smart app
Get the Kasa Smart app from Google Play or the Apple App Store, or scan the QR code below to download it.


Log in or sign up with TP-Link ID
Open the Kasa Smart app and log in with your TP-Link ID. If you don’t have an account, create one first.
Add Device
Tap the button in the Kasa Smart app, select Add a Device >Smart Plugs > Smart Plug Lite / Mini and then follow step-by-step app instructions to complete the setup.
Simple to Set up and Use with Alexa
Setup is faster than ever before with Alexa. Use your Echo device to set up the plug via voice command.
Once you’ve set up your Echo device, plug in your TP-Link smart plug. If Alexa or the Alexa app says “New plug found,” go straight to step 3.
In the Kasa app, click the ‘+’ icon and then follow the step-by-step instructions to set up your smart plug and link your TP-Link account to Amazon.
To use your device with Alexa, just say “Alexa, turn on First Plug.”

TP-Link Kasa Wi-Fi Plug EP10 Device Controls
After you successfully set up your smart plug, you will see the home page of the Kasa Smart app. Here you can view and manage all devices that you’ve added to Kasa. Tap a smart plug to control and manage it.
Home Page

Device Status

Configure Your Smart Wi-Fi Plug Mini
Set Schedule
You can set schedules for your smart plug to turn on/off automatically to simplify your daily rountine
Tap
 on the Device Status Page.
Tap the + icon and select the time and frequency for your smart plug to turn on or off automatically.

You can also choose to turn your plug on or off at Sunrise or Sunset, which is based on the your location.

Set Away Mode
You can set Away Mode for your smart plug to turn on/off automatically at random intervals while you are away to make the appearance that someone is at home.
Tap
 on the Device Status page.
Set the time period during which your smart plug will turn on/off automatically and select the repeating frequency.

Set Timer
Set the countdown timer and your smart plug will automatically be turned on/off after the time ends
Tap
 on the Device Status page.
Set the time period after which your smart plug will turn on or off automatically.

Check Usage
You can view and track energy consumption of your smart plug.
Tap
 on the Device Status page.
Check the runtime of your smart plug.

Change Device Settings
You can change the device name and check device information in Device Settings.
Tap
 in the Device Status page
You can view Device Info and change the name of your smart plug

Create Scenes
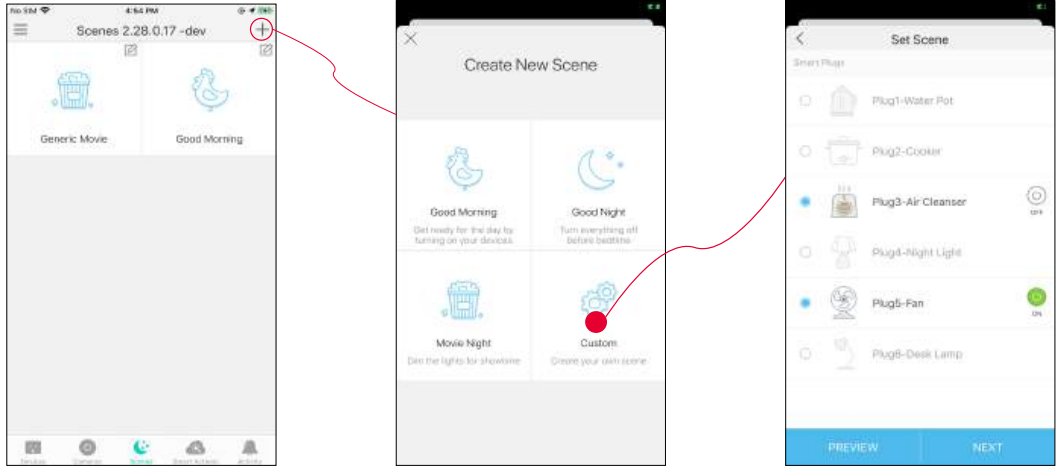
A scene is a preset group of smart devices that can be programmed, customized and activated simultaneously at the touch of a button from your smartphone or tablet, allowing you to easily set your mood, activity or fit any special occasion. This page allows you to preset how your smart home devices should act automatically at special occasions.
- Tap at the bottom, then tap + at the top right corner.
- Select a scene or create your own scene.
For example: I want to turn off Air Cleanser light and turn on Fan simultaneously with just a tap in the Kasa Smart app . Select devices for the scene to work on and set their status respectively.
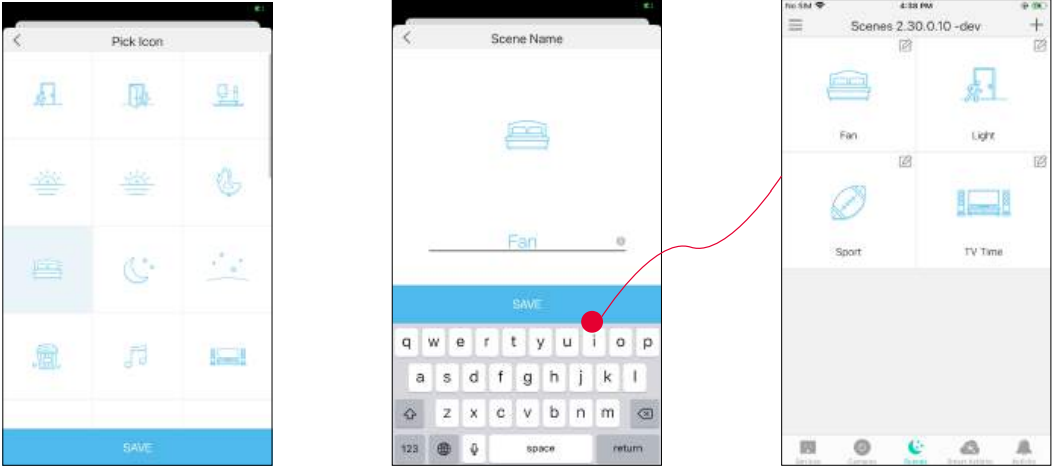
- Pick an icon for your scene.
- Name your scene.
Your scene is created and is displayed in the scene list. Just tap the scene to activate it.
Smart Actions
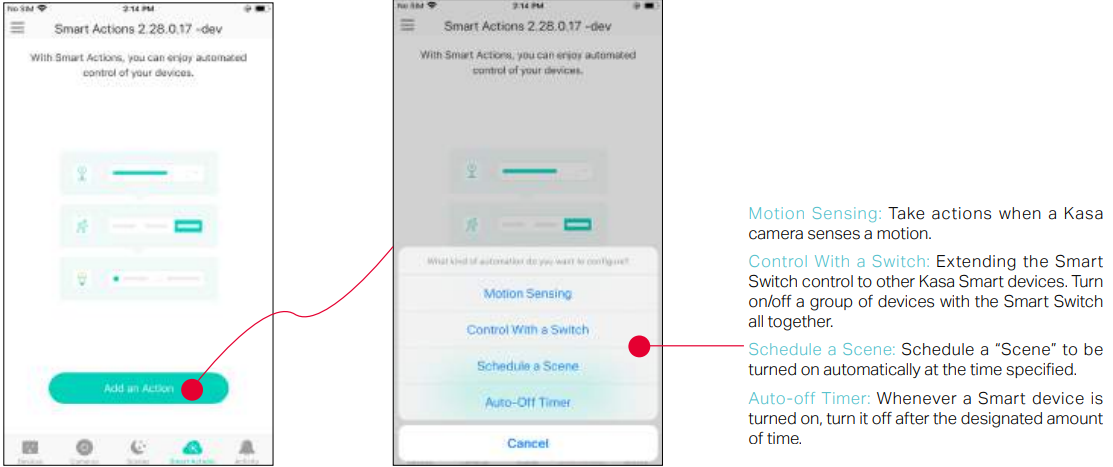
Smart Actions is a function provided that enables device interconnections and home automations. With Smart Actions, your Kasa devices can work together to create a smarter smart home. From the moment you wake up to the moment you drift asleep, Smart Actions make your home safer and more comfortable.
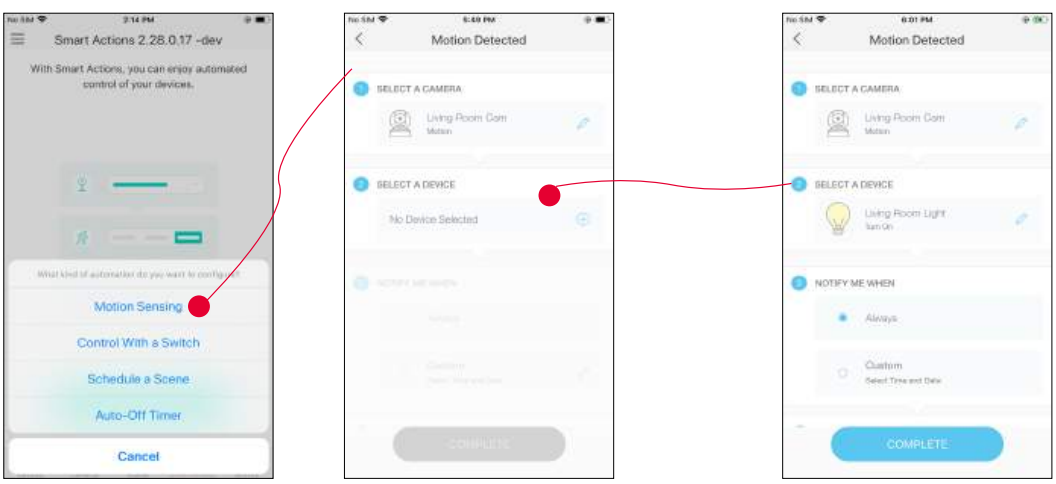
- Tap at the bottom, then tap Add an Action.
Select an automation type for your Smart Actions.
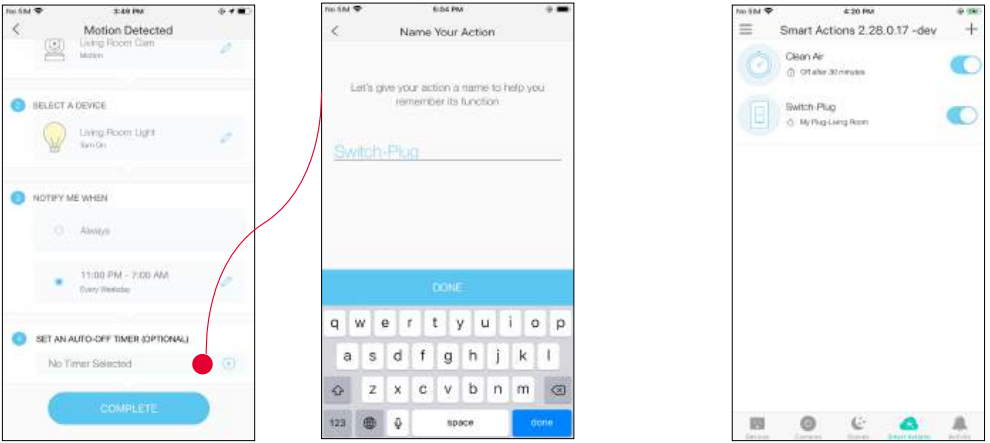
Configure Motion Sensing
If you already have a Kasa Smart Camera
e.g.: I want to turn the living room light on when my Kasa camera senses a motion.
- Tap Motion Sensing then select a camera.
Select the outlet of your Smart Power Strip which your living room light is plugged in.
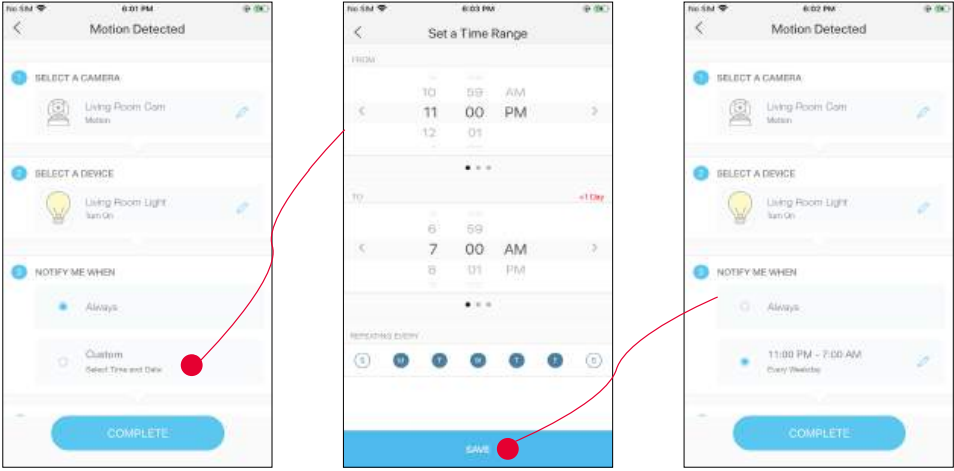
Set the time when you want to be notified. You can choose Always or tap Custom to choose time according to your needs. For example: I want the motion to trigger the light on from 11:00 PM to 7:00 AM every day.
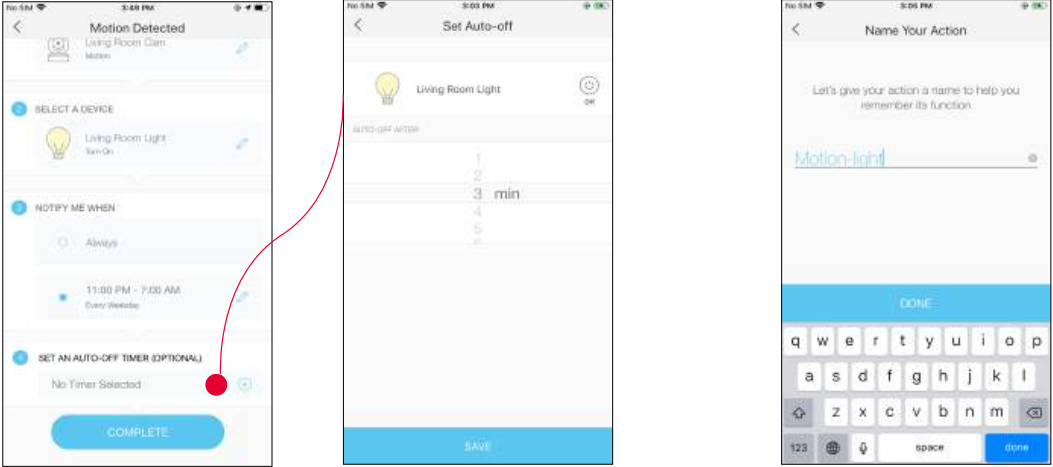
- (Optional) Set an auto-off timer then tap Complete. Then your living room light will be turned off after the time you set.
Name your action for easy identification.
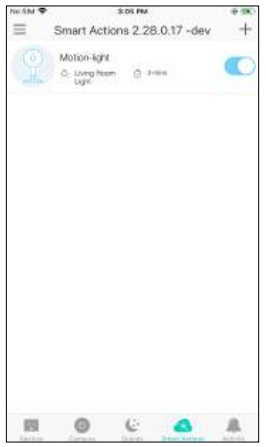
The Smart Action is created successfully and displayed in the Smart Actions list.
Configure Control With a Switch
If you already have a Kasa Smart Switch
e.g.: I want to turn the living room light on when I turn on my switch, and turn the light off when I turn off the switch.
- Tap Control With a Switch.
Add a Kasa smart switch. Then select the outlet of your Smart Power Strip which your living room light is plugged in.
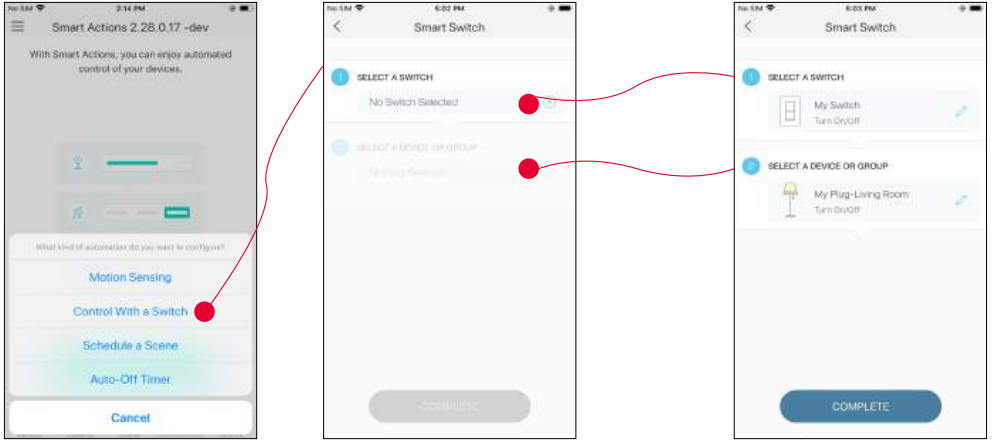
- Name your action for easy identification.
Now Your Smart Action is created successfully.
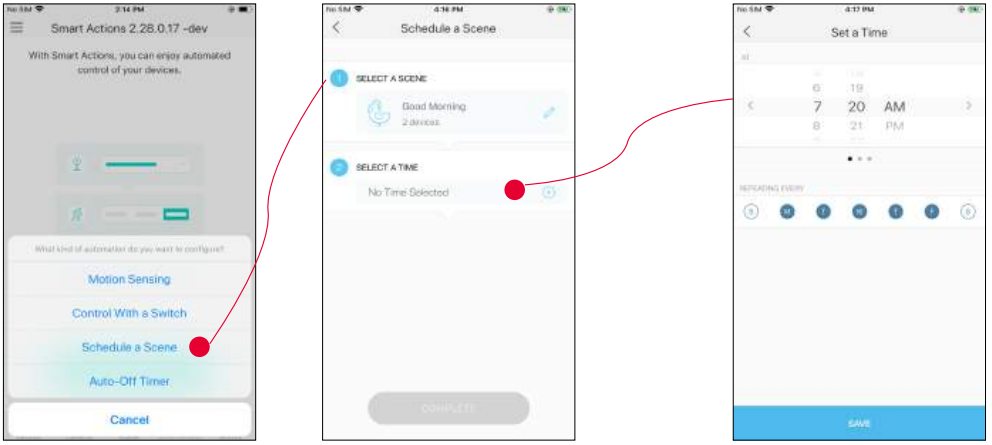
Configure Schedule a Scene
e.g.: I want to turn on the scene I have created automatically at scheduled time.
- Tap Schedule a Scene then select a scene you have created.
For example: I want to turn on my Good Morning scene, which turns on my bedroom and kitched light with just a tap, at 7: 20 AM every weekday. Set the time and frequency at which you want your scene to be turned on .
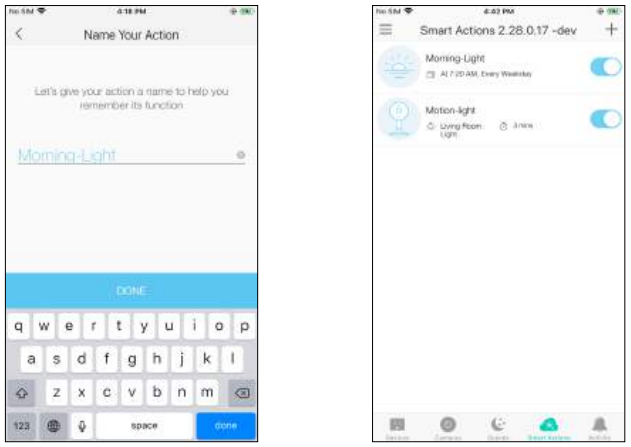
- Name your action for easy identification.
The Smart Action is created successfully and displayed in the Smart Actions list.
Configure Auto-Off Timer
e.g.: I want to turn off my air cleaner is plugged in after 30 minutes whenever it is turn on.
- Tap Auto-Off Timer then select a device.
Set the time.
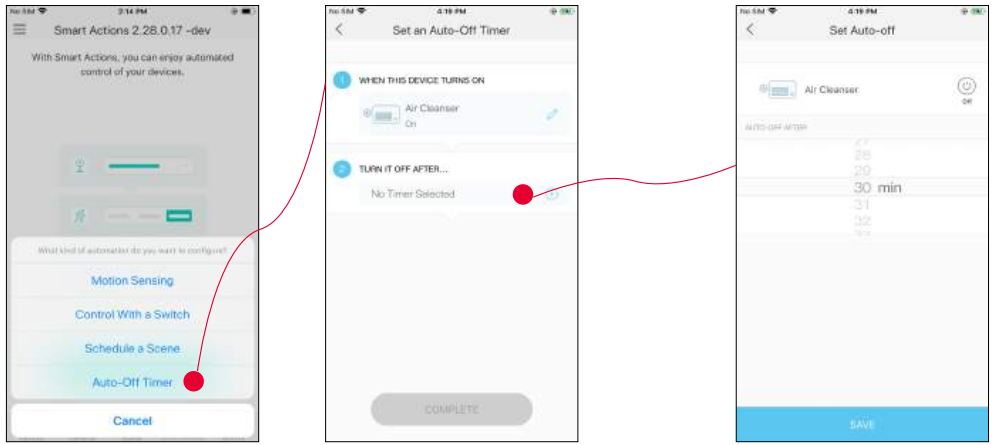
- Name your action for easy identification.
The Smart Action is created successfully and displayed in the Smart Actions list.
Discover Kasa
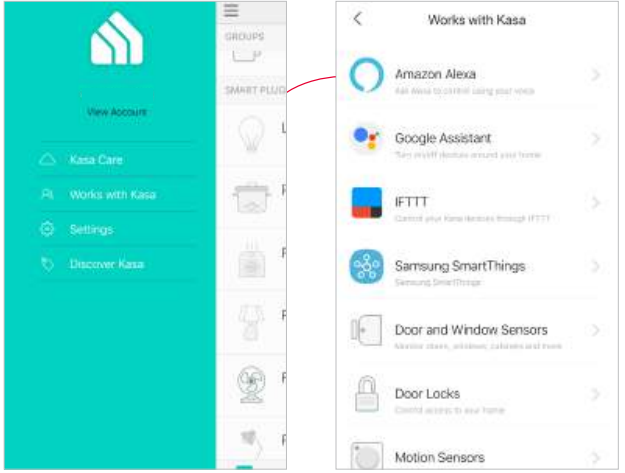
Use the Kasa Smart app to pair your Smart Wi-Fi Power Strip with Amazon Alexa or Google Home Assistant, and enjoy a full hands-free experience. Kasa helps manage the rest of your smart home too, working with Samsung SmartThings to trigger changes when you arrive home or leave for the day.
Launch the Kasa Smart app. Go to the sidebar and tap Work with Kasa. You can choose Amazon Alexa / Google Assistant/ IFTTT / Samsung SmartThings for detailed instructions.
Troubleshooting
If you're having trouble with the TP-Link Kasa Wi-Fi Plug EP10, try the following solutions:
- Check that the plug is properly plugged into an outlet and that the outlet is working.
- Make sure that your Wi-Fi network is working properly and that the plug is within range.
- Restart the Kasa app and try connecting the plug again.
- Check that the plug's firmware is up to date by going to the "Device Info" page in the Kasa app.
- If you're still having trouble, try resetting the plug to its factory settings by pressing and holding the reset button for 10 seconds.
Pros & Cons about Kasa Wi-Fi Plug EP10
Pros
- Voice control with Amazon Alexa, Google Assistant, and Microsoft Cortana
- Remote control and scheduling with the Kasa app
- Compact design that won't block other outlets
- Energy monitoring to track power usage
Cons
- Only compatible with 2.4GHz Wi-Fi networks
- No support for IFTTT or other third-party apps
Faqs
What is the TP-Link Kasa Wi-Fi Plug EP10?
How does the TP-Link Kasa Wi-Fi Plug EP10 work?
What can I control with the TP-Link Kasa Wi-Fi Plug EP10?
Can I schedule the TP-Link Kasa Wi-Fi Plug EP10 to turn devices on and off automatically?
Does the TP-Link Kasa Wi-Fi Plug EP10 track energy usage?
Can I share control of the TP-Link Kasa Wi-Fi Plug EP10 with family members or roommates?
How much power can the TP-Link Kasa Wi-Fi Plug EP10 handle?
Is the TP-Link Kasa Wi-Fi Plug EP10 compatible with IFTTT (If This Then That)?
Does the TP-Link Kasa Wi-Fi Plug EP10 track energy usage over time?
Can I schedule the TP-Link Kasa Wi-Fi Plug EP10 to turn on and off specific times?
Leave a Comment
