How to Control: Ultenic Robot VC & Mop D5s PRO Guide
Content
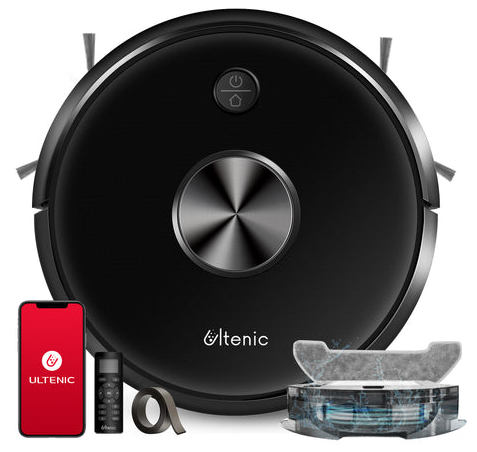
Ultenic Robot VC & Mop D5s PRO
Introducing the Ultenic Robot VC & Mop D5s PRO, the ultimate solution for a cleaner and more convenient home. This smart robot vacuum and mop combo offers powerful suction, advanced navigation, and convenient app control. With an estimated price of $399 and a launching date set for August 2023, it's time to elevate your home cleaning game.
Detailed Specifications
The Ultenic Robot VC & Mop D5s PRO boasts impressive features including a 2600Pa strong suction power, a 5200mAh battery providing up to 150 minutes of runtime, and a LIDAR navigation system ensuring efficient and thorough cleaning. It is also equipped with a 400ml dustbin and a 200ml smart electronic water tank. The robot has a height of 3.3 inches, allowing it to easily navigate under furniture and reach tight spaces.
About Your Robot
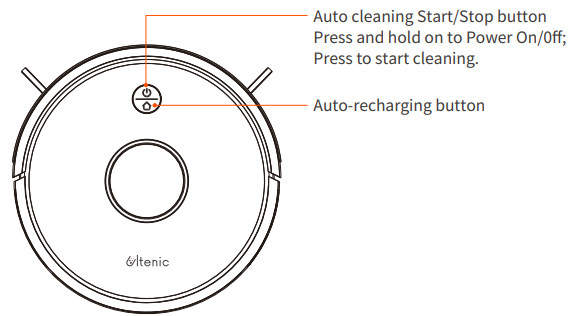
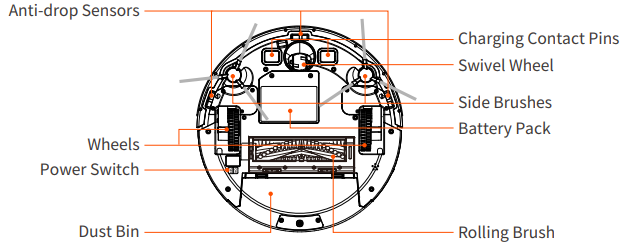
Robot
Accessories
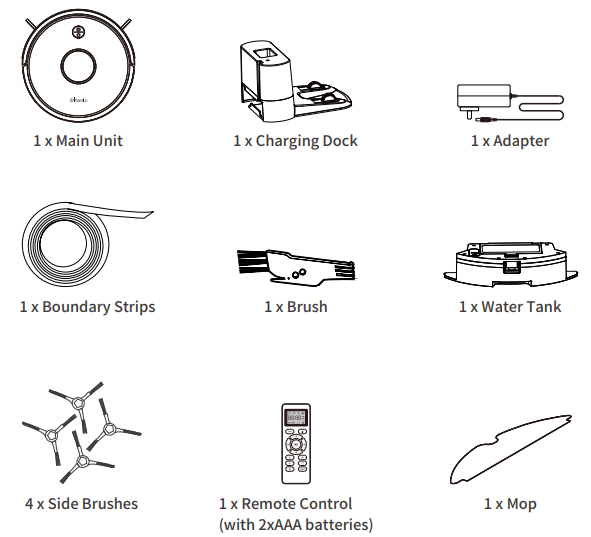
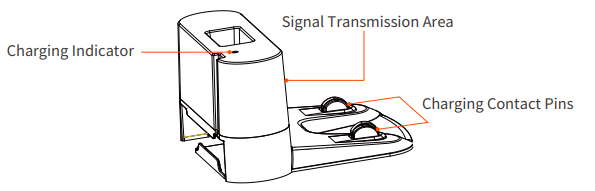
Charging dock
Remote Control
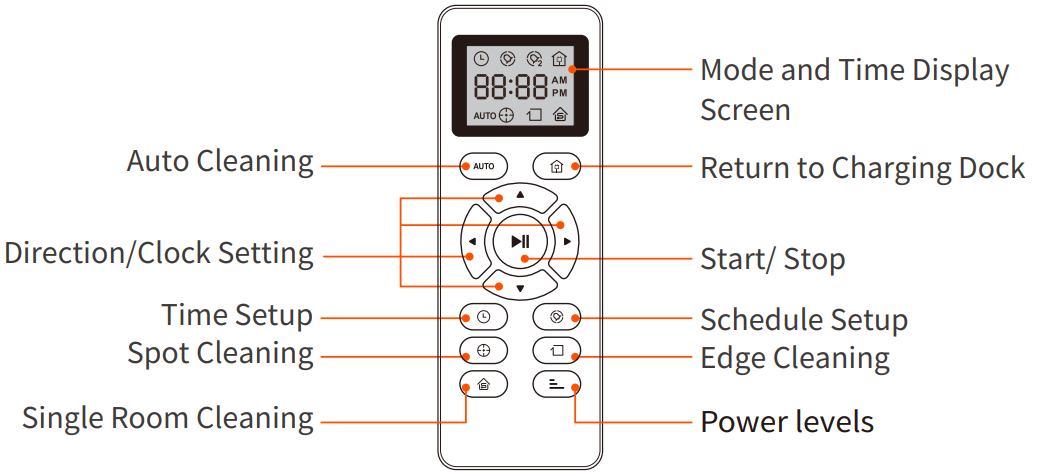
Tips: Install 2 AAA batteries before using the remote control for the first time. Make sure the positive and negative ends are facing the correct polarity direction as marked in the battery compartment. When using the remote control, please aim at the robot, and the effective distance is 0-5m.
LED Indicator
LED light | Status |
Solid bluelight | Working normally/pause/standby is powering on/configuring network/ |
Blue light flashs | upgrading firmware |
Yellow lightflashs | low battery/recharging |
Green lightflashs | charging |
Solid greenlight | Fully charged |
Red lightflashs quickly | Abnormal/Error |
Light off | Off/sleep |
Description
The Ultenic Robot VC & Mop D5s PRO combines the functionality of a vacuum and a mop, making it a versatile cleaning companion for your home. Its strong suction power effectively tackles dust, debris, and pet hair on various surfaces, while the mopping feature leaves your hard floors spotless and streak-free. The LIDAR navigation system ensures efficient cleaning path planning and obstacle avoidance, while the app control offers scheduling, customization, and real-time monitoring. Experience a deeper clean and take advantage of the Ultenic Robot VC & Mop D5s PRO's user-friendly design and intelligent features.
Using Your Robot
Quick Start
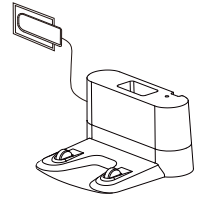
Plug in the charging dock, and put the cable into the trunking at the bottom of the charging dock.
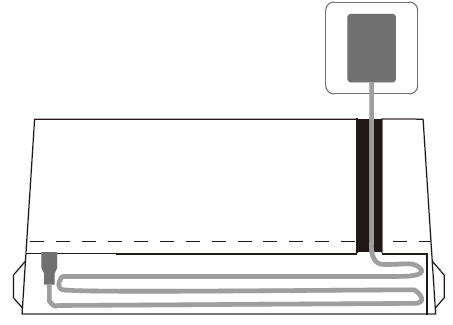
Note: If you don't put the cable into the trunking, it may get stuck in the robot while charging or cleaning.
Charging Dock Position
Place the charging dock on a hard, level surface and against a wall.
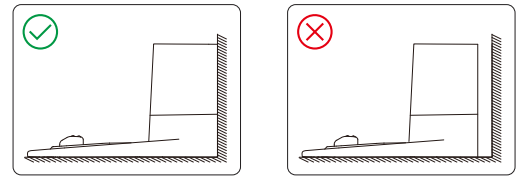
Place the charging dock against the wall and make sure the place is an open & uncluttered area leaving at least:
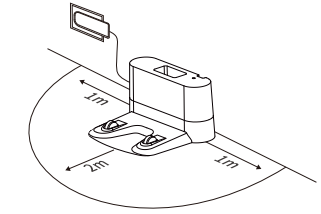
- 2 meters (6.5 feet) in front of the charging dock.
- 1 meter (2.3 feet) on both sides of the charging dock.
Connect the round connector of the adapter into the power socket on the charging dock and the other end into a wall outlet.
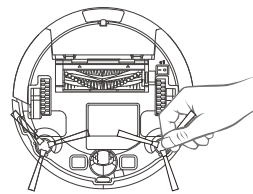
Install Side Brushes
Attach side brushes to the bottom of robot by pressing a brush into each slot.
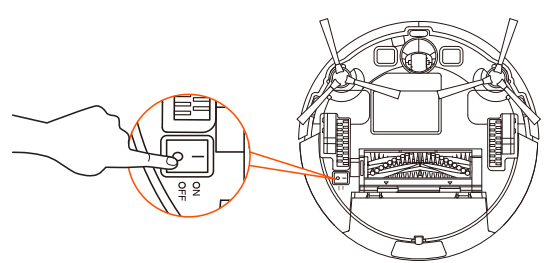
Note: Please make sure the indicator light is on when the charging dock is plugged in; otherwise, the robot cannot be charged.
Turn on the main power switch on the bottom of the robot.
Activate the Robot
Place the robot on the charging dock, making sure the metal charging contacts on the charging dock match up with those underneath the robot. If successful, you will hear a series of tones.

Start Cleaning Cycle
Press the “
.png) ” power button once to wake up the robot.
” power button once to wake up the robot.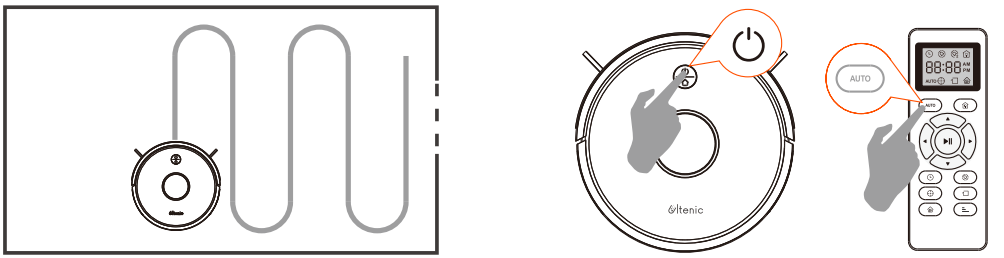
- Press the “” power button again or press the “AUTO” button on the remote control to start a cleaning cycle.
Pause
- To pause the robot during a cleaning cycle, press the “” button or press the “ ►II ” button on the remote control.
To start the robot, press the “
” button or press the “ ►II ” button on the remote control.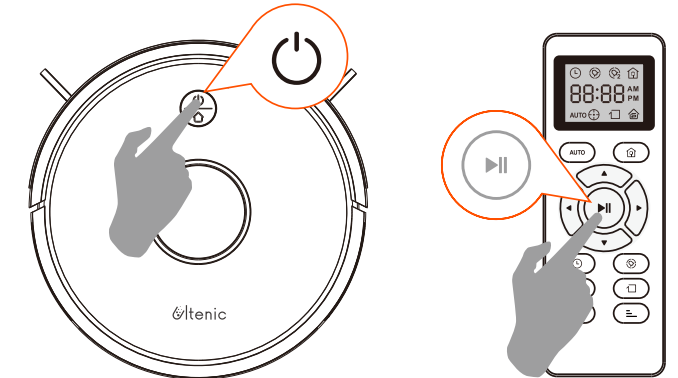
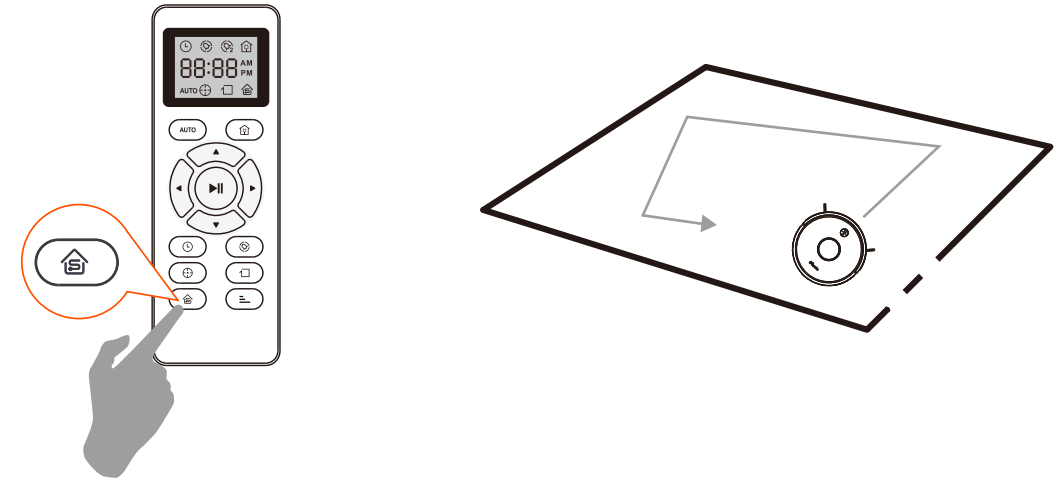
Power OFF
To end the cleaning cycle and put the robot in standby mode, press and hold the “
” button until the robot indicators turn off.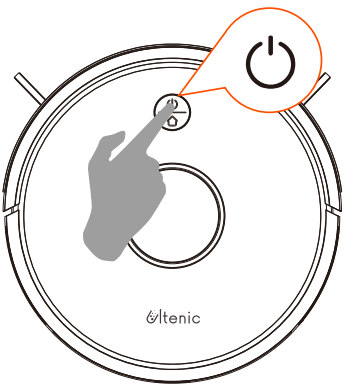
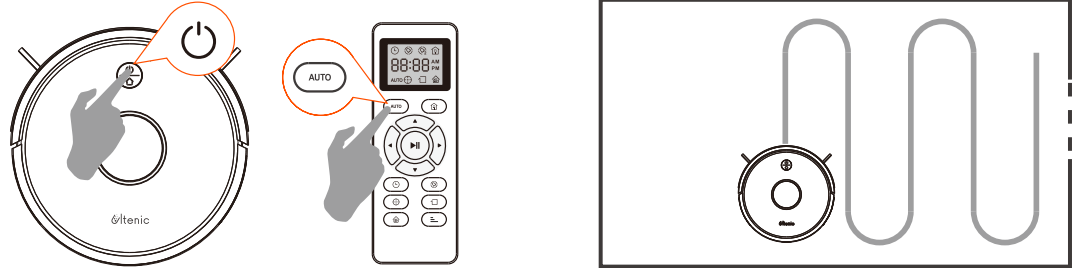
How Robot Cleans Your Home
Auto Cleaning
- Press the “” button on the robot or press the “AUTO” button on the remote control to start auto cleaning.
- If the battery is low while the cleaning is not finished, the robot will return to the charging dock for charging.
Warm Tips: During the recharging process, there may be a phenomenon that the charging dock cannot be found. At this time, the robot will flash a red light and "BEEP" four times. Please manually put the robot onto the charging dock to charge.
Spot Cleaning
When you select spot cleaning, the robot intensely cleans a localized area by spiraling outward about 3 feet (1 meter) in diameter and then spiraling inward to where it started. During spot cleaning, the robot boosts vacuum power to ensure the best cleaning performance for what you need. To use spot cleaning, place the robot on top of the localized debris and press “
 ” (Spot) on the remote control.
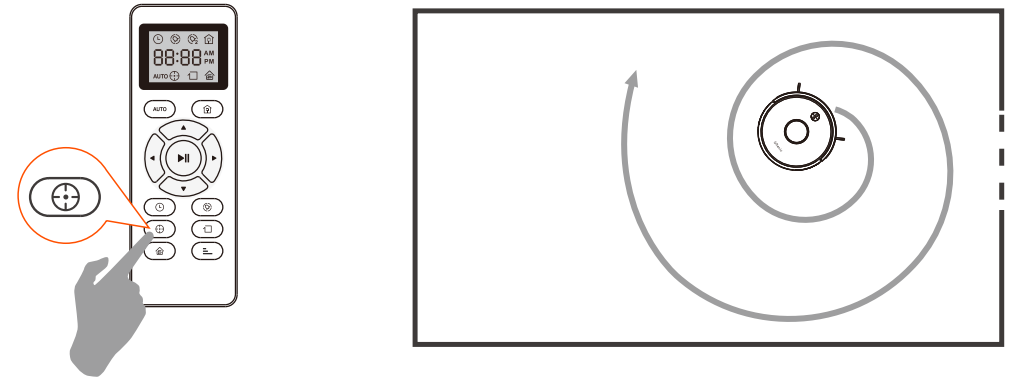
Power levels
- When the robot vacuum cleaner is in sweeping mode, press this button to adjust the suction power;
- When the robot vacuum cleaner is in sweeping and mopping simultaneous mode, press this button to adjust the suction power;
When the robot vacuum cleaner is in mopping mode, press this button to adjust the speed of the water output.
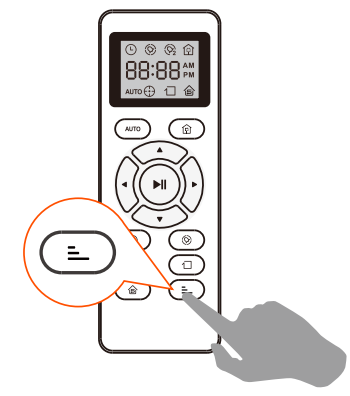
Edge Cleaning
After the robot finishes cleaning the open areas of your floor, it enables edge cleaning mode to ensure that it has cleaned along walls and around furniture legs. If you prefer a quicker edge cleaning, press the “ ” button on the remote control.
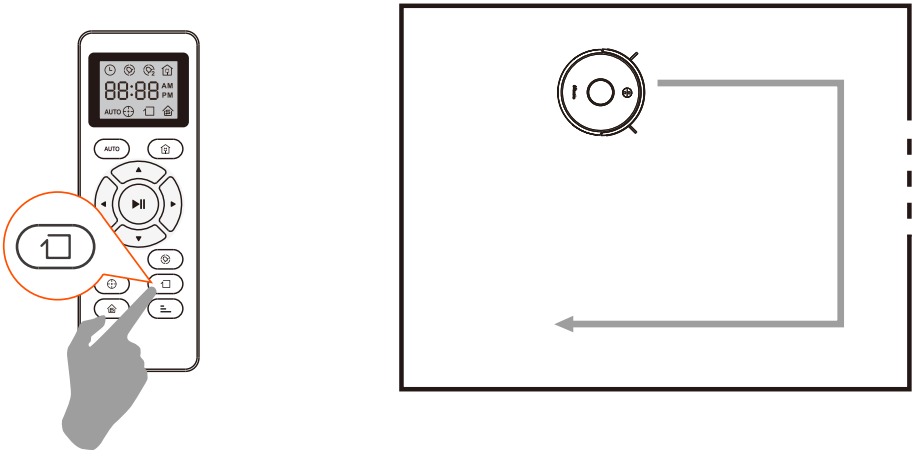
Single Room Cleaning
Press the “![]() ” button on the remote control to start random cleaning.
” button on the remote control to start random cleaning.
Warm Tips: In this mode, the robot will keep cleaning for about 30 minutes and then stop. Please close the door to ensure the robot will not go out of the room.
Floor Mopping Cleaning
The Robot is equipped with a water tank so that it can clean your home in the mopping mode:
- Attach the cloth and fill the water tank with water.
- Remove the dust bin.
Put the water tank back and start the robot.
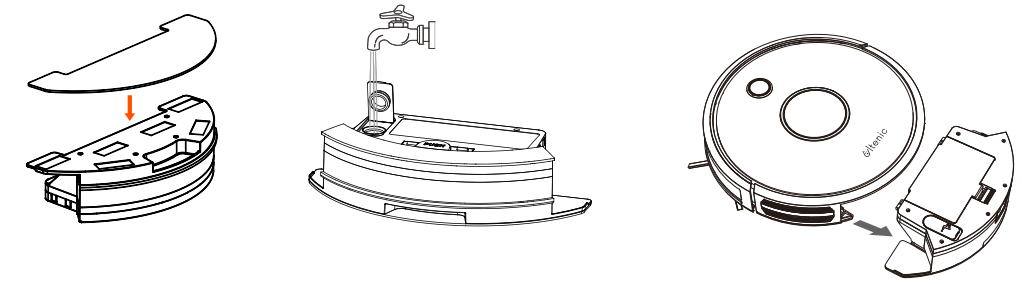
Note: If you are using the dry-sweeping mode, skip the step of filling water.
Setup Guide
To start using the Ultenic Robot VC & Mop D5s PRO, follow these steps:
- Charge the robot fully before the initial use.
- Install the Ultenic app and create an account.
- Connect the robot to your Wi-Fi network using the app.
- Place the robot on the charging dock when not in use.
- Add cleaning solution to the water tank for mopping.
Cleaning Schedule
The robot has cleaning schedule settings which allow you to customize when the robot cleans your home.
Set the Remote Control's Clock
- Press the “
.png) ” button on remote control, and then the hour section begins to flash in the clock display setting window.
” button on remote control, and then the hour section begins to flash in the clock display setting window. - Press the “
.png) ” or “
” or “.png) ” button to select the minute or hour section. Press “
” button to select the minute or hour section. Press “.png) ” or “
” or “ .png) ” button to select the desired figures.
” button to select the desired figures. And then press the “
.png) ” button, the robot will "BEEP" when the clock setting is completed.
” button, the robot will "BEEP" when the clock setting is completed.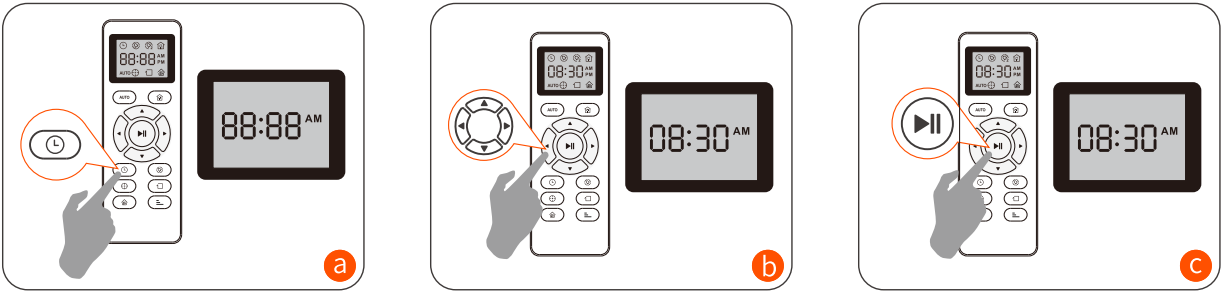
Set the Cleaning Schedule
Press the “![]() ” button on the remote control, and then the hour section begins to flash in the cleaning schedule display setting window.
” button on the remote control, and then the hour section begins to flash in the cleaning schedule display setting window.
- Press the “” or “” button to select the minute or hour section.
- Press “” or “” button to select the desired figures.
Then press the “
” button, the robot will "BEEP" when the cleaning schedule setting is completed.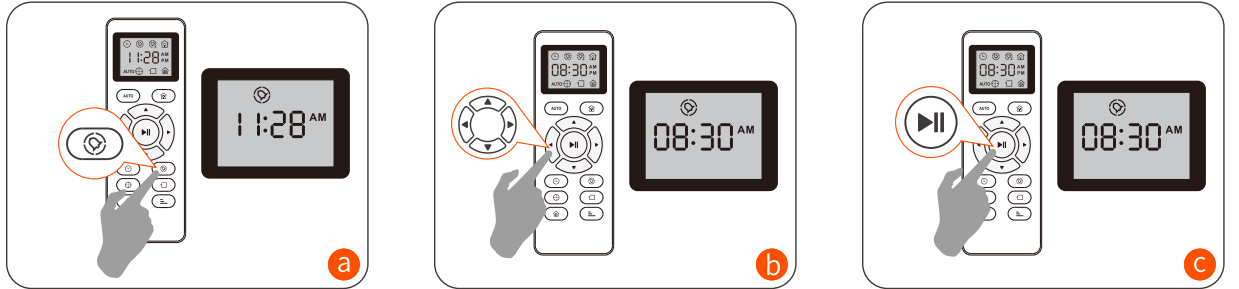
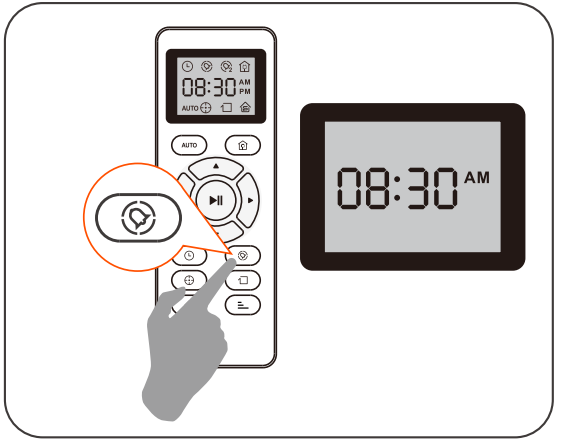
Cancel the Cleaning Schedule
Press and hold the “” button for approximately 4 seconds on the remote control, and the robot will "BEEP" when the cleaning schedule process is canceled.
Regular Robot Care
Please perform the following care procedures to keep the robot running at its peak performance. If you notice the robot picking up less debris from your floor, then empty the bin, clean the filter, and rolling brush.
Recommended cleaning/replacement frequency:
Robot part | Cleaning | Replacement frequency |
Dust bin | After eachuse | ⸺ |
Filters | Once everyweek | Every 2 months |
Rolling brush | Once everyweek | Every 6-12 months |
Side brushes | Once everymonth | E(ovrewryh3e-n6 vmisoibnltyhws orn) |
Brush guard | Once everymonth | Esivliecroyn3e-6rumbobnerthsstr(ioprownhtehne tbhreush guard is visibly worn) |
Sensors | Once everymonth | ⸺ |
Charging pins | Once everymonth | ⸺ |
Swivel wheel | Once everymonth | ⸺ |
Empty the Robot's Bin
- Press the bin release button to remove the bin.
Open the bin's door to empty it.
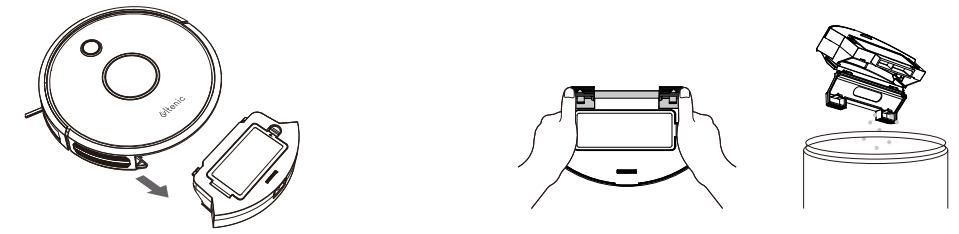
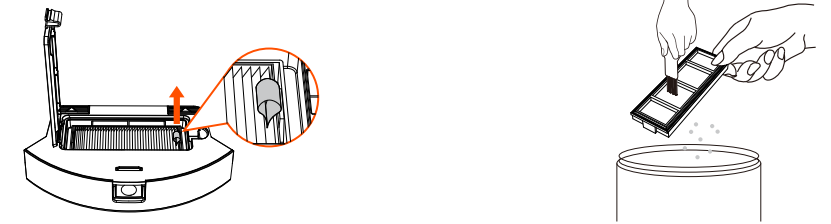
Clean the Robot's Filter
- Remove the filter by grasping the white tab.
Shake off debris by tapping the filter against your trash container.
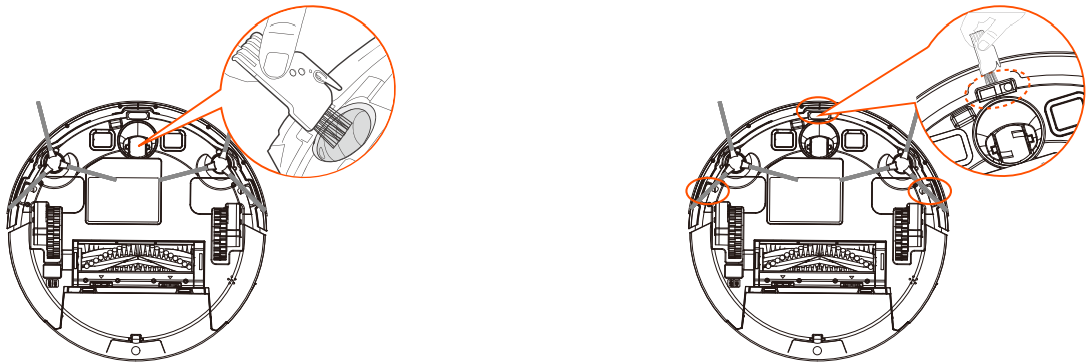
Clean the Robot's Rolling Brush, Side Brush, Swivel Wheel, and Sensors
Take out the rolling brush, clean the vacuuming aisle with a cloth.
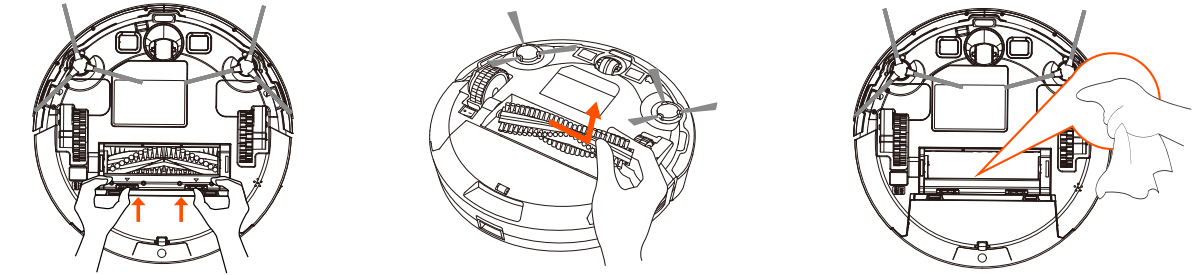
- Clean the rolling brush. Cut off the hair wound in the rolling brush with the knife of provided cleaning tools.
Remove the side brush, use a cloth to remove the dust from the brush.
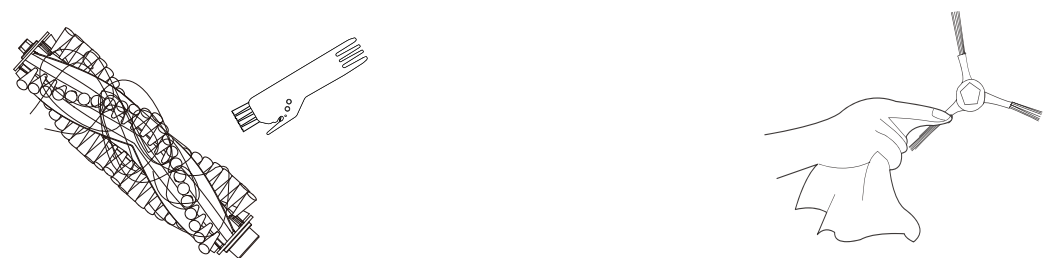
- Pull out the swivel wheel, then clean it with the cleaning tools provided.
Dust off the cliff sensors to maintain the best performance.
Important Safety Instructions
To reduce the risk of injury or damage, keep these safety precautions in mind when setting up, using and maintaining your robot vacuum cleaner:
- Read all safety and operating instructions before operating your robot.
- Retain the safety and operating instructions for future reference.
- Pay attention to all warnings on your robot, battery, charging dock and in the user manual.
- Follow all operating instructions.
- The external cable or cord of the power supply unit cannot be replaced; if the cord or plug is damaged, the power supply unit shall be disposed of.
- This product is designed to be plugged into a standard outlet only. Product may not be used with any type of power converter. Use of power converters will immediately void the warranty.
- CAUTION: Only charge one of the following robot batteries: maximum 14.4V, max 2600mAh Ni-MH or maximum 2600mAh Li-ion battery. Other types of batteries may burst and cause injuries. Please contact Customer Care for the correct replacement of your battery.
- Please charge and remove the battery from your robot and accessories before long-term storage or transportation.
- The battery must be removed from this device before this device is disposed of. To remove the battery from this device, first remove the screws on the bottom, then remove the main PCB and unscrew the battery cover by using a screwdriver. Remove the battery by disconnecting the quick connector.
- WARNING: Chemical Exposure: If the battery pack is leaking, do not allow the liquid to come in contact with skin or eyes. If contact has been made, wash the affected area with copious amounts of water and seek medical advice. Place the battery (the used battery pack included when the robot will be disposed) in a sealed plastic bag and dispose of safely according to local environmental regulations.
- WARNING: Fire or Explosion Hazard: Do not crush or dismantle battery packs. Do not heat or place the battery pack near any heat source or direct sunlight. Do not incinerate or short-circuit the battery pack. Do not subject batteries to mechanical shock.
- Contact your local waste management authority for battery recycling and disposal regulations in your area.
- Your robot is not a toy. Do not sit or stand on the robot. Children and pets should be supervised when your robot is operating.
- The robot is for indoor use only.
- Do not use non-rechargeable batteries. Use the rechargeable battery provided with the product only. For replacement, purchase identical robot batteries or contact robot Customer Care for alternative battery options.
- Store and operate the robot in a room with moderate temperatures only.
- Do not spray or pour liquids on your robot.
- Do not use any other power supply cord. For replacement cords, please contact Customer Care to ensure proper selection of country-specific power supply cord.
- Do not use the robot to pick up sharp objects, glass, or anything that is burning or smoking.
- Do not immerse the battery pack in any liquid.
- Do not use the robot to pick up spills of water, bleach, paint, or other chemicals, or anything wet.
- Picking up objects like clothing, loose papers, pull cords for blinds or curtains, power cords, and any fragile objects before using the robot. If the robot passes over a power cord and drags it, objects on table or shelves are likely to fall off.
- If the room to be cleaned contains a balcony, a physical barrier should be used to prevent access to the balcony and ensure safe operation.
- Do not place anything on top of your robot.
- Be aware that the robot moves on its own. Take care when walking in the area that the robot is operating in to avoid stepping on it.
- Do not operate the robot in areas with exposed electrical outlets on the floor.
- Do not use this device on an unfinished, unsealed, waxed or rough floor. It may cause damage to the floor and this device. Use only on hard floor surfaces or low pile carpets.
- This device has been designed to be used on floors without scratching them. We still recommend that you test this device on a small area of the room to be cleaned to ensure no scratches are made before cleaning the whole room.
Battery and Charging Information
Lithium-ion Battery
Battery Storage
Important: Lithium-ion batteries and products that contain Lithium-ion are subject to stringent transportation regulations. If you need to ship this product (with the battery included) for service, travel, or any other reason, you MUST comply with the following shipping instructions:
- Remove the Lithium-ion battery from the product.
- Place a piece of tape over the battery's metal charging contacts.
- Reinstall the battery (with the tape on it) in the product and secure the battery door.
- Package the product in its original packaging or in your own packaging that prevents any movement during transportation.
- Ship via ground transportation only (no air shipping).
Battery Storage
If storing the robot off the charging dock, remove the battery first. Then store the robot and the battery in a cool, dry place.
Disposal Information
The symbol on the product or its packaging indicates: Do not dispose of electrical appliances as unsorted municipal waste; use separate collection facilities. Contact your local authority for information regarding the collection systems available. If electrical appliances are disposed of in landfills or dumps, hazardous substances can leak into the groundwater and get into the food chain, damaging your health and well-being. Please contact your local or regional waste authority for more information on collection, reuse, and recycling programs.
Troubleshooting
The robot will inform you of an error with a two-tone distress sound. The indicator will also blink or turn red. Refer to the chart below to resolve the robot's problem. If the problem is not resolved, please contact our COST FREE customer service team for further assistance.
Warm Tips: Some errors can be resolved by rebooting the robot. To reboot the robot, press the power button on the bottom of the robot, you will hear an audible tone signifying a successful reboot.
| Robot blinks and says | Likely cause | What to do |
|---|---|---|
| BEEP once | Gyroscope error. | Keep the robot at a stable place to restart and do not move the machine. |
| BEEP twice | Bumper is stuck. | Check whether the bumper is flexible. |
| BEEP triple | Robot's cliff sensors are dirty, it is hanging over a drop, or it is stuck on a dark surface. | If the robot is hanging over a drop, or on a dark surface, please start in a new location. Otherwise, wipe its cliff sensors with a dry cloth. |
| BEEP quartic | Low power or charging error. | The voltage of the robot is too low and needs manually charging. |
FAQS
| Problems | Solutions |
|---|---|
| The Robot cannot be activated. | - Make sure the main power switch is in the ON position. |
| - Make sure the battery is fully charged. | |
| - Replace the batteries (2 x AAA) in the remote control. | |
| - Make sure the remote control is within 0-5m. | |
| - If you still have trouble, turn off the main power switch and then turn it back on. | |
| The remote control does not work. | - Replace the batteries in the remote control. |
| - Make sure the robot is turned on and fully charged. | |
| The Robot stops working suddenly. | - Check if the robot is trapped or stuck on an obstacle. |
| - Check if the battery level is too low. | |
| - If you still have trouble, turn off the main power switch, wait for 2 seconds, and then turn it back on. | |
| You can’t set up a cleaning schedule. | - Make sure the main power switch on the bottom of the robot is turned on. |
| - Make sure the time, time of day (AM/PM), and the scheduled time have been set correctly. | |
| - Check if the robot’s power is too low to start cleaning. | |
| Suction power is weak. | - Check if any obstructions are blocking the suction inlet. |
| - Empty the dust bin. | |
| - Clean the filters with a vacuum cleaner or a cleaning brush. | |
| - Check if the filters are wet due to water or other liquid on the floor. Air-dry the filters completely before use. | |
| The Robot can’t be charged. | - Check if the indicator on the charging dock lights up. If not, contact the service center to repair or replace the charging dock. |
| - Check if you can hear a beep when the robot has returned to the charging dock. If not, contact the service center to replace the charging dock. | |
| The Robot can’t return to the charging dock. | - Remove objects within 3 ft/1 m to the left and right side and within 6 ft/2 m of the front of the charging dock. |
| - Please place the charging dock against the wall. | |
| - When the robot is in the vicinity of the charging dock, it will return more quickly. However, if the charging dock is located in a narrow area, it may take time to return. | |
| - Please manually put the robot onto the charging dock to charge. Clean the charging contact pins. | |
| The rolling brush doesn’t rotate. | - Clean the rolling brush. |
| - Check if the rolling brush and brush guard have been installed properly. | |
| The robot movements or travel path are abnormal. | - Clean the sensors carefully with a dry cloth. |
| - Restart the robot by turning the power switch off and on. |
Pros & Cons
Pros
- Powerful suction and mopping functionality
- Efficient LIDAR navigation
- User-friendly app control
- Long battery life and large dustbin
Cons
- May not fit under some low-clearance furniture
- Mopping feature may not be as effective on deeply soiled surfaces
Faqs
What surfaces can the Ultenic Robot VC & Mop D5s PRO clean effectively?
How often should I empty the dustbin Ultenic Robot VC & Mop D5s PRO?
Can the Ultenic Robot VC & Mop D5s PRO be controlled manually?
What cleaning solution should I use for mopping Ultenic Robot VC & Mop D5s PRO?
How long does it take to charge the Ultenic Robot VC & Mop D5s PRO?
Can the Ultenic Robot VC & Mop D5s PRO resume cleaning after charging?
How loud is the Ultenic Robot VC & Mop D5s PRO during operation?
Does the Ultenic Robot VC & Mop D5s PRO support voice commands?
Can I schedule cleaning sessions in advance Ultenic Robot VC & Mop D5s PRO?
What should I do if the Ultenic Robot VC & Mop D5s PRO gets stuck?
Leave a Comment