Umoval Solar Security PTZ Cameras 4G LTE User Manual
Content
Introduction
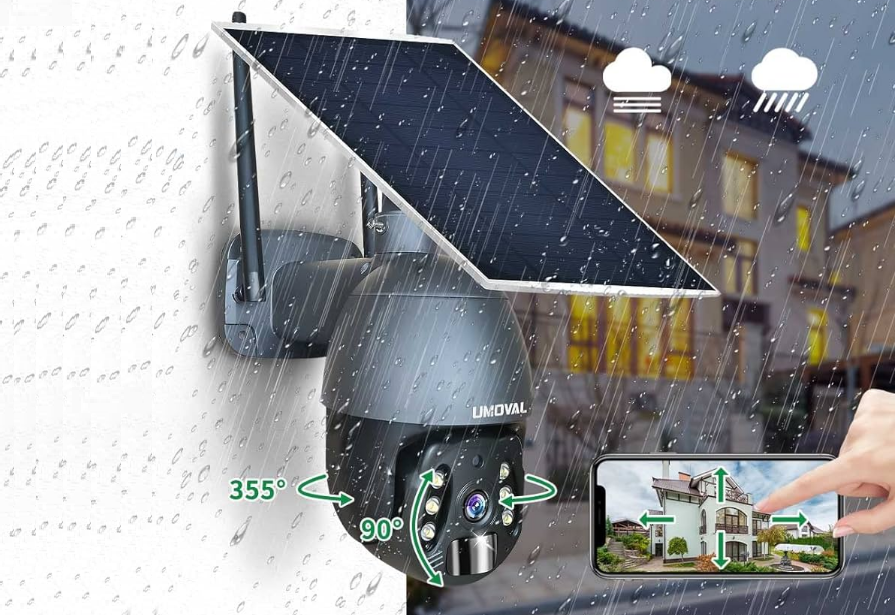
The Umoval Solar Security PTZ Camera 4G LTE is a cutting-edge surveillance solution designed for both residential and commercial use. This camera features pan-tilt-zoom capabilities, allowing for comprehensive monitoring of large areas with high-definition video quality. Equipped with solar power and 4G LTE connectivity, it ensures reliable operation even in remote locations without Wi-Fi access. With motion detection alerts and night vision capabilities, this camera enhances security and peace of mind around the clock. The price of the Umoval Solar Security PTZ Camera 4G LTE is $219.99.
Detailed Specifications
- Resolution: 1080p Full HD
- PTZ Functionality: Pan 360°, Tilt 90°, Zoom 30x Digital
- Connectivity: 4G LTE, Wi-Fi
- Power Source: Solar Panel with Rechargeable Battery
- Weather Resistance: IP66 Rated
- Night Vision: Infrared LEDs for up to 100 feet
- Storage: MicroSD Card Slot (up to 128GB)
Please Note: 4G LTE is supported, but Wi-Fi is not supported. And the camera must be inserted with 4G SIM Card to connect with network. Different countries will have different 4G bands. Therefore, please purchase and use 4G solar camera locally.
| Model No. | 4G LTE | Wi-Fi | Applications | Color |
|---|---|---|---|---|
| UM-Q6-4G-BK | Support | Not Support | Outdoor | Black |
| UM-Q6-4G-WH | Support | Not Support | Outdoor | White |
What's included in the Package Box?
Please open the package box and check the item & parts one by one as below:
- 1 x UMOVAL Wireless 4G LTE Solar Powered PTZ Camera.
- 1 x lOW Solar Panel with Extended 10 feet/3 meter Type-C Cable.
- 1 x USB Type-C Charging Cable (SV Adapter is not included).
- 1 x Solar Panel Bracket (Fixed on the Top of Camera).
- 1 x Solar Panel Bracket (Fixed on Other Areas' Surface).
- 2 x Packages of Screws & Plastic Stoppers.
- 1 x Screwdriver Tool for DIY Installation.
- 1 x Bracket Mounting Sticker for Solar Camera.
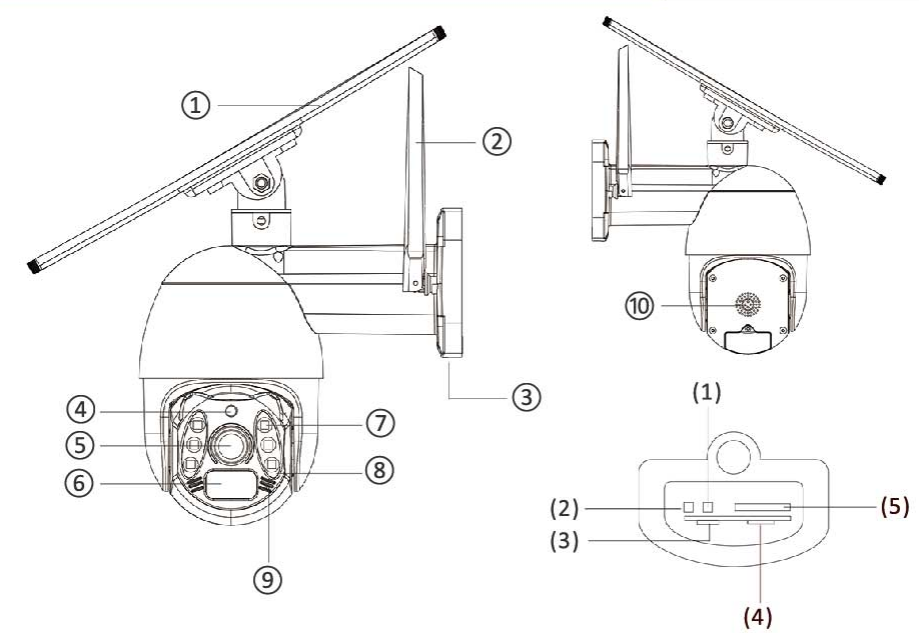
Structure Diagram
| ① Solar Panel 10W | ⑥ PIR Motion Detector | (1) Reset Button |
|---|---|---|
| ② Antenna | ⑦ Infrared & Starlight LED | (2) ON/OFF Button |
| ③ Type-C Socket | ⑧ Indicator Light | (3) USB Type-C Socket |
| ④ Photo Resistance Parts | ⑨ Microphone | (4) 4G SIM Card Slot |
| ⑤ CMOS Lens | ⑩ Speaker | (5) Micro SD Card Slot |
How to Download Tuya Smart APP?
- Method 1: Search the keyword "Tuya Smart" in Apple Store or Android APP Store to download APP.
- Method 2: Or scan the QR code to download APP named Tuya Smart.

How to Add Your Device on APP?
Register a New Account on Smart Tuya APP
If it is the first time for you to use Tuya Smart APP, you need to register a new account by your email address or mobile phone number.
- Step 1: Click "Sign Up" to register a new account. Choose local country or region to proceed.
- Step 2: Enter Verification Code and set up the password. Click the button of Done to finish.
- Step 3: And then click the red button "Log In" to go ahead.
Note: Only mobile phone number registration is supported in some regions. Otherwise please use email address to register in your region.

Add Your Camera on Tuya Smart APP
Important Note: There are built-in rechargeable Lithium Polymer battery packs in the device. Please charge it by Type-C cable connecting with your current DC SV 2A USB adapter in around 10 hours for the first time when you are going to set up the camera.
Charge the Device Fully & Switch ON
- Step 1: Use screwdriver tool to unscrew the screw on the bottom of camera.
- Step 2: Push the plastic cover towards the microphone side by fingers to pick it up.
Step 3: Insert 4G SIM Card into the SIM card slot correctly. The copper side is toward SD card side. And the side without a corner is toward inside. In addition, please press the inserted SIM card to pop it up if you want to do so.
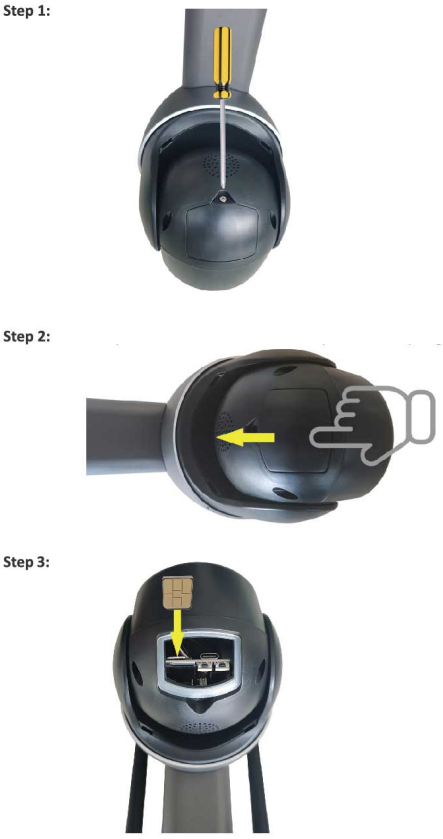
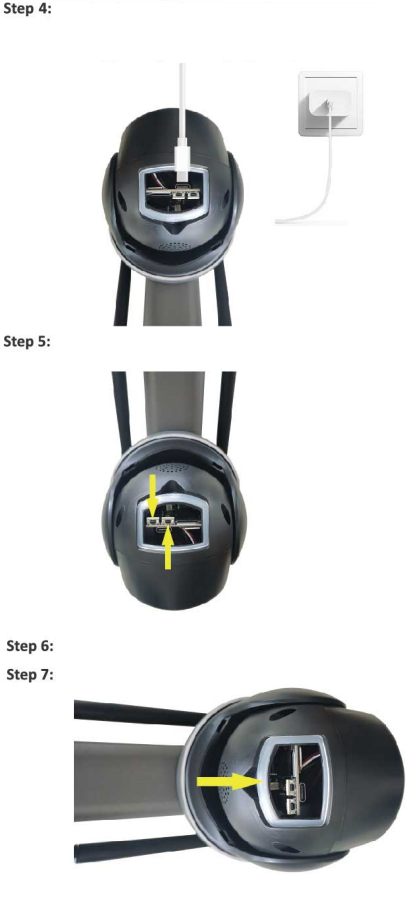
- Step 4: Insert Type-C cable into the device and connect with DC SV 2A USB adapter to charge it in around 10 hours. (Please Note: no DC SV USB adapter supplied and please use your current mobile phone's adapter to connect with supplied Type-C charging cable)
Step 5: Press the ON/OFF and Reset Button to Switch ON the device.
- Press the Button for 3 seconds to switch on the device.
- Press the Button for 5 seconds to reset the device.
- Press the Button for 3 seconds to turn off the device.
Note: The ON/OFF and Reset Button are similar. The press button on side is the ON/OFF Button. And the Reset Button is next to ON/OFF Button. Please distinguish them correctly.
- Step 6: Please insert Micro SD card into the slot for local video recording storage if you prefer.
Step 7: And then place the waterproof rubber band correctly, recover and screw it tightly after being charged fully in around 10 hours.
Scan QR Code to Add Device
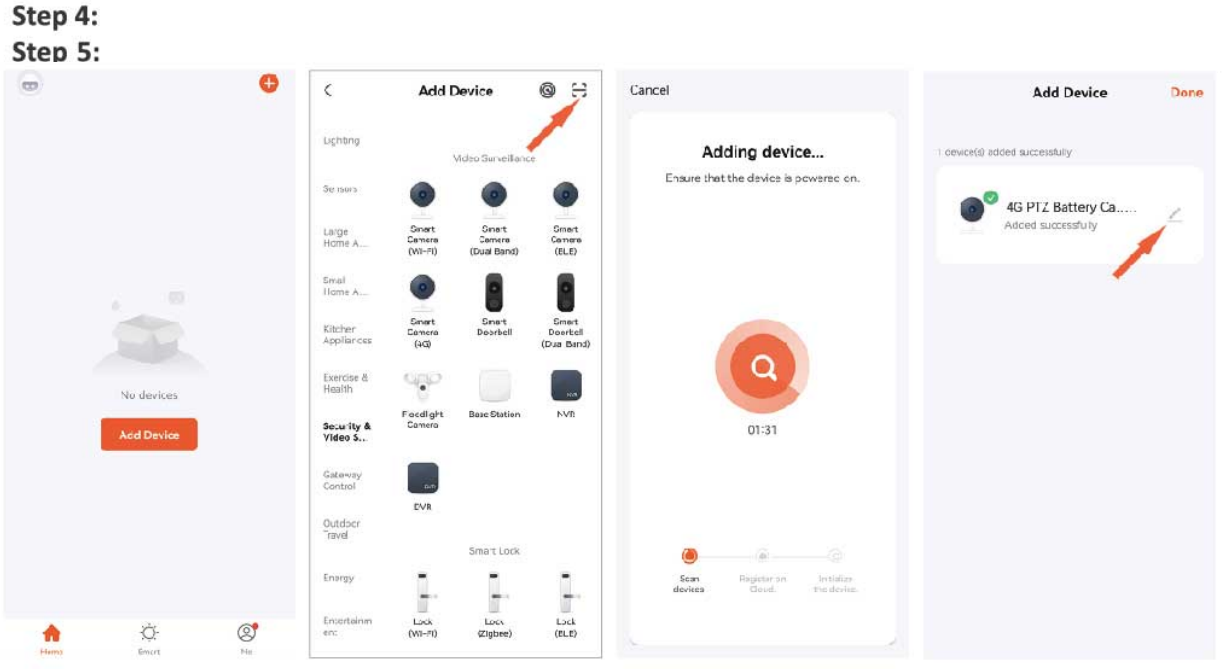
- Step 1: Click the Button to Add Device.
- Step 2: Click the Button to Scan QR Code.
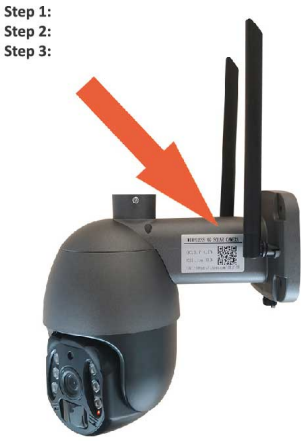
Step 3: Scan QR Code on the bracket side of camera.
- Step 4: Then please wait a moment for adding device. Please keep the camera being on.
Step 5: Added successfully and then please click the symbol of Edit to rename the camera. Finally, click the button of Done to finish. Congratulation! It is ready for you to use the device for video surveillance.
Note: Please make sure 4G wireless signal is strong where you locate before adding device.
About the Status of Indicator Light

- Red Indicator Light is flashing: Not connected with 4G network successfully.
- Blue Indicator Light is flashing: The device has connected with 4G network successfully and wait for configuration.
- Blue Indicator Light is ON: Normal working status.
How to Control the Camera by APP Interface?
Live Preview Interface & Diagram
Preview Interface & Diagram

- Settings Menu -Click the button for more Settings.
- HD/SD- HD is clearer than SD.
- Battery Capacity- Display the current battery percentage or charging status.
- Full Screen-Click the button for full screen.
- Screenshot- Images will be saved to gallery.
- Hold to Talk- One-way or two-way audio to visitors on site.
- Record Video- Manually recorded video will be saved to gallery.
- Pop-up Menu- More features menu will be popped up.
- Floating Screen- Click the button for floating screen display.
- Sound-Click the button to turn ON or OFF the audio.
- Erect Full Screen- Enlarge to be full screen soon, but not clear & not advised.
- Network Traffic-Display current traffic.
Feature Menu & Diagram
Features Menu
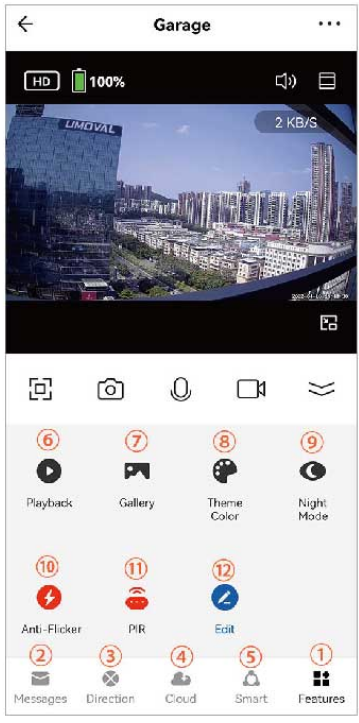
- Features- More Features Menu
- Messages: Alarm Message
- Direction-PTZ Control
- Cloud-Cloud Storage Service
- Smart-Smart Management
- Playback-Video Playback
- Gallery- Video Recording, Screenshots Saved on Your Smart Device
- Theme Color-Set the background color
- Night Mode-Set the Night Modes
- Anti-Flicker-Set anti-flicker for the camera according to your choice
- PIR-Set PIR Modes
- Edit-Not Allowed
Description
The umoval Solar Security PTZ Cameras 4G LTE combines advanced surveillance technology with sustainable energy solutions. The camera's high-resolution 1080p Full HD video capture ensures clear and detailed footage, while the PTZ functionality allows for precise monitoring of specific areas. The solar panel and rechargeable battery eliminate the need for constant power replacements, making it suitable for remote or hard-to-reach locations.
The camera is designed to withstand various weather conditions with its IP66 rating, ensuring durability and reliability. Night vision capabilities extend the camera's functionality into the night, providing comprehensive security coverage around the clock.
Two Choices for Video Recording Storage
There are totally two choices for video recording storage. One is Micro SD Card for local storage. The other is cloud storage and the user has to purchase VAS for it on APP interface.
Micro SD Card for Local Storage - Recommended
- 32 GB, 64 GB, 128 GB Micro SD Card is recommended for local storage.
- Local storage by Micro SD card is recommended by UMOVAL since it is more economical than cloud storage and will help you to save money in the coming years.
How to Insert Micro SD Card into the Camera Correctly?
- Step 1: Open the cover on the bottom of camera.
- Step 2: Pick up Micro SD card and keep the printed side toward the bottom of camera.
- Step 3: Insert Micro SD card into slot completely, please check the photo for example.

Purchase VAS for Video Cloud Storage
- Step 1: Click the button of Cloud on the bottom of APP interface.
- Step 2: Click the button of Purchase Service and Subscribe to proceed.
- Step 3: Choose the service type you'd like to use, such as Trial, Basic Plan (Monthly), or Basic Plan (Annually). And you can have a try of Trial Service at first.

Split Screen to View Different Live Videos
The split-screen function is only for multiple cameras operating at a same APP account.
- Step 1: Click the split-screen button on the upper right nearby Adding device.
- Step 2: Click the split-screen quantity you prefer to set. 4 is the default number.
- Step 3: Click the Full Screen button to set for simultaneous view of multiple cameras.

Note: The split-screen mode will be working for more than two cameras.
How to View Live Video on a Computer?
The cameras must be added on Tuya Smart APP before viewing live video on computer.
- Step 1: Log in the website https://ipc.ismartlife.me/login
- Step 2: English is the default language. Please choose the local language as you like.
- Step 3: And please choose the region where you are located, which is important.
- Step 4: Then please scan the QR Code by your Tuya Smart APP account to log in.


Note: The displayed video on PC is not as clear as that displayed on smart devices. Because only SD video is displayed on PC.
Setup Guide
To set up the umoval Solar Security PTZ Cameras 4G LTE, follow these steps:
- Mount the camera in a desired location, ensuring direct sunlight for optimal solar charging.
- Insert the microSD card for local storage if desired.
- Connect to your 4G LTE network using the provided SIM card slot.
- Download and install the umoval app on your smartphone or tablet to configure settings and stream live video.
- Pair the camera with your device through the app, following on-screen instructions.
How to Link to Third Party Voice Systems Supported?
The device is able to work with supported third party voice systems, including Amazon Alexa and Google Home (Google Assistant).
How to Link to Amazon Alexa?
- Step 1: Click the button of Settings .... On the upper right.
- Step 2: Click the symbol of Alexa/Amazon Echo on the interface of Settings.
- Step 3: Click the button of "Accept all" or "Set your preferences" to approve cookies for normal operation.
- Step 4: Click the button of "Link with Account Password- Instructions" to learn more how to link to Amazon Echo/Alexa.
- Step 5: Please finish the linkage to Amazon Echo/Alexa according to the instructions step by step.

How to Link to Google Assistant?
- Step 1: Click the button of Settings .... On the upper right.
- Step 2: Click the symbol of Google Home/Assistant on the interface of Settings.
- Step 3: Click the button of "Accept all" or "Set your preferences" to approve cookies for normal operation.
- Step 4: Click the button of "Link with Account Password- Instructions" to learn more how to link to Google Home/Assistant.
- Step 5: Please finish the linkage to Google Home/Assistant according to the instructions step by step.

Learn More about the Camera
| Features | Model No. | UM-Q6-4G-BK | UM-Q6-4G-WH |
|---|---|---|---|
| Weatherproof | Yes | Yes | |
| Infrared Night | Yes | Yes | |
| Starlight | Yes | Yes | |
| One-way Audio | Yes | Yes | |
| Two-way Audio | Yes | Yes | |
| Remote Live View | Yes | Yes | |
| PTZ Rotation | Yes | Yes | |
| Motion Detection | Yes | Yes | |
| Auto Tracking | No | No | |
| iOS | Yes | Yes | |
| Android | Yes | Yes | |
| HarmonyOS | Yes | Yes | |
| LAN Port | No | No | |
| Power Adapter | No | No | |
| Video Resolution | 2MP/3MP | 2MP/3MP | |
| Applications | Outdoor | Outdoor |
Umoval Solar Security PTZ Cameras 4G LTE Troubleshooting
Common issues and solutions:
- No Power: Ensure the solar panel is exposed to sunlight. Check battery health and replace if necessary.
- No Signal: Verify that the SIM card is properly inserted and that you have a stable 4G LTE connection in your area.
- Blurry Video: Adjust camera focus settings through the app. Clean the lens if necessary.
Warranty & Customer Supports
UMOVAL is a trustable company and we will sincerely do customer supports for all of customers if there are any quality issues during the usages of the camera within the limited warranty period in 12 months since your order date.
Our customer support email address is as below: [email protected]

Pros & Cons
Pros:
- Sustainable Energy: Solar power reduces operational costs and environmental impact.
- Advanced PTZ Functionality: Precise monitoring with pan-tilt-zoom capabilities.
- Weather Resistance: Durable design withstands various weather conditions.
- Real-Time Streaming: 4G LTE connectivity ensures immediate alerts and live video streaming.
Cons:
- Higher Initial Cost: Compared to traditional wired cameras, the initial investment may be higher.
- Dependence on Sunlight: Requires consistent sunlight for optimal performance; backup power sources may be necessary during prolonged periods of low sunlight.
- Complex Setup: Requires technical knowledge for initial setup and configuration.
Customer Reviews
Customers have praised the Umoval Solar Security PTZ Cameras 4G LTE for its reliability, clear video quality, and eco-friendly design. However, some users have noted that the initial setup can be complex and that consistent sunlight is necessary for optimal performance.
Faqs
How does the solar panel charge the battery in low sunlight conditions?
What is the maximum storage capacity of the microSD card?
Can I use this camera indoors?
Is this camera compatible with all 4G LTE networks?
How do I update the firmware of my camera?
Can multiple users access the same camera at once?
What kind of alerts does this camera provide?
Is there a warranty provided with this product?
Can I integrate this camera with other smart home devices?
How do I reset my camera to factory settings?
Leave a Comment
