Vaunn Medical vB100A Digital Upper Arm B.P Monitor User Manual

Content
Introduction of Vaunn Medical vB100A Digital Upper Arm B.P Monitor
The Vaunn Medical vB100A Digital Upper Arm B.P Monitor is a reliable and accurate home health monitoring device. This monitor is designed to provide quick and easy blood pressure readings, making it an ideal choice for those who need to monitor their blood pressure regularly. The estimated price of this product is around $30 to $40, and it is currently available for purchase online and in-stores.
Technical Specifications
- Weight: 580g/1lb 4.4oz (with batteries + cuff)
- Size (L x W x H): 125mm x 91mm x 59mm / 4.9”x 3.5”x 2.3”
- Storage temperature: -20 to +55°C / -4 to +131°F
- Humidity: 15 to 90% relative humidity maximum
- Atmospheric pressure: 700 to 1060hPa
- Operation temperature: 10 to 40°C/ 50 to 104°F
- Display: LCD Display (Liquid Crystal Display)
- Measuring method: oscillometric
- Pressure sensor: capacitive
- Measuring range: 60 - 255 mmHg – blood pressure 40 - 200 beats per minute – pulse
- Cuff pressure display range: 0-299 mmHg
- Memory: Automatically stores the latest 99 measurement results per user
- Measuring resolution: 1 mmHg
- Number of independent users: 2
- Static accuracy: pressure within ± 3 mmHg
- Pulse accuracy: ± 5 % of the readout value
- Power source: 4 dry cells (alkaline batteries), size AA, 1.5V
- Battery life: approximately 920 measurements
Features
- Fully automatic, digital upper arm blood pressure measuring device.
- Dual user mode with memory storage that records up to 99 sets of readings per user.
- Guest mode for one-time measurement with no data recorded.
- Unique SmartCheck™ technology that enhances the accuracy and precision of blood pressure measurements even during arrhythmia.
- Latest GentleRead™ technology that provides customized level of cuff inflation for comfortable and pain-free experience during measurement.
- Irregular Heartbeat Detection technology with audible signal that warns about the occurrence of abnormal rate and periodicity of systole during measurement.
- Movement Warning Indicator that detects movement during measurement and alerts user to retake measurement.
- Cuff Error Warning that alerts user of inadequate pressure in the cuff during measurement.
- Large LCD screen for easy reading.
- 3-color backlight display and traffic light indication that classify blood pressure readings in accordance with the latest American Heart Association (AHA) guidelines.
- Date and Time function.
- Alarm Clock function that allows user to set two alarms.
- Battery life indicator.
- Automatic switch off.
- Extended range arm cuff that fits a wide range of arm sizes from 8.7-16.5” (22-42 cm).
About Self-Measurement
- The blood pressure monitor is intended to measure and monitor your blood pressure levels. It is not intended to diagnose and/or treat any medical condition or disease. Please consult with your healthcare provider if you experience unusual readings. Under no circumstances should you alter the dosage of any medication prescribed by your doctor.
- The pulse display is not suitable for checking the frequency of heart pacemakers.
- For cardiac irregularity (irregular heartbeat), measurements obtained with this device should only be evaluated in consultation with your doctor.
Electromagnetic interference: The device contains sensitive electronic components (microcomputer). Therefore, avoid strong electrical or electromagnetic fields in the direct vicinity of the device (for example: mobile phones, microwaves). These can lead to the temporary impairment of measurement accuracy.
Important Information Blood Pressure and Its Measurement
How Does High Blood Pressure Arise?
Blood pressure and heart rate are controlled by the lower portion of the brainstem called medulla oblongata. Blood pressure is dynamic and responds to respective situation by way of feedback mechanism via the nervous system. To adjust for blood pressure, the strength and frequency of the heart (pulse), as well as the width of circulatory blood vessels respond by changing. The latter is affected by way of fine muscles in the blood vessel walls. The level of arterial blood pressure changes periodically during the heart activity: During blood ejection (Systole), the value is maximal (systolic blood pressure value); at the end of the heart’s rest period (Diastole), the value is minimal (diastolic blood pressure value). For a healthy adult, the blood pressure values should lie within certain range (see below).
Blood Pressure Values Classification
According to American Heart Association (AHA) guidelines in 2017, blood pressure values are classified into 4 levels, as shown in the table below. Note: ESH/ESC guidelines may vary. Consult your healthcare provider for region-specific guidelines and information.
Further information
- If your blood pressure values are mostly in the normal range under resting conditions but exceptionally high under conditions of physical or psychological stress, it is possible that you are suffering from a medical condition called labile hypertension. Please consult your healthcare provider if you suspect this to be the case.
- Correctly measured diastolic blood pressure values of above 110mmHg will require immediate medical treatment.
There are measures you can take to prevent and/or reduce medically established high blood pressure.
Eating Habits
- Strive for a normal weight for your age and height.
- Avoid excessive consumption of table salt.
- Avoid fatty food.
Existing Illnesses
- Follow consistently any medical instructions for treating existing illnesses, such as diabetes (diabetes mellitus), fat metabolism disorder, gout, etc.
Habits
- Restrict caffeine consumption, such as coffee.
- Drink only moderate amount of alcohol.
- Avoid smoking.
Physical Activities
- Exercise regularly.
- Choose sports that require stamina over those that require strength.
- Do not over exert and/or avoid reaching the limits of your performance.
- If you have a pre-existing condition and/or you are over 40, please consult your healthcare provider before starting any physical activities.
SmartCheck Technology
SmartCheck technology is an innovative concept to achieve optimum reliability in self-measurement of blood pressure. Highly accurate measurement result is achieved by the automatic analysis of three successive measurements (see section 5.5 Measuring Procedure). As human blood pressure is dynamic and can fluctuate, the SmartCheck technology provides a convenient way to obtain an accurate measurement, even during arrhythmia. This results in greater accuracy when compared to the calculation of average result.
Measurement specification
- The total measurement time for a full measurement cycle is less than 3 minutes, as opposed to a single measurement time of about 1.5 minutes.
- Single results are not displayed.
- Based on data analysis result, a 4th measurement may be applied.
Irregular Heartbeat Detection (IHD)
The appearance of the symbol indicates that certain pulse irregularity is detected during measurement. This may cause results to vary from your normal blood pressure levels. In general, this is not a cause for concern. However, if the symbol appears more frequently than usual, it is recommended that you consult with your healthcare provider. If SmartCheck™ measurement mode is used, irregular heartbeat detected during measurement will not affect results (see section 2.3 for more information).
Note: The device detects early stage pulse irregularities. It is not a replacement for cardiac examination.
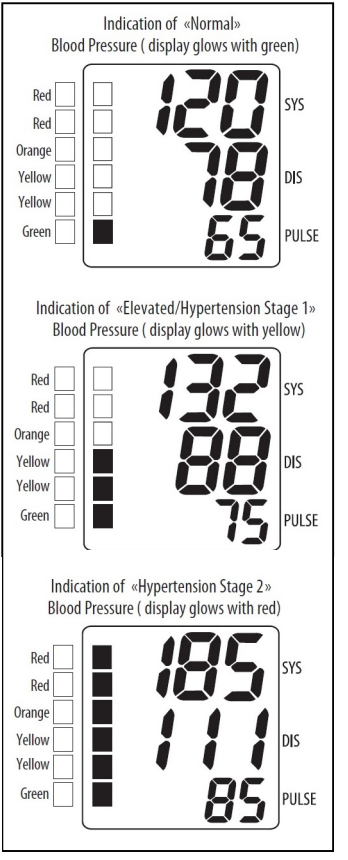
Vaunn Medical vB100A Digital Upper Arm B.P Monitor Traffic Light Indication
The colored bars on the left edge of the display indicate the range within which the measured blood pressure values lie. Depending on the height (or number) of the bars, the measured values are either within the normal (green), elevated/hypertension stage 1 (yellow) or hypertension stage 2 (orange/red) range. The classification corresponds to the 4 levels as defined by the American Heart Association (AHA). Please refer to the table in section 2.2 to learn more. In addition, the 3-color backlight display shows different color according to the measured blood pressure values. Readings in the classification range of 1 is shown in green backlight, classification ranges of 2, 3 in yellow backlight and classification ranges of 4, 5, 6 in red backlight.
Elements of the Blood Pressure Monitor
Measuring Unit
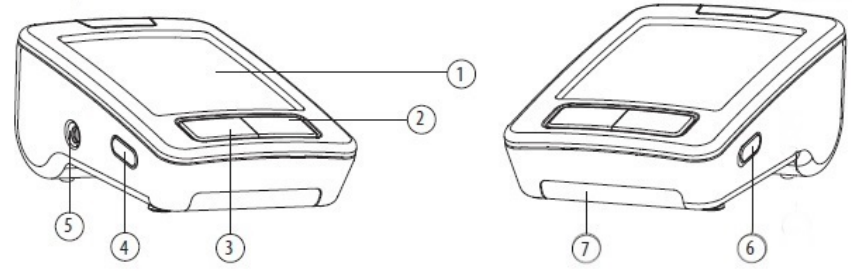
Item | Function | |
1 |
LCD screen | Display measurement readings, time and date. |
2 | Start/Stop button |
Press to start or stop measurement. |
3 | Memory button |
Press to view recorded data. |
4 |
Time/User button | Press to set/view current date and time or to switch user. |
5 |
Arm cuff connector | Connect the upper arm cuff here and place the cuff around your arm to measure your blood pressure. |
6 |
Mode slide switch | Slide switch to select single or SmartCheck™ measurement mode. |
7 | Battery compartment | Insert four AA batteries here. |
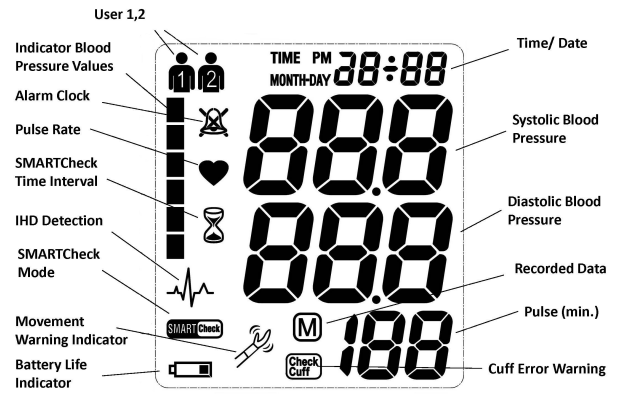
LCD screen display and symbol designation
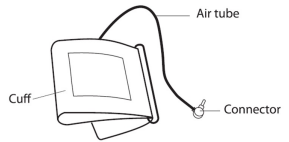
Cuff: Extended range upper arm cuff made of soft nylon material with Velcro closure. For arm circumference 8.7-16.5 inches (22-42 cm).
Setting Up the Blood Pressure Monitor
Battery Installation
- Open the battery compartment cover in the direction shown.
- Insert four AA batteries according to the indicated polarity.
Mount the battery cover horizontally until it snaps back in place.

Attention!
- When the battery life indicator appears as
 in the display, the batteries are flat and need to be replaced with new ones.
 - When the battery life indicator appears as,
 the device cannot operate until the batteries are replaced.
 - If the blood pressure monitor is not used for an extended period of time, please remove the batteries from the device.
Functional check: Press and hold the Memory button![]() . All display segments should appear when functioning properly.
. All display segments should appear when functioning properly.
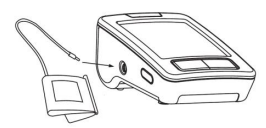
Arm Cuff Connection
Insert the distal end of the cuff tube into the opening of the arm cuff ![]() connector on the measuring unit, as shown in the diagram.
connector on the measuring unit, as shown in the diagram.
Setting Date and Time
The blood pressure monitor includes date and time function. For each measurement taken, results are recorded with the date and time of the measurement. After battery installation, set the date and time.
- The year YYYY should be blinking. Set year by pressing the Memory
 button. To confirm, press the Time/User
  button.
 The month, day and time can be set by following the same steps above.

Note
- You can change values more rapidly by holding down the Memory button.
- After initial setup, date and time can be reset. Refer to section 4.4 below.
- The date and time must be re-entered each time the batteries are replaced.
Switching Sound On/Off
The device beeper is on by default and can be turned off if desired. With the device off, press the Time/User button ![]() and hold until the display shows “bEP On”. Press the Memory button to switch between “bEP OFF” and “bEP On”. Press the Time/User button
and hold until the display shows “bEP On”. Press the Memory button to switch between “bEP OFF” and “bEP On”. Press the Time/User button ![]() to make your selection.
to make your selection.
Note
- Date (year, month, day) and time will need to be re-confirmed by pressing the Time/User button .
- You can reset the date and time by pressing the Memory button, then press the Time/User button to confirm.
Reading Date and Time
The display shows the time by default. To show the date, press the Time/User button ![]() .
.
Specifying User
The blood pressure monitor has 2 user settings and can store up to 99 sets of readings per user. In addition, guest mode is available for measurement without data recording.
- Before taking a measurement, make sure that the correct user (User 1, User 2, or Guest) has been selected.
- With the device off, press the Time/User button to cycle through User 1, User 2 or Guest mode (see illustration of screen display below).
Press the Start/Stop
 button to make your selection.
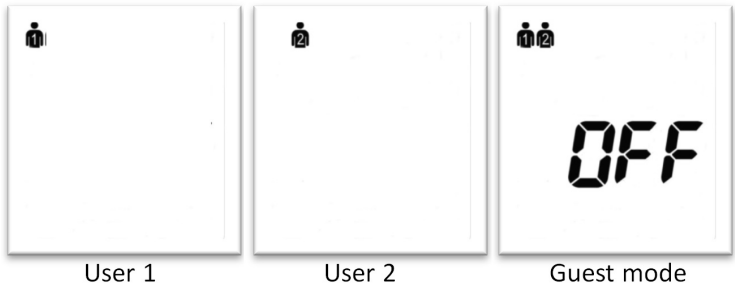
Operating the Blood Pressure Monitor
Before Taking Measurement
- Avoid eating, smoking, and any strenuous activity such as exercise before measurement. These factors can influence the measurement result. It is recommended that you relax for about ten minutes before measurement. Example: sitting in an armchair in a quiet environment.
- Remove any tight or constricting garment around the upper arm.
- Always measure from the same arm – typically the left arm.
- Attempt/plan to carry out measurement regularly around the same time of day as blood pressure changes during the course of the day.
Common Sources of Error
Note: Comparable blood pressure measurements require and/or are dependent on the same conditions.
- Any effort by the user to support his/her arm during measurement can increase the blood pressure values. Therefore, make sure that the user is in a comfortable, relaxed position and does not activate any muscles of the arm during measurement. Use a cushion for support if necessary.
- If the arm artery lies considerably lower (higher) than the heart, an erroneously higher (lower) blood pressure will be registered. Each 15 cm (5.9 inches) difference in height results in a measurement error of about 10 mmHg.
- An arm cuff that is too narrow or too short will result in false measurement values. Using the correct size cuff is crucial in getting accurate measurement values. The cuff size is dependent on the circumference of the arm, measured at the center. Note: only use Vaunn Medical arm cuff.
- A loose cuff or sideways protruding air pocket causes false measurement values.
- Repeated measurements cause blood to accumulate in the arm. This can lead to false results. Therefore, it is recommended to pause for at least 1 minute between measurements.
Description
The Vaunn Medical vB100A Digital Upper Arm B.P Monitor is a clinically approved device that is suitable for both home and professional use. This monitor features a large LCD screen that displays clear and easy-to-read measurements. It can measure blood pressure and pulse rate simultaneously and has an irregular heartbeat detection feature. The cuff fits arm circumferences of 9 to 17 inches, making it suitable for most adults. The device has a memory function that stores up to 120 readings, and it can detect and display an average of the last three readings.
Fitting the Arm Cuff
a. Pass the end of the cuff (with sewn-in rubber stopper) through the metal D-ring to form a loop. The Velcro closure should be facing outward. If assembled correctly, the metal D-ring should not touch the skin whenthe cuff is looped around the arm. Note: Skip this step if the cuff has already been prepared. |
 |
b. Insert left arm through the cuff loop and position the cuff on the upper arm. The tube should point in the direction of the lower arm. | 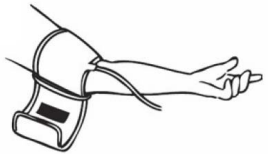 |
c. Adjust the cuff position on the upper arm. The lower edge of the cuff should be approximately ¾-1” (2-3cm) above the elbow. The tube and “ARTERY MARK” should be aligned with the inner side of the arm. Important: The red line along the edge of the cuff must lie exactly over the artery which runs down the inner side of the arm. |
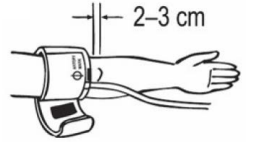 |
d. Tighten the free end of the cuff and secure with the Velcro closure. The cuff should fit snugly on your upper arm such that you can fit2 fingers between the cuff and your upper arm. Any clothing that restricts the arm should be removed prior to measurement. | 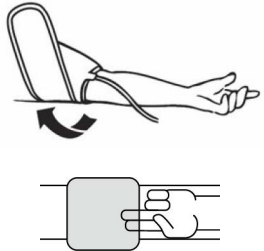 |
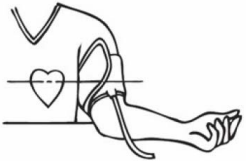
e. Lay the arm on the table or support cushion with the palm upward. The arm cuff should be at the same level as the heart. Check to make sure that the tube is not kinked. |
 |
f. Remain seated comfortably for abou ttwo minutes before starting measurement. | 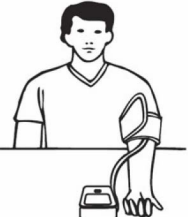 |
Note: If it is not possible to fit the cuff on the left arm, it can also be placed on the right arm. However, for consistency, measurements should only be taken from the same arm.
Measurement Mode Selection
You can choose between single or SmartCheck™ measurement mode.
- Single mode
Slide the mode switch (on the right-hand side of the measuring unit) towards “1”.
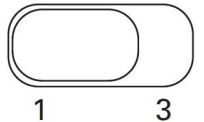
- In single mode, 1 measurement will be taken.
- SmartCheck mode
- Slide the mode switch towards “3”.
- In SmartCheck mode, 3 measurements will be taken in succession and final results will be calculated automatically.
- The symbol on the screen display indicates that the device is set to measure in SmartCheck mode.
Measuring Procedure
Before taking measurement, make sure that the arm cuff has been applied and positioned correctly.
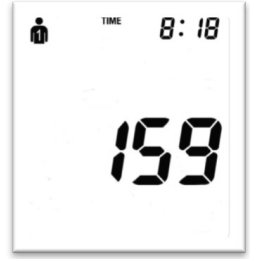
- Press the Start/Stop button. The pump will begin to inflate the cuff. The display shows the increasing cuff pressure during inflation.
The pump will stop once inflation pressure has been reached. Cuff pressure will start to decrease slowly. Similarly, the display shows the decreasing cuff pressure during deflation.
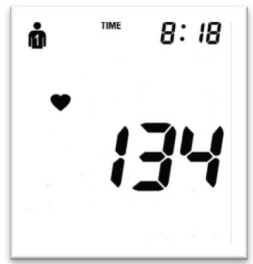
When the device detects the pulse, the heart symbol begins to blink on the display and a beep tone will register with every pulse beat.
- When measurement is complete, a long beep tone will register. The measured systolic and diastolic blood pressure values as well as the pulse rate are displayed. Traffic light indicator bars and colored backlight will be displayed according to the classification ranges in which the measurement results lie.
If the symbol
 appears on the display, it indicates that an irregular heartbeat has been detected during measurement. This may cause results to vary from your normal blood pressure levels. It is recommended that you retake your measurement after a brief pause of at least 1 minute. It is important that you remain relaxed, still, and do not talk during measurement.
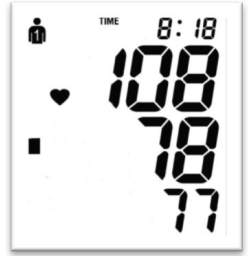
Note: If the symbol appears more frequently than usual, it is recommended that you consult with your healthcare provider.- The measurement results will remain on the display until the device is switched off by pressing the Start/Stop button . If the button is not pressed within 1 minute, the device will switch off automatically to save power.
- If the device is set to SmartCheck measurement mode, it will take 3 separate measurements in succession and calculate the analyzed blood pressure values. There will be 15 seconds resting time between measurements. During this resting period, the symbol
 will blink on the display and time will count down. You will hear a beeping sound during the last 5 seconds.
Note- If measured data from each cycle differs too much, a 4th measurement will be performed before final results are displayed.
- In rare cases where the blood pressure values are unstable even after the fourth measurement, <<Err6>> will be displayed.
Discontinuing a Measurement
If it is necessary to interrupt and/or stop a blood pressure measurement for any reason (e.g. the user feels unwell), the Start/Stop button![]() can be pressed at any time. The device will immediately decrease the cuff pressure.
can be pressed at any time. The device will immediately decrease the cuff pressure.
Switching Device Off
To switch the device off, press the Start/Stop button![]() . If no activity is detected within 1 minute, the device will switch off automatically.
. If no activity is detected within 1 minute, the device will switch off automatically.
Memory Recall of Recorded Data
The blood pressure monitor automatically records and stores up to 99 measurement results for each user. To recall recorded data, press the Memory button![]() to display the latest recorded results with date and time stamp of the measurement. Press the Memory button
to display the latest recorded results with date and time stamp of the measurement. Press the Memory button ![]() again to scroll through all and earlier recorded results.
again to scroll through all and earlier recorded results.
Note
- If an irregular heartbeat is detected in any measurement, the symbol will be displayed with the blood pressure values. Similarly, if the measurement is taken in SmartCheck mode, the symbol will be displayed with the blood pressure values.
- To see the recorded results for the second user, first switch to the second user (see section 4.6). Then press the Memory button as described above.
When the memory storage reaches 99 sets of recorded data, any new measurement will be recorded
 as and the oldest data will be over written/erased.
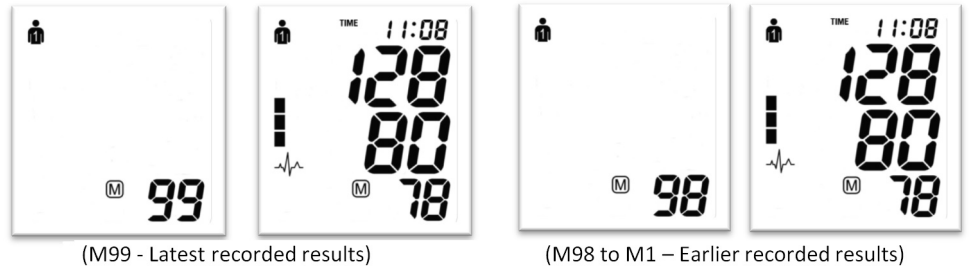
Clearing Recorded Data
- Memory Full: When the memory stores 99 sets of data, it is full. Any new measurement results will be recorded and overwrite the oldest recorded data.
- Clearing All Recorded Data: If you wish to delete all recorded data permanently, first switch off the device. Then press and hold the Memory button for about 8-10 seconds
 until appears. Release the button ( starts to blink) and press the Memory button once more to confirm. To clear recorded data for the second user, first switch to the second user (see section 4.6). Then follow the steps above.
Note: Recorded results cannot be deleted individually.
Setting Alarm Clock as Reminder
The blood pressure monitor has an alarm clock function that allows you to set two alarm times. This can be a useful aid, for instance, as a reminder to take medication or perform blood pressure measurement at the same time each day.
- To set the alarm, first switch off the device. Press and hold the Time/User button , then press and hold the Memory button (both buttons must be held down) until the Alarm Clock symbol appears
 on the display. Release both buttons and you will see flashing “1” which indicates that the first alarm time can now be set.
 - Press the Time/User button and the ‘hour’ will flash. Press the Memory button to set the hour. To confirm, press the Time/User button. The ‘minute’ will now flash. You can set the minute by following the same steps.
- After confirming the alarm time, the Alarm Clock symbol will flash. Press the Memory button to toggle between (alarm active) or
 (alarm inactive). To confirm, press the Time/User button .
 - To set a second alarm time, follow step 1 above. When the flashing “1” appears, press the Memory button and it will switch to flashing “2”. The second alarm time can now be set by following steps 2-3 above.
Note
- An active alarm is indicated by the symbol on the display.
- The alarm will go off at the set time daily.
- To switch off the alarm, press the Start/Stop button .
- To inactivate the alarm setting, follow steps 1-3 above and select the inactive alarm symbol at step 3. The symbol will disappear on the display.
- The alarm time(s) must be re-entered each time the batteries are replaced.
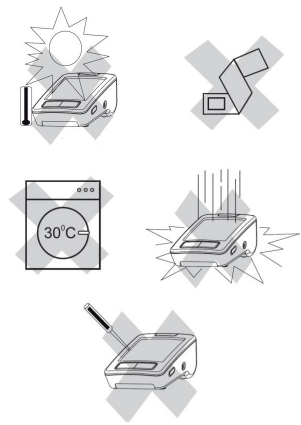
Care and Maintenance
- Do not expose the device to extreme temperatures, humidity, dust, or direct sunlight.
- The cuff contains a sensitive airtight bubble. Therefore, handle with care and do not strain, twist, or buckle.
- The device and cuff can be wiped clean with a soft, dry cloth.
WARNING: Do not machine wash the cuff! - Do not drop the device and avoid strong vibrations.
Do not attempt to open and/or repair the device.
Troubleshooting
Problems | Solutions |
The display remains blank when the device is switched on. |
with new batteries. |
The device failsto measure bloodpressure values, or the measured values are too low or too high. |
relaxed, stilland do nottalk during |
measurement. | |
Every measurement results differ and you are sure the device functions properly. | Blood pressure is dynamic and can fluctuate. It is important to note that comparable blood pressure measurements require and/or are dependent on the same conditions. These include relaxed and quiet conditions, and performing measurements at approximately the same time of the day. Please also refer to section 5.2 to avoidcommon sources of error. |
The measurement results (blood pressure values)are not consistent with those measured at a doctor’s office. | Blood pressure is dynamic andcan fluctuate. It is recommended to record daily development of your blood pressure values and consult with your healthcare provider. |
Error Messages and Troubleshooting

Error | Icon shown on display | Description | Possible causeand solution |
Err 1 |
N/A |
Signal too weak | The pulse signals detected on the cuff are too weak. Reposition/readjust the cuff and repeatthe measurement. |
Err 2 |
 |
Movement detected | During measurement, movement or muscle tension is detected by the cuff.Repeat measurement and remain relaxed, still and do not talk during measurement. |
Err 3 |
 |
Cuff pressure too low | An adequate pressure cannot be generated in the cuff.It can be due to a leak, loose cuff or cuff tubing incorrectly connected. Check cuff tubing connection and reposition/readjust the cuff. Repeat measurement. |
Err 5 |
N/A |
Abnormal result | The measuring signals are inaccurate or unstable, therefore no result can be displayed. Refer to chapter 5 |
on operating the blood pressure monitorand repeat measurement accordingly. | |||
Err 6 |
N/A |
SmartCheck™ mode error | Multiple errors detected during measurement in SmartCheck™ mode,preventing a reliable final result. Refer to chapter 5 on operating the blood pressure monitor and repeat measurement accordingly. |
HI |
N/A |
Pulse or cuff pressure too high | Cuff pressure is toohigh (over 300 mmHg) or pulse detected is too high(over 200 beatsper minute). Pauseand relax forat least 5 minutes and repeat measurement. |
LO |
N/A |
Pulse too low | Pulse detected is too low(less than 40 beats per minute). Pause and relax for at least5 minutes and repeat measurement |
If an error occurs during a measurement, the measurement is discontinued and a corresponding error code is displayed (Example: Error No. 1).
Guarantee
The device is under warranty for one year from the date of purchase. Please register your purchase at www.beyondmedshop.com/pages/warranty
Pros & Cons about vB100A Digital Upper Arm B.P Monitor
Pros
- Clinically approved for accurate readings
- Large LCD screen for easy reading
- Simultaneous blood pressure and pulse rate measurement
- Irregular heartbeat detection
- Memory function for storing up to 120 readings
- Affordable price point
Cons
- May not fit larger arm circumferences
- May be less accurate for users with arrhythmia or other heart conditions
Customer Reviews about Vaunn Medical vB100A Digital Upper Arm B.P Monitor
The Vaunn Medical vB100A Digital Upper Arm B.P Monitor has received mostly positive reviews from customers. Many users have praised its accuracy, ease of use, and affordability. However, some users have reported issues with the cuff size and the device's durability.
Faqs
How do I set the date and time on the Vaunn Medical vB100A Digital Upper Arm B.P Monitor?
What should I do if the Vaunn Medical vB100A Digital Upper Arm B.P Monitor shows an error message?
Can the Vaunn Medical vB100A Digital Upper Arm B.P Monitor monitor be used on children?
What are the operating conditions for the Vaunn Medical vB100A Digital Upper Arm B.P Monitor?
What is the warranty period for the Vaunn Medical vB100A Digital Upper Arm B.P Monitor?
How accurate is the Vaunn Medical vB100A Digital Upper Arm B.P Monitor?
How is the Vaunn Medical vB100A Digital Upper Arm B.P Monitor powered?
What is the cuff size for the Vaunn Medical vB100A Digital Upper Arm B.P Monitor?
How do I clean and maintain the Vaunn Medical vB100A Digital Upper Arm B.P Monitor?
How does the Vaunn Medical vB100A Digital Upper Arm B.P Monitor?
Leave a Comment