Vevor CNC Engraving Machine 2418 User Manual | Installation Instructions
Content
Introduction
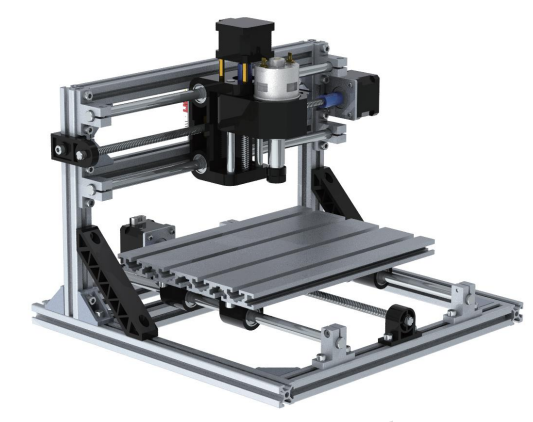
This tutorial will teach us how to operate the Vevor CNC Engraving Machine 2418, a flexible and easy-to-use desktop CNC router for precise milling, engraving, and cutting jobs. This machine is perfect for small enterprises and amateurs since it has a robust frame, and user-friendly software, and it can work with a wide range of materials, such as plastic, wood, and soft metals. Affordable and powerful performance combine to make the Vevor CNC 2418 a great starting point for anyone interested in learning about CNC machining.
Vevor CNC Engraving Machine 2418 Package
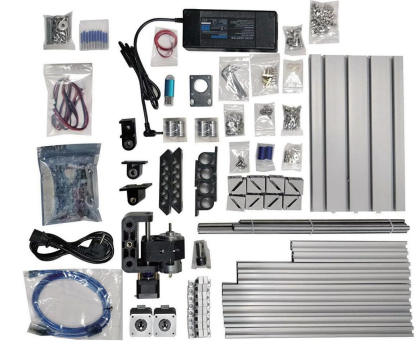
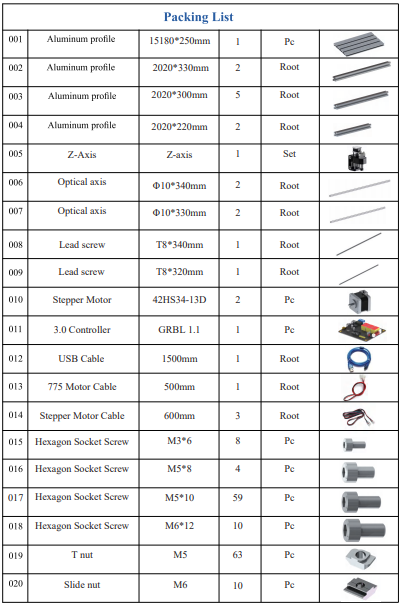
Packing List

Detailed Specifications
- Control: CNC controller with GRBL firmware
- Spindle: 775 motor with a speed of up to 10,000 RPM
- Travel size: 24x18 inches (600x450mm)
- Material thickness: Up to 2 inches (50mm)
- Resolution: 0.001 inches (0.025mm)
- Cooling system: Built-in fan
- Power supply: 220V
1-inch offline Instructions
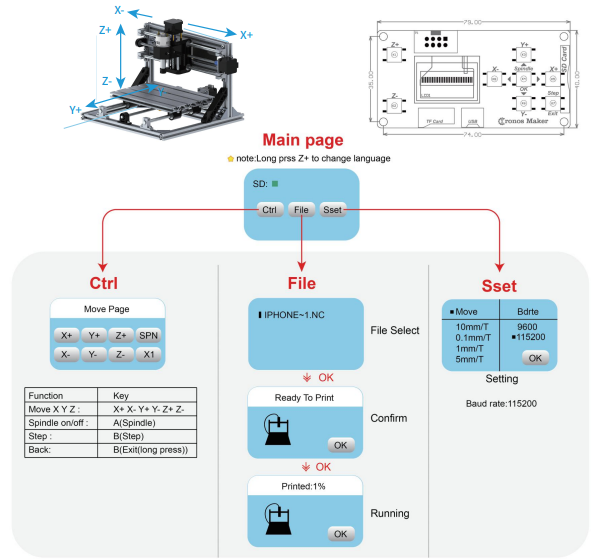
- Boot Page:
- X+: right X-: left
- Y+: Send $X to the grbl motherboard to unlock the grbl board.
- Y-: Send $H to the grbl motherboard to achieve automatic zero return of the grbl board.
- OK/SPN: Confirm button.
- Move the page: Manually move each axis to the desired position.
- X+: X axis move right direction, X- opposite
- Y+: Y axis move forward direction, Y- opposite
- Z+: Z axis move up direction, Z- opposite
- Move the page: Manually move each axis to the desired position.
- If there is a problem, the corresponding button on the screen turns gray.
- OK/SPN: Spindle test switch, press to open the spindle (corresponding to SPN gray on the screen), press again to close the spindle (the corresponding SPN on the screen returns to normal).
- Exit/STP:
- Function 1: Tap on each axis button of XYZ to change the movement distance by 0.1, 1, 5, 10 cycles each time.
- Function 2: Press and hold for about 2 seconds to exit and reset grbl, the current position of the machine is set to absolute 0.
- File Page:
- File list: Select the file to be engraved. Support documents include: NC, NCC, TAP, TXT, Gcode, GCO, NL, CUT.
- CNC: Y+: up, Y-: down.
- OK/SPN: Confirm the selection and enter the confirmation engraving page.
- Confirm the Engraving Page:
- Confirm that the engraving file is started without errors.
- OK/SPN: Confirmation starts, ready to print becomes the progress display percentage, the OK button on the screen turns gray, and the file selection page is returned after the engraving is completed.
- File tool setting: If the file contains G38.2 Z-100, Grbl will perform the tool setting process. After the spindle touches the tool block, the screen will limit the tool value returned by the board.
- Settings Page:
- Settings: X+: right, X-: left, Y+: up, Y-: down.
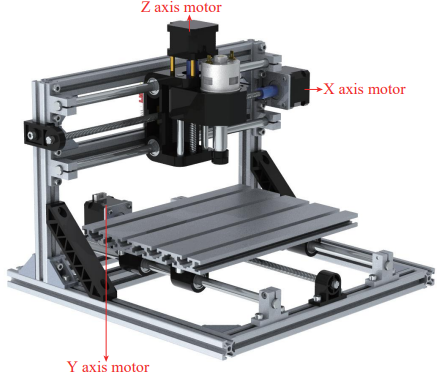
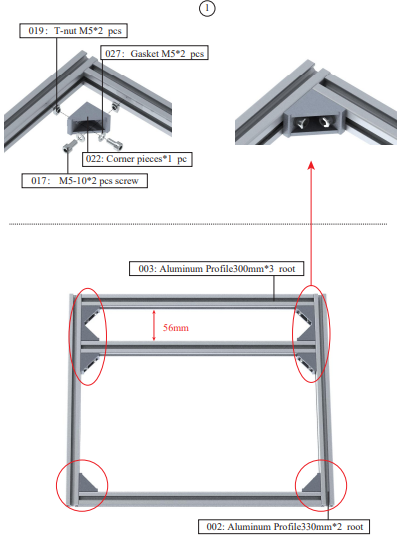
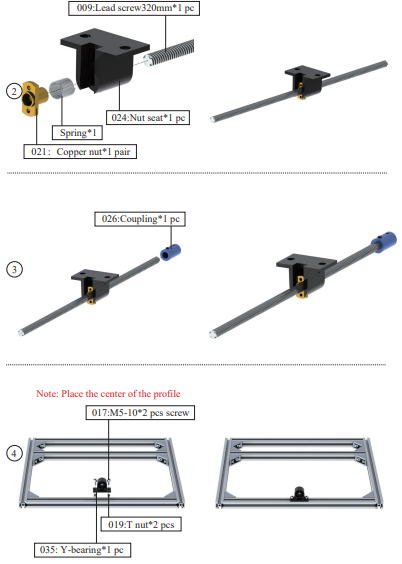
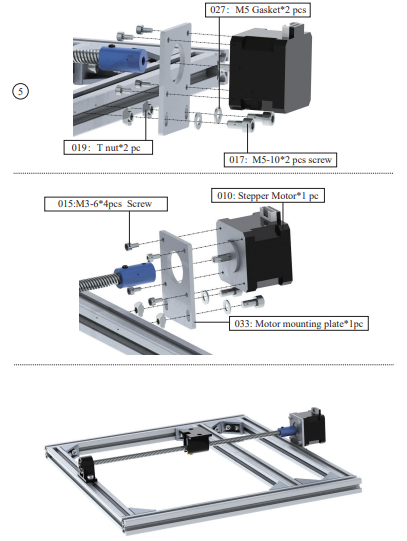
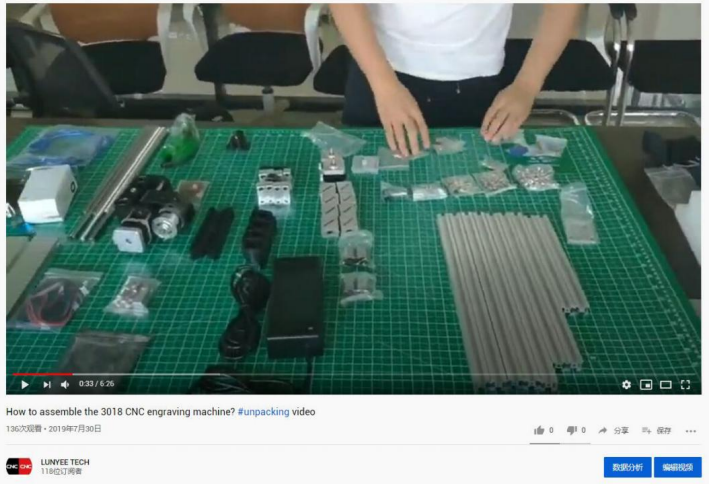
2418 Machine Assembly
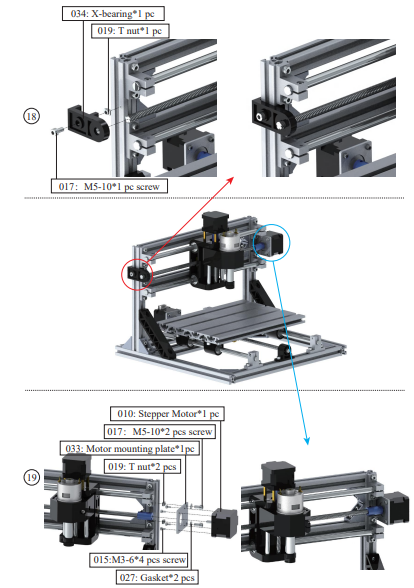
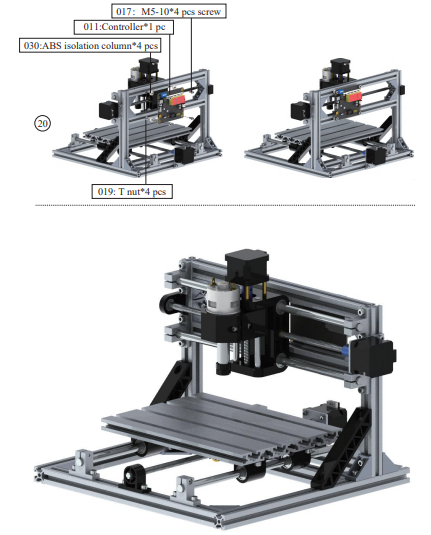
Description
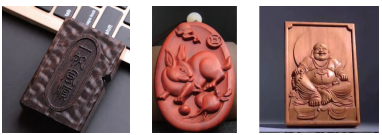
Built to last, the Vevor CNC Engraving Machine 2418 is a top-notch, long-lasting device. It has a strong, solid frame that offers stability and accuracy while in use. Additionally, the machine has a potent 775 motor that can run at up to 10,000 RPM, which makes engraving and cutting work quickly and effectively. Additionally, the machine's enormous travel size of 24 by 18 inches makes it appropriate for cutting and engraving a wide range of materials. The machine also boasts a high resolution of 0.001 inches, which guarantees accurate and detailed engravings.
Laser machine

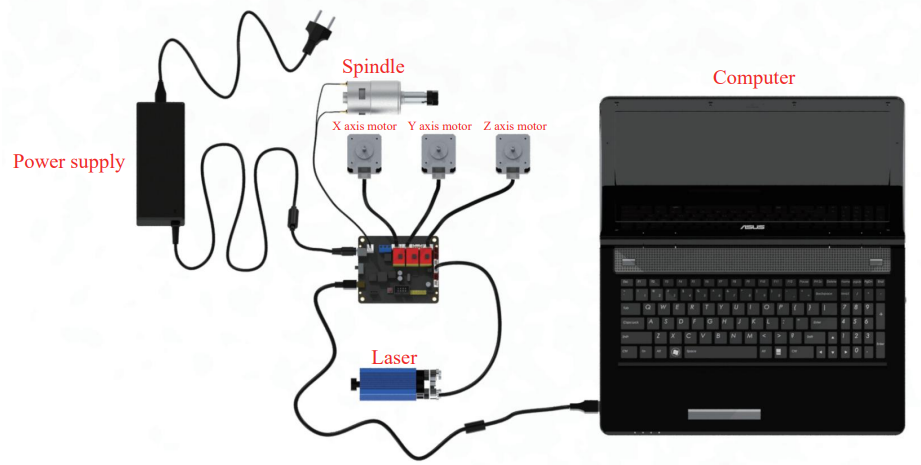
How to Connect
Candle software
Overview
Candle is an open-source software suitable for CNC machine tool processing. It supports G code file processing and visual display.
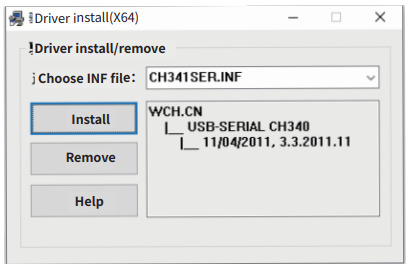
Install the Driver
For the first time use, please connect the device to the computer via USB cable, and click the CH340-Driver.exe file in the driver folder to install the driver. Under normal circumstances, the Win10 system will automatically identify and install the driver. For Win7 and Win8 systems, please install it manually.
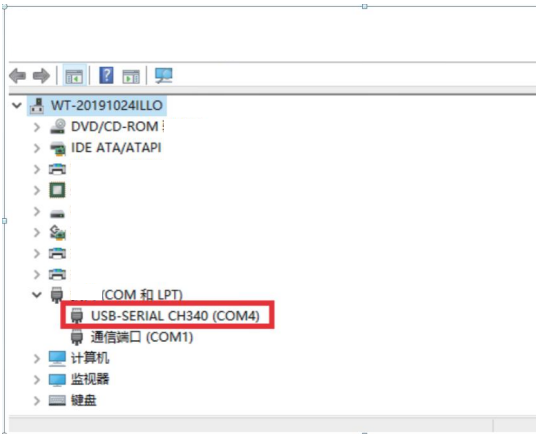
Set the Port
After installing the driver, open the device manager of the computer and click on the port option to see the content inside the red box on the screen shown in the figure below (the port information is in brackets).
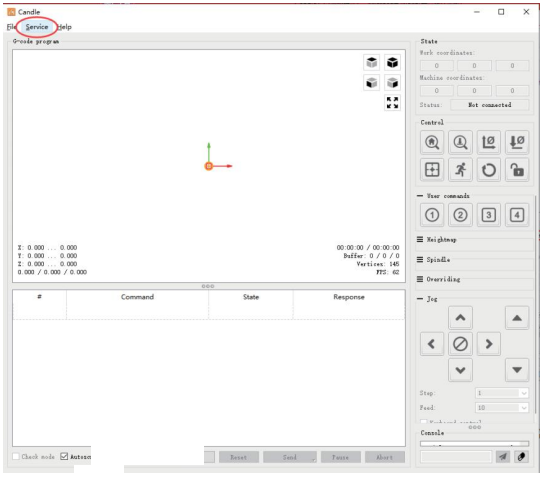
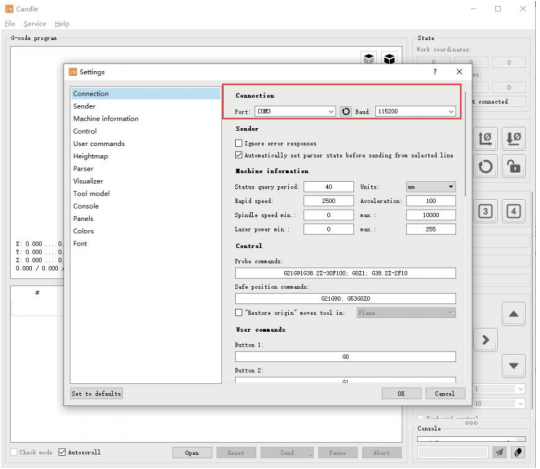
Remember the port information queried above, switch to the Candle software interface and click the "Settings" option in the upper left corner. Selecting the setting will bring up the interface. Under "Connection", select the port name you queried, select the baud rate 115200, and then click the icon "Finish" to complete the setting.
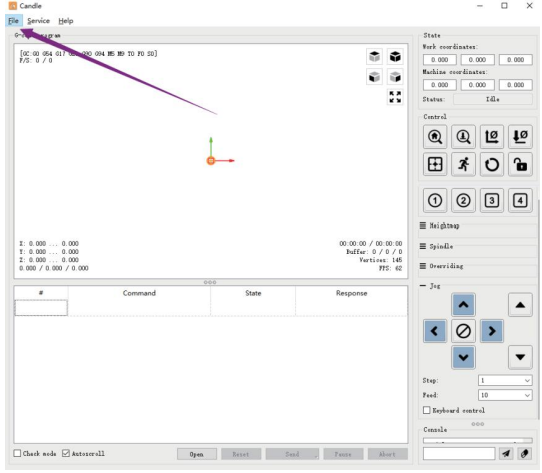
Connection is Complete
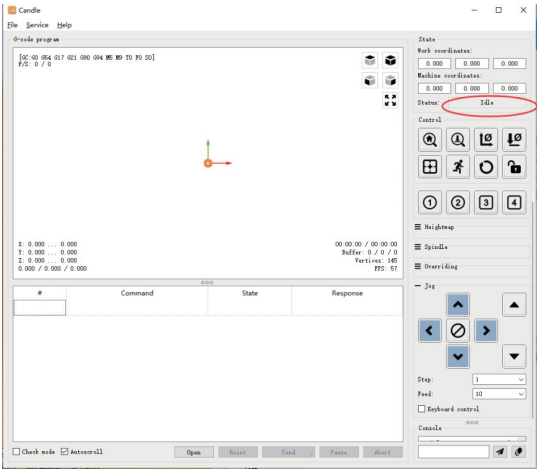
After setting the port and baud rate, click Finish. The status bar at the top right of the Candle interface will show Idle, and at the same time, the console at the bottom right will display the information shown below, indicating that the connection has been successfully established.
Processing Documents
The "File" option at the top, click "New" to create a G code in the command bar at the bottom of the interface, and click "Open" to select a G code file that has been made, and then you can import the file. After importing, the middle of the interface will display a visual graph composed of tool paths (the position of the pen-shaped graph in the graph is the current tool position). In the visualization window, hold down the left mouse button to move to rotate the graph, and hold down the right button to move the graphics. Scrolling the middle wheel can zoom in and out of the graphics. At the same time, the content of the G code will be displayed in the lower command bar. During processing, the machine will run one by one according to the G code commands.
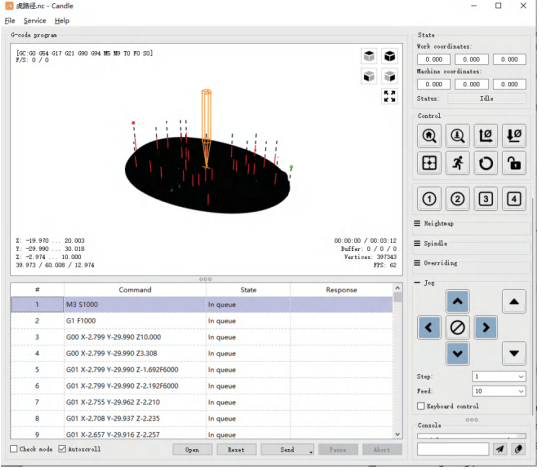
Set the Working Coordinate Origin
Before running the G code program, you need to find the position of the engraving figure relative to the overall engraving plate. There is a three-axis coordinate system in the visual graphics. The origin of the three-axis coordinate system is the tool setting point of the actual processing graphic. You can move the tool to determine the position of the engraving graphic relative to the overall engraving plate based on the position of this origin. The engraving figure in the figure below is taken as an example. After the selected tool position is started, the X, Y, and Z axes are reset to zero ![]() (the axis is reset to zero, and the Z axis is reset to zero buttons). Before returning to zero, make sure that the tool approaches the distance of one sheet of paper for engraving, and then return the X, Y, and Z axes to zero (please use a flat-bottom sharp knife when engraving, and use a cylindrical milling cutter when machining planes, slots, and holes). The effect is that the sculpted figure will be carved with the blade tip as the origin.
(the axis is reset to zero, and the Z axis is reset to zero buttons). Before returning to zero, make sure that the tool approaches the distance of one sheet of paper for engraving, and then return the X, Y, and Z axes to zero (please use a flat-bottom sharp knife when engraving, and use a cylindrical milling cutter when machining planes, slots, and holes). The effect is that the sculpted figure will be carved with the blade tip as the origin.
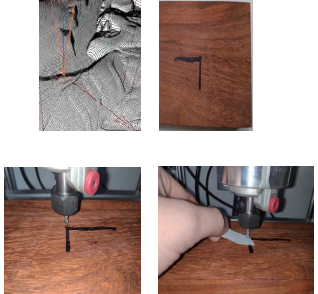
Start Carving
After finding the engraving position, click the send button below and the device will automatically start engraving. The status bar at the top right shows running. The visualization window shows that the tool is moving along the tool path. You can choose the pause and stop buttons below when engraving. (After pausing, click again to continue the previous engraving. After termination, click Send to start processing from the beginning).
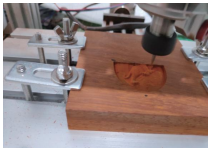
Finished Processing
After the processing is completed, the visualization window prompts that the engraving is completed and the time required for engraving.
Setup Guide
- Assemble the machine according to the instructions provided in the user manual.
- Connect the machine to a power source and turn it on.
- Install the CNC controller software on your computer.
- Connect the machine to your computer via the USB cable.
- Open the CNC controller software and load your design file.
- Adjust the settings ( such as spindle speed, travel distance, etc) in the software according to your needs.
- Start the machine and monitor the engraving process.
Precautions
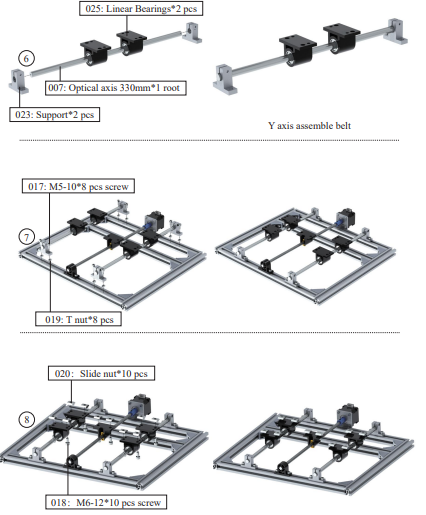
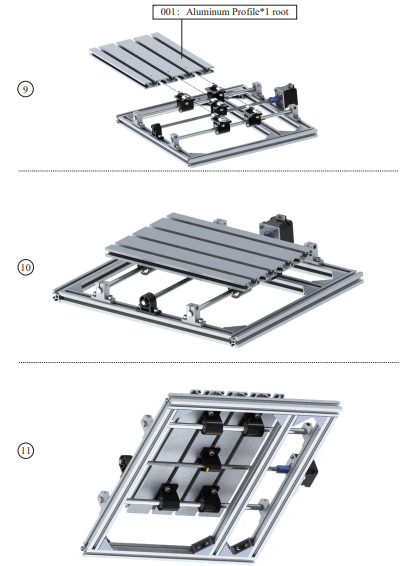
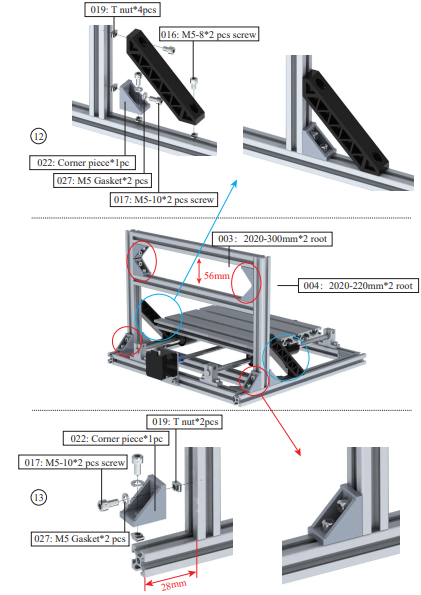
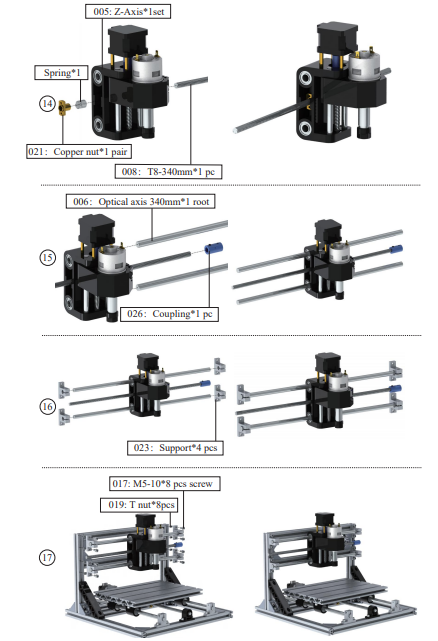
Please refer to the attached USB flash drive to assemble and operate. If the USB flash drive does not work, please contact us and leave the email address. We will send it to you.
- All parts in this description are just for illustrative purposes. If there is any difference, please refer to the actual part shape.
- Please pay attention to the order in the installation steps to avoid repeated disassembly or assembly. If the laser needs to work for a long time, please be sure to disable the sleep function of the computer. Please don't make the laser continuously emit light out of control to avoid burning the engraved items or the desktop.
- Please don't use the item without someone present.
- Be sure to wear protective glasses before operating the laser. Follow our Channel to get help with assembly, operation, software, and technical staff suggestions.
Safety Guide
- Caution: Avoid eye or skin exposure to direct radiation.
- Keep away from children.
- Always wear protective glasses when using the machine.
- Prohibited from use near flammable objects or gases.
- In case of emergency, cut off the power immediately.
Shutdown steps: When you are not using the machine, first cut off the power, then turn off the software, and lastly disconnect the USB cable.
Troubleshooting
- If the machine is not responding, check the power supply and make sure it is properly connected.
- If the machine is making strange noises, check for loose components and tighten them if necessary.
- If the engraving is not accurate, check the resolution settings in the CNC controller software and adjust them if necessary.
- Always use the machine in a well-ventilated area and avoid contact with moving parts.
Vevor CNC Engraving Machine 2418 Pros & Cons
Pros
- High precision and accuracy
- Powerful and efficient motor
- Large travel size
- Sturdy and durable frame
- User-friendly CNC controller software
Cons
- May be expensive for some users
- May require some technical knowledge to set up and use
- Power supply requirement may not be available in some countries
Customer Reviews
Customers have praised the Vevor CNC Engraving Machine 2418 for its high precision and accuracy, powerful motor, and large travel size. Many have also noted that the machine is easy to set up and use, and that the CNC controller software is user-friendly. However, some have mentioned that the machine can be expensive and that the power supply requirement may not be available in some countries.
Faqs
Which materials are compatible with the Vevor CNC Engraving Machine 2418?
Which software works with the Vevor 2418 CNC Engraving Machine?
How can I program the Vevor CNC Engraving Machine 2418 to accept a design?
How can I fasten the materials to the work surface?
What safety measures ought to I follow when operating the Vevor CNC Engraving Machine 2418?
How can I swap out the bit or cutting tool?
What is the Vevor Vevor CNC Engraving Machine 2418 maintenance schedule?
The CNC machine is not turning on; why is that?
How to clean and maintain the Vevor CNC Engraving Machine 2418?
What can I do to correct crooked or uneven cuts?
Leave a Comment