

Setup: Voxelab 3D Printer Machine Aquila X2 User Manual
Content
Voxelab 3D Printer Machine Aquila X2

Introduction
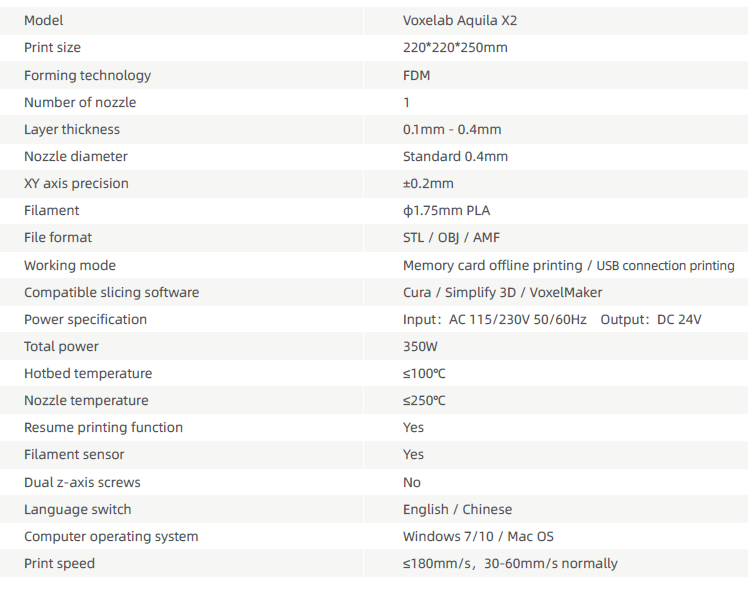
The Voxelab 3D Printer Machine Aquila X2 is an affordable and user-friendly option for those venturing into the world of 3D printing. With a build volume of 220x220x250mm, it features a heated glass platform and a user-friendly interface with a color LCD screen. This printer supports various filament types, making it versatile for different projects. The Aquila X2 is priced at approximately $200, providing excellent value for beginners and hobbyists alike.

- XE-axis kit
- X-axis limit switch
- Build plate
- Y-axis tensioner
- Extruded kit
- Material rack and spool holder
- Handle
- Z-axis passive block
- X-axis tensioner
- Screen
- Knob switch
- Machine base
- Y-axis limit switch
- Voltage regulatorY-axis motorFilament detector
- E-axis motor X-axismotor X-axis motor
- Coupling
- Z-axis limit switch
- Z-axis motor
- Power switch and socket
Specifications
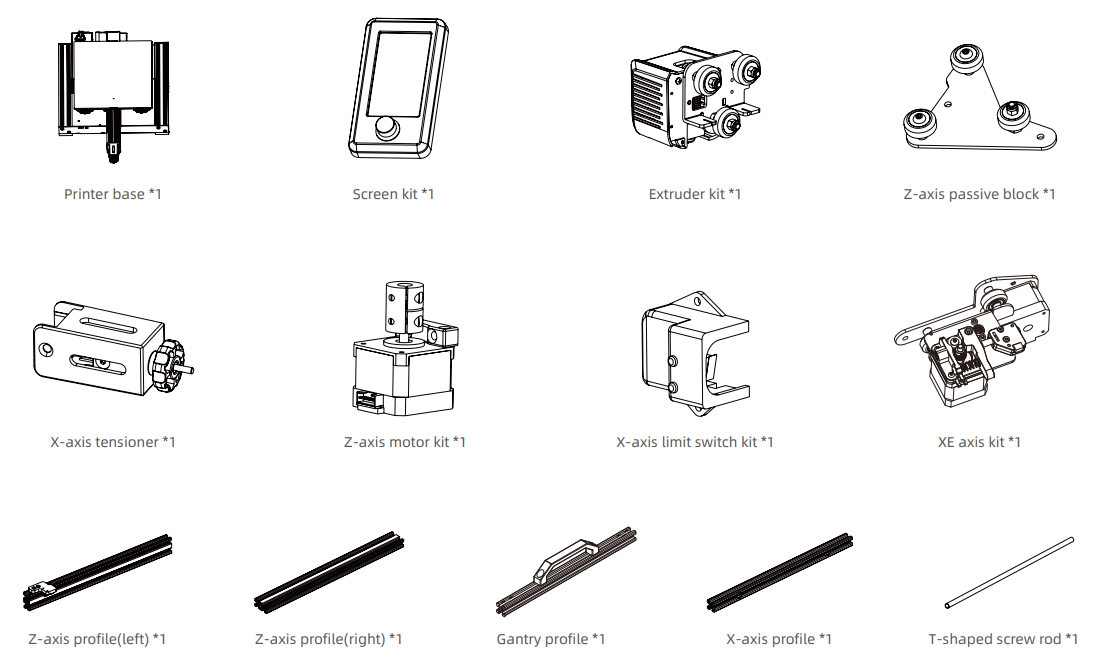
Mechanism Parts
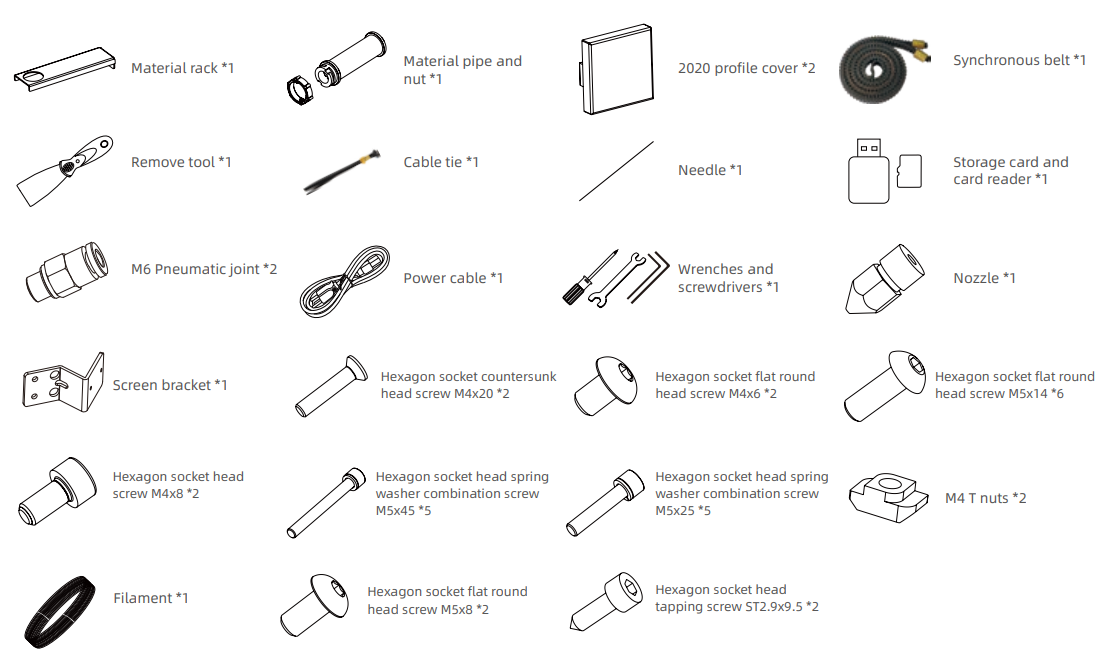
Spare Parts
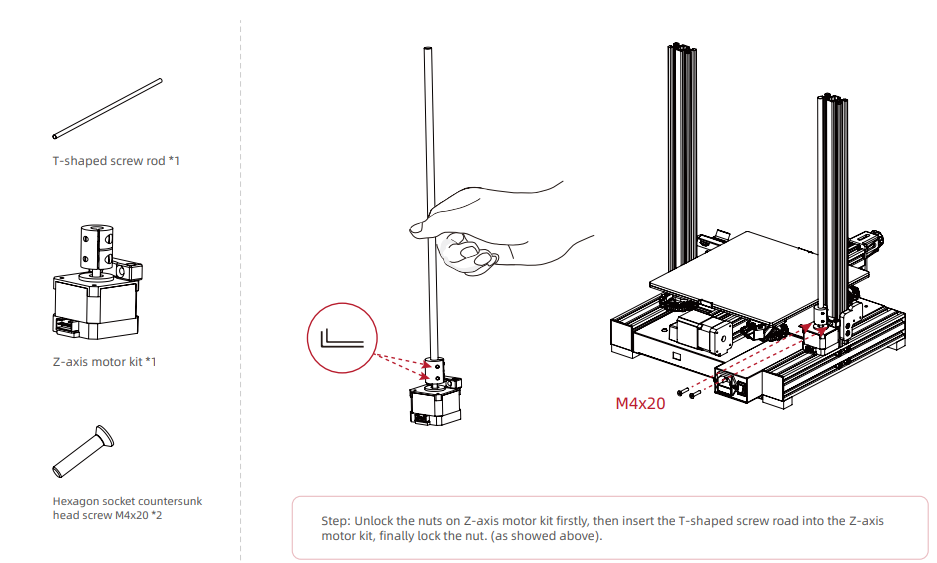
Installation of Z-axis limit switch kit and Z-axis profiles

Install the Z-axis motor kit and the T-shaped screw rod..
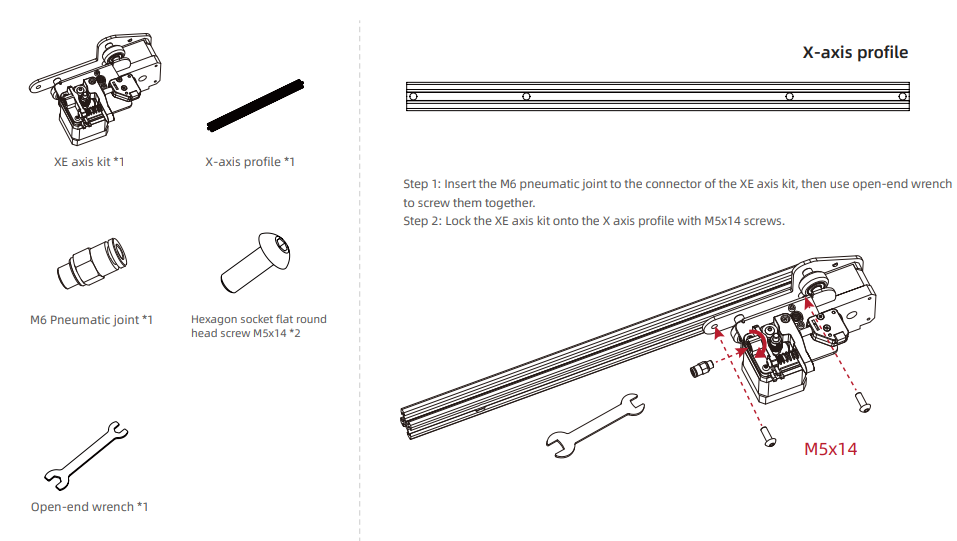
Install pneumatic joint, XE-axis kit
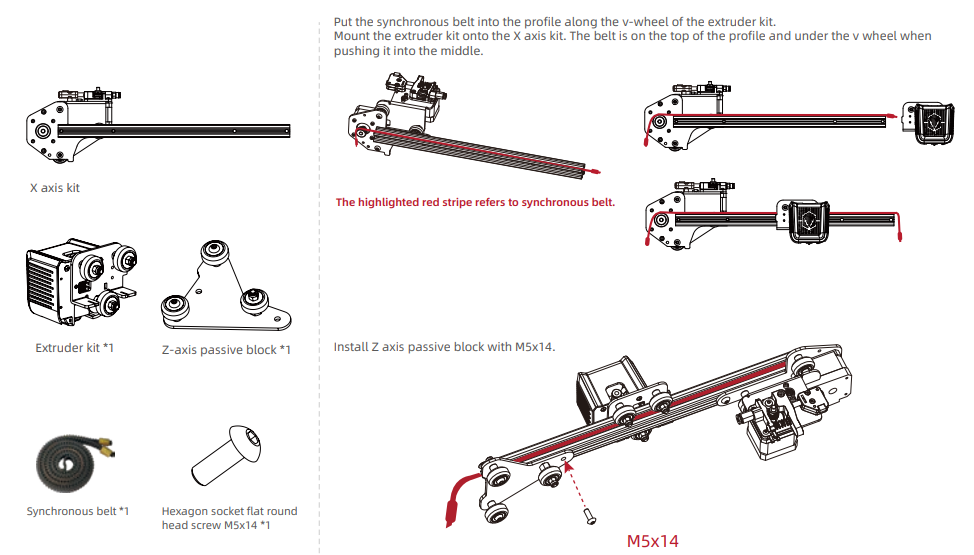
Install synchronous belt, extruder k,, it and Z-axis passive b..lock..
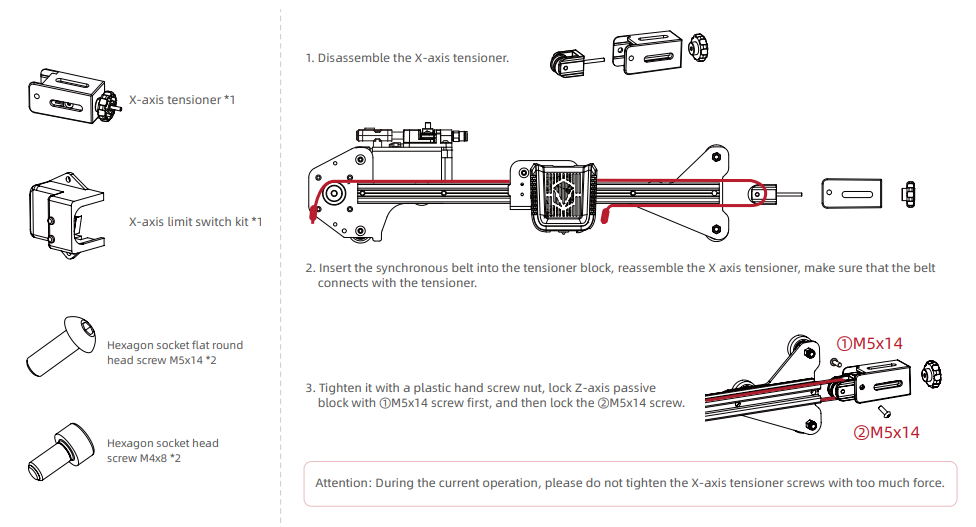
Install X-axis Tensioner
Install X-axis Tensioner
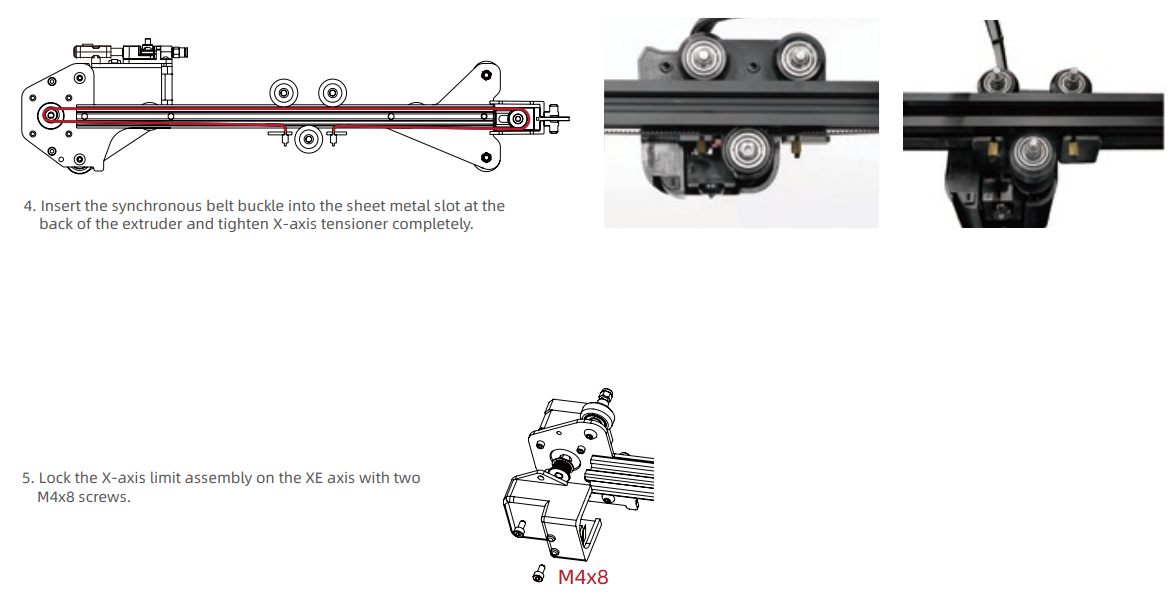
Install the X-axis moving kit and adjust the tightnethe ss of the X-axis and Y-axis tensioners.

Install the gantry profile, screen ki.t

Install the spool holder and the gantry cover..

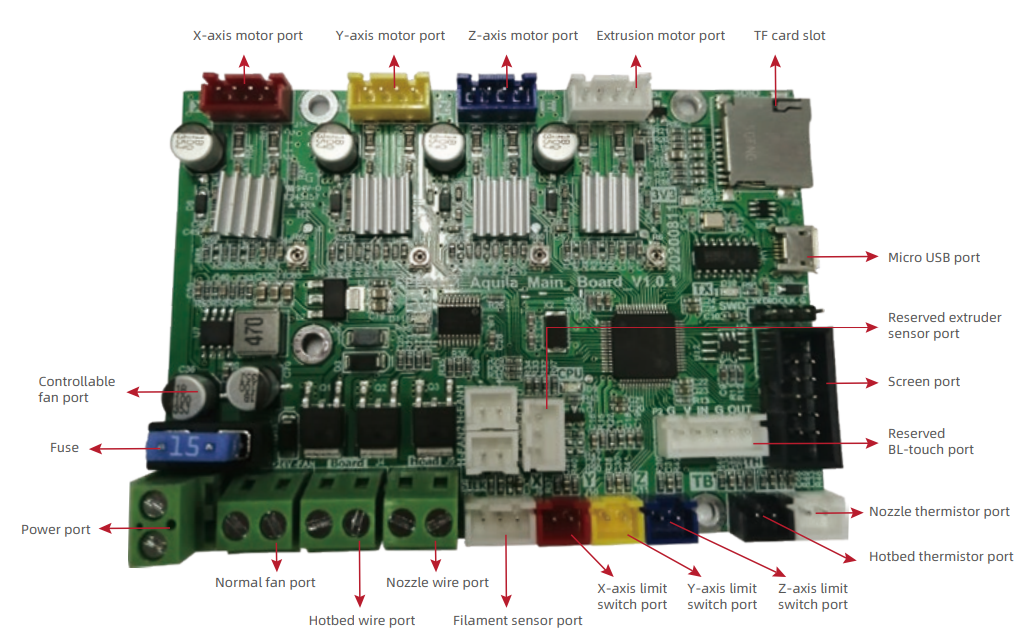
Wire connection
- Insert the teflon tube into the pneumatic connector.
- Connect the yellow-labeled cable to the 6-pin (44-wireport to the -E-axis stepper motor.
- Connect the yellow-labeled cable on the 6-pin (4-wireport to the X-axis stepper motor.
- Connect the yellow-labeled cable on the 3-pin (2-wire) port to the X-axis limit switch.
- Connect the cable on the 3-pin port to the filament detector.
- Connect the yellow-labeled cable on the 3-pin port to the Z-axis limit switch.
- Connect the yellow-labeled cable on the 6-pin port to the Z-axis motor.
- Plug in the power cord (as shown and toggle the switch to turn on the power.

Wiring connection
Troubleshooting
Q: How to upgrade the firmwares?
- Insert the TF card into the card reader
- Insert the card reader into the USB interface of the computer
- Create a new folder named firmware in the TF card
- Copy the xx.bin file into the "firmware" folder
- Insert the TF card into the TF card socket of the machine
- Restart the machine
Q: How to get the firmwares?
- Enter the official website < www.voxelab3dp.com and download them at the <Download Center>.
Q: What if the model warps or is unable to stick to the The build plate temperature is too low; increase its temperature accordingly;
- Filament failed to adhere or bond to the build plate. Use glues to enhance the adhesion.
- The distance between the build plate and the nozzle is too far,, or the build plate is not leveled enough; re-leveling the build plate accordingly.
Q: What if the accuracy othe f the model is not good?
- Please ensure the normal status of the synchronous belt, neither loose nor tight.
- Adjust the transmission ratio in the settings: turn up the transmission ratio if the size turns smaller,, and turn down the transmission ratio if the size turns larger.
Q:What if the screen turns dark?
- Please check the wire of the screen and re-plug it;
- Refresh the firmware to see if the screen can return to normal. Contact the after-sales personnel if not.
Q: What if the build plate cannot be heated?
- Please check the digital display of the temperature. If the temperature e is improper, please replace the plate wires.
- Otherwise, please replace the heating wires.
Q: What if the nozzle cannot be heated?
- Please check the digital display of the temperature; if the temperature displayed is in error, replace the temperature sensor cable;
- If the temperature is displayed normally, replace the heating cable.
Q: What if the axis cannot be moved?
- Check the wire of the electric motor.
- Contact us by email listed.
- Email: support@voxelab3dp.com
Q:What if the files on the TF card cannot be identified?
- Clean and wipe the storage card
- Format the storage card
- Replace the storage card
Q:What if the files are garbled and cannot be read?
- Change file name to English or numeric formats;
- Format of your sliced files is not compatible;
- Repair the model before slicing.
Q: What if the noise occurs for the return to zero device?
- Check the return to zero sensor to see whether it has been knocked;
- Check the lines and see whether the noises could stop if the sensor is pressed by hand.
- Take the replacement method to check.
Q: Unable to resume printing after a power failure?
- It might be caused by a different TF card. Make sure you are using the same TF card before and after the power cut off.
Q: What if the offset occurs on the finished model?
- Check the tightness of the synchronous belt and ensure it is correctly installed.
- Slice the model again
- Reduce print speed or adjust the acceleration value.
- Make sure the operating temperature doesn't exceed its assigned set-point temperature by 30℃.
Q: Damage occurs when turning on the 3D printer.
- It might be caused by a dialing error from the switch power supply. Please check whether the voltage is set to the correct value. If the voltage is 110V and the power supply is 220V, damage will occur. Please select 110V/230V at the switch before powering on.
Q: Too much filament oozing?
- Reduce print temperature by 5~10℃;
- Increase traveling speed, or increase the retraction length and speed.
Q: No filament coming out during printing?
- The arm force of the feeding structure might be too tight to allow the filament ut. Please adjust the arm force, neither too loose nor too tight.
- Lower the retraction length to avoid any abrasion.
- Check whether the extruder is clogged, and clean it with the needle if necessary.
Pros & Cons
Pros
- Affordable Price: Priced competitively, making it accessible to a wide range of users.
- Ease of Use: Pre-assembled design and user-friendly interface make it easy to get started.
- High Print Quality: Capable of producing detailed prints with good layer adhesion.
- Large Build Volume: Allows for printing larger models and projects.
- Modular Design: Easy to upgrade and maintain.
Cons
- Noisy Operation: Some users report that the printer can be quite loud during operation.
- Bed Leveling Issues: Requires frequent calibration to ensure optimal print quality.
- Limited Connectivity Options: Does not support Wi-Fi or Ethernet connectivity.
- No Auto-Leveling Feature: Manual bed leveling can be time-consuming and tedious.
Customer Reviews
Customers praise the Aquila X2 for its value for money, ease of assembly, and good print quality. However, some users have reported issues with bed leveling and the need for frequent calibration. Overall, the printer is well-regarded for its performance and durability.
Common complaints
Including the lack of auto-leveling and the noisy operation. Despite these minor drawbacks, the Voxelab Aquila X2 remains a popular choice among 3D printing enthusiasts.
Faqs
What is the build volume of the Voxelab Aquila X2?
What types of filament does the Aquila X2 support?
Does the Aquila X2 come with an auto-leveling feature?
How do I troubleshoot bed leveling issues on the Aquila X2?
Can I upgrade or modify the Voxelab Aquila X2?
What is the estimated price range for the Voxelab Aquila X2?
Does the Aquila X2 support offline printing?
How do I assemble and set up the Voxelab Aquila X2?
What are some common issues with the Voxelab Aquila X2?
Is the Voxelab Aquila X2 suitable for beginners?
Leave a Comment