How to Install: Wemo Smart Light Switch F7C030 Setup Guide
Content
Introduction of WEMO Smart Light Switch F7C030
The WEMO Smart Light Switch F7C030 is the latest addition to the smart home market, offering users an easy and convenient way to control their home lighting. This sleek and modern light switch is estimated to be priced around $50, making it an affordable option for those looking to upgrade their home technology. The WEMO Smart Light Switch F7C030 is set to launch in the coming months, so be sure to keep an eye out for this innovative product.
Detailed Specifications
The WEMO Smart Light Switch F7C030 boasts several key features that make it stand out from its competitors. These features includes.
- Compatibility with Amazon Alexa, Google Assistant, and Apple HomeKit
- Easy installation with no neutral wire required
- Ability to schedule and automate lighting
- Remote control through the WEMO app
- Energy monitoring and usage tracking
Detailed Description
The WEMO Smart Light Switch F7C030 is more than just a simple light switch. With its compatibility with popular voice assistants, users can control their lighting with just the sound of their voice. The switch also features easy installation, with no neutral wire required, making it accessible to homeowners and renters alike. The scheduling and automation capabilities allow for added convenience and energy savings, while the WEMO app provides remote control and energy usage tracking.
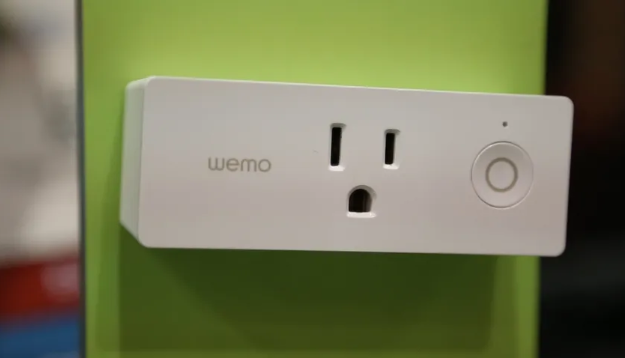
WeMo Light Switch
http://www.belkin.com/us/support-article?articleNum=8185
Setting up the WeMo Light Switch for the first time can be done through the two (2) procedures below
- Install the WeMo Light Switch to your electrical line
- Set up the WeMo Light Switch with the WeMo App
Install the WeMo Light Switch to your electrical line
Install the WeMo Light Switch to your electrical line If you’re familiar with basic electrical work, it takes just a few minutes to set up your WeMo Light Switch. Otherwise, please do not try and do it yourself. Please call a professional electrician if you are unfamiliar or uncomfortable with electrical work.
IMPORTANT: If you are located in Australia, Australian law requires that WeMo Light Switch be installed by a professional electrician such as Jim’s Electrical.

To learn more, visit https://www.jimselectrical.com.au/
Before installing the WeMo Light Switch to your electrical line, meet the following electrical requirements below
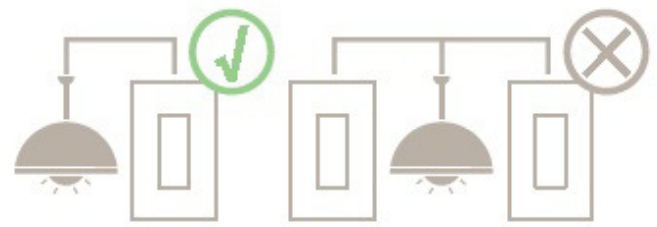
- A Neutral wire (Requires all three (3) AC electrical connections at the wall switch)
A single pole light switch (not compatible with lights controlled by more than one switch)
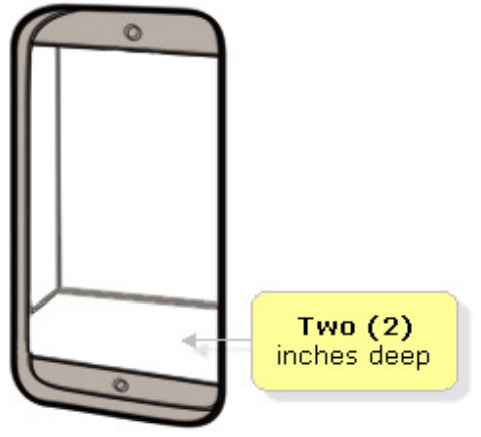
The light switch box must be two (2) inches deep
IMPORTANT: The WeMo Light Switch is not designed to work with metal faceplates (it interferes with the Wi-Fi signal) and is recommended for residential and dry indoor locations only.
If you have met the electrical requirements, proceed with the electrical installation instructions below.
- Step 1: Shut OFF the power at the circuit breaker for the switch you are replacing. You may need to shut OFF more than one circuit breaker/switch to make sure the switch you're working on is powered OFF.
IMPORTANT: Use a non-contact voltage detector or flip your light switch a few times to make sure that the power is OFF. - Step 2: Unscrew and disconnect the wires from the old switch using a screw driver.
- Step 3: Identify the wires on your WeMo Light Switch.
- Switch (Live/Load) wires: On this light switch, the Switch wires are the two (2) black wires. Every light switch will have both of these wires. But they could be either red or black in color.
- Neutral wire: It is required by WeMo Light Switch, but isn't always present in your electrical wiring at home. If present, the neutral wire is normally found within the wall box with a wire nut on top of it.
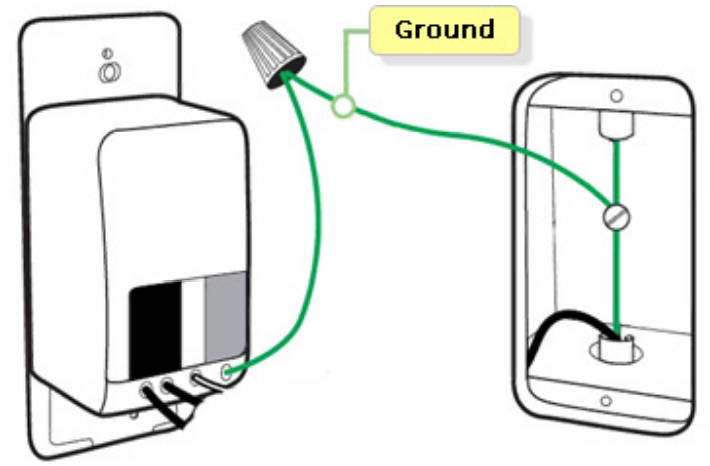
- Ground wire: If present, it should be plugged into the top of the light switch here. It's normally green or copper in color. Don't worry if you can't find the ground wire, WeMo Light Switch doesn't require one.
Warning! The following wiring scenarios may be dangerous or illegal: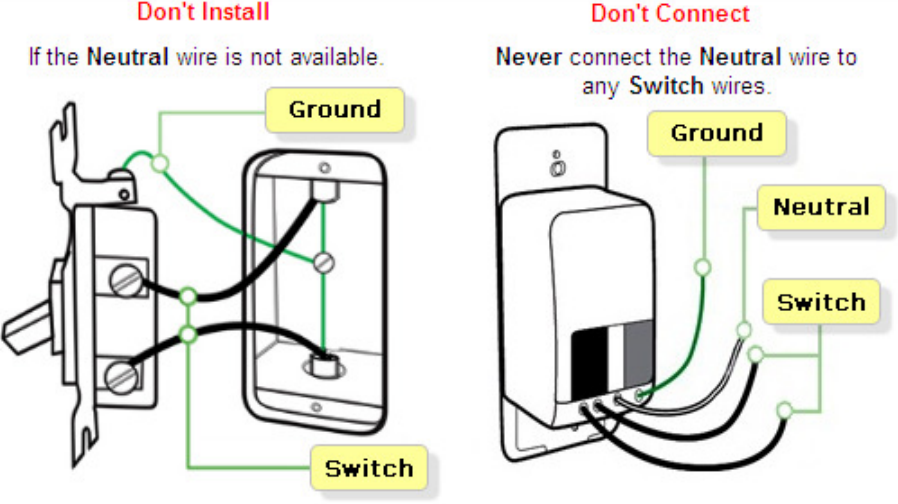
NOTE: For more details, see Trouble wiring the WeMo Light Switch
Step 4: Install the WeMo Light Switch. Connect each of the two (2) black wires from the WeMo Light Switch to the available Switch (Live/Load) wires. In case you found more than one (1) wire, just place them into the wire nut.
NOTE: The wire nut is the cap-like object connecting the wires.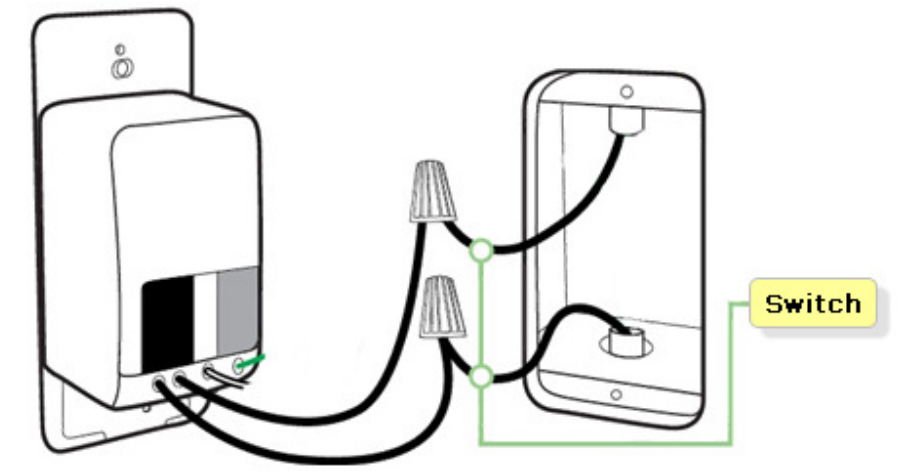
Step 5: If you have a Ground wire (optional), disconnect it from the old switch and connect it to the green wire on the WeMo Light Switch.
Step 6: Unscrew the wire nut that is holding together the existing Neutral wires. Connect the white wire from the WeMo Light Switch to the outlet's exposed Neutral wires. Securely screw them together inside the wire nut.
IMPORTANT: Wrap electrical tape around the wire nuts to makure the copper conductor is fully concealed.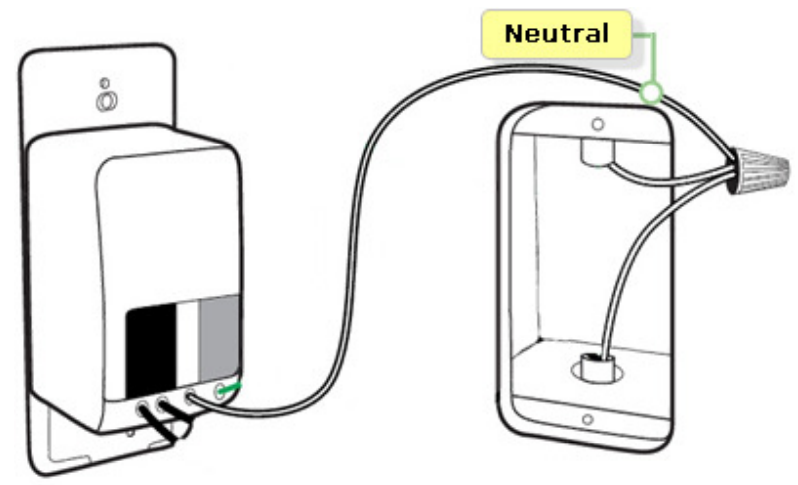
Step 7: Screw in the WeMo Light Switch and attach the faceplate. Push all the wires back into the wall box and try to allow as much space for the switch as possible. Align the two (2) screw terminals and screw in the WeMo Light Switch. Attach the faceplate.
NOTE: Belkin discourages using metal faceplates as they may interfere with your Wi-Fi signal.
- Step 8: Turn the power back ON at your circuit breaker.
QUICK TIP
To verify that the WeMo Light Switch has been successfully installed to your electrical line, manually switch it ON. You have now installed the WeMo Light Switch to your electrical line.
Set up the WeMo Light Switch with the WeMo App
Before setting up the WeMo Light Switch with the WeMo App, make sure you have the following:
- A WeMo Light Switch that is already installed to your electrical line and is functioning.
- A Wi-Fi router with active Internet connection.
- The wireless network name (SSID) and password of your router. To know how to get them, click here.
- A mobile device installed with the WeMo App:
- An iPhone® / iPad® / iPod® touch.
- An Android™ device with 4.0 and later operating systems.
NOTE: If you haven’t downloaded and installed the WeMo App in your mobile device yet, go to the Apple® App StoreSM if you are using an iOS device or to the Google Play™ Store if you are using an Android™ device.
If you have met the requirements, proceed with the instructions below.
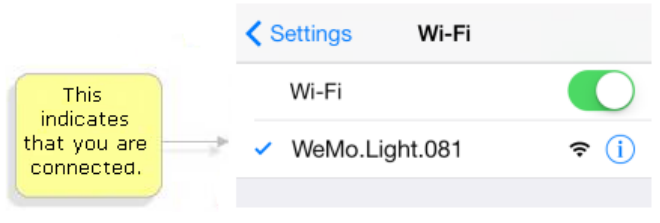
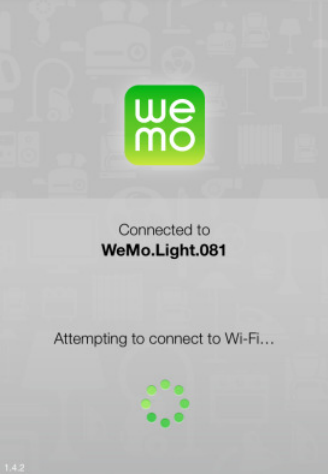
Step 1: Enable the Wi-Fi feature of your mobile device. Look for the wireless network name (SSID) of the WeMo Light Switch which will be WeMo Light and tap it to connect your device.
- QUICK TIP: It may take for a while to connect to your WeMo Light Switch. You can try setting up with your mobile device near the WeMo Light Switch. If you have multiple WeMo devices, connect to the one with the same WeMo ID at the back of the device. The WeMo ID is the word WeMo, followed by WeMo model, and then three (3) alphanumeric characters. If your WeMo Light Switch does not show up in the Wi-Fi search, try resetting it. Click here to know how.
NOTE: To know how to enable the Wi-Fi feature of your mobile device, refer to your device’s manual.

- Wait until you are connected to the WeMo Light Switch network. A successful connection is indicated with check mark beside the WeMo Light Switch (SSID).
- QUICK TIP: It may take for a while to connect to your WeMo Light Switch. You can try setting up with your mobile device near the WeMo Light Switch. If you have multiple WeMo devices, connect to the one with the same WeMo ID at the back of the device. The WeMo ID is the word WeMo, followed by WeMo model, and then three (3) alphanumeric characters. If your WeMo Light Switch does not show up in the Wi-Fi search, try resetting it. Click here to know how.
- Step 2: Launch the
 App.
App. Step 3: Tap the wireless network name (SSID) of your router and enter the password when required.
NOTE: WeMo can only connect to your 2.4 GHz network, with the correct wireless settings. To know how to get them, click here.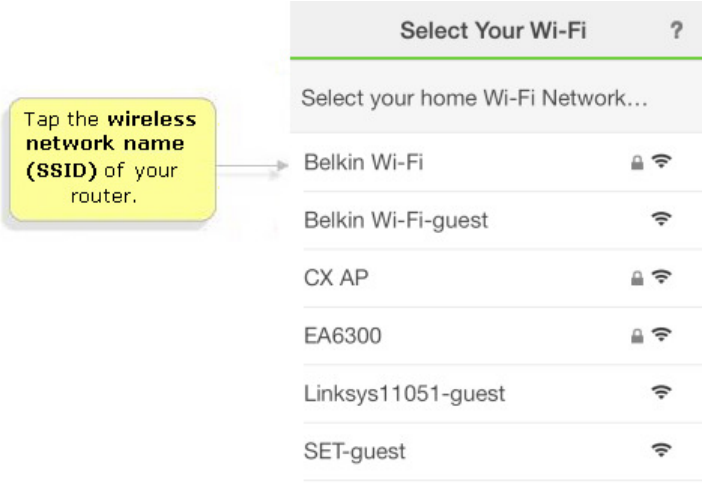
- Wait while the WeMo App attempts to connect. If the WeMo encounters difficulty connecting to the Wi-Fi network, try refreshing your mobile device’s Wi-Fi and try connecting again. For more troubleshooting instructions, click here.
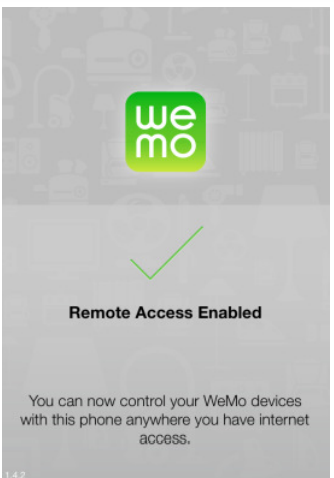
- The Remote Access Enabled message will then pop up. By default, this feature is enabled.
Step 4: When the WeMo Light Switch setup is completed, tap Done after viewing the information of the device.
QUICK TIP: You can customize the Name, Device Icon, and Email of your WeMo Light Switch. It is recommended to enable the Remember Wi-Fi Settings option so the- WeMo App will automatically connect to your wireless network once it is in range.
- The WeMo App will then refresh, look for devices and automatically detect your WeMo Light Switch.

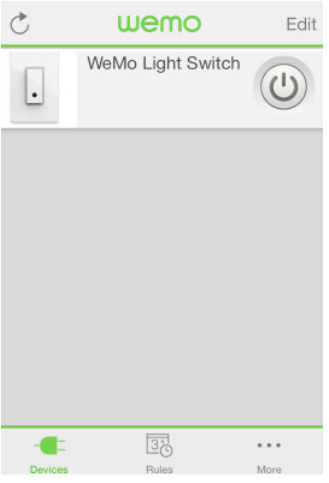
- You should now have installed the WeMo Light Switch with the WeMo App.
- With the WeMo App, you can create different rules for your WeMo Light Switch.
- Click on the links below to know more: How to create or edit Rules for WeMo using a mobile device
NOTE: To get access and interact with other Belkin users in the WeMo Community, click here.
Setup Guide
Setting up the WEMO Smart Light Switch F7C030 is simple and straightforward. Follow these steps for a successful installation:
- Turn off the power to the circuit at the circuit breaker.
- Remove the existing light switch and connect the WEMO Smart Light Switch to the wires.
- Turn the power back on and follow the instructions in the WEMO app to complete the setup process.
Troubleshooting
If you encounter any issues with the WEMO Smart Light Switch F7C030, try these troubleshooting steps:
- Make sure the power is turned off before installing the switch.
- Check that the switch is properly connected to the wires.
- Ensure that the switch is compatible with your home's electrical system.
- If using voice control, make sure the switch is properly connected to your voice assistant.
Pros & Cons of WEMO Smart Light Switch F7C030
Pros:
- Compatible with popular voice assistants
- Easy installation with no neutral wire required
- Scheduling and automation capabilities
- Remote control through the WEMO app
- Energy monitoring and usage tracking
Cons:
- May not be compatible with all home electrical systems
- Voice control may require additional setup
Faqs
What capabilities does the WeMo Smart Light Switch F7C030 offer?
How do I install the WeMo Smart Light Switch F7C030 in my home?
Is a neutral wire necessary for the WeMo Smart Light Switch F7C030?
Can I use the WeMo Smart Light Switch F7C030 with different types of light bulbs?
What steps do I follow to connect the WeMo Smart Light Switch F7C030 to my Wi-Fi network?
How can I troubleshoot the WeMo Smart Light Switch F7C030 if it's not connecting to my network?
What features are accessible remotely with the WeMo Smart Light Switch F7C030?
How do I create schedules for the WeMo Smart Light Switch F7C030?
What should I do if the WeMo Smart Light Switch F7C030 is unresponsive?
How do I reset the WeMo Smart Light Switch F7C030?
Leave a Comment