Woodbridge Modern One Piece Toilet B0750 | Installation Instructions
Content
Introduction of Woodbridge Modern One Piece Toilet B0750
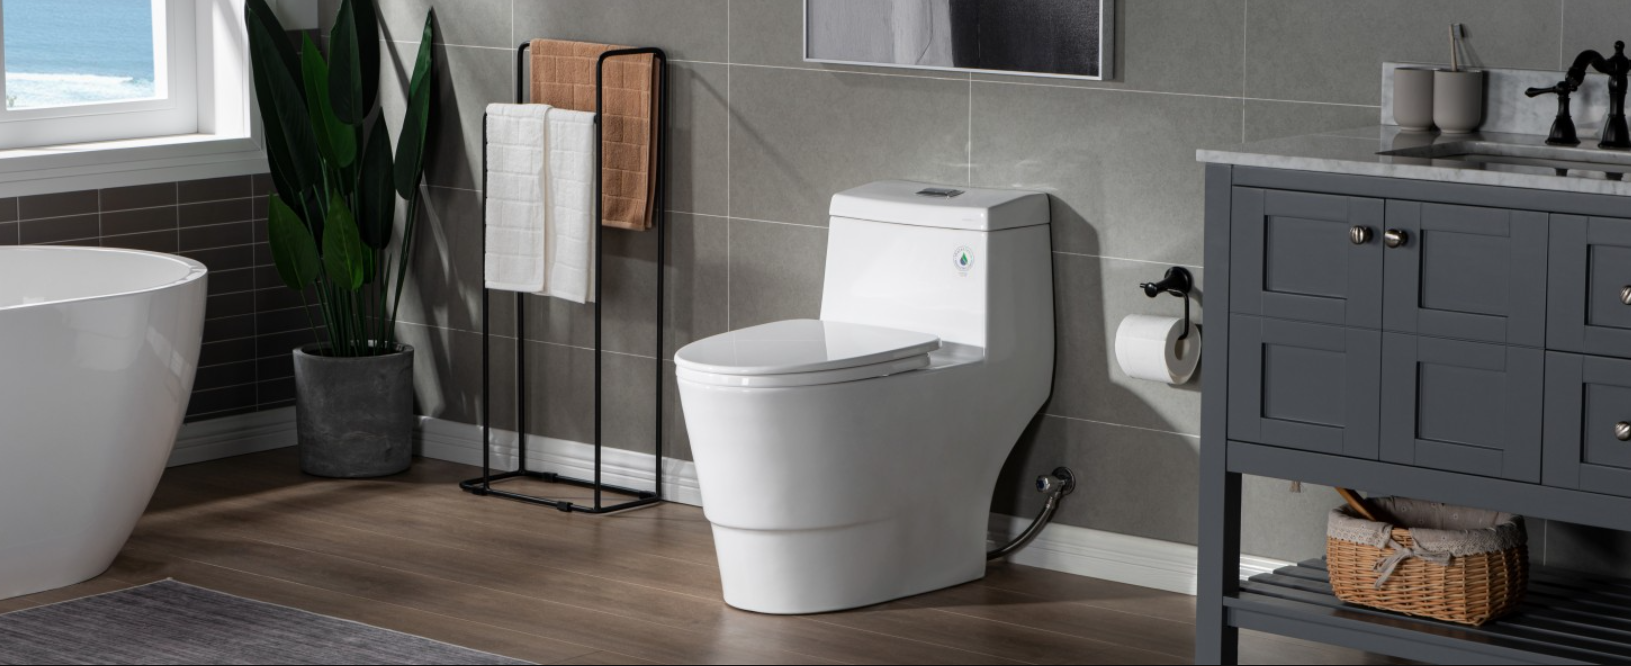
Woodbridge Modern One Piece Toilet B0750 is a sleek and stylish addition to any bathroom. This modern toilet boasts a one-piece design, making it easy to clean and maintain. With its elongated seat and comfortable height, it's perfect for users of all ages. The estimated price for this product is around $500, and it was launched in 2018.
Detailed Specifications of Modern One-Piece Toilet
This Woodbridge Modern One Piece Toilet B0750 features a powerful siphon flushing system that uses 1.28 gallons of water per flush, making it a water-efficient option for your home. It has a quiet closing seat and cover, and its durable stainless steel seat hinges ensure long-lasting use. The toilet's skirting design hides the tramway, giving it a clean and modern look. The product dimensions are 28.5 x 14.5 x 27.5 inches, and it weighs approximately 119 pounds.
Description of Woodbridge Modern One-Piece Toilet
The Woodbridge Modern One Piece Toilet is a high-quality toilet that offers superior performance and style. Its one-piece design eliminates the need for a tank, making it easier to clean and maintain. The elongated seat provides extra comfort, and the toilet's height is comparable to a chair, making it easy to sit down and stand up. The powerful siphon flushing system ensures a clean and hygienic flush every time, while the quiet closing seat and cover prevent any loud noises. Additionally, the skirting design adds a touch of elegance to any bathroom.
TOILET COMPONENTS OF Woodbridge Modern Toilet B0750
During unpacking the product and prior to installation inspect your new product for any damages or missing parts. Do not attempt to install or operate the product if the product is damaged.

TOOLS REQUIRED FOR INSTALLATION

WIRING DIAGRAM OF Modern One Piece Toilet B0750
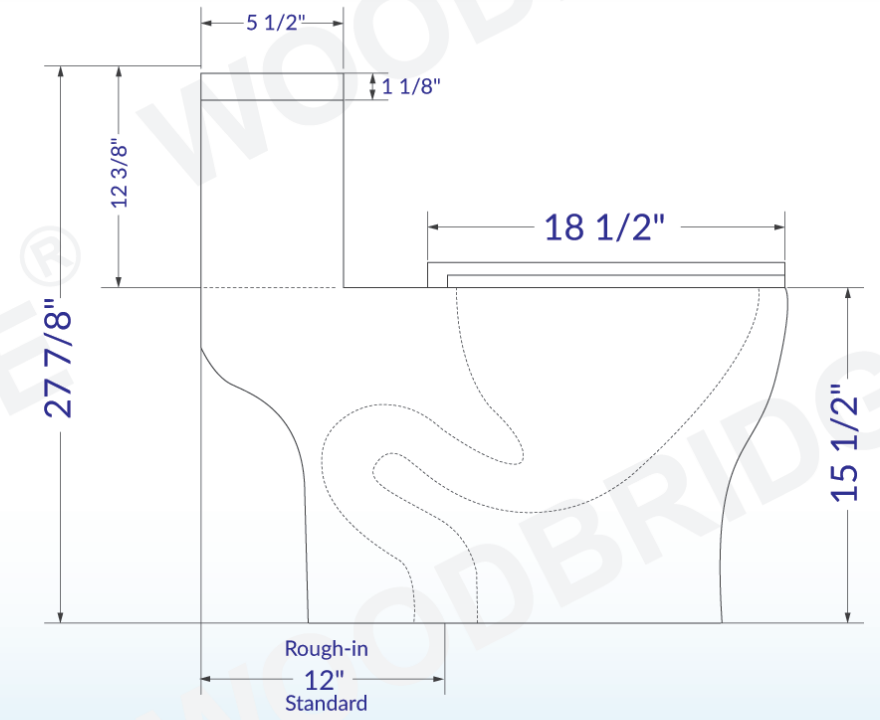
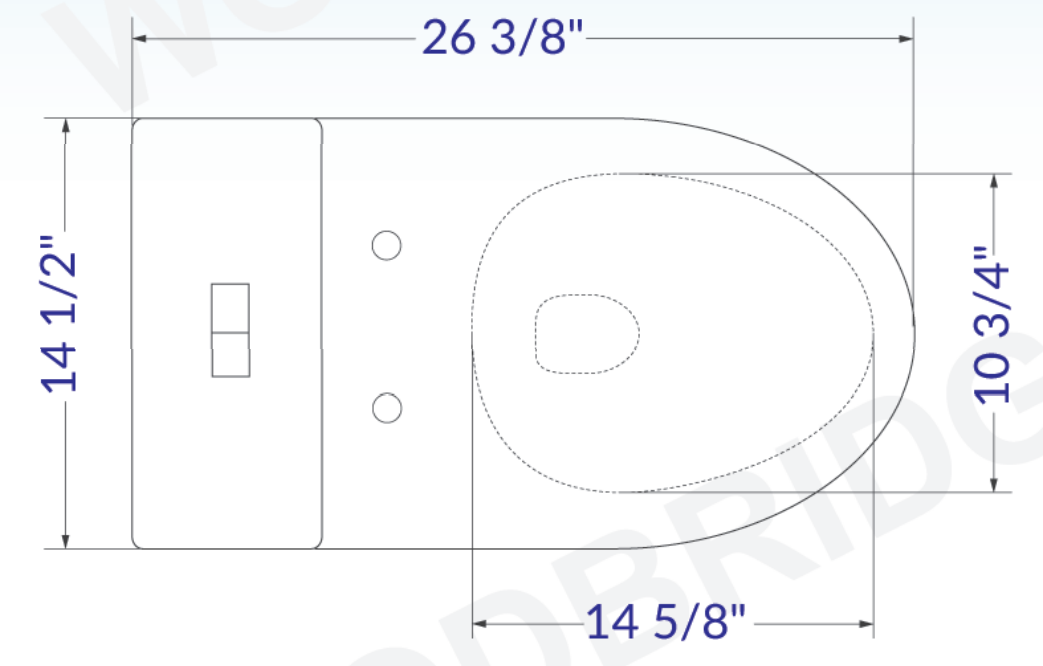
OVERVIEW OF THE Woodbridge Modern One Piece Toilet
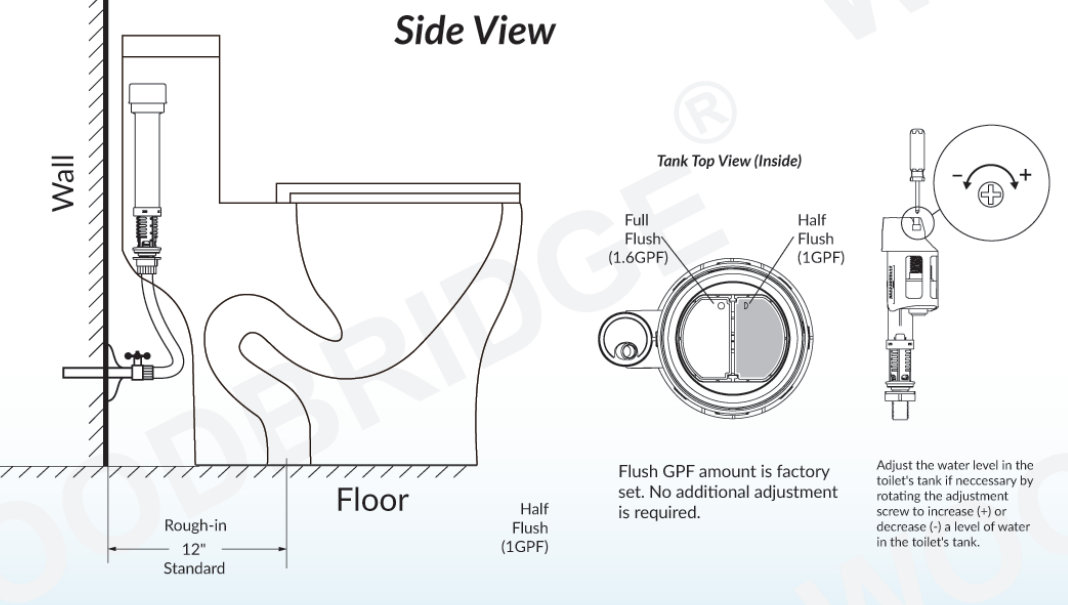
Setup Guide of Modern One Piece Toilet B0750
Setting up the Woodbridge Modern One Piece Toilet is a straightforward process. First, ensure that the toilet is placed on a level surface. Next, connect the water supply line to the bottom of the toilet and tighten the connection. Turn on the water supply and check for any leaks. Finally, install the seat by aligning the seat with the toilet bowl and securing it with the provided screws.
INSTALLATION INSTRUCTIONS
REMOVE OLD TOILET
- Shut off water supply line. If you do not have shut-off valve near the toilet shut off main water supply line.
- Flush the old toilet and make sure that tank is empty.
- Disconnect and remove water supply line connected to the toilet's tank.
- Remove old toilet, bolts, nuts from the closet flange.
- Clean closet flange area from old wax ring and putty sealant using putty knife from the base area.
- Clean any remaining debris and wipe any water at the installation area
- Temporarily plug flange on a floor with a flange plug 01· towel to prevent gasses from escaping
IMPORTANT: The mounting surface area must be clean, dry, and leveled prior to installation of the new toilet.
NOTE: Inspect the existing closet flange for damages. If damaged, replace it to new flange before proceeding to the installation
PREPARE CLOSET FLANGE
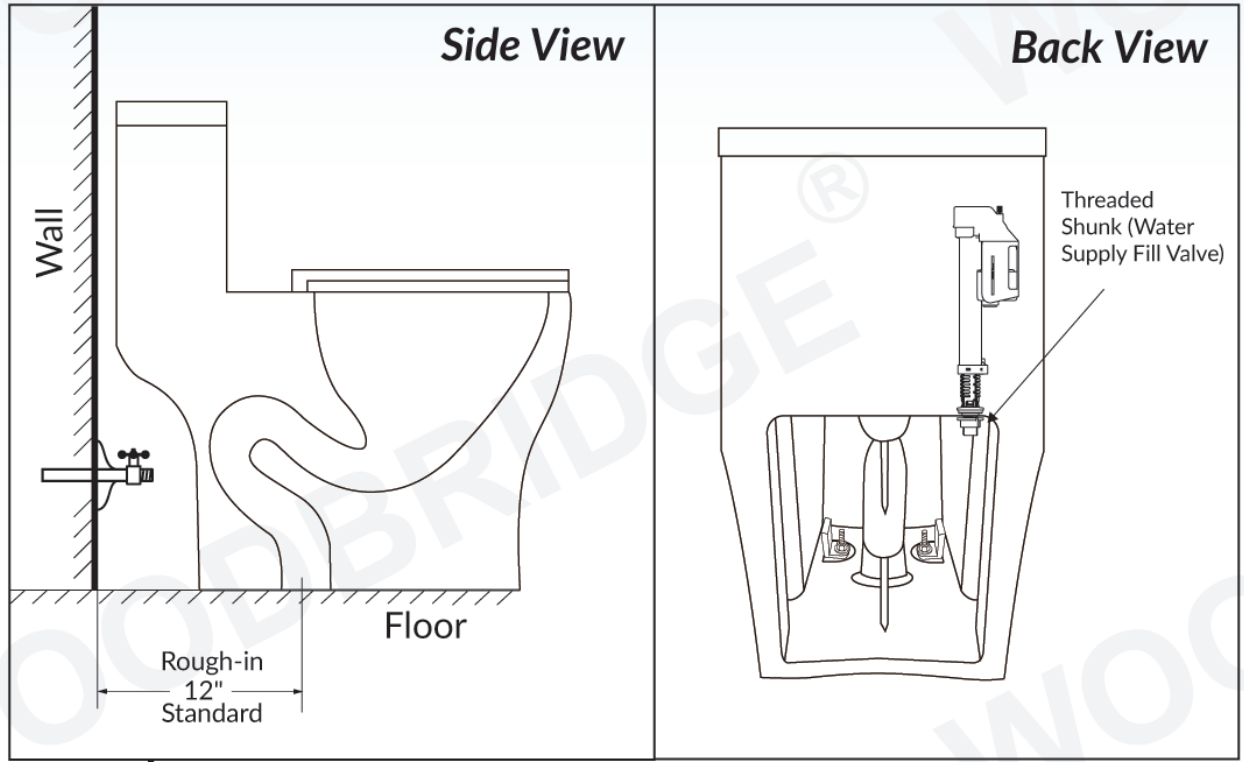
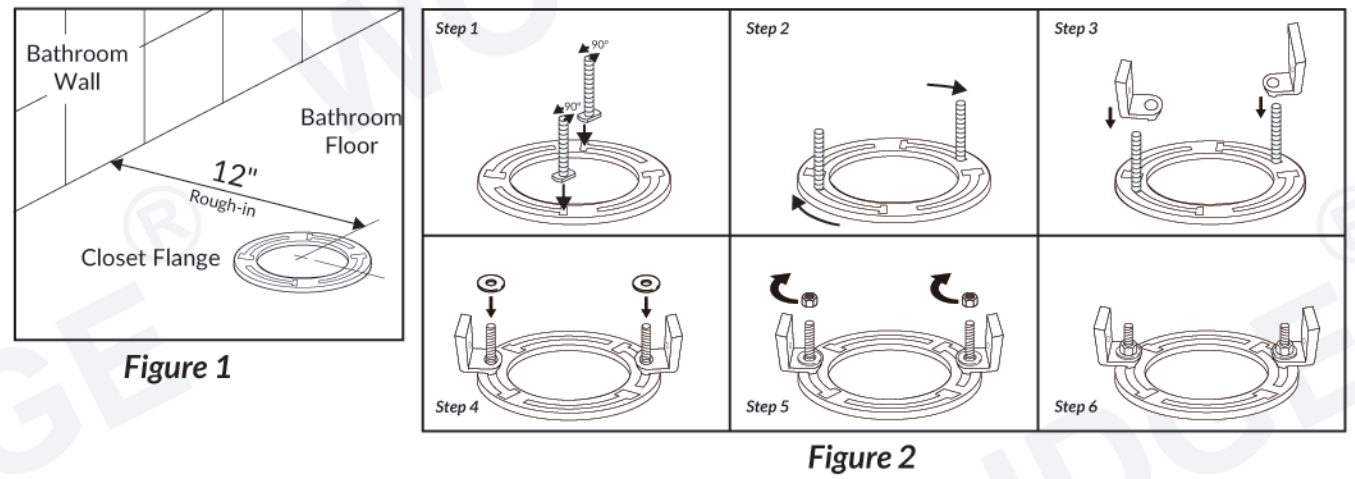
Make sure that rough-in is 12" by measuring the distance from the wall to the center of the closet flange. See Figure 1
- Insert 2 floor bolts inside of the toilet flange
Slide the closet bolts through the holes and align bolts horizontally. See Figure 2
INSTALL WAX RING
Important: safety glasses must be worn by the installer and all bystanders.
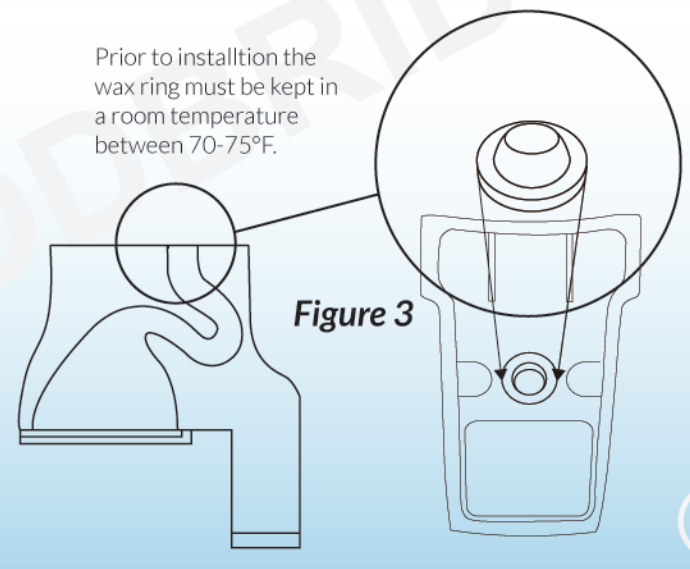
Cover the floor with a soft-close blanket. Carefully turn the toilet on it's side or upside-down on the blanket with assistance of a second person. Install wax ring over the horn discharge located on the bottom of the toilet's bowl. See Figure3
Note: Ceramic is a fragile material. You must always cover the floor with a soft-cloth blanket if you want to put the toilet on the floor on any side other than the bottom of the toilet. If you do not cover the floor with a soft-close blanket contact of the toilet with the floor may and will cause minor or moderate scratches on the toilet's surface.
Always Use Soft-Cloth Blanket
INSTALL NEW TOILET
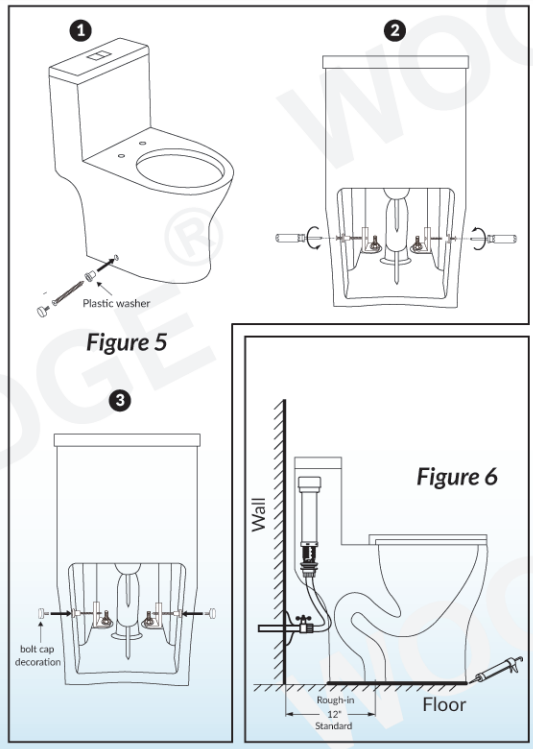
- Lift and carefully put the toilet over the closet flange so the closet bolts can go through the mounting holes in the toilet's base. Once the bowl is in the position press the bowl down with slight twisting motion in level position towards the floor. Apply your body weight to evenly compress the wax ring to create watertight seal. Make sure that the bowl is as leveled as possible to have a nice seal tight. Do not rock the toilet back and forth and side to side as it may and will break a seal and you will need to replace the wax ring again and start the installation process over. SeeFigure4
- Once the toilet is set and leveled install washers and nuts over the closet bolts. Tighten nuts. Do not overtighten the nuts. It may and will cause damage to the toilet's ceramic base. See Figure 5
CONNECT TOILET'S TANK TO WATER SUPPLY LINE
Connect the water supply line between the tank and water shut-off valve using a toilet hose (not supplied). When connecting toilet hose tighten coupling nut to the tank by 1/4 turn beyond the hand tight.
Do not overt1ghten nut on the tank connection.It may and will cause water leakage.
Turn on valve on water supply line and allow tank to fill. Check all connections for leakages and tighten as needed.
Once tank is filled with water flush it 4-5 times to perform a test of the flushing system. At the same time check the bottom of the toilet for leaks to make sure that the wax ring is properly installed and sealed. If there are no leaks you are ready finalize the installion. If any shims are installed at the bottom of the toilet's bowl you may trim them. Apply silicone around base of the toilet's. Allow 24 hours for silicone to dry before start using the toilet. See Figure 6
Important: Leaks may not occur during or right after the installation. Make sure to check for leaks every couple hours first day installed and and occasionally check it everyday for the next week to ensure that toilet is properly installed and no leaks occur. If any leaks occur immediately shut off the water supply line valve and contact your local plumber to fix all leaks.
Important:
Under no circumstances We shall not be liable for any and all incidental damages sustained in connection with this product
Neither manufaclure. nor distributor. nor retailer is responsible for water damage 01 flood caused due to use of this product. Under no circumstances We shall not be liable for any and all fees. cost of installation/reinstallation/removal. subsequent damage or transportation in case of the product defect
TOILET SEAT ADJUSTMENT

- Insert the hinges into the toilet
- Tighten the screws of the hinges
Untighten the screws a bit by turning them 90° right

- Clip on the toilet seat and cover
- Aligh the toilet seat and cover with ceramic
Take off the toilet seat and cover by pressing both pushbuttons

- Tighten the screws
- Place covering caps on the hinges
Clip on the toilet seat and cover

ADJUSTMENT & MAINTENANCE (DUAL FLUSH VALVE)
Important Note: Flush GPF amount is factory set. No additional adjustment is required. This page is for reference only. All adjustments are already made by manufacturer. . BASE INSTALLATION
- Check the dual flush valve and make sure that it does not have any damaged or missing parts.
- Install the base with the rubber gasket in the tank, turn the screw as illustrated to make sure there is no water leakage and no looseness
- Install a body of the flush into the base and make sure they can be totated clockwise arbitrarily.
- Rotate the valve clockwise to adjust its position inside of the toilet's tank
Install the sealing gasket

FLUSH VOLUME ADJUSTMENT
Full flush and half Flush range will decline when the button is moved upward from the bottom.
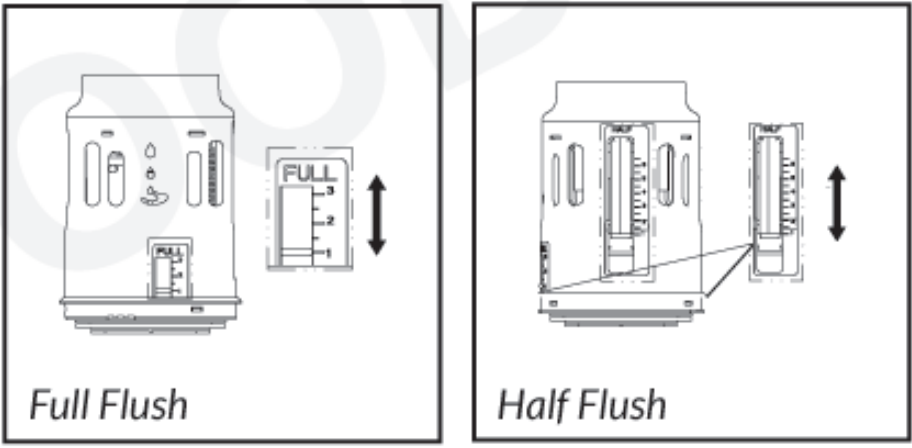
PUSH BUTTON ADJUSTMENT
- Check the completeness of the product before adjustment
- Take out the lock nut and insert the push button into the tank cover
- Adjust the push button and lock the nut to make it well-fixed in the tank
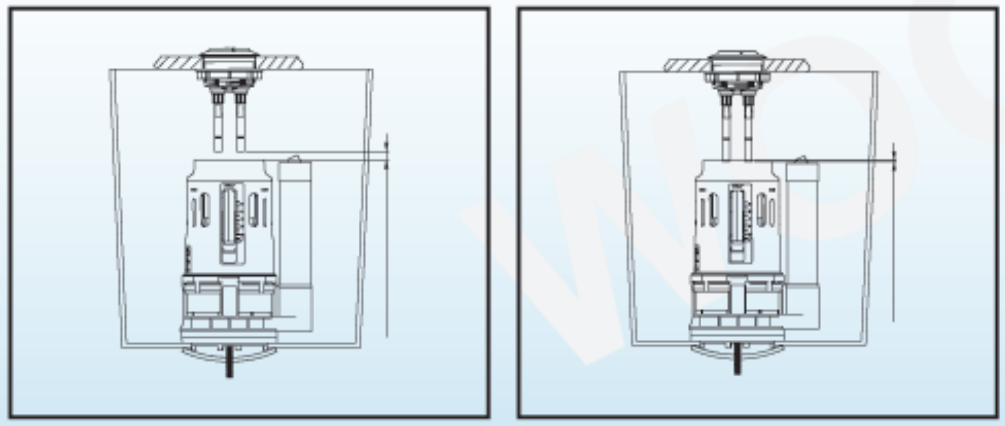
The distance between the rod tail and valve push button must be 1-2mm

REFILL TUBE ASSEMBLY
- Put the refill tube into the white cap hole firmly
The refill tube can't be lower than the wate1·sealing level
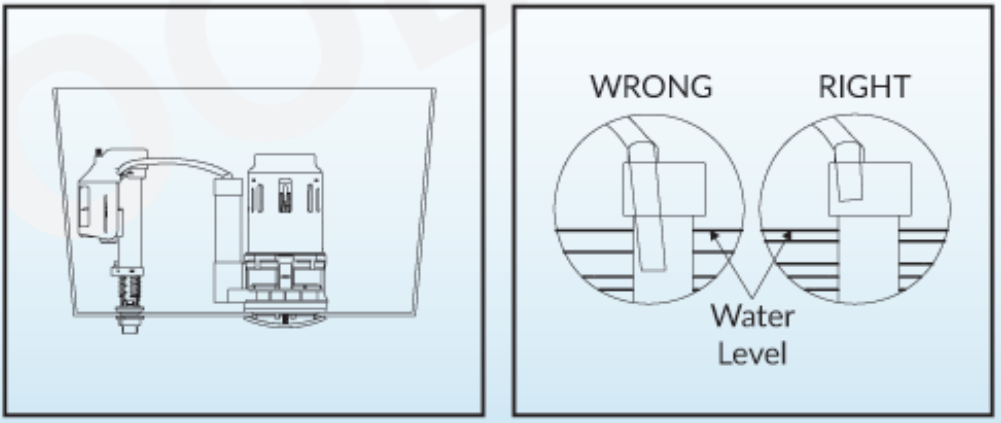
ADJUSTMENT & MAINTENACE (FILL VALVE)
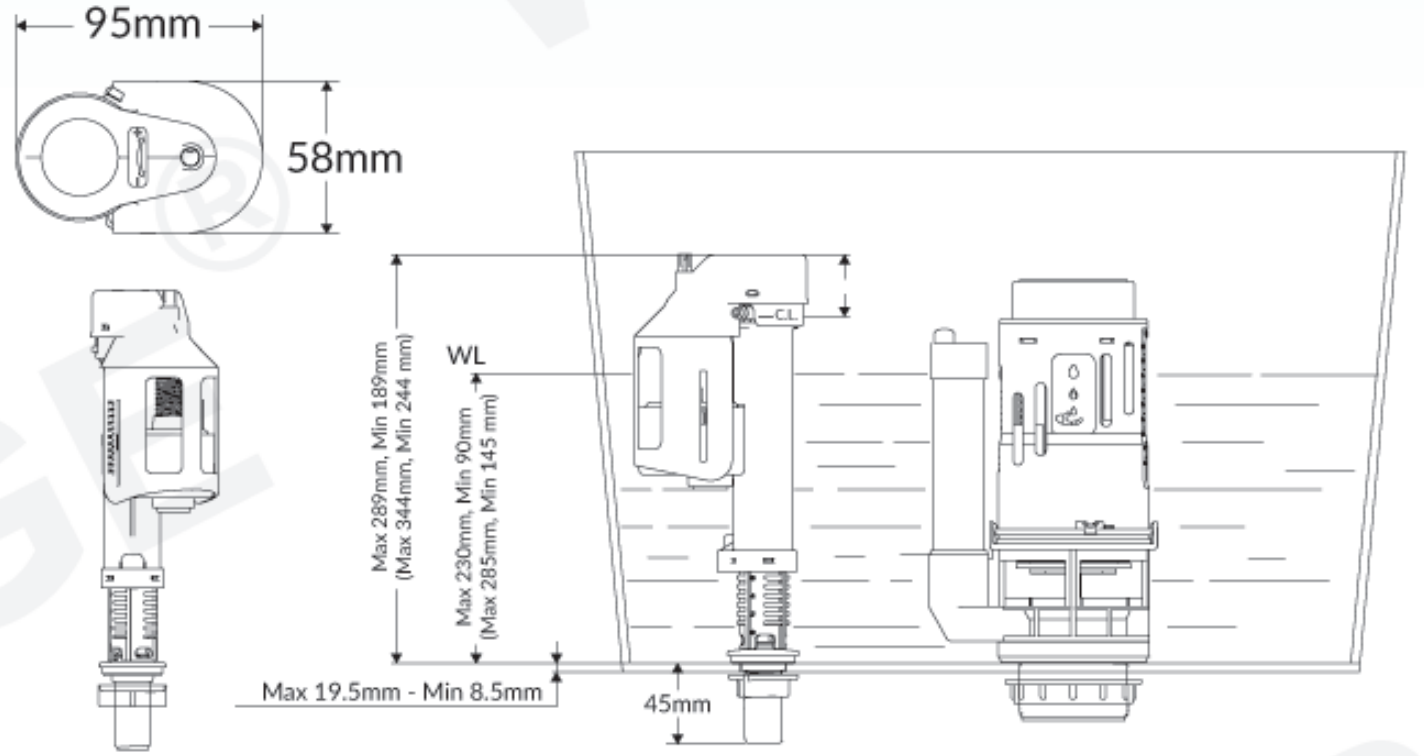
Important Note: Flush GPF amount is factory set. No additional adjustment is required. This page is for reference only. All adjustments are already made by manufacturer.
Instructions: When valve installed. the critical level mark on fill valve (identified by C.L. mark on valve body) shoud be at least 1" above top of the over flow pipe.
Required: Water temperature: 36-112° F
Important: Under no circumstances seller shall not be liable for any and all incidental damages sustained in connection with this product
Neither manufacture, nor distributor, nor retailer is responsible for water damage or flood caused due to use of this product. Under no circumstances seller shall not be liable for any and all fees, cost of installation/reinstallation/removal, subsequent damage or transportation in case of the product defect
IMPORTANT: Do not use or drop any chlorine or any other chemicals. Use of chemical products will result in damage to the fill valve and flush valve components and may cause flood and property damage. Do not overtighten bolts/nuts as it may and will cause damage to the toilet parts and componets.

PREPARATION
Remove the worn-out fittings and clean your tank prior to the installation of the new ones. There might be a lot of impurities in your tank that may cause damage to the new parts if you do not clean them out. The tank must be absolutely clean prior to installation.
WATER LEVEL ADJUSTMENT
Check the fill valve and make sure that it does not have any damaged or missing parts
- Press buckle and unscrew.
- Pull the valve upwards or press down to desired height
- Unscrew the valve body and fasten the buckle
Rotating screw. rise or lower the water level to adjust water level to suitable position (water volume will gradually increase when the adjuster is moved upward from the bottom.)
FILL VALVE INSTALLATION

- Install the valve into tank. Do not use any wrench tools. Fasten with hand only.
- Connect water supply to the fill valve. Turn on water.
- Turn off water supply valve before height adjustment of the toilet's fill valve.
- Put the refill tube into the white cap hole firmly.
CLEANING & TROUBLESHOOTING (FILL VALVE)
FILL VALVE CLEANING
- Shut off water supply line before filter cleaning.
- Carefully, take out the filter from inlet by using pliers.
- Use water to wash and clean the filter and adapter from any debris.
- Re-install the filter and re-connect the water supply line.
MAINTENANCE & CARE
Use soft sponges or soft-cloths to clean the surface. Always rinse thoroughly any cleaning solutions immediately after cleaning. Do not any chemical remain on the surface for extended periods of time.
IMPORTANT
- DO NOT USE: Abrasive cleaners such as: acid, ammonia, bleach, and simmila1· solutions. Use of such solutions may cause corrosion, finish peeling, and/or dull the surface.
- DO NOT USE: Abrasive sponges or cloth. Never use steel, wool, or wired brushes that will permanently scratch the surface.
FILL/FLUSH VALVES MAINTENANCE & CARE
Do not pour any mounts of chlorine or any other chemicals into the tank. Use of chemical products will result in damage to the fill valve and flush valve components and may cause flood and property damage
Note: fill and flush valves are maintenance free. No maintenance is required.
Retain these installation instructions for future reference.
IMPORTANT INFORMATION
- Measurements are +3/8" and subject to change without notice
- Specifications & Configurations are subject to change without notice
- Measurements herein supersede all others published prior to publication date shown below
- Pis measure toilet on-site before installation
TROUBLESHOOTING OF One Piece Toilet B0750
| Issue | Cause | Solution |
|---|---|---|
| Water level is too high or too low | Improper water level adjustment | Adjust the water level |
| Fill valve fails to shut off or fails to fill the water into the toilet's tank | 1. Inlet valve switch is turned on. | 1. Turn on inlet valve switch |
| 2. Inlet valve float crashed against ceramic wall | 2. Adjust inlet valve position | |
| 3. Filter screen is clogged due to dirty water | 3. Clean the filter screen | |
| 4. Improper refill hose installation | 4. Install refill hose correctly (see diagram on the right) |
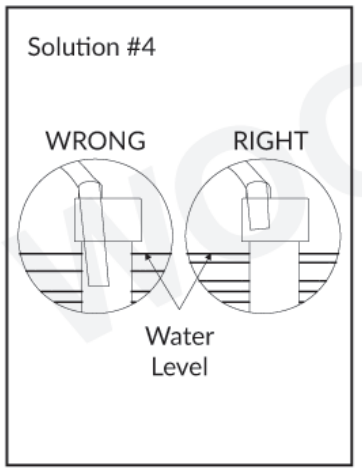
- If the rod is too short. please 1·e-adjust it (outward mtation).
- If the rod is too long please cut-off the extra length and re-adjust it.
Pros & Cons of Woodbridge Modern One Piece Toilet B0750
Pros
- One-piece design is easy to clean and maintain
- Powerful siphon flushing system ensures a clean and hygienic flush
- Quiet closing seat and cover
- Elegant skirting design adds a touch of style to any bathroom
- Water-efficient, using only 1.28 gallons per flush
Cons
- May be too heavy for some users to install without assistance
- Some users may prefer a two-piece toilet design
Customer Reviews about Woodbridge Modern One Piece Toilet B0750
Customers have praised the Modern One Piece Toilet for its sleek design and powerful flushing system. Users have reported that the toilet is easy to clean and maintain, and the elongated seat provides extra comfort. Some users have noted that the toilet is heavy and may require assistance to install. The most common complaint is that the toilet can be noisy when flushing, but this is a minor issue compared to its many benefits.
Faqs
How should the Woodbridge B0750 toilet be installed?
What are the Woodbridge B0750's water-saving features?
How should the Woodbridge B0750 toilet be maintained and cleaned?
How can I fix a Woodbridge B0750 toilet that isn't flushing correctly?
Is it possible to upgrade or replace the toilet seat?
The toilet in my Woodbridge B0750 is running all the time. How can I make it right?
What is the ADA compliance of the Woodbridge B0750?
How does the Woodbridge B0750 toilet's dual flush technology operate?
What should I do if my Woodbridge B0750 toilet leaks?
What kind of guarantee does the Woodbridge B0750 toilet come with?
Leave a Comment
