Zanussi Gas Cooker Oven ZCG43250XA Instruction Manual
Content
Introduction
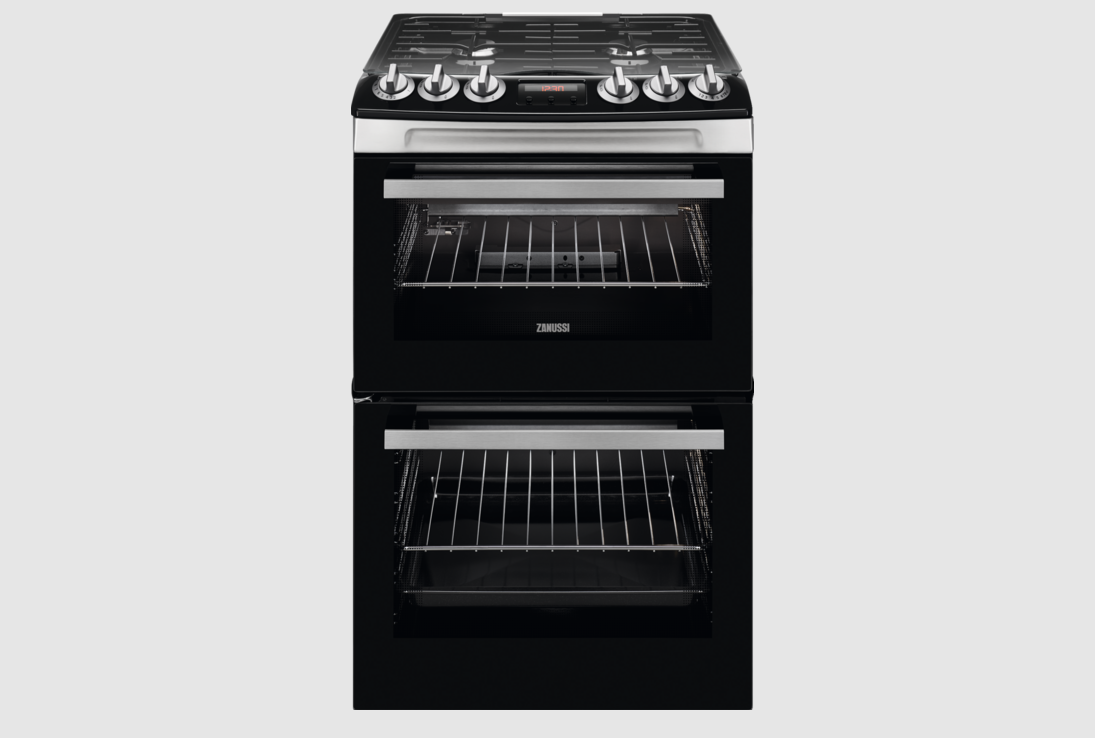
The Zanussi Gas Cooker Oven ZCG43250XA is a versatile and efficient kitchen appliance designed to enhance your cooking experience. Featuring a spacious oven with a gas cut-off safety device, it ensures reliable performance while prioritizing safety. The cooker also includes a catalytic cleaning system that activates at high temperatures, making maintenance effortless. With its responsive gas hob, you can enjoy instant heat for quick meal preparation. Priced at $599, the ZCG43250XA combines functionality with modern design for everyday cooking needs.
INSTALLATION
WARNING! Refer to the Safety chapters.
Technical data
Dimensions
- Height 899 - 917 mm
- Width 550 mm
- Depth 600 mm
Zanussi Gas Cooker Oven ZCG43250XA
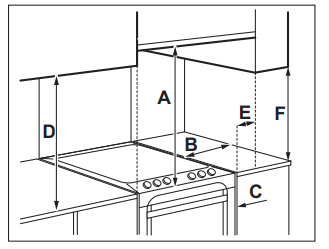
You can install your freestanding appliance with cabinets on one or two sides and in the corner.
For the minimal distances of fitting check the table.
Minimum distances
- Dimension 650 mm
- Dimension 450C mm
- Dimension 400 mm
- Dimension 150 mm
- Dimension less than 400 mm
Levelling of the appliance
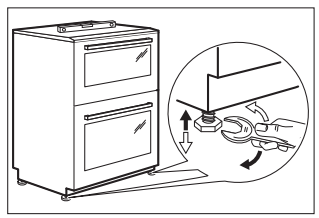
Use small feet on the bottom of the appliance to set the appliance top surface level with other surfaces.
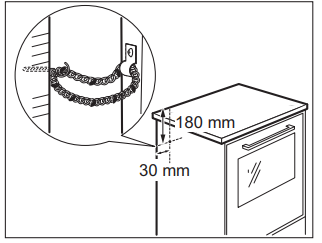
Stability chain
CAUTION!
Install the stability chain to prevent the appliance from tilting. The stability chain only works when the appliance is put in a correct area.
- Measure down 180 mm from the appliance top surface, then measure right 30 mm.
Mark the position of the wall and this gives anchor point for the stability chain.
Other technical data
WARNING!
These instructions are only valid in the countries whose symbols appear on this booklet's cover.
- Gas category: I2H
- Gas supply: G20 (2H) 20 mbar
- Voltage: 220-240 V
- Frequency: 50 Hz
Gas burners
BURNER NORMAL POWER kW | Natural Gas | |||
INJECTORMARK 1/100 mm Btu/h | ||||
| Auxiliary | 0.95 | 70 | 3242 | |
| Semi-rapid | 1.9 | 96 | 6483 | |
| Rapid | 2.8 | 119 | 10236 | |
| Semi-rapid | 1.9 | 96 | 6483 | |
| Top Oven | 1.7 | 95 | 5804 | |
| Main Oven | 1.7 | 95 | 5804 | |
Gas Connection
Use a flexible pipe in compliance with the regulation in force. Make sure they do not come in touch with mobile parts and are not squeezed.
WARNING!
- Only a qualified and competent person can do the gas installation.
- Before you connect te gas, disconnect the appliance from the electricity supply or switch off the fuse in the fuse box.
- Close the primary valve of the gas supply.
NOTE
- Supply piping should not be less than R3/8. Connection is made to the Rc ½ (1/2 “ B.S.P.) female threaded. The entry pipe is located just below the hob level on the rear left hand side of the appliance.
- The gas supply ramp is on the rear side of the appliance.
WARNING!
Only liquid sealants can be used when the inlet gas pipe is fitted i.e.: do not use the P.T.F.E. sealant tape. When the installation is complete, carry out a gas tightness test and make sure that the seal of each pipe fitting does not leak.
NOTE
Use flexible tubing, which comply with the BS.669 current edition.
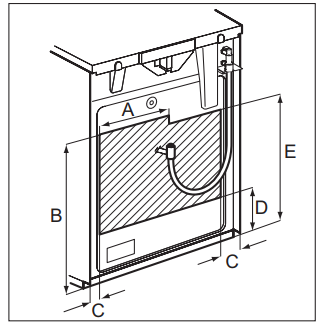
| Dimension | mm |
| A | 250 |
| B | 680 |
| C | 50 |
| D | 250 |
| E | 580 |
WARNING!
The gas bayonet connector must be in the marked area.
Pressure test
The Rapid injector is used as a pressure test point.
- Connect the pressure gauge to the Rapid injector.
- Examine the supply pressure by turning the Rapid burner and one other burner fully on, and lighting them. The pressure must be 20 mbar for Natural Gas.
- Turn the taps off and disconnect the pressure gauge.
- Make sure that all burners work correctly.
Checking the hob burners
- Lift the lid.
- Put on the burner crowns and caps. Make sure that they are correctly seated.
- Put on the pan supports.
- Light one of the hob burners
To light the hob burner refer to the "Ignition of the hob burners".
Check if the flame is regular.
Check each of the burners. - Turn the knob for the hob to the off position.
Checking the oven burners
- Put in the deep pan and the trivet.
- Light the oven burner.
To light the oven burner refer to the "Ignition of the oven burners".
Check if the flame is regular. - Turn the knob to the off position.
Checking the Lid Safety Device
- Lift the lid.
- Light one of the hob burners. To light the hob burner refer to the "Ignition of the hob burners".
- Close the lid. There should be no gas supply to the hob burners. The burner goes out.
- Turn the knob to the off position and lift the lid. The gas supply should be restored to the hob burners, when you turn the knob on.
Electrical installation
WARNING!
The manufacturer is not responsible if you do not follow the safety precautions from Safety chapters.
This appliance is supplied with a main plug and a main cable.
NOTE
The spark generator is active all the time if the phases are not connected correctly.
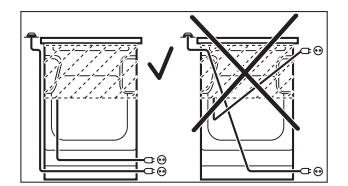
WARNING!
The power cable must not touch the part of the appliance shaded in the illustration.
PRODUCT DESCRIPTION
General overview
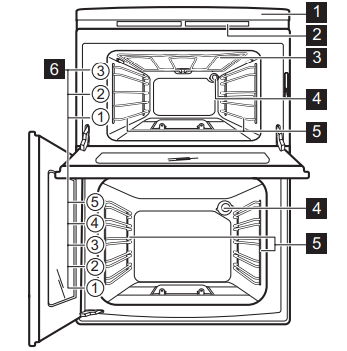
- Control panel and hob
- Air vents for the cooling fan
- Grill
- Lamp
- Shelf support, removable
- Shelf positions
Hob overview
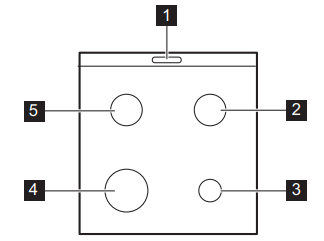
- Steam outlet number and position depending on the model
- Semi-rapid burner
- Auxiliary burner
- Rapid burner
- Semi-rapid burner
Cooker control panel

- Knob for the top oven
- Knobs for the hob
- Display
- Knob for the main oven
Accessories
- Wire shelf
For cookware, cake tins, roasts. - Grill- / Roasting pan
To bake and roast or as pan to collect fat. - Trivet
For roasting and grilling.
NOTE
Use the trivet only with the Grill- / roasting pan.
Description
The Zanussi Gas Cooker Oven ZCG43250XA features a durable stainless steel exterior that adds a touch of modernity to any kitchen. The enamel-coated oven interior ensures easy cleaning and durability. The four gas burners offer flexibility in cooking, from simmering sauces to searing steaks. The oven compartment is spacious enough to accommodate large dishes and includes multiple cooking modes to suit various recipes.
The user-friendly control panel allows for easy operation, with clear labels and intuitive knobs. Safety features include automatic ignition for the burners and a child safety lock on the oven door.
BEFORE FIRST USE
WARNING!
Refer to Safety chapters.
Initial Cleaning
- Remove all accessories and removable shelf supports from the appliance.
- Clean the appliance and the accessories before first use.
- Put the accessories and the removable shelf supports back to their initial position.
Setting and changing the time
- You must set the time before you operate the oven.
- NOTE
Only the top oven works without the set time.
- NOTE
- When you connect the appliance to the electrical supply or after a power cut
 , flashes.
 - Press the or to set the correct time.
After approximately 5 seconds, the flashing stops and the display shows the time of day.
To change the time, press again and again until
 starts to flash.
NOTE
You cannot change the time of day if any of the functions operates.
Preheating
Preheat the empty appliance before first use.
NOTE
Preheat the two ovens. Heat up one oven at a time.
- Set the maximum temperature.
- Let the appliance operate for 1 hour.
- Set the function
 .
. - Let the appliance operate for 15 minutes.
Accessories can become hotter than usual. The appliance can emit an odour and smoke. This is normal. Make sure that the airflow is sufficient.
HOB - DAILY USE
WARNING!
Refer to Safety chapters.
Ignition of the hob burners
NOTE
Always light the burner before putting on the cookware.
WARNING!
Be very careful when you use open fire in the kitchen environment. The manufacturer declines any responsibility in case of the flame misuse.
- Turn the knob for the hob to the position and push it down. When you push the knob, the spark generator activates automatically.
- Keep the knob for the hob pushed for equal or less than 10 seconds to let the thermocouple warm up. If not, the gas supply is interrupted.
- Adjust the flame after it is regular.
WARNING!
Do not keep the knob pushed for more than 10 seconds. If the burner does not light after 10 seconds, release the knob, turn it into the off position and try to light the burner again after minimum 1 minute.
NOTE
If after some tries the burner does not light, check if the crown and its cap are in the correct position.
NOTE
It is not possible to use the hob without electricity.
NOTE
If the burner accidentally goes out, turn the knob to the off position and try to light the burner again after minimum 1 minute.
NOTE
The spark generator can start automatically when you switch on the mains, after installation or a power cut. It is normal.
Burner overview
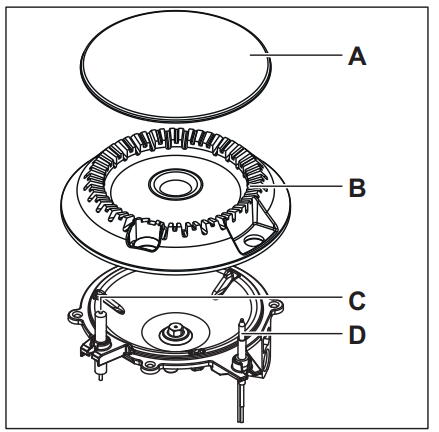
- Burner cap
- Burner crown
- Ignition candle
- Thermocouple
Replacing burner parts
- Put carefully the burner crown on the burner body. Let the crown fall freely onto the body. Do not use force.
Make sure that the hole in the crown is above the ignition candle.
Make sure that the location pegs are in the slots in the burner body.
Make sure that you can move the crown a small distance from side to side. - Put the burner cap centrally on top of the crown.
Make sure that the cap is correctly installed, with the enamel side up and you can move the cap from side to side and front to back. - Light the burner.
If the burner does not ignite, adjust the crown and cap again.
Turning the burner off
To put the flame out, turn the knob to the off position .
WARNING!
Always turn the flame down or switch it off before you remove the pans from the burner.
Lid Safety Device
Lid has safety device, which cuts off the gas supply for the hob. Closing the lid activates the safety device.
WARNING!
Always use the knob for the hob to switch off a burner. Do not use the lid as a cut-off device.
HOB - HINTS AND TIPS
WARNING!
Refer to Safety chapters.
Cookware
- recommended: aluminium, copper
- not recommended: stainless steel, cast iron, glass
WARNING!
Do not put the same pan on two burners.
WARNING!
Do not put unstable or damaged pots on the burner to prevent spills and injuries.
CAUTION!
Make sure that pot handles are not above the front edge of the cooktop.
CAUTION!
Make sure that the pots are placed centrally on the burner in order to get the maximum stability and a lower gas consumption.
WARNING!
Do not use vessels that have rim based or convex-based shaped bottom on the hotplate as there is a high risk of overturn.
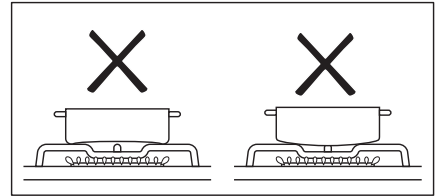
Diameters of cookware
WARNING!
Use cookware with diameters applicable to the size of burners.
| Burner Type | Diameter of Cookware (mm) |
|---|---|
| Rapid | 180 - 240 / 260¹ |
| Semi-rapid | 120 - 220 / 240¹ |
| Auxiliary | 80 - 160 |
CARE AND CLEANING
WARNING!
Refer to Safety chapters.
General information
- Clean the hob after each use.
- Always use cookware with a clean base.
- Scratches or dark stains on the surface have no effect on how the hob operates.
- Use a special cleaner suitable for the surface of the hob.
- Wash stainless steel parts with water, and then dry them with a soft cloth.
Pan supports
NOTE
The pan supports are not resistant to washing in a dishwasher. They must be washed by hand.
- Remove the pan supports to easily clean the hob.
Be very careful when you replace the pan supports to prevent the hob top from damage. - After you clean the pan supports, make sure that they are in correct positions.
- For the burner to operate correctly, make sure that the arms of the pan supports are aligned with the center of the burner.
Cleaning the hob
- Remove immediately: melted plastic, plastic foil, salt, sugar and food with sugar, otherwise, the dirt can cause damage to the hob. Take care to avoid burns.
- Remove when the hob is sufficiently cool: limescale rings, water rings, fat stains, shiny metallic discoloration. Clean the hob with a moist cloth and a non-abrasive detergent. After cleaning, wipe the hob dry with a soft cloth.
Cleaning the spark plug
This feature is obtained through a ceramic ignition candle with a metal electrode. Keep these components well clean to prevent difficult lighting and check that the burner crown holes are not obstructed.
DAILY USE
Top Oven Function
| Oven Function | Application |
|---|---|
| Off Position (0) | The oven is off. |
Full Grill | To grill flat food and to toast bread. When the function is active, the lamp turns on. |
Heat Setting | Heat settings for Conventional Cooking. |
Ignition | To activate the top oven. |
1 - 145 °C, 2 - 165°C, 3 - 180°C, 4 -200°C, 5 - 225°C, 6 - 255°C, 7 - 280°C, 8 - 295°C
Main Oven Functions
| Oven Function | Application |
|---|---|
| Off Position (0) | The oven is off. |
Minimum Temperature | To set the minimum temperature. |
Heat Setting | Heat settings for Conventional Cooking. |
Ignition | To activate the main oven. |
1) min - 135 °C, 1 - 155°C, 2 - 170°C, 3 -185°C, 4 - 210°C, 5 - 235°C, 6 - 250°C, 7 - 260°C, 8 - 265 °C
Igniting the oven burners
CAUTION!
When the oven is active, the lid has to be opened to avoid over-heating. Keep the oven door open when you ignite the burner.
NOTE
Oven safety device:
The oven burners have a thermocouple. It stops the gas flow, if the flame goes out.
NOTE
You cannot operate the top oven burner, when the grill is active.
- Open the oven door.
- Push the knob for the main oven and turn it counterclockwise to
 to ignite the main oven burner.
- Push the knob for the top oven and turn it counterclockwise to
 to ignite the top oven burner.
- Push the knob for the top oven and turn it counterclockwise to
- Keep the knob pushed for equal or less than 15 seconds to let the thermocouple warm up. If not, the gas flow is interrupted.
- After ignition release the knob, close the oven door and turn the knob to set the necessary heat setting.
WARNING!
Do not push the knob for more than 15 seconds. If the oven burner does not light after 15 seconds, release the knob, turn it back to off position and try to light the oven burner again after minimum 1 minute.
CAUTION!
In the absence of electricity you can ignite the oven burner without an electrical device. In this case open the oven door, put the flame near the hole in the bottom of the oven cavity, turn the knob to the spark position and push it down. Keep the knob for the oven functions pushed for equal or less than 15 seconds to let the thermocouple warm up.
NOTE
If the oven burner accidentally goes out, turn the knob for the oven functions to the off position and try to light the burner again after minimum 1 minute. Check if the burner holes are not blocked.
Turning off the oven burners
To put out the flame, turn the knob to the off position.
Using the grill
- Turn the knob for the oven functions clockwise to
- Adjust the deep pan runner position to fit in different portions of food.
Cooling fan
When the appliance operates, the cooling fan turns on automatically to keep the surfaces of the appliance cool. If you turn off the appliance, the cooling fan can continue to operate until the appliance cools down.
NOTE
If there is a defect in the cooling fan, contact the Authorised Service Centre.
Inserting the oven accessories
Deep pan:
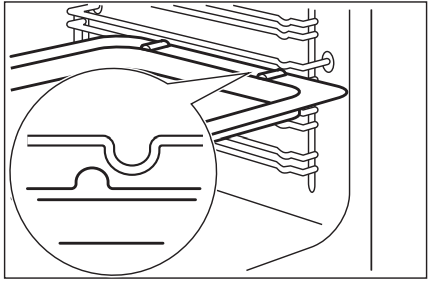
- Do not use the deep pan on the first shelf position in the main oven.
- Push the deep pan between the guide bars of the shelf support.
Wire shelf:
Push the shelf between the guide bars of the shelf support.
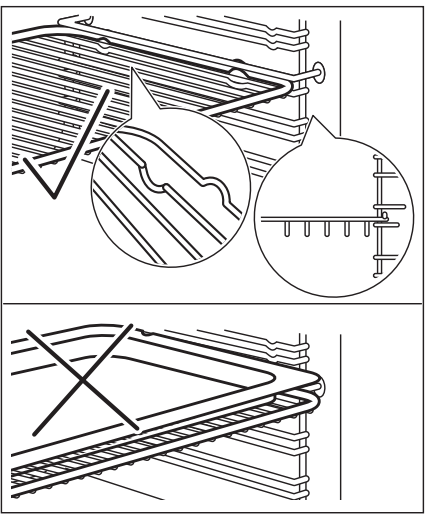
NOTE
- All accessories have small indentations at the top of the right and left side to increase safety. The indentations are also anti-tip devices.
- The high rim around the shelf is a device which prevents cookware from slipping.
Trivet and Grill- / Roasting pan
You can use the trivet to roast larger pieces of meat or poultry on one shelf position.
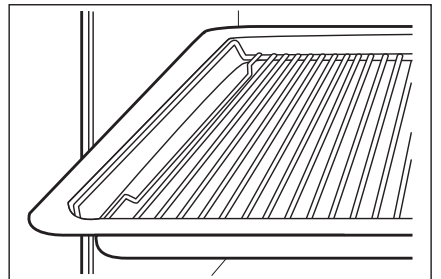
- Put the trivet into the deep pan so that the supports of the wire shelf point up.
- Put the deep pan into the oven on the necessary shelf position.
You can use the trivet to grill flat dishes in large quantities and to toast.
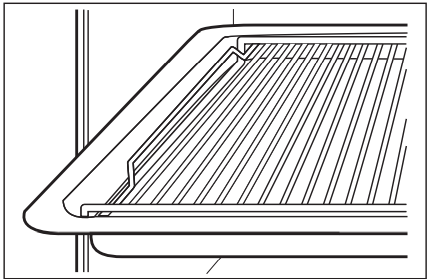
- Put the trivet into the deep pan so that the supports of the wire shelf point down.
- Put the deep pan into the oven on the necessary shelf position.
Setup Guide
To set up your Zanussi Gas Cooker Oven ZCG43250XA, ensure you follow these steps:
- Unpack and inspect the appliance for any damage.
- Place the cooker oven in its designated space, ensuring it is level.
- Connect to a gas supply according to the manufacturer's instructions.
- Plug in the appliance if it includes any electric components (e.g., the oven light).
- Read through the user manual to understand all controls and features.
OVEN - CARE AND CLEANING
Notes on cleaning
Cleaning Agents
- Clean the front of the appliance only with a microfibre cloth with warm water and a mild detergent.
- Use a cleaning solution to clean metal surfaces.
Clean stains with a mild detergent. Do not apply it on the catalytic surfaces.

Everyday Use
- Clean the cavity after each use. Fat accumulation or other residue may cause fire.
Do not store the food in the appliance for longer than 20 minutes. Dry the cavity only with a microfibre cloth after each use.

Accessories
- Clean all accessories after each use and let them dry. Use only a microfibre cloth with warm water and a mild detergent. Do not clean the accessories in a dishwasher.
Do not clean the non-stick accessories using abrasive cleaner or sharp-edged objects.

Catalytic cleaning
CAUTION!
Do not clean the catalytic surface with oven sprays, soap or other cleaning agents. It will damage the catalytic surface.
CAUTION!
Always turn the oven light on while using the catalytic cleaning (if applicable).
WARNING!
Keep children away when you clean the oven at a high temperature. The oven surface becomes very hot and there is a risk of burns. Spots or discolouration of the catalytic surface have no effect on catalytic properties.
Before activating the catalytic cleaning remove all the accessories from the oven.
The walls with catalytic coating are selfcleaning.
They absorb fat which collects on the walls while the appliance operates.
To support the self-cleaning procedure, heat the empty oven on a regular basis. The oven cavities must be cleaned separately
Cleaning the top oven
- Clean the oven floor with warm water and washing-up liquid, then dry it.
- Set the maximum temperature and let the oven operate for 1 hour.
- When the appliance is cool, clean it with a soft and moist sponge.
Cleaning the main oven
- Clean the oven floor with warm water and washing-up liquid, then dry it.
- Set the maximum temperature and let the oven operate for 1 hour.
- When the appliance is cool, clean it with a soft and moist sponge.
Removing the shelf supports
To clean the oven, remove the shelf supports.
- Pull the front of the shelf support away from the side wall.
Pull the rear end of the shelf support away from the side wall and remove it.
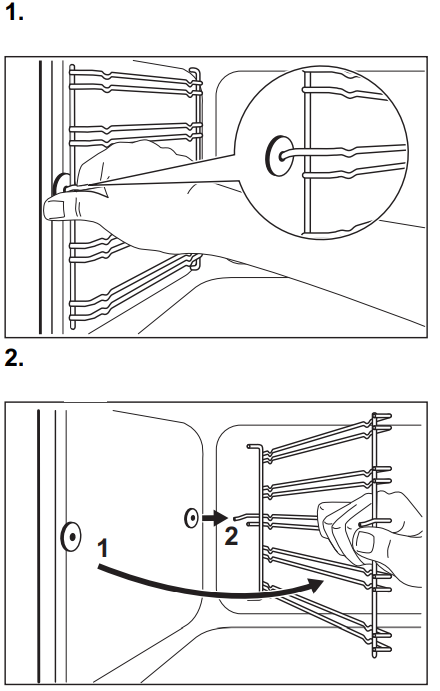
Install the shelf supports in the opposite sequence.
CAUTION!
Make sure that the longer fixing wire is in the front. The ends of the two wires must point to the rear. Incorrect installation can cause damage to the enamel.
Removing and cleaning the door glasses - top oven
The door glass in your product can be different in type and shape from the examples you see in the image. The number of glasses can also be different.
- Open the door.
Hold the door trim on the top edge of the door at the two sides and push inwards to release the clip seal.
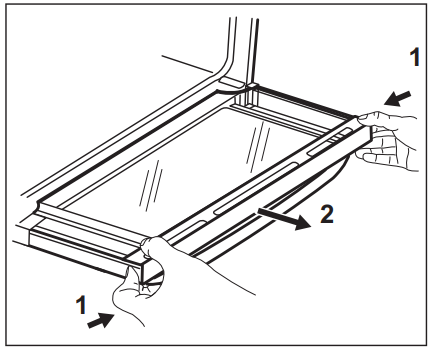
- Pull the door trim to the front to remove it.
Remove the glass panels.
To install the panels, do the same steps in reverse.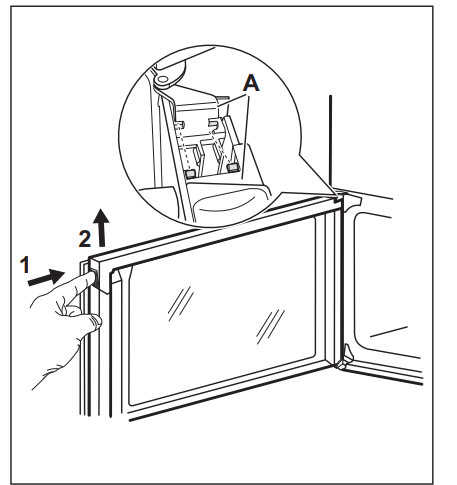
Removing and cleaning the door glasses - main oven
The door glass in your product can be different in type and shape from the example you see in the image. The number of glasses can also be different.
- Push the door trim at one side to remove it.
- Pull up the trim.
- Remove the glass panels. To replace the glass panels, do the same steps in reverse. Before you lower the trim, attach the A trim part to the door. Refer to the image.
Replacing the lamp
WARNING!
Risk of electric shock.
The lamp can be hot.
- Turn off the oven. Wait until the oven is cold.
- Disconnect the oven from the mains.
- Put a cloth on the bottom of the cavity.
The back lamp
The lamp glass cover is at the back of the cavity.
- Turn the lamp glass cover counterclockwise to remove it.
- Clean the glass cover.
- Replace the oven lamp with a suitable 300 °C heat-resistant oven lamp. Use the same oven lamp type.
- Install the glass cover.
Zanussi Gas Cooker Oven ZCG43250XA Troubleshooting
What to do if...
Problem | Possible cause | Remedy |
You cannot activate the appliance. | The appliance is not connected to an electrical supply or it is connec‐ted incorrectly. | Check if the appliance is correctly connected to the electrical supply. |
You cannot activate the appliance. | The fuse is blown. | Make sure that the fuse is the causeof the malfunction. If the fuse is blown again and again, contact a qualified electrician. |
The burners do notwork. | There is no gas supply. | Check the gas connection. |
There is no spark when you try to | Burner cap andcrown are placedin‐ | Place the burnercap and crown cor‐ |
activate the spark generator. | correctly. | rectly. |
The flame extinguishes immediately | Thermocouple is notheated up suf‐ | After lightning the flame, keepthe |
after ignition. | ficiently. | knob pushedfor equal or less than10 seconds. |
The flame ring is uneven. | Burner crown is blocked with food residues. | Make surethat the injector is not blocked and the burner crown is clean. |
The oven does notheat up. | The oven is deactivated. | Activate the oven. |
The oven does notheat up. | The clock is notset. | Set the clock. |
The oven does notheat up. | The necessary settings are not set. | Make sure that thesettings are cor‐rect. |
The lamp does not operate. | The lamp is defective. | Replace the lamp. |
The display shows "12.00". | There was a power cut. | Reset the clock. |
Steam and condensation settle on | You left thedish in theoven for too | Do not leavethe dishes in the oven |
the food and in the cavityof the oven. | long. | forlonger than 15 - 20 minutes afterthe cooking process ends. |
Pros & Cons
Pros
- High-quality build and durable materials
- Multiple cooking modes and precise heat control
- Spacious oven compartment with even heat distribution
- A-rated energy efficiency
- User-friendly interface and safety features
Cons
- Higher price point compared to some other models on the market
- Installation requires professional assistance if you are not familiar with gas connections
- Cleaning the enamel-coated oven interior can be time-consuming
Customer Reviews
Customers have generally praised the Zanussi Gas Cooker Oven ZCG43250XA for its performance and features. Many have noted the ease of use and the consistent cooking results. However, some have mentioned that cleaning the oven interior can be a bit challenging.
Common Complaints
Common complaints include the need for professional installation and the higher cost compared to other models.
Faqs
What are the dimensions of the Cooker Oven?
How many burners does the Zanussi Cooker have?
What is the oven capacity of the Zanuss?
What cooking modes does the oven offer?
Is the Cooker Oven energy-efficient?
How do I clean the enamel-coated oven interior?
Does the Zanussi Gas Cooker Oven have automatic ignition for the burners?
What materials is the Zanussi ZCG43250XA made of?
Do I need professional assistance to install this cooker oven?
Leave a Comment


