Aclas Printer Driver PP7MX User Manual | Installation Instructions
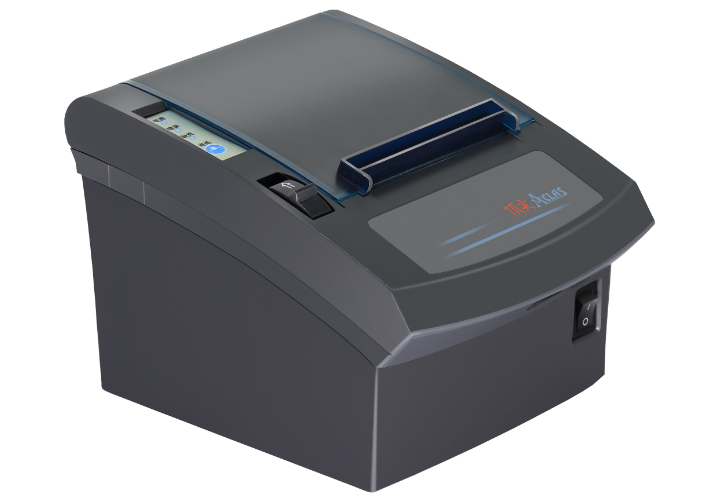
Content
Introduction
The Aclas Printer Driver PP7MX is a high-performance printer driver designed for use with Aclas printers. This driver is compatible with both Windows and Mac operating systems and is designed to provide fast and reliable printing capabilities. The PP7MX printer driver is easy to install and use, and it offers a range of features that make it an ideal choice for businesses and individuals who need to print high-quality documents quickly and efficiently.
Detailed Specifications
The Atlas Printer Driver PP7MX supports a range of printers, including the Aclas MX300, MX500, and MX700. The driver offers a maximum printing resolution of 2400 x 1200 dpi, which ensures that text and images are printed in high detail. The driver also supports a range of paper sizes, including A4, A5, and legal-size paper.
The PP7MX printer driver is compatible with both 32-bit and 64-bit versions of Windows 10, 8.1, 8, and 7, as well as with MacOS 10.13 and later. The driver supports a range of print modes, including duplex printing, which allows users to print on both sides of a sheet of paper.
USB / Serial /Parallel Printer Driver Installation
Printer Driver Installation
Connect the PP7X to PC double click the file Aclas printer_x86_x64.exe in the folder Aclas Printer to I install the printer driver


Serial Parallel Printer Driver Installation


USB Printer Driver Installation


Ethernet /WIFI Printer Driver Installation


Note: After installing the printer driver, you can use the printer. If the printer cannot work, you can refer to Chapter 1.2 to see the connecting port and make sure that the connecting port you choose is correct and is not being used; then refer to Chapter 1.3 to configure the port.
USB port convert to serial port Printer Driver Installation
Note: if the customer’s PC does not support the USB printer function , the function of the USB port convert to serial port is needed. The detailed operation steps are as follows:
First,, you need to install a USB port convert to a serial port driver program. Please read the readme text before installation, because different computer systems use different driver programs, so you need to follow the readme text to choose the correct driver program and add the suitable documents to relevant content. The installation steps are as follows:


Open the printer tool , the system will pop up the following interface:

Click “certain” and choose “parameter setting”, enter into the following interface:

After finishing downloading , the system will show the following interface:

Back to the computer desk, right-click “my computer” and choose “device manage”, if the following picture can be seen , it means that the operation succeeded.

Open “printer and fax” in the control panel of the computer, choose “ Aclas Printer” printer device, right-click the mouse property port , choose COM3 , and click apply。


Note: there is the information about computer name\ printer name\port name and data file etc. on the print test page. The printer can be used after finishing the installation of the driver , but if the printer cannot be used normally, please refer to Chapter 1.2 and Chapter 1.3.
If you want to return to using the USB function, you can follow the following steps:
First, insert the serial cable into the computer, click “my computer ” and choose “device manager”, find the port number( note: port number should be the same as the one that shown on the computer), here the COM port is COM3

According to the prompts, the printer will give a hint after the success of downloading, and then the printer will restart automatically. Finally, you can insert the USB, at that time, the function of the printer USB can be reused again.

How to Know The Connect Port
Connect the PP7X to the computer, follow the steps below to know which port is connected. Right-click the ‘My Computer’ icon on the desktop, and choose ‘Manage’:

Serial printer connect port:

Parallel printer connect port:

USB printer connect port:

How to Config Connect Port
Enter the ‘properties’ interface of the printer first to configure the port after knowing the connecting port.
If your PC is installed with Windows XP system, please follow the below steps to enter the ‘properties’ interface of the printer.

If your PC is installed with Vthe ista system, please follow the below steps to enter ‘the properties’ interface.

Note: If you are not allowed to access to run as the administrator, please choose the item ‘properties’ directly after entering the Printer interface, as the window below:

If your PC is installed with the WIN7 system, please follow the below steps to enter the ‘properties’ interface.

Choose connecting port
Choose the connecting port that you have known from Chapter 1.2. For example, the connecting port of the USB printer known from Chapter 1.2 is COM3, so you should choose COM3 in the following interface. Take the port configuration of a USB printer in Windows XP system as an example:
Configure port


Note: Parallel printers and USB could skip this step, and go to step 4 directly.
Finish port configuration

Description
The ACLAS Printer Driver PP7MX is designed to provide fast and reliable printing capabilities for ACLAS printers. The driver is easy to install and use, and it offers a range of features that make it an ideal choice for businesses and individuals who need to print high-quality documents quickly and efficiently.
One of the key features of the PP7MX printer driver is its support for high-resolution printing. The driver can print at up to 2400 x 1200 dpi, which ensures that text and images are printed in high detail. The driver also supports a range of paper sizes, including A4, A5, and legal-size paper, making it a versatile choice for a wide range of printing needs.
BT Printer Driver Installation
The communication distance of the PP7 blue tooth printer is up to 10m without obstacles.
BT Printer Driver Installation
Connect the PP7X to the PC, and double-click the file ‘Aclas printer.exe’ in the folder ‘Aclas Printer’ to install the printer driver.


Wireless 2.4G/Wireless 433 Printer Driver Installation
The communication distance: PP7 wireless 433 printers are up to 100m without obstacles PP7 wireless 2.4G printers are up to 10m without obstacles PP7X printers of this model can communicate with PC in two ways, via 433MHz Base Station or 2.4G Dongle. If you use 433MHz Base Station, please refer to Chapter 3.2; if use 2.4G Dongle, please refer to Chapter 3.3.
Wireless Printer Driver Installation
Note: The working baud rate of wireless 433 printers is ‘9600’, its printing speed is relatively lower. It had better not use driver printing, we suggest that you adopt command print.
Please refer to Chapter 2.1 “BT Printer Driver Installation” for the details of the wireless printer driver installation.
Wireless 433 Base Station
Wireless Printer Setting:
If the printer needs to communicate with the PC through the base station, the following operation should be carried out.
- Power on BS via the power supply adaptor, and the power indicator light lightened.
- Connect BS with PC via Ethernet.
Double click ‘Internet Explorer’ on your PC desktop, input Base Station IP ‘192.168.1.14’, and then press [Enter] on your keyboard, the system displays as follows:
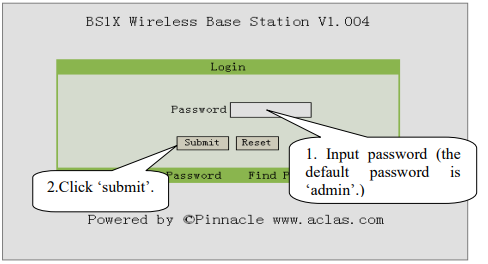
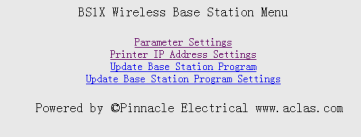
Enter the ‘station menu’ interface, and choose the ‘Printer IP Address Settings’ item:
Add, Remove, or Change the printer server listening port in the interface as below: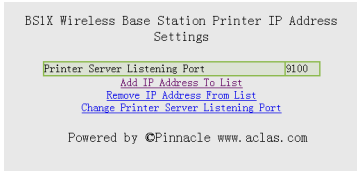
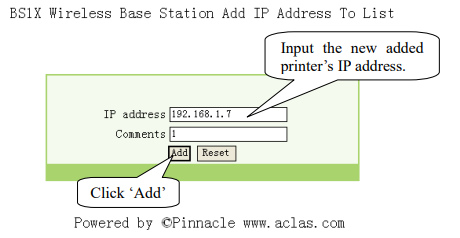
I choose ‘Add IP Address To List’ to add a printer, please input the newly added printer’s ‘IP address’ and ‘comments’, and click ‘add’.
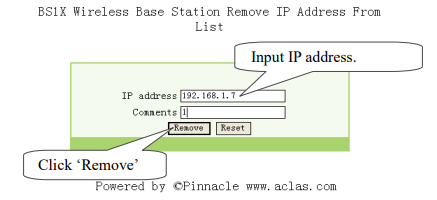
If you choose ‘Remove IP Address From List’, please input the newly added printer’s IP address or comments, and click ‘Remove’; if you need to delete the IP address, please click ‘Reset’.
Wireless 433 USB Dongle/2.4G
USB Dongle Driver Installation
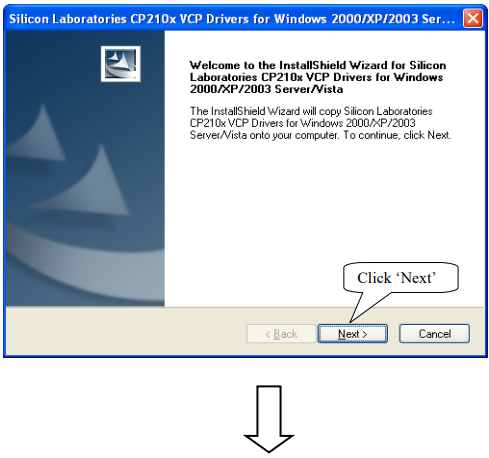
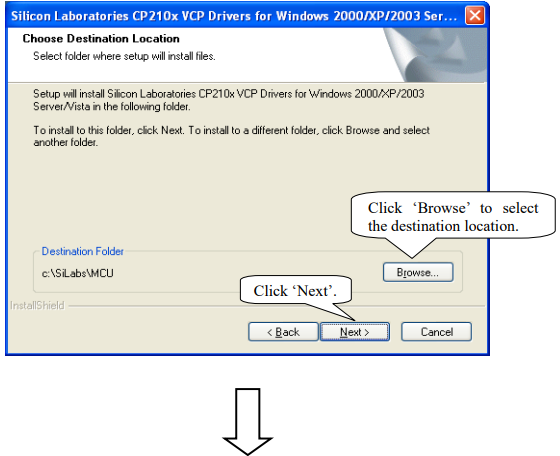
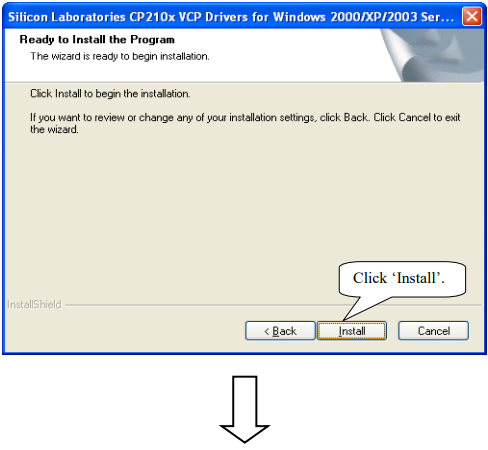
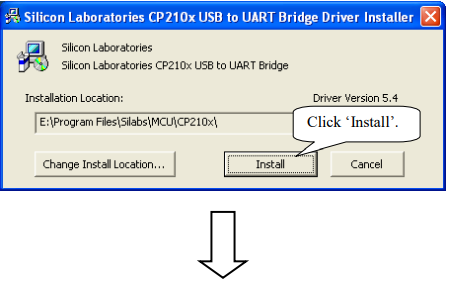
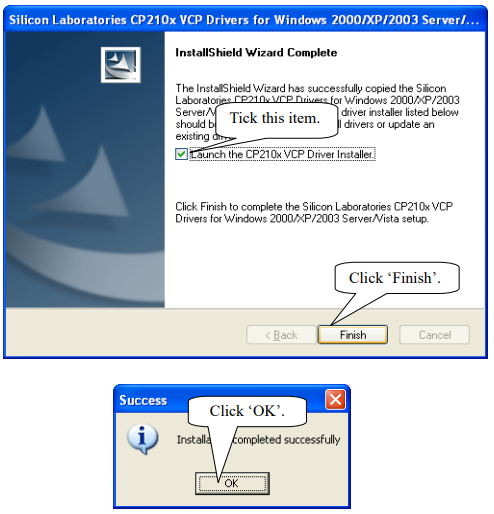
You can install t he USB dongle driver after you install printer driver. Double -click file CP210x_VCP_Win2K_XP_S2K3.exe exe, pop -up this window:
How to Know The Connect Port
After you install the USB dongle driver, restart the computer, and insert the 433 dongle into the USB port of the computer. Then, you can follow the below steps to know which port is connected.
Right-click the ‘My Computer’ icon on the desktop, and choose ‘Manage’.


Dongle Parameter Setting
Double click to open ‘DownloadDongle.exe’. Download the setting to 433 dongle to realize a wireless connection between the PC and the printer.

Local IP: the IP of 433 dongle.
Target Dongle IP: the wireless IP address of PP7HW4.
Stream CTRL: stream control, if the transmitting data is over 255 bytes, please choose ‘Hard’. If the software is used to transmit data, please set the stream control as ‘Hard’.
Note: After clicking the button ‘Download’, if the system displays ‘Download OK’, it prompts the parameter setting is successful, and then please pull out the dongle and insert it again; if the system displays ‘Fail’, please check whether you choose the correct COM port, or whether the COM port is occupied by other equipment.
Setup Guide
To install the Atlas Printer Driver PP7MX, follow these steps:
- Download the driver installation file from the ACLAS website or from an authorized ACLAS dealer.
- Double-click the installation file to begin the installation process.
- Follow the instructions on the screen to complete the installation.
- Connect your Atlas printer to your computer using a USB cable or network connection.
- Select the class printer from the list of available printers in your printing software.
- Start printing!
Troubleshooting
If you encounter any issues while using the Atlas Printer Driver PP7MX, try the following troubleshooting steps:
- Make sure that your class printer is properly connected to your computer.
- Check that the printer is turned on and has paper loaded.
- Try restarting your computer and printer.
- Make sure that you have installed the latest version of the PP7MX printer driver.
- If the issue persists, contact ACLAS support for further assistance.
Aclas Printer Driver PP7MX Pros & Cons
- Pros
- Supports high-resolution printing up to 2400 x 1200 dpi
- Compatible with both Windows and Mac operating systems
- Supports a range of paper sizes and print modes
- Easy to install and use
- Cons
- May not be compatible with older versions of Windows or MacOS
- Only compatible with ACLAS printers
- May require occasional updates or troubleshooting
Faqs
What is the Printer Driver PP7MX for Aclas?
Which versions of Windows are compatible with the Aclas Printer Driver PP7MX?
The Aclas Printer Driver PP7MX: How Do I Install It?
How do I upgrade the PP7MX printer driver for Aclas?
Is it possible to print receipts using the driver?
How can I get in touch with Aclas support if I have questions about drivers?
Is the Aclas Printer Driver PP7MX handbook or guide available somewhere?
How can I use the driver to set up my printer?
What happens if my computer is unable to detect the Aclas Printer Driver PP7MX?
Is the driver able to manage several print jobs concurrently?
Leave a Comment
