How to Use Charge controller: Acopower Solar Panels KIT-HYS100MB User Guide
Content
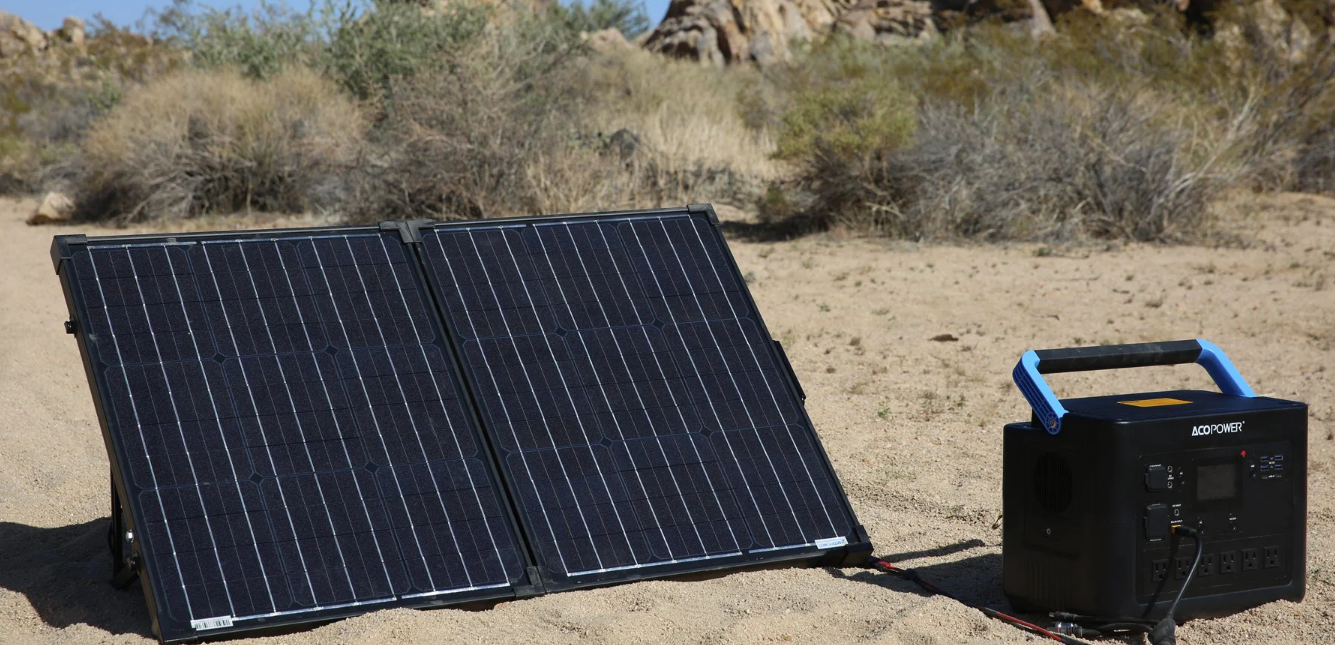
Introduction of ACOPower Solar Panels KIT-HYS100MB
This portable solar panel comes with a pre-installed charge controller. This charge controller protects battery against unsafe electrical conditions and must be used to charge 12V batteries. To charge solar generators with a built-in charge controller, simply use the MC4 cables provided and plug them into the cables that came with your power station to charge. A 12V battery and solar generator can be charged at the same time.
Description of Solar Panels KIT-HYS100MB
The Solar Panels KIT-HYS100MB is a 100W high-efficiency monocrystalline solar panel kit, designed for off-grid applications, such as RVs, boats, cabins, and remote power systems. The kit includes a 100W solar panel, a 20A charge controller, a pair of 20ft 12AWG adaptor cables, and a set of Z-brackets for easy installation. The solar panel is made of high-quality monocrystalline silicon, ensuring high efficiency and long-term durability. The IP65-rated junction box and MC4 connectors provide excellent water and dust resistance, making the panel suitable for various outdoor conditions.
Specifications
120w solar panel
Type |
Module Size |
N.W |
Specification | ||||
Max-Power |
Max-Power Voltage |
Max-Power Current | Open- Circuit Voltage |
Shortcircuit Current | |||
Module |
mm |
Kg |
W |
V |
A |
V |
A |
2×60w |
615×515×50 |
6.3 |
120 |
19.8 |
6.06 |
23.4 |
6.42 |
1 | Electrical Parameters | |||
1-1 | Rated solarpanel amps | 10/15/20 | Max. | AMP |
1-2 | Normal inputSolar cell array voltagecharge | 15-22 | VDC | |
1-3 | Max. solarcell array voltage(output has no load) | 25 | Max. | VDC |
1-4 | The controller operating voltage at solar or battery side | 8V | Min | VDC |
1-5 | Standby consumption at night | 5 | Max | mA |
1-6 | Maximum voltagedrop-Solar panel to battery | 0.25 | Max. | VDC |
2 | Charging characteristics | |||
2-1 | Minimum battery start charging voltage | 3 | Min | VDC |
2-2 | Soft startcharging voltage | 3-10 | +/-0.2 | VDC |
2-3 | Soft start charging current (50%PWM duty) | Up to 5/7.5/10 | AMP | |
2-4 | Bulk charge | By the maximum ratedcurrent | ||
Bulk chargelevel1 for LeadCrystal battery | By 100% maximumrated current charge up to 14.4V. | |||
Bulk chargelevel2 for LeadCrystal battery | By 50% rated currentcharge up to 14.7V from 14.4V. | |||
2-5 | Absorption charging voltage at 25℃ | |||
--Lead Crystal battery | 14.7 | +/-0.2 | VDC | |
--Gel type battery | 14.1 | +/-0.2 | VDC | |
--AGM typebattery (default setting) | 14.4 | +/-0.2 | VDC | |
--WET type battery | 14.7 | +/-0.2 | VDC | |
--Calcium type battery | 14.9 | +/-0.2 | VDC | |
--LTO battery | 14.0 | +/-0.2 | VDC | |
--LFP battery | 14.5 | +/-0.2 | VDC | |
--Li-ion battery | 12.6 | +/-0.2 | VDC | |
2-6 | Absorption transits to Equalizing or Float condition: | |||
--Charging current drops to | 1.5 | +/0.1 | AMP | |
--or Absorption charging timer timed out | 4 | Hour | ||
2-7 | Equalization charging active | |||
--Only for WET or Calciumbattery | ||||
--Battery voltage discharged to less than | 10 | +/-0.2 | VDC | |
--Automatic equalizing charging periodical | 28 | Day | ||
2-8 | Equalization charging voltageat 25℃ | 15.5 | +/-0.2 | VDC |
2-9 | Equalization charging timer timed out | 2 | Hour | |
2-10 | Float voltage (for Crystal, GEL, WET, Calcium, AGM battery) at 25℃ | 13.8 | +/-0.2 | VDC |
Restart voltage for LTO battery | 13.2 | +/-0.2 | VDC | |
Restart voltage for LFP battery | 13.4 | +/-0.2 | VDC | |
Restart voltage for Li-ion battery | 12.0 | +/-0.2 | VDC | |
2-11 | Voltage control accuracy | +/- 1% | ||
2-12 | Battery temperature compensation coefficient | -24 | mV/*C | |
2-13 | Temperature compensation range | -20 ~ +50 | ℃ | |
3 | Protection | |||
3-1 | Against reverse polarity or shortcircuit at panel or battery | |||
3-2 | Noreverse current from battery to solar at night | |||
3-3 | Over temperature protection duringcharging | 65 | ℃ | |
4 | Electrical parts | |
4-1 | Input output terminal | M5terminals |
5 | Physical Parameters | |
5-1 | Controller material | Plastic, Standard ABS |
5-2 | Power terminal maximum stranded wire size | #6AWG stranded-16 mm2 |
5-3 | Power terminal torque | Upto 17 in-lb (0.2n-m) |
5-4 | Mounting | Vertical wall mounting |
5-5 | IPgrade | IP65, |
5-6 | Netweight | Approx. 0.5KG |
6 | Environmental characteristics | |
6-1 | Operating temperature | -25 ~ 50℃ / -13~ 122 ℉ |
6-2 | Storage temperature | -40 ~ 85℃ / -40~ 185 ℉ |
6-3 | Operating Humidity range | 100% no condensation |
Summary of folding solar panel structure
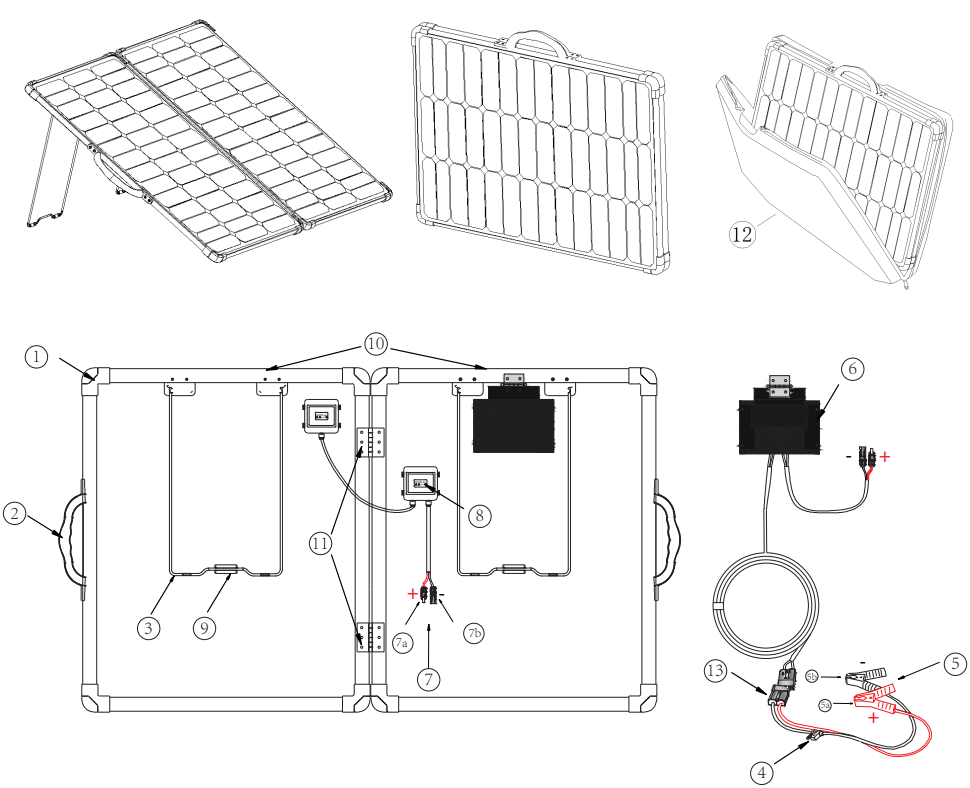
Accessories
1.Corner protector | 5b.Black Negative Battery Clip | 9.Support fixing block |
2.Handle | 6.Controller | 10.Solar panel |
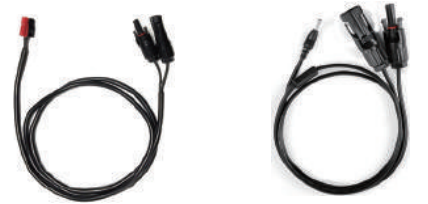
3.Supporting legs | 7.MC4 cables | 11.Hinge |
4.Fuse | 7a.Red Negative MC4 Cable | 12.Soft bag |
5.Battery Clips | 7b.Black Negative MC4 Cable | 13.Anderson Plug |
5a.Red Positive Battery Clip | 8.Junction box |
Notice
When the bracket is folded to the extreme position, please avoid using force to prevent the bracket from deforming! A-A position.
Features
- Max 120 watts solar panel
- 20A PWM Waterproof charge controller
- Portable
- Waterproof IP65 for charge controller and IP65 for whole kit
- Removable MC4 Connectors
- Charge 12V battery by Lithium-ion,LifePO4,LTO, Flooded, GEL, AGM, Crystal and Calium batteries
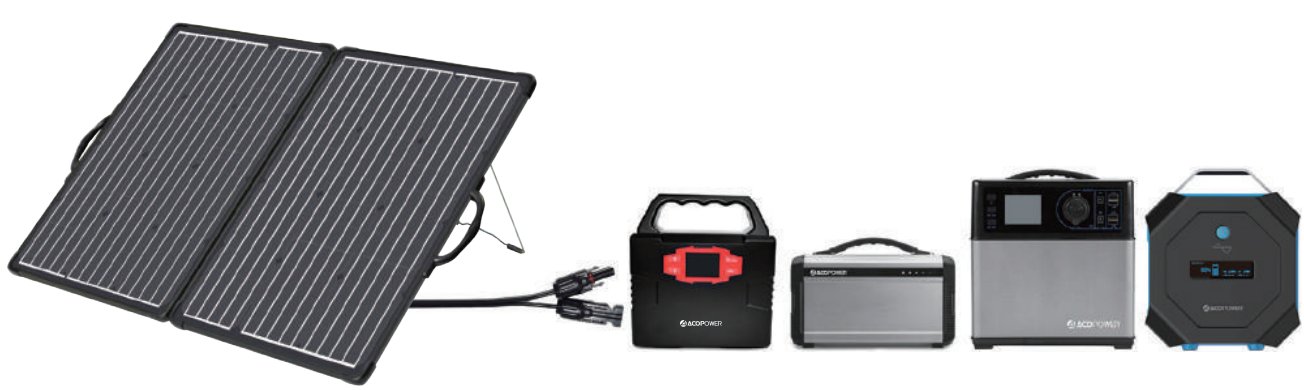
- Charge 12V solar generator by MC4 Connectors- battery with inverter, power bank/station with built-in charge controller. ACOPOWER 400Wh solar generator recommended.Adapter is needed.
- Can be used on its own or as part of a larger solar system.
- Extendable with MC4 Connectors(Max.240W Solar Panel;needs adapter cables)
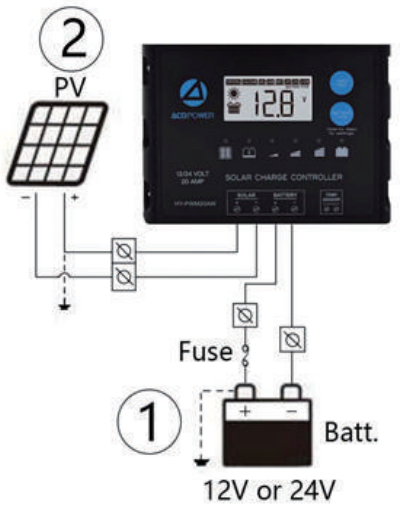
Setup Guide
To set up the Solar Panels KIT-HYS100MB, follow these steps
- Find a suitable location for the solar panel, ensuring it receives direct sunlight for most of the day.
- Assemble the Z-brackets and attach them to the back of the solar panel.
- Connect the solar panel to the charge controller using the MC4 connectors and the adaptor cables.
- Mount the charge controller in a dry and well-ventilated location, close to the battery bank.
- Connect the charge controller to the battery bank using the appropriate cables and terminals.
- Turn on the charge controller and check the voltage and current readings to ensure proper operation.
Test the solar panel
Use a multimeter
Set your multi-meter to measure DC voltage and put the red probe on the red positive MC4 cable (7a, Table 1) and the black probe on the black MC4 cable (7b, Table 1) and make sure the connections are secure. the open-circuit voltage should be displayed on your multi-meter and it should be around 17.6V-23V. This is your solar panel’s voltage without going through the charge controller. If you’re not getting something within that range or close to those numbers, you should check and make sure the solar panel is in direct sunlight and that the connections between the MC4 cables and the multi-meter is secure.
- Use your solar generator
To test if the solar panel is working with a solar generator with a built-in charge controller, connect the MC4 adapters that came with your solar generator and plug it in to the MC4 cables of the solar panel directly (7a and 7b, Table 1). Turn your solar generator on and it should start charging from the solar panel.
How to test if the charge controller is working
When testing the charge controller, please make sure a battery in working condition is used. The charge controller will not power on with a bad battery. A good thing to do is to test with your 12 V car battery.
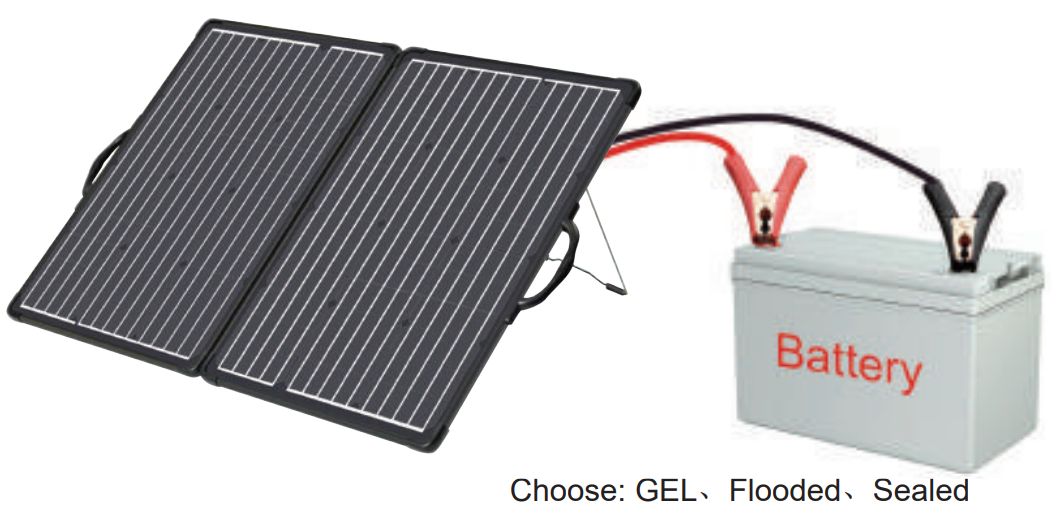
- Clamp the red positive battery clip (5a, Table1) to the positive terminal of 12V battery, black negative battery clip (5b, Table 1) to the negative terminal and make sure the connection is secure.
- When all the connections are complete, the Battery status indicator (13, Figure 1) should light up if the battery is connected to the charge controller. If the solar panel is under direct sunlight, the charging status indicator (13, Figure 1) will be on as well. (Detailed information under Specifications section)
Tip: The charge controller will not respond unless it is connected to a battery! Always connect the battery first, then load (if applicable). For lights explanation, please check the Specifications section.
What are you going to use it for
Charge solar generators
Charge 12V Solar Generator with built-in Charge Controller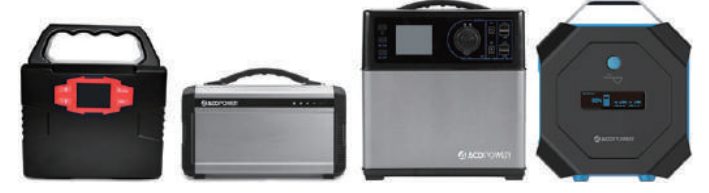
understand your solar generator and prepare the MC4 adapter for your solar generator
- Disconnect MC4 Connectors and let it to be a solar panel with MC4 connectors
Use your MC4 Adapter to charge your solar generator
- Charge your 12 Volt battery
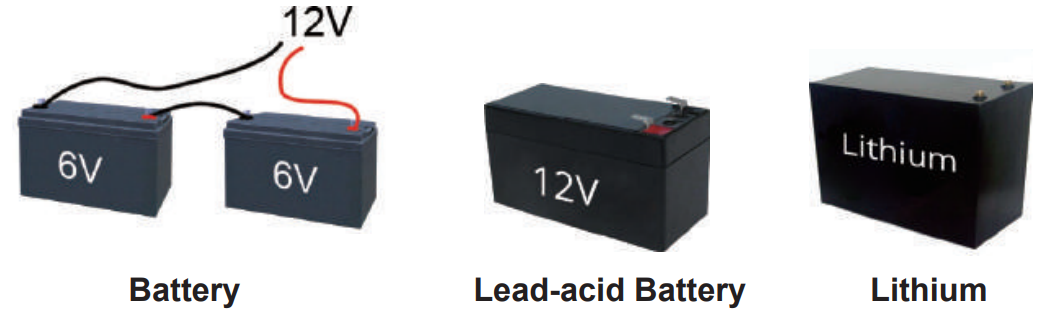
The solar panel kit is designed to charge a large range of batteries including Sealed, Flooded, GEL, AGM, Lithium, lead-acid battery and other deep cycle battery. The batteries are used as car battery, RV battery, boat battery and emergency back-up battery.- understand your battery: battery type, capacity and voltage
- check the charge controller’s set up. We have defaulted the setting of the charge controller is for SEALED. (AGM is also included in SEALED type.) If your battery’s type is different, please set your battery type with the charge controller following the instructions below.
- Connect in parallel with another solar panel to charge a 12V battery faster
When you combine two solar panels in parallel, the current from the two solar panels are added together and this will enable the battery to charge faster. For more information about adapters needed, please contact us.
Warning: Make sure the combined current is lower than the rated current of the charge controller which is 20 amps for this model.
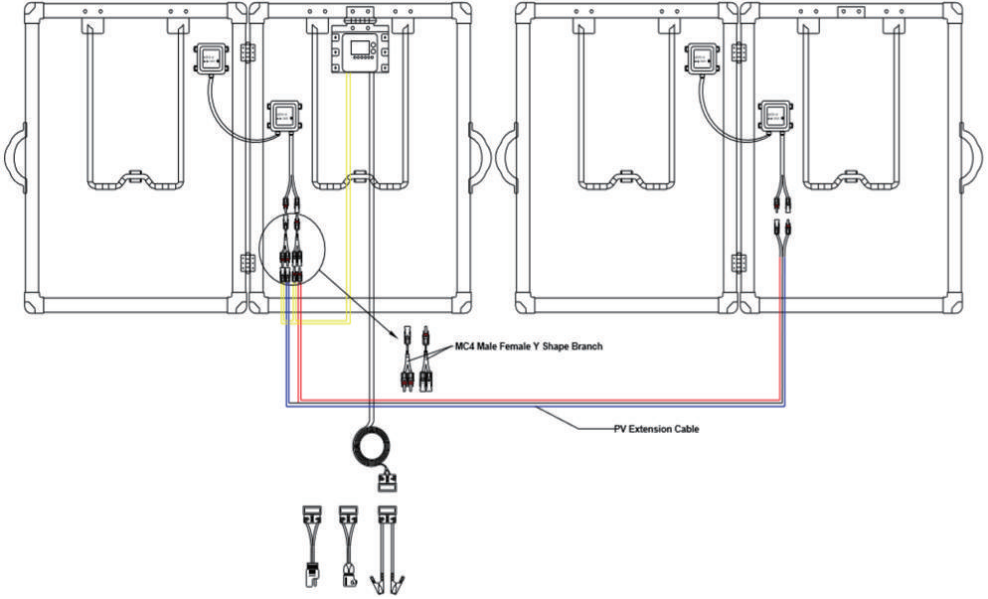
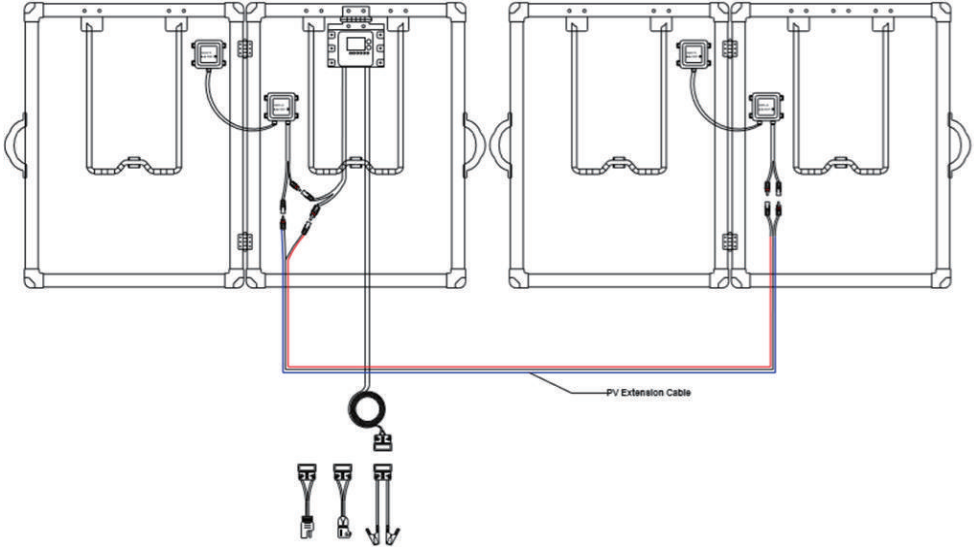
Parallel 12V Battery Charging
First connect the positive and negative electrodes MC4 of the two 120W PV modules to the MC4 Male Female Y Shape Branch input section (the two MC4 ports are the input parts) to form a solar panel parallel system (if the two solar panel are far, please purchase PV Extension Cable), then connect the positive and negative MC4 of the controller to the MC4 Male Female Y Shape Branch output section (MC4 Male Female Y Shape Branch is not included please purchase that if you need it). Please see the connection diagram
Charge Your 24V battery
Series 24V battery charging: first connect two 120W PV modules in positive and negative connection to form a series system (if the two solar panel are far, please purchase PV Extension Cable) Then connect the positive and negative terminals MC4 of the controller to the positive and negative terminals MC4 Please see the connection diagram
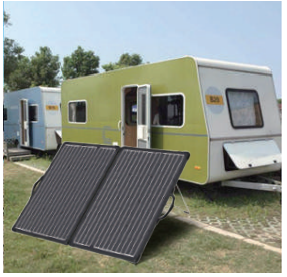
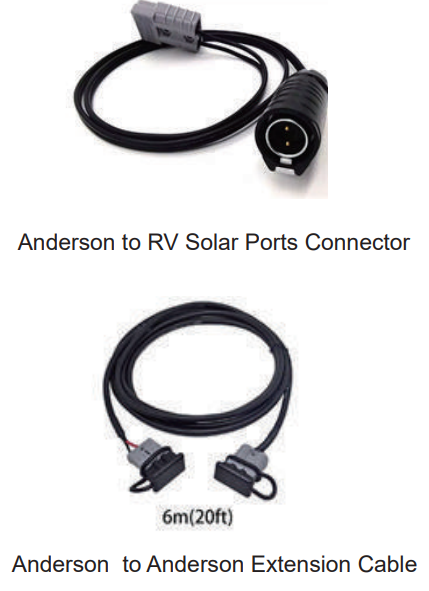
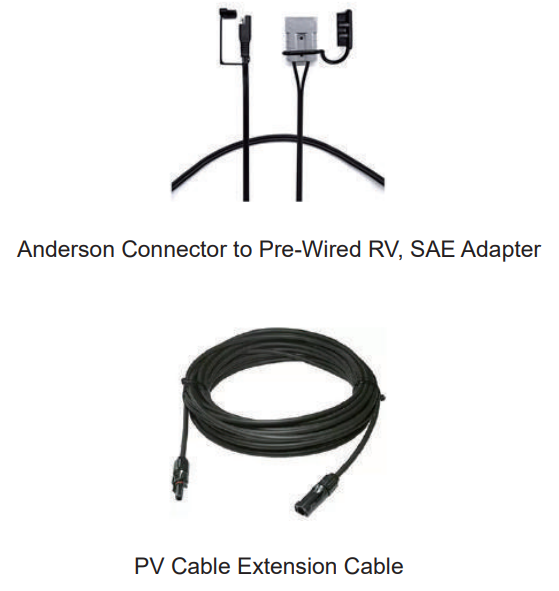
RV /Camper battery charging
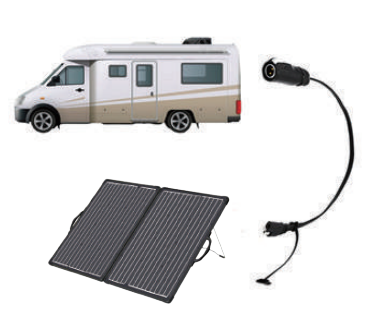
If your RV /Camper has a built-in solar controller, please refer to Figure 1
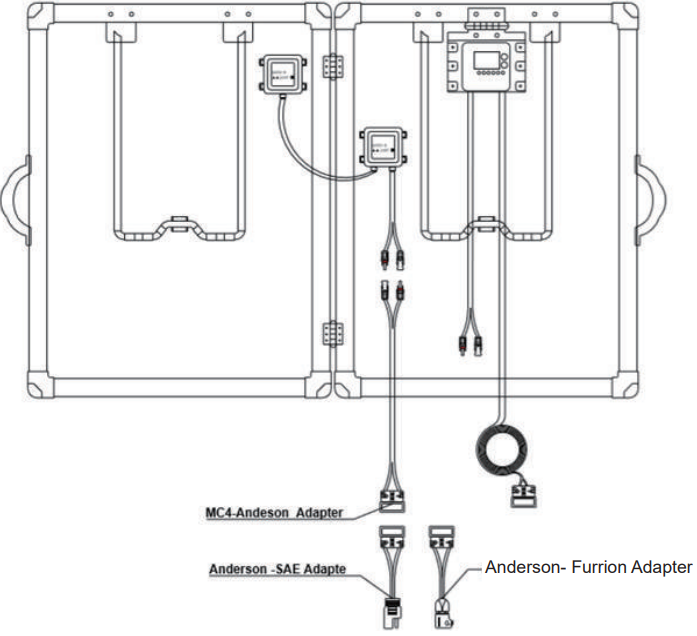
If your RV /Camper has no built-in solar controller, please refer to Figure 2

Note that please charge the battery, please select the appropriate battery type.
Please choose the right connector adapter (Purchase separately)
ProteusX 20A Charge Controller
The ProteusX is ACOPOWER's first waterproof PWM charge controller
- It is a negative ground controller. This ensure compatibility with any negative ground system, which is the standard and most conventional way of grounding.
- There are 8 Battery Type Compatible -Lithium-ion, LiFePO4, LTO, Gel, AGM, Flooded, Crystal and Calcium.
- It is 20 amps 12V/ 24v auto continuous charging capacity, enables use of up to 12V/360watts, 24V/720watts.
Features and Mounting

- VOLT / AMP button
- BATTERY TYPE button
- Mounting hole $5
- Charging Status LED Indicator
- Battery Status LED Indicator
- Bulk charge(charged capacity < 25%)
- Bulk charge(charged capacity < 50%)
- Bulk charge(charged capacity < 75%)
- Bulk charge (charged capacity ≤100%)
- Solar Module Terminals
- Battery Terminals
- Temperature Sensor
characteristic
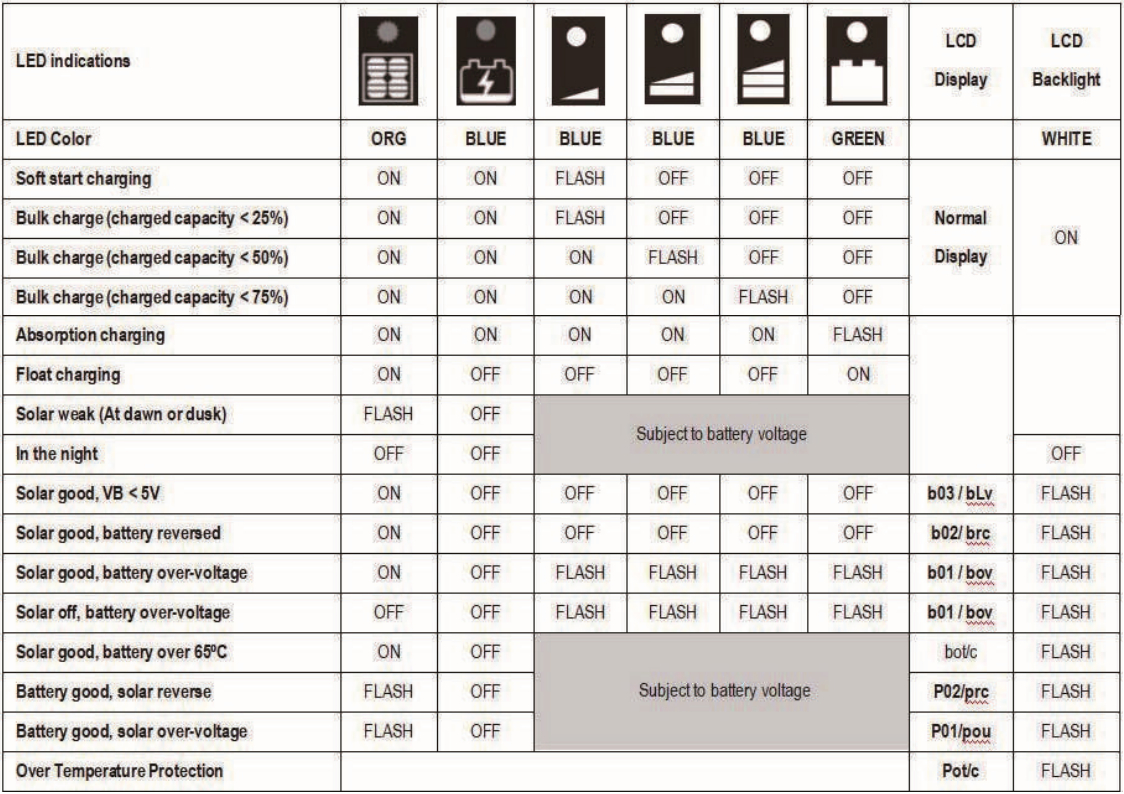
Indicators Description and Operation
OPERATION - LCD DISPLAY
Please check your battery manufacturer’s specifications to select correct battery type. The unit provides eight ( 8 ) battery types for selections: Lead crystal, Lithium-ion, LiFePO4, LTO, Gel, AGM, WET (conventional lead acid), and Calcium battery.
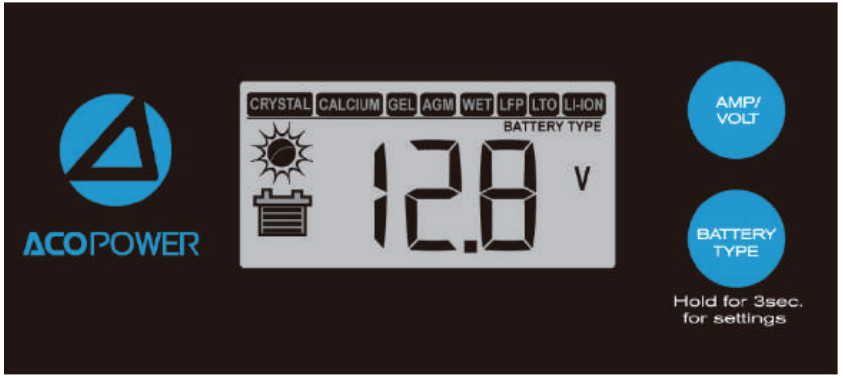
Press BATTERY TYPE button and hold for 3 seconds to go into your battery type selection mode, the battery type you select will be shown on the LCD meter, the default setting is AGM Battery; the controller will automatically me morize your battery type setting.
Li-ion battery shown in LCD indicates 3-SERIES Li-ion battery shown as below
- Lithium Cobalt Oxide LiCoO2 (LCO) battery
- Lithium Manganese Oxide LiMn2O4 (LMQ) battery
- Lithium Nickel Manganese Cobalt Oxide LiNiMnCoO2 (NMC) battery
- Lithium Nickel Cobalt Aluminum Oxide LiNiCoAlo2 (NCA) battery
Remarks: This solar controller is recommended to just work with 3 x series above Li-ion batteries.
LiFePO4 battery shown in LCD indicates Lithium Iron Phosphate battery, LFP battery. LTO battery shown in LCD indicates Lithium titianate oxidized, Li4Ti5O12 battery.
Caution: Incorrect battery type setting may damage your battery.
When the controller powers on, the unit will run self-qualify mode and automatically show below items on LCD before going into charging process

After going into charging process, the LCD displays the charging statues as below: Press VOLT / AMP button in sequence, the LCD will display in turn with Battery Voltage, Charging Current, Charged capacity (Amp-hour) and Battery Temperature (if external temperature sensor connected)
Display in sequence

Alternatively Display voltage and FUL when battery is fully charged

The VOLT / AMP button can be changed at any time during charging process. The LCD also can be treated as an independent voltage meter or thermometer.
CHARGING STAGE
The unit has a 6-stage charging algorithm.
Diagnose* - Soft Charge – Bulk Charge - Absorption charge – Equalizing Charge* - Float Mode
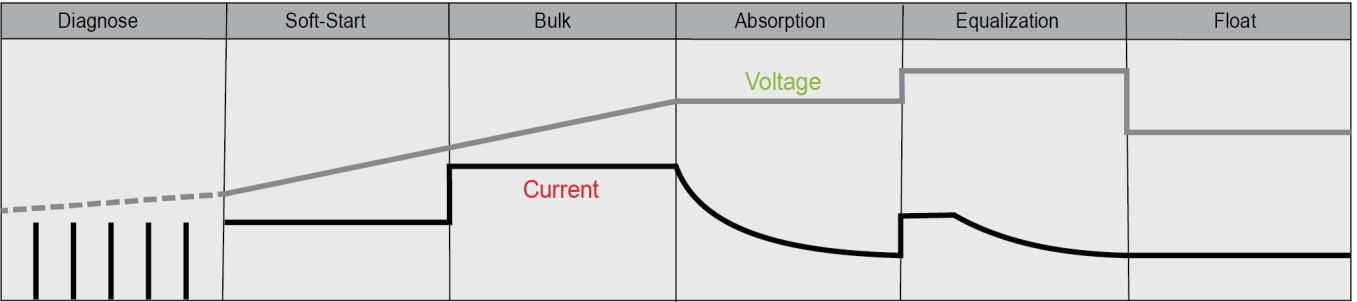
- Diagnose: Only for Lithium battery type, subjected to the Lithium battery initial voltage then determinegoing to Soft start or Bulk charge; if the Lithium battery is protected by BMS, the controller will automatically send the sign al periodically to the battery terminal to activate the BMS against protection.
- Soft start: When batteries suffer an over-discharge, the controller will softly ramp the battery voltage upto 10V for 12V battery, 20V for 24V battery.
- Bulk Charge: Maximum current charging until batteries rise to Absorption level.
For Lead crystal battery type, the charge controller will deliver two step level of Bulk charge, when the first
level rises the battery voltage up to14.4V, then switch into the second level of the 50% of the first bulk charge rate, until the Lead crystal battery voltage up to 14.7V. - Absorption: Constant voltage charging and battery is over 85% for lead acid battery; a Li-ion battery, LiFePO4 battery and LTO battery will close fully charging after the absorption stage, the absorption voltage level will reach 12.6V for Li-ion battery, 14.4V for LiFePO4 battery; 14.0V for LTO battery. 14.7V for Lead crystal battery.
- Equalization: Only for WET battery or Calcium battery type, when the battery is deeply drained below 10V or every 28 days cycle, it will automatically run this stage to bring the internal cells as an equal state and fully complement the loss of capacity. (Lead crystal, Li-ion, LiFePO4, LTO, Gel and AGM battery do not run Equalization ch charge)
- Float Charge or Re-Bulk charge: Battery is fully charged and maintained at a safe level.A fully charged Lead acid battery (Crystal, GEL, AGM, WET battery) has a voltage of more than 13.8 Volts;if the lead acid battery voltage drops to 12.8V at float mode, it will return to Bulk charge; Li-ion, LiFePO4 and LTO battery have no float mode; If a Li-ion battery voltage drops to 12.0V after absorption stage, it will return to Bulk charge; if a LIFePO4 battery voltage drops to 13.4V, or LTO battery voltage drops to 13.2V after Absorption stage, they will return to Bulk charge. (voltage x 2 for 24V use)
LED INDICATION
SAFETY PROTECTION
Spark-free protection.
- Reverse polarity solar and battery connection.
- Against reverse current from battery to solar panel at night.
- Over temperature protection with charging current de-rate.
- Transient overvoltage protection, a varistor or transient voltage suppressor (TVS) at the solar input and battery output against surge voltage.
- Safety and EMC compliance
IEC/EN 60335, EN61000-4-2, EN61000-4-3, EN61000-4-4, EN61000-4-5 FCC Class-B EN61000-4-6, EN61000-4-11, EN61000-3-3, CISPR14-1
MAINTENANCE
Occasionally, clean the case using a damp cloth and mild cleaning agent. Check with terminals without loose, rus ty; If connecting cable is damaged, replace the cable by qualified person.
Warranty
The solar panel itself comes with an 18-months workmanship warranty and a 25-year 85% output warranty.
- Within 30 days of purchase: Items can be returned for a full refund or replacement, we will cover return shipping due to quality issues, buyer pays return shipping and replacement shipping due to non-quality issues.
- Within 30 days to 6 months: Items can be replaced new or refurbished due to quality issues, we will cover return shipping. Items can be replaced with a restocking fee due to non-quality issues, buyer pays for all shipping.
- Within 6 months to 18 months: Items can be replaced refurbished due to quality issues, buyer pays for all shipping.
Troubleshooting
If the ACOPower Solar Panels KIT-HYS100MB is not working properly, check the following
- Check the connections between the solar panel, charge controller, and battery bank for loose or corroded contacts.
- Check the voltage and current readings on the charge controller to ensure they match the specifications of the solar panel and battery bank.
- Check the fuses or circuit breakers for any blown or tripped components.
- Check the solar panel for any visible damage, such as cracks or hot spots, and clean it if necessary.
- Check the battery bank for sufficient charge and replace any dead batteries.
Pros & Cons of Solar Panels KIT-HYS100MB
Pros
- High-efficiency monocrystalline solar panel
- Included charge controller and mounting hardware
- Water and dust-resistant design
- Easy to install and use
Cons
- May not produce sufficient power in low light conditions
- May require additional components, such as inverters or batteries, for specific applications
- May not be suitable for extreme weather conditions
Customer Reviews of ACOPower Solar Panels
Customers generally praise the Solar Panels KIT-HYS100MB for its high efficiency, easy installation, and included charge controller. However, some customers report issues with the durability of the Z-brackets and the compatibility with certain battery types. Overall, the kit receives positive reviews and is recommended for off-grid and mobile applications.
Faqs
What's in the KIT-HYS100MB Package for ACOPower Solar Panels?
Can 12V and 24V Batteries be Charged by the ACOPower Solar Panels KIT-HYS100MB?
With the ACOPower KIT-HYS100MB, what kind of charge controller is included?
How Can I Fix My ACOPower Solar Panels That Aren't Charging?
How long are the ACOPower Solar Panels KIT-HYS100MB expected to last?
How Are the ACOPower Solar Panels Maintained and Cleaned?
Are the KIT-HYS100MB ACOPower Solar Panels weatherproof?
Is It Possible to Grow My ACOPower Solar Panel System Later on?
How Effective Is the ACOPower Solar Panel Kit in Low Light?
How long is the ACOPower Solar Panels KIT-HYS100MB warranty valid?
Leave a Comment