Specifications & Features: Akai Pro MPC Live II User Guide
Content

Introducing the Akai Pro MPC Live 2
Introducing a new approach to music production with an ultra-fast and super-intuitive workflow, the MPC Live is powered by a radiant 7” color multi-touch display. Literally grab and pinch waveforms, draw midi events, adjust envelopes, chop samples, add effects and precisely set your controls using your fingertips. Combined with the classic MPC feel, sound and vastly improved pads, the MPC Live embodies the best elements of our past while taking music production tech into the future.
System Requirements & Product Support
For the latest information about this product (system requirements, compatibility information, etc.) and product registration, visit https://akaipro.com. For additional support, visit https://akaipro.com/support
Technical Specifications
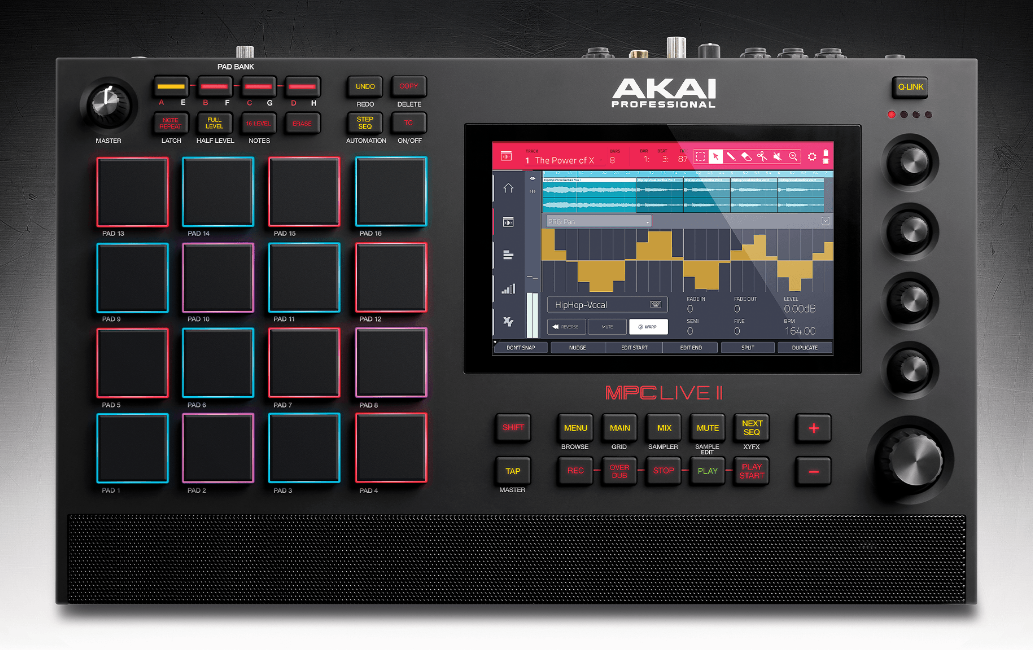
Pads | (16) velocity- andpressure-sensitive pads, RGB-backlit (8) banks accessible via Pad Bankbuttons |
Knobs | (4) 360° touch-sensitive Q-Link knobs (4) Q-Link knob columns accessible via Q-Link button (1) 360° encoder for navigation and selection via push |
Buttons | (22) dedicated function buttons; red-, amber-,or green-backlit |
Display | 6.9” / 176 mm (diagonal) 5.9” x 3.7” / 150 x 93 mm (width x height) Full-color LED-backlit displaywith touch interface |
CPU | Processor: 1.8 GHz quad-core ARM® Cortex® A17 processor RAM: 2 GB Storage: 16 GB (user storage, 10 GB pre-installed content), 4 GB (MPC operating system) |
File System Compatibility exFAT (read &write) (recommended) | |
FAT32 (read & write) | |
NTFS (read & write) | |
EXT4 (read & write) | |
HFS+ (read only) | |
Connections | (2) 1/4” (6.35mm) TRS inputs(1 stereopair) (6) 1/4” (6.35mm) TRS outputs(3 stereopairs)
(2) 5-pin MIDIinputs (2) 5-pin MIDIoutputs (2) USB Type-Aports (1) USB Type-Bport (1) SD cardslot (1) power adapter input |
Power | via power adapter:19 V, 3.42 A, center-positive, included via battery: lithium-ion, rechargeable, up to 4 hours of battery life |
Dimensions (width x depth x height) | 16.7” x 8.8” x 2.7” 424 x 224 x69 mm |
Weight | 5.9 lbs. 2.7 kg |
Features
Top Panel
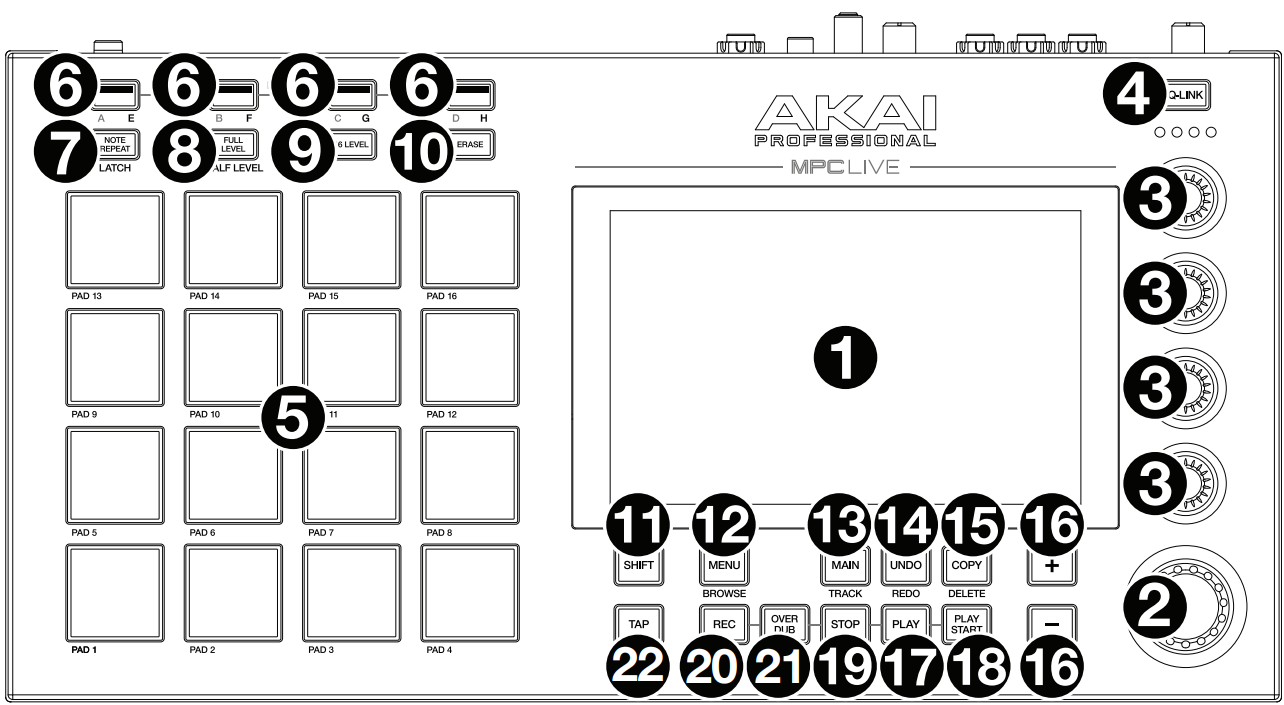
- Touchscreen: This full-color multi-touch display shows information relevant to MPC Live’s current operation. Touch the display (and use the hardware controls) to control the MPC interface. See the later Touchscreen section to learn how to use some basic functions.
- Data Dial: Use this dial to scroll through the available menu options or adjust the parameter values of the selected field in the touchscreen. Pressing the dial also functions as an Enter button.
- Q-Link Knobs: Use these touch-sensitive knobs to adjust various parameters and settings. The knobs can control one group of parameters at a time. The lights below the Q-Link button indicate the currently selected column of Q-Link knobs. Press the Q-Link button to change which parameter or group of parameters they currently control.
- Q-Link Button: Press this button to change which parameter or group of parameters the Q-Link knobs currently control (indicated by the lights above the Q-Link knobs). Each press will select the next column of Q-Link knobs. Press and hold Shift and then press this button to select the previous column of Q-Link knobs instead.
Press and hold this button to show the QLink window over the touchscreen’s current contents. These are the same parameters and settings as what is shown in Q-Link Edit Mode. You can tap Q-Link Edit at the bottom of the window to enter Q-Link Edit Mode immediately (see Operation > Modes > Q-Link Edit Mode to learn about this). - Pads: Use these pads to trigger drum hits or other samples. The pads are velocity-sensitive and pressure-sensitive, which makes them very responsive and intuitive to play. The pads will light up different colors, depending on how hard you play them (ranging from yellow at a low velocity to red at the highest velocity). You can also customize their colors.
- Pad Bank Buttons: Press any of these buttons to access Pad Banks A–D. Press and hold Shift while pressing any of these buttons to access Pad Banks E–H. Alternatively, double-press one of these buttons.
- Note Repeat/Latch: Press and hold this button, and then press a pad to trigger that pad’s sample repeatedly. The rate is based on the current tempo and Time Correct settings.
Press and hold Shift and then press this button to “latch” the Note Repeat feature. When latched, you do not have to hold the Note Repeat button for it to be activated. Press Note Repeat once more to unlatch it. - Full Level/Half Level: Press this button to activate/deactivate Full Level. When activated, the pads will always trigger their samples at the maximum velocity (127), regardless of the amount of force you use.
Press and hold Shift and then press this button to activate/deactivate Half Level. When activated, the pads will always trigger their samples at half-velocity (64). - Level: Press this button to activate/deactivate 16 Level. When activated, the last pad that was hit will be temporarily copied to all 16 pads. The pads will now output the same note number as the initial pad, but a selectable parameter will be fixed at values that increase as the pad numbers increase (e.g., Pad 1 is the minimum, Pad 16 is the maximum), regardless of how hard you press them. In the screen that appears, use the Type selector to choose the parameter: Velocity, Tune, Filter, Layer, Attack, or Decay. See Operation > General Features > 16 Level to learn more.
- Erase: As a Sequence is playing, press and hold this button and then press a pad to delete the note event for that pad at the current playback position. This is a quick way to delete note events from your sequence without having to stop playback. See Operation > General Features > Erase to learn more.
- Shift: Press and hold this button to access some buttons’ secondary functions (indicated by grey writing). Double-press this button to see which buttons have secondary functions—the buttons will flash for a few seconds.
- Menu/Browse: Press this button to open the Menu. You can tap an option in the Menu to enter that mode, view, etc. Press and hold Shift and then press this button to view the Browser. You can use the Browser to locate and select programs, samples, sequences, etc.
- Main/Track: Press this button to enter Main Mode.
Press and hold Shift and then press this button to enter the Track View. - Undo/Redo: Press this button to undo your last action. Hold down Shift and press this button to redo the last action you undid.
- Copy/Delete: Press this button to copy one pad to another. When the From Pad field is selected, press the “source” pad (the pad you want to copy). When the To Pad graphic (of all pads) is selected, press the “destination” pad. You can select multiple destination pads, and you can select pads in different pad banks. Tap Do It to continue or Cancel to return to the previous screen.
Press and hold Shift and press this button to delete. - –/+: Press these buttons to decrease/increase the value of the selected field in the touchscreen.
- Play: Press this button to play the sequence from the audio pointer’s current position.
- Play Start: Press this button to play the sequence from its start point.
- Stop: Press this button to stop playback. You can double-press this button to silence audio that is still sounding once a note stops playing. Quickly pressing this button three times will act as a “MIDI panic” and shut off all voices and stop all audio processing. You can also press this button to abort the loading any files that are being loaded (e.g., if you select a project or program by accident).
- Rec: Press this button to record-arm the sequence. Press Play or Play Start to start recording. Recording in this way (as opposed to using Overdub) erases the events of the current sequence. After the sequence plays through once while recording, Overdub will be enabled.
- Overdub: Press this button to enable Overdub. When enabled, you can record events in a Sequence without overwriting any previously recorded events. You can enable Overdub before or during recording.
- Tap Tempo: Press this button in time with the desired tempo to enter a new tempo (in BPM).
Touchscreen
Tap a button or option to select it. Use the data dial or –/+ buttons to change its setting or value
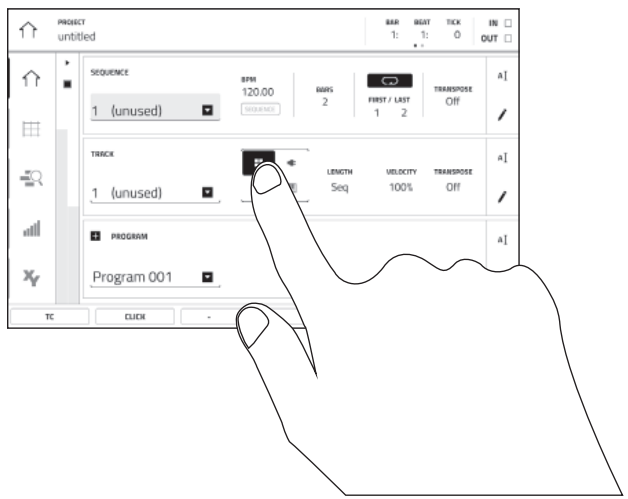
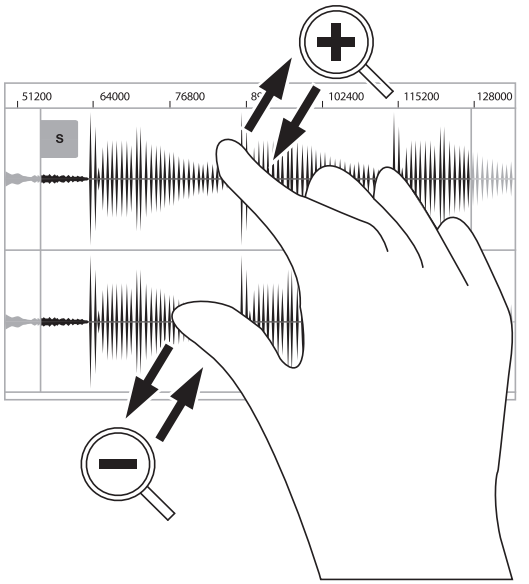
Spread two fingers to zoom in (into a section of a waveform, for example). Pinch two fingers to zoom out.
Double-tap a button to access advanced editing options. In some cases, this will show a numeric keypad that you can use to enter a value (an alternative to the data dial or –/+ buttons). Tap the upper-left part of the touchscreen to return to the previous view.
The top of the touchscreen shows the toolbar, which contains information about the current view (often the name of the current track, sequence, audio pointer position, etc.). Tap an item to select it. The bottom of the touchscreen shows various buttons that you can use in the current view. Tap a button to press it. To return to a previous view, either tap outside of the window currently in the touchscreen or tap the left arrow (⇐) in the upper-left part of the touchscreen.
Rear Panel

- Power Input: Use the included power adapter to connect MPC Live to a power outlet.
- Power Switch: Turns MPC Live’s power on/off.
- Charging Indicator: This light (behind the vent) will turn on when MPC Live’s internal battery is charging (when the power input is connected to a power outlet). When the battery is fully charged or when it is disconnected from a power outlet, then this light will turn off.
- USB-B Port: Use the included USB cable to connect this USB 3.0 port to an available USB 3.0 port on your computer. This connection allows MPC Live to send/receive MIDI and audio data to/from the MPC software on your computer. It also allows any connected USB drives, SD cards, and drives connected to the internal SATA port to mount on your computer (i.e., your computer can access these storage devices that are connected to your MPC Live).
- USB-A Ports: Connect USB flash drives to these USB ports to access their files directly using MPC Live. MPC Live supports read and write capability for exFAT, FAT32, NTFS, and EXT4 file systems a well as read-only capability for HFS+ file systems. (We recommend using an exFAT file system as it is the most robust one supported by both Windows and Mac OS X.)
- SD Card Slot: Insert a standard SD/SDHC card into this slot to access its files directly using MPC Live.
- Rec Vol: Turn this knob to adjust the volume of the inputs.
- Master Vol: Turn this knob to adjust the volume of Outputs 1/2 and the phone's output.
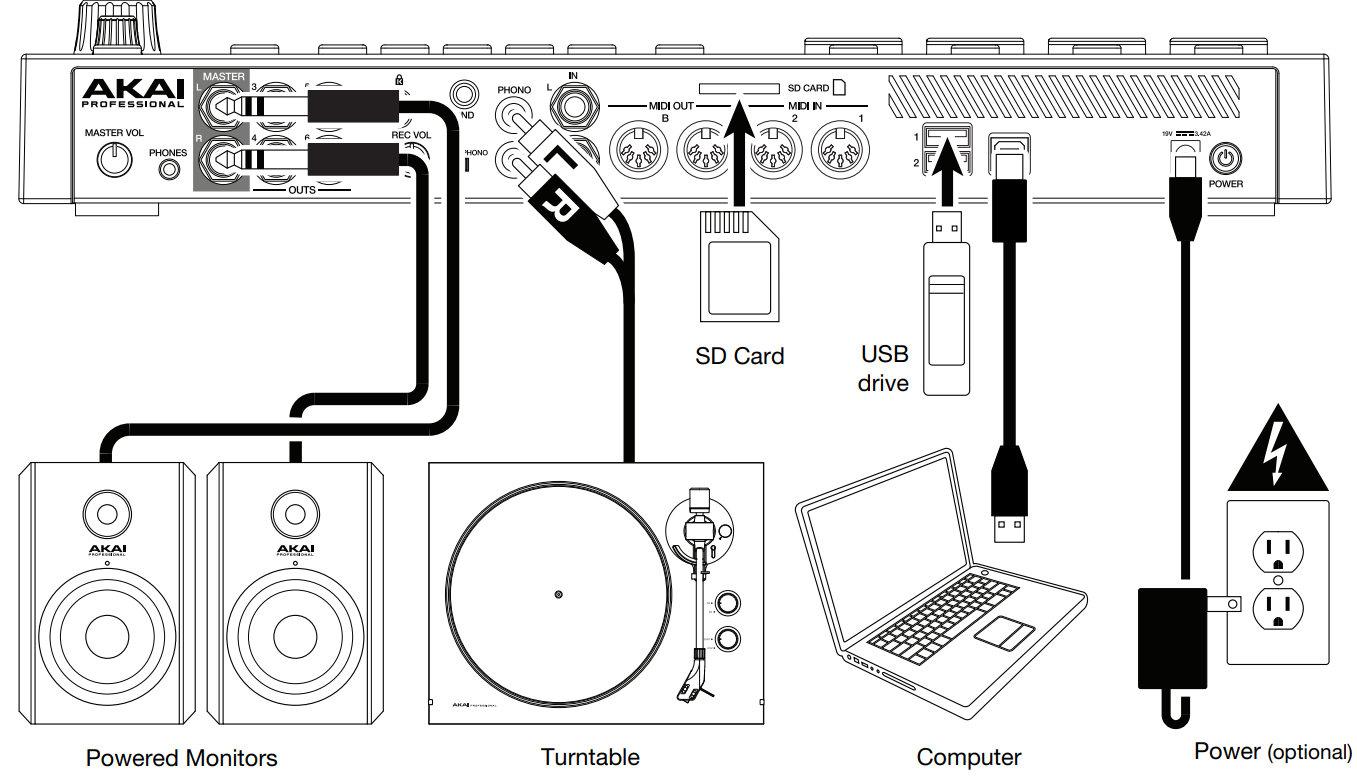
- Inputs (1/4” / 6.35 mm): Use standard 1/4” (6.35 mm) TRS cables to connect these inputs to an audio source (mixer, synthesizer, drum machine, etc.). In Sample Record Mode, you can select whether you want to record either channel or both channels in stereo or in mono. To use these inputs, set the Line/Phono switch to Line.
- Inputs (RCA): Use a standard RCA stereo cable to connect these inputs to a phono-level audio source like a turntable. In Sample Record Mode, you can select whether you want to record either channel or both channels in stereo or in mono. To use these inputs, set the Line/Phono switch to Phono.
- Line/Phono Switch: Set this switch to the appropriate position, depending on which inputs you want to use. If you are using the RCA inputs, set this switch to Phono to provide the additional amplification needed for phono-level signals. If you are using the 1/4” (6.35 mm) inputs, such as a keyboard or a sampler, set this switch to Line.
- Grounding Terminal: If using phono-level turntables with a grounding wire, connect the grounding wire to these terminals. If you experience a low “hum” or “buzz”, this could mean that your turntables are not grounded. Note: Some turntables have a grounding wire built into the RCA connection and, therefore, nothing needs to be connected to the grounding terminal.
- Outputs (1/4” / 6.35 mm): Use standard 1/4” (6.35 mm) TRS cables to connect these outputs to your monitors, mixer, etc.). The Master L/R outputs are the same as Outputs ½.
- Phones (1/8” / 3.5 mm): Connect standard 1/8” (3.5 mm) stereo headphones to this output.
- MIDI In: Use a standard 5-pin MIDI cable to connect this input to the MIDI output of an external MIDI device (synthesizer, drum machine, etc.).
- MIDI Out: Use a standard 5-pin MIDI cable to connect this output to the MIDI input of an external MIDI device (synthesizer, drum machine, etc.).
- Kensington Lock Slot: You can use this slot to secure your MPC Live to a table or other surface.
Description
The MPC Live 2 is designed to be the ultimate standalone production solution, with a range of features that make it perfect for both live performance and studio production. The 16 velocity-sensitive RGB pads provide a tactile and responsive playing surface, while the 7-inch multi-touch screen display allows for easy navigation and manipulation of sounds and samples. The MPC Live 2 also includes a range of onboard effects and plugins, as well as support for third-party VSTs, making it a fully-featured production tool.
Installation
To use MPC Live in Controller Mode (to control the MPC software), follow these steps to download and install the required drivers & software:
- Go to https://akaipro.com and register your product. If you don’t have an Akai Professional account yet, you will be prompted to create one.
- In your Akai Professional account, download the MPC software package.
- Open the file and double-click the installer application.
- Follow the on-screen instructions to complete the installation.
Note: By default, the MPC software will be installed in [your hard drive]\Program Files\Akai Pro\MPC (Windows) or Applications (Mac OS X). You can also create a shortcut on your Desktop.
Getting Started Akai Pro MPC Live II
- Power on MPC Live.
- On your computer, open the MPC software.
- Follow the on-screen instructions to authorize your version of MPC.
- You will need an iLok account and iLok License Manager to complete this. You can create an account and download the license manager at ilok.com.
Make a note of the PACE code in your account, and enter it when asked for it during the authorization/unlock process. - On MPC Live, check the upper-right corner of the touchscreen:
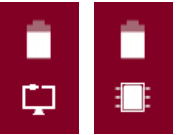
If there is a monitor/cable icon under the battery icon, then MPC Live is already in Controller Mode. Continue to Step 6.
If there a chip icon under the battery icon, then MPC Live is in Standalone Mode.
Follow these steps:- Press Menu to enter the Menu.
- Tap the MPC chip icon in the upper-right corner.
In the Enter Controller Mode window that appears, tap Controller Mode.
Looking for computer may appear briefly in the touchscreen before MPC Live recognizes the USB connection as a controller.
- In the MPC software, click the Edit menu, and select Preferences. Click the Audio tab and select the sound card you want to use. Click OK when you are done.
Important: We highly recommend using your MPC Live’s sound card (Akai Pro MPC Live ASIO). If you need to use the internal sound card on a Windows computer, we recommend downloading the latest ASIO4ALL driver at asio4all.com.
To view the MPC software user guide, click the Help menu and select MPC User Manual.
Setup
Connection
Here is just an example of how to use MPC Live in your setup. Items not listed under Introduction > Box Contents of your included quickstart guide are sold separately.
Remember to remove the protective film from the MPC Live touchscreen!
To use MPC Live in Standalone Mode, just power it on! If this is the first time you’re using MPC Live, its battery will be only partially charged. We recommend connecting it to a power outlet, using the included power adapter, to charge it fully. You can use MPC Live as its battery charges.
Note: We highly recommend checking https://akaipro.com for any available updates to the MPC Live software/firmware and/or drivers.
Tutorial / Basic Concepts
Important: MPC Live’s four Q-Link knobs control up to four parameters at a time—up to 16 within each screen. Whenever this manual instructs you to use the Q-Link knobs to adjust parameters, you can use the Q-Link button (above the QLink knobs) to move through the four columns of four Q-Link knobs.
Press and hold the Q-Link button to see an overview of all 16 Q-Link knobs and their parameters. You can then tap any column of knobs to select those four Q-Link knobs, and then release the Q-Link button.
On the following pages we will create a short song to show you some of MPC Live’s most important features.
Starting Up
Make sure you have completed all of the steps described in Introduction > Setup. This includes:
- Installing the most current drivers and software.
- Connecting your MPC Live to a power source using the included power adapter and powering it on.
- Opening and authorizing your MPC software.
Creating a Drum Kit
Let’s start by making a simple drum kit.
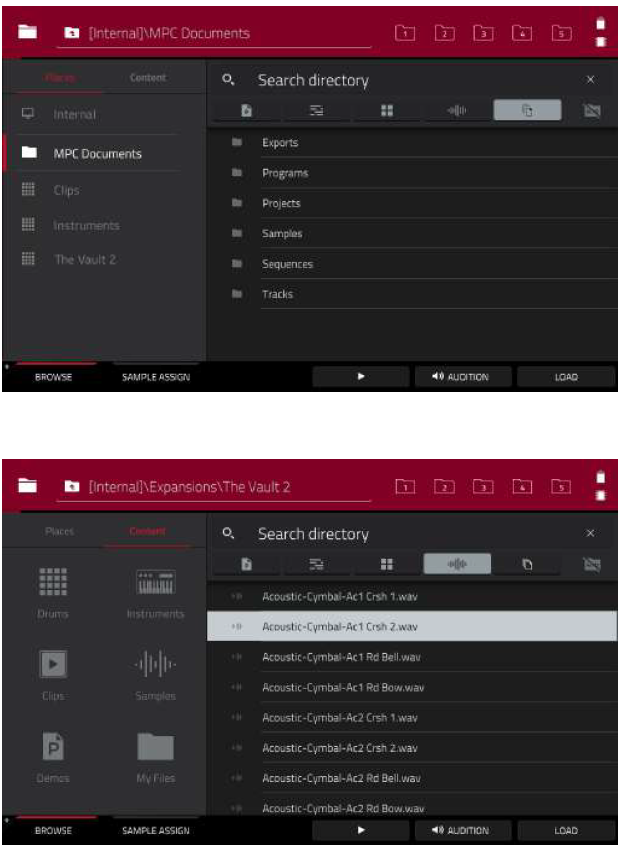
Press Shift+Menu/Browse to show the Browser. Then, use the touchscreen to navigate to where your drum sounds are located:
- To browse your files by location, tap Places on the left side of the touchscreen. Internal is the MPC Live’s internal drive. MPC Documents is a shortcut to the MPC Documents folder on the internal drive. If you have USB drives connected to MPC Live’s USB ports, they will appear in this column, as well.
Important: MPC Live supports read and write capability for exFAT, FAT32, NTFS, and EXT4 file systems as well as read-only capability for HFS+ file systems. (We recommend using an exFAT file system as it is the most robust one supported by both Windows and Mac OS X.) - To browse your files by type, tap Content and then tap the type of file: Drums, Instruments, Clips, Samples, Demos, or My Files.
- To move up one folder level, tap the folder/ icon in the upper-left corner.
- To move through a list, swipe up or down, turn the data dial or use the –/+ buttons.
- To select a file or folder, tap it once.
- To enter a folder, double-tap it or tap Open in the lower-right corner. Alternatively, press the data dial to enter a selected folder.
- To load a selected file, double-tap it, tap Load, or press the data dial. If the file is a sample, it will be loaded to the project’s sample pool. If the file is a project, it will be loaded in its entirety (you will be asked if you want to close your current project).
- To load all files in a selected folder, press and hold Shift and then tap Load All in the lower-right corner.
- To delete a selected file, press and hold Shift and then tap Delete File at the bottom of the touchscreen.
- To preview a selected sound, tap and hold Play (›) at the bottom of the touchscreen.
- To enable or disable the audition function and set its volume level, tap Audition at the bottom of the touchscreen. In the screen that appears, tap Auto to enable or disable it, and tap and drag the level slider up or down to set the volume level. Tap Audition once more to hide the window.
To show the information for the current drive, press and hold Shift and then tap Drive Info at the bottom of the touchscreen. The drive’s information will appear in a new window. Tap OK to return to the previous screen.
After loading samples for a drum kit into the sample pool, use the Sample Assign tab to assign a kick drum sound to a pad:
- Tap Sample Assign at the bottom of the touchscreen. This lets you view the pads and project’s sample pool.
- Press Pad 1 or tap Pad 1 in the touchscreen to select it. The pad will be lit green.
- Swipe the Sample Pool list up or down or use the data dial or –/+ buttons to move through it.
To load a sample to the selected pad (Pad 1, in this case) tap it in the Sample Pool list or press the data dial. Now, you can press Pad 1 to play the kick drum sample.
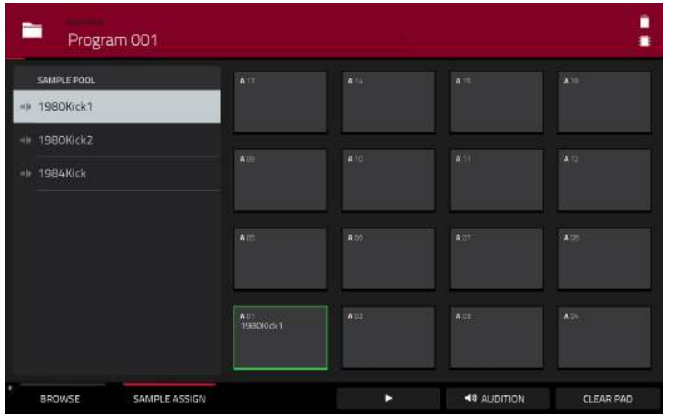
To create a simple drum kit, repeat the above steps for other pads. We recommend loading a snare drum, a closed hi-hat, and an open hi-hat.
Creating a Drum Sequence
Now that your drum kit is set up, let’s record a drum sequence.
- Press Menu to enter the Menu, and then tap Grid View.
- Press Tap Tempo repeatedly at the speed you want to record your sequence. MPC Live will detect the rate and adjust itself automatically.
- Press the Rec button to activate Record Mode.
- Press the Play button to start the actual recording. The pre-count will count one measure before MPC Live starts to record. We recommend recording only one sound (pad) at a time, especially if you are not familiar with playing drums on the pads.
- Play a simple bass drum pattern. The note events you just recorded will automatically be placed in the grid (in this case, on 16th notes). The initial measure length is two bars. After the two bars, the recording will enter Overdub Mode automatically; the sequence plays again from the beginning and keeps looping, allowing you to record further notes. Don’t stop the recording!
- Play the snare drum part, then a hi-hat part.
- When you’re done recording, press the Stop button.
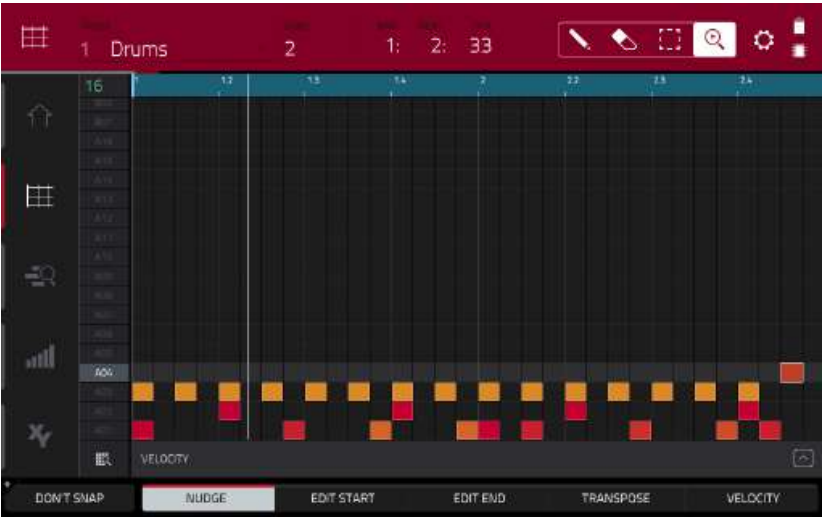
If you start recording again on this sequence, keep in mind that the pads you play in your new recording will automatically replace existing notes played with the same pads. To prevent this, you can start again from Step 1 but press the Overdub button instead of the Rec button. Overdub lets you record additional note events over the existing Sequence.
The Undo button functions differently while in Record Mode. Normally, pressing Undo will undo just the last event. When there is an event to undo, the Undo button will be lit solid. While recording, the Undo button will flash. In this case, pressing Undo will erase all events from that recording (i.e., since Play or Play Start was pressed).
Menu
The Menu lets you select any of the 20 modes, save your project, set your preferences, switch between Standalone Mode and Controller Mode, or view your system resources. To open the Menu, press Menu, or tap the icon in the upper-left corner of the touchscreen while on the normal page of your current mode.
When viewing the Menu, do any of the following:
- To enter a mode, tap it.
- Important: If a sequence is currently playing, you will not be able to enter Song Mode. Stop playback before entering Song Mode.
To return to the previous mode, tap the grey area in the upper-left corner, or press Menu again.
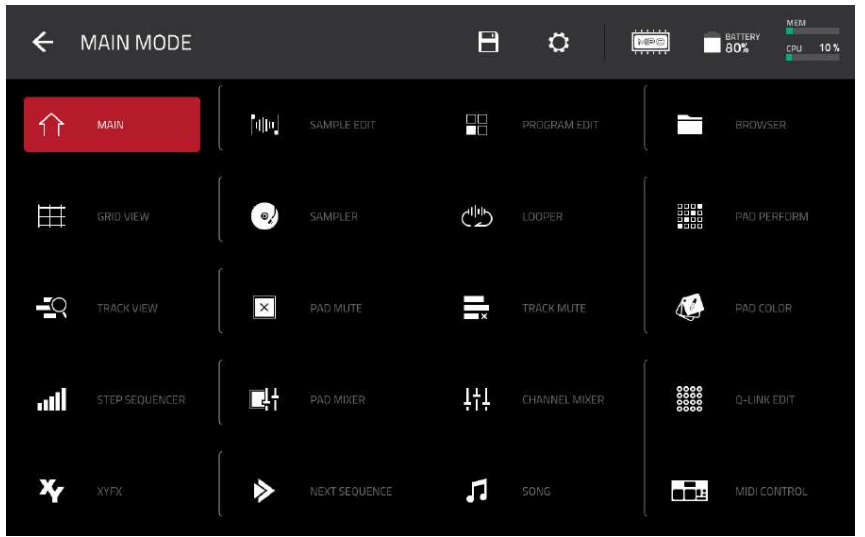
- Click a part of the screen above to skip directly to that part of this user guide.
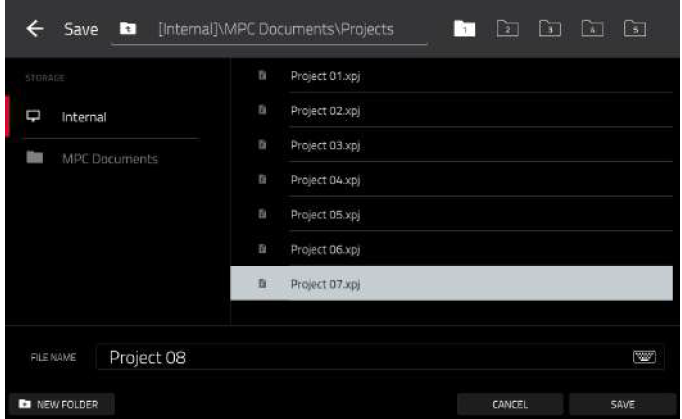
Save
To save the project, tap the disk icon at the top of the touchscreen. If you have already saved the project, your changes will be saved. If you have not saved the project yet, use the Save window to save the project:
To select the storage device you want to view, tap it in the Storage column on the left. Internal is the MPC Live’s internal drive. MPC Documents is a shortcut to the MPC Documents folder on the internal drive. If you have USB drives connected to MPC Live’s USB ports, they will appear in this column, as well.
To enter a folder, double-tap it. Alternatively, turn the data dial or use the –/+ buttons to move through the list, and press the data dial to enter a folder. You can also tap one of the five folder buttons in the upper-right to jump immediately to those pre-assigned file paths (see Modes > Browser to learn how to do this).
To create a new folder, tap New Folder, use the virtual keyboard that appears to enter a name, and then tap Do It. You will immediately enter the new folder.
To move up one folder level, tap the folder/ ⇑ icon.
To name the file, tap the File Name field at the bottom of the touchscreen, and use the virtual keyboard that appears. To save the file, tap Save.
To cancel and return to the Menu, tap Cancel. Alternatively, tap the ⇐ icon in the upper-left corner.
Akai Pro MPC Live II Preferences
- To return to the Menu, tap the ⇐ icon in the upper-left corner. Any changes you have made in the Preferences will be retained.
- To restore your MPC Live’s default settings, tap Reset. In the screen that appears, tap OK to continue or Cancel to return to the Preferences. In the next window, tap Save to save your current project before restoring the default settings; tap Cancel to return to the Preferences; or tap Don’t Save to restore the default settings without saving your current project.
- To enter Update Mode, press and hold Shift and tap Update. In the screen that appears, tap Save to save your current project before entering Update Mode; tap Cancel to return to the Preferences; or tap Don’t Save to enter Update Mode without saving your current project.
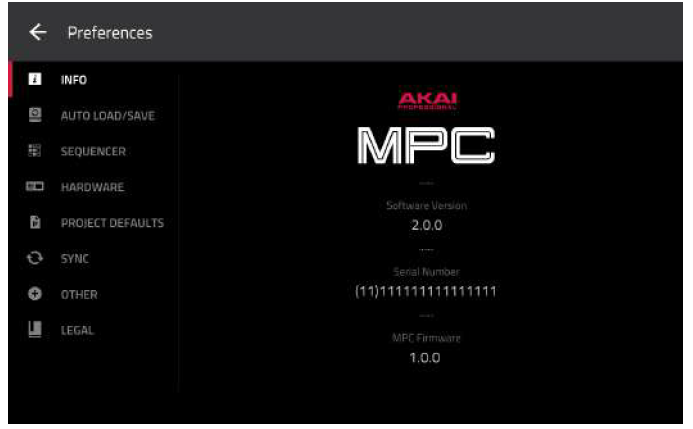
Info
This screen shows current information about your MPC Live: its current firmware version, which includes its standalone operating system (MPC Firmware); its hardware Serial Number; and its current firmware for the Control Surface.
Auto Save
The settings on this screen determine if (and how) projects are automatically saved.
- Enabled: When enabled, MPC Live will automatically save your current project after each Timeout interval. When disabled, MPC Live will not automatically save your project; you may save only manually.
- Timeout: Use this field to select how often your project will automatically save.
Sequencer
The settings on this screen determine how sequencing works in Grid View and in the Step Sequencer.
- Display Resolution: This is the display resolution (in PPQN—pulses per quarter note) of pulse values in certain areas of the operating system. Please note that this setting affects the display resolution, not the timing.
- Instant Track Mute: When disabled, if you mute a track, its Note On messages will be ignored, and samples and notes that are playing will finish playing their entire length (this is how legacy MPCs’ track-muting worked). This is useful if you are using loops and want a loop to play to the end of a bar but not play the next time the sequence loops. When enabled, if you mute a track, the MIDI track volume (0) will be sent. The loop will continue to play but at zero volume, allowing the loop to continue playing when the track is unmuted. This is useful when you want to have the track muted immediately.
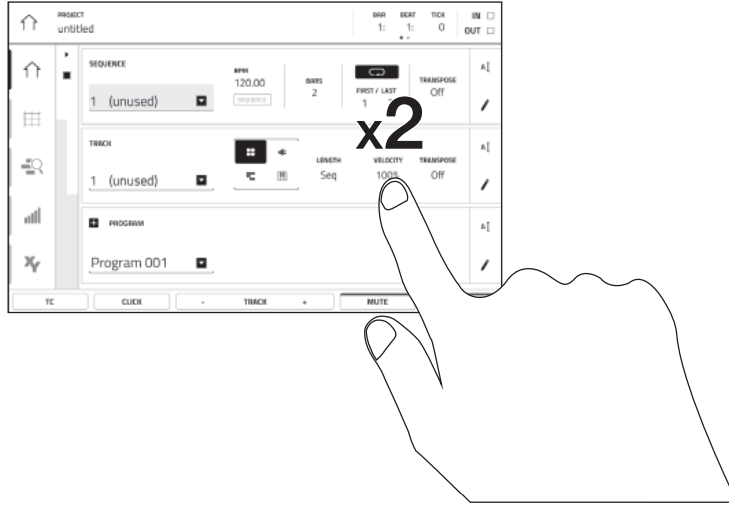
- Play Track Mute and Solo Events: When enabled, track mute and solo events are played back when you are in Track Mute Mode. When disabled, track mute and solo events will not be played back while in Track Mute Mode.
- Record Track Mute and Solo Events: When enabled, track mute and solo events are recorded when you are in Track Mute Mode (timing correct settings will affect the recorded position events). When disabled, track mute and solo events will not be recorded while in Track Mute Mode. This feature is useful if you want to use Track Mute Mode to record track mutes or solos into your sequences as opposed to using Track Mute Mode for performance or listening purposes only.
- Record Pad Aftertouch Event: When enabled, pad aftertouch data (from MPC Live’s pressure-sensitive pads) will be recorded. When disabled, pad aftertouch data will be ignored.
- Place Events Recorded During Count-In at Start Point: When enabled, pressing a pad during the recording’s pre-count will record that note event at the start of the recording (this is how the MPC3000 worked). When disabled, no notes will be recorded until the pre-count is finished and recording has begun.
- Truncate Duration: This determines if/how events are cropped if they exceed the length of the current Sequence:
- To Sequence Length: If the length of an event exceeds the length of the sequence, it will be truncated. This ensures that the event will not overlap itself when the sequence loops.
- To Sequence End: If an event exceeds the length of the sequence, it will be truncated to the end of the current sequence. In other words, the event will stop playing when the sequence ends or loops.
- As Played: Events will play back exactly as they were recorded, even if they overlap themselves when the sequence loops.
Hardware
The settings on this screen determine the behavior of MPC Live’s pads and touchscreen.
- Pad Threshold: This determines how much force is required to strike the pads for them to trigger.
- Pad Sensitivity: This determines how the pads respond to touch. At lower values, you need to use more force to generate a high-velocity note. At higher values, it is easier to generate high-velocity notes, even if you do not use much force while pressing a pad.
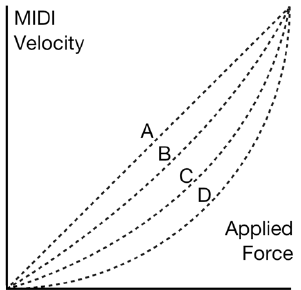
Pad Curve: This determines how striking the pads translates into velocity values. The A curve is essentially linear, while the B, C, and D curves are exponential (see graphic here).
- Velocity & Aftertouch: View these meters when striking and pressing the pads to help gauge the force and pressure you are applying to them. These meters are useful when adjusting the Pad Threshold and Pad Sensitivity parameters (above).
- Footswitch 1 & Footswitch 2: These determine how connected footswitches will work. These options are not available for MPC Live, which does not have footswitch inputs.
- MIDI Control Mode Output: This determines which MIDI port MPC Live is using to send MIDI messages to external MIDI devices.
- Screen Dimming: This determines how much time must pass before MPC Live automatically dims its touchscreen to preserve its battery life.
- Screen Brightness: This determines the brightness of the screen during normal operation: normal brightness (Day) or dimmed (Night).
- Power On Screen: This determines whether or not the power-on screen appears when you power the unit on. The power-on screen shows a Start button that you must tap and hold in order to fully power MPC Live on. If you do not tap and hold the Start button, MPC Live will return to its powered-off state. This feature is to prevent MPC Live from powering on if the power button is accidentally pressed. When set to Never, this feature is disabled. When set to When On Battery, this feature is enabled only if MPC Live is not connected to a power outlet. When set to Always, this feature is enabled regardless of a power outlet connection.
WiFi/Bluetooth
The settings on this screen will determine how MPC Live’s wireless and Bluetooth connections work. We will add this functionality in a near-future release. Check akaipro.com to ensure you are using the latest software version. Your MPC Live’s current firmware (which includes its standalone operating system) is in the Info screen of these Preferences.
Project Defaults
The settings on this screen determine various default values for any new project that you create.
- Default Tempo: This is the default tempo in BPM.
- Default Master Tempo: When enabled, the default tempo value will be used for the master tempo. When disabled, the default tempo will be used for sequences.
- Default Sequence Bars: This determines the default number of bars of a new sequence.
- Default Time Signature Numerator: This determines the number of beats per bar of a new sequence (the top number of a time signature).
- Default Time Signature Denominator: This determines the value of each beat of a new sequence (the bottom number of a time signature).
- Default Pad Slice: This determines how new samples will play when you load them or record them into a project. When set to Pad, the Slice menu in Program Edit Mode will be set to Pad, which lets you set the start point, end point, etc. for the layer. When set to All, the Slice menu in Program Edit Mode will be set to All, in which the entire sample plays.
- Default Drum/Keygroup Filter: This determines the default type of filter that drum and keygroup programs will use.
- New Project Dialog: This determines what options you see when you start a new project. When set to Off, a new project will be empty with no preconfigured settings except for the project defaults shown here. When set to Demo, you can choose to load a demo project (from several different genres) as a starting point or an empty project. When set to Demo/Template/Recent, you can choose to load a demo project, a project template file, or an empty project.
Sync
The settings on this screen determine how MPC Live synchronizes with connected USB and MIDI devices.
- Receive MIDI: This determines whether MPC Live receives MIDI Clock information (MIDI Clock), MIDI Time Code information (MIDI Time Code (MTC)), or neither (Off).
- MTC Frame Rate: This determines the frame rate used by MIDI Time Code (MTC), which is important for correct timing, especially when working on film scoring projects. In most cases, you should select 25.
- Send MIDI: This determines whether MPC Live sends MIDI Clock information (MIDI Clock), MIDI Time Code information (MIDI Time Code (MTC)), or neither (Off).
- Start Time: This is the starting time that will be sent when Send MIDI is set to anything other than Off. The time is formatted in hours:minutes:seconds:frames.
- Send Port 1 & Send Port 2: These are the MIDI ports over which MIDI Clock or MTC information will be sent.
- Receive MMC: When enabled, MPC Live will be able to receive MIDI Machine Control (MMC) information. When disabled, MPC Live will not receive this information.
- Send MMC: When enabled, MPC Live will be able to send MIDI Machine Control (MMC) information. When disabled, MPC Live will not send this information.
Other
The settings on this screen determine how other features work in the hardware and operating system.
- Tap Tempo: This determines how many times you have to press the Tap Tempo button before the new tempo is recognized.
- Flash Tap Tempo Light: When enabled, the Tap Tempo button’s light will flash in time with the tempo. When disabled, the Tap Tempo button’s light will be off.
- Bank Button Press: This determines how the Pad Bank buttons work.
- Select A-D: Pressing a Pad Bank button once will select the corresponding bank from Pad Banks A–D. Pressing and holding Shift while pressing a Pad Bank button will select the corresponding bank from Pad Banks E–H.
- Select/toggle bank: Pressing a Pad Bank button will alternate between the corresponding bank from Pad Bank A–D and Pad Bank E–H. In other words, you do not need to hold Shift to select one of Pad Banks E–H.
- Filter ‘All Notes Off’ CC: When enabled, “All Notes Off” (“MIDI panic”) messages will be ignored. This is useful if you are using an external MIDI device that can send these types of messages but you want to filter them out. When disabled, “All Notes Off” messages will be received normally.
- Program Change: This determines what an incoming MIDI program change message will change: a Program, Sequence, or Track.
- Vintage Mode: This determines the type of emulation applied to the audio output. You can apply the particular sonic qualities of, for example, the MPC3000 or MPC60, or of course no emulation (None).
- Sampling Bit Depth: This determines bit depth of the audio recorded from a sample.
- Audition Auto Play: This determines how long a sample will sound when auto-previewing it.
- Cue Preview: This determines if/how audio is played as you move the cue playhead. As you move the cue playhead through a sample waveform, you can set it to play the small part of the sample before the cue playhead (Before), play the small part of the sample after the cue playhead (After), or not play at all (Off). You can also set this in Sample Edit Mode (see Modes > Sample Edit Mode > Settings).
- Slice Preview: This determines if/how audio is played as you move a slice marker. As you move the slice marker through a sample waveform, you can set it to play the small part of the sample before the slice marker (Before), play the small part of the sample after the slice marker (After), or not play at all (Off). You can also set this in Sample Edit Mode (see Modes > Sample Edit Mode > Settings).
- Screensaver Disable: This determines if/when your computer’s screensaver is disabled while using the MPC software (using MPC Live in Controller Mode):
- Never: Your computer’s screensaver will function normally.
- When hardware attached: As long as your MPC Live is connected to your computer and powered on, your computer’s screensaver will be disabled. It will function normally again if you power off or disconnect your MPC Live from your computer.
- Always: Your computer’s screensaver will be disabled as long as the MPC software is open (whether or not your MPC Live is connected or powered on).
- Collect Usage Statistics: This determines whether or not your usage statistics will be sent occasionally to us, enabling us to improve the MPC experience.
- Threads: This determines how many cores of your computer’s processor will be used to render audio. The available range depends on your processor.
- Audio Warp Algorithm: This determines how a sample is “warped” when you adjust the length of a sample without changing its pitch (e.g., the Warp function in Audio Edit Mode for audio tracks or in Program Edit Mode for clip programs).
- Auto Warp: This determines how recorded audio track regions are warped. When set to On, any audio track region that you record will be warped automatically to match the current sequence tempo. You can then adjust the sequence tempo while the audio track region remains in time.
Note: When you record an audio file, the current sequence tempo will be embedded with it. This information is stored within the sample file when you save the project. When you warp an audio track region, the warping algorithm uses this sequence tempo and the current value in the BPM field to generate the “stretch factor.”
Legal
This screen shows legal information relevant to MPC. For complete legal information, visit https://akaipro.com/product-legal
Mode
Tap this icon to switch MPC Live between Standalone Mode and Controller Mode. In the screen that appears, select whether you want to save your current project before switching (Save), switch without saving your project (Don’t Save), or stay in the current mode and project (Cancel). You cannot freely switch between Standalone and Controller Modes without also closing your current project.
System Resources
Tap one of these icons to show the System Resources window.
The indicators in this window show current usage statistics:
- Battery: The first indicator shows the current battery life as a percentage. If you see an exclamation point (!) in the indicator and a low-battery warning at the bottom of the window, connect MPC Live to a power outlet as soon as possible.
- CPU: The second indicator shows the current CPU as a percentage.
RAM Usage (Mem): The third indicator shows MPC Live’s current RAM usage as a percentage.
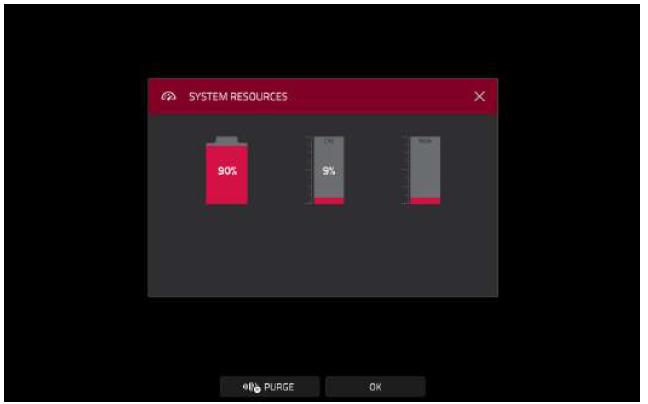
To delete samples from the project, tap Purge. In the screen that appears, tap Unused Samples to delete all unused samples from the project, tap All Samples to delete all samples from the project, or tap Cancel to return to the previous screen.
To close the System Resources window, tap OK, the X in the upper-right corner, or anywhere outside the window.
Troubleshooting
If you encounter any issues with the Akai Pro MPC Live II try the following troubleshooting steps:
- Make sure the MPC Live 2 is connected to a power source and turned on.
- Check that all cables are securely connected to the MPC Live 2 and your other devices.
- Make sure that the MPC Live 2's audio and MIDI settings are correctly configured.
Akai Pro MPC Live II Pros & Cons
- Pro: Portable and standalone production solution
- Pro: Velocity-sensitive RGB pads and multi-touch screen display
- Pro: Onboard effects and plugins, as well as support for third-party VSTs
- Con: Expansion of the onboard storage can be expensive
- Con: The price point may be high for some users
Customer Reviews
"The Akai Pro MPC Live II is an absolute game-changer. The portability and standalone capabilities make it perfect for live performances, and the onboard effects and plugins are top-notch." - John D., verified customer
"I love the tactile feel of the pads and the ease of use of the multi-touch screen display. The Akai Pro MPC Live IIhas greatly improved my workflow and productivity." - Jane S., verified customer
Faqs
What is the battery life of the Akai Pro MPC Live II?
Which software is part of the Akai Pro MPC Live IIpackage?
Can I use the Akai Pro MPC Live II to connect external instruments?
Are MIDI controllers supported by the Akai Pro MPC Live II?
What is the number of pads on the Akai Pro MPC Live II?
Does the Akai Pro MPC Live II have WiFi support?
Leave a Comment