How to Use: Dero Tower Fan DR-HTF005 User Manual
Content
Introduction of the Dero Tower Fan DR-HTF005
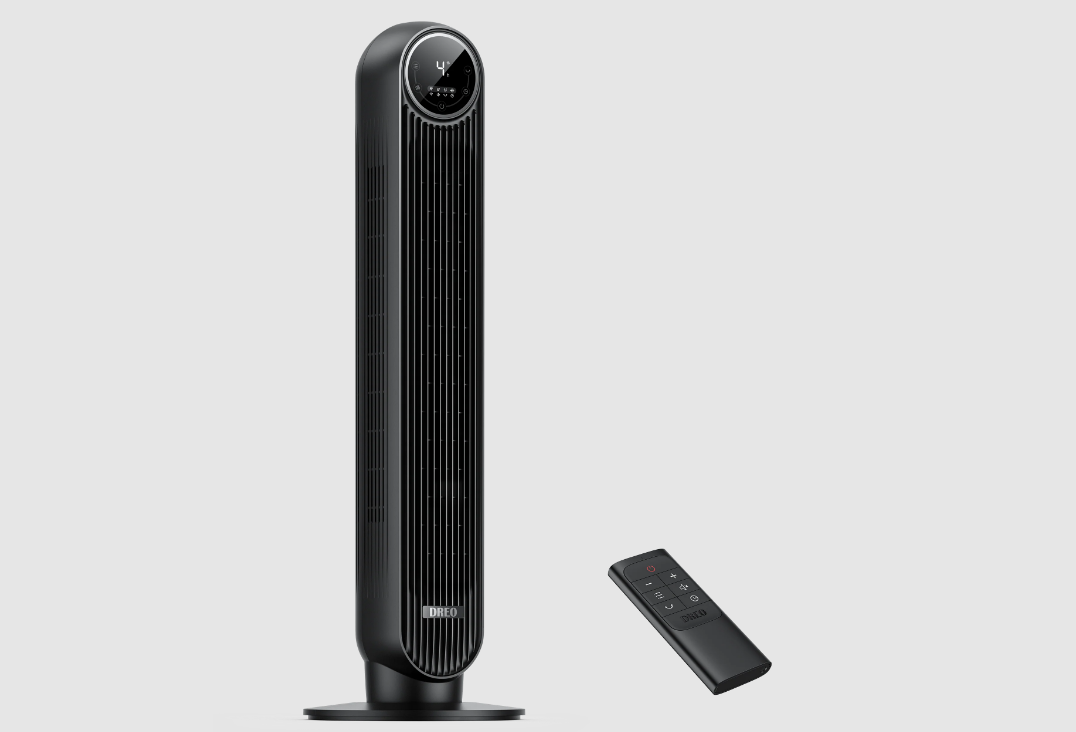
Dero Tower Fan is a sleek and efficient cooling solution designed to enhance airflow in any room. Featuring multiple speed settings and oscillation capabilities, it ensures optimal air distribution for maximum comfort. The Dero Tower Fan DR-HTF005 is priced at approximately $69.99. The fan operates quietly, making it suitable for use in bedrooms or offices. Its modern design complements various home decors, while the remote control offers convenience for easy adjustments.
Specifications
| Specification | Details |
|---|---|
| Model | DR-HTF005 |
| Power Supply | 24V 1A |
| Rated Power | 24W |
| Power Adapter | Input: 100-240V ~50/60Hz |
| Output: 24V 1A | |
| Remote Control Battery | CR2025 3V |
Description
DR-HTF005 boasts a modern and compact design that complements any interior decor. Its vertical structure allows for maximum airflow while minimizing floor space. The fan features a user-friendly interface with easy-to-use buttons and a remote control, making it simple to adjust settings without getting up. The built-in timer and multiple speed settings ensure that you can customize the cooling experience to your comfort level.
The fan also includes a washable filter to help purify the air and reduce dust circulation. With its energy-efficient design, it not only cools your space effectively but also helps in reducing your electricity bill.
ASSEMBLING YOUR TOWER FAN
Assembly Instructions
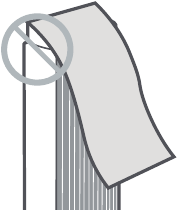
When using the appliance for the first time, remove the wraps and attach the parts by following the steps below.
Keep two base halves in a crossed position, then insert pegs on one half onto the slots on the other half.
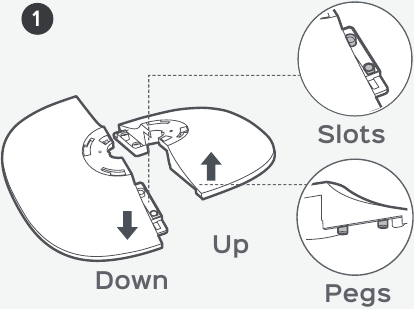
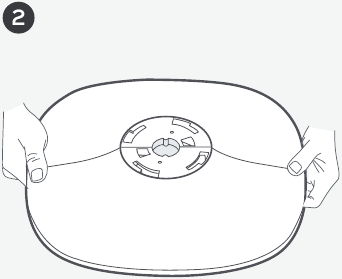
Press down on edges to click two base halves together.
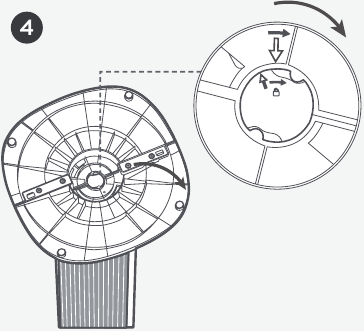
Fit the base onto the bottom of the fan by aligning the arrows on the underside. Make sure the jutting points in the center of the base are fitted into the recesses on the fan.
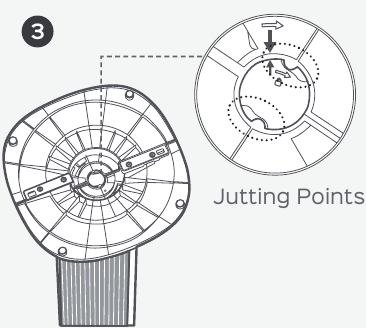
Rotate the base clockwise to lock in place.
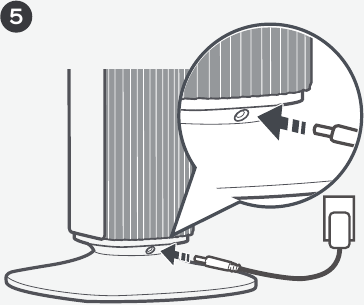
Put the fan upright, then plug the power adapter into the power input (located at the back of the fan), and into the power outlet.
CAUTION
Do not operate the tower fan if the base has not been installed.
Dero Tower Fan DR-HTF005 Package Contents
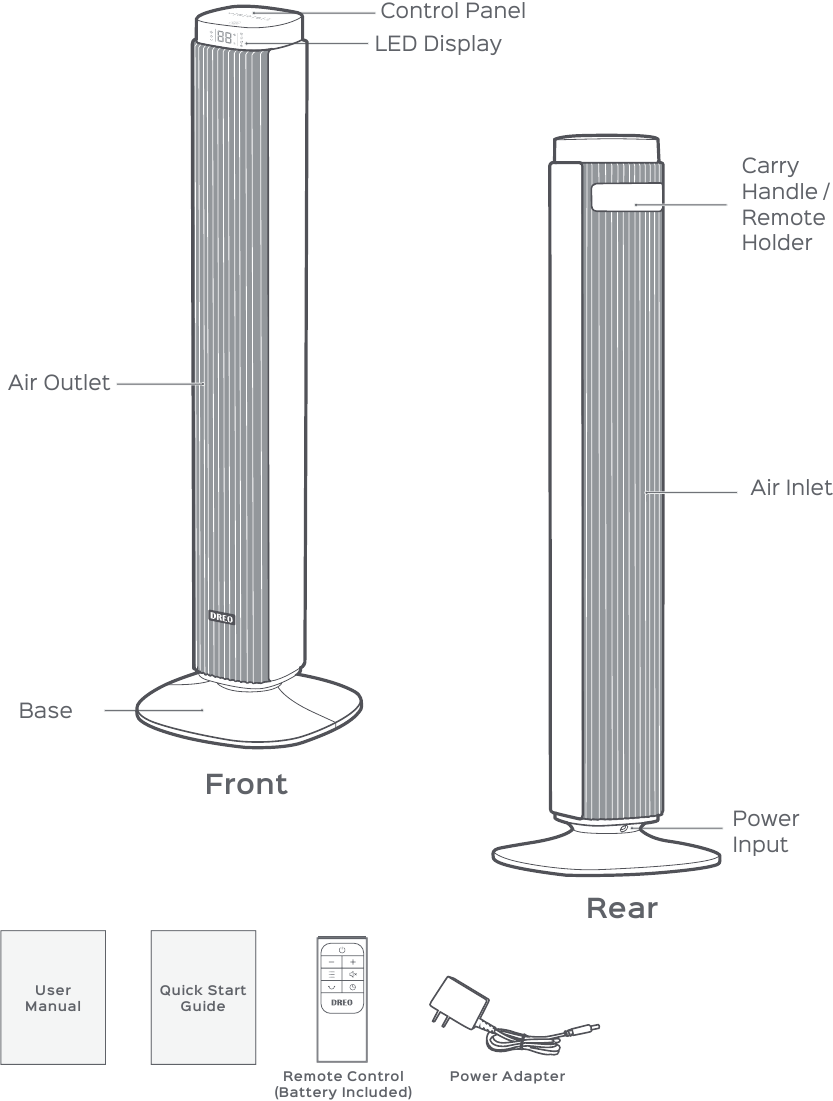
KNOWING YOUR TOWER FAN
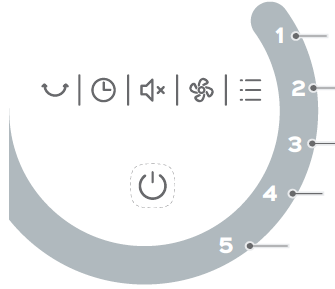
Control Panel


Oscillation Button
Adjust airflow direction

Timer Button
Select to set a timer (0-12h)

Mute Button
Turn on/off button sounds

Fan Speed Button
Adjust fan speed (1-9 levels)

Mode Button
Switch between Normal/ Natural/ Sleep/ Auto Mode

Power Button
Turn power on/off
LED Display
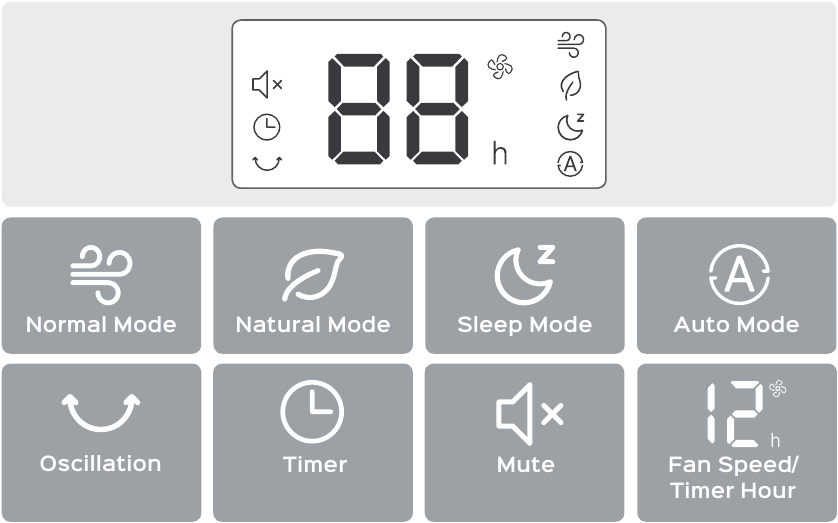
NOTE:
- Display will turn off after 1 minute (after 5 seconds in sleep mode).
- Wake the display up with any button.
- Display will not turn off when the auto on timer is enabled.
Getting the Most out of Your Tower Fan
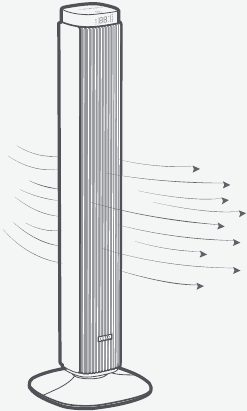
- It's not an air conditioner.
- Remove any tall obstacles that might block the airflow from the fan.
- Combine with your AC unit to get cooler air throughout the room.
- Position the tower fan closer to you to get more direct airflow.
- Place a bucket of ice in front of the fan for an extra cooling boost.
USING YOUR TOWER FAN
General Operations
- Touch
 to turn on, and
  to choose a working mode.
 - Touch
 to adjust the airflow volume.
 - Touch
 to change the airflow direction.
 - Touch
 to set a timer.
 - Touch to turn off the tower fan.
Working Modes

Sleep Mode
(Mute Auto On)
Fan speed decreases every 30 minutes.
Speed decreases by two levels at most and will remain constant if at level 3, 2 or 1:
- For level 9: 9→8→7
- For level 8: 8→7→ 6
- For level 7: 7→6→5
- For level 6: 6→5→4
- For level 5: 5→4→3
- For level 4: 4→3
- For level 3: 3
- For level 2: 2
- For level 1: 1

Auto Mode
Fan speed adapts to the ambient temperature.

Normal Mode
Fan runs at the constant speed.

Natural Mode
Fan runs at alternating speeds.
Additional Features

When the fan is ON/OFF, touch the timer ![]() button repeatedly to set a timer from 1 to 12 hours. When the timer ends, the fan will stop/start running automatically. To cancel, set the time to 0 hour.
button repeatedly to set a timer from 1 to 12 hours. When the timer ends, the fan will stop/start running automatically. To cancel, set the time to 0 hour.
Note: When the auto off timer is enabled, display will return to fan speed after 3 seconds.

Touch the mute button ![]() to turn on or off the button sounds.
to turn on or off the button sounds.

If the fan is turned OFF or disconnected from power, it will operate under the previous settings (except the timer setting) when it is turned ON again.
Remote Control
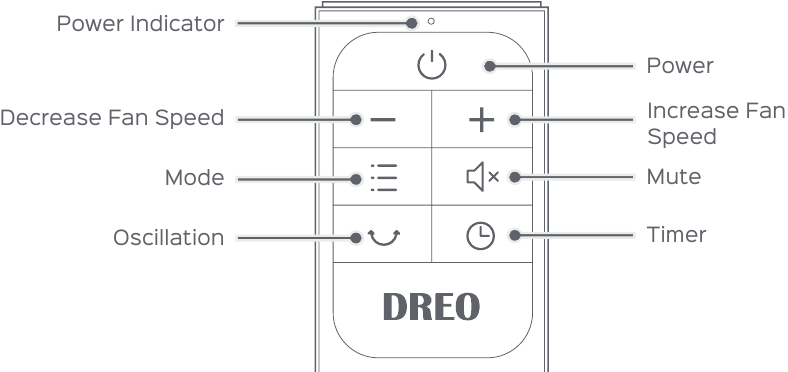
Battery Replacement
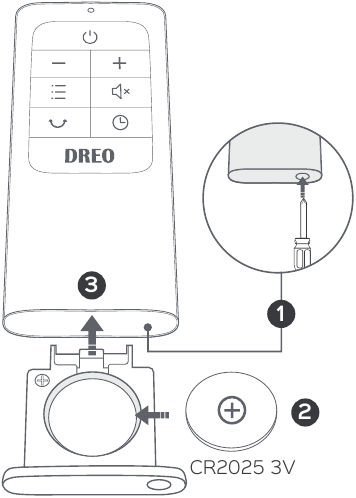
- Press the locking button to pop out the battery holder.
- Replace with the same battery type with the (+) side facing up.
- Push in the holder until securely locked into place.
Note: If the indicator on the remote control doesn't turn on any more, please consider replacing the battery.
WARNING
Chemical Burn Hazard. Keep batteries away from children.
This product contains a lithium button/coin cell battery. If a new or used lithium button/coin cell battery is swallowed or enters the body, it can cause severe internal burns and can lead to death in as little as 2 hours. Always completely secure the battery compartment. If the battery compartment does not close securely, stop using the product, remove the battery, and keep it away from children. If you think batteries might have been swallowed or placed inside any part of the body, seek immediate medical attention.
The batteries must be disposed of properly, including keeping them away from children. Even used cells may cause injury.
Setup Guide
To set up the Dero, follow these steps:
- Unbox the fan and all included accessories (remote control, washable filter).
- Assemble the base and column according to the instructions provided.
- Plug in the fan and turn it on using the power button.
- Use the remote control or panel buttons to adjust speed settings, timer, and oscillation.
- Ensure the washable filter is properly installed for optimal air quality.
CLEANING AND MAINTENANCE
Outer Surface
Gently wipe off the dust with a soft, dry cloth.

Grilles & Blades
Remove the dust using a vacuum or air duster.
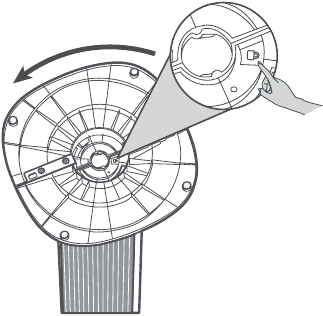
Base
Press on the lock sign here and rotate counterclockwise to release the base, then disassemble the base in the reverse order of assembly.
CAUTION
- Always unplug the fan before any cleaning or maintenance to avoid the risk of fire, electric shock, or injury to persons.
- Do not immerse in water or get water inside the motor housing.
- Do not use any chemical agents when cleaning the fan.
- Store in a cool, dry place and cover it to protect from dust.
IMPORTANT SAFETY INSTRUCTIONS
READ ALL CAUTIONARY MARKINGS ON THE APPLIANCE AND SAFETY INSTRUCTIONS IN THE USER MANUAL BEFORE USE.
Do not cover the air inlet and outlet while in operation.
Do not use the fan near flammables and combustibles.

General Safety
- Children shall not play with the appliance. Cleaning and maintenance shall not be performed by children without supervision.
- Use the appliance as described in the user manual only. Any other use not recommended in the user manual may cause fire, electrical shock, or personal injury.
- This appliance can be used by children aged above 8 years and persons with reduced physical, sensory or mental capabilities or lack of experience and knowledge if they have been given supervision or instruction concerning use of this appliance in a safe way and understand the hazards involved.
Operation Safety
- Place the appliance on a flat, dry surface before use.
- Do not immerse in water and any other liquids.
- Do not use the appliance until the base is installed.
- Do not insert your fingers, pencil and any other objects into the grilles while in operation.
- Do not dismantle, repair, or modify. All servicing should be performed by qualified personnel.
Electricity Safety
- Make sure that the voltage of your electricity supply is the same as that indicated on the appliance.
- Always unplug before cleaning or leaving the appliance unused for a long period of time. Keep your hands dry when plugging/unplugging.
- Do not operate any fan with a damaged cord or plug. Discard fan or return to an authorized service facility for examination and/or repair.
- Do not run cord under carpeting. Do not cover cord with throw rugs, runners, or similar coverings. Do not route cord under furniture or appliances. Arrange cord away from traffic area and where it will not be tripped over.
- WARNING: To reduce the risk of fire or electric shock, do not use this tower fan with any solid-state speed control device.
- Use 24V/1A power adapter only. Turn off the appliance before plugging.
FOR HOUSEHOLD USE ONLY
READ AND SAVE THESE INSTRUCTIONS
Gentle Reminder
Check the appliance regularly and refer to TROUBLESHOOTING or contact our customer support if it shows any of the following signs:
- Power cord or plug is damaged.
- Loud noise, unusual smell or excessive heat.
Dero Tower Fan DR-HTF005 Troubleshooting
My fan won't turn on!
- Make sure that the cord is connected to a powered outlet and the mains voltage corresponds with the voltage indicated on the fan.
- Check if the power adapter is securely inserted into the power outlet and the tower fan.
My fan is shaky and wobbling!
- Place the fan on a flat, level surface.
- Incorrect installation might also cause shakiness. Please refer to the assembly instructions.
My fan is making vibration and noise!
- Place the fan on a flat, level surface.
- Be sure not to insert anything into the air inlet and outlet.
Warranty
Default 12-Month Warranty
This appliance is covered by Dreo warranty for 12 months from the date of its original purchase.
Extend Your Warranty
Extend your warranty by registering your new appliance on our website https://dreo.com/warranty
Pros & Cons
Pros:
- Sleek and compact design
- Multiple speed settings and oscillation function
- Ultra-quiet operation
- Energy-efficient and affordable
- Includes remote control for convenience
- Washable filter for improved air quality
Cons:
- Limited coverage area compared to larger fans
- No ionizer or additional air purification features
- Some users find the remote control battery life to be short
Customer Reviews
Customers have praised the Dero Tower Fan DR-HTF005 for its quiet operation, ease of use, and efficient cooling. Many appreciate its slim design which fits well in small spaces. However, some users have noted that it may not cover very large areas and that the remote control batteries drain quickly.
Faqs
What are the dimensions of the Tower Fan?
How many speed settings does the Dero have?
Does the Dero Tower Fan come with a remote control?
What is the noise level of the Dero?
Can I adjust the timer on the Tower Fan?
Is there an oscillation function on the Dero?
How do I clean the filter of my Tower Fa?
Leave a Comment