Chamberlain Wall Mount Garage Door Opener RJO20 User Manual
Content

Introduction
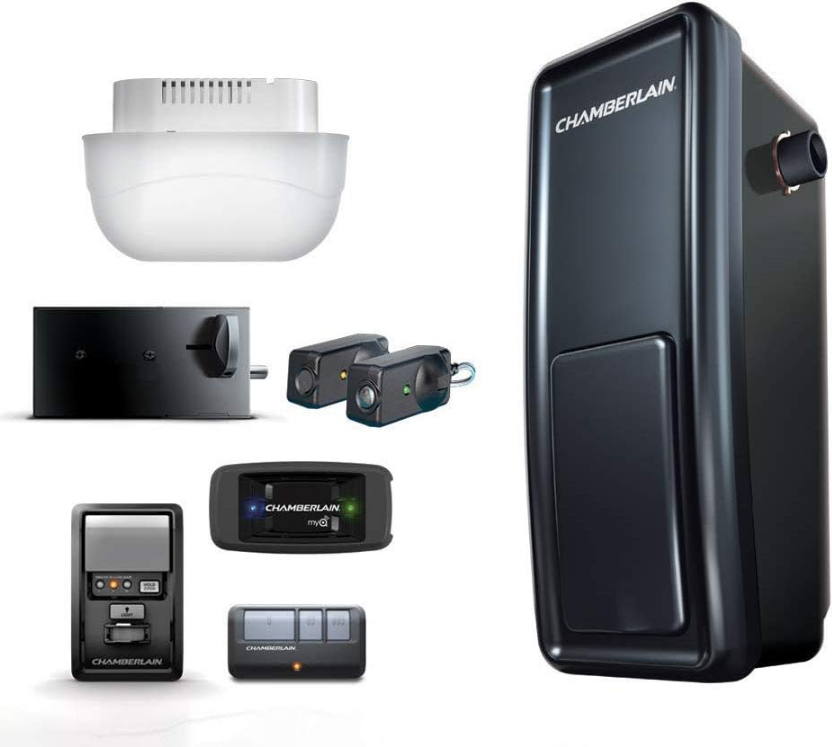
The Chamberlain Wall Mount Garage Door Opener RJO20 is a modern solution designed to provide convenience and efficiency for homeowners. This innovative opener mounts discreetly on the wall, freeing up overhead space and minimizing vibrations for quieter operation. Equipped with smart technology, it allows users to control and monitor their garage door remotely via a smartphone app. With a powerful motor and battery backup, the RJO20 ensures reliable performance, making it a great choice for secure garage access. The price of the Chamberlain Wall Mount Garage Door Opener RJO20 is $440.52.
This product is NOT intended for use on low headroom tracks with outside pickup drum or garage doors utilizing extension springs. For advanced or customized adjustments, door springs, and/ or track confi gurations, contact a trained door systems technician.
- Please read this manual and the enclosed safety materials carefully!
- Fasten the manual near the garage door after installation.
- The door WILL NOT CLOSE unless the Protector System and cable tension monitor are connected and properly aligned.
- Periodic checks of the garage door opener are required to ensure safe operation.
- This garage door opener is ONLY compatible with myQ accessories.
- The model number label is located behind the hinged door of your opener.
Detailed Specifications
The Chamberlain Wall Mount Garage Door Opener RJO20 boasts several key features that make it an attractive choice:
- Powerful DC Motor: Ensures smooth, quiet operation.
- Wall Mount Design: Saves space and reduces noise and vibration.
- Advanced Safety Features: Infrared sensors and reinforced belt drive system for safe operation.
- Compatibility: Suitable for various garage door types and sizes.
- Smart Home Integration: Compatible with Chamberlain's myQ smart home system for remote monitoring and control.
IMPORTANT INSTALLATION INSTRUCTIONS
WARNING: To reduce the risk of SEVERE INJURY or DEATH:
- READ AND FOLLOW ALL INSTALLATION WARNINGS AND INSTRUCTIONS.
- Install garage door opener ONLY on properly balanced and lubricated door. An improperly balanced door may NOT reverse when required and could result in SEVERE INJURY or DEATH.
- ALL repairs to cables, spring assemblies and other hardware MUST be made by a trained door systems technician BEFORE installing garage door opener.
- Disable ALL locks and remove ALL ropes connected to door BEFORE installing garage door opener to avoid entanglement.
- Where possible, install the door operator 7 feet or more above the floor.
- Mount the emergency release within reach, but at least 6 feet (1.83 m) above the floor and avoiding contact with vehicles to avoid accidental release.
- NEVER connect garage door opener to power source until instructed to do so.
- NEVER wear watches, rings or loose clothing while installing or servicing the garage door opener. They could be caught in door or operator mechanisms.
- Install wall-mounted door control:
within sight of the door.
out of reach of small children at a minimum height of 5 feet (1.5 m) above floors, landings, steps or any other adjacent walking surface.
away from ALL moving parts of the door. - Install the Entrapment Warning Placard next to the door control in a prominent location.
- Place emergency release/safety reverse test label in plain view on inside of door.
- Upon completion of installation, test safety reversal system. Door MUST reverse on contact with a 1-1/2" (3.8 cm) high object (or a 2x4 laid flat) on the floor.
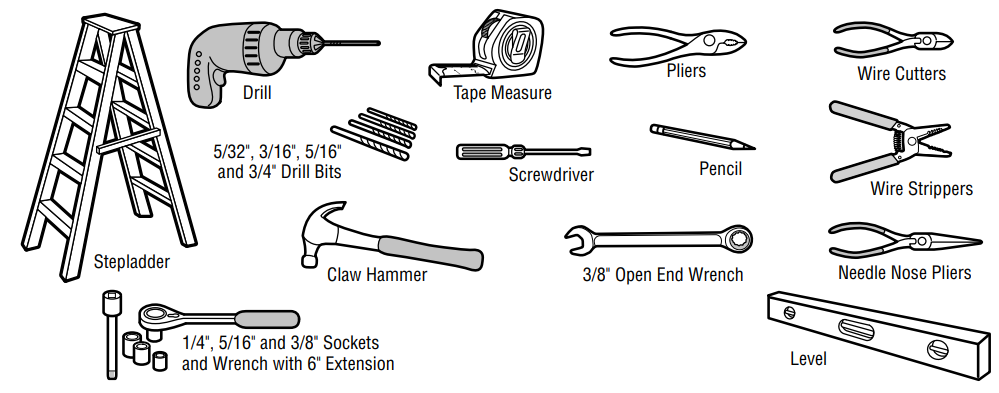
Tools You Will Need
During assembly, installation and adjustment of the garage door opener, you will need these tools.
Description
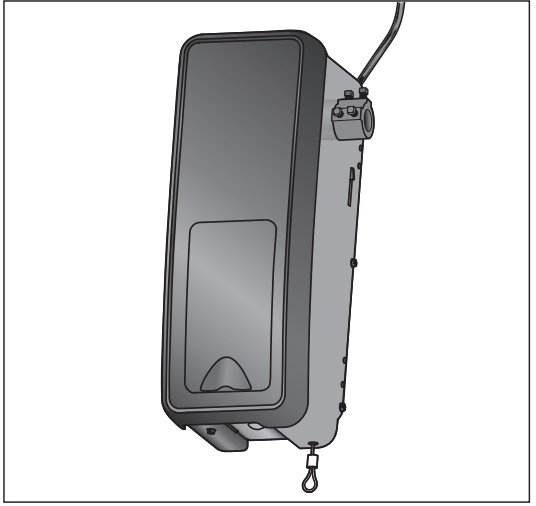
The Chamberlain Wall Mount Garage Door Opener RJO20 is engineered to provide superior performance while minimizing space usage. Its sleek design allows it to blend seamlessly into any garage environment, making it both functional and aesthetically pleasing. The product comes with a comprehensive kit that includes all necessary hardware and instructions for easy installation.
The RJO20 also features Chamberlain's patented Security+ 2.0 encryption, ensuring secure and reliable communication between the opener and remote controls. This model is backed by a robust warranty and dedicated customer support, providing peace of mind for homeowners.
Chamberlain Wall Mount Garage Door Opener RJO20 Installation
Attach the Collar to the Garage Door Opener

The garage door opener can be installed on either side of the door; see "Is Your Garage Ready?" on page 4. The illustrations shown are for installation on the left side.
- Loosen the preset collar screws with the 3/8" open end wrench.
- Slide the collar onto the garage door opener shaft until it stops.
- Position the collar so the screws are facing out and accessible when attached to the torsion bar.
- Tighten the 2 square head set screws by hand until they contact the torsion bar. Then, use a socket wrench to finish tightening the set screws by turning them 1/4 - 1/2 turn.
- Loosely attach slotted side of mounting bracket to the same side of the garage door opener as the collar, using screws provided.
NOTE: Do not tighten mounting bracket screws until instructed.
WARNING: To prevent possible SERIOUS INJURY or DEATH, the collar MUST be properly tightened. The door may not reverse correctly or limits may be lost due to collar slip.
Position and Mount the Garage Door Opener
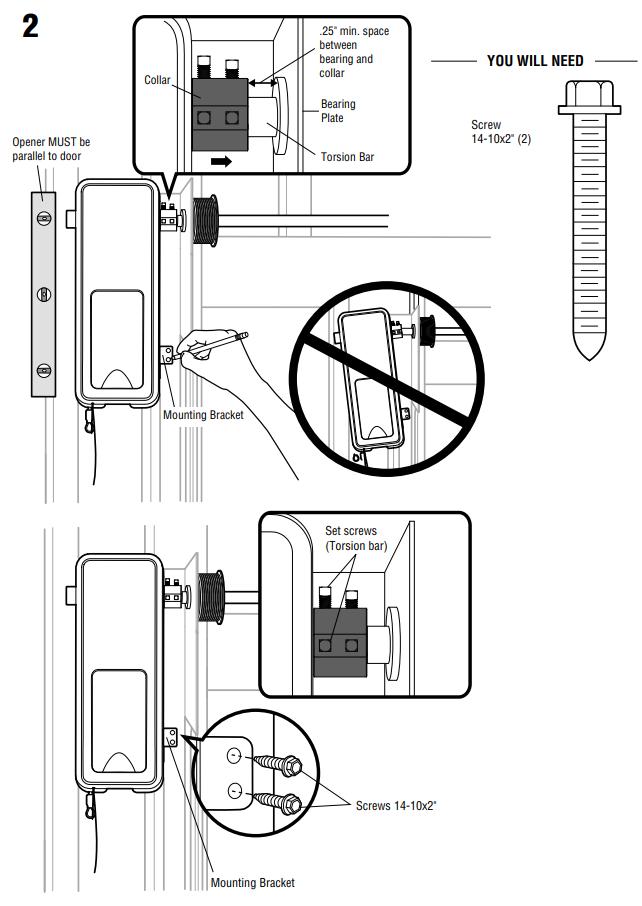
- Close the garage door completely.
- Slide the garage door opener onto the end of the torsion bar. Ensure the collar does NOT touch the bearing plate.
- Use a level to align the garage door opener parallel to the door. Verify the mounting bracket installation wall is a solid surface, such as wood, concrete or a door/flag bracket.
IMPORTANT: If installing on drywall, the mounting bracket MUST be attached to a stud. - When the garage door opener is properly aligned, mark the mounting bracket holes. If necessary, tighten collar screws on the torsion bar to hold garage door opener in place while marking holes.
NOTE: The garage door opener does not have to be flush to the wall.
WARNING: To prevent possible SERIOUS INJURY or DEATH:- Concrete anchors MUST used if mounting bracket into masonry.
- NEVER try to loosen, move or adjust garage door, springs, cables, pulleys, brackets or their hardware, ALL of which are under EXTREME tension.
- ALWAYS call a trained door systems technician if garage door binds, sticks or is out of balance. An unbalanced garage door might NOT reverse when required.
- Garage door opener MUST be mounted at a right angle to the torsion bar to avoid premature wear on the collar.
- Remove the garage door opener from torsion bar.
- Drill 3/16 inch pilot holes at the marked locations. Drill through metal door rail plates if necessary.
- Slide the garage door opener back onto the torsion bar until pilot holes align with bracket.
- Tighten the 2 square head set screws on the torsion bar. For a hollow torsion bar, tighten screws 3/4 - 1 full turn after making contact with the bar. For a solid shaft torsion bar, tighten screws 1/4 - no more than 1/2 turn after making contact with the shaft. If installing on a keyed torsion bar, DO NOT tighten the screws into the keyway.
- Secure the mounting bracket to the wall and to the garage door opener. Use the 14-10x2" screws to secure the mounting bracket to the wall.
NOTE: Due to torsion bars being out-of-round, the operator may wobble during operation. This is normal.
Attach the Emergency Release Rope and Handle
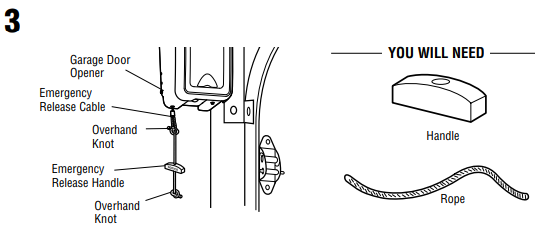
- Thread one end of the rope through the hole in the top of the red handle so “NOTICE” reads right side up. Secure with an overhand knot at least 1 inch (2.5 cm) from the end of the rope to prevent slipping.
- Thread the other end of the rope through the loop in the emergency release cable. Adjust rope length so the handle is within reach but is no lower than 6 feet (1.83 m) above the floor, and avoid contact with vehicles to avoid accidental release. Secure with an overhand knot.
NOTE: If it is necessary to cut the rope, heat seal the cut rope end with a match or lighter to prevent unraveling.
Power Door Lock Location
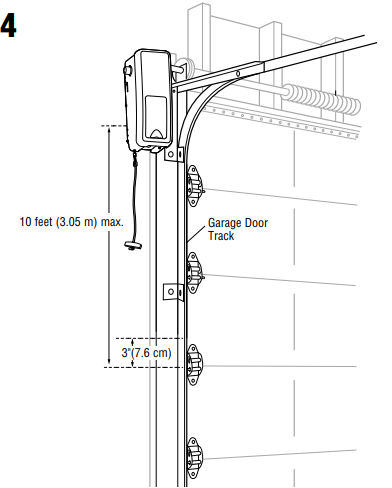
- Determine where to install the power door lock.
- Mount the door lock on the same side as the opener. The third roller from the floor is ideal for most installations.
- The power door lock MUST be mounted within 10 feet (3.05 m) of garage door opener with approximately a 3-inch (7.6 cm) distance between the center of a door roller and the hole for the power door lock bolt.
WARNING: To prevent possible SERIOUS INJURY or DEATH from a falling garage door:- If possible, use an emergency release handle to disengage the door ONLY when the garage door is CLOSED. Weak or broken springs or unbalanced doors could result in an open door falling rapidly and/or unexpectedly.
- NEVER use an emergency release handle unless the garage doorway is clear of persons and obstructions.
- Determine where to install the power door lock.
Install Power Door Lock
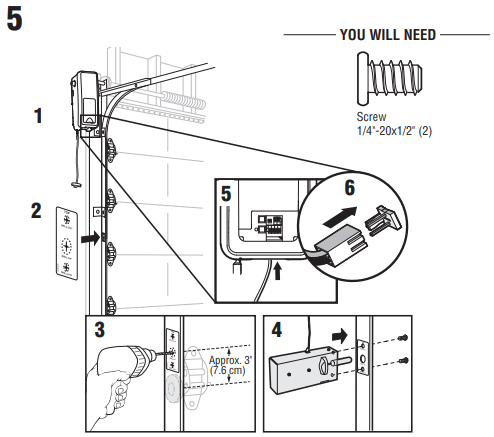
- Pull down on the manual release to disengage the door and open the door manually.
- Clean track surface, and attach lock template to the track.
- Drill holes as marked on the template. You may fi nd it useful to pre-drill the holes with a smaller bit before proceeding to larger sizes.
- Fasten power door lock to the outside of the garage door track with 1/4"-20x1/2" screws provided.
- Run wire up wall to garage door opener. Use insulated staples to secure wire in several places.
- Insert wire through the bottom of the garage door opener and plug the connector into the garage door opener.
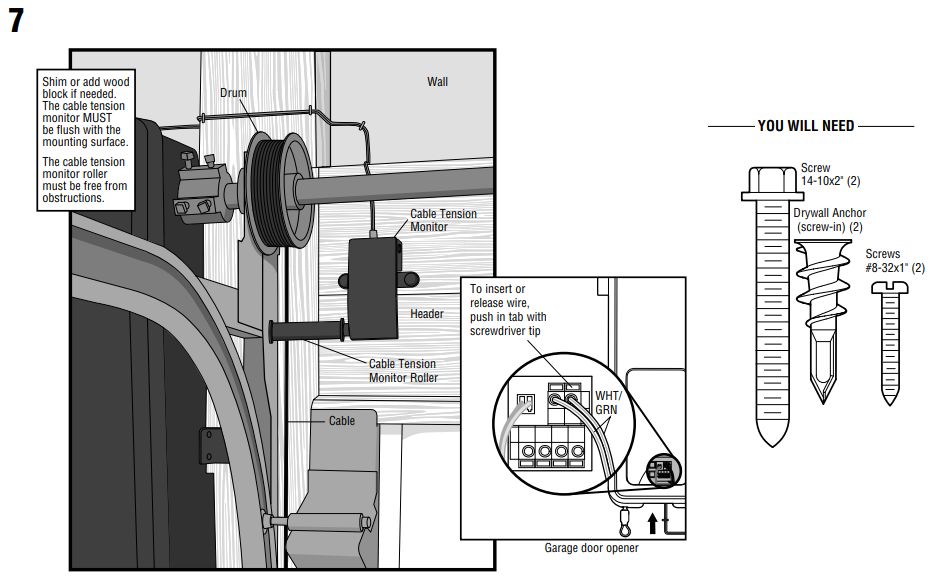
Position the Cable Tension Monitor (Required)
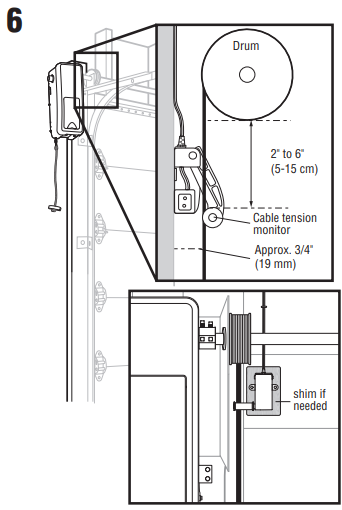
The cable tension monitor detects any slack in the garage door cables. When slack is detected, the garage door opener stops the door from closing, and reverses the door to stay open. The cable tension monitor MUST be connected and properly installed BEFORE the garage door opener will move in the down direction. The cable tension monitor must be installed on the same side as the garage door opener. Factory default is configured for left-side installation.
- Determine if the cable tension monitor will be installed on the left or right side of the door.
- For left-side installation, skip to Step 3. For right-side installation ONLY, remove the c-clip from the roller shaft, move the roller to the other side, and reinstall the c-clip.
- Make sure the door cable is approximately 3/4" (19 mm) from the mounting surface.
Position the cable tension monitor 2" to 6" (5-15 cm) from the drum, and over a wood support surface.
- Shim or add wood block if needed. The cable tension monitor MUST be fl ush with the mounting surface.
- Cable tension monitor roller must be free from obstructions.
NOTE: No obstructions should exist that prevent the cable tension monitor from closing completely when slack is detected.
Attach the Cable Tension Monitor
- Mark and drill 3/16 inch pilot holes for screws. If the cable tension monitor cannot be mounted into wood, it can be mounted into 1/2 inch (1 cm) or greater drywall using the drywall anchors (2) and the #8 screws (2) provided in the hardware bag.
- Attach the cable tension monitor to the wall using the hardware provided. Check that the roller is on top of the cable.
- Run wire to garage door opener. Securely affix wire to wall and ceiling. Secure any additional wire away from the moving parts of the door.
- Connect wire to the green quick-connect terminals on the garage door opener.
NOTE: Cable must have tension through entire door travel. Check there is no slack in cable on opposite side of garage door during normal operation. If slack occurs during door travel, contact a trained door systems technician .
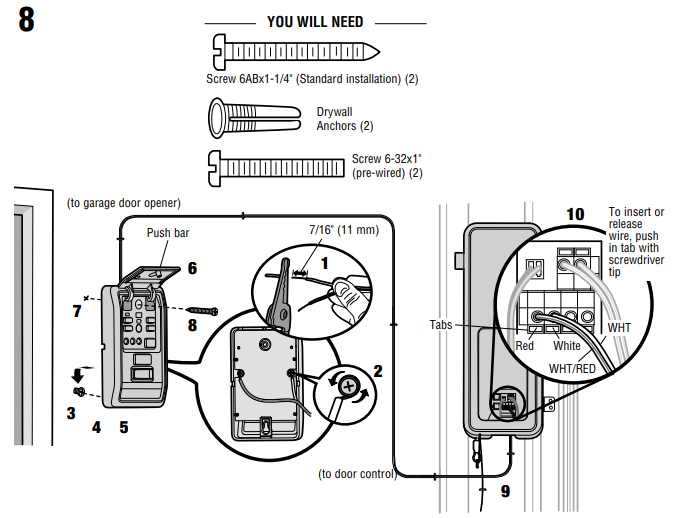
Install the Door Control (myQ Control Panel)
Install door control within sight of garage door, out of reach of small children at a minimum height of 5 feet (1.5 m) above floors, landings, steps or any other adjacent walking surface, and away from ALL moving parts of door.
For gang box installations it is not necessary to drill holes or install the drywall anchors. Use the existing holes in the gang box.
NOTE: Due to power consumption this door control (Model 041A7928-3) cannot be used in conjunction with another wired door control connected to your garage door opener.- Strip 7/16" (11 mm) of insulation from one end of the wire and separate the wires.
- Connect wires to the door control. Make sure the polarity is correct.
- Red wire to the RED terminal.
- White wire to the WHT terminal.
- Mark the location of the bottom mounting hole and drill a 5/32" (4 mm) hole.
- Install the bottom screw, allowing 1/8" (3 mm) to protrude from the wall.
- Position the bottom hole of the door control over the screw and slide down into place.
- Lift the push bar up and mark the top hole.
- Remove the door control from the wall and drill a 5/32" (4 mm) hole for the top screw.
- Position the bottom hole of the door control over the screw and slide down into place. Attach the top screw.
- Run the white and red/white wire from the door control to the garage door opener. Attach the wire to the wall and ceiling with the staples (not applicable for gang box or pre-wired installations).
- Strip 7/16" (11 mm) of insulation from the end of the wire near the garage door opener. Connect wire to the quick-connect terminals on the garage door opener: white to white and white/red to red.
Fasten the warning placard to the wall next to the door control.
NOTE: DO NOT connect the power and operate the garage door opener at this time. The door will travel to the full open position but will not return to the close position until the safety reversing sensors are connected and properly aligned.
WARNING
To prevent possible SERIOUS INJURY or DEATH from electrocution:- Be sure power is NOT connected BEFORE installing door control.
- Connect ONLY to 7-28 VOLT low voltage wires.
To prevent possible SERIOUS INJURY or DEATH from a closing garage door:
- Install door control within sight of garage door, out of reach of small children at a minimum height of 5 feet (1.5 m) above floors, landings, steps or any other adjacent walking surface, and away from ALL moving parts of door.
- NEVER permit children to operate or play with door control push buttons or remote control transmitters.
- Activate door ONLY when it can be seen clearly, is properly adjusted, and there are no obstructions to door travel.
- ALWAYS keep garage door in sight until completely closed. NEVER permit anyone to cross path of closing garage door.
YOU WILL NEED
IMPORTANT INSTALLATION INSTRUCTIONS
WARNING: To reduce the risk of SEVERE INJURY or DEATH:- This portable luminaire has a polarized plug (one blade is wider than the other) as a feature to reduce the risk of electric shock.
- This plug will fit in a polarized outlet ONLY one way.
- If the plug does not fit fully in the outlet, reverse the plug.
- If it still does not fit, contact a qualified electrician.
- NEVER use with an extension cord unless plug can be fully inserted.
- DO NOT alter the plug.
- Light is intended for ceiling mount and indoor applications ONLY.
Install Remote Light
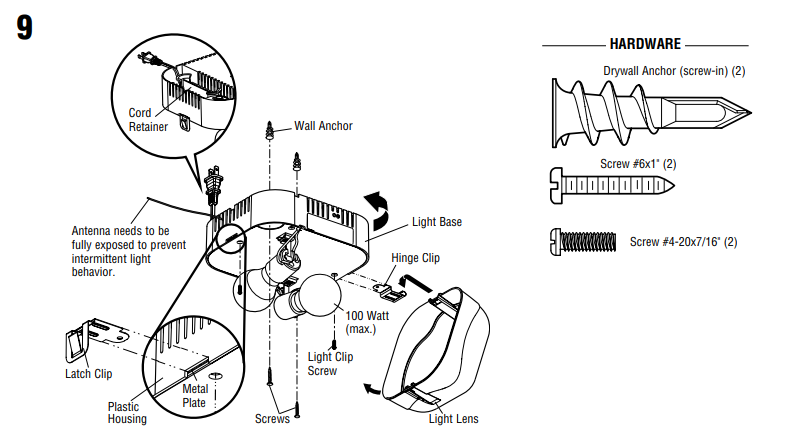
The remote light (garage door opener light) is designed to plug directly into a standard 120V outlet. Select an appropriate location on the ceiling to mount the light within 6 feet (1.83 m) of an electrical outlet so that the cord and light are away from moving parts.
- Install the hinge and latch clips. Clips slide in between the metal plate and the plastic housing on each side of the light base.
- Install screws into the ceiling leaving 1/8 inch (3 mm) of the thread exposed.
NOTE: If installing light on drywall and a ceiling joist cannot be located, use drywall anchors provided. No pilot hole is required for drywall anchors. - Wind any excess cord around cord retainer on the top side of the light base.
- Install the light base by pushing onto the screws and turning the base clockwise to lock the light in place.
- Install two Type A19 incandescent or compact fluorescent bulbs (100 watt maximum per bulb, 200 watts total).
NOTE: Do not use LED bulbs as they may reduce the range or performance of your remote control(s). - Install the light lens by hooking one end of the lens over the hinge and pressing up on the other end to latch into place.
Plug in the light to outlet.
NOTE: Light will not operate until the garage door opener is activated. Multiple openers in the same garage may cause interference between lights. Program all lights to one opener to avoid interference.
CAUTION: To prevent possible OVERHEATING of the end panel or light socket:- DO NOT use short neck or specialty light bulbs.
- DO NOT use halogen bulbs. Use ONLY incandescent.
- DO NOT use bulbs larger than 100W.
- ONLY use A19 size bulbs.
To provide an adequate visual alert, the garage door opener light bulb MUST be a minimum of 40 Watt (or equivalent).
Install the Protector System
The safety reversing sensor must be connected and aligned correctly before the garage door will move in the down direction. This is a required safety device and cannot be disabled.
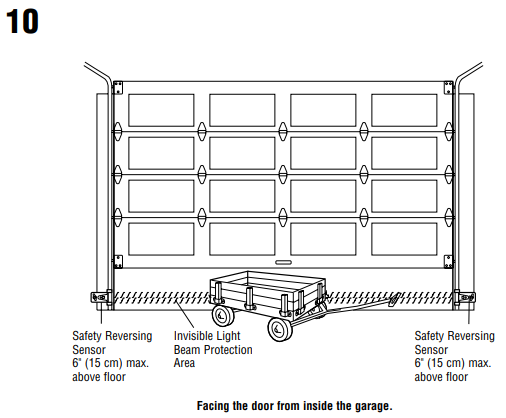
IMPORTANT INFORMATION ABOUT THE SAFETY REVERSING SENSOR- When properly connected and aligned, the safety reversing sensor will detect an obstacle in the path of its electronic beam. The sending sensor (with an amber indicator light) transmits an invisible light beam to the receiving sensor (with a green indicator light). If an obstruction breaks the light beam while the door is closing, the door will stop and reverse to full open position, and the opener lights will flash 10 times.
- The sensors must be installed inside the garage so that the sending and receiving sensors face each other across the door, no more than 6 inches (15 cm) above the floor. Either sensor can be installed on the left or right of the door as long as the sun never shines directly into the receiving sensor lens.
- The mounting brackets are designed to clip onto the track of sectional garage doors without additional hardware.
- If it is necessary to mount the sensors on the wall, the brackets must be securely fastened to a solid surface such as the wall framing. Extension brackets (see accessories) are available if needed. If installing in masonry construction, add a piece of wood at each location to avoid drilling extra holes in masonry if repositioning is necessary.
The invisible light beam path must be unobstructed. No part of the garage door (door tracks, springs, hinges, rollers or other hardware) may interrupt the beam while the door is closing.
WARNING: Be sure power is NOT connected to the garage door opener BEFORE installing the safety reversing sensor.
To prevent SERIOUS INJURY or DEATH from a closing garage door:- Correctly connect and align the safety reversing sensor. This required safety device MUST NOT be disabled.
- Install the safety reversing sensor so beam is NO HIGHER than 6" (15 cm) above garage floor.
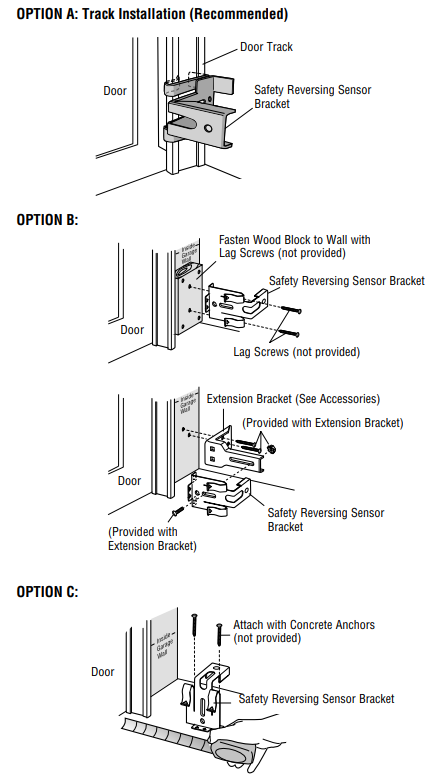
INSTALLING THE BRACKETS
The brackets house the safety reversing sensors in a fixed, secure position so the safety reversing sensors will face each other across the garage door, with the beam no higher than 6" (15 cm) above the floor. Be sure power to the opener is disconnected.
Choose one of the following installations.- OPTION A: Track Installation (Recommended)
- Slip the curved arms over the rounded edge of each door track, with the curved arms facing the door, and make sure brackets measure no higher than 6" (15 cm) above the floor.
- Snap bracket into place against the side of the track. It should lie flush, with the lip hugging the back edge of the track, as shown.
If your door track will not support the bracket securely, see Option B: Wall Installation.
- OPTION B: Wall Installation
- Place the bracket against the wall with curved arms facing the door. Be sure there is enough clearance for the sensor beam to be unobstructed.
- If additional depth is needed, an extension bracket (Model 041A5281-1) or wood blocks can be used. See Accessories section.
- Use bracket mounting holes as a template to locate and drill (2) 3/16" diameter pilot holes on the wall at each side of the door, no higher than 6" (15 cm) above the floor.
Attach brackets to wall with lag screws (not provided).
If using extension brackets or wood blocks, adjust right and left assemblies to the same distance out from the mounting surface. Make sure all door hardware obstructions are cleared.
If Option B will not work, see Option C: Floor Installation.
- OPTION C: Floor Installation
- Use wood blocks or extension brackets (see Accessories) to elevate sensor brackets so the lenses will be no higher than 6" (15 cm) above the floor.
- Carefully measure and place right and left assemblies at the same distance out from the wall. Be sure all door hardware obstructions are cleared.
Fasten to the floor with concrete anchors as shown.
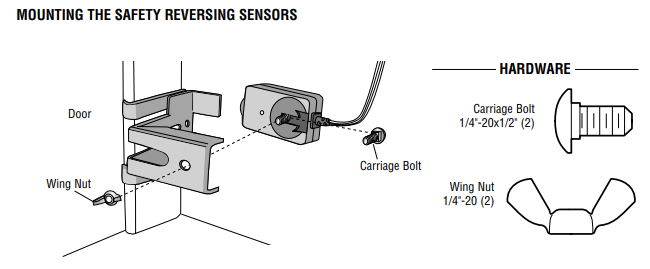
MOUNTING THE SAFETY REVERSING SENSORS
- Slide a 1/4"-20x1/2" carriage bolt head into the slot on each sensor.
- Use wing nuts to fasten safety reversing sensors to brackets, with lenses pointing toward each other across the door. Be sure the lens is not obstructed by a bracket extension.
Finger tighten the wing nuts.
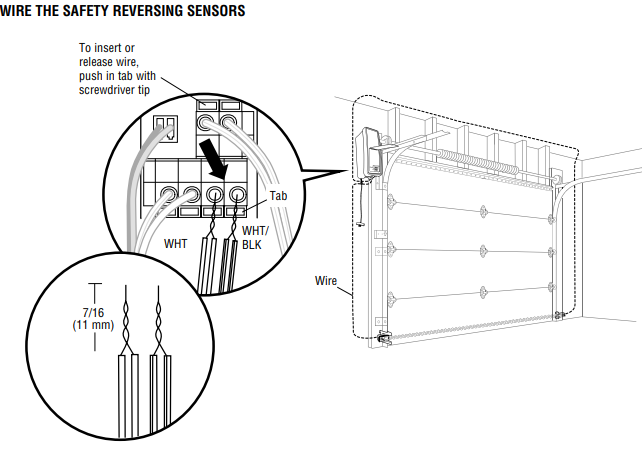
WIRE THE SAFETY REVERSING SENSORS
- Run the wire from both sensors to the garage door opener. Securely affix the wire to the wall and ceiling with staples (not provided).
- Strip 7/16 inch (11 mm) of insulation from each set of wires. Separate white from the black the wires. Twist the white wires together. Twist the white/black wires together.
On the garage door opener, push the tab with a screwdriver tip to insert the white wires into the white terminal and the white/black wires into the grey terminal.
Connect Power
To avoid installation difficulties, do not run the garage door opener at this time.
To reduce the risk of electric shock, your garage door opener has a grounding type plug with a third grounding pin. This plug will only fit into a grounding type outlet. If the plug doesn’t fit into the outlet you have, contact a qualified electrician to install the proper outlet.
WARNING: To prevent possible SERIOUS INJURY or DEATH from electrocution or fire:- Be sure power is NOT connected to the opener, and disconnect power to circuit BEFORE removing cover to establish permanent wiring connection.
- Garage door installation and wiring MUST be in compliance with ALL local electrical and building codes.
- NEVER use an extension cord, 2-wire adapter or change plug in ANY way to make it fit outlet. Be sure the opener is grounded.
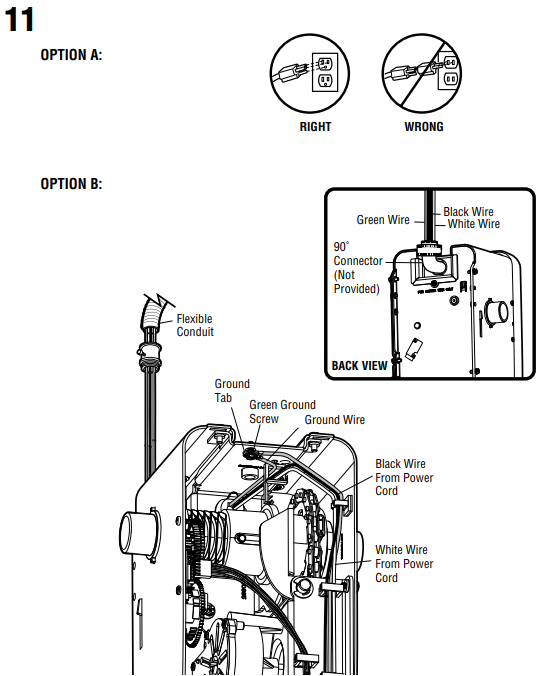
There are two options for connecting power:- OPTION A: TYPICAL WIRING
- Plug in the garage door opener into a grounded outlet.
- DO NOT run garage door opener at this time.
- OPTION B: PERMANENT WIRING CONNECTION
If permanent wiring is required by your local code, refer to the following procedure.- To make a permanent connection through the 7/8 inch hole in the back of the garage door opener (according to local code):
- Be sure power is NOT connected to the opener, and disconnect power to circuit.
- Remove the garage door opener from the torsion bar, remove cover screws and set the cover aside.
- Cut the line cord 6" (15.2 cm) above the strain relief.
- Squeeze the strain relief and push into garage door opener, then remove the strain relief from the line cord.
- Install a 90° conduit (not provided) or flex cable adapter (not provided) to the 7/8" hole. Reinstall garage door opener to torsion bar.
- Run wires through conduit, cut to proper length and strip insulation.
- Strip 1/2" (1.3 cm) of insulation from the existing black, white and green wires.
- Connect the line to the black wire and neutral to the white wire with wire nuts (not provided). Connect ground wire to the green ground screw.
- Properly secure wires under plastic ties so that they do not come into contact with moving parts.
- Reinstall cover.
- OPTION A: TYPICAL WIRING
Align the safety reversing sensors
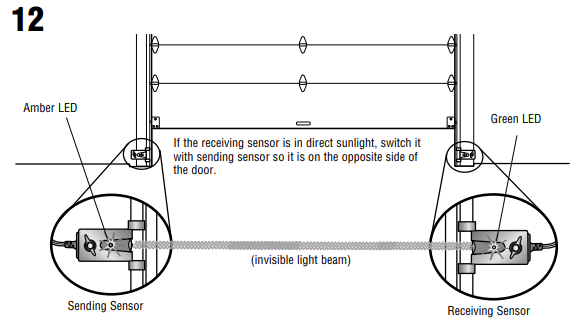
The door will not close if the sensors have not been installed and aligned correctly. The LEDs in both sensors must be glowing steady, which indicates they are powered and aligned correctly. The sending sensor (with an amber LED) transmits an invisible light beam to the receiving sensor (with a green LED). If an obstruction breaks the light beam while the door is closing, the door will stop and reverse to the full open position, and the remote lights will flash 10 times. If the door is already open, it will not close.
- TO ALIGN SENSORS:
The sensors can be aligned by loosening the wing nuts, aligning the sensors, and tightening the wing nuts.If the LEDs are not glowing steadily:- Check that both sensors are installed inside the garage, one on either side of the door.
- Check that sensors are facing each other with the lenses aligned and the receiving sensor light does not receive direct sunlight.
- Check that sensors have the same measurement, no higher than 6” above the floor.
- Amber LED is not lit:
- Check there is power to the garage door opener.
- Check the sensor wire is not shorted/broken.
- Check the sensor has been wired correctly: white wires to white terminal and white/black wires to grey terminal.
- Green LED is not lit:
- Check that the sensor wire is not shorted/broken.
- Check that the sensors are aligned.
- TO ALIGN SENSORS:
ENSURE THE DOOR CONTROL IS WIRED CORRECTLY
The yellow Command LED and the red Learn LED on the door control will blink quickly for up to 5 minutes as the door control recharges. When the door control is operational, the yellow Command LED will glow steadily.
Setup Guide
Setting up the Chamberlain Wall Mount Garage Door Opener RJO20 involves several steps:
- Preparation: Ensure all necessary parts are included and read through the instructions carefully.
- Mounting: Secure the mounting bracket to the wall beside your garage door using the provided hardware.
- Installation of Motor Unit: Connect the motor unit to the mounting bracket and align it properly.
- Connecting Sensors and Cables: Attach infrared sensors and connect all cables as per the instructions.
- Configuration and Testing: Configure the opener using the remote control or smart home app and test its operation.
Getting Connected
Internet Gateway
The Internet Gateway gives you control of your garage door from your internet-connected computer or mobile device, letting you use the myQ app to open and close your door, get alerts, and set schedules from anywhere. In addition, connected smart garage door openers also receive software updates to ensure the opener has the latest operational features. You must have your Internet Gateway set up in the myQ app to use it with the control panel.
Before you begin, you will need:
- Wi-Fi enabled smartphone or tablet
- Broadband internet connection and router
- Wi-Fi signal in the garage (2.4 Ghz, 802.11b/g/n required)
- Password for your home network (router's main account, not guest network)
- myQ serial number located on the garage door opener
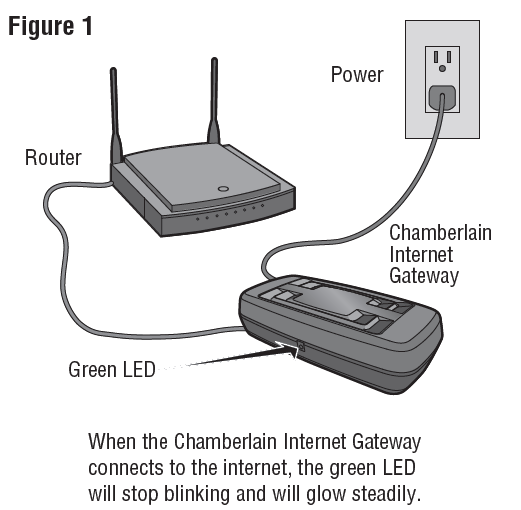
Connect the Internet Gateway to your router and power. When the green LED on the gateway has stopped blinking and glows steadily, it is connected to the internet.
Setup and Connect Your Gateway and Opener in the myQ App
- Download the myQ App and set up your account.
- Follow the instructions given in the app to find and connect your Internet Gateway.
- Next, select the device you wish to add (Garage Door Opener).
- Once you select the opener in the app, you have 3 minutes to press the LEARN button two times on the myQ control panel. The red LEARN LED will turn on. (Figure 2)
- When the red LEARN LED turns off, programming is complete. Once the opener is learned and appears in the app device list, name your device (e.g., Garage Door Opener).
NOTE: If you are unable to add the myQ Control Panel to your Chamberlain Internet Gateway, erase all codes from the door control and try again. Note that you will need to reprogram any accessories you wish to use.
To Erase All Codes From the Door Control (myQ Control Panel)

Memory Erase all remote controls and keyless entries:
- Press and hold the LEARN button on the control panel until the red learn LED goes out (approximately 6 seconds). All remote control and keypad codes are now erased. Reprogram any compatible accessory you wish to use.
Erase all devices (including myQ enabled accessories):
- Press and hold the LEARN button on the control panel until the red Learn LED goes out (approximately 6 seconds).
- Immediately press and hold the LEARN button again until the red Learn LED goes out. All codes are now erased. Reprogram any compatible accessory you wish to use.
Maintenance
Care of Your Garage Door Opener
MAINTENANCE SCHEDULE
- Once a Month
- Manually operate door. If it is unbalanced or binding, call a trained door systems technician.
- Check to be sure door opens and closes fully. Adjust limits and/or force if necessary (see Adjustment Steps 1 and 2).
- Repeat the safety reverse test. Make any necessary adjustments (see Adjustment Step 3).
- Once a Year
- Oil door rollers, bearings and hinges. The garage door opener does not require additional lubrication. Do not grease the door tracks.
THE REMOTE CONTROL BATTERY

The 3V CR2032 Lithium battery should produce power for up to 3 years. If the battery is low, the remote control's LED will not flash when the button is pressed.
To replace battery, pry open the case first in the middle (1), then at each side (2 and 3) with the visor clip. Replace the batteries with only 3V CR2032 coin cell batteries. Insert battery positive side up. Dispose of old batteries properly.
WARNING
- To prevent possible SERIOUS INJURY or DEATH:
- NEVER allow small children near batteries.
- If battery is swallowed, immediately notify doctor.
- To reduce risk of fire, explosion or chemical burn:
- Replace ONLY with 3V CR2032 coin batteries.
- DO NOT recharge, disassemble, heat above 212° F (100° C) or incinerate.
Troubleshooting
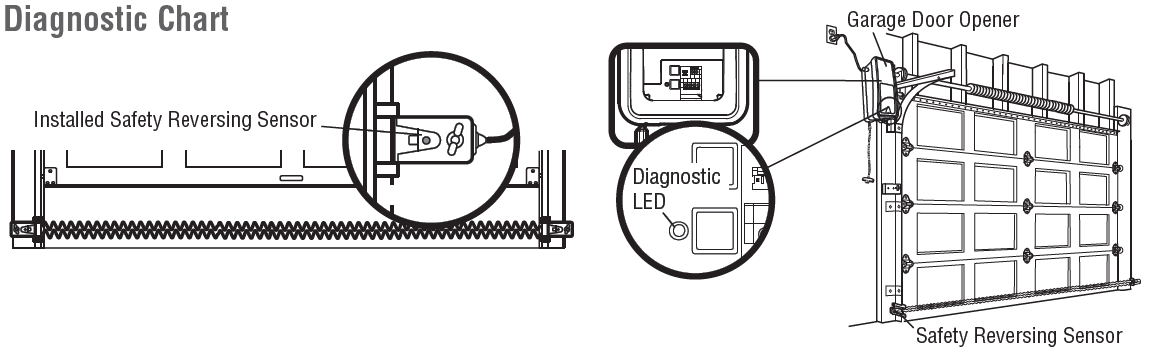
Diagnostic Chart
Your garage door opener is programmed with selfdiagnostic capabilities. The diagnostic LED will flash a number of times, then pause, signifying it has found a potential issue. Consult Diagnostic Chart below.
FLASH — Safety reversing sensors wire open (broken or disconnected)
SYMPTOM: One or both of the Indicator lights on the safety sensors do not glow steadily.
- Safety reversing sensors are not installed, connected, or wires may be cut.
- Inspect sensor wires for a disconnected or cut wire.
- There is a short or reversed wire for the safety reversing sensors. Inspect safety sensor wire at all staple and connection points, replace wire or correct as needed.
FLASHES — Safety reversing sensors wire shorted or black/white wire reversed
SYMPTOM: One or both of the Indicator lights on the safety sensors do not glow steadily.
- There is a short or reversed wire for the safety reversing sensors. Inspect the wire at all staple and connection points, replace wire or correct as needed.
FLASHES — Door control or wire shorted
SYMPTOM: The door doesn’t activate from the door control.
- Inspect door control/wires for a short (staple in wire), replace as needed.
- Disconnect wires at door control, touch wires together. If the garage door opener activates, replace the door control.
- If the garage door opener does not activate, disconnect the door control wires from the garage door opener. Momentarily short across red and white terminals with a jumper wire. If the garage door opener activates, replace the door control wires.
FLASHES — Safety reversing sensors slightly misaligned (dim or flashing LED)
SYMPTOM: Sending indicator light glows steadily, receiving indicator light is dim or flashing.
- Realign receiving sensor, clean lens, and secure brackets.
- Verify the door track is firmly secured to the wall and does not move.
FLASHES — Motor RPM is not recognized
SYMPTOM: Door travels 2-3 inches and stops.
- Reprogram limits and forces. See Adjustment section.
- If the motor unit continues to travel 2-3 inches, check the travel module connection or replace the travel module.
SYMPTOM: No movement, motor runs 2-3 seconds.
- Reconnect the emergency release.
- Motor may need to be replaced.
FLASHES — Cable tension monitor reversal
SYMPTOM: Door stops and reverses while closing.
- Check for possible door obstructions and remove.
- Check that the cable tension monitor is properly connected to the opener.
- Replace the cable tension monitor.
FLASHES — Limits and forces need reprogramming
SYMPTOM: Door stops while opening.
- Reprogram limits and forces. See Adjustment section.
FLASHES — Limits and forces need reprogramming
SYMPTOM: Door stops and reverses while closing.
- Reprogram limits and forces. See Adjustment section.
FLASHES — Attempting to compensate
SYMPTOM: Door stops and reverses while closing.
- Garage door opener will try to compensate three times before turning to a 10 Flash.
FLASHES — Attempting to compensate
SYMPTOM: Door stops while opening.
- Garage door opener will try to compensate three times before turning to an 11 Flash.
Additional Troubleshooting Information:
- The garage door opener doesn't operate from either the Door Control or the remote control:
- Does the garage door opener have electric power? Plug a lamp into the outlet. If it doesn’t light, check the fuse box or circuit breaker.
- Have you disabled all door locks? Review installation instructions.
- Is there a build-up of ice or snow under the door? The door may be frozen to the ground. Remove any restriction.
- The garage door spring may be broken. Have it replaced.
- The yellow and red LEDs on the Door Control are blinking quickly:
- The control panel is charging and may take up to 5 minutes to become operational.
- My remote control will not activate the garage door:
- Verify the lock feature is not activated on the door control.
- Reprogram the remote control.
- The remote control has short range:
- Change the location of the remote control in your car.
- Some installations may have a shorter range due to a metal door, foil-backed insulation, or metal garage siding.
- The door doesn’t open completely:
- Check the power door lock.
- Is something obstructing the door? Is it out of balance, or are the springs broken? Remove the obstruction or repair the door.
- The door opens but won’t close:
- Check the cable tension monitor.
- If the garage door opener lights blink, check the safety reversing sensor.
- If the garage door opener lights don’t blink, check installation or adjustments.
- The door reverses for no apparent reason and garage door opener lights don’t blink:
- Check the cable tension monitor.
- Is something obstructing the door?
- Clear ice or snow from the garage floor area where the door closes.
- My door will not close and the light bulbs blink:
- The safety reversing sensor must be connected and aligned correctly before the garage door will move in the down direction.
- Verify the safety sensors are properly installed, aligned, and free of any obstructions.
- The garage door opener strains to operate the door:
- The door may be out of balance or the springs may be broken.
- Check and adjust the door manually.
- The garage door opener motor hums briefly, then won't work:
- The garage door springs may be broken. See above.
- The garage door opener won't operate due to power failure:
- Manually open the power door lock.
- Door loses limits:
- Collar not tightened securely. Tighten the collar and reprogram limits.
- The garage door opener moves when the door is in operation:
- Some minor movement is normal. If excessive, check the collar or torsion bar.
- Power lock makes noise when operating:
- Call for replacement power lock.
Chamberlain Wall Mount Garage Door Opener RJO20 Warranty
The Chamberlain Group, Inc. (“Seller”) warrants to the first retail purchaser of this product, for the residence in which this product is originally installed, that it is free from defects in materials and/or workmanship for a specific period of time as defined below (the “Warranty Period”). The warranty period commences from the date of purchase.
WARRANTY PERIOD
- Parts
Motor - Accessories
5 years - Lifetime
1 year
The proper operation of this product is dependent on your compliance with the instructions regarding installation, operation, and maintenance and testing. Failure to comply strictly with those instructions will void this limited warranty in its entirety.
Pros & Cons
Pros
- Space-Saving Design: Ideal for garages with limited overhead space.
- Quiet Operation: Reduces noise and vibration compared to traditional openers.
- Advanced Safety Features: Infrared sensors and reinforced belt drive system enhance safety.
- Smart Home Integration: Compatible with myQ smart home system for remote control.
Cons
- Higher Price Point: More expensive than some traditional garage door openers.
- Complex Installation: Requires careful alignment and setup which can be time-consuming.
- Dependence on Technology: Requires a stable internet connection for smart home features.
Customer Reviews
Customers have generally praised the Chamberlain Wall Mount Garage Door Opener RJO20 for its innovative design and smooth operation. However, some users have noted that the installation process can be challenging without professional assistance.
Common complaints include higher than expected noise levels during initial use (which often subsides after proper adjustment) and occasional connectivity issues with the smart home app.
Faqs
How does the wall mount design benefit homeowners?
Is the Door Opener compatible with different types of garage doors?
What safety features does the Chamberlain Wall Mount include?
Can I integrate the Chamberlain Wall Mount Garage Door Opener with my smart home system?
What are some potential drawbacks of using the Wall Mount?
How do I set up my Chamberlain Wall Mount Garage Door Opener?
What kind of warranty does Chamberlain offer for their Garage Door Opener?
Are there any specific precautions I should take while operating my Chamberlain?
Leave a Comment