Jxp Rocking Massage Chair LY-003BP User Manual
Content
Introduction
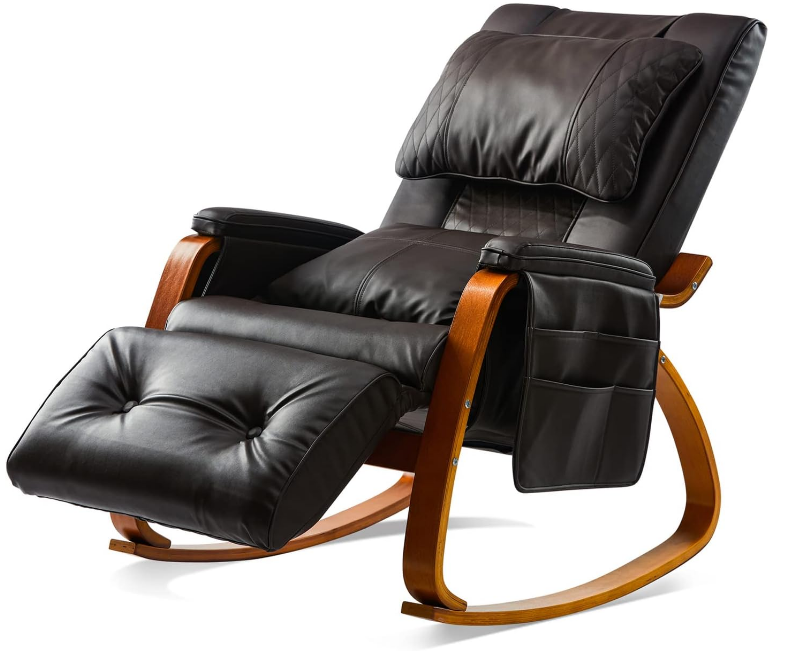
The JXP Rocking Massage Chair LY-003BP is designed to provide a soothing and relaxing experience, combining modern aesthetics with advanced massage technology. This chair features multiple massage modes and adjustable settings, allowing users to customize their relaxation sessions according to their preferences. With its ergonomic design and comfortable cushioning, it ensures optimal support for your body. Priced at approximately $350, this massage chair is an excellent addition to any home for stress relief and comfort.
JXP Rocking Massage Chair LY-003BP Overview
- NECK PART:
Adjustable pillow - BACK PART:
- Kneading& Tapping
- Infrared Heating
- HIP PART:
Two vibration intensities supply comfortable vibration on the thighs. - LEG PART:
Five angles to adjust different positions for relaxing your leg. - 15 mins time-limited
Specifications
Product Name | Rocking Massage Chair |
Model No. | LY-003BM LY-003BP |
Voltage | 12V 3A |
Rated Power | 36 W |
Time Limited | 15min |
Product Size | 890(L) X 410(W) X 605(H) |
N.W. | 18KG |
G.W. | 20KG |
CAUTION
TO REDUCE THE RISK OF ELECTRIC SHOCK, DO NOT REMOVE THE COVER, THERE ARE NO SERVICEABLE PARTS INSIDE.
TO REDUCE THE RISK OF FIRE OR ELECTRIC SHOCK, DO NOT EXPOSE THIS ITEM TO RAIN OR MOISTURE.
The lightning flash with an arrowhead symbol within an equilateral triangle is intended to alert the user to the presence of uninsulated “dangerous voltage” within the unit’s enclosure that may be of sufficient magnitude to constitute a risk of electric shock.
The exclamation point within an equilateral triangle is intended to alertthe user to the presence of important operating and maintenance (servicing)instructions in the literature accompanying the unit
Controller

- Power ON/OFF and Auto Programme
Switch the ON or OFF the machine.
Press this button to start the kneading massage, vibration, and heating function. - Keading Massage for Full Body
Press this button to start a 2D kneading massage for the full body and the bidirectional massage head will provide 2 different massage techniques to relieve sore muscles. - Kneading Massage for the Top Part of Back
Press this button to start the kneading massage for the top part of the back. - Kneading Massage for Lower Back
Press this button by starting a kneading massage for lower back. - Vibration Massage
Press this button by starting a vibration massage to relax your thighs - Heat Therapy
Press this button by starting the heating function to improve the metabolism rate
Tips: Product powered on, on/off indicator light will flash indicating that the back massage movement is being reset.
Reset completed, the indicator light will be off, the product will be in the standby state.
How to operate
- Open the packing, and place the massage chair in a flat place & assemble.
- Connect the DC with the adaptor.
- Connect the adaptor with the power.
- Press the button on the controller to start working.
Notes
| Before use | Please read carefully the instruction before use. |
Practice | Working 20 minutes every day at the beginning stage and more time step by step; do not exceed 20 minutes for safety. Could place one folded towel or blanket on back in case of too strong massage pressure. |
| Longer Life | Please let the machine be rest for 20 minutes after 40 minutes operation so to ensure of longer life of machine. |
After Use | Please turn-off power and then pull out the plug after usage; please do pull the plug from the socket and do not pull the wire. |
Place to put | Please do not operate the massager where with much dust, oil crust, fog. Please do not put the massager near to electric appliance. Please do not put the massager where under direct sunshine Please do not use the massager where with much humidity ( like hot spring, swimming pool, bathroom etc ). Please do not use the massager outdoor. Please do not operate the massager where with fog and lack of oxygen. |
Suitable for the crowd | Those who feel uncomfortable, been operation or be injured on back, neck, please consult with doctor before using. Do not use within one hour after lunch/dinner. The following people please use the massager after consulting with doctor or specialist : a) with cancer b)heart disease Pay much attention when the massager is running, especially for patients or those without ability of operation. You are suggested to wear baggy clothes when using the massager; Do not use it nakedly which might cause hurt to your skin; Too thick or thin clothes or those with collar, belt or other hard objects should also be avoided because they might affect massage effects. Prohibit using for kids and those pregnant women |
FAQ
Phenomenon | How to check | How to handle |
Sounds like squeak, ping, click, | Sound is causedby motor; normal; no need to check | N/A |
Noise during massager | Has it been working for a long time or continue? | Please turn offpower and be rest over one hour |
Feeling hot on the surface | Has the working time exceed time limit? | Please operate within time limit |
No working or stop suddenly during running |
devise |
rest overone hour |
Please consultthe distributor if no use after the above handling | ||
DANGER
To reduce the risk of electric shock
- Always unplug the appliance from the electrical outlet innediately after use and before cleaning.
- Never use pins or other metallic fasteners with this appliance.
- Keep dry-Do not opperate in a water or moist condition.
SIZE
Foot Support Unfold Size 100x105x65cm
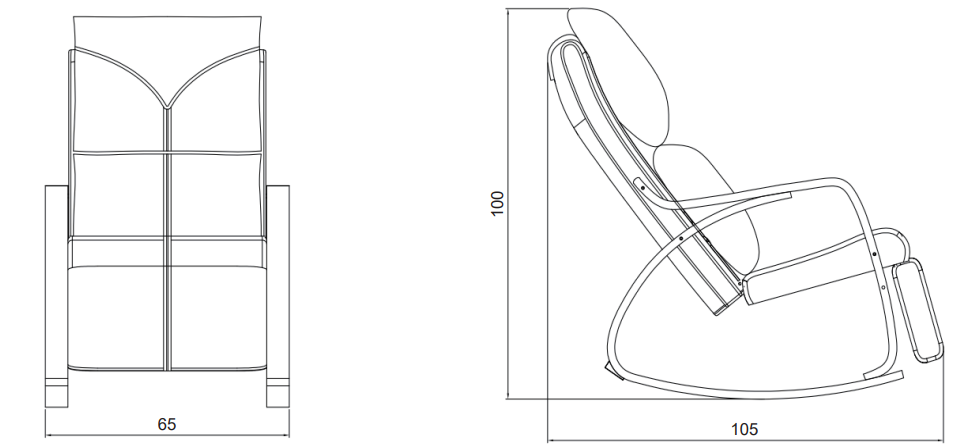
Foot Support Fold Size 100x123x65cm

Description
The JXP Rocking Massage Chair LY-003BP is a comprehensive solution for those seeking advanced massage therapy in the comfort of their own home. The chair features a robust metal frame wrapped in premium leather, ensuring durability and style. The ergonomic design includes contoured seating and backrests that provide excellent support and comfort. The multiple massage modes, combined with the rocking mechanism and heat therapy, offer a holistic relaxation experience that targets various muscle groups and promotes overall well-being.
The user-friendly control panel allows for easy adjustment of massage settings, including intensity, duration, and mode selection. Additionally, the Bluetooth connectivity feature enables users to listen to music or guided meditation while enjoying their massage session.
ASSEMBLY INSTRUCTIONS
Step 1:Check the accessories bag
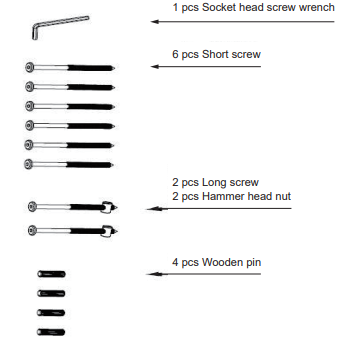
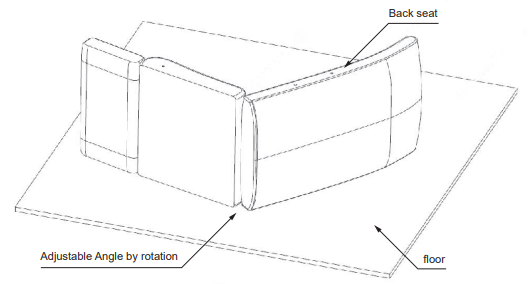
- Step 2: Lay chair back seat sideways on the floor
Tips: The back seat should be placed on the floor at a certain Angle, otherwise it is easy to roll over.
Step 3: Place the wooden handrail L on the back seat, insert the short screw into the LA1 hole, use an Allen wrench to lock it into the thread in the LA1 hole clockwise and rotate 3-5 turns
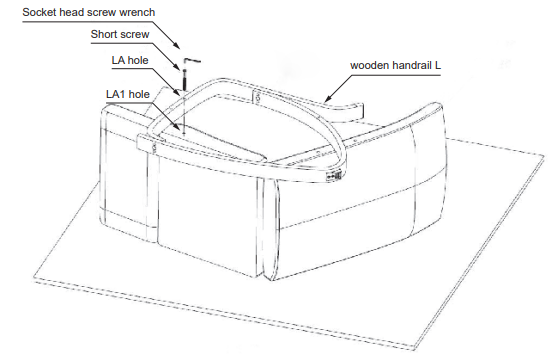
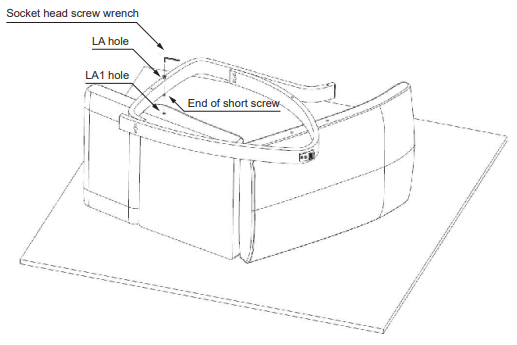
- Tips1: When locking in, the wooden handrail L needs to be properly raised, and the end of the screw and the LA1 hole that can be seen through the wooden handrail L shall prevail, so that the short screw can be inserted into the LA1 hole visually.
Tips2: Only be rotated 3-5 circles, otherwise the subsequent screws will not be easily locked in
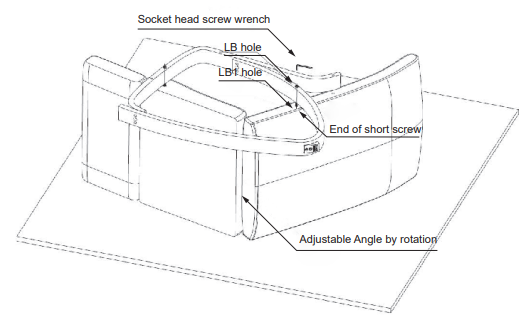
- Step 4: Manually adjust the angle of the back seat, adjust the position of the wooden armrest L, insert the short screw into the LB1 hole, use the Allen wrench to lock the thread in the LB1 hole clockwise, and rotate 3-5 turns
- Tips1: When locked in, because the screw in the LA1 hole is not locked, the wooden handrail L can be properly raised, and the short screw can be inserted into the LB1 hole visually.
- Tips2: It must be installed according to the specified holes, and the order cannot be wrong, otherwise the subsequent screws will not be easily locked;
Tips3: Only be rotated 3-5 circles, otherwise the subsequent screws will not be easily locked in
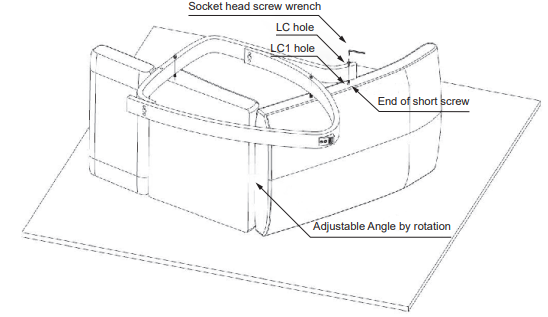
- Step 5: Manually adjust the angle of the back seat, adjust the position of the wooden armrest L, insert the short screw into the LC1 hole, use the Allen wrench to lock the thread in the LC1 hole clockwise, and rotate 3-5 turns
Tips: When locked in, since the screws in the LA1 hole and the LB1 hole are not locked, the wooden handrail L can be properly raised, and t nto the LC1 hole visually;
- Step 6:
- Insert the wooden pin into the wooden pin hole of the crosspiece and insert the hammer nut into the hammer nut hole of the crosspiece
- Connect the rung to the handrail L by means of two wooden dowels
Insert the long screw through the LD hole, insert it into the LD1 hole, and use an Allen wrench to lock it into the hammer nut clockwise
Tips: When locking, it is necessary to make the 1-shaped groove of the hammer nut and the long screw in the same direction, so that the long screw can be smoothly locked into the hammer nut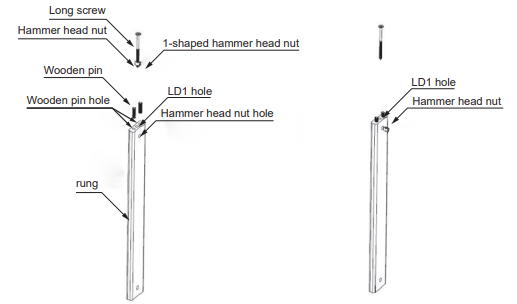
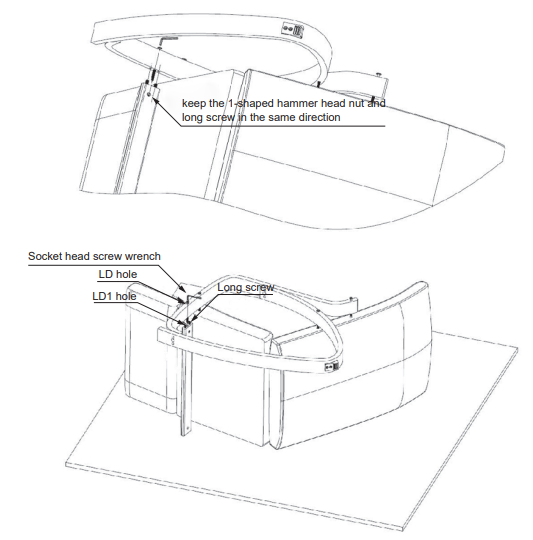
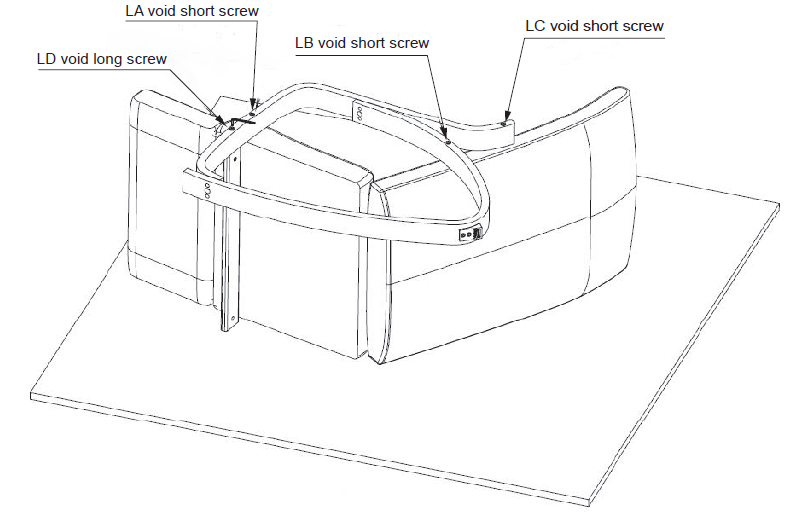
Step 7: Tighten the short screw in the LA hole, LB hole, LC hole, LD hole in sequence
- Step 8:
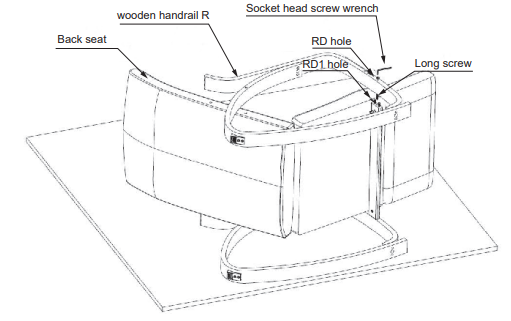
- Turn the chair over 180°, place it on the floor, and place the wooden armrest R on the back seat
- Refer to the installation step 6, insert the long screw through the RD hole and insert it into the RD1 hole, use the Allen wrench to lock the hammer nut clockwise, and rotate 3-5 turns
- Tips1: When locking, it is necessary to make the 1-shaped groove of the hammer nut and the long screw in the same direction, so that the long screw can be smoothly locked into the hammer nut
Tips2: Only be rotated 3-5 circles,cannot be locked, otherwise the subsequent screws will not be easily locked in
- Step 9:
- Referring to installation steps 3, 4 and 5, insert the short screw through the RA hole, insert it into the RA1 hole, and rotate 3-5 turns clockwise; insert the short screw through the RB hole, insert it into the RB1 hole, and rotate clockwise 3-5 turns; Insert the short screw through the RC hole, insert it into the RC1 hole, and turn it clockwise for 3-5 turns
Referring to installation step 7, tighten the short screws in the RA hole, the short screws in the RB holes, the short screws in the RC holes, and the long screws in the RD holes in sequence.
Tips1: The short screws only be rotated 3-5 circles cannot be locked and need in order , otherwise the subsequent screws will be difficult to lock in
Tips2: After all the screws are locked and rotated 3-5 turns, then tighten all the screws in turn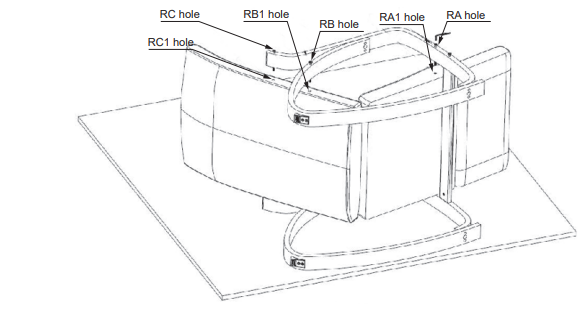
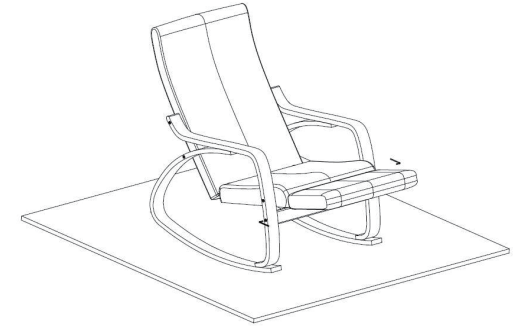
Step 10: Check all screws make sure are all locked
Setup Guide
To set up the JXP Rocking Massage Chair LY-003BP, follow these steps:
- Unpack the chair carefully from the box and remove all packaging materials.
- Place the chair on a flat surface and ensure it is stable.
- Plug in the power cord to a nearby outlet.
- Turn on the chair using the power button on the control panel.
- Select your desired massage mode and adjust settings as needed.
- If using Bluetooth, pair your device with the chair by following the on-screen instructions.
Troubleshooting
If you encounter any issues with your JXP Rocking Massage Chair LY-003BP, here are some common problems and solutions:
- No Power: Check if the power cord is properly plugged into both the chair and the outlet. Ensure that there are no electrical issues in your home.
- Massage Function Not Working: Check if the massage mode is selected correctly on the control panel. Also, ensure that there are no blockages or obstructions in the massage nodes.
- Bluetooth Not Connecting: Restart both your device and the chair. Ensure that Bluetooth is enabled on your device and follow pairing instructions carefully.
Instructions & Warnings: Always follow the manufacturer's guidelines for use. Avoid using the chair near water or in humid environments. Regularly clean and maintain the chair to prolong its lifespan.
JXP Rocking Massage Chair LY-003BP Pros & Cons
Pros
- Advanced Massage Technology: Multiple modes and heat therapy for comprehensive relaxation.
- Ergonomic Design: Provides excellent support and comfort.
- Rocking Mechanism: Enhances relaxation with gentle motion.
- Bluetooth Connectivity: Streams music for an immersive experience.
- Durable Materials: High-quality leather and metal frame ensure longevity.
Cons
- High Cost: Although affordable for its quality, it may be out of budget for some users.
- Space Requirements: The chair requires ample space due to its reclining function and rocking mechanism.
- Noise Level: Some users may find the motor noise slightly loud during operation.
Customer Reviews
Customers have praised the JXP Rocking Massage Chair LY-003BP for its exceptional comfort and effectiveness in relieving stress and muscle tension. Many users appreciate the variety of massage modes and the soothing heat therapy. However, some users have noted that the chair can be quite large and may require significant space in their home.
Common complaints
Include minor issues with Bluetooth connectivity and occasional noise from the motor. Despite these, overall satisfaction with the product remains high due to its robust features and durability.
Faqs
What are the different massage modes available on the jxp Rocking LY-003BP?
How does the rocking mechanism work on this chair?
Is the JXP Rocking Massage Chair suitable for people with back problems?
Can I use the Rocking if I have metal implants?
How do I clean and maintain the Massage Chair?
Can I assemble the jxp LY-003BP myself?
Does the jxp come with a warranty?
How much space does the JXP Chair LY-003BP require?
Is it safe to use the JXP Rocking Massage Chair during pregnancy?
How do I pair my device with the JXP LY-003BP via Bluetooth?
Leave a Comment
