Amcrest GPS Tracker AM-GL300W-4G User Manual
Content
Introducing the Amcrest GPS Tracker AM-GL300W-4G
The Amcrest GPS Tracker AM-GL300W-4G is a powerful and reliable tracking device that offers real-time tracking and monitoring capabilities. This compact and waterproof device is perfect for tracking vehicles, assets, and even people. With an estimated price of $59.99 and a launching date of August 2021, this GPS tracker is a must-have for anyone who wants to ensure the safety and security of their valuable belongings.
What’s Included
Included in the box with the GPS are the following:
- The GPS
- Mini USB 5V AC Power Adapter
- SIM card information
- Quick Start Instruction Card
Detailed Specifications
- Waterproof and dustproof (IPX5 rated)
- Real-time tracking and monitoring
- Geofencing capabilities
- Up to 2 weeks of battery life
- Compact and lightweight design
- Support for 2G GSM networks
- Speed alert notifications
- Low battery notifications
- Over-speed and movement alerts
Features
Below are the main features of your device:
- Real-Time Tracking
- Small Form Factor: 2” x 1” x .9”
- Remote access via PC, Mac, iOS, or Android devices
- Rechargeable Li-Polymer Battery, 2600mAh
- Receive Location and Speed Alerts by E-mail & Text Message
- Geo-fencing Capabilities
- 1 Year Warranty
GPS Diagram
Note: The SIM card comes preinstalled in the device. Please do not remove or replace it. If you experience a problem you believe may be related to the preinstalled SIM card, please contact support.
Charging the Device
To charge the device, lift the flap covering the charging post and plug the charger cable end into the unit via the USB port, then plug the charger into a wall outlet. The battery LED light on the front of the GPS tracker will have a blinking red light when charging, and the LED in the center will blink green periodically to indicate that it still has power. If the battery LED flashes red, that means the battery level is low, and the GPS tracker should be charged.
Power On/Off
To turn the device on, press the Power button on the top of the device once. As the device obtains a cellular signal, the green (CEL) LED will begin to blink and start relaying location data. To turn off the device, press and hold the Power button on the top of the device until the LEDs disappear.
Activating the Device
- After purchasing the device, you must purchase a monthly service plan that allows the device to send your data to your Amcrest account. You can activate your device and service plan at http://www.amcrest.com/gps-activation.
- If you choose to buy a second device, fill out the activation form and be sure to select ‘ADD TO EXISTING ACCOUNT’ under Activation Type.
- Follow the activation steps on the site, and within 24 hours you will receive an email with details about the device, along with the username and password to log on to https://amcrestgps.net/. Change your password upon logging in for the first time and begin enjoying tracking your movements.
Note: When activating your device, make sure you are near a window or in an open sky environment that does not obstruct signal reception.
Device Placement
Before placing your device in its desired location ensure that the green CEL LED is blinking to make sure it has proper reception in the position you placed it. The GPS is water resistant, yet it is recommended to not place the device in an area where it may become submerged in water.
Description
The Amcrest GPS Tracker AM-GL300W-4G is a versatile and easy-to-use tracking device that offers real-time monitoring and tracking capabilities. With its waterproof and dustproof design, this GPS tracker can withstand harsh weather conditions and is perfect for tracking vehicles, assets, and even people. The device is also compact and lightweight, making it easy to carry and conceal. The Amcrest GPS Tracker AM-GL300W supports 2G GSM networks and offers geofencing capabilities, allowing users to set up virtual boundaries and receive notifications when the tracker enters or exits those boundaries. The device also offers speed alert notifications, low battery notifications, and over-speed and movement alerts.
Amcrest GPS iOS Application
To get started with the Amcrest GPS app make sure you have registered an Amcrest GPS account and activated your GPS. This can be done by going to https://www.amcrest.com/gps-activation on a laptop or computer, as described in section 1.6 Activating a Device, or via the Amcrest GPS app directly.
Note: You can only activate your device using the app on Android mobile devices only. Apple users (iOS) will have to activate their device from a laptop or computer..
To register for an account on the Amcrest GPS app, first, download the app from the App Store. Open the app and log in using your Amcrest GPS account credentials.
- Once logged in the map interface will be displayed. In the map interface if multiple devices are connected to the account, tap on the device list menu to display all devices.
- Tap on the Info tab to display informaiton about a device such as speed, mileage, location, battery percentage, etc.
Tap the settings ( ) icon in the upper left corner of the screen to access in app features for your GPS.
Map
This tab shows the last location of the GPS tracker, as well as allows for use of many different map tools.
Trips This tab allows the user to see trip history and play trip data.
Zones This tab allows the user to create and manage custom zones (geofences).
Zone Alerts This tab allows the user to create and manage custom zone alerts.
Events This tab allows the user to access and manage tracking events.
Settings This tab allows the user to adjust tracking settings and alerts.
Profile This tab allows you to adjust or modify your account settings and information.
Change Password This tab allows you to adjust modify your password (must have old password)
Logout This tab allows the user to sign out of their GPS tracker account.
Map
- This tab shows the last location of the GPS tracker and other information related to a selected device.
After you select your device from the device list the app will automatically detect and locate your device on the map. To access information regarding a selected device, click on the Info tab.
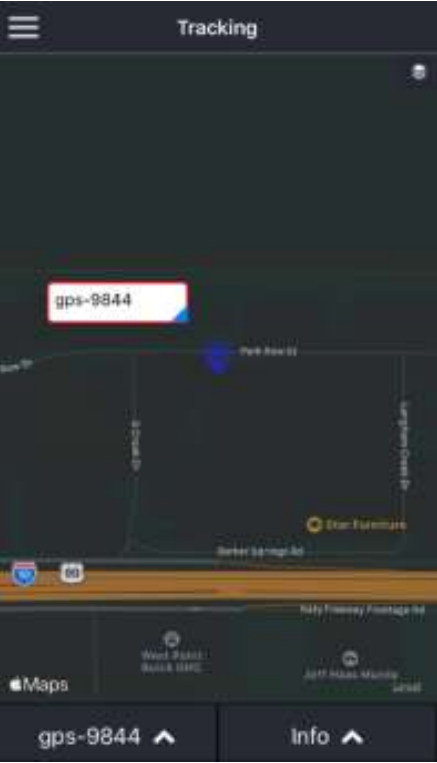
The Info tab will display the following categories:
| Speed | The current MPH or speed the device is traveling. |
| Mileage | Displays the current odometer reading of the vehicle. |
| Battery % | The battery life currently associated with the device. |
| Date/Time | The date and time of the last recorded event the device transmitted. |
| Location | The Last known location of the device or location that is being transmitted. |
| Reload Location | Reloads the previously tracked location of the device. |
| Street View | Displays a Google street view image based on the location of the device. |
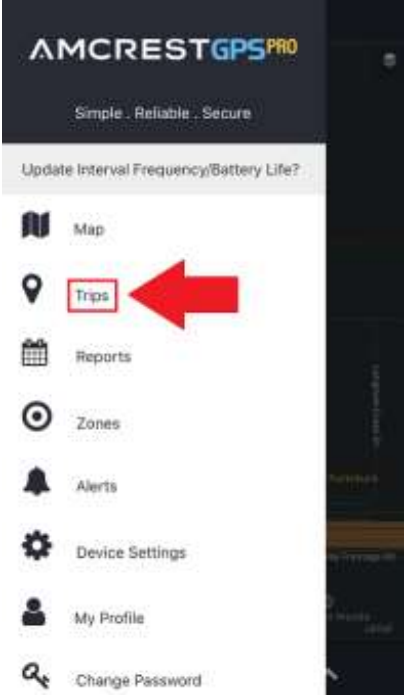
Trips
The tab allows the user to see trip history and playback recorded trip data. To access the trips menu, please select “Trips” from the main menu.
A representation of the last known trip data will be displayed on the map interface. For details on the current trip, tap on the Trips option.
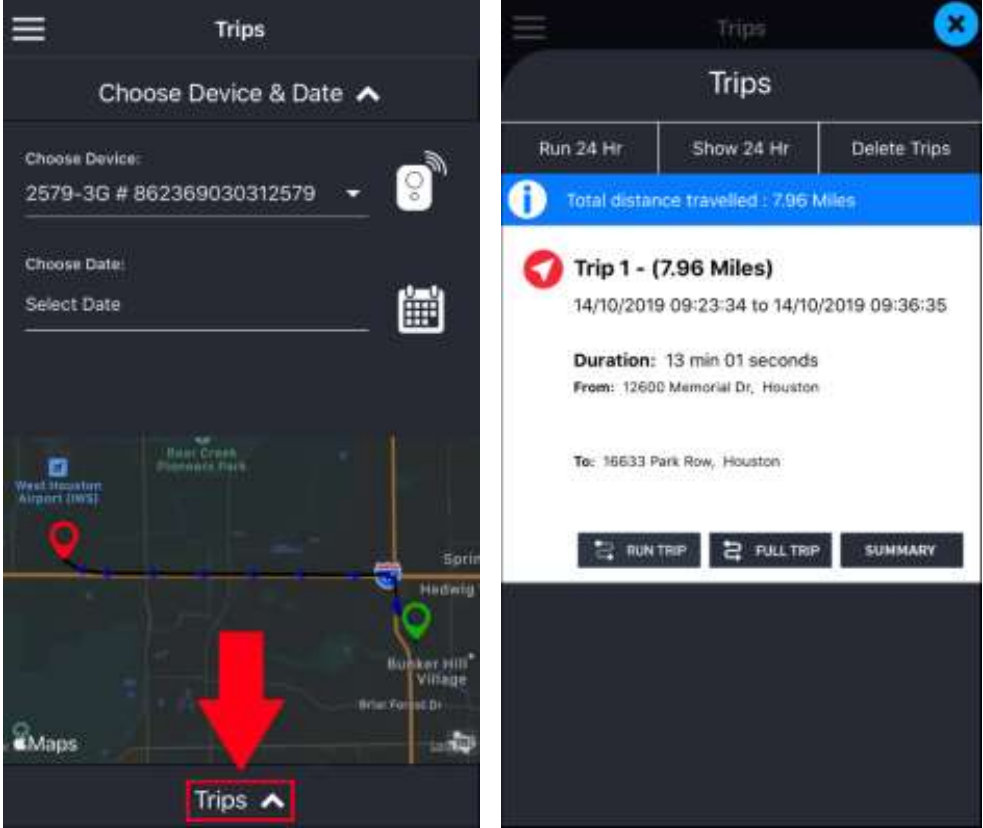
- Information such as total miles driven, the date and time, duration, as well as automation options will be provided. For more information on options provided in this menu, please review the table provided below.
| Run 24 Hr | Runs an automation of all trips recorded in the last 24 hours on the map interface. Note: Tap the Stop button to exit the playback interface. |
| Show 24 Hr | Displays a route for all trip data recorded in the last 24 hours on the map interface. |
| Delete Trips | Deletes all trip data reported for that day. |
| Run Trip | Runs an automation of a single trip in the map interface. Note: Tap the Stop button to exit the playback interface. |
| Full Trip | Displays a route of a single trip in the map interface. |
| Summary | Displays the IMEI, average speed, minimum and maximum speeds, the average, minimum and maximum battery percentage of the device during a specific trip. |
Selecting Previous Trip Data
To select trip data based on specific dates, tap on the Select Date option located in the trip interface. A calendar will be displayed which shows applicable dates with recorded data. Data is represented by a blue dot in the interface. Tap on the represented date to populate trip data for that specific date.
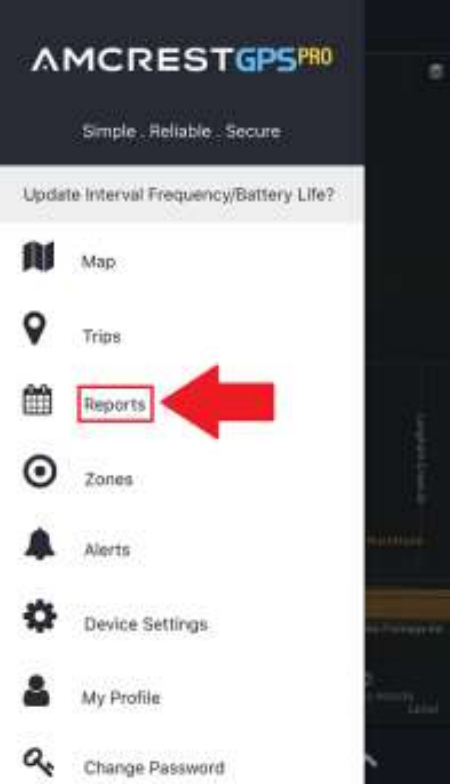
Reports
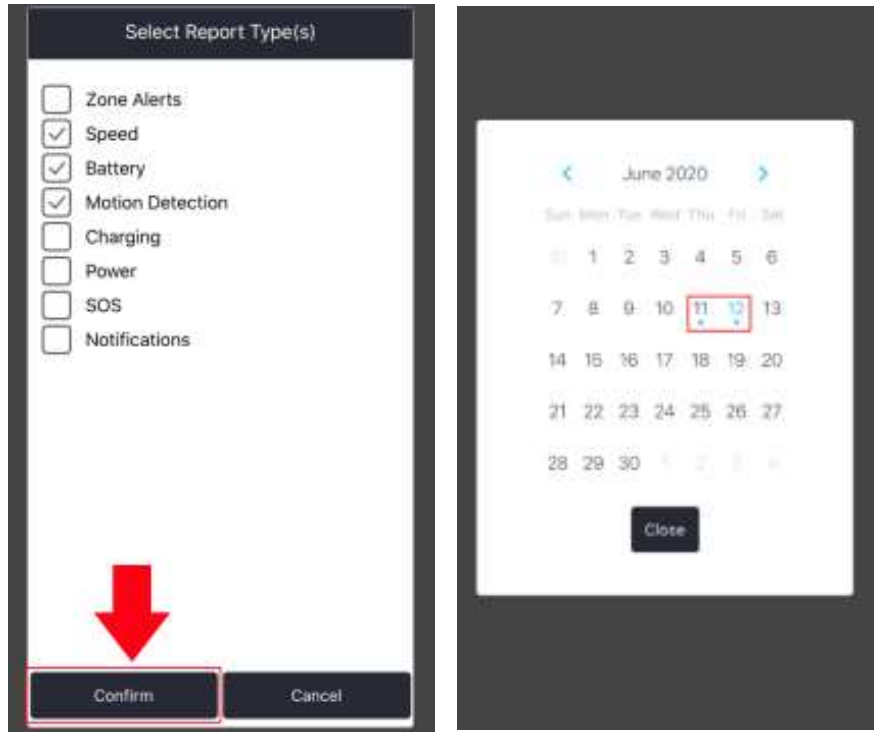
- The reports tab allows the user to create custom reports which includes criteria such as, battery, charging, zone alerts, power, SOS/emergency, speed, motion detection, and notifications.
Tap on the Reports option to access the interface.
Select the GPS device from the interface and select a report type from the Choose Report Type drop down menu. Select all applicable report types and tap Confirm. Tap on the tap on the Select Date option located in the reports interface. A calendar will be displayed which shows applicable dates with reported data. Data is represented by a blue dot in the interface. Tap on the represented date to populate report data.
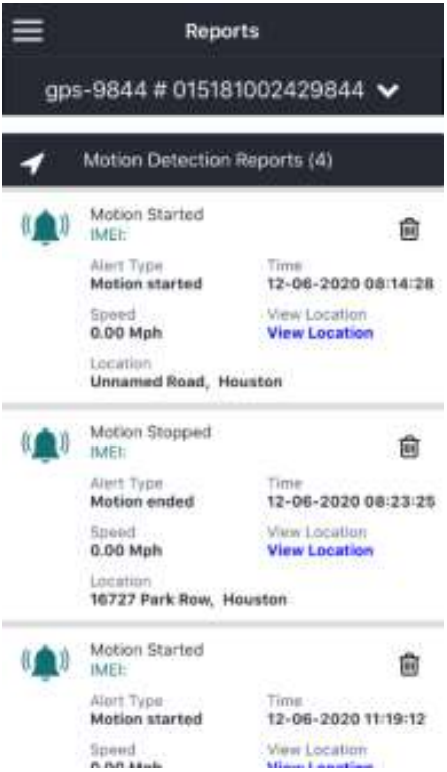
A list of reports for each specific report type will be displayed. Tap on the report type to be viewed to view all data listed in the report. Tap on View Location to view the location of the report.
Zones
- The Zones tab allows the user to create a virtual geographic boundary which will alert the user if the device enters or exits a specific zone.
Tap on the Zones option to access the interface.
Tip: To create a zone, start searching locations from the top-left search icon.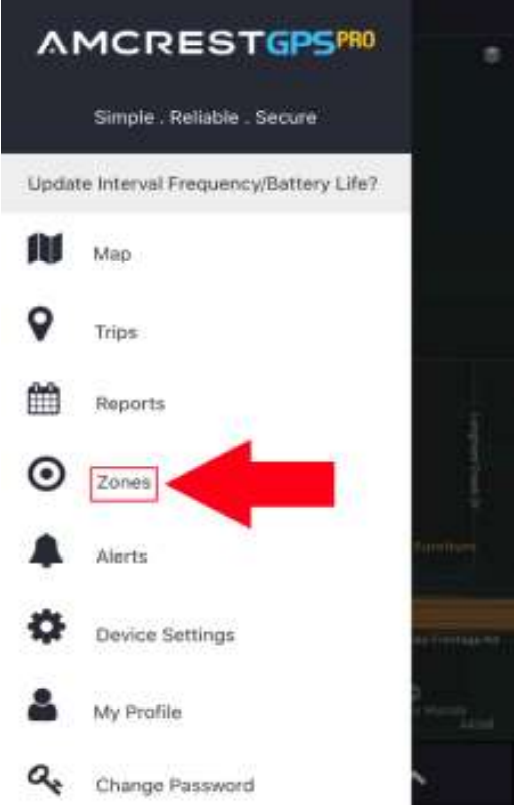
To add a custom zone, click on the “+ Add Zone” option. Click “Got it!” in the prompt to begin.
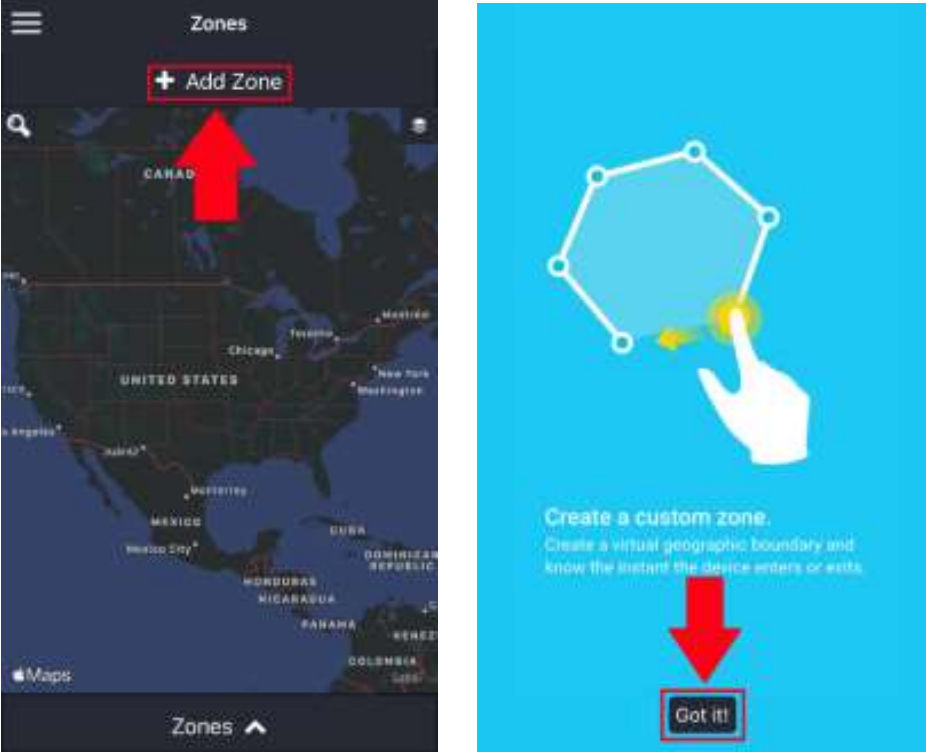
Use the search tool in the left-hand corner to select an area to draw the custom zone. Tap on the interface to create a custom zone in a specific area of the map. Click Save Zone once all points have been set.

Enter a name for the zone and choose which type of zone will be reported. This can be an alert when the device enters a zone, exits a zone, or both. A zone group can be applied to the zone, via the Zone Group menu. Select a group from the interface or tap on “+ Create New Zone Group” to create a new group.
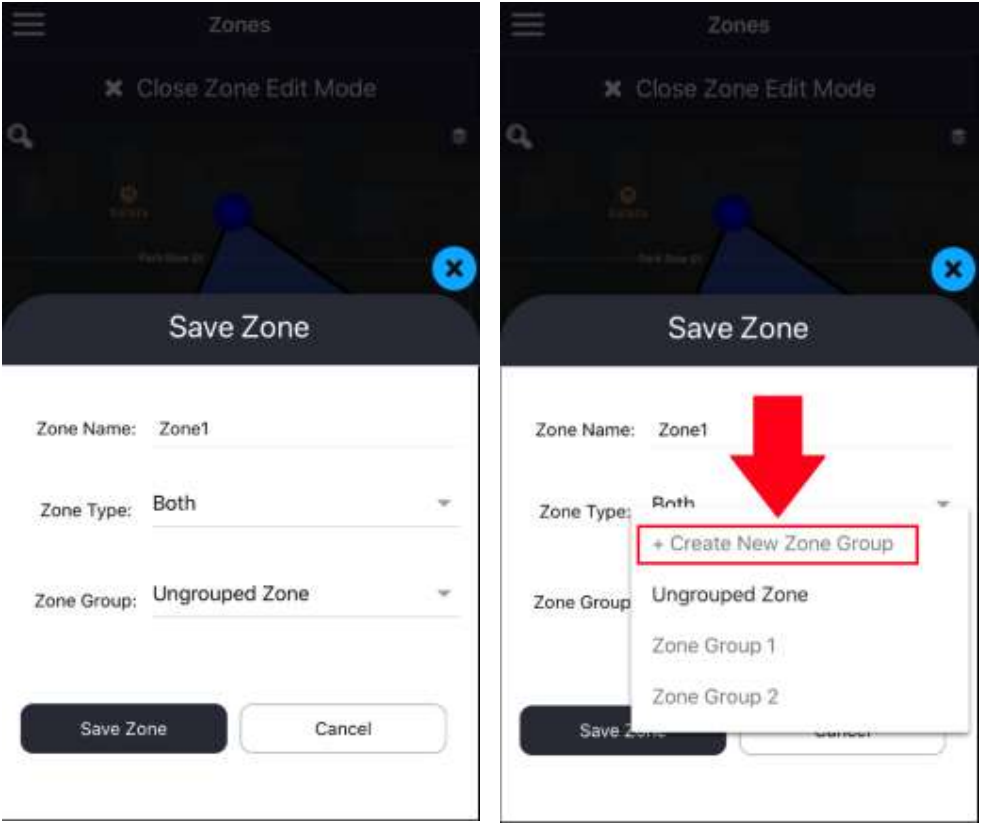
Creating a New Zone Group
- A Zone Group allows multiple zones to be grouped in the interface for a specific device. To create a zone group, tap on the “+ Create New Zone Group”.
Note: The zone can be ungrouped in the interface, however, if multiple zones need to be applied to a device it is highly recommended to create a zone group. - Enter a name for the zone group and click Create Zone Group. The zone group will be applied to the zone, tap on Save Zone to save, and apply the custom zone to the device. Tap on “Create” to create the zone.
Adding Zone Alerts
- Once a zone alert has been created the interface will prompt the user to create an alert. Zone alerts are used to provide push notification alerts to your mobile device if a device enters or exits a custom zone. An email can also be used to receive zone alerts if applicable.
A zone alert can be applied to multiple devices in the interface and can be applied to individual (ungrouped) zones or specific zone groups. To begin creating an alert, tap on “+Add Alert”. Enter a name for the alert in the interface and tap on the Select Device(s) drop down menu to select your device. Multiple devices can be applied to a single alert if necessary. Tap Confirm for add a device into the Alert setup interface.
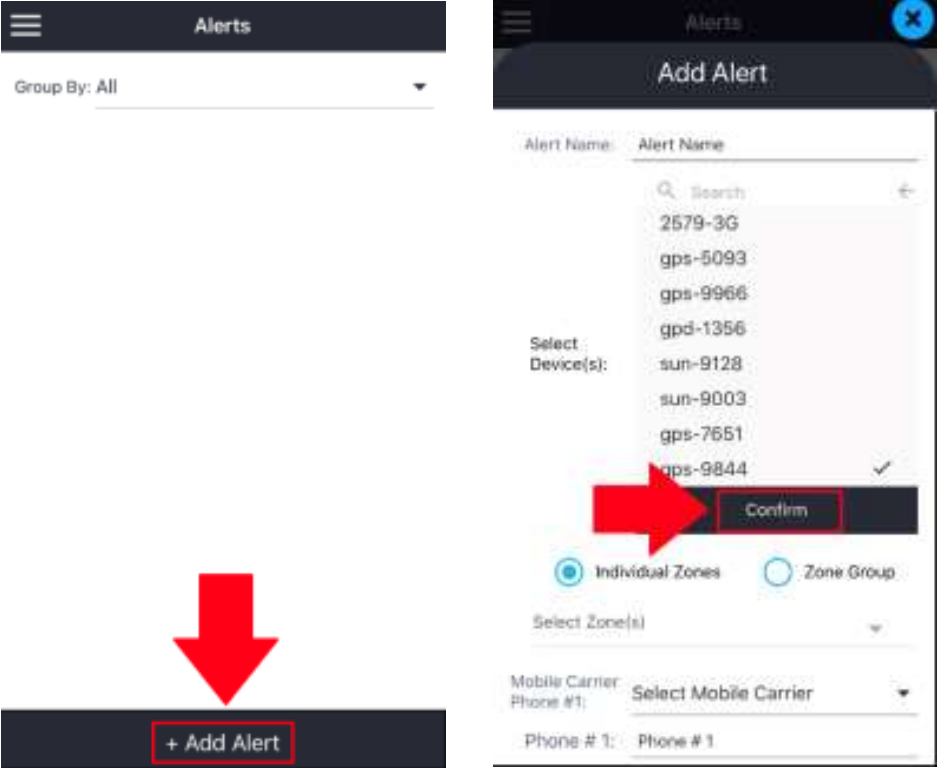
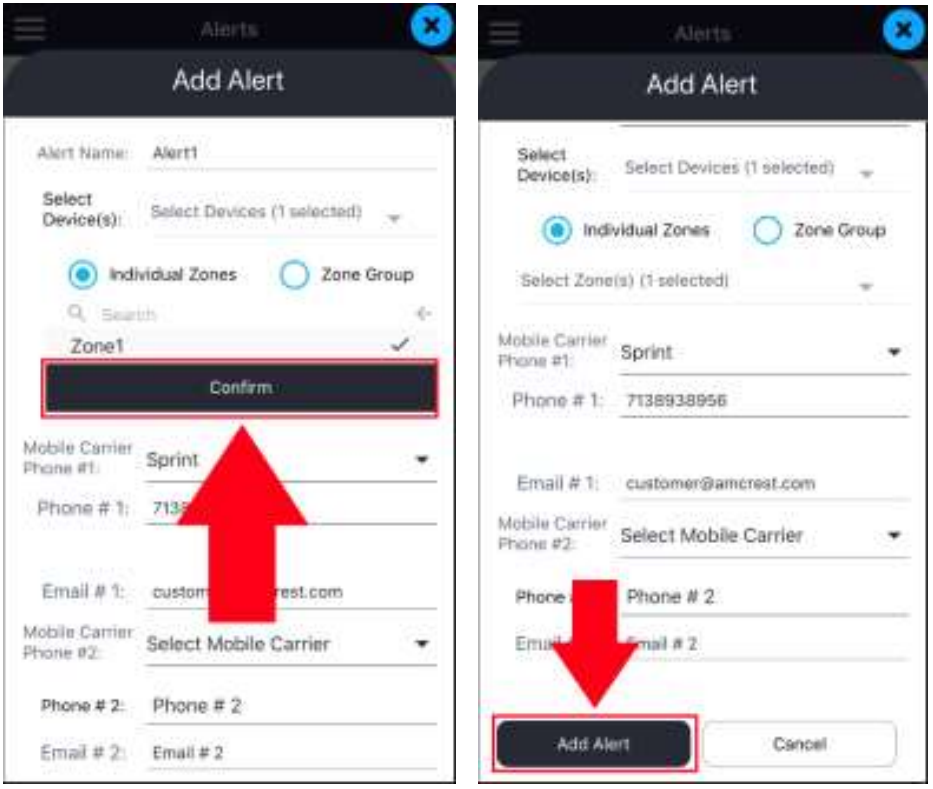
- Select whether the alert will apply to individual zones or a zone group. Tap on the Select Zone(s) drop down menu and select the applicable zone for the alert from the menu and tap Confirm.
Enter all necessary information in the alert menu, select the current mobile carrier for your mobile device from the Mobile Carrier Phone drop down menu, then enter a phone number in which push notifications will be sent. If applicable, enter a valid email address the in the Email field. Another mobile device can be used as well for the same alert in the #2 fields. Tap Add Alert to apply the alert to your device. Alerts can be created and edited as well in the Alerts menu in the app.

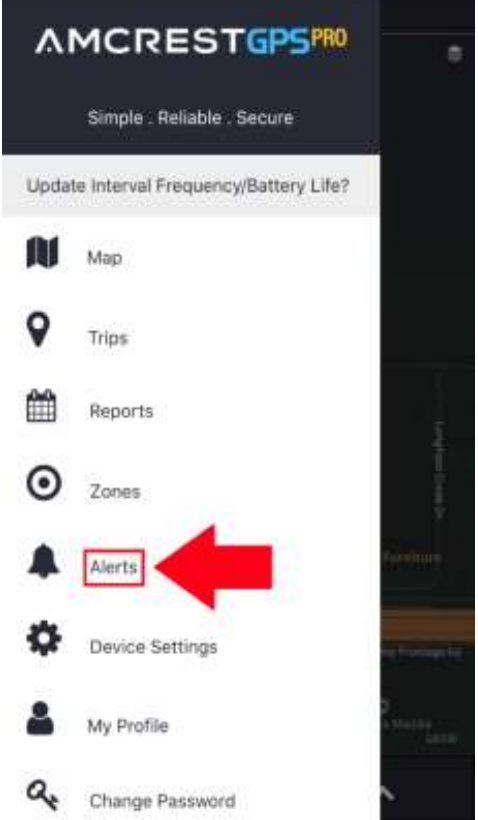
Alerts
- The alerts menu allows the user to add, modify, or remove alerts.
Tap the Alerts option to access the interface.
Adding an Alert
- Alerts are used to provide push notification alerts to your mobile device if a device enters or exits a custom zone. An email can also be used to receive zone alerts if applicable.
A zone alert can be applied to multiple devices in the interface and can also be applied to individual (ungrouped) zones or specific zone groups. To begin creating an alert, tap on “+Add Alert”. Enter a name for the alert in the interface and tap on the Select Device(s) drop down menu to select your device. Multiple devices can be applied to a single alert if necessary. Tap Confirm for add a device into the Alert setup interface.
- Select whether the alert will apply to individual zones or a zone group. Tap on the Select Zone(s) drop down menu and select the applicable zone for the alert from the menu and tap Confirm.
Enter all necessary information in the alert menu, select the current mobile carrier for your mobile device from the Mobile Carrier Phone drop down menu, then enter a phone number in which push notifications will be sent. If applicable, enter a valid email address the in the Email field. Another mobile device can be used as well for the same alert in the #2 fields. Tap Add Alert to apply the alert to your device. Alerts can be created and edited as well in the Alerts menu in the app.
Editing Alerts
To edit an alert, select an alert from the Alert interface and tap on View/Edit. Update the alert information and tap Update Alert.
Deleting an Alert
To delete an alert, select the alert from the interface and tap Delete. A prompt will ask if you would like to delete the alert, tap Delete to confirm. Multiple alerts can be deleted at the same time as well by selecting each alert in the interface and tapping Delete.
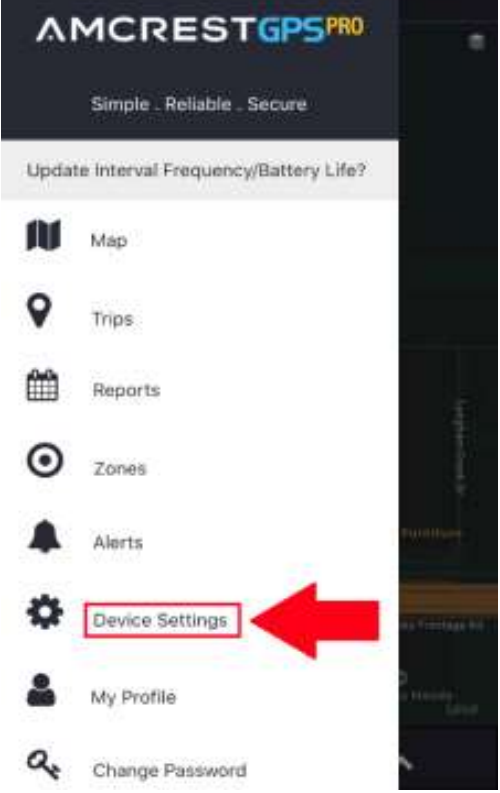
Device Settings
- This tab allows the user to adjust general settings associated with a connect GPS device.
To access the device settings menu, tap on Device Settings in the main menu.
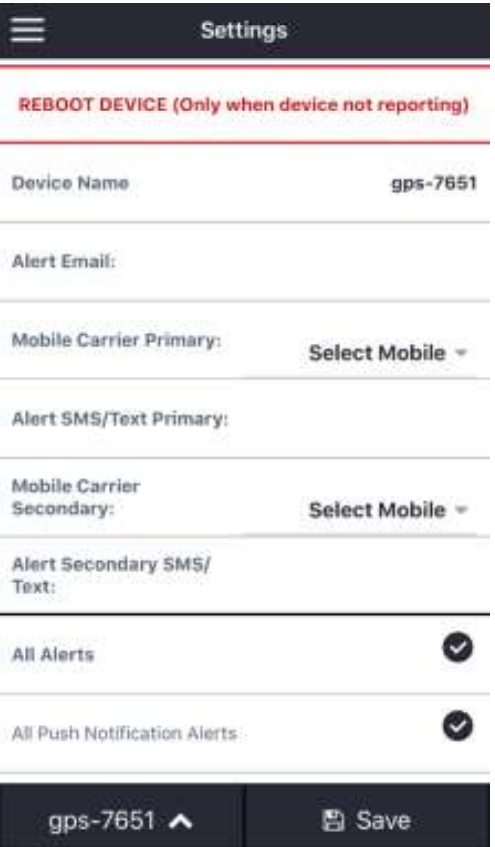
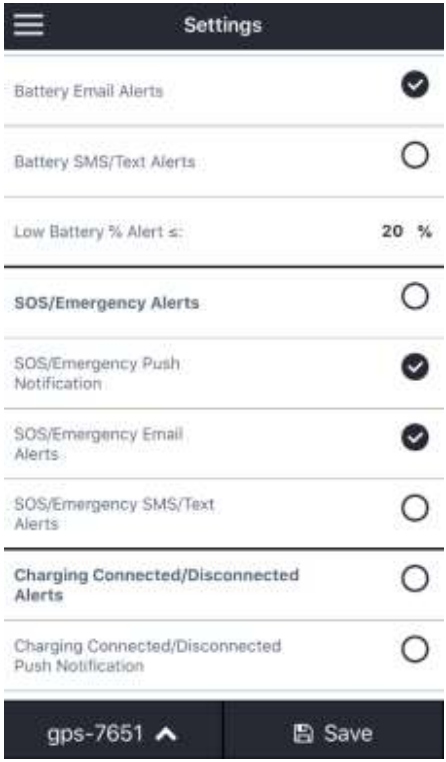
Settings
The device can only reboot when the device is not reporting.
- Device Name: The name of the device being used.
- Alert Email: The email the current account email being used.
- Mobile Carrier Primary: Select a primary mobile carrier.
- Alert/SMS/Text Primary: The primary means of receiving SMS.
- Mobile Carrier Secondary: Choose a secondary mobile carrier.
- Alert Secondary SMS/Text: The secondary way of receiving SMS.
- All Alerts: Enable to allow the device to receive all alerts.
All Push Notification Alerts: Enable to allow push notifications.
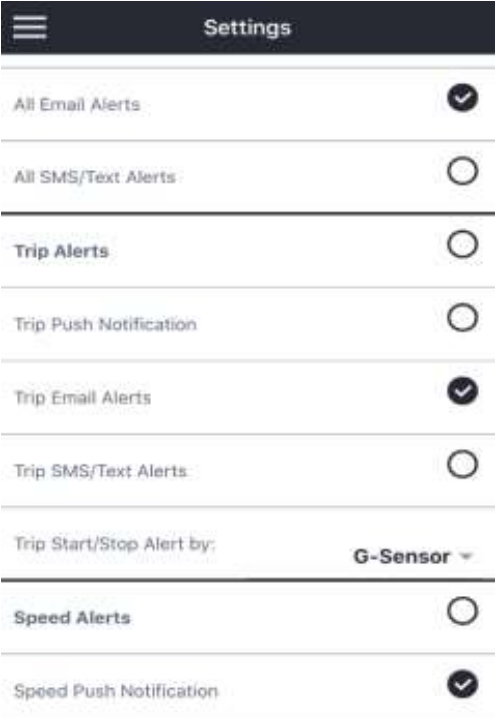
- All Email Alerts: Enable to allow all email alerts to be sent.
- All SMS/Text Alerts: Enable to allow all SMS alerts to be sent.
- Trip Alerts: Enable to allow trip alerts to be sent.
- Trip Push Notifications: Enable to allow trip push notifications.
- Trip Email Alerts: Enable to allow trip emails alerts to be sent
- Trip SMS/Text Alerts: Enable to allow SMS trip alerts.
- Trip Start/Stop Alert by: Enable G-sensor or Coordinate Change to start or stop a trip alert.
- Speed Alerts: Enable/disable speed alerts.
Speed Push Notifications: Enable speed push notification alerts.
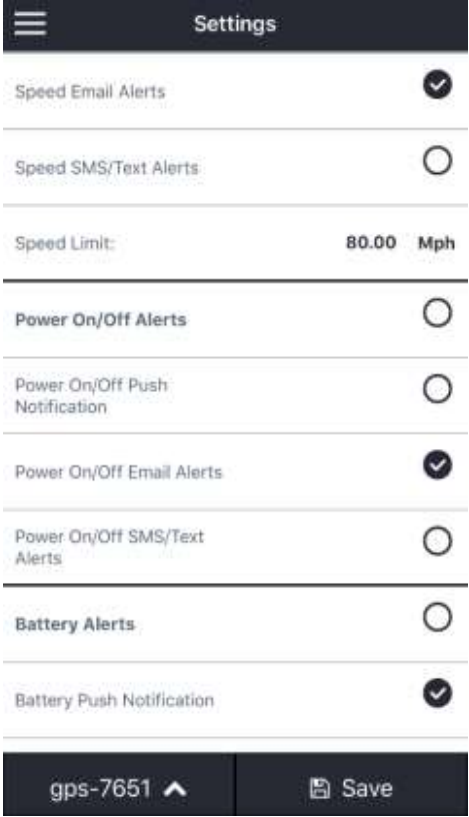
- Speed Email Alerts: Enable/disable speed related email alerts.
- Speed SMS/Text Alerts: Enable/disable speed related SMS alerts.
- Speed Limit: Set MPH threshold for speed alerts.
- Power On/Off Alerts: Enable/disable power on/off alerts.
- Power On/Off Push Notifications: Enable/disable power related push notification alerts.
- Power On/Off Email Alerts: Enable/disable power related email alerts to be sent.
- Power On/Off SMS/Text Alerts: Enable/disable power related SMS alerts.
- Battery Alerts: Enable/disable alerts to be sent if the battery is too low.
Battery Push Notification: Enable/disable a push notification to be sent if the battery is too low.
- Battery Email Alerts: Enable/disable an email to be sent when the battery is too low.
- Battery SMS/Text Alerts: Enable/disable SMS alerts to be sent if the battery if too low.
- Low Battery % Alert ≤: Enable/disable alerts if battery percentage is less than or equal to a specified percentage.
- SOS/Emergency Alerts: Enable/disable all SOS/Emergency alerts.
- SOS/Emergency Push Notifications: Enable/disable SOS/Emergency push notifications.
- SOS/Emergency Email Alerts: Enable/disable SOS/Emergency alerts to be emailed.
- Charging Connected/Disconnected Alerts: Enable/disable alerts to be sent when the device is being charged or disconnected.
Charging Connected/Disconnected Push Notification: Enable/disable push notifications to be sent if the device is charging or is disconected.
Charging Connected/Disconnected Email Alerts: Enable/disable email alerts to be sent if the device is being charged or is disconnected- Charging Connected/Disconnected SMS/Text Alerts: Enable/disable SMS alerts to be sent if the device is charging or is disconnected.
- Trip End Timer: Use this slider to set trip end times. This can range from 0 to 10 minutes; 10 minutes is set by default.
Vehicle Skins: Set the vehicle color in which the device is attached. The app will need to be reloaded for this function to be applied.
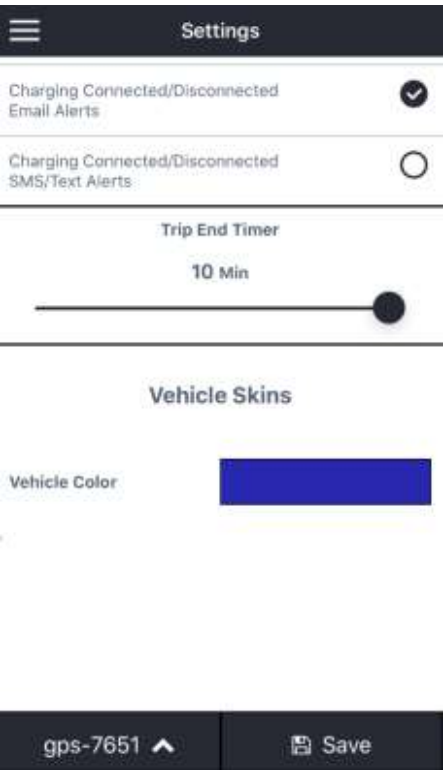
Note: Tap the Save button to save and apply settings.
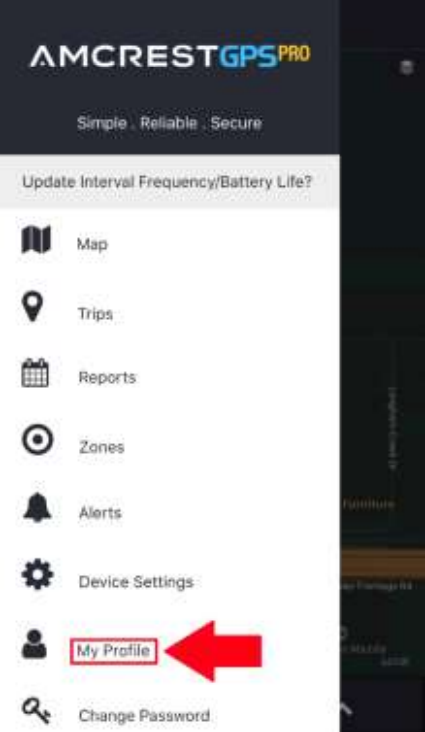
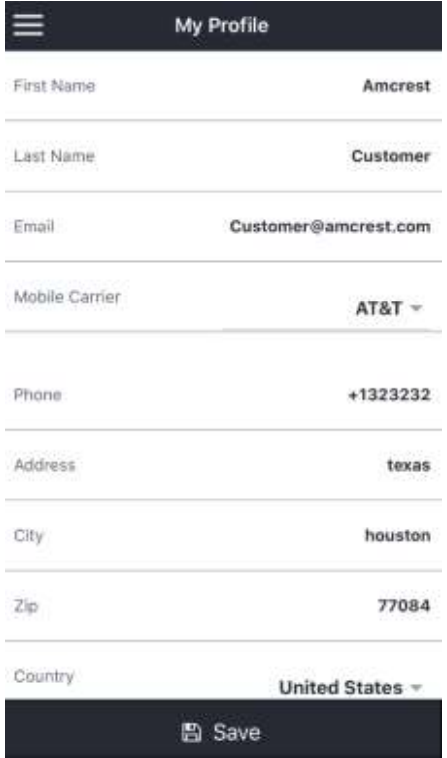
My Profile
This tab allows users to view and adjust profile settings associated with their GPS account. To access the profile settings, tap on the My Profile option in the main menu.
Enter the appropriate information into the form if necessary. Please note, the email address for your profile cannot be updated. Tap Save to update profile settings.
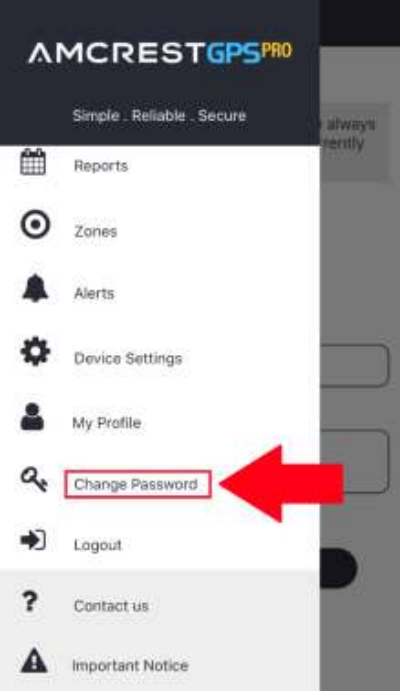
Change Password
- This tab allows the user to update password information associated with the GPS device.
To change the password for your account please tap on the “Change Password” tab located in the main menu of the app.
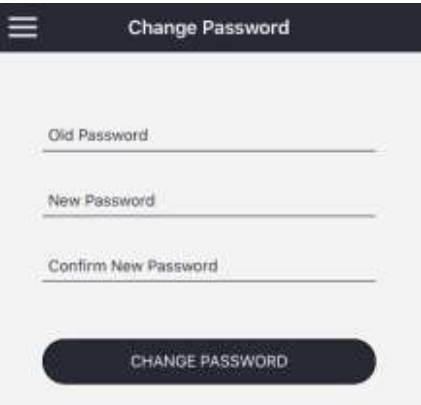
To change the password, enter the old password for your device into the “Old Password” field and then enter a new password into the “New Password” field. Confirm the new password in the “Confirm New Password” field. Once this is complete, press “Change Password” to complete the password update process.
Logout
- This tab allows you to logout of your account and will redirect you to the main menu screen of the app.
- To logout, please press the “Logout” tab located in the main menu of the app.
Contact Us
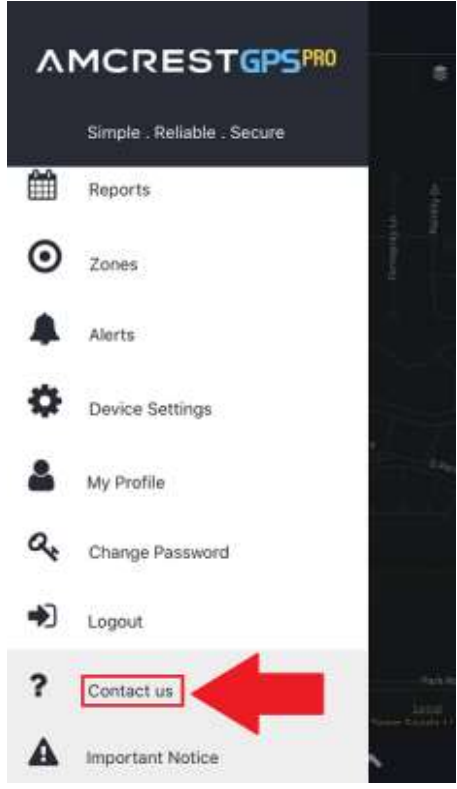
- The Contact Us tab provides the user direct access to a contact form which a customer can use to reach Amcrest directly for general support, billing inquiries, or bug reports.
To access the form, tap on the Contact Us option located in the main menu.
- To use the contact us form, select the reason for the issue (general support, billing inquiries, bug report) and select the device from the Choose Device drop down menu.
- Enter a brief description of the issue into the “How may we help you?” and tap Send when ready to submit the report. An Amcrest support agent will respond to assist with the issue.
Important Notice
This tab provides users with an important notice regarding their GPS devices. Please refer to the important notice below.
IMPORTANT
This device is configured to work in the US, Canada, and Mexico only. If you plan to use the device internationally (outside North America), please contact us at [email protected] to enable this feature BEFORE the device leaves North America.
Setup Guide
Setting up the Amcrest GPS Tracker AM-GL300W-4G is easy and straightforward. Here are the steps to follow:
- Insert the SIM card into the device.
- Charge the device for at least 2 hours before use.
- Download and install the Amcrest GPS Tracker app on your smartphone or tablet.
- Create an account and log in.
- Add the device to your account using the device's IMEI number.
- Set up the geofencing and alert notifications as desired.
Important Security Warning
To keep your Amcrest GPS tracker secure and prevent unauthorized access, please make sure to follow the steps below:
Change the default password after viewing your tracker on amcrestgps.com. Always ensure that your amcrestgps.com password is at least 8 characters long and contains a combination of lowercase characters, uppercase characters as well as numbers.
Important Safeguards and Warnings
- Electrical Safety
All installation and operation should conform to your local electrical safety codes. The product must be grounded to reduce the risk of electric shock. We assume no liability or responsibility for any fires or electrical shock caused by improper handling or installation. - Transportation Security
Heavy stress, violent vibrations, and excess moisture should not occur during transportation, storage, and installation of the device. Do not adjust GPS tracker settings or placement while driving. - Repair Professionals
All the examination and repair work should be done by qualified service engineers. We are not liable for any problems caused by unauthorized modifications or user-attempted repair. - Environment
The GPS tracker should be kept in a cool, dry place away from direct sunlight, flammable materials, explosive substances, etc. This product should be transported, stored, and used only in the specified environments as stated above. - Operation and Maintenance
To clean dust or dirt off the GPS tracker, use an air blower or a microfiber cloth. - Accessories
Be sure to use only the accessories recommended by manufacturer. Before installation, please open the package and check to ensure that all the components are present. Contact the retailer that you purchased from, or Amcrest directly if anything is broken or missing in the package. - Legal Notice
Ensure strict observation of relevant laws to ensure this product cannot be used for any illegal purposes. Amcrest Technologies assumes no liability or risk for misuse of this product and any consequences of said misuse.
Troubleshooting
If you encounter any issues with the Amcrest GPS Tracker AM-GL300W, here are some common problems and solutions:
- If the device is not tracking, make sure the SIM card is activated and has sufficient balance.
- If the device is not charging, make sure the charging cable is properly connected.
- If the device is not responding, try resetting it by removing the battery and reinserting it.
- If you are having trouble setting up the device, make sure you are following the instructions carefully and that you have a stable internet connection.
Pros & Cons
Pros
- Real-time tracking and monitoring
- Waterproof and dustproof design
- Long battery life
- Easy to use and set up
- Affordable price
Cons
- Limited to 2G GSM networks
- May not work in areas with poor cell coverage
Faqs
What is the Amcrest Tracker and how does it work?
What is the battery life of the AM-GL300W-4G?
Can I use the Amcrest GPS Tracker AM-GL300W-4G outside of the United States?
How do I replace the SIM card in the Amcrest GPS Tracker?
What should I do if the Amcrest GPS Tracker is not charging?
How do I reset the Amcrest to its factory settings?
Leave a Comment