Aovo W PRO Drone with Camera AOVO66 User Guide | Settings & Operations
Content
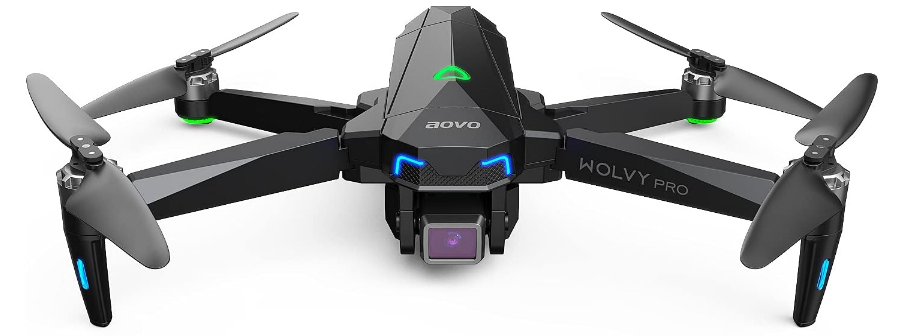
Introducing the Aovo W PRO Drone with Camera AOVO66
The Aovo W PRO Drone with Camera AOVO66 is a high-performance quadcopter tailored for both enthusiasts and beginners. Equipped with a 4K UHD camera, it captures stunning aerial footage and images, while its GPS functionality ensures stable flight and features like Follow Me mode enhance usability. With a remarkable flight time of up to 60 minutes thanks to dual batteries, this drone offers an exceptional flying experience. The cost of the Aovo W PRO Drone is approximately $199.99 USD.
SPECIFICATIONS
DRONE
- Model: W PRO
- Weight: 520 g / 18.4 oz
- Max Flight Time: Approx 30 minutes
- Operating Temperature Range: 32° to 104°F
- Dimensions: 115 x 175 x 80 mm (Folded) 285 x 225 x 80 mm (Unfolded)
DRONE BATTERY
- Capacity: 2500 mAh
- Voltage: 11.4 V
- Battery Type: Li-Po
- Energy: 28.5 Wh
- Charging power: 34.2 W
- Charging Temperature Range: 41° to 104°F (5° to 40°C)
- Charging Time: 4.5~5.5 hours
TRANSMITTER
- Operating Frequency: 2.4 GHz
- MAX Transmission Distance: 1000m (outdoor and unobstructed)
- Battery: 3.7V 300 mAh.
- Charging Time: Approx 45 mins
- Operating Temperature Range: 32° to 104°F
CAMERA
- Camera frequency: 5 GHz
- Video/ Photo Resolution: 4K
- Lens: FOV 90°
FPV Distance: 800m (outdoor and unobstructed) - Photo: JPEG
- Video: MP4
- MAX Supported TF Cards: 64 GB (Not included)
- Controllable Range: Pitch: -90° to 0°
- Operating Temperature Range: 32° to 104°F
- USB CHARGING CABLE
- Voltage: 5 V
- Ampere: > 2 A
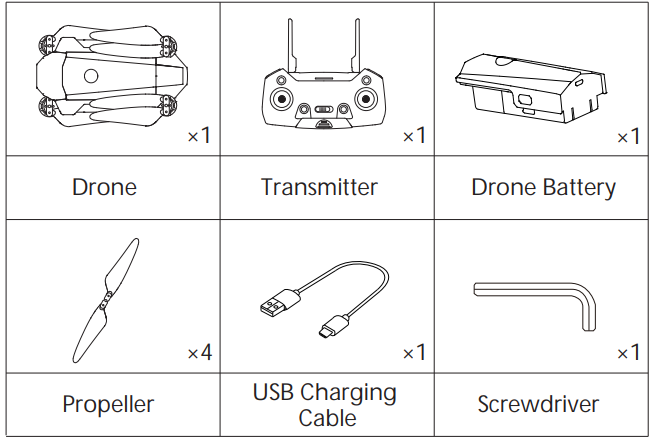
PACKAGE CONTENTS
DRONE’S DETAILS

TRANSMITTER DETAILS
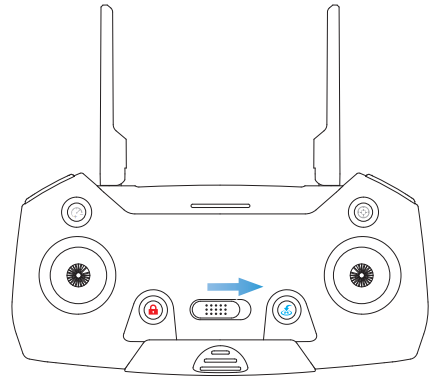
Transmitter Functions
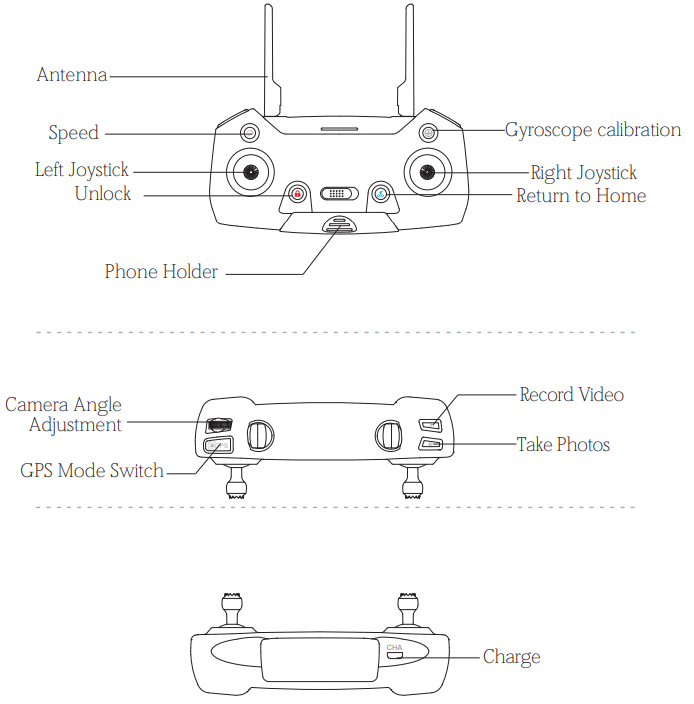
- GPS Mode Switch
When turning on the transmitter, the default mode is the GPS Mode. Turn off GPS by press GPS switch. Check the icon “ ” on the App interface to confirms GPS status.
 - Return to Home

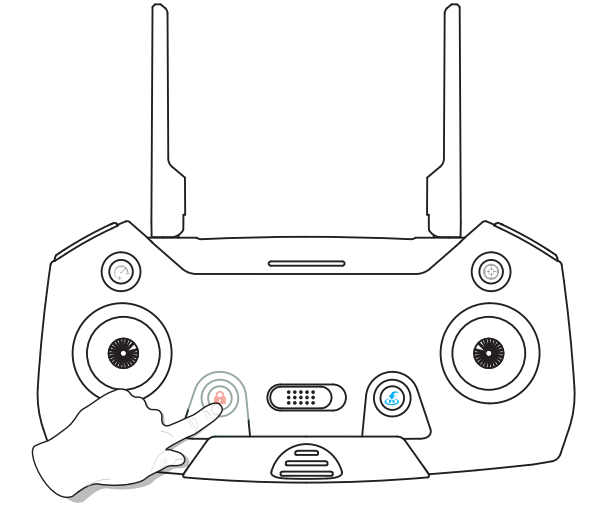
Press the button to start the RTH, the transmitter makes “beep beep” sound per 1.5 seconds and the drone will fly back to the recorded Home Point.
Press the RTH button again to exit RTH procedure and regain control of the drone. - Unlock/Lock
Press the button ” “ then the motor will rotate.
Pull the Left Joystick to the bottom position. The motor will stop rotating and the drone will be locked. - Photo/ Video
Press the button and the camera icon “ ” on the Controllor, the camera takes one photo.
Press the same button, the video icon “ ” on the Controllor, the camera will take the video. Press again will exit shooting.
 - Speed Switch
Low speed is default setting before speed change.
Press the button “ ” on the Controllor and you will hear a beep, which means the drone is at the low speed.
Press the button “ ” again and you will hear two beeps, which means the drone is at the high speed.
Description
The Aovo W PRO Drone with Camera AOVO66 is a high-quality drone perfect for capturing stunning aerial shots and videos. The 1080p HD camera provides clear and detailed images and videos, while gesture control makes it easy to operate. The altitude hold function ensures stable flight, while one-key takeoff and landing makes it easy to use. The headless mode helps with orientation, and the drone has a flight time of up to 15 minutes and a range of up to 120 meters. Its foldable design makes it easy to store and transport, and the LED lights make it possible to fly at night. The APP control makes it easy to operate and control the drone.
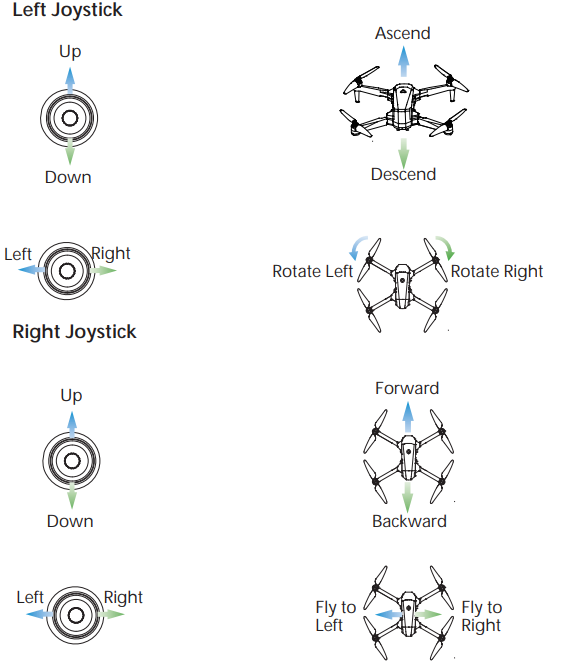
Controller Operation
Aovo W PRO Drone with Camera AOVO66 INSTALLATION
Drone Battery
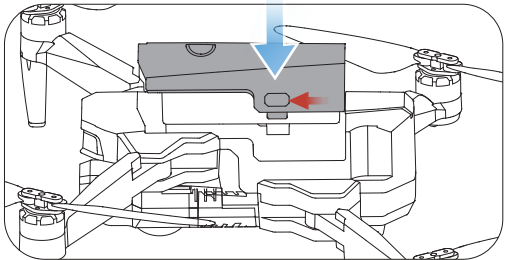
Installation: Push the battery into the battery compartment of the drone. Make sure that you hear a click sound indicating the battery is firmly installed.
Attention:
The battery should be installed firmly, failure to do so may affect the flight safety of your drone. The drone may crash due to power-cut during the flight.
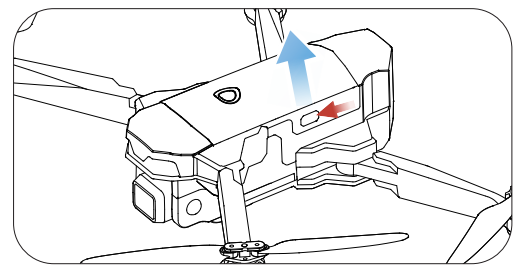
Removal: As shown above, press and hold the lock on the both side of the battery at the same time to remove the battery.
Install TF Card
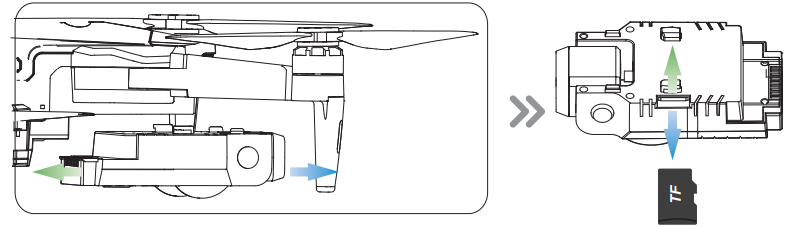
As shown in the above figure. Please push the camera module out and insert the TF card ( Need to be purchased separately ) to TF card slot, then you could hear “Click” , means insert successfully. Push the camera module into the specified position of drone.
WARNING
- Please operate carefully for avoid damage the camera module.
- The original pixel pictures and videos will be stored in the TF card.
Transmitter Battery
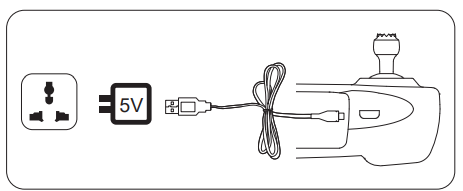
- Connect the USB cable to a USB socket such as mobile power supply.
- Connect the remote controller with USB cable, the LED of controller is turn solid in Green means Charging status. If the LED of controller is off, means Charging completed. .
Note:The voltage of power supply is no greater than or equal to 5V, otherwise there is a risk of overloading the USB cable. The charging time approx 45 mins
Propellers
Installation
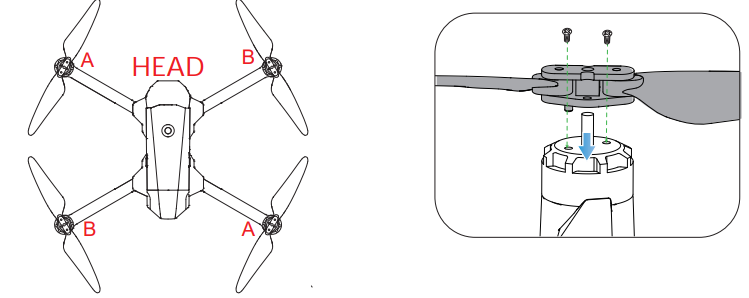
The drone will not fly unless the correct propeller is installed on the correct motor shaft. See illustration above. An “A” or “B” is printed on the back of each propeller. Lock the propeller to the motor shafts with screws rotating each screw clockwise.
Removal
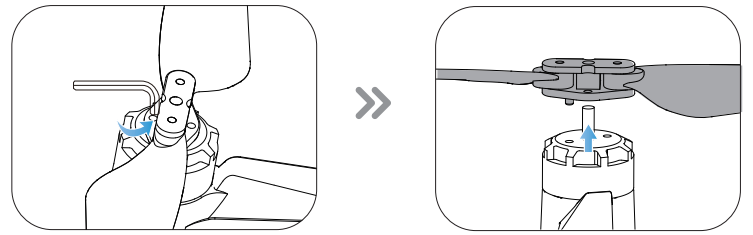
For propeller removal use screwdriver (provided) to rotate counter-clockwise and remove propellers.
Phone Holder
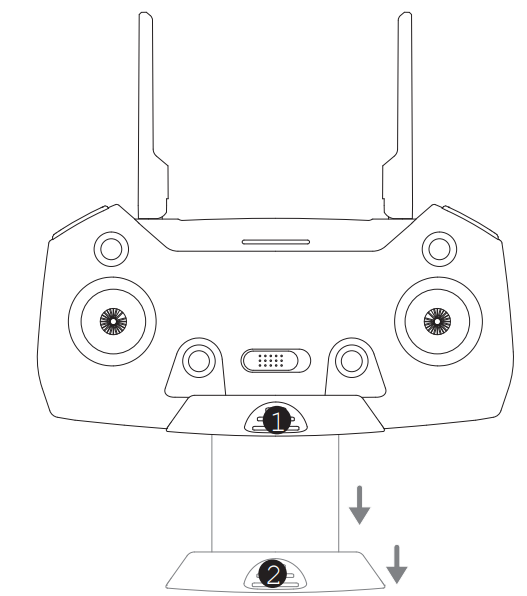
- Pull down the position of controller.
- Adjust the Mobile Device Holder to hold tightly for the mobile device.
CHARGING
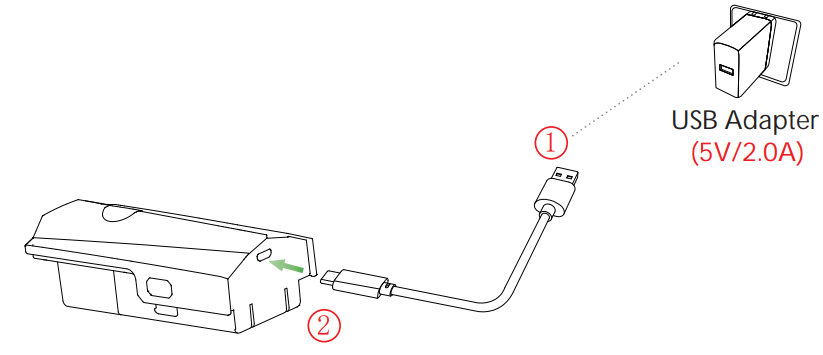
- Connect the USB cable to a USB socket such as mobile power supply (Use an power supply with standard output voltage 5V and current greater than or equal to 2A). And then connect the battery with USB cable, the LED of battery is flashing, means charging. When four LEDs on battery are bright and go steady, means Charging completed.
- The charging time of a single battery is 4.5~5.5 hours.
WARNING
- Before charging, please check the contents of the “ Use of Battery” section of the “ Safety Guidelines” carefully!
- This product is only equipped with a single battery, you can choose to buy another battery to experience a longer flight.
- Use an power supply with standard output voltage 5V and current greater than or equal to 2A, otherwise there is a risk of overloading the USB cable.
OPERATION GUIDE
Download APP
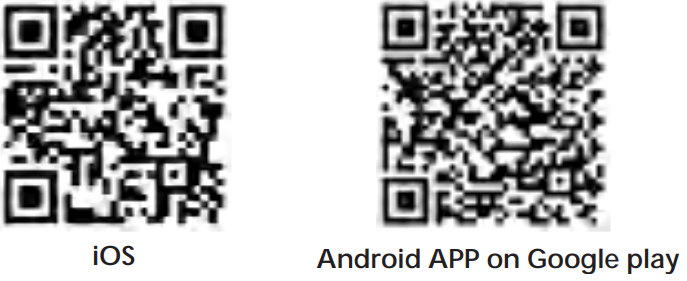
- Scan the QR code, corresponding to either App Store or Google Play Store and download the “ W - GPS ” application for free.
- Required Operating Systems: iOS v8.0 and later / Android v4.3 and later
Unfolding the Drone
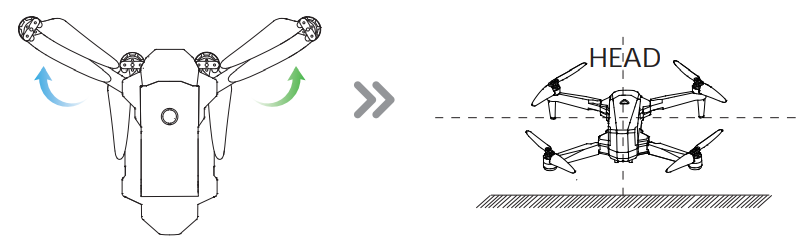
To unfold the drone follow the steps below.
- Step 1: Unfold the front arms.
- Step 2: Unfold the rear arms and place drone on a flat, level surface. Head should face forward.
Connect to Wi-Fi
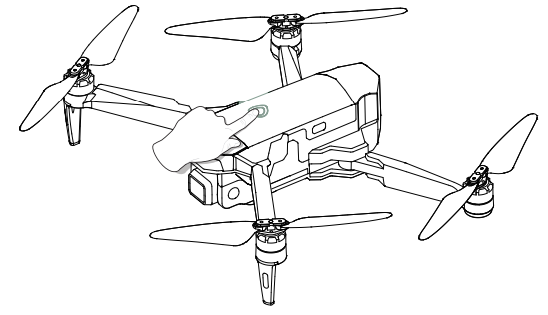
- Short press and then long press the Power Switch approx 2 seconds, and the LEDs on the battery are fully bright and the drone make a sound, means the drone power on, and place it on a level surface with the head forward.
Connect your smart phone to the Wi-Fi network created by the drone.
Check the drone’s status in the ”W - GPS” App. - Your smartphone will launch a search of the available Wi-Fi networks:
W PRO-4K-****** - Select the Wi-Fi network: W PRO-4K-******.
- Wait for several seconds until your smartphone connect to the Wi-Fi network of the drone.
This connection is generally represented by the Wi-Fi logo appearing on your smartphone’s screen. - Launch the W - GPS application.
The connection between your smartphone and the drone will be established automatically.
Pairing
After connect the WiFi signal between smart phone and drone. Turn on the switch on the transmitter. Once the transmitter sends out “Beep” sound, it means that the drone has been successfully paired with the transmitter.
Calibrating the Compass
After pairing operation, the LED lights of the drone are sharp-flashing, that mean is begin compass calibration.
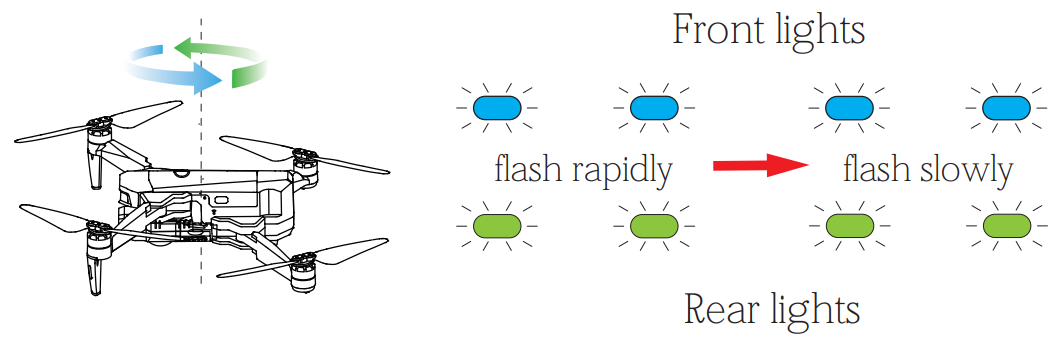
Step 1: Now, the APP interface displays the diagram. Hold the drone horizontally and rotate the drone in approx 3 complete circles. When completed the transmitter sends out “Beep” sound and LED lights of drone flash slowly.
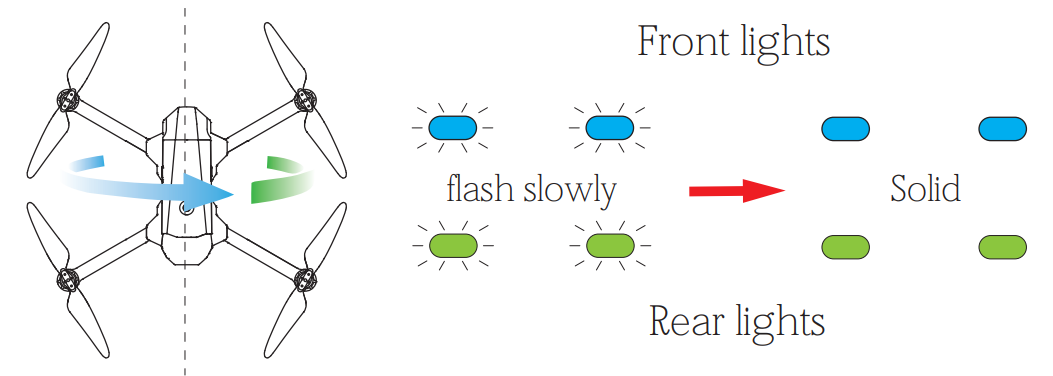
Step 2: Now, the APP interface displays the diagram. Hold the drone vertically and rotate the drone in 3 complete circles. When completed the transmitter sends out “Beep” sound and LEDs lights of drone turn solid.
Attention:- If the GPS receives a signal from 7 or more satellites the rear LEDs of the drone will flash twice per second.
- Every time the drone is powered on the compass calibration should be performed.
Gyroscope calibration
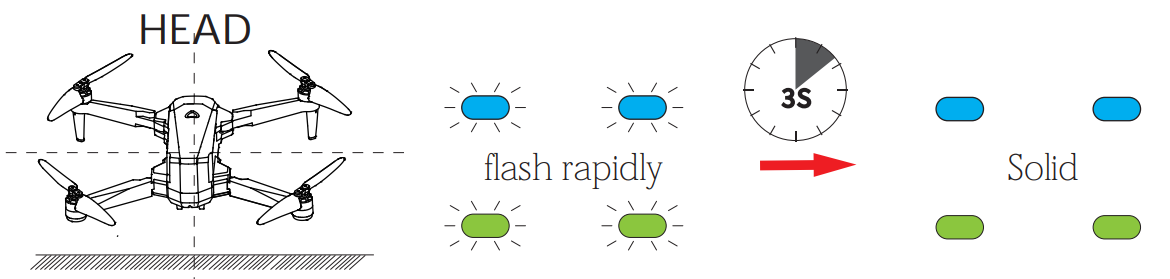
Now, the APP interface displays the diagram. Place the drone on the level surface and  . The LED lights of the drone will flash rapidly for about 3 seconds. When completed, the front and rear lights turn solid. Or press the Gyroscope calibration switch “
  ” on the remote control. The LED lights of the drone will flash rapidly for about 3 seconds. When completed, the front and rear lights turn solid.
Unlocking the Motor
Please unlock the motor before take-off.
Press the red button “![]() ” , the motors rotate.
” , the motors rotate.
- Unlock the motor function will be activated, base the GPS receives a signal from 7 or more satellites OR Indoor mode.
- If you do not any operation approx 10 seconds after unlock the drone, the motors will stop rotating.
Locking the Motor
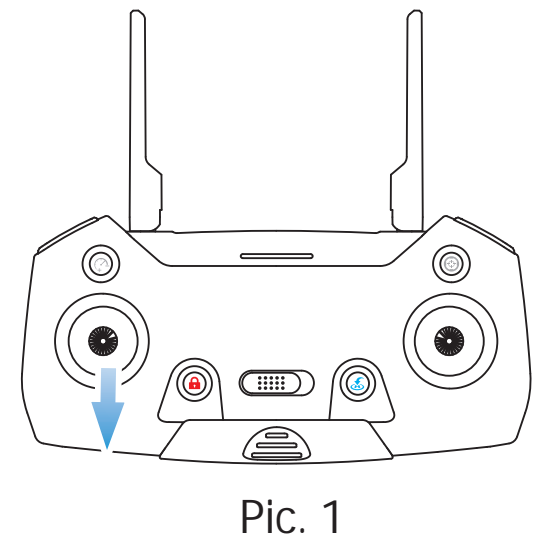
- Pull the Left Joystick to the bottom position. The motor will stop rotating and the drone will be locked. (Pic.1)
One Key Takeoff/ Landing
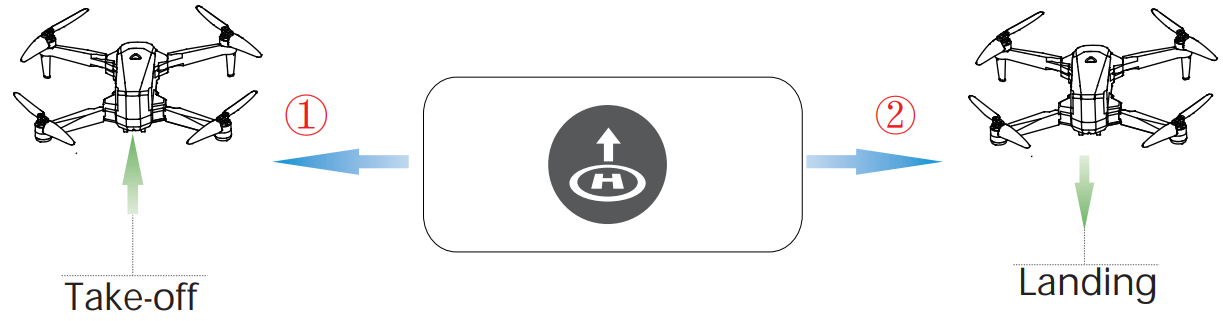
- After unlocking the drone, press the “
 ” button in the APP interface, Slide right to confirm “” and the drone will automatically take off and hover at 1.5m altitude. Or press the button “” again for take off after unloack the motors.
 - When the drone is flying, press the “” button, the drone will flight back to the Home point and automatically land on the ground.
Tips: Before flying, make sure the GPS Mode is turned on in case the drone gets lost
DISCLAIMER & WARNING
- Please read this Disclaimer & Warning and Safety Guidelines carefully before using our product. This product is not recommended for people under the age of 14. By using this product, you hereby agree to this disclaimer and signify that you have read it fully. You agree that you are responsible for your own conduct and any damaged caused while using this product, and its consequences . You agree to use this product only for purposes that are proper and in accordance with local regulations, terms and all applicable polices and guidelines AOVO may make available.
- When using this product, please be sure to strictly abide by the specifica-tion requirements and safety guidelines stated in this document. Any personal injury property damage, legal disputes and all other adverse events caused by the violation of the safety instructions or due to any other factor, WILL NOT be AOVO’s responsibility.
SAFETY GUIDELINES
Check Before Use:
- This product is a high precision drone that integrates various electronic stability and control mechanisms. Please be sure to setup this drone careful-ly and correctly to ensure safe, accident-free operation.
- Please be sure that the batteries of the drone and transmitter are clean, undamaged and, fully charged.
- Please be sure that all the propellers are undamaged and are installed in the correct orientation.
- Please do a thorough check of the product before each use. Inspect the integrity of the parts, any signs of cracks and wear of the propeller, battery power and effectiveness of the indicator, etc. If after doing a complete check any issues are found, please refrain from using the product until the issue has been resolved.
Flight Environment
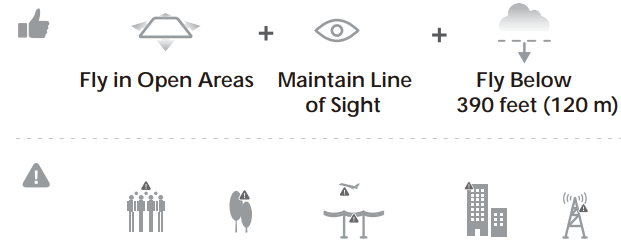
Avoid flying over or near obstacles, crowds, high voltage power lines, trees,South pole and North Pole, base station. DO NOT fly near strong electromagnetic sources such as power lines and base stations as it may affect the onboard compass.

Don’t use this drone in adverse weather conditions such as rain, snow, fog, and wind.
Operation Requirements
- Please don’t use this product to follow any moving vehicles .
- During the flight, only turn off the motor in case of an emergency.
- As battery becomes low return the drone back to your starting point.
- This product should not be used while drinking alcohol, if you are feeling fatigued, taking medicine, or feeling any physical discomfort.
Beware of the noise volume the drone produces. Keep your distance to avoid ear damage.

- Stay away from the rotating propellers and motors.
- Don’t fly in the No-Fly Zone.
Use of Battery
- Please ensure batteries are fitted in the correct orientation as shown in the instruction manual.
- Avoid short circuits by fitting the batteries incorrectly, and do not crush or squeeze the batteries as this could carry the risk of an explosion.
- Do not mix new and old batteries as this can lead to a poor performance of the product.
- Dispose used batteries carefully, do not litter.
- Please keep dead batteries away from heat and fire.
- If the device is not going to be used for an extended period of time, remove batteries to prevent potential damage from battery leakage.
- It is recommended to only use the USB charging cable that comes with the drone to charge the battery.
- Don't connect the battery directly to wall outlets or car cigarette -lighter sockets.
- Don't attempt to disassemble or modify the battery in any way.
- Don't use the battery if it gives off an odor, generates heat, becomes discolored or deformed,or appears abnormal in any way. If the battery is in use or being charged, remove it from the device or charger immediately and discontinue use.
- Don't pierce the battery casing with a nail or other sharp object, break it open with a hammer, or step on it!
- Always charge the batteries in a fireproof container and away from combustible materials. Don't charge on surfaces that can catch fire. This includes: wood, cloth, carpet, or in the application's device.
- Don't immerse the battery in water or allow it to get wet.
- Don’t solder battery terminal directly.
- Keep battery out of reach of children or pets.
- Don't short-circuit the battery by connecting wires or other metal object to the positive(+) and negative(-) terminals
Setup Guide
To set up the Aovo W PRO Drone with Camera AOVO66, follow these steps:
- Charge the drone's battery fully before the first use.
- Download the Aovo App on your smartphone and connect it to the drone via Wi-Fi.
- Calibrate the drone's compass and remote control.
- Adjust the camera settings as desired.
- Press the one-key takeoff button to launch the drone.
MAINTENANCE
- Clean the product after each use with a clean, soft cloth.
- Avoid prolonged exposure to direct sunlight and avoid buildup of heat on the drone.
- This device is not waterproof and must not be submerged in water under any circumstance. Failure to maintain the device completely dry will result in the failure of the unit.
- Check the charging plug and other accessories for signs of damage frequently. If any part of the device is damaged, refrain from flying until maintenance can be carried out.
Troubleshooting
No. | Problem | Solution |
1 | When the drone is powered on, the indicator light keeps flashing rapidly. | The drone is in the gyroscope calibration state. Please place the drone on an flat and level surface. |
2 |
The dronecannot hover aftertakeoff and tilts to one side. | Place the drone on a flat, level surface and repeat the gyro calibration. |
3 |
Thedrone vibrated in flight. |
The propeller are damaged. Please replace the new propeller. |
4 | The drone could not be unlocked and the drone’s lights flashed. |
The dronebattery voltage is too low. Please fullycharge the battery. |
Aovo W PRO Drone with Camera AOVO66 Pros & Cons
Pros
- High-quality camera for stunning aerial shots and videos
- Easy to operate with gesture control and one-key takeoff and landing
- Stable flight with altitude hold function
- Long flight time and range
- Foldable design for easy storage and transportation
Cons
- The drone may be difficult to control in windy conditions
- The drone may lose connection with the remote control
- The battery life could be longer
Customer Reviews
Customers have praised the Aovo W PRO Drone with Camera AOVO66 for its high-quality camera and easy operation. However, some have noted issues with wind resistance and connection problems. Most common complaints include short battery life and difficulty in controlling the drone in windy conditions.
Faqs
What is the maximum flight time of the Aovo?
What is the maximum flight range of the Aovo?
Does the Drone with have a built-in camera?
How do I connect the Aovo W PRO to my smartphone?
How do I calibrate the compass of the Aovo W PRO Drone with Camera AOVO66?
Can the Aovo W PRO Drone with Camera AOVO66 be flown indoors?
How do I adjust the camera settings of the Drone with Camera?
What is the weight of the Aovo W PRO Drone with Camera AOVO66?
What is the return to home function of the Aovo W PRO Drone?
Leave a Comment