Arlo Pro 3 Floodlight Camera Instruction Manual
Content
Arlo Pro 3 Floodlight Camera
Introducing the Arlo Pro 3 Floodlight Camera is a state-of-the-art security solution that combines a high-definition camera with an integrated floodlight, enhancing outdoor surveillance. With 2K HDR video quality, color night vision, and powerful LED lights, it ensures clear visibility day or night. The camera features advanced motion detection, two-way audio, and customizable settings for optimal security. Easy to install and completely wireless, the Arlo Pro 3 Floodlight Camera is priced at $249.99.
Specifications
- Resolution: 2K (2560x1440 pixels)
- Field of View: 160 degrees
- Night Vision: Infrared and Color Night Vision
- Motion Detection: Customizable zones and sensitivity
- Weather Resistance: IP65 certified
- Power: Battery-powered (rechargeable) or wired option
- Storage: Cloud storage with subscription, local storage via USB drive
- Connectivity: Wi-Fi (2.4GHz and 5GHz), Ethernet
- Additional Features: Built-in siren, motion-activated floodlight
Description
The Arlo Pro 3 Floodlight Camera boasts a sleek and durable design, making it suitable for various outdoor environments. The camera's body is made of high-quality materials that withstand harsh weather conditions. The 2K resolution ensures that you get clear and detailed video footage, both during the day and at night, thanks to its infrared and color night vision capabilities.
The motion-activated floodlight is a significant feature, providing an additional layer of security by illuminating any movement detected in the camera's field of view. This not only helps in capturing clearer footage but also serves as a deterrent to potential intruders.
Get to Know Your Pro 3 Floodlight Camera
Illuminate and view 2K video with your Arlo Pro 3 Floodlight Camera. Your floodlight cuts through darkness with brilliant LEDs, and the integrated 2K camera allows you to view live video or recorded clips from your phone. When your floodlight detects motion or audio, it uses a WiFi link to your internet connection to stream video to your Arlo account in the cloud.
Instantly illuminate a wide perimeter to deter unwanted visitors. Receive notifications when visitors arrive or packages are delivered1, adjust brightness, and view live video or recorded clips directly from your phone. Hear and speak to visitors clearly with two-way audio. See in full color at night so you can identify unique details, and track and zoom on moving objects with clarity. The wire-free and sleek design seamlessly integrates into any home or business.
Hear something outside?
Manually trigger your light, siren, or view live video from your phone. Call Emergency Response2 from the Arlo app.
Get the Arlo app
Download the Arlo app. The Arlo app lets you create an Arlo account in the cloud and set up and manage all your Arlo devices.
Note: If you already use the Arlo app, make sure that you’re using the latest version. To find out if an update is available, go to the app store and search for Arlo.
- Requires Arlo Secure subscription.
- Emergency Response feature available for U.S. subscribers only. Requires Arlo Secure Plus subscription.
Meet your Pro 3 Floodlight Camera
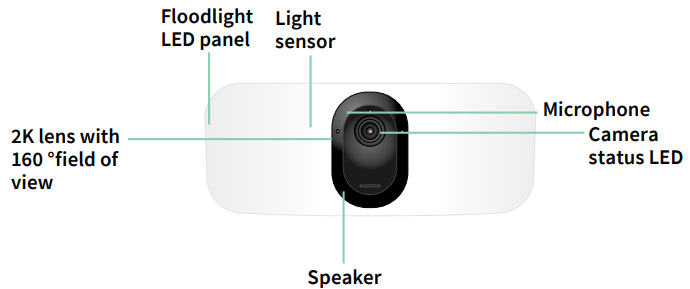
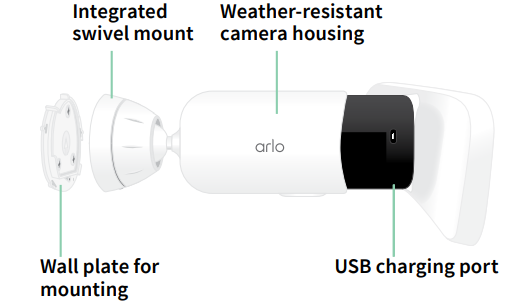
Your Pro 3 Floodlight Camera consists of two parts, the housing and the floodlight camera with a battery compartment.
Front view
Side view
Bottom view
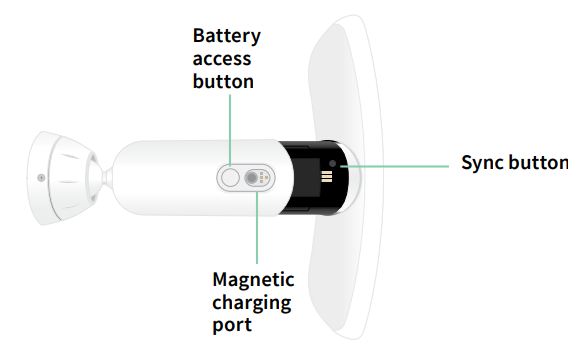
Features
- Superior brightness. Brightly illuminate your property with 2000-3000 lumens.3
- Color night vision. See what’s lurking with color night vision or black & white.
- Built-in smart siren. Trigger your siren remotely or automatically during an event.
- Custom control. Enhance protection with custom floodlight and camera settings.
- Multiple power options. Power with included rechargeable battery, or optional solar panel and outdoor magnetic charging cable.
- 2K video with HDR. Zoom in on objects and see clearer details and colors in 2K HDR.
- 160° diagonal view. Keep an eye on more of what matters with a wider field of view.
- 2-Way Audio. Hear and speak to visitors clearly with superior audio quality.
- Rechargeable battery. Convenient and long-lasting, it takes the expense out of security.
- Weather-resistant. Built to withstand the heat, cold, rain, or sun.
Do more with Arlo
You can add these options, which are sold separately:
- Add more Arlo cameras and devices. Cover more areas in and around your home by adding cameras, video doorbells, and more.
- Arlo ceiling adapter. See Install the ceiling adapter (sold separately) on page 14.
- Arlo outdoor magnetic charging cable. Using this cable this increases the light brightness from 2000 to 3000 lumens. It also supports CVR (when your floodlight is paired with an Arlo SmartHub or base station). See Outdoor magnetic charging on page 75.
- Arlo Solar Panel. Connect an Arlo Solar Panel to your camera and harvest power from the sun to keep your camera battery charged. See Solar panel charging on page 76.
- Upgrade your Arlo subscription. For more information, visit What are the available Arlo subscription plans and how much cloud recording is available?
WiFi Setup and Connections
When you install and set up your floodlight, the Arlo app guides you through the process of connecting the floodlight to your router’s 2.4 GHz WiFi network or to an optional Arlo SmartHub or base station.
WiFi connection options for your floodlight
When you install your floodlight you can connect it directly to your router’s 2.4 GHz WiFi band, or you can connect the floodlight with WiFi to an Arlo SmartHub VMB5000 or VMB4540, or an Arlo base station VMB4500 or VMB4000.
An Arlo SmartHub or base station isn’t included in the package with your floodlight. They are sold separately. Using your floodlight with a SmartHub or base station gives you access to these additional features:
- 2K local streaming and 2K local recording
- Auto Zoom and Tracking
- CVR (with a subscription)
- Use local storage on an SD card in a VMB5000 SmartHub or on a USB storage device connected to the SmartHub VMB4540 or base station VMB4500 or VMB4000.
- Use remote access for SmartHubs VMB5000 and VMB4540.
After you install and set up your floodlight, you can move its WiFi connection from your router to a SmartHub or base station. You can also move your floodlight’s WiFi connection from a SmartHub or base station and connect it directly to your router’s 2.4 GHz WiFi band. To do this, you must remove the device from your account and reinstall through the Arlo app, selecting the appropriate option to move back and forth.
Tips for optimal WiFi performance
The distance between WiFi devices can affect the WiFi signal:
- Maximum recommended distance
We recommend that you place your floodlgiht within 300 feet (90 meters) of your WiFi router. The maximum line-of-sight range of 300 feet is reduced by each wall, ceiling, or other major obstruction between the floodlight and the router. - Minimum recommended distance
To reduce WiFi interference, allow at least 6½ feet (2 meters) between your floodlight and any Arlo cameras that you install.
These materials can reduce WiFi signal strength if they are located between WiFi devices:
- Unusually thick walls and ceilings
- Brick
- Concrete
- Stone
- Ceramic
- Glass, especially mirrors
- Metal
- Large quantities of water, such as the water in a fish tank or water heater
Connect your mobile device to a 2.4 GHz WiFi network during setup
If you’re connecting your floodlight directly to your router’s WiFi network, it’s important to understand that your mobile device must connect to the same WiFi network as the floodlight during setup.
Your floodlight can only connect to a 2.4 GHz WiFi network. Many routers broadcast WiFi networks in both 2.4 GHz and 5 GHz bands, so your phone might connect to the 5 GHz WiFi band. During setup, connect your phone to your 2.4 GHz WiFi network, then connect your Pro 3 Floodlight Camera to that same 2.4 GHz WiFi network.
Find your 2.4 GHz WiFi network name and password
Your phone might connect to your 5 GHz WiFi network most of the time. If you’re not sure about how to find the 2.4 GHz WiFi network:
- Look on your WiFi router label.
Many routers have a label that shows the WiFi network name, which is also called an SSID. Your 2.4 GHz network name might have a 2, 2.4, or 2G at the end. Your 5 GHz network name might have a 5 or 5G at the end. If you changed your WiFi settings, then check the place where you saved your custom settings. - If your WiFi network name or SSID doesn’t indicate whether it’s 2.4 GHz or 5 GHz, ask your internet service provider (ISP) or the person who set up your WiFi router.
- If you have a mesh WiFi network, it uses only one WiFi network name for both WiFi bands. The floodlight finds and connects to the 2.4 GHz WiFi band. As long as you connect your phone to the same mesh network, Arlo can discover the floodlight.
Connect your iOS (Apple) device to a 2.4 GHz network
- Unlock your device and tap Settings.
- Tap Wi-Fi, near the top of the list of Settings options.
- Turn on WiFi by tapping the switch next to Wi-Fi at the top.
Note: WiFi is activated when the switch is green. - Select a 2.4 GHz WiFi network.
This is commonly indicated by a 2, 2.4, or 2G at the end of the network name. - If prompted, enter the password for the network.
When you’re connected to the WiFi network, a blue check mark appears to the left of the network name.
Connect your Android device to a 2.4 GHz network
- Unlock your device and tap Settings.
- Tap Network & internet > Wi-Fi.
- Turn on WiFi by tapping Use WiFi at the top.
- Select a 2.4 GHz WiFi network.
This is commonly indicated by a 2, 2.4, or 2G at the end of the network name. - If prompted, enter the password for the network.
When you’re connected to the WiFi network, the word Connected appears under the network name.
Connect an optional Arlo SmartHub
Your Pro 3 Floodlight Camera can connect to a SmartHub or Base Station with Siren. The SmartHub or base station uses an Ethernet cable to connect to your router.
Connect a SmartHub
The Arlo app guides you through the steps to install and set up your Arlo SmartHub.
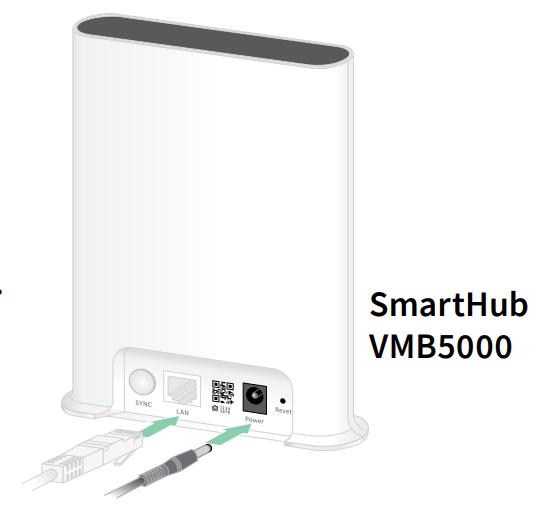
- Connect the SmartHub to your router with an Ethernet cable.
Connect the AC adapter to the SmartHub and plug it in. The LED on the front of the SmartHub lights.
The SmartHub LED
The SmartHub LED located on the front panel indicates the status of the SmartHub.
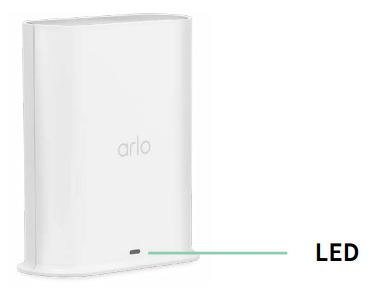
The LED blinks once when the SmartHub is first powered on. Then the LED lights as follows:
- Solid blue. The SmartHub is connected to the internet.
- Slow blinking blue. The SmartHub is ready to sync and pair with a camera or is connecting with a camera.
- Fast blinking blue. The SmartHub paired with a camera.
- Solid amber. An error occurred or something is wrong with the connection.
- Slow blinking amber. The SmartHub can’t connect to the camera. The camera can’t be found, is out of range, or another connection error occurred.
- Alternating blue and amber. A firmware update or a reset is in progress.
Connect an optional Arlo Base Station with Siren
You can connect your floodlight directly to your home router’s 2.4 GHz WiFi network, or you can connect your floodlight to an Arlo SmartHub or Base Station with siren. Your floodlight is compatible with Base Station with Siren models VMB4500 and VMB4000. The base station uses an Ethernet cable to connect to your router. The Arlo app guides you through the steps to install and set up your base station.
- Connect the base station to your router with an Ethernet cable.
Connect the AC adapter to the base station and plug it in.
The LED on the front of the base station lights.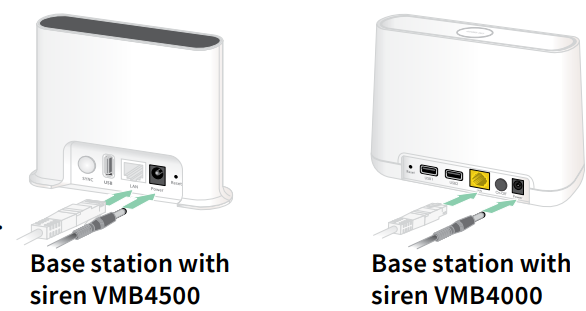
Base Station LED (VMB4500)
The LED located on the front indicates the status of the base station.
.png)
The LED lights as follows:
- Solid blue. The base station is connected to the internet and to an Arlo device.
- Slow blinking blue. The base station is ready to sync with an Arlo device.
- Fast blinking blue. The base station is synching with an Arlo device.
- Solid amber. The base station is booting.
- Slow blinking amber. The base station can’t connect to the Arlo device. The device can’t be found, is out of range, or another connection error occurred.
- Alternating blue and amber. A firmware update or a reset is in progress.
Base Station LEDs (VMB4000)
This base station has three LEDs located on the front.
.png)
The LEDs light as described in this table.
Power LED | Status |
|---|---|
| Solid green | The base station is powered on. |
| Blinking green | A firmware update is in progress. DO NOT TURN OFF THE BASE STATION OR THE CAMERAS. |
| Solid amber | The base station is booting. |
Internet LED | |
| Solid green | The base station is connected to the internet. |
| Blinking green | The base station is transmitting data. |
| Solid amber | The base station is connected to the router, but it isn’t connected to the internet. |
Camera LED | |
| Solid green | A camera is connected to the base station. |
| Blinking green | The base station is attempting to sync with a camera. |
| Solid amber | A camera is too far from the base station. The signal strength is weak. |
Move your floodlight’s WiFi connection to a SmartHub or base station
You can change your floodlight’s WiFi connection from your router to an Arlo SmartHub VMB5000 or VMB4540, or an Arlo base station VMB4500 or VMB4000.
To add a SmartHub or base station and connect your floodlight:
- Open the Arlo app.
- Add the SmartHub or base station to the same Arlo account that your floodlight was originally connected to.
If you’re using a trial Arlo subscription associated with this account, doing this keeps the trial active so you don’t lose it. - Follow the Arlo app instructions to set up your SmartHub or base station and connect it to the internet.
- Tap Settings > My Devices.
- Select your floodlight.
- Scroll down and tap Remove Device.
Your device is reset and removed from your account. - From My Devices, tap Add New Device > Cameras > Pro> Pro 3 Floodlight Camera.
- Follow the Arlo app instructions to add the floodlight.
- When the Arlo app detects your SmartHub or base station, follow the instructions to connect your floodlight to your SmartHub or base station.
Move your floodlight’s WiFi connection to a direct router connection
You can change your floodlight’s WiFi connection from a VMB5000, VMB4540, VMB4500, or VMB4000 SmartHub or base station, and connect the floodlight directly to your router’s 2.4 GHz WiFi network.
When you connect your floodlight directly to your router, you can still cross-trigger an Arlo Chime or other Arlo cameras that are paired with an Arlo SmartHub or base station. However, you can’t store Arlo recordings from your floodlight on a local storage device in the SmartHub or base station.
To move your floodlight’s WiFi connection directly to your router:
- Open the Arlo app and log into the same Arlo account that your floodlight is connected to. If you’re using a trial Arlo subscription associated with this account, doing this keeps the trial active so you don’t lose it.
- Make sure that your mobile device is connected to your router’s 2.4 GHz WiFi network. For more information, see Connect your mobile device to a 2.4 GHz WiFi network during setup on page 19.
- Tap Settings > My Devices.
- Select your floodlight.
- Scroll down and tap Remove Device.
Your device is reset and removed from your account. - From My Devices, tap Add New Device > Cameras > Pro> Pro 3 Floodlight Camera.
- If Arlo detects a SmartHub or base station, tap Connect without SmartHub or Connect without a Base Station.
- Follow the Arlo app instructions to connect your floodlight directly to a 2.4 GHz WiFi network.
Troubleshooting
Scan a QR code during setup
During setup, the floodlight must scan a QR code from the Arlo app when you’re adding the floodlight to your 2.4 GHz WiFi network. If your floodlight doesn’t emit a chime sound after scanning the QR code, then the QR code wasn’t successfully scanned.
If your floodlight didn’t scan the QR code:
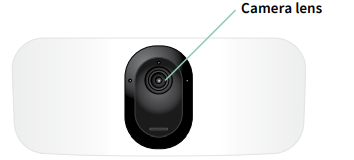
- Move your mobile device farther from, or closer to, the floodlight camera lens.
Position your mobile device about 6 in. (15 cm) from the floodlight camera lens, and slowly move it closer. If that doesn’t work, try moving your mobile device farther away. You can also try different angles. - Decrease or increase the brightness on your mobile device.
Your mobile device’s brightness might be too high or too low for your floodlight to scan the QR code.
If it’s dark outside, try setting the brightness on your mobile device to the 50% level.
If it’s bright outside, try raising the brightness on your mobile device to the highest level. - Disable Dark Mode if you’re using an iOS device.
In your iOS Settings, scroll down to find and select Display & Brightness. Choose Light mode under the Appearance options. - Scan the QR code in an evenly lit area.
Avoid scanning the QR code in the dark or in direct sunlight. If you are installing at night, turn on porch lights. If your floodlight is exposed to direct sunlight during installation, provide some shade. - Try using a mobile device with a larger screen ,such as a tablet or iPad, if available.
- Clean the floodlight camera lens.
The camera lens might have debris or a smudge on it, hindering its ability to scan the QR code. Try using a lint-free cloth to remove anything that might prevent the camera from scanning the QR code.
The floodlight is inactive during charging
Your floodlight is inactive while the USB Charging Cable or Indoor Magnetic Charging Cable is plugged in. This is because these charging cables are meant for indoor charging only. To use the floodlight, record audio, and record video while your camera charges, you must use an Outdoor Magnetic Charging Cable or Arlo Solar Panel, which are sold separately.
Optimize multiple 2K streams
You might experience connectivity issues if you’re running multiple 2K live streams on your Arlo app. To optimize connectivity, check your network environment and adjust your floodlight settings as needed. Make sure your average bandwidth speed is at least 2 Mbps per camera.
Note: To check your Internet speed, visit www.speedtest.net. The result of the Internet speed test might change, depending on varying amounts of traffic. For accurate results, run the speed test several times. If you’re still experiencing connectivity issues after checking your WiFi connection and Internet speed, do the following tasks until your connection is back to normal.
Adjust your floodlight settings in the Arlo app:
- Change the power management settings on each camera to Optimized.
- Change the power management settings on each camera to Best Battery Life. See Change the video quality and battery usage on page 56.
Troubleshoot Arlo Geofencing
Each Arlo user has a unique setup environment. These are the most common geofencing issues.
- Your mobile device isn’t sharing its location information with Arlo. See Prepare your mobile device for geofencing on page 42.
- Away mode isn’t triggered when you leave because an extra mobile device that’s enabled for geofencing is still in the Device Location. See Geofencing with multiple mobile devices on page 43.
- Geofencing stopped working because the location sharing settings for a mobile device changed. See Prepare your mobile device for geofencing on page 42.
- A task-killing app is interfering with Arlo Geofencing. A task-killing app, such as Shutapp or Doze, can disable Arlo Geofencing. To use Arlo Geofencing, disable any apps that suppress the Arlo app.
- Geofencing for your mobile device on your friend’s Arlo account isn’t working.
- If you’re a friend on someone else’s Arlo account, your mobile device can only change Home/Away modes if the Arlo account owner does the following:
- Turn on the Allow Access Rights setting. See Grant access to friends on page 50.
- Set your device as an Enabled Device in Geofencing settings. See Enable or disable geofencing for friends’ mobile devices on page 44.
Still experiencing issues with geofencing? Contact Arlo Customer Support.
Can’t see video streams in a browser
Your router might be blocking the ports to which Arlo sends data. To make sure that Arlo can stay connected, you must keep ports 443 and 80 open on your router. To troubleshoot problems with the video stream, check for the conditions in the following sections WiFi signal interference.
WiFi signal interference
Environments with multiple WiFi networks, WiFi devices, or frequencies can cause signal interference. If possible, minimize the number of networks, WiFi devices, and transmitted frequencies in the area where you place your floodlight. For help with adjusting WiFi settings
such as the channel for your router, check the instructions that came with your router or contact your Internet service provider (ISP) if they installed your router.
We recommend that you place your floodlight at least 1 to 3 feet (30 to 100 centimeters) from your router or Arlo SmartHub or base station if you use one. Allow at least 6½ feet (2 meters) between each floodlight or Arlo camera to prevent WiFi signals between the devices from interfering with each other.
Out of range
- Make sure that your floodlight is close enough to receive a strong WiFi signal. The range of your router’s WiFi signal can vary depending on the router model and conditions in your local environment. If you pair your floodlight to an optional
- Arlo SmartHub or base station, we recommend that you place the floodlight no farther than 300 feet (90 meters) from the SmartHub or base station. The range might be less if metal objects or thick walls and ceilings are between a floodlight and the SmartHub or base station.
- Make sure that your floodlights display three or four bars of signal strength in the area where you intend to install them. The floodlights can work when signal strength is at one or two bars, but they might go out of range intermittently due to fluctuations in the environment.
Low battery
A low battery can cause the camera to stream intermittently. It’s time to recharge the battery or change it when the battery level is down to two bars on the Arlo app Devices page.
Not receiving push notifications
You must be logged in to the Arlo app to receive Arlo alerts on your smartphone or mobile device. Arlo registers your device for push notification when you log in. If you used the logout option instead of simply exiting the app, you must log back in to the app. You receive Arlo alerts even if your device is sleeping.
Check the rules for armed modes
Check the rules in your modes. Make sure that push notification is enabled in the Armed mode or in a custom mode if you created one.
- Open the Arlo app.
- Tap Mode.
- Tap the floodlight or your optional Arlo SmartHub or base station, if you use one. A list of modes displays.
- Tap
 Edit next to Armed.
 - Tap
 Edit next to the rule.
 - Under Alert, make sure that the Push Notification check box is selected.
- If you made changes, tap Save.
Check the Arlo app notification settings on an iOS device
Make sure that you allow the Arlo app to receive push notifications. The Arlo app push notifications can be disabled on iOS and Android devices.
- Tap the Settings icon for your iOS device.
- Tap Notifications > Arlo.
- Make sure that Allow Notification is selected.
Check the Arlo app notification settings on an Android device
Make sure that you allow the Arlo app to receive push notifications. The Arlo app push notifications can be disabled on iOS and Android devices.
- Tap the Settings icon for your Android device.
- Tap Application Manager > Arlo.
- Make sure that the Show Notifications setting is selected.
If you said no to push notifications at installation
When you install the Arlo app for the first time, to receive alerts, you must select Allow when asked if you want Arlo to send you push notifications. For iOS apps, after you respond to this alert, it isn’t presented again unless the device is restored to factory settings or the app is uninstalled for at least a day.
If you said no on an iOS device, uninstall the app, wait for a day, and then reinstall it, and allow notifications. If you don’t want to wait a day before you reinstall the app, you can use the system clock on your device to simulate a day. Set the system clock forward a day or more, turn your device off, and then turn the device back on. After you reinstall the app, return the system clock to the correct setting.
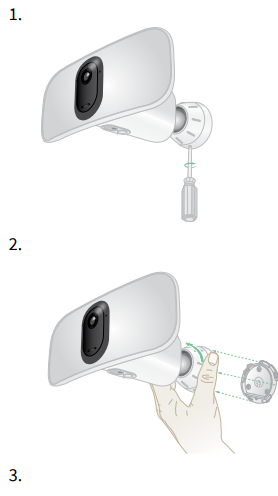
Remove a mounted floodlight from the wall
Note: You don’t need to remove the camera housing from the wall plate in order to reposition your camera or to charge the battery.
- Use a Phillips screwdriver to loosen the screw at the bottom of the camera housing’s grip.
- Turn the camera housing counter-clockwise, and pull it from the back plate.
Unscrew the screws from the wall plate, and remove the wall plate from your wall.
Pros & Cons
Pros
- High-resolution 2K video capture
- Motion-activated floodlight for enhanced security
- Weather-resistant design
- Customizable motion detection zones
- Wireless and wired connectivity options
- Built-in siren for added deterrence
Cons
- Requires subscription for cloud storage
- Battery life may vary based on usage
- Higher cost compared to some competitors
- Some users report occasional connectivity issues
Customer Reviews
Customers generally praise the Arlo Pro 3 Floodlight Camera for its high-quality video, robust build, and effective motion detection. Many appreciate the ease of installation and the comprehensive app features. However, some users have noted that the battery life can be shorter than expected when using wireless mode, and there may be occasional connectivity issues.
Common complaints include the necessity of a subscription for full cloud storage benefits and the higher initial cost compared to other security cameras on the market.
Faqs
How do I set up the Floodlight?
What is the resolution of the Arlo Camera?
Is the Arlo Pro 3 Floodlight Camera weather-resistant?
Can I customize motion detection zones on the Arlo Pro 3 Floodlight Camera?
Does the Camera require a subscription?
How long does the battery last on the Arlo Pro 3 Floodlight Camera?
Can I use the Arlo Pro 3 Floodlight Camera with other smart home devices?
What is the field of view of the Arlo Pro 3 Floodlight Camera?
How do I troubleshoot connectivity issues with the Arlo Pro 3 Floodlight Camera?
Is there a built-in siren on the Arlo Pro 3 Floodlight Camera?
Leave a Comment


