Arlo Video Doorbell Wired AVD1001-100EUS User Manual

Content
Introduction
Doorbell Wired AVD1001-100EUS is a state-of-the-art security solution designed to enhance your home’s safety. Featuring a 180-degree field of view, this doorbell allows you to see visitors from head to toe or even packages left at your doorstep. With high-definition video quality, night vision capabilities, and two-way audio, you can communicate with visitors directly from your smartphone. Priced at approximately $199.99, it combines convenience with advanced security features for peace of mind.
Specifications
Video Doorbell Wired comes with several key features that make it a standout in its category:
- HD Video: 1536x1536 resolution at 1:1 aspect ratio for clear and detailed video feed.
- Field of View: 180-degree diagonal view to capture more area.
- Motion Detection: Advanced motion detection alerts you to any activity at your door.
- Two-Way Audio: Clear and loud two-way audio for real-time communication.
- Weather Resistance: Built to withstand various weather conditions.
- Integration: Compatible with Amazon Alexa, Google Assistant, and Apple HomeKit.
- Cloud Storage: Optional cloud storage plans for video recording and playback.
Get to Know Your Doorbell
The wired Arlo Essential Video Doorbell lets you get notifications when motion is detected and view live video on your phone. Get the bigger picture of what’s at your door, from head to toe or a package on the ground. Even see clearly in low light with night vision. Speak to visitors with two-way audio or use pre-recorded quick reply messages when you’re busy. The wired Arlo Essential Video Doorbell uses your existing doorbell wiring for continuous power.
Features
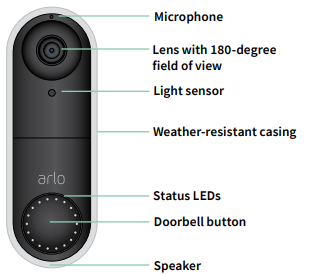
- HD Video. See a clear picture in every detail through your doorbell’s high performance lens.
- Motion Detection and Alerts. Receive alerts when motion is detected.
- Video Call. Calls your phone directly so you never miss a visitor
- Night vision. See who’s at your door at night, even without a light on.
- 180° Viewing Angle. See a person from head to toe or a package on the ground.
Front view
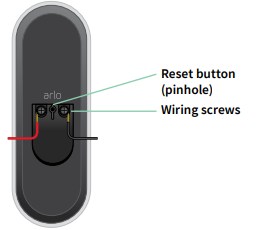
Rear view
Installation requirements
To install your wired Arlo Essential Video Doorbell you need:
- A wired doorbell and chime with existing electrical wiring
- Voltage between 16V AC and 24V AC, and a 10VA transformer
Follow the instructions in the Arlo app to connect the wired Arlo Essential Video Doorbell to your home’s existing doorbell wiring. If you need further help, contact a local electrician or professional to assist you. Arlo has also partnered with HelloTech to provide nationwide professional installation services for the Arlo Video Doorbell. Visit https://www.Hellotech.com/arlo learn more.
Get the Arlo app
Download the Arlo app. The Arlo app lets you create an Arlo account in the cloud and set up and manage all your Arlo devices.
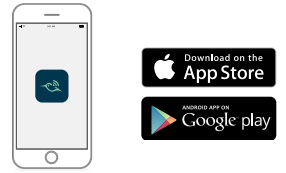
Note: If you already use the Arlo app, make sure that you’re using the latest version. To find out if an update is available, go to the app store and search for Arlo.
Optional Arlo SmartHub or Base Station
You can connect your wired Arlo Essential Video Doorbell directly to your home router’s 2.4 GHz WiFi network, or you can connect your doorbell to an Arlo SmartHub or Base Station with siren. Your doorbbell is compatible with any of the models described in this section.
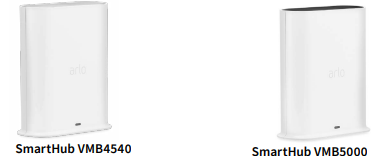
Arlo SmartHub
The Arlo SmartHubs offer the best Arlo experience and are compatible with all Arlo wire-free devices, except Arlo Go.
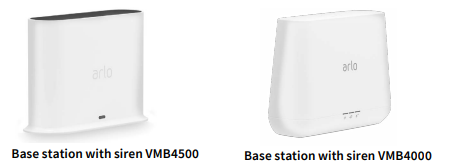
Base Station with Siren
The Base Stations with Sirens are compatible with all Arlo wire free cameras except Arlo Go and they’re also compatible with the Arlo Audio Doorbell.
Do more with Arlo
You can add these options, which are sold separately:
- Add more Arlo cameras and devices. Cover more areas in and around your home by adding cameras, security lights, and more.
- Upgrade your Arlo subscription.
Description
The Arlo Video Doorbell Wired AVD1001-100EUS is designed with a sleek and modern aesthetic, making it a stylish addition to any home. The doorbell features a high-resolution HD camera that provides a clear and sharp video feed, even in low light conditions due to its night vision capability. The device also includes a built-in microphone and speaker for clear two-way audio communication.
The doorbell is easy to install and configure, with a user-friendly app that allows you to monitor your doorstep from anywhere. It also supports advanced features like motion alerts and customizable activity zones, ensuring you are notified only when it matters.
Get Started
You can install the wired Arlo Essential Video Doorbell yourself, or contact a local electrician or professional to assist you. Arlo has partnered with HelloTech in the US to provide nationwide professional installation services for the wired Arlo Essential Video Doorbell. For more information, visit https://www.HelloTech.com/arlo
Note: In some regions, a transformer is included in the package with the wired Arlo Essential Video Doorbell. It is recommended that the transformer be installed by a professional electrician.
Voltage requirements
The wired Arlo Essential Video Doorbell requires a wired doorbell and chime with voltage between 16V AC and 24V AC, and a 10VA transformer. We recommend that you check the voltage on the transformer that powers your existing doorbell before installing your wired Arlo Essential Video Doorbell. If the transformer’s voltage isn’t 16-24 VAC, you must upgrade your transformer before you use the doorbell.
You can check the voltage level of your doorbell transformer by one of these methods:
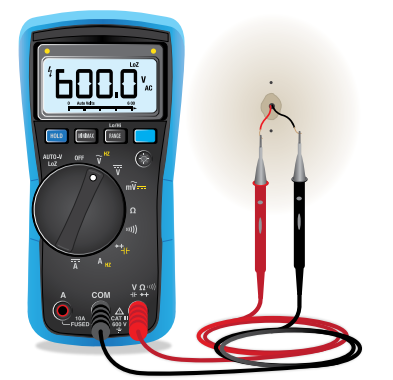
- Use a multimeter to test the voltage.
A multimeter is an electronic tool that measures the precise voltage level of your existing doorbell wiring. Using a multimeter gives you the most accurate estimate of your transformer’s voltage, and it can be done without finding the transformer. We recommend that you measure at the existing doorbell wiring or at your chime. - Check if the voltage is printed on the transformer that provides power to your existing doorbell.
The estimated voltage is commonly printed on transformers. This is typically accurate, but it isn’t as precise as using a multimeter.
Use a multimeter to check the voltage of a transformer
- Disconnect your existing doorbell.
To do this, unmount or unscrew your existing doorbell to expose the wiring or AC terminals on the back. - Set your multimeter to AC (the V with a wavy line on top or next to it).
- Connect the two probes from the multimeter to the wires from your doorbell.
- Read the voltage level on your multimeter’s display.
If the voltage level is between 16-24 VAC, you can use the wired Arlo Essential Video Doorbell with your current doorbell transformer.
If the voltage level is lower than 16VAC or the transformer is underpowered (less than 10VA) then consider having the transformer replaced by an electrician or a professional service provider.
Check the voltage level printed on the doorbell transformer
A doorbell transformer is a device that steps down your household AC voltage to a lower voltage suitable for powering an electric doorbell.

The transformer is typically found:
- In the front closet near your existing doorbell
- Near your house’s circuit breaker
- In the basement or attic
- In the garage
- Near your house’s furnace
- In the crawl space under your house
Use the Arlo app for installation and setup
You must use the Arlo app to install and set up your wired Arlo Essential Video Doorbell. The Arlo app guides you through installation and setup:

- Create your Arlo account.
You use the same account to manage all your Arlo devices. - Follow the instructions in the Arlo app to install and set up your wired Arlo Essential Video Doorbell.
Once you set up your Arlo account, you can access it by using the Arlo app on a smartphone or tablet, or from a computer using a web browser. If you’re using a computer, enter https://my.arlo.com/#/login in the address bar of the browser.
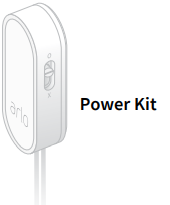
Install the Power Kit in your chime box
The Power Kit ensures that your wired Arlo Essential Video Doorbell receives consistent power. The Power Kit is required for the Video Doorbell to function reliably and prevents your chime from ringing when the wired Arlo Essential Video Doorbell is recording or live-streaming.
Note: If your chime box uses only batteries, it is not compatible with the wired Arlo Essential Video Doorbell. Before you install the doorbell, consult an electrician to replace your chime box with a wired doorbell and chime, with voltage between 16-24 VAC.
WARNING: To prevent fire and injury, connect the wired Arlo Essential Video Doorbell and Power Kit only to a voltage between 16 – 24VAC.
The Arlo app guides you through the process of installing the Power Kit in the chime box for your existing doorbell.
These are the main steps:
- Turn off your power at the breaker.
Warning: Failure to turn off your power might result in serious injury. - Remove the cover of your chime box.
- Follow the specific instructions in the Arlo app for how to connect the Power Kit wires to your chime.
If your chime is more complex than two or three wires, then you might need to consult a professional electrician. - Place your Power Kit in the chime box.
Make sure to place the Power Kit in a safe spot in the chime box that won’t interfere with the operation of the chime. See the suggested placements and areas to avoid, as illustrated in the Arlo app.
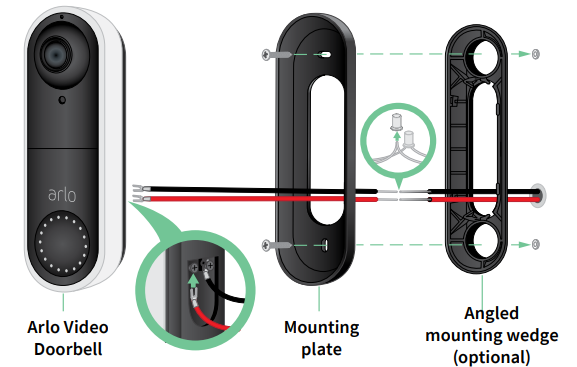
Install your wired Arlo Essential Video Doorbell
You need:
- The items that came in the wired Arlo Essential Video Doorbell box
- Phillips screwdriver
- (Optional) power drill
After installing the Power Kit in your chime box, follow the steps in the Arlo app to install your doorbell.
The Arlo app guides you through installation in this order:
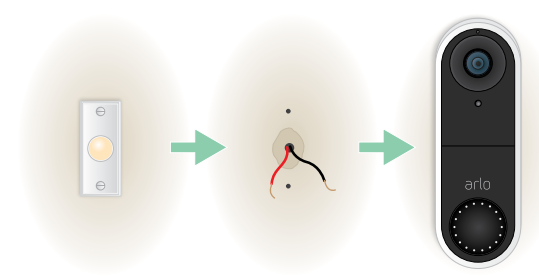
- Turn off your power at the breaker.
Warning: Failure to turn off your power might result in serious injury. - Remove and disconnect your existing doorbell.
Determine whether to use the flat mounting plate on its own, or combine it with the angled mounting plate to adjust the field of view for your doorbell.
Installing with an angled mounting plate depends on the position of the doorbell and the walkway to your home. The angled mounting plate lets you install your doorbell so that it is angled toward the left or angled toward the right.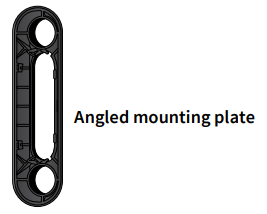
Follow the instructions in the Arlo app to connect the wires and install your doorbell.
- Turn on power at the breaker.
- Check the LED on the front of your wired Arlo Essential Video Doorbell. See LED during setup on page 15.
- Connect your wired Arlo Essential Video Doorbell to your home network’s 2.4 GHz WiFi.
Use the optional wire extensions
Two identical wire extensions and fasteners come in the package with your wired Arlo Essential Video Doorbell.
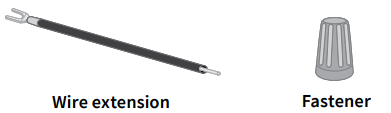
If the existing wires for your doorbell are too short to connect your wired Arlo Essential Video Doorbell you can use the wire extensions and fasteners to lengthen the wires.
To connect wire extensions to your wired Arlo Essential Video Doorbell:
- Remove the rubber ends from the wire extensions.
- Attach a wire extension to one of your existing doorbell wires.
To do this, connect the wire end of the wire extension (not the prong end) to your existing doorbell wire and twist the wires together securely. - Attach the second wire extension to the other doorbell wire.
- Place the fasteners on top of the connected wire ends, and twist the fasteners.
The fasteners funnel and secure the wires together. - Attach the extended wires to your wired Arlo Essential Video Doorbell.
- Tuck the wire extensions and the fasteners into the wiring cavity in the wall, behind your doorbell.
If there isn’t sufficient space, you may need to use the angled mounting plate to create additional space behind the wired Arlo Essential Video Doorbell. Place your wired Arlo Essential Video Doorbell onto the mounting plate in an up-and-in motion.
Ensure that the mounting screws are completely screwed in and flush with the mounting plate so that the Video Doorbell clips securely into the mounting plate.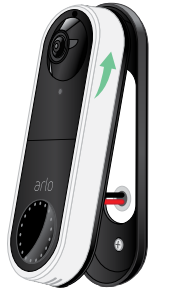
You are ready to use the Arlo app to continue the setup process for your Video Doorbell.
Setup Guide
To set up the Arlo Video Doorbell Wired AVD1001-100EUS, follow these steps:
- Ensure you have a compatible doorbell wiring system in place.
- Turn off the power to your doorbell circuit at the breaker or fuse box.
- Remove your old doorbell and connect the wires to the new Arlo Video Doorbell.
- Download and install the Arlo app on your smartphone or tablet.
- Follow the in-app instructions to pair the doorbell with your Wi-Fi network and configure settings.
- Test the doorbell to ensure it is working correctly.
Arlo Video Doorbell Wired AVD1001-100EUS LED
The LED is on the outside of your wired Arlo Essential Video Doorbell and indicates how the doorbell is operating. The following sections describe how the LED works if you didn’t change the default LED settings.
LED during setup
- Off
The doorbell is not receiving power.
Check that the power at the breaker is on.
Check that the wiring to the doorbell is secured. - Solid white
The doorbell is powered on and ready for setup. - Solid amber. The doorbell isn’t receiving enough power.
You might need to activate bypass mode. For more information, see Use Bypass mode for the Power Kit on page 73
You can also consult an electrician or replace your transformer and chime with one that offers 16-24 VAC, with 10VA minimum. - Flashing amber
Your Video Doorbell didn’t connect to your WiFi network. During setup, make sure that your phone and doorbell connect to your 2.4 GHz WiFi network. - Flashing white
Your Video Doorbell is scanning for a QR code, attempting to connect to WiFi, or attempting to connect to the Arlo network. If your doorbell LED continues to flash white for more than a few minutes, change the WiFi settings in your phone to connect to the same 2.4 GHz WiFi network as the doorbell. Also confirm that your WiFi router has an Internet connection. - Alternating amber and white
The operating temperature or voltage is too low. Wait up to 13 minutes for the doorbell to warm up or for its internal battery to charge.
LED after setup
- Slow breathing pattern white. The doorbell detected motion.
- Solid white. The doorbell was pressed and is calling you or the doorbell is connected to a call.
- Fading white. The call from the doorbell ended.
Test motion detection
You can use the motion detection test to find the right motion sensitivity setting for your doorbell.
- Open the Arlo app.
- Tap the gear icon next to the wired Arlo Essential Video Doorbell.
- Tap Device Utilities > Motion Detection Test.
- Move in front of the camera.
During this test, the camera LED blinks white when motion is detected. - Move the slider to adjust the motion sensitivity level as needed.
- Edit the ruler to enter the motion sensitivity level that you want to use. See Change motion sensitivity on page 50.
Control when your doorbell detects motion
You control when your wired Arlo Essential Video Doorbell detects motion and the rules it uses to record and alert you by selecting a mode. The Arlo app comes with four modes:
- Armed
- Disarmed
- Schedule
- Geofencing
Troubleshooting
The doorbell doesn’t scan the QR code in the
Arlo app during setup
During setup, your doorbell must scan a QR code from the Arlo app. If your doorbell doesn’t emit a chime noise, then the QR code was not successfully scanned. If this situation occurs, try the following:
- Scan the QR code in an evenly lit area.
Avoid scanning the QR code in the dark or in direct sunlight. If possible, turn on porch lights if installing at night, or provide some shade if your doorbell is exposed to direct sunlight during installation. - Move your phone closer to the doorbell’s camera lens.
Position your phone about four inches (10 cm) from the doorbell lens and slowly move it closer. You can also try different angles. - Increase the brightness on your phone.
Turn up the brightness on your phone to the highest level. On an iPhone, also select Light (not Dark) under Settings > Display & Brightness. - If your phone is small, consider using the Arlo app on a tablet to set up your doorbell.
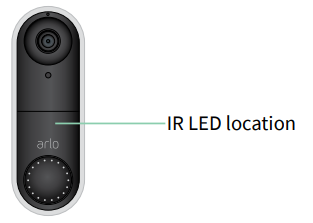
If the infrared (IR) LED on the doorbell is lit red while you are scanning the QR code, cover the LED with your thumb. The IR LED can interfere with scanning the QR code.
Clean the doorbell’s camera lens.
- Use a lint-free cloth to remove any smudges.
The Arlo app doesn’t find the doorbell during setup
After your doorbell scans the QR code in the Arlo app during setup, the Arlo app attempts to discover your wired Arlo Essential Video Doorbell on the same WiFi network that your phone is connected to. Since the doorbell connects to 2.4 GHz WiFi networks, during setup you must connect your phone to the same 2.4 GHz WiFi network.
If the Arlo app doesn’t discover your doorbell during the setup process:
- Check the doorbell LED to see what went wrong.
- Doorbell LED flashes yellow for 10 seconds. The doorbell can’t connect to the WiFi network. Make sure that you enter the correct WiFi settings for your 2.4 GHz WiFi network. The WiFi network name (SSID) and WiFi password are both case sensitive. MyWiFiPassword is not the same as mywifipassword.
- Doorbell LED flashes white for up to 10 hours. The doorbell connected to a WiFi network, but it is not on the same WiFi network as your phone. To correct this situation, connect your phone to the same 2.4 GHz WiFi network as your doorbell.
- Check your phone’s WiFi connection.
During setup, your phone must connect to the same 2.4 GHz WiFi network as your doorbell.
Many WiFi routers broadcast in both the 2.4 GHz and 5 GHz WiFi bands. Your home network might include two WiFi networks, or even three if you have a guest network.- In your phone’s WiFi settings, look for your WiFi network name that ends in 2, 2.4, or 2G and connect to that network. For more information, see Connect your mobile device to a 2.4 GHz WiFi network on page 73.
- Your phone might automatically connect to cellular data. To keep this from happening, make sure that Wi-Fi Assist and Adaptive Wi-Fi features are off on your mobile device. These features allow mobile phones to automatically switch between WiFi and cellular network Internet access.
- If you use a VPN or WiFi extender, disconnect it during the WiFi setup process.
- Check your WiFi router’s Internet connection.
After your doorbell connect to the same WiFi network as your phone, the Arlo app needs to access your Arlo account in the cloud in order to add your doorbell to your Arlo account.
Use Bypass mode for the Power Kit
If your wired Arlo Essential Video Doorbell isn’t working as expected, even though the voltage level of your doorbell transformer is 16-24 VAC, you might need to activate Bypass mode on your Power Kit. When Bypass mode is turned on, your wired Arlo Essential Video Doorbell isn’t electrically connected to your doorbell chime. This prevents your doorbell chime from ringing when you use your doorbell.
We recommend that you turn on Bypass mode if:
- Your doorbell chime rings or buzzes at unexpected times, while your wired Arlo Essential Video Doorbell is operating.
- The LED on your wired Arlo Essential Video Doorbell is amber during initial setup.
To activate Bypass mode on your Arlo Power Kit:
- Turn off your power at the breaker.
- Remove the cover from your doorbell chime.
- Locate the Arlo Power Kit that is attached to your Doorbell Chime.
- Move the switch on your Arlo Power Kit to Bypass Mode.
- Turn your power back on at the breaker.
- Turn off the traditional chime setting in the Arlo app.
Your Arlo Power Kit now bypasses your doorbell chime. Your doorbell chime will not ring when someone presses your Video Doorbell. If your wired Arlo Essential Video Doorbell still doesn’t function correctly after activating Bypass mode, you might need to consult an electrician to confirm the voltage and available power.
The chime doesn’t ring when I press the doorbell
If your existing chime doesn’t ring when someone presses your wired Arlo Essential Video Doorbell, your doorbell or Power Kit might not be wired correctly, or the temperature of your wired Arlo Essential Video Doorbell might be too high.
If your wired Arlo Essential Video Doorbell doesn’t ring:
- Make sure that the Power Kit is correctly wired to your existing chime. For more information, see Install the Power Kit in your chime box on page 83.
- Make sure that Bypass mode is disabled on the Power Kit. For more information, see Use Bypass mode for the Power Kit on page 73.
- Make sure that your wired Arlo Essential Video Doorbell is powered on and wired correctly. For more information, see Video Doorbell LED doesn’t light on page 74.
- Check the chime setting in the Arlo app. For your chime to ring, the chime setting in the Arlo app must be set to Mechanical or Digital, depending on the type of doorbell chime you have. See Change the type of chime the doorbell triggers on page 42.
- Check if Silent mode is turned on in the Arlo app. See Turn Silent mode on and off on page 27.
- Check if the Arlo app is warning that your doorbell temperature is too high.
If your wired Arlo Essential Video Doorbell is heated to 149°F–185°F (65°C–85°C), the Arlo app disables your chime, but continues to operate. If your doorbell is heated to above 185°F (85°C) the doorbell stops functioning until it cools down.
LED doesn’t light
During installation, if the LED is off for more than a minute, your doorbell isn’t receiving power.
To troubleshoot your wired Arlo Essential Video Doorbell when the LED is off, make sure that:
- Power is available to your home.
- The power breaker for your home is on.
- The Power Kit is correctly wired to your doorbell chime.
- Your wired Arlo Essential Video Doorbell is wired correctly.
- The voltage of your doorbell transformer is between 16-24V AC.
If you have checked all these troubleshooting options, and the doorbell LED is still off, consult an electrician to confirm whether your home is compatible with the wired Arlo Essential Video Doorbell.
Power interruption notification
- The push notification Power interruption at [TIME] means your doorbell is not currently receiving any voltage or its wires have been disconnected, but your home’s WiFi and Internet connection are still working.
- If you have an Arlo Smart subscription, you can tap the notification to activate an alarm, call a friend, or call e911.
- When the power returns to your doorbell, wait about 10 minutes for the doorbell to come back online. If your wired Arlo Essential Video Doorbell remains in this state longer than 20 minutes after power is restored, try restarting your doorbell from within the Arlo app.
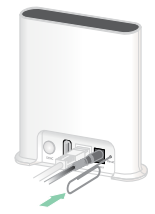
Remove the doorbell from its mount
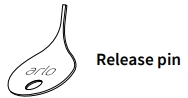
After you install the wired Arlo Essential Video Doorbell, you can remove it from the mount so that you can access the doorbell’s rear panel. Use a paperclip or the release pin that came with your wired Arlo Essential Video Doorbell.
Press the release pin into the pin hole in the mount.
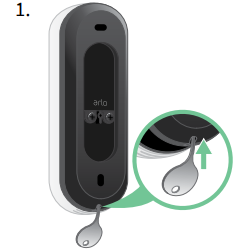
The doorbell releases with a click sound.
- Remove the doorbell from the mount.
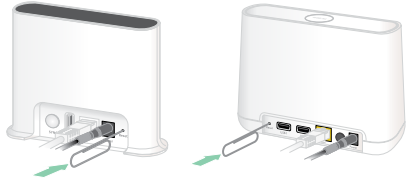
Reset the doorbell
Resetting your wired Arlo Essential Video Doorbell returns it to default settings. Your doorbell is also removed from your Arlo account when you reset it. This means that you must use the Arlo app to add and set up your wired Arlo Essential Video Doorbell after a reset.
Use a paperclip or the release pin that came with your wired Arlo Essential Video Doorbell.
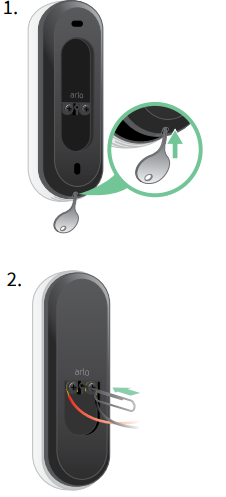
- If you already installed your wired Arlo Essential Video Doorbell, remove it from the mount so that you can access the rear of the wired Arlo Essential Video Doorbell. To do this, press the release pin into the pin hole.
- Use a paperclip or the release pin to press and hold the reset button on the back of the doorbell for about 10 seconds.
The doorbell LED flashes white. To add the doorbell to your Arlo account and set it up, open the Arlo app and tap Add New Device.
Can’t see video streams in a browser
The Arlo web client uses the Adobe Flash plug-in to display your camera streams in a browser. Make sure that your browser isn’t blocking the plug-in and that you’re using the latest version of Adobe Flash. Your router might be blocking the ports to which Arlo sends data. To make sure that Arlo can stay connected, you must keep ports 443 and 80 open on your router. Also see the following sections WiFi signal interference and Out of range.
WiFi signal interference
Environments with multiple WiFi networks, WiFi devices, or frequencies can cause signal interference with your Arlo system. Minimize the number of networks, WiFi devices, and transmitted frequencies in the area where you place your WiFi router and cameras. We recommend that you allow at least 6½ feet (2 meters) between your wired Arlo Essential Video Doorbell and any Arlo cameras that you install to prevent WiFi signals between the devices from interfering with each other.
Out of range
Make sure that your wired Arlo Essential Video Doorbell is no farther than 300 feet (90 meters) from your WiFi router. The range might be less if metal objects or thick walls and ceilings are between your router and the wired Arlo Essential Video Doorbell.
Not receiving push notifications
You must be logged in to the Arlo app to receive Arlo alerts on your smartphone or mobile device. Arlo registers your device for push notification when you log in. If you used the logout option instead of simply exiting the app, you must log back in to the app. You receive Arlo alerts even if your device is sleeping.
Check the rules for armed modes
Check the rules in your modes. Make sure that push notification is enabled in the Armed mode or in a custom mode if you created one.
- Open the Arlo app.
- Tap the Mode button.
- Select the wired Arlo Essential Video Doorbell. A list of modes displays.
- Tap Edit
 next to Armed.
 - Tap Edit next to the rule.
- Under Alert, make sure that the Push Notification check box is selected.
- If you made changes, tap Save.
Check the Arlo app notification settings on an iOS device
Make sure that you allow the Arlo app to receive push notifications. The Arlo app push notifications might be disabled on your iOS device.
- Tap the Settings icon for your iOS device.
- Tap Notifications > Arlo.
- Make sure that Allow Notification is selected.
Check the Arlo app notification settings on an Android device
Make sure that you allow the Arlo app to receive push notifications. The Arlo app push notifications might be disabled on your Android device.
- Tap the Settings icon for your Android device.
- Tap Application Manager > Arlo.
- Make sure that the Show Notifications setting is selected.
If you said no to push notifications at installation
When you install the Arlo app for the first time, to receive alerts, you must select Allow when asked if you want Arlo to send you push notifications. For iOS apps, after you respond to this alert, it isn’t presented again unless the device is restored to factory settings or the app is uninstalled for at least a day.
If you said no on an iOS device, uninstall the app, wait for a day, and then reinstall it, and allow notifications. If you don’t want to wait a day before you reinstall the app, you can use the system clock on your device to simulate a day. Set the system clock forward a day or more, turn your device off, and then turn the device back on. After you reinstall the app, return the system clock to the correct setting.
Troubleshoot Arlo Geofencing
Each Arlo user has a unique setup environment. These are the most common geofencing issues:
- Your mobile device isn’t sharing its location information with Arlo. See Prepare your mobile device for geofencing on page 53.
- Away mode isn’t triggered when you leave because an extra mobile device that’s enabled for geofencing is still in the Device Location. See Geofencing with multiple mobile devices on page 55.
- Geofencing stopped working because the location sharing settings for a mobile device changed. See Prepare your mobile device for geofencing on page 53.
- A task-killing app is interfering with Arlo Geofencing. A task-killing app, such as Shutapp or Doze, can disable Arlo Geofencing. To use Arlo Geofencing, disable any apps that suppress the Arlo app.
- Geofencing for your mobile device on your friend’s Arlo account isn’t working.
If you’re a friend on someone else’s Arlo account, your mobile device can only change Home/Away modes if the Arlo account owner does the following:
- Turn on the Allow Access Rights setting. See Grant access to friends on page 40.
- Set your device as an Enabled Device in Geofencing settings. See Enable or disable geofencing for friends’ mobile devices on page 55.
Verify that an optional SmartHub or base station is online
You can connect your wired Arlo Essential Video Doorbell directly to your home router’s 2.4 GHz WiFi network, or you can connect your doorbell to an Arlo SmartHub or Base Station with siren. Your doorbbell is compatible with SmartHub model VMB5000 and VMB4540 and Base Station with Siren model VMB4500 and VMB4000.
To determine whether your SmartHub or base station is online, check the LED on the front of the SmartHub or Base Station with Siren:
For a SmartHub or for a Base Station with Siren VMB4500:
- If the LED is solid blue, the SmartHub or base station is connected to the Internet.
- If the LED is amber, the SmartHub or base station isn’t connected to the Internet.
For Base Station with Siren VMB4000, check the Internet LED:
- If the Internet LED is green, the base station is connected to the Internet.
- If the Internet LED is amber, the base station is connected to your router, but it isn’t connected to the Internet. Check the router’s Internet connection.
If you’re not at the same location as your SmartHub or base station, open the Arlo app or log in to your Arlo account at https://my.arlo.com
- If you can review the video feed from your cameras, your SmartHub or base station is connected to the Internet.
- If instead of the video feed, you see an error message (such as SmartHub Offline or something similar), your SmartHub or base station isn’t connected to the Internet.
The SmartHub or base station is offline
You can connect your wired Arlo Essential Video Doorbell directly to your home router’s 2.4 GHz WiFi network, or you can connect your doorbell to an Arlo SmartHub or Base Station with siren. Your doorbbell is compatible with SmartHub model VMB5000 and VMB4540 and Base Station with Siren model VMB4500 and VMB4000.
If you’re not sure whether your SmartHub is offline, see Verify that an optional SmartHub or base station is online on page 79.
- Check the cable connections:
- The Ethernet cable is securely connected to the back of your SmartHub or base station and to your router. You are using the Ethernet cable that came with your Arlo system.
- The power adapter is securely connected your SmartHub or base station and securely plugged into an outlet.
- Try to connect to the Internet from another device that is connected directly to your router.
Try an Ethernet-connected device, not a device that is using WiFi (you can turn WiFi off on the device to make sure that the device is connecting through the Ethernet cable).
If you can’t browse the Internet from this device, you must restore your router’s connection to the Internet.
If you can browse the Internet from this device, continue troubleshooting. - Power cycle your SmartHub or base station and check the LED.
Unplug the power adapter from the outlet, wait one minute, and reconnect the power adapter to the outlet. The SmartHub or base station takes one to two minutes to start. For a SmartHub or for a Base Station with Siren VMB4500:- If the LED is solid blue, the SmartHub or base station is connected to the Internet.
- If the LED is amber, the SmartHub or base station isn’t connected to the Internet.
For Base Station with Siren VMB4000, check the Internet LED: - If the Internet LED is green, the base station is connected to the Internet.
- If the Internet LED is amber, the base station is connected to your router, but it isn’t connected to the Internet. Check the router’s Internet connection.
- If you or someone from an IT department customized your router settings:
- Check your router’s DHCP settings and client list.
Make sure that DHCP is enabled and that router’s DCHP client list supplied an IP address to the SmartHub. (If it did, the SmartHub or base station appears in the client list.) For more information, see your router documentation. - If you were previously able to connect your SmartHub to the Internet, but now can’t connect, check the router’s security settings and firmware to make sure that no changes were made since the last time it successfully connected.
You might want to temporarily lower the security settings on the router or temporarily place the SmartHub in the DMZ to rule out any firewall restrictions. If you make these changes, power cycle your SmartHub as described in Step 3. - Check to make sure that ports 443 and 80 are open on your router.
If you don’t manage your Internet environment, contact your IT department for assistance with any firewall or router configurations. The SmartHub can’t connect through most proxy servers. Check with your IT team and Internet service provider (ISP) about ways to bypass any proxy servers. Ask your IT team to make sure that ports 443 and 80 are open.
- Check your router’s DHCP settings and client list.
- If you still can’t connect, visit https://support.arlo.com and submit a support case describing the steps you took and provide the following information:
- SmartHub or base station serial number.
- User name (email address used to register your Arlo account).
- Internet service provider (ISP) name.
- Internet connection type (DSL, cable, and so on) and speed (Arlo requires at least 1 Mbps upstream).
- Internet router model.
- List of other devices connected directly to your router.
- The last time and place that your SmartHub connected to the Internet.
Reset a SmartHub to factory settings
You can connect your wired Arlo Essential Video Doorbell directly to your home router’s 2.4 GHz WiFi network, or you can connect your doorbell to an Arlo SmartHub or Base Station with siren. Your doorbbell is compatible with SmartHub model VMB5000 and VMB4540 and Base Station with Siren model VMB4500 and VMB4000.
Performing a factory reset returns your SmartHub to the default settings. It also removes the serial number from your Arlo account.
To reset the SmartHub:
Use a straightened paper clip to press and hold the Reset button on the back of the SmartHub for about 10 seconds.
When the SmartHub reset completes, the LEDs on the front of the SmartHub blink amber.
When the LEDs stop blinking amber, your SmartHub reboots. The SmartHub is removed from your Arlo account.- To add the SmartHub and set it up, wait for the LED on the front to light solid blue and then open the Arlo app.
- Tap New to Arlo?.
- Follow the setup instructions.
If your Arlo cameras were paired to the SmartHub, you might need to pair the cameras to the SmartHub again.
Reset a Base Station to factory settings
You can connect your wired Arlo Essential Video Doorbell directly to your home router’s 2.4 GHz WiFi network, or you can connect your doorbell to an Arlo SmartHub or Base Station with siren. Your doorbbell is compatible with SmartHub model VMB5000 and VMB4540 and Base Station with Siren model VMB4500 and VMB4000.
Performing a factory reset returns your base station to the default settings. It also removes the serial number from your Arlo account.
To reset a base station:
Use a straightened paper clip to press and hold the Reset button for about 10 seconds.
The base station resets.
The LED behavior during the reset depends on your base station model.- The Base Station VMB4500 has one LED on the front. The LED blinks alternating blue and amber.
- The Base Station VMB4000 has three LEDs on the front. The LEDs blink amber. The base station reboots.
- Wait for the base station to finish rebooting before you unplug it, turn it off, or use the Arlo app to set it up.
- To add the Base Station with Siren to your Arlo account and set it up, open the Arlo app and tap New to Arlo?.
- Follow the setup instructions.
If your Arlo cameras were synched or paired to the SmartHub, you might need to synch or pair the cameras to the base station again.
Pros & Cons
Pros
- Wired connection ensures continuous power without battery replacements.
- HD video with a wide field of view and night vision capability.
- Customizable activity zones and real-time alerts.
- Compatible with major smart home ecosystems like Alexa, Google Assistant, and HomeKit.
Cons
- Requires technical knowledge for wiring and installation.
- Additional fees for cloud storage plans.
- Requires a stable internet connection for full functionality.
Customer Reviews
Customers have generally praised the Arlo Video Doorbell Wired AVD1001-100EUS for its high-quality video feed, reliable motion detection, and easy integration with other smart devices. However, some users have noted that the installation process can be complex and requires some technical knowledge.
A common complaint is the additional cost for cloud storage plans, which some users find unnecessary. Despite these minor issues, the product has received positive reviews overall for its performance and features.
Faqs
How do I install the Arlo Video Doorbell Wired?
Does the Arlo Video Doorbell Wired require a subscription for cloud storage?
Is the AVD1001-100EUS compatible with other smart home devices?
What is the resolution of the video feed on the Video Doorbell?
Does the Video Doorbell have night vision?
Can I customize motion detection zones on the Arlo Video Doorbell?
Is the Arlo Video Doorbell weather-resistant?
How do I troubleshoot if my Arlo Video Doorbell is not receiving power?
Can I use the Arlo Video Doorbell without an internet connection?
Is two-way audio available on the Arlo Video Doorbell?
Leave a Comment