Asus Hard Factory Reset Instruction Manual
Content
Introduction of ASUS Hard Factory Reset
The ASUS Hard Factory Reset is a powerful tool designed to restore your ASUS device to its original factory settings. This process can help solve various software-related issues, including slow performance, app crashes, and system errors. The estimated price of this tool is around $30 to $50, and it is available for purchase through ASUS's official website and authorized retailers.
Applicable models
Blue cave
- BRT-AC828
- 4G-AC68U/
- 4G-AC53/
- 4G-AC55
- RT-AC5300/
- RT-AC3200/
- RT-AC88U/
- RT-AC3100
- RT-AC87U/
- RT-AC87R/
- RT-AC87W
- RT-AC68U/
- RT-AC68R/
- RT-AC68RW/
- RT-AC68UF/
- RT-AC68W/
- RT-AC1900/
- RT-AC1900P/
- RT-AC68U_White/
- RT-AC68P
- RT-AC1900U/
- RT-AC67U/
- RT-AC66U_B1/
- RT-AC1750_B1/
- RT-N66U_C1
- RT-AC56S
- RT-AC66U/
- RT-AC66R/
- RT-AC66W/
- RT-AC66U_WHITE/
- RT-AC1750/
- RT-N66U/
- RT-N66W/
- RT-N66R
- RT-AC51U/
- RT-AC750/
- RT-AC51U+/
- RT-AC52U_B1/
- RT-AC52U/
- RT-AC53/
- RT-AC750GF/
- RT-AC54U/
- RT-AC55UHP/
- RT-AC58U/
- RT-AC1300GPLUS/
- RT-ACRH13/
- RT-AC1300UHP
- RT-AC1200G/
- RT-AC1200G+/
- RT-AC1200HP/
- RT-AC1200/
- RT-AC1200E/
- RT-AC1200GU
- RT-N11P_B1/
- RT-N12VP B1/
- RT-N12+ B1/
- RT-N12+ PRO/
- RT-N12E C1/
- RT-N300 B1/
- RT-N12_D1/
- RT-N12HP_B1/
- RT-N14UHP/
- RT-N18U/
- RT-N800HP DSL-AC68U/
- DSL-AC68R
- RP-AC68U/
- RP-AC53
Applicable models: RT-AX88U/ GT-AX11000/ RT-AX92U/ RT-AC86U/ RT-AC2900/ GT-AC5300
Applicable models: Lyra/ Lyra Trio
Applicable models: Lyra Voice
Applicable models: DSL-AC52U/ DSL-AC55U/ DSL-N55U_C1/ DSL-AC56U DSL-N17U/ DSL-N12U_C1/ DSL-N12E_C1
ASUS Hard Factory Reset Specifications
The ASUS Hard Factory Reset comes with the following key features:
- Compatible with all ASUS devices
- Easy-to-use interface with clear instructions
- Quick and efficient factory reset process
- Restores device to original factory settings
- Comes with a one-year warranty
How to make my router more secure
General Setting
- Set your wireless network encryption as WPA2-AES
After QIS (Quick Internet Setup), the system sets WPA2-AES as your default encryption. Although the system provides multiple encryptions, we suggest you keep your system in WPA2-AES encryption if there is no special
requirement. - Set up separate passwords for your wireless network and Web GUI
In QIS, we will ask users to set up a password for your wireless network and an admin password. Please use two different passwords to prevent someone who knows the wireless network password from logging in Web GUI. - Use long and more complex passwords
Use passwords with more than 8 characters mixed with capitalized letters, numbers, and special characters to increase the security level of your devices. Do not use passwords with consecutive numbers or letters, such as 12345678, abcdefgh, or qwertyuiop. - Update your router to the latest firmware
New version of firmware usually includes new security fixes. Check if there is any new firmware available via Web GUI or ASUS Router app. - Enable the firewall
Firewall setting page is in Advanced Settings. The default value is enabled. Please do not disable the firewall if there is no special requirement. Enable AiProtection
Enable AiProtection if your device supports this function. It protects your router and LAN devices from potential threats and increases the security level.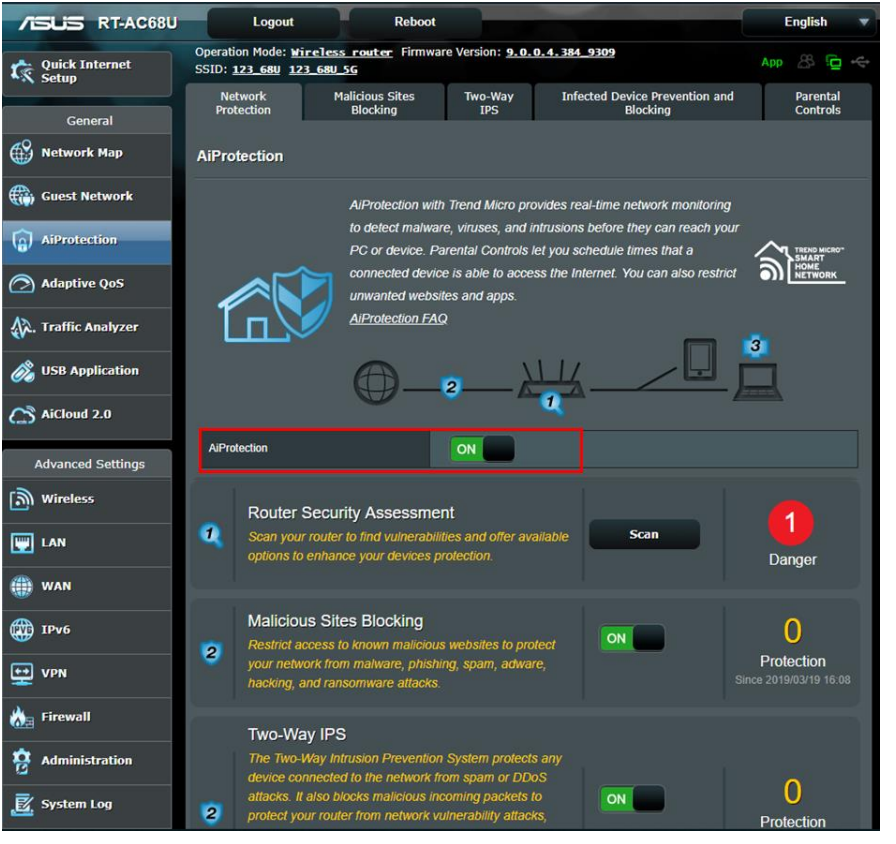
Disable the access from WAN
Access from WAN allows you to access your router from the Internet. The default value of this function is disabled. Do not enable this function if there is no special requirement.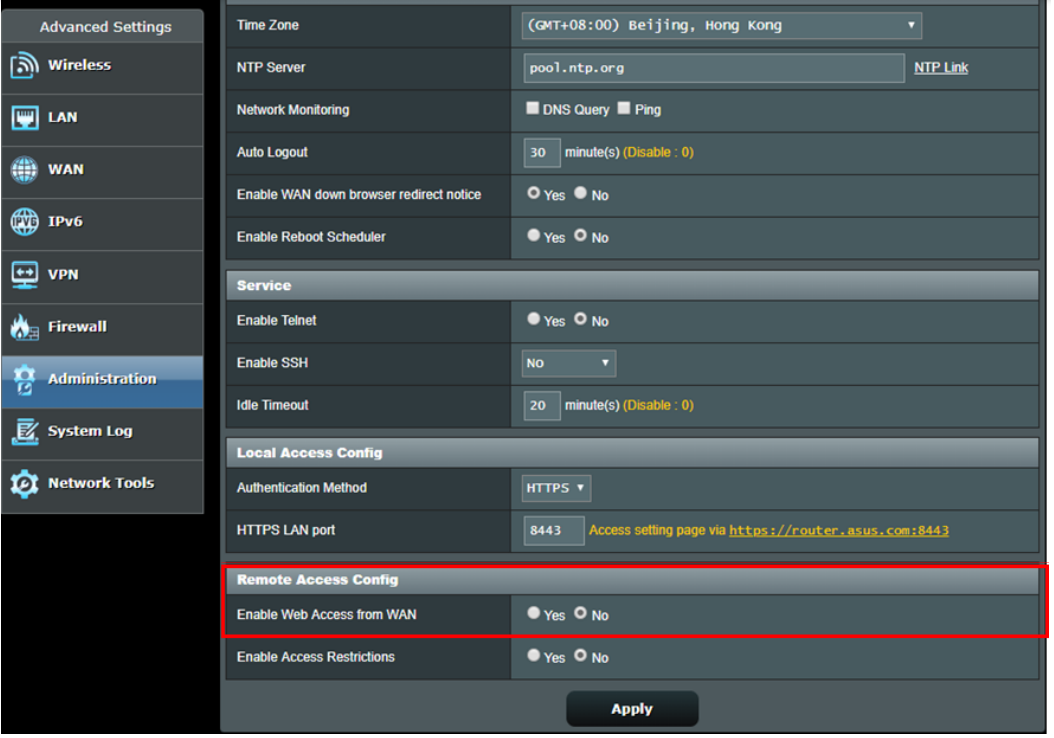
Disable Telnet and SSH
Telnet and SSH allow you to use Linux commands to control your router. The default value of this function is disabled. Do not enable this function if there is no special requirement. Go to Advanced Settings -> Administration-> Service for configuration.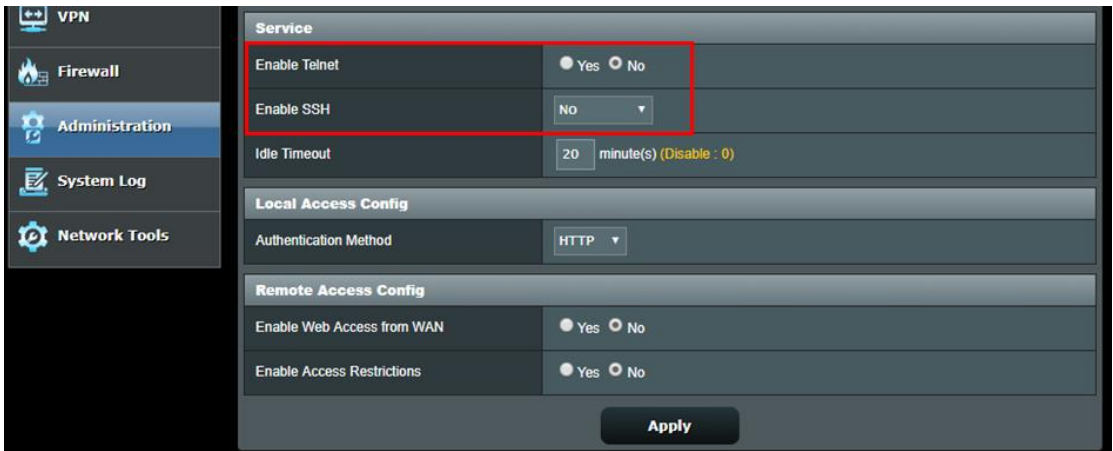
Do not enable DMZ
If your LAN devices need to provide service to other external devices such as FTP servers, video servers and file servers, please set up Port Forwarding rules for each service. Do not enable this function if there is no special requirement to do so. Some P2P software forums suggest users add PC IP to DMZ, but it increases the risk of getting attacked. We highly suggest not to do so.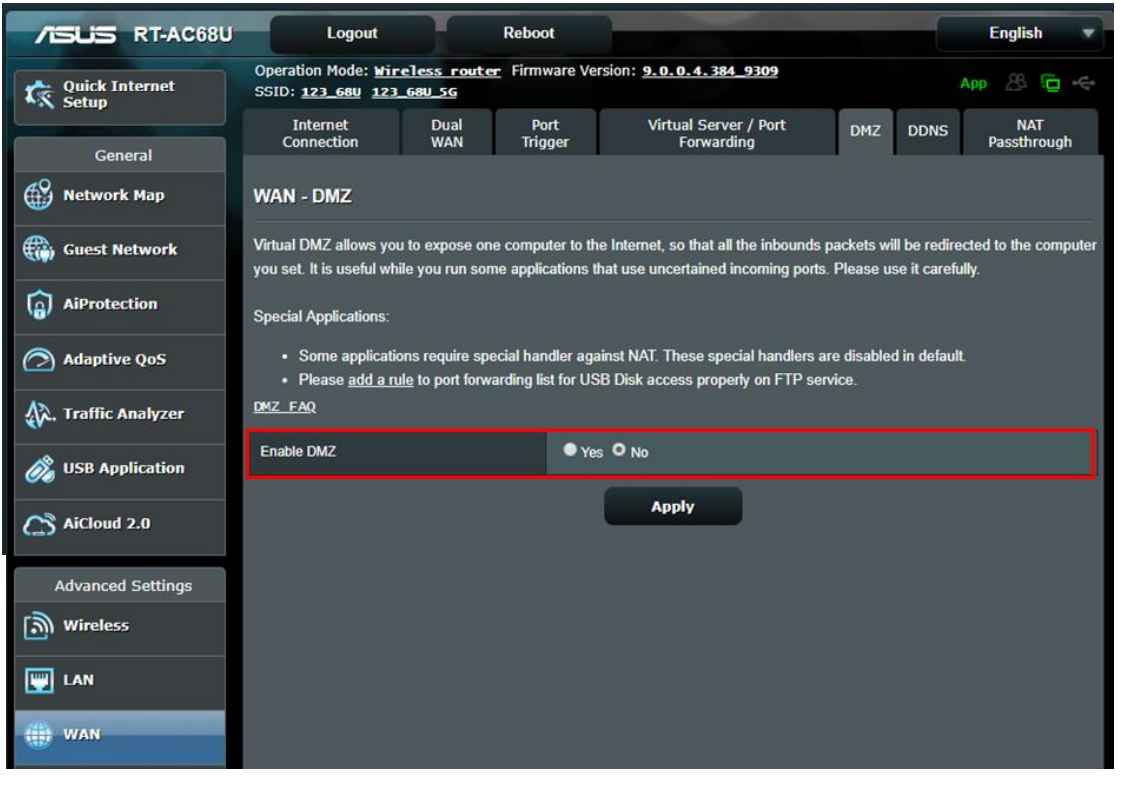
Advanced Setting of ASUS Hard Factory Reset
Enable https to log in ASUSWRT
Https is a standard HTTP protocol covered with a layer of SSL/TLS encryption when you are using WPA-AES encryption. ASUSWRT with WPA-AES encryption default connects you with http considering its ease-of-use.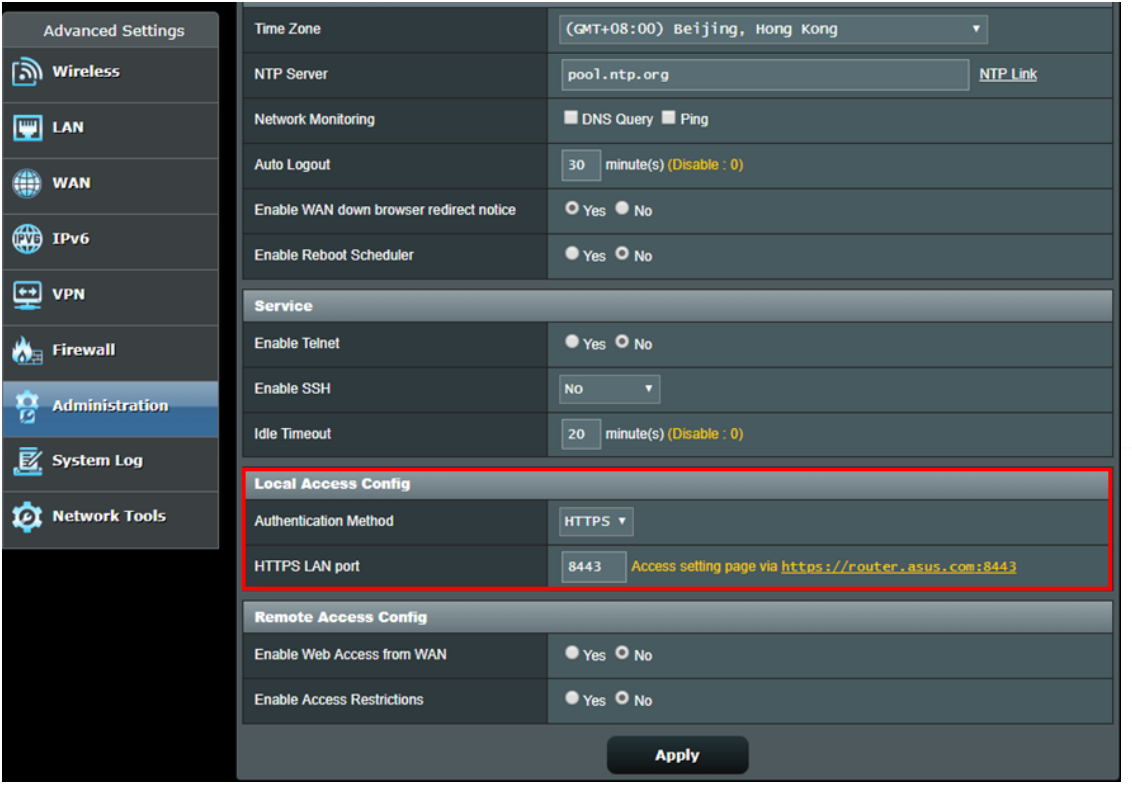
Because routers use self-signed certificates, the browser will show the warning message as shown in the following screenshot. You can ignore the warning because your router is a trusted device. Please click Advanced and visit ASUSWRT.
*When you see this warning with connecting to other websites instead of ASUSWRT, please stay alert. This might be a dangerous website.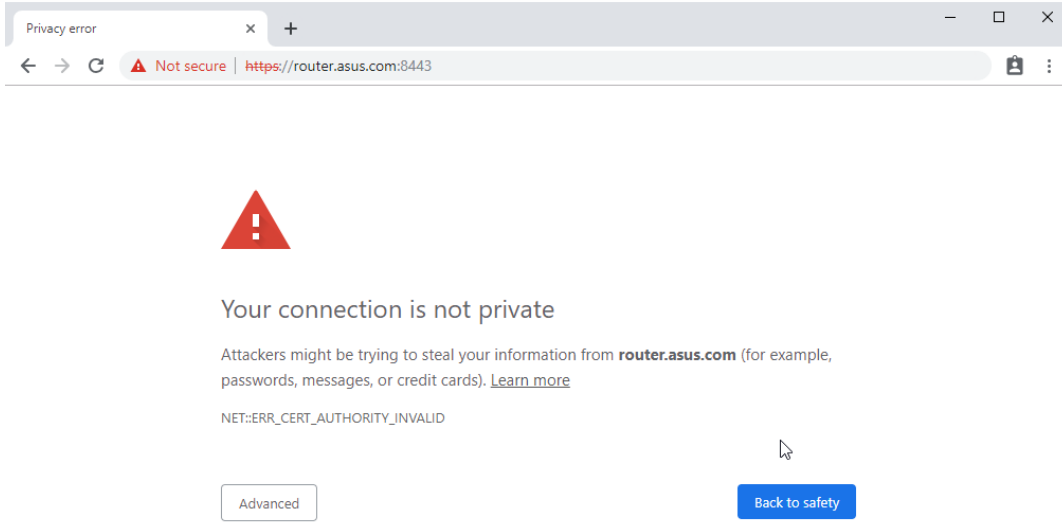
Only allow specified IP address to log in ASUSWRT
Go to Advanced Settings-> Administration-> System-> Specified IP Address to allow specific IP to login to the ASUSWRT. This will increase the security level for your network.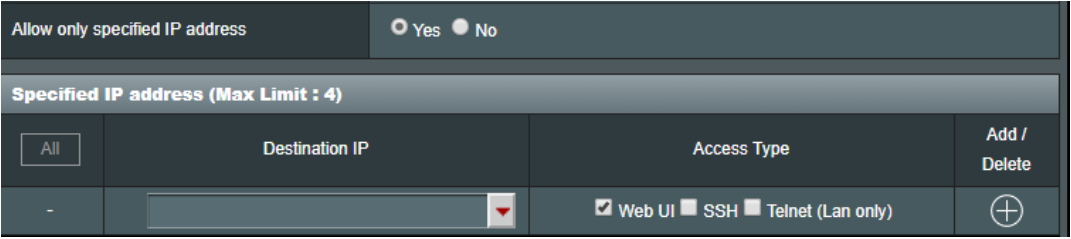
Disable UPnP
Some devices use the UPnP for the ease-of-use. For compatibility, ASUSWRT default enables UPnP. Users can visit Advanced Settings-> WAN -> Basic Config -> Enable UPnP to disable UPnP. You can keep UPnP disabled if there is no trouble that occurs after disabling it.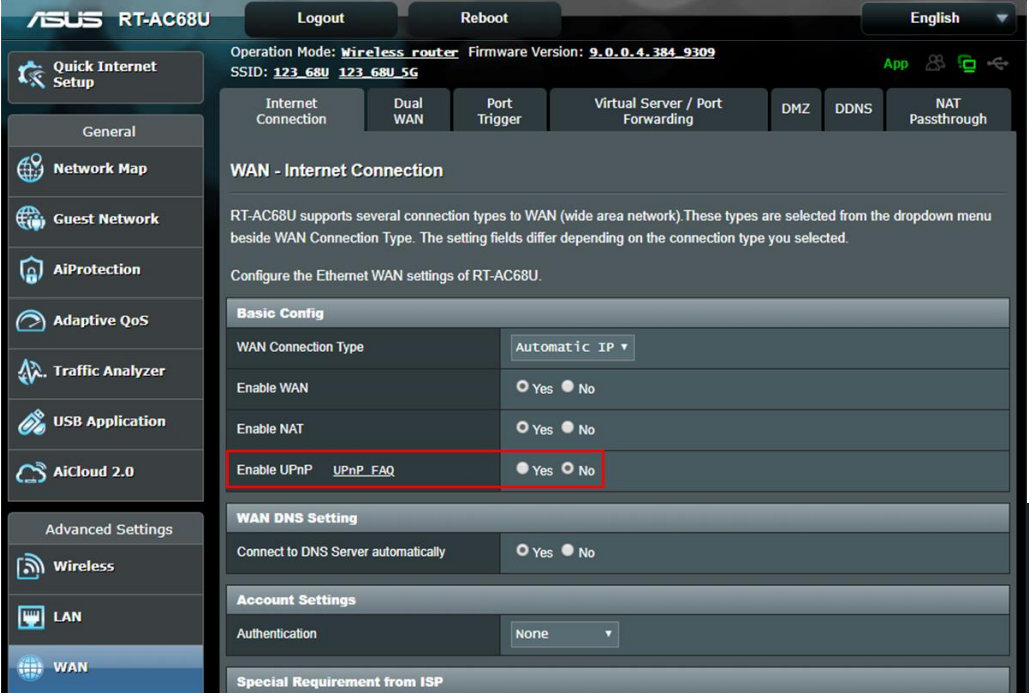
Setting up the Wireless MAC Address Filter for your wireless network
If your connecting client does not always change, you can set up a white list in the Wireless MAC Address Filter that only allows the specified MAC address to get connected to your router. Visit Advanced Settings -> Wireless -> Wireless MAC Filter -> Change MAC filter mode to Accept and add specific MAC address to your list. Only those devices in the list are allowed to connect to your router.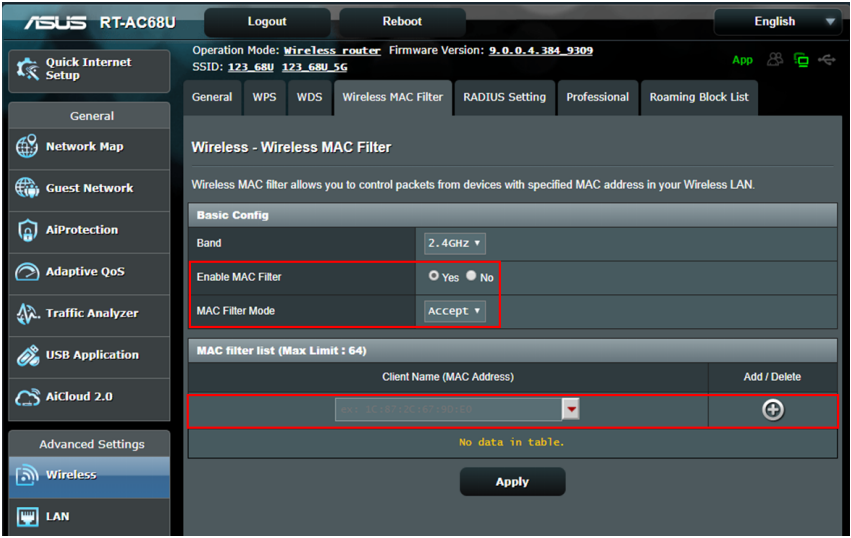
Failed Internet access through router
Please confirm your router has a correct WAN connection. Refer to the steps below
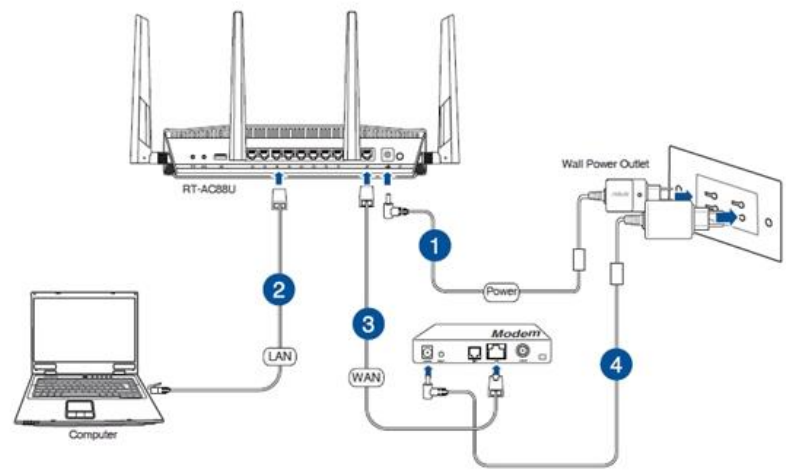
To set up your wireless router via wired connection- Connect your wireless router’s AC adapter to the DC-IN port and into a power outlet.
- Using the bundled network cable, connect your computer to your wireless router’s LAN port.
Note: Ensure that the LAN LED is blinking. - Using another network cable, connect your modem to your wireless router’s WAN port.
Connect your modem’s AC adapter to the DC-IN port and into a power outlet.
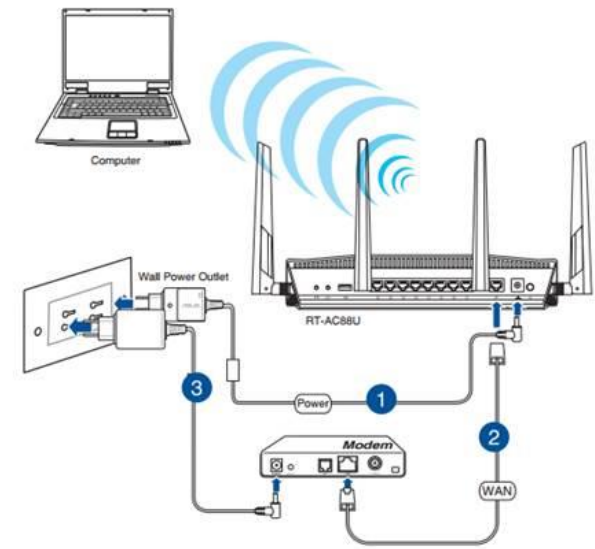
To set up your wireless router via wireless connection
- Connect your wireless router’s AC adapter to the DC-IN port, then connect the other end into a power outlet
- Using the bundled network cable, connect your modem to your wireless router’s WAN port.
- Connect your modem’s AC adapter to the DC-IN port, then connect the other end into a power outlet
Install an IEEE 802.11a/b/g/n/ac WLAN adapter on your computer.
- Please make sure your adapter is set to obtain IP automatically.
- Set the TCP/IP settings to automatically obtain an IP address.
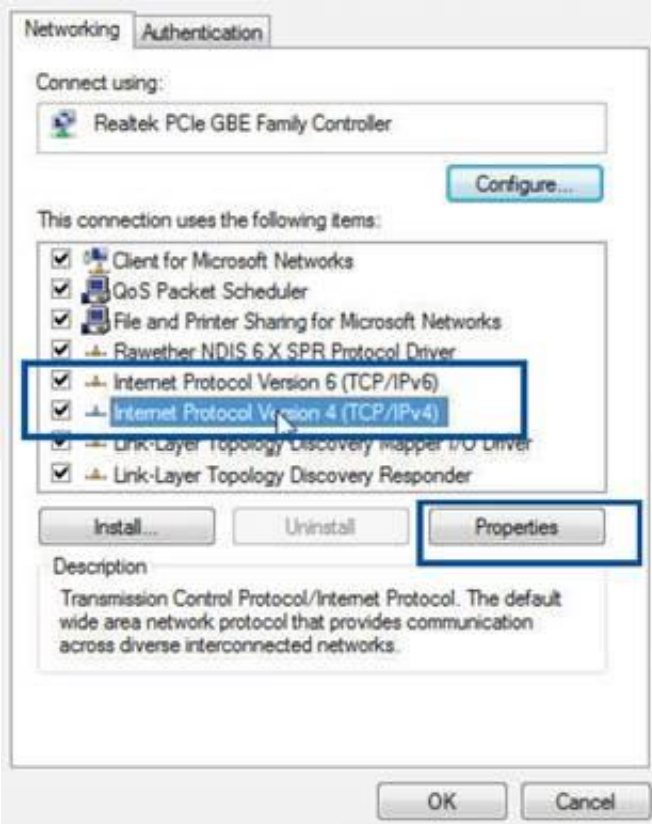
Example: Windows 7 - Click Start > Control Panel > Network and Internet > Network and Sharing Center > Manage network connections.
Select Internet Protocol Version 4 (TCP/IPv4) or Internet Protocol Version 6 (TCP/IPv6), then click Properties.
- To obtain the IPv4 IP settings automatically, select Obtain an IP address automatically. To obtain the IPv6 IP settings automatically, select Obtain an IPv6 address automatically.
Click OK when done.
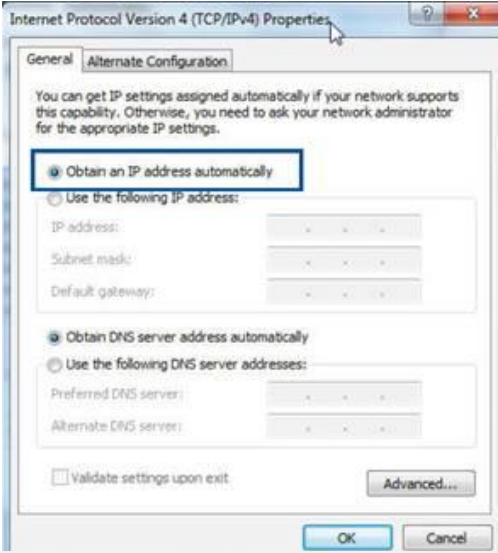
Note: Refer to your operating system’s help and support feature for details on configuring your computer’s TCP/IP settings.
- Set the TCP/IP settings to automatically obtain an IP address.
- Confirm that your computer can access the Internet through other network environments.
- Please confirm your ISP Internet settings and related information
Example: Taiwan - Chunghwa Telecom
Internet connection type:PPPoE / Static IP
Chunghwa Telecom PPPoE account is 8 numerical [email protected] - Please check that your computer can connect to the Internet via the network cable provided by the ISP
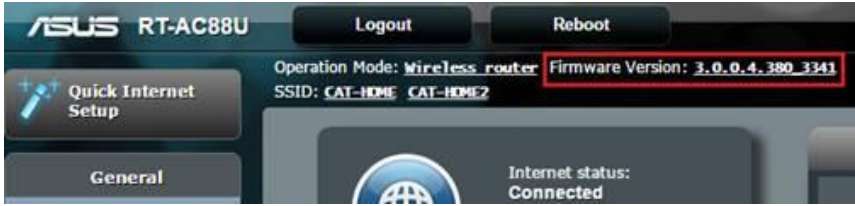
Please confirm that the router has the latest firmware version.
- Restore your router to default setting
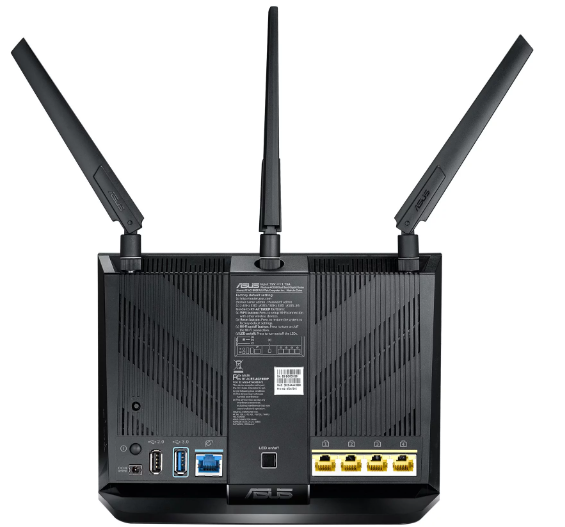
The Reset button is on the back of the router. When the router is powered on, press and hold the Reset button (approximately 5 secs) until the Power LED starts flashing, then release Reset button for it to reboot.
Notice:If router is restored to default ststus, then you need to reset your information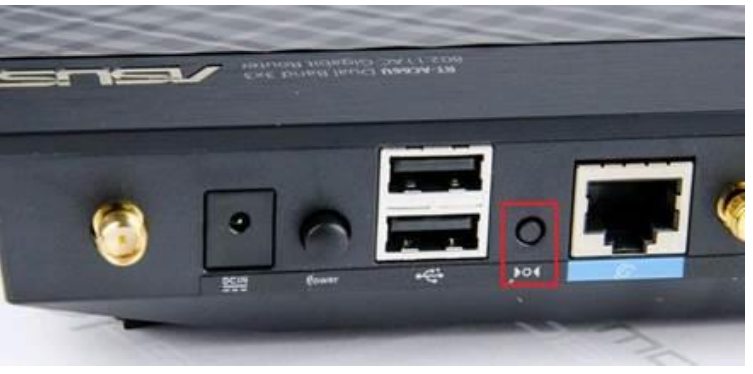
Finish entering your settings through QIS
Description of ASUS Hard Factory Reset
The ASUS Hard Factory Reset is a reliable and efficient solution to restore your ASUS device to its original factory settings. This tool is designed to be user-friendly, with clear instructions to guide you through the process. It is compatible with all ASUS devices, making it a versatile solution for any ASUS user. The quick and efficient factory reset process ensures that your device is restored to its original settings in no time. Additionally, the ASUS Hard Factory Reset comes with a one-year warranty, providing you with peace of mind and protection against any defects or issues.
How to set up an Internet Connection
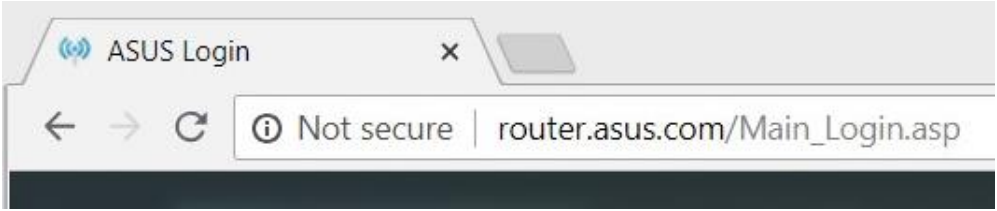
Enter the IP address of your device in the browser, followed by your username and password to login to your ASUS networking device. ASUS Wireless Routers use a web-based user interface that allows you to configure the router by any web browser, such as Internet Explorer, Mozilla Firefox, Apple Safari, or Google Chrome.
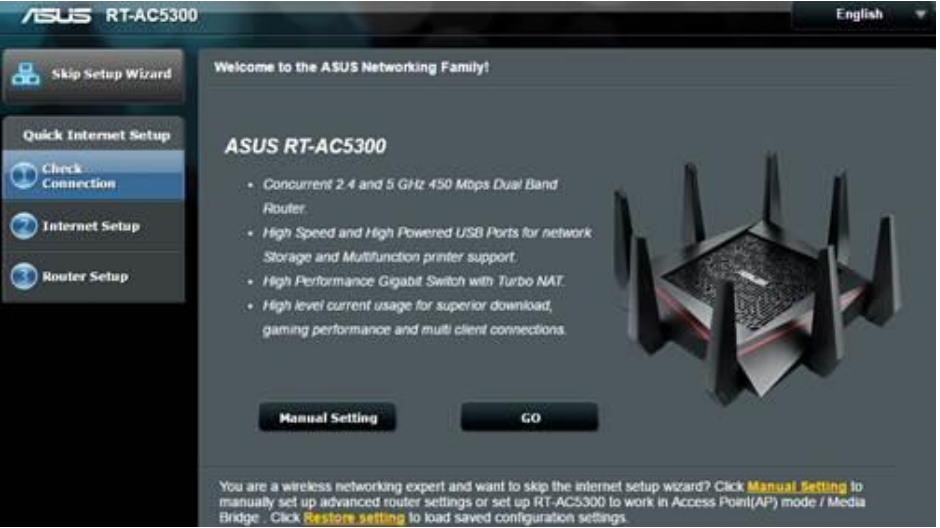
- Click [Quick Internet Setup]
The Quick Internet Setup function guides you to quickly set up your Internet connection.
The wireless router automatically detects if your ISP connection type is Automatic IP, Static IP, PPPoE, PPTP and L2TP. Key in the necessary information for your ISP connection type.
IMPORTANT: Obtain the necessary information from your ISP about the Internet connection type.
Example: How to use the QIS (Quick Internet Setup) to set up PPPoE ? (ASUSWRT) If you need detailed setup information, go to the WAN- Internet Connection.
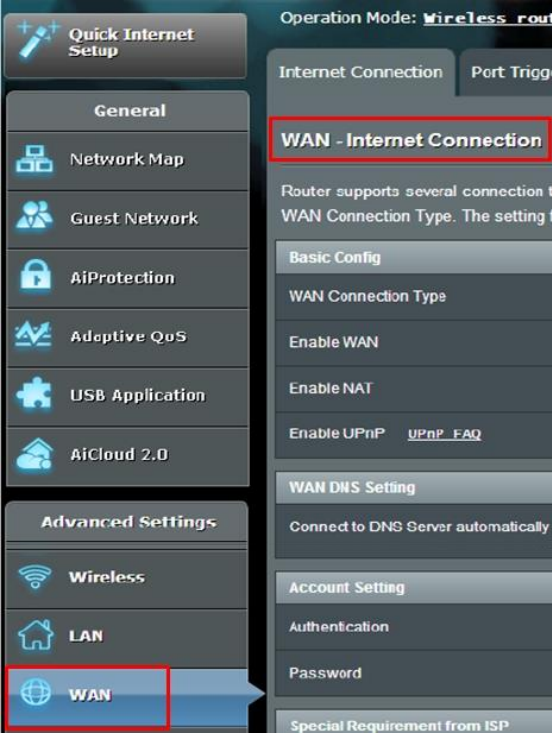
- There are 5 WAN connections to choose from : Automatic IP, Static IP. PPPoE, PPTP, L2TP.
Automatic IP
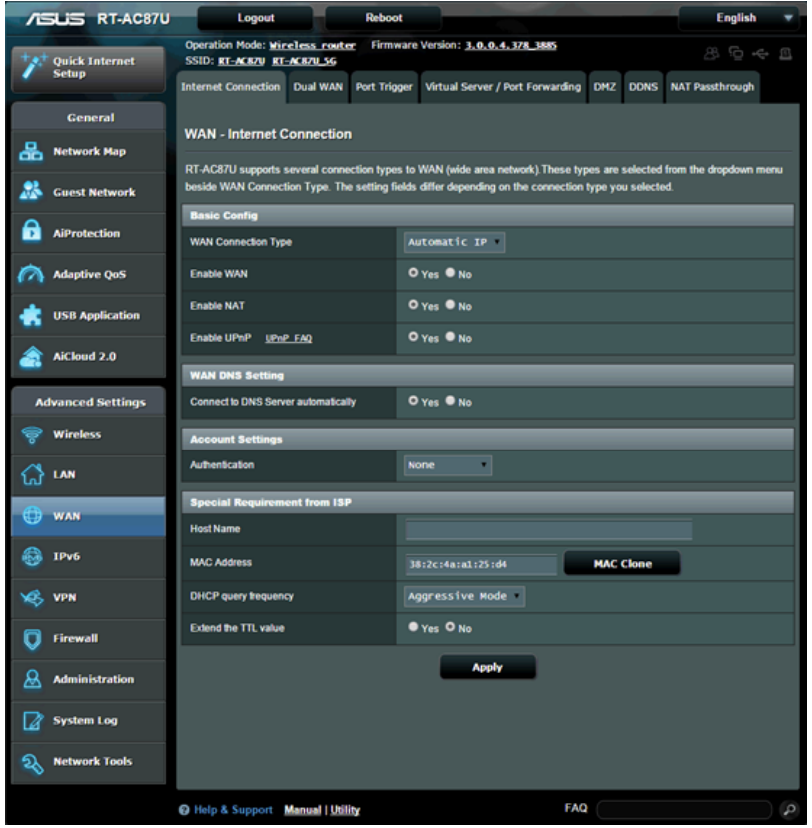
- Enable WAN: Enable and disable WAN. Under some connection types, you can get a new IP address by using Enable and Disable WAN.
- Enable NAT: NAT(Network Address Translation) is a process used in routers to replace the address information of network packets with new address information. Typical applications for NAT is for routers which connect to LAN with the WAN. In LAN, every network device had a private IP (LAN IP) but there’s only one public IP (WAN IP). To grant internet access to the network devices, the router replaces the private IP address of the sender with its own public IP address in all outgoing data packets. The router saves all necessary information in a table (NAT table) so that incoming data packets can then be assigned to the correct network device.
- Enable UPnP: UPnP(Universal Plug and Play) allows several devices(routers, televisions, stereo systems, game consoles, cellular phone) to be controlled via an IP-based network with or without a central control through a gateway.
- Connect to DNS Server automatically: Allows this router to get the DNS IP address from the ISP automatically.
- Authentication: This item may be specified by some ISPs. Check with your ISP and fill them in if required.
- Host Name: You can provide a host name for your router. It’s usually requested by your ISP.
- MAC Address: MAC(Media Access Control) address is a unique identifier that identifies your computer or device in the network. ISPs monitor the MAC addresses of devices that connect to their services, and would disallow Internet Connection for new MAC addresses. To fix this issue, you can do either of the following:
- Contact your ISP and request to update the MAC address associated with your ISP subscription.
- Clone or change the MAC address of the new device to match the MAC address of the original device.
- DHCP query frequency: Some Internet Service Providers block MAC addresses if the device makes DHCP queries too often. To prevent this, change the DHCP query frequency. In the default Aggressive mode, if the router does not get a response from the ISP, it sends another query after 20 seconds and then makes three more attempts. In Normal mode, if the router doesn’t get a response from the ISP, it makes a second query after 120 seconds and then makes two more attempts.
Static IP
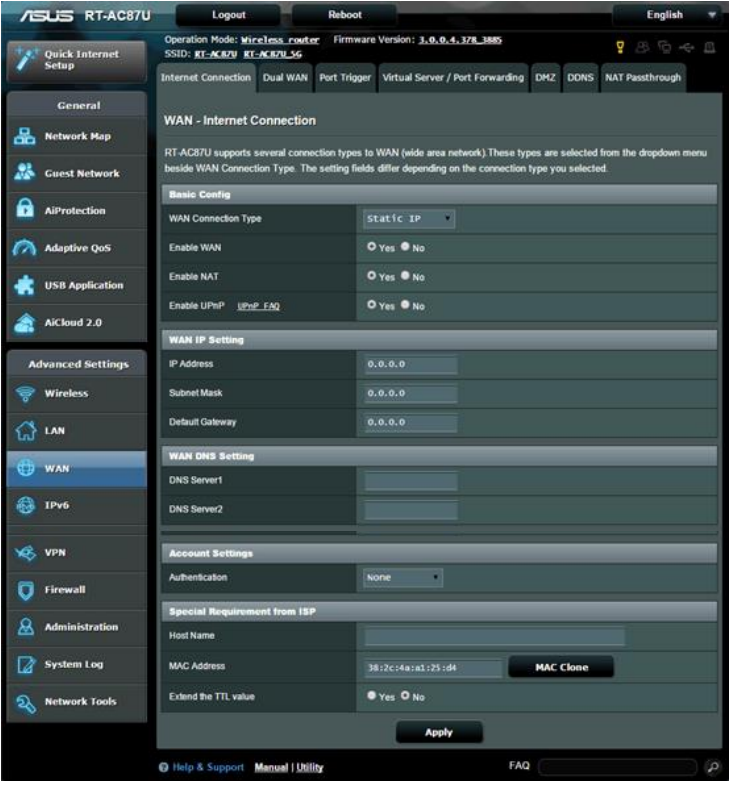
- Enable WAN: Enable and disable WAN. Under some connection type, you can get a new IP address by enable and disable WAN.
- Enable NAT: NAT(Network Address Translation) is a process used in routers to replace the address information of network packet with new address information. Typical applications for NAT is router which connect to LAN with the WAN. In LAN, every network devices had a private IP(LAN IP) but there’s only one public IP(WAN IP). To grant the network devices access to internet, the router replaces the private IP address of the sender with its own public IP address in all outgoing data packets. The router saves all necessary information in a table(NAT table) so that incoming data packets can then be assigned to the correct network device.
- Enable UPnP: UPnP(Universal Plug and Play) allows several devices(routers, televisions, stereo systems, game consoles, cellular phone) to be controlled via an IP-based network with or without a central control through a gateway.
- IP Address: If your WAN connection requires a static IP address, key in the IP address in this field.
- Subnet Mask: If your WAN connection requires a static IP address, key in the subnet mask in this field.
- Default Gateway: If your WAN connection requires a static IP address, key in the gateway IP address in this field.
- DNS Server: This field indicates the IP address of DNS that the router contacts to.
- Authentication: Some Internet Service Providers block MAC addresses if the device makes DHCP queries too often. To prevent this, change the DHCP query frequency. In the default Aggressive mode, if router does not get a response from the ISP, it sends another query after 20 seconds and makes three more attempts. In Normal mode, if router doesn’t get a response from the ISP, it makes a second query after 120 seconds and makes two more attempts.
- Host Name: You can provide a host name for your router. It’s usually requested by your ISP.
- MAC Address: MAC(Media Access Control) address is a unique identifier that identifies your computer or device in the network. ISPs monitor the MAC addresses of devices that connect to their services, and would disallow Internet Connection for new MAC addresses. To fix this issue, you can do either of the following:
- Contact your ISP and request to update the MAC address associated with your ISP subscription.
- Clone or change the MAC address of the new device to match the MAC address of the original device.
PPPoE
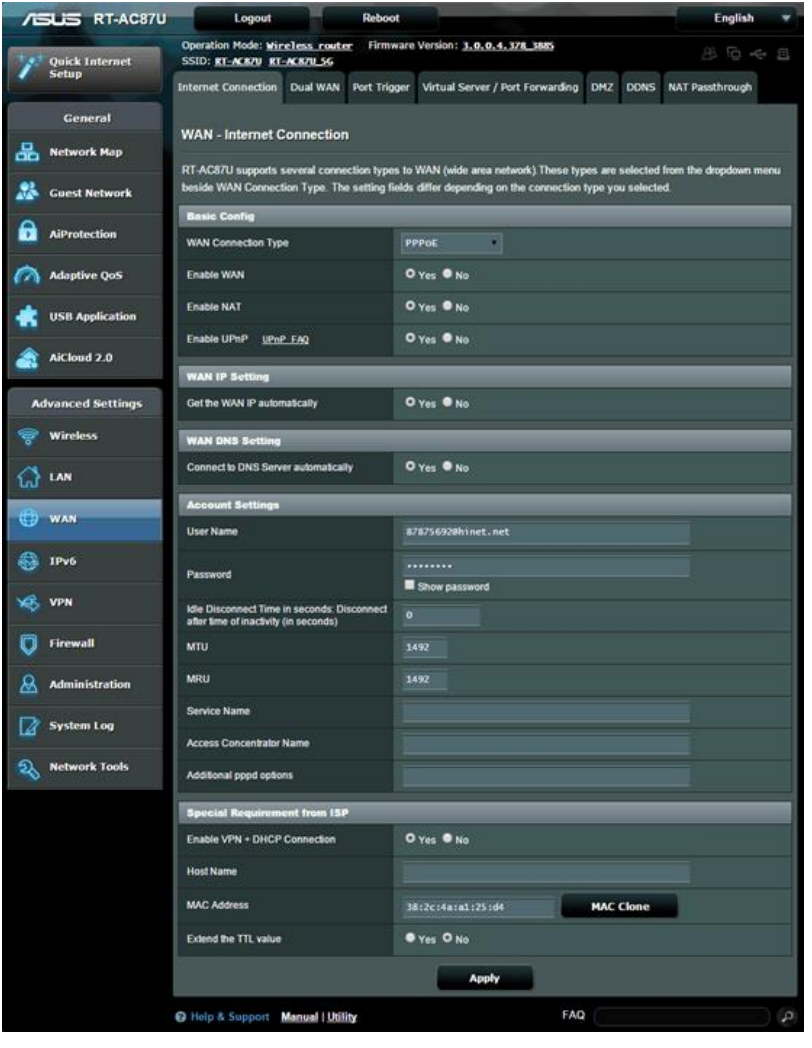
- Enable WAN: Enable and disable WAN. Under some connection type, you can get a new IP address by enable and disable WAN.
- Enable NAT: NAT(Network Address Translation) is a process used in routers to replace the address information of network packet with new address information. Typical applications for NAT is router which connect to LAN with the WAN. In LAN, every network devices had a private IP(LAN IP) but there’s only one public IP(WAN IP). To grant the network devices access to internet, the router replaces the private IP address of the sender with its own public IP address in all outgoing data packets. The router saves all necessary information in a table(NAT table) so that incoming data packets can then be assigned to the correct network device.
- Enable UPnP: UPnP(Universal Plug and Play) allows several devices(routers, televisions, stereo systems, game consoles, cellular phone) to be controlled via an IP-based network with or without a central control through a gateway.
- Get the WAN IP automatically: Allows the router to get the WAN IP address from the ISP automatically.
- Connect to DNS Server automatically: Allows this router to get the DNS IP address from the ISP automatically.
- User Name: Fill-in the information which ISP provided.
- Password: Fill-in the information which ISP provided.
- Idle Disconnect Time in seconds: Disconnect after time of inactivity (in seconds): This field is optional and allows you to configure to terminate your ISP connection after a specified period of time. A value of zero allows infinite idle time.
- MTU: The Maximum Transmission Unit(MTU) of PPPoE packet. The default value is 1492. Change this value only if your ISP requires it.
- MRU: The Maximum Receive Unit(MRU) of PPPoE packet. The default value is 1492. Change this value only if your ISP requires it.
- Service Name: This field is optional and may be specified by some ISPs. Check with your ISP and fill them in if required.
- Access Concentrator Name: This field is optional and may be specified by some ISPs. Check with your ISP and fill them in if required.
- Additional pppd options: This item may be specified by some ISPs. Check with your ISP and fill them in if required.
- Enable VPN + DHCP Connection: Decied you want to enable VPN and DHCP connection or not.
- Host Name: You can provide a host name for your router. It’s usually requested by your ISP.
- MAC Address: MAC(Media Access Control) address is a unique identifier that identifies your computer or device in the network. ISPs monitor the MAC addresses of devices that connect to their services, and would disallow Internet Connection for new MAC addresses. To fix this issue, you can do either of the following:
- Contact your ISP and request to update the MAC address associated with your ISP subscription.
- Clone or change the MAC address of the new device to match the MAC address of the original device.
PPTP
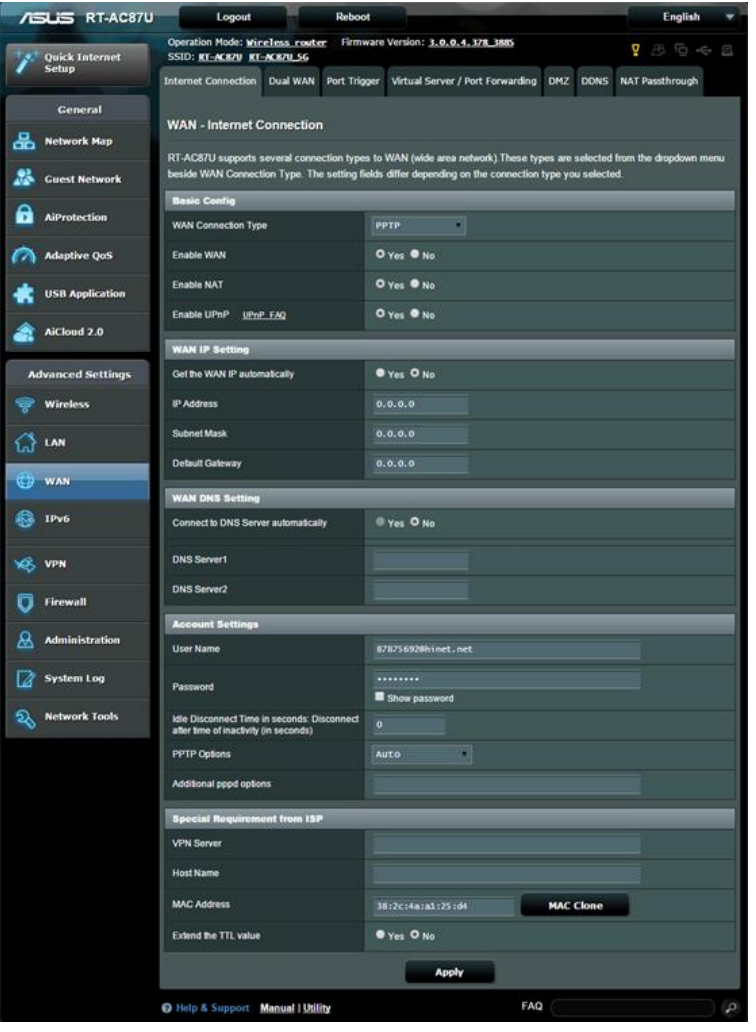
- Enable WAN: Enable and disable WAN. Under some connection type, you can get a new IP address by enable and disable WAN.
- Enable NAT: NAT(Network Address Translation) is a process used in routers to replace the address information of network packet with new address information. Typical applications for NAT is router which connect to LAN with the WAN. In LAN, every network devices had a private IP(LAN IP) but there’s only one public IP(WAN IP). To grant the network devices access to internet, the router replaces the private IP address of the sender with its own public IP address in all outgoing data packets. The router saves all necessary information in a table(NAT table) so that incoming data packets can then be assigned to the correct network device.
- Enable UPnP: UPnP(Universal Plug and Play) allows several devices(routers, televisions, stereo systems, game consoles, cellular phone) to be controlled via an IP-based network with or without a central control through a gateway.
- Get the WAN IP automatically: Allows the router to get the WAN IP address from the ISP automatically.
- IP Address: If your WAN connection requires a static IP address, key in the IP address in this field.
- Subnet Mask: If your WAN connection requires a static IP address, key in the subnet mask in this field.
- Default Gateway: If your WAN connection requires a static IP address, key in the gateway IP address in this field.
- Connect to DNS Server automatically: Allows this router to get the DNS IP address from the ISP automatically.
- DNS Server: This field indicates the IP address of DNS that the router contacts to.
- User Name: Fill-in the information which ISP provided. This filed is only available when setting the WAN Connection Type as USB Modem, PPPoE, PPTP or L2TP.
- Password: Fill-in the information which ISP provided. This field is only available when setting WAN Connection Type as PPPoE.
- Idle Disconnect Time in seconds: Disconnect after time of inactivity (in seconds): This field is optional and allows you to configure to terminate your ISP connection after a specified period of time. A value of zero allows infinite idle time.
- PPTP Options: This item may be specified by some ISPs. Check with your ISP and fill them in if required.
- Additional pppd options: This item may be specified by some ISPs. Check with your ISP and fill them in if required.
- VPN Server: If your WAN connection type is PPTP or L2TP, please enter the server name or server IP of the VPN Server.
- Host Name: You can provide a host name for your router. It’s usually requested by your ISP.
- MAC Address: MAC(Media Access Control) address is a unique identifier that identifies your computer or device in the network. ISPs monitor the MAC addresses of devices that connect to their services, and would disallow Internet Connection for new MAC addresses. To fix this issue, you can do either of the following:
- Contact your ISP and request to update the MAC address associated with your ISP subscription.
- Clone or change the MAC address of the new device to match the MAC address of the original device.
L2TP
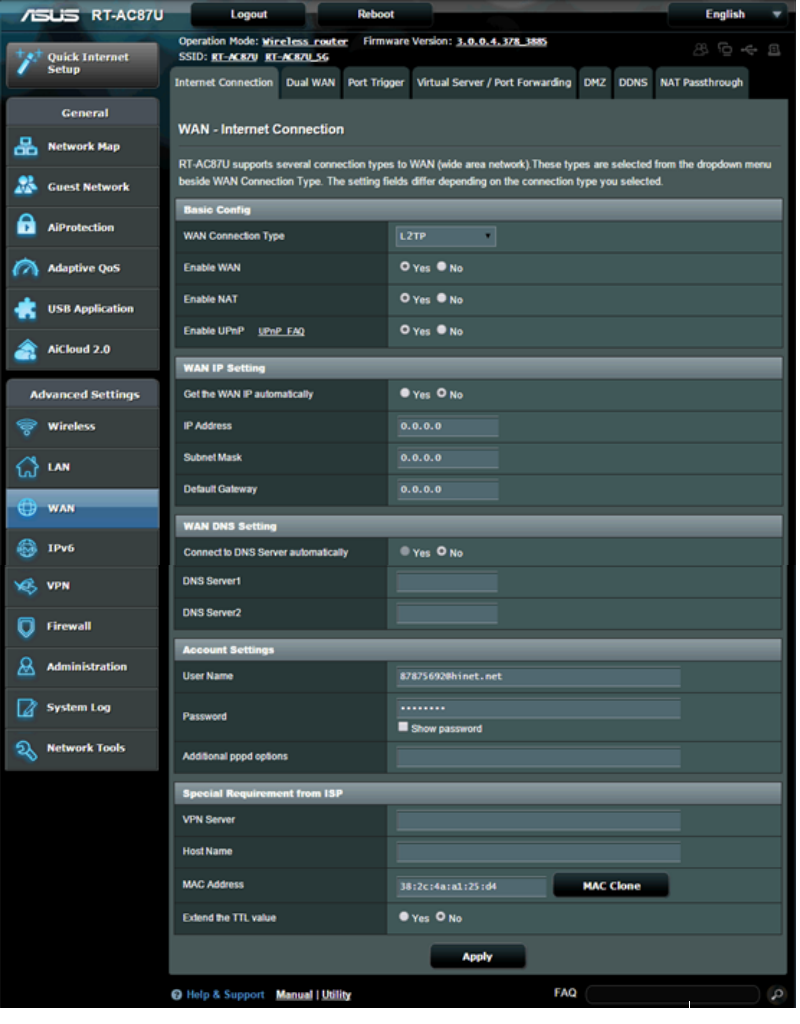
- Enable WAN: Enable and disable WAN. Under some connection type, you can get a new IP address by enable and disable WAN.
- Enable NAT: NAT(Network Address Translation) is a process used in routers to replace the address information of network packet with new address information. Typical applications for NAT is router which connect to LAN with the WAN. In LAN, every network devices had a private IP(LAN IP) but there’s only one public IP(WAN IP). To grant the network devices access to internet, the router replaces the private IP address of the sender with its own public IP address in all outgoing data packets. The router saves all necessary information in a table(NAT table) so that incoming data packets can then be assigned to the correct network device.
- Enable UPnP: UPnP(Universal Plug and Play) allows several devices(routers, televisions, stereo systems, game consoles, cellular phone) to be controlled via an IP-based network with or without a central control through a gateway.
- Get the WAN IP automatically: Allows the router to get the WAN IP address from the ISP automatically.
- IP Address: If your WAN connection requires a static IP address, key in the IP address in this field.
- Subnet Mask: If your WAN connection requires a static IP address, key in the subnet mask in this field.
- Default Gateway: If your WAN connection requires a static IP address, key in the gateway IP address in this field.
- Connect to DNS Server automatically: Allows this router to get the DNS IP address from the ISP automatically.
- DNS Server: This field indicates the IP address of DNS that the router contacts to.
- User Name: Fill-in the information which ISP provided. This filed is only available when setting the WAN Connection Type as USB Modem, PPPoE, PPTP or L2TP.
- Password: Fill-in the information which ISP provided. This field is only available when setting WAN Connection Type as PPPoE.
- Additional pppd options: This item may be specified by some ISPs. Check with your ISP and fill them in if required.
- VPN Server: If your WAN connection type is PPTP or L2TP, please enter the server name or server IP of the VPN Server.
- Host Name: You can provide a host name for your router. It’s usually requested by your ISP.
- MAC Address: MAC(Media Access Control) address is a unique identifier that identifies your computer or device in the network. ISPs monitor the MAC addresses of devices that connect to their services, and would disallow Internet Connection for new MAC addresses. To fix this issue, you can do either of the following:
- Contact your ISP and request to update the MAC address associated with your ISP subscription.
- Clone or change the MAC address of the new device to match the MAC address of the original device.
ASUS Hard Factory Reset Setup Guide
To use the ASUS, follow these steps:
- Turn off your ASUS device.
- Connect the ASUS Hard Factory Reset to your device's charging port.
- Turn on your device and follow the instructions displayed on the ASUS Hard Factory Reset's screen.
- Wait for the factory reset process to complete. This may take several minutes.
- Once the factory reset is complete, your device will restart, and you can set it up as new.
Troubleshooting
If you encounter any issues while using the ASUS Hard Factory Reset, try the following solutions:
- Ensure that your device is turned off before connecting the ASUS Hard Factory Reset.
- Make sure that you are following the instructions correctly.
- If the factory reset process is taking too long, disconnect the ASUS Hard Factory Reset and restart your device.
- If you are still experiencing issues, contact ASUS's customer support for further assistance.
Pros & Cons
Pros
- Quick and efficient factory reset process
- User-friendly interface
- Compatible with all ASUS devices
- One-year warranty
Cons
- May not solve hardware-related issues
- Will erase all data on your device
- May not be necessary for minor software issues
Customer Reviews about ASUS Hard Factory Reset
Customers have praised the ASUS Hard Factory Reset for its quick and efficient factory reset process. Many users have reported that the ASUS Hard Factory Reset has solved various software-related issues, including slow performance and app crashes. However, some users have noted that the ASUS Hard Factory Reset does not solve hardware-related issues. Overall, customers have rated the ASUS Hard Factory Reset highly for its user-friendly interface and compatibility with all ASUS devices.
Most Common Complaints
The most common complaint among users is that the ASUS Hard Factory Reset does not solve hardware-related issues. Additionally, some users have reported that the ASUS Hard Factory Reset erased their data without warning. It is important to note that the ASUS Hard Factory Reset will erase all data on your device, so it is recommended to back up your data before using the tool.
Faqs
What is the ASUS Hard Factory Reset?
What issues can the ASUS Hard Factory Reset solve?
Is the ASUS Hard Factory Reset user-friendly?
Will the ASUS Hard Factory Reset erase all data on my device?
Is the ASUS Hard Factory Reset compatible with all ASUS devices?
How long does the factory reset process take?
What should I do if I encounter issues while using the ASUS Hard Factory Reset?
Does the ASUS Hard Factory Reset come with a warranty?
Can the ASUS Hard Factory Reset solve hardware-related issues?
How do I use the ASUS Hard Factory Reset?
Leave a Comment