How to Setup: Bissell PET STAIN ERASER Cleaner 2002
Content
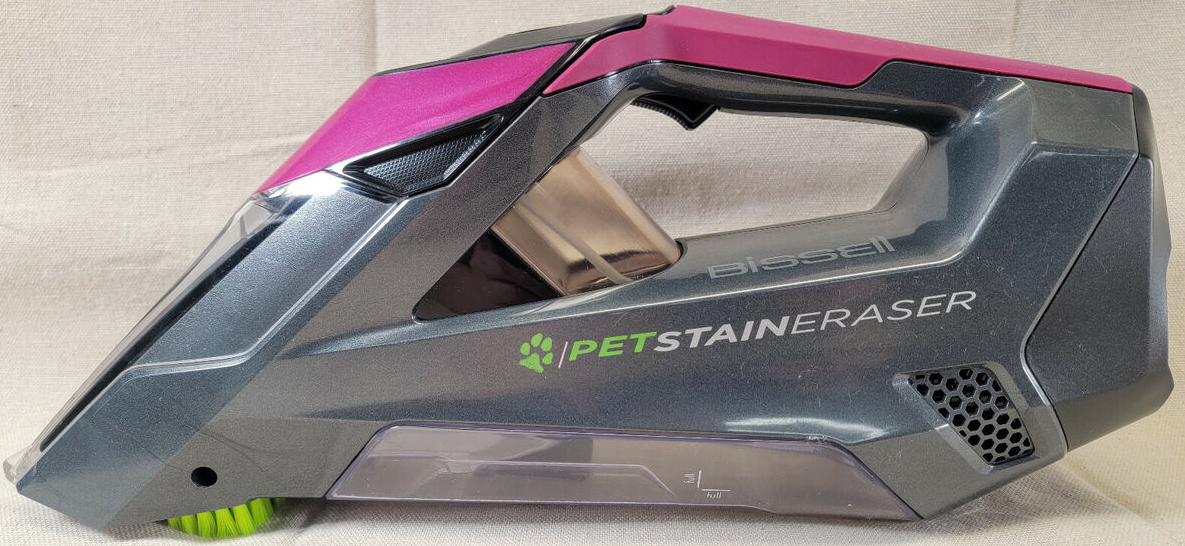
Bissell PET STAIN ERASER Cleaner 2002
The PET STAIN ERASER Cleaner 2002 is a powerful and portable cleaning device designed specifically for pet owners. This handheld cleaner is perfect for tackling pet stains, odors, and messes on carpets, upholstery, and car interiors. The estimated price of this product is around $130, making it an affordable solution for every pet owner. The PET STAIN ERASER Cleaner was launched in 2021, and it has already become a popular choice among pet owners.
Detailed Specifications of PET STAIN ERASER Cleaner 2002
The Bissell PET STAIN ERASER Cleaner 2002 comes with several key features that make it an ideal choice for pet owners. These features include a 12-ounce portable spot-cleaning solution, a 13-inch power cord, and a 0.75-liter tank. The device also features a 3-inch tough stain tool, a 6-inch stair tool, and a 2-inch upholstery tool. The device weighs only 4.6 pounds, making it easy to carry and use. The Bissell PET STAIN ERASER Cleaner 2002 is also certified by the Carpet and Rug Institute, ensuring that it is safe to use on all types of carpets and upholstery.
Description of PET STAIN ERASER Cleaner
The PET STAIN ERASER Cleaner is a versatile and powerful cleaning device that is easy to use and maintain. The device is designed to tackle pet stains and odors, leaving your carpets and upholstery looking and smelling clean and fresh. The 3-inch tough stain tool is perfect for removing stubborn pet stains, while the 6-inch stair tool makes it easy to clean stairs and other hard-to-reach areas. The 2-inch upholstery tool is ideal for cleaning car interiors, furniture, and curtains. The device is lightweight and compact, making it easy to store and use. The 12-ounce portable spot-cleaning solution is designed specifically for pet stains and odors, ensuring that your home stays clean and fresh.
Product Overview of PET STAIN ERASER Cleaner
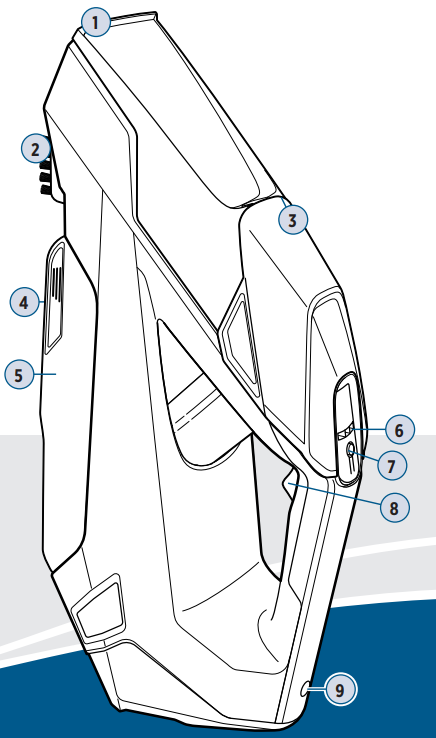
- Removable Nozzle
- Scrubbing Brush
- Formula Tank
- Tank Release Latch
- Dirty Water Tank
- Battery Status Indicator Lights
- Power Switch
- Spray Trigger
- Battery Charging Port
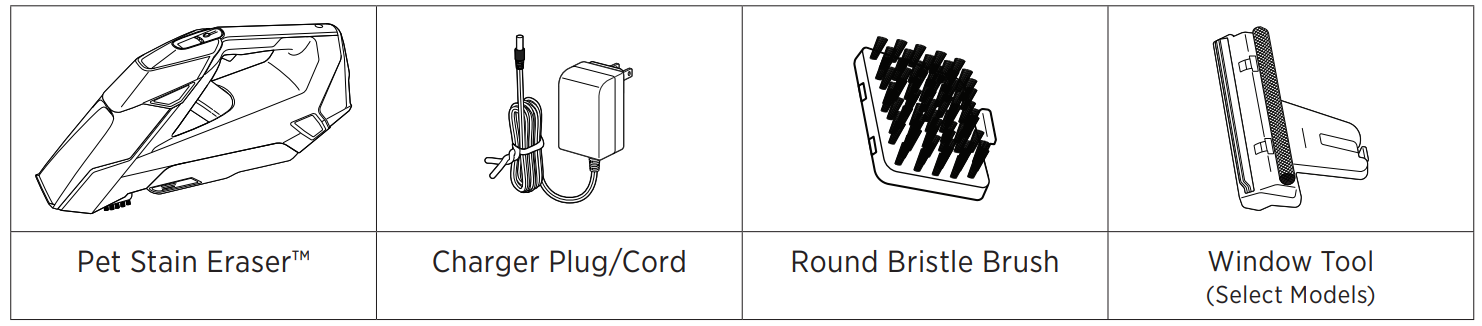
What’s in the Box?
Standard accessories may vary by model. To identify what should be included with your purchase, please refer to the “Carton Contents” list located on the carton top flap.
Charging the Battery
If you need additional help charging your battery, head to https://support.bissell.com/
- Before charging, make sure machine is OFF and the Battery Status Indicator Lights are not illuminated. Insert the charging adapter plug into the charging port on the handle near the base of the machine.
NOTE: There is a door covering the charging port that will automatically slide out of the way when the charging adapter is inserted. - Plug the adapter into a wall outlet. For maximum run time, charge the machine 4 hours prior to use.
- The battery status indicator lights will illuminate when charging.

NOTICE Use of cleaning formulas that contain lemon or pine oil may damage this appliance and void the warranty. Chemical spot cleaners or solvent-based soil removers also should not be used. These products may react with the plastic materials used in your cleaner, causing cracking or pitting.
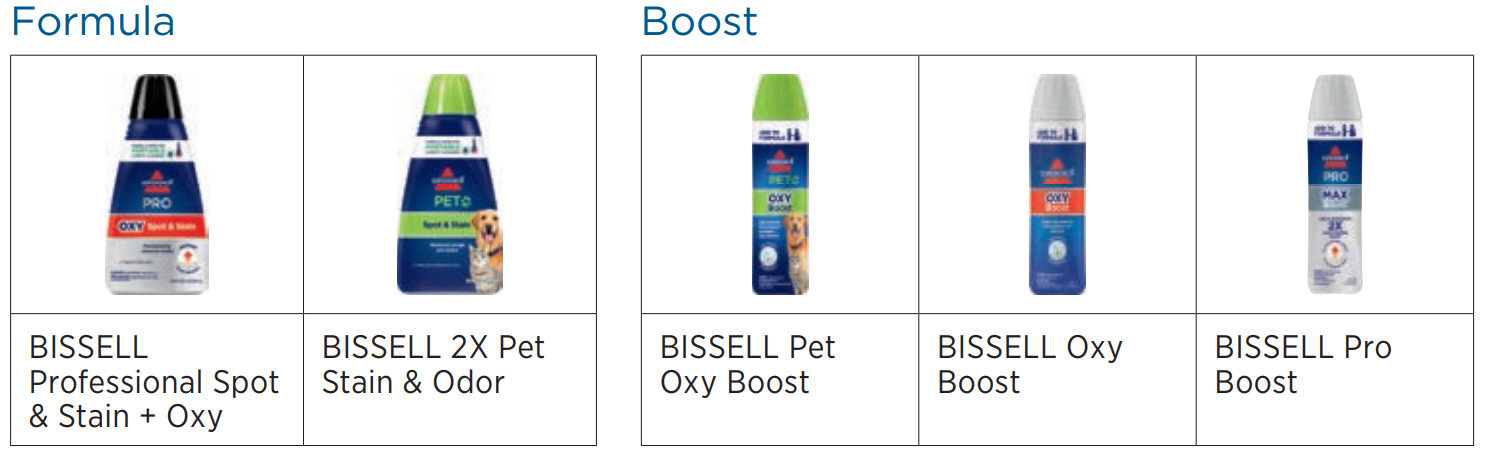
Cleaning Formula
Find more formulas at https://www.bissell.com/
Keep plenty of genuine BISSELL® Spot & Stain Cleaner formula for portable spot cleaning machines on hand so you can clean whenever it fits your schedule.
Note: Always use genuine BISSELL cleaning formulas.
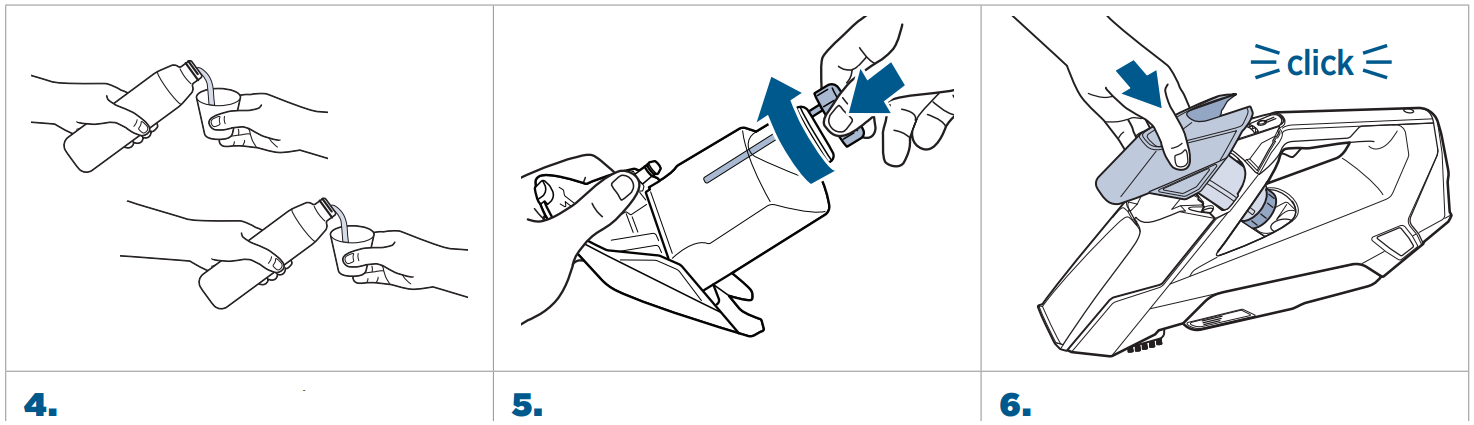
Filling the Formula Tank
- Pull the tank away at an angle to remove it from the machine.
- Twist and remove the tank cap.
Add formula to the indicated fill line on the Formula Tank.
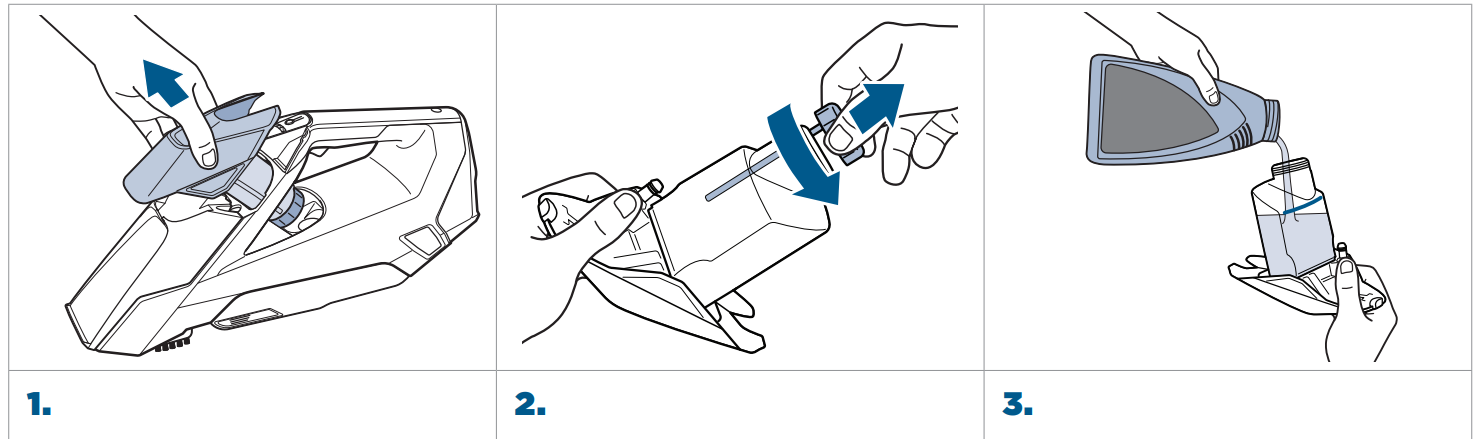
NOTE: No water is needed when using BISSELL Portable Deep Cleaning Formula.- If desired, add 1/2 ounce of BISSELL BOOST Formula to 2X Pet Stain & Odor formula.
- Twist to replace the cap on the tank.
- Return the tank to the machine and make sure it is fully seated.
Spot Cleaning Carpet & Upholstery
- Push Power Switch to turn the machine ON. Battery status lights will illuminate to show how much battery remains.
- Hold the machine above soiled surface and press the trigger to spray formula.
For stubborn spots, use brush to gently scrub soiled area while continuing to spray formula.
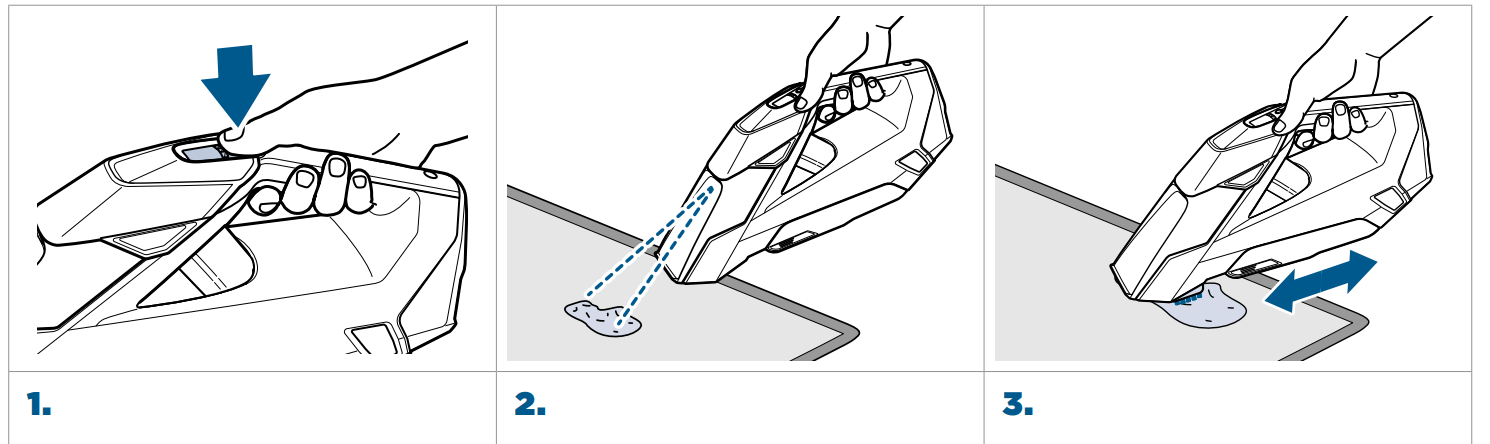
- For maximum suction performance, tilt machine upward and press nozzle down firmly on cleaning surface.

IMPORTANT: Check the manufacturer’s tag before cleaning the upholstery. “W” or “WS” on the tag means you can use your Pet Stain Eraser. If the tag is coded with an “S” (with diagonal strike-through), or says “Dry Clean Only,” do not proceed. If the manufacturer’s tag is missing or not coded, check with your furniture dealer.
WARNING Keep spray away from face. Failure to do so may result in personal injury.
Window Cleaning (select models)
This machine is safe to use with any off-the-shelf ammonia-based window cleaning solutions. Do not attempt to use any other types of cleaning fluids, such as lemon-based, pine-based or solvent based cleaning fluids, as it may damage your machine and void your warranty.
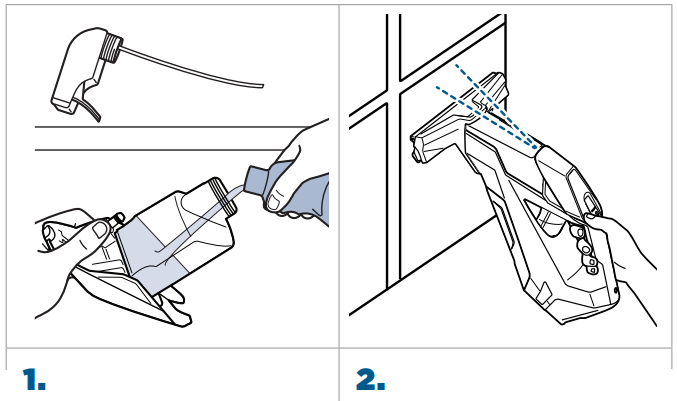
Attach Window Cleaning Tool
- Remove scrubbing brush by pushing tab up and pulling gently.
- Attach Window Cleaning Tool by first securing on the clear nozzle. Then rotate tool until it clicks into place.
Choose Your Cleaning Method
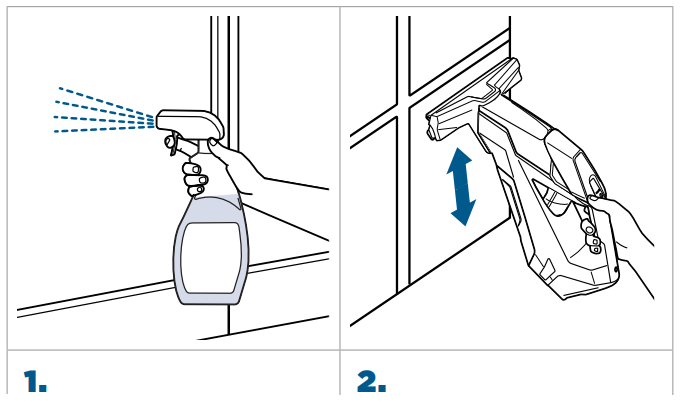
Method 1: Fill Formula Tank with Window Cleaner (not included)
- Rinse tank to remove any previous contents. Fill with window cleaner (not included).
- Hold machine vertically in front of window. Press Spray Trigger to spray cleaner. Release and use the sponge to gently scrub.
Method 2: Spray Window Cleaner onto Window
- Spray window cleaning solution directly on the window.
- With Spray Trigger released, use the sponge on the tool to gently scrub.
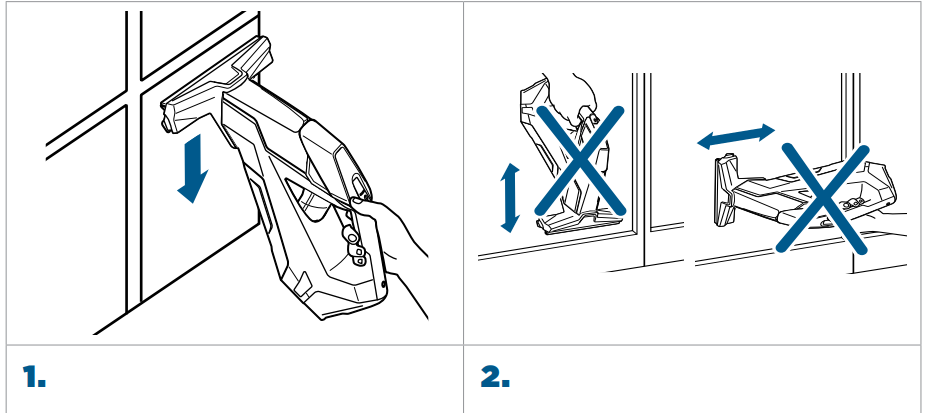
Squeegee the Window
- With trigger released, tilt machine down to engage the squeegee. Clean with complete vertical strokes and work across entire window.
- When cleaning, ensure squeegee is against window for optimal suction and hold machine in upright position.
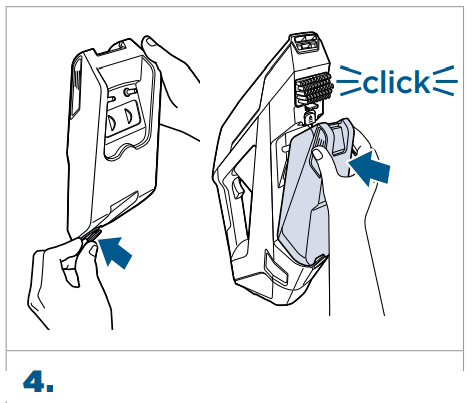
Emptying the Dirty Water Tank
- Ensure the machine is OFF and set upright on a flat surface. Push up on the release button located on the top of the Dirty Water Tank.
- Carefully remove the tank from the machine and carry to a sink. To prevent spills, hold tank vertically after removing.
To empty, pull tab at the end of the tank and empty to remove the dirty water. Rinse out the tank with clean water after emptying.
Close the tank plug and return tank to the machine. Ensure the tank is secure before use.
WARNING To reduce the risk of fire, electric shock or injury, turn power OFF and disconnect from charger before performing maintenance or troubleshooting.
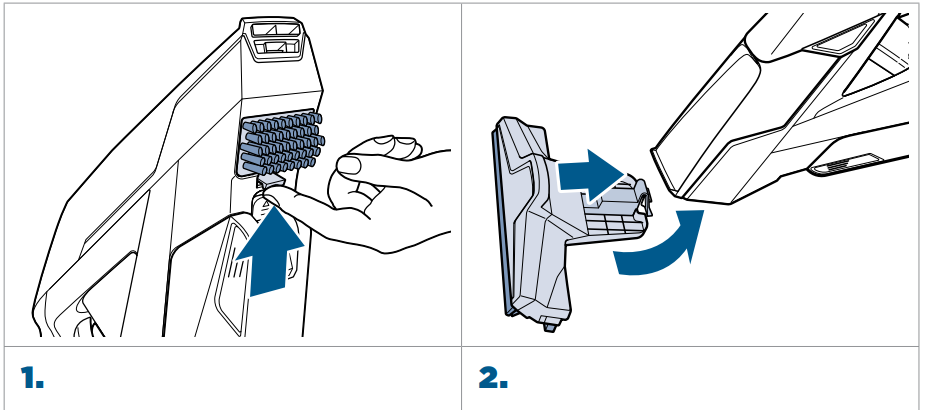
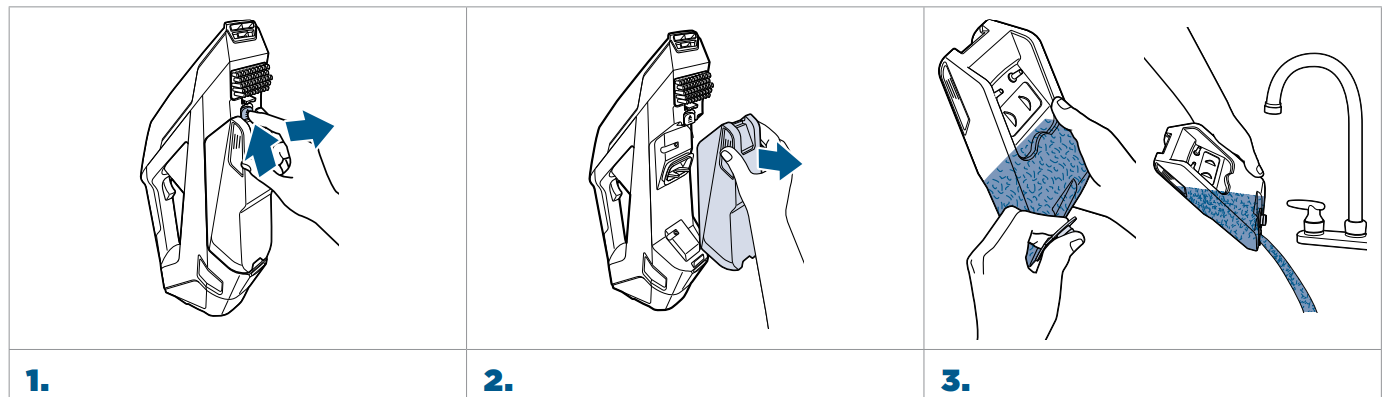
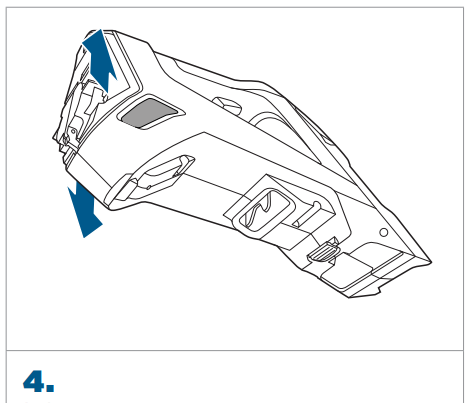
Cleaning the Nozzle and Brush
- The front nozzle of the machine removes for easy cleaning of dirt and debris. Remove the Formula Tank and locate the latch at the top of the nozzle. Pull tab and rotate back to separate from machine.
- Rinse nozzle with clean water and check spray nozzle for dirt or debris.
Replace the front nozzle by hooking lower edge onto machine and snapping into place. Then place the Formula Tank back on the machine.
Note: Ensure nozzle clicks into place and that it’s properly installed prior to replacing Formula Tank. If nozzle does not click, then the seal isn’t made and will significantly reduce suction.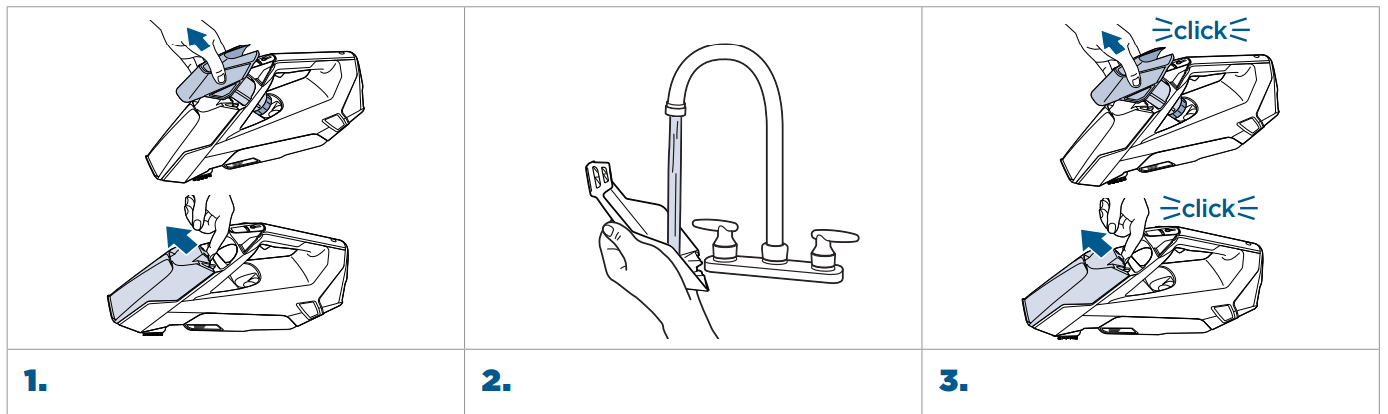
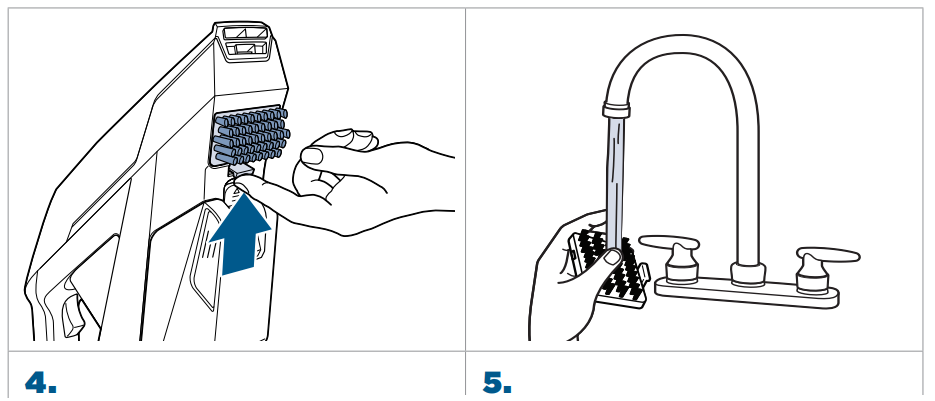
- Ensure the machine is OFF and set upright on a countertop or flat surface. Remove the Scrubbing Brush by lifting the tab up and pulling gently to release.
- Rinse brush with clean water and check brush for debris. Once cleaned, insert brush by aligning the top of the brush into the machine and snap into place. Ensure it is secure before using.
Storing Your Machine
Before storing your machine, ensure Dirty Water Tank is empty. Machine should not be left on its side with water in the Dirty Water Tank. Store your machine in a protected, dry area.
NOTICE : To reduce the risk of a leaking condition, do not store where freezing may occur. Damage to internal components may result.
WARNING : To reduce the risk of fire, electric shock or injury, turn power OFF and disconnect from charger before performing maintenance or troubleshooting.
Disposing of the Batteries
Before proceeding, ensure that
- the machine is disconnected from the charger
- the Formula Tank, Dirty Water Tank, nozzle and brush have been removed from machine (see removal instructions on pages 4, 7-8)
- you have a flat-head and Phillips screwdriver, required for disassembly
- Remove the cover on the base of the machine by using a flat-head screw driver.
- Remove the screw near the LED window using a Phillips-head screwdriver. Then, remove entire top handle portion from machine by using a flathead screwdriver.
Using a Phillips-head screwdriver, remove seven screws in the locations referenced in the image.
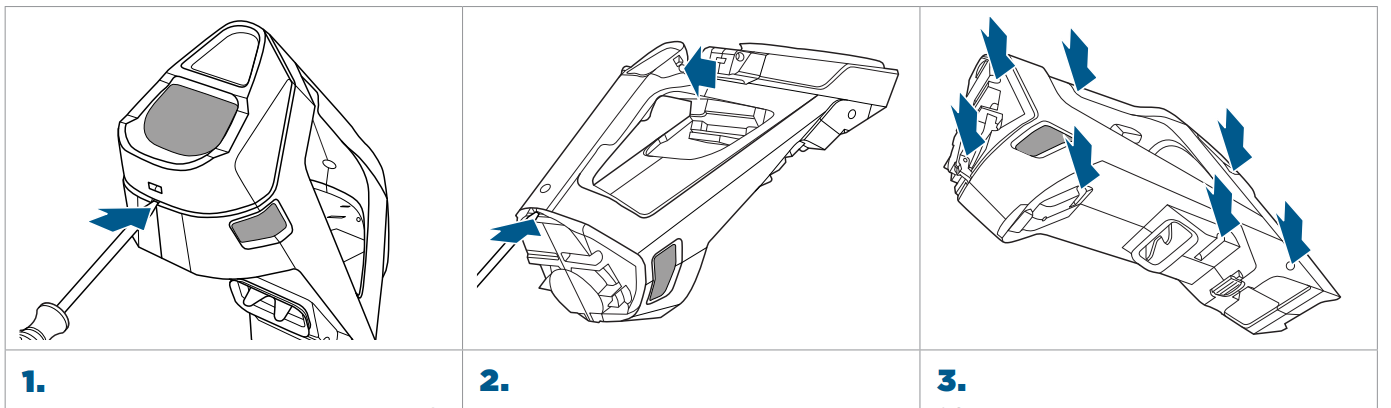
- Remove product rating label. Pull open the housing on the base of the machine in opposite directions. Disconnect and remove the entire battery assembly. Keep battery assembly together – DO NOT separate individual batteries.
NOTE: Disconnecting the battery will destroy the appliance and invalidate the warranty.
WARNING: This product contains lithium-ion rechargeable batteries. According to Federal
and State regulations, removal and proper disposal of lithium-ion batteries is required. For removal of the batteries in your Pet Stain Eraser™, see instructions on this page. For specific disposal instructions of batteries, please contact the RBRC (Rechargeable Battery Recycling Corporation) at 1-800-822-8837 or visit Call2Recycle.org.
IMPORTANT SAFETY INSTRUCTIONS
WARNING
TO REDUCE THE RISK OF FIRE, ELECTRIC SHOCK OR INJUR
- Keep hair, loose clothing, fingers, and all parts of body away from openings and moving parts of the appliance and its accessories.
- Use only the type and amount of liquids specified under the Operations section of this guide.
- Unplug charger from outlet when not in use and before servicing.
- Always connect to a proper electrical socket.
- Do not modify plug.
- Do not expose to rain. Store indoors.
- Do not allow to be used as a toy. Close attention is necessary when used by or near children.
- Use only as described in the user guide.
- Use only manufacturer’s recommended attachments.
- Do not use with damaged charger, cord or plug.
- Do not immerse in water or liquid.
- If appliance is not working as it should, has been dropped, damaged, left outdoors, or dropped into water; do not attempt to operate it and have it repaired at an authorized service center.
- Do not pull or carry charger by the cord, use cord as a handle, close a door on cord, or pull cord around sharp edges or corners. Do not run appliance over cord.
- Keep charger away from heated surfaces.
- Do not unplug charger by pulling on cord.
- To unplug, grasp the plug, not the cord.
- Do not handle charger, including charger plug and charger terminal with wet hands.
- Do not put any object into openings.
- Do not use with any opening blocked; keep free of dust, lint, hair, and anything that may reduce air flow.
- Use extra care when cleaning on stairs.
- Turn OFF all controls before plugging or unplugging appliance.
- Do not use to pick up flammable or combustible liquids, such as gasoline, or use in areas where they may be present.
- Do not pick up toxic material (chlorine bleach, ammonia, drain cleaner, etc.)
- Do not pick up anything that is burning or smoking, such as cigarettes, matches or hot ashes.
- Do not use appliance in an enclosed space filled with vapors given off by oil-based paint, some moth-proofing substances, flammable dust, or other explosive or toxic vapors.
- Do not pick up hard or sharp objects such as glass, nails, screws, coins, etc.
- Do not use a flammable or combustible liquid.
- Prevent unintentional starting. Ensure the switch is in the OFF-position before picking up or carrying the appliance. Carrying the appliance with your finger on the switch or energizing appliance that can turn the switch on invites accidents.
- Under abusive conditions, liquid may be ejected from the battery; avoid contact. If contact accidentally occurs, flush with water. If liquid contacts eyes, additionally seek medical help. Liquid ejected from the battery may cause irritation or burns.
- Do not use appliance that is damaged or modified. Damaged or modified batteries may exhibit unpredictable behavior resulting in fire, explosion or risk of injury.
- Do not expose appliance to fire or excessive temperature. Exposure to fire or temperature above 130°C/265°F may cause explosion.
- Follow all charging instructions and do not charge the appliance outside of the temperature range specified in the instructions. Charging improperly or at temperatures outside of the specified range may damage the battery and increase the risk of fire.
- Have servicing performed by a qualified repair person using only identical replacement parts. This will ensure that the safety of the product is maintained.
- Do not modify or attempt to repair the appliance except as indicated in the instructions for use and care.
- Keep the temperature range of between 4-40°C/40-104°F when charging battery, storing machine or during use.
- Only use with the following chargers; SIL Model SSA-100060US, E-tek Model ZD0006C100063USE, or SUNWARD Model AD12BUH100063.
- Recharge only with the charger specified by the manufacturer. A charger that is suitable for one type of battery pack may create a risk of fire when used with another battery pack.
Troubleshooting of PET STAIN ERASER Cleaner
| Problem | Possible Cause | Remedies |
|---|---|---|
| Machine is leaking | Formula Tank is not properly seated. | Ensure tank is fully seated, see page 4. |
| Dirty Water Tank plug is not sealed properly. | Ensure tank plug is sealed properly, see page 5. | |
| Dirty Water Tank is full. | Empty tank. Machine should not be left on its side with water in the tank. | |
| Machine is not level. | Ensure machine is upright. | |
| Formula Tank cap is not properly threaded. | Ensure cap is properly threaded on tank. If issue does not resolve, contact Consumer Care. | |
| Machine is not powered or underpowered | Charger plug/cord not connected. | Make sure charger plug is completely plugged into wall outlet and charging cord is completely plugged into port on back of machine. |
| Not the correct charger. | Use only the charger that comes with the machine. | |
| Formula Tank is empty. | Refill tank. | |
| Pump not primed. | While the machine is turned ON, press Spray Trigger and gently rock Pet Stain Eraser™ back and forth. | |
| Reduced spray or no spray | Batteries weak/undercharged. | Recharge according to instructions. |
| Spray tip clogged. | Rinse tip with clean water. | |
| Formula Tank not fully inserted. | Ensure tank is securely seated by removing and then replacing. | |
| Reduced suction or no suction | Dirty Water Tank drain plug is loose. | Check plug for snug fit. |
| Dirty Water Tank not properly installed. | Snap tank into place. | |
| Removable Nozzle improperly installed. | Remove and reinstall nozzle. |
Warranty of Bissell PET STAIN ERASER Cleaner
2-Year limited warranty, may vary by state.
Pros & Cons of PET STAIN ERASER Cleaner
Pros
- Portable and lightweight design
- Powerful and effective cleaning solution
- Multiple cleaning tools for versatility
- Safe to use on all types of carpets and upholstery
- Affordable price
Cons
- Small tank size may require frequent refilling
- The power cord may be too short for some users
- Not designed for cleaning large areas
Customer Reviews about Bissell PET STAIN ERASER Cleaner 2002
Customers love the Bissell PET STAIN ERASER Cleaner for its portability, versatility, and effective cleaning solution. The device has received an average rating of 4.5 out of 5 stars from thousands of customers, with many praising its ease of use and effectiveness. However, some customers have complained about the small tank size and short power cord. Overall, the PET STAIN ERASER Cleaner is a highly rated and popular choice among pet owners.
Faqs
What distinguishes the Bissell PET STAIN ERASER 2002 from other cleaning machines?
What kind and duration of battery does the Bissell PET STAIN ERASER 2002 use?
Is it possible to use the Bissell PET STAIN ERASER 2002 on any kind of carpet or fabric?
After using my Bissell PET STAIN ERASER 2002, how should I clean the nozzle and brush?
What actions should I take to ensure that my Bissell PET StAIN ERASER 2002 is correctly charged?
How should the cleaning solution be added to the Bissell PET Stain Eraser 2002?
When I use my Bissell PET STAIN ERASER 2002, how should I dispose of the contaminated water properly?
What should I do if my Bissell PET STAIN ERASER 2002's suction becomes less strong?
Can I use cleaning solutions from a store or make my own for my Bissell PET StAIN ERASER 2002?
What does the Bissell PET STAIN ERASER 2002 warranty cover?
Leave a Comment