Configuration: Asus Motherboard Prime Z390-A User Manual
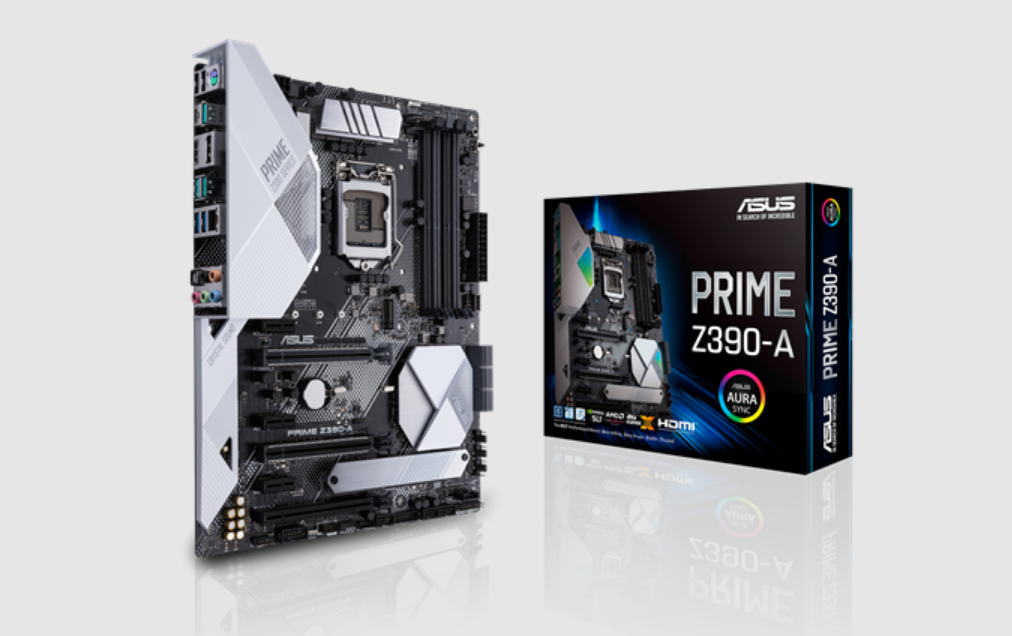
Content
Introduction
The ASUS Motherboard Prime Z390-A is a high-performance motherboard designed for Intel's 8th and 9th generation processors, featuring the LGA 1151 socket. It supports DDR4 memory up to 4266 MHz and offers advanced features such as AI Overclocking, dual M.2 slots for SSDs, and comprehensive cooling controls. With its robust power delivery system and user-friendly UEFI BIOS, the Prime Z390-A is ideal for gamers and content creators alike. This motherboard is priced at approximately $159.99.
ASUS Motherboard Prime Z390-A Package contents
Check your motherboard package for the following items.
- Motherboard
- 1 x PRIME Z390-A motherboard
- Cables
- 3 x Serial ATA 6.0Gb/s cables
- Accessories
- 1 x SLI HB Bridge (2-WAY-M)
- 1 x ASUS Q-Shield
- 1 x Q-connector
- 1 x M.2 screw package
- 1 x CPU FAN Holder
- Application DVD
- 1 x Motherboard support DVD
- Documentation
- 1 x User guide
NOTE: If any of the above items is damaged or missing, contact your retailer.
Installation tools and components
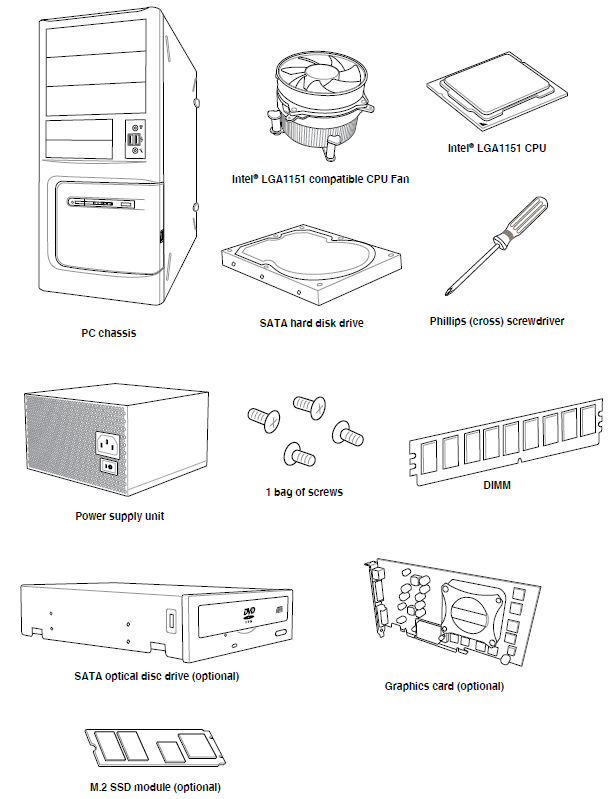
NOTE: The tools and components above are not included in the motherboard package.
PRIME Z390-A specifications summary
CPU | Intel® Socket 1151 for Intel® Core™ 9000 series, 8thGeneration Core™ i7 / i5 / i3, Pentium® and Celeron® processors Supports 14nm CPU Supports Intel® Turbo Boost Technology 2.0* * Intel® Turbo Boost Technology 2.0 support depends on the CPU type. ** Refer to www.asus.com for CPU support list. |
Chipset | Intel® Z390 Chipset |
Memory | 4 x DIMM, max. 64GBDDR4 4133+(OC)* / 4000(OC)* / 3866(OC)* / 3733(OC)* / 3600(OC)* / 3466(OC)* / 3400(OC)* / 3333(OC)* / 3300(OC)* / 3200(OC)* / 3000(OC)* / 2800(OC)* / 2666 / 2400 / 2133 MHz, non-ECC, un-buffered memory Dual channel memory architecture Supports Intel® Extreme MemoryProfile (XMP) * The maximum memoryfrequency supported variesby processor. Please refer to Memory QVL(Qualified Vendors List) for details. |
Expansion Slots | Intel® Socket 1151 forIntel® Core™ 9000 series, 8th Generation Core™ i7 / i5 / i3, Pentium® and Celeron® processors
Intel® Z390 Chipset
1 x PCIe 3.0 x16 slot (max. at x4 mode)** * Hyper M.2 X16series card soldseparately. Install a Hyper M.2X16 series card and enable thiscard under BIOSsettings. ** The PCIe x16_3slot shares bandwidth with SATA_5 andSATA_6. The PCIe x16_3 is defaultset at x2 mode. |
Multi-GPU Support | Supports NVIDIA® 2-Way/Quad-GPU SLI™ Technology Supports AMD® 3-Way/Quad-GPU CrossFireX™ Technology |
Graphic | Integrated Graphics Processor- Intel® UHD Graphics support Multi-VGA output support: HDMI/DisplayPort port
Supports Intel® InTru™ 3D/Quick Sync Video/Clear Video HD Technology/Insider™ |
USB | Intel® Z390 Chipset
|
Storage | Intel® CPU support with Intel® Rapid Storage Technology (RAID 0 & RAID 1)
Intel® Z390 Chipset support with Intel RapidStorage Technology (RAID 0, 1, 5, 10) - 1 x M.2_1Socket 3 with M Key, type 2242/2260/2280/2280 storage devicessupport (both SATA& PCIE mode)** - 1 x M.2_2Socket 3 with M Key, type 2242/2260/2280/22110 storage devices support (PCIE x4 mode)
* Hyper M.2 X16series card soldseparately. Install a Hyper M.2X16 series card and enable thiscard under BIOSsettings. ** The M.2_1 socketshares bandwidth with SATA6G_2 port when using M.2 SATA devices. Adjust BIOS settings to use a SATA device. |
LAN | Intel® I219-V GigabitLAN ASUS LAN Guard ASUS Turbo LANUtility |
Audio | Realtek® S1220A 8-channel highdefinition audio CODEC featuring CrystalSound 3
- Internal audio Amplifier to enhance thehighest quality sound for headphone and speakers
- Supports up to 32-Bit/192kHz playback*
Audio Features:
* Due to limitations in HDAbandwidth, 32-Bit/192kHz is not supported for 8-Channel audio. 32-Bit/192kHz is only available under Windows® 10. |
ASUS Special Features | 5-Way Optimization by Dual Intelligent Processors 5 - 5-WayOptimization tuning keyperfectly consolidates TPUInsight, EPU Guidance, DIGI+VRM, Fan Expert4, and Turbo App
selection for optimized system cooling control
audio scene configuration for selected applications.
ASUS OptiMem II
UEFI BIOS
- EZ Tuning Wizard AURA
ASUS Exclusive Features
ASUS 5X Protection III - ASUS SafeSlot Core: Fortified PCIewith solid soldering
Q-Design
|
ASUS Quiet Thermal Solution |
|
Back I/O Ports | 1 x PS/2 keyboard/mouse comboport 1 x HDMI port
2 x USB 3.1 Gen1 ports[blue] 4 x USB 3.1Gen2 ports (3 x Type-A[teal blue] and1 x TypeC™ ports) 1 x LAN (RJ45) port 5 x Audio jacks 1 x Optical S/PDIF out |
Internal I/O Ports | 1 x USB 3.1Gen 1 frontpanel TypeC™ connector 1 x USB 3.1Gen 1 headersupports additional 2 USB 3.1Gen 1 ports (19-pin) 3 x USB 2.0 headerssupport additional 6 USB 2.0 ports 6 x SATA6Gb/s ports 1 x M.2 Socket3 with M Key, type2242/2260/2280 storage devices support (bothSATA & PCIe 3.0 x 4 modes) 1 x M.2 Socket3 with M Key, type2242/2260/2280/22110 storage devices support (PCIe 3.0 x 4 mode) 1 x 4-pin CPU FAN connector 1 x 4-pin CPU_OPT fan connector 2 x 4-pinChassis fan connectors 1 x M.2 FAN connector 1 x 4-pinAIO_PUMP connector 1 x 4-pinW_PUMP+ connector 1 x EXT_FAN header 1 x Thermal sensor connector 1 x 24-pin EATX power connector 1 x 8-pin EATX 12V power connector 2 x Aura RGB headers 1 x MemOK! II switch 1 x Node connector 1 x Power-on button 1 x Thunderbolt header(5-pin) for ASUS ThunderboltEX series support 1 x Clear CMOS jumper(2-pin) 1 x COM port 1 x TPM header 1 x CPU OV header 1 x Front panelaudio connector (AAFP) 1 x System Panel(Q-Connector) |
BIOS | 128 Mb Flash ROM, UEFIAMI BIOS, PnP,SM BIOS 3.1,ACPI 6.1, Multi-language BIOS, ASUS EZ Flash 3, CrashFree BIOS 3, F11 EZ Tuning Wizard, F6 Qfan Control, F3 My Favorites, Last Modified log, F9 Search,F12 PrintScreen, and ASUS DRAM SPD (Serial Presence Detect) memoryinformation |
Manageability | WfM 2.0, DMI 3.0,WOL by PME,PXE |
Support DVD | Drivers ASUS Utilities ASUS EZ Update Anti-virus software (OEM version) |
Operating System Support | Windows® 10 64-bit |
Form Factor | ATX Form Factor, 12”x 9.6” (30.5cm x 24.4 cm) |
Specifications are subject to change without notice. Please refer to the ASUS website for the latest specifications
Description
The ASUS Prime Z390-A is built with durability and performance in mind. The motherboard features a robust power delivery system with a 12+2 phase design, ensuring stable power to the CPU and other components. It also includes advanced cooling solutions such as comprehensive fan controls and heat sinks to keep temperatures under control during intense usage.
The audio system, powered by the SupremeFX S1220, offers high-quality sound with DTS Sound Unbound technology. The motherboard also includes high-speed networking with Intel I219-V Gigabit LAN and extensive USB connectivity options.
Basic Installation
Building your PC system
The diagrams in this section are for reference only. The motherboard layout may vary with models, but the installation steps are the same for all models.
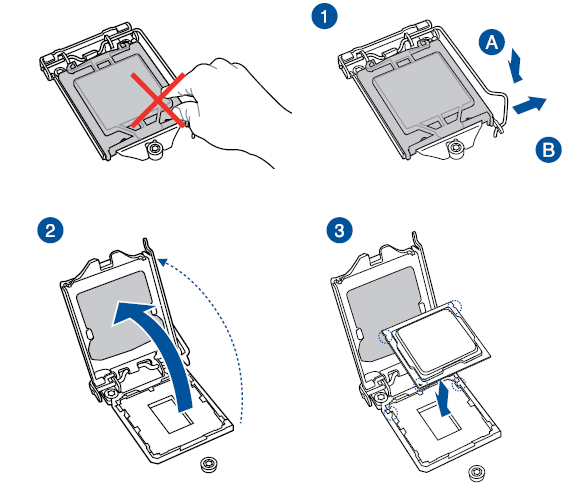
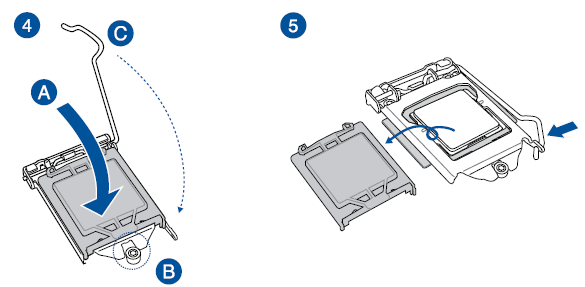
CPU installation
WARNING
- Ensure that you install the correct CPU designed for the LGA1151 socket only. DO NOT install a CPU designed for LGA1155 and LGA1156 sockets on the LGA1151 socket.
- ASUS will not cover damages resulting from incorrect CPU installation/removal, incorrect CPU orientation/placement, or other damages resulting from negligence by the user.
Cooling system installation
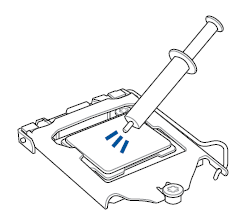
WARNING
Apply Thermal Interface Material to the CPU cooling system and CPU before you install the cooling system, if necessary.
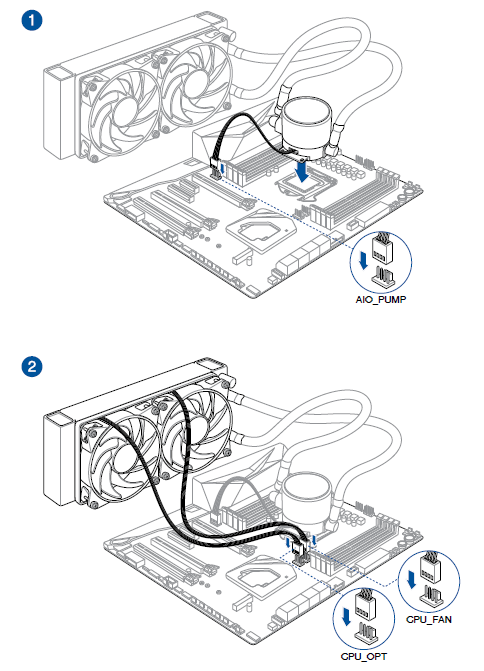
To install a CPU heatsink and fan assembly

To install an AIO cooler
Motherboard installation
- Place the motherboard into the chassis, ensuring that its rear I/O ports are aligned to the chassis’ rear I/O panel.
Place nine (9) screws into the holes indicated by circles to secure the motherboard to the chassis.
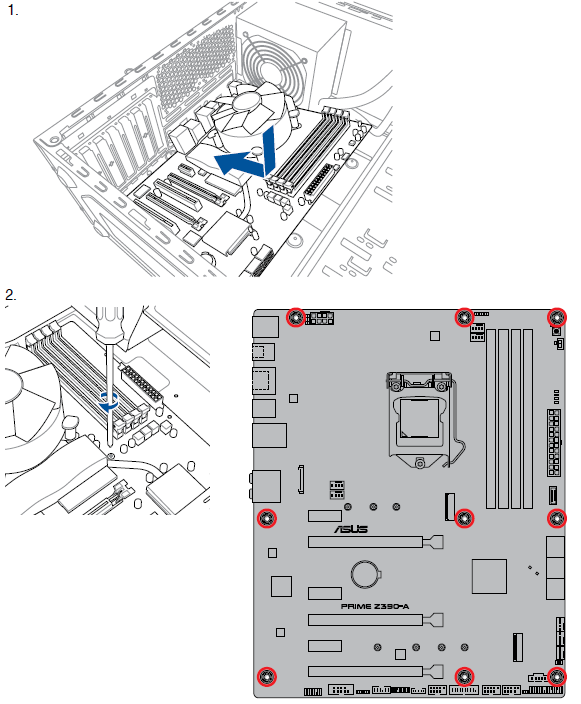
WARNING: DO NOT overtighten the screws! Doing so can damage the motherboard.
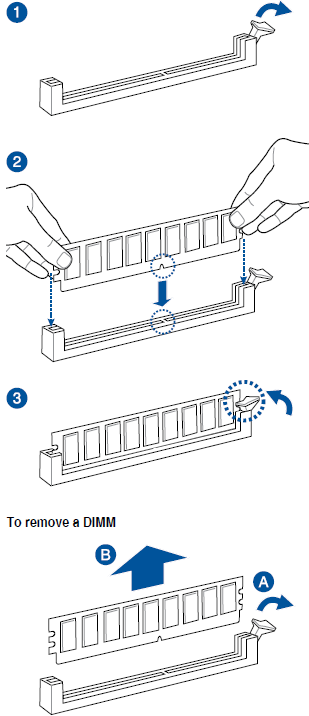
DIMM installation
ATX power connection
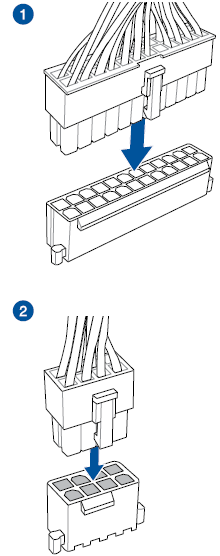
WARNING: Ensure to connect the 8-pin power plug, or connect both the 8-pin and 4-pin power plugs.
SATA device connection
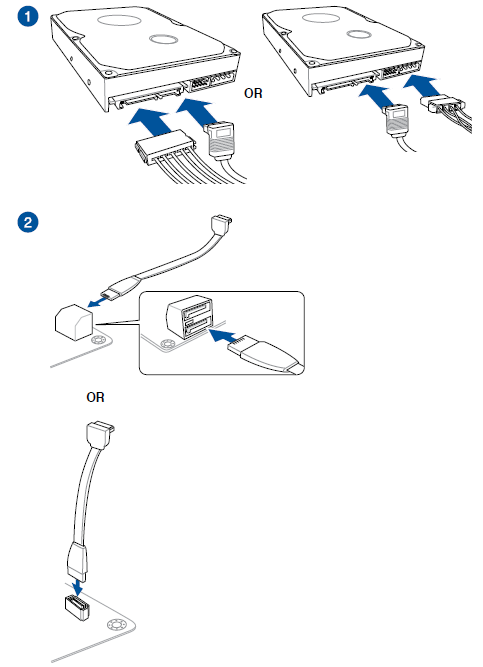
Front I/O connector
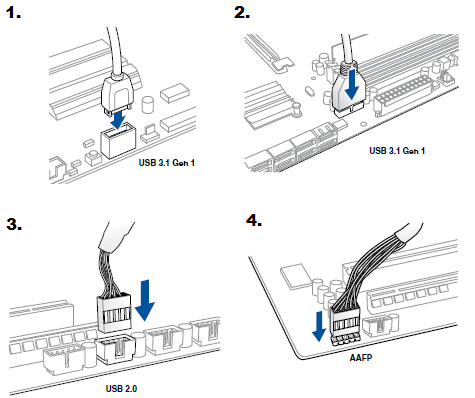
- To install USB 3.1 Gen 1 front panel connector
- To install USB 3.1 Gen 1 connector
WARNING: This connector will only fit in one orientation. Push the connector until it clicks into place. - To install USB 2.0 connector
- To install front panel audio connector
Expansion card installation
- To install PCIe x16 cards
To install PCIe x1 cards
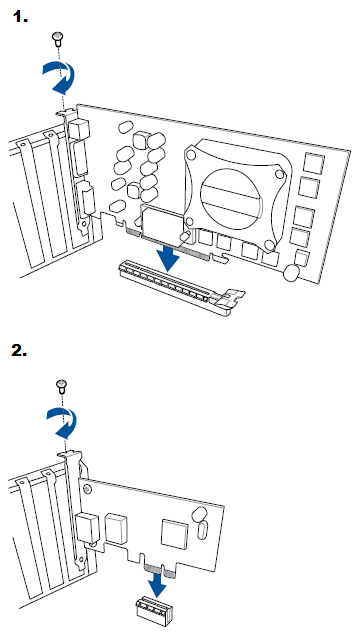
To install FAN EXTENSION CARD
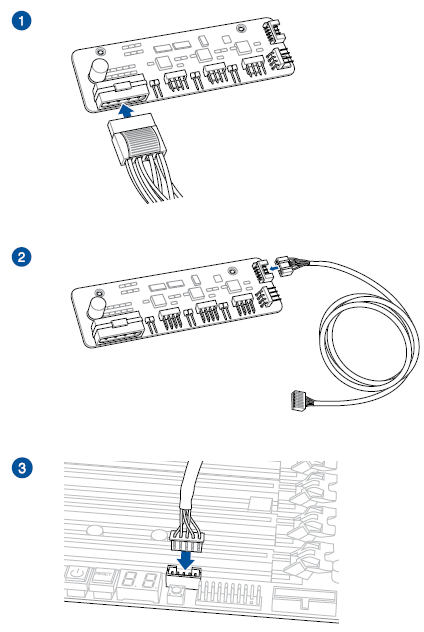
WARNING- The illustrations in this section are for reference only. The motherboard layout may vary with models, but the installation steps are the same for all models.
- The FAN Extension card is purchased separately.
To install the ThunderboltEX 3 card
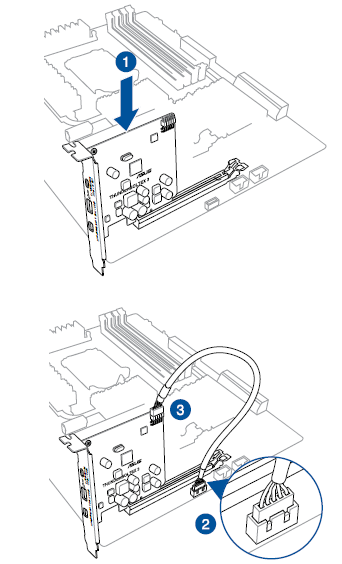
M.2 installation
- For type 22110 M.2 on M.2_2 socket
For type 2242 / 2260 / 2280 M.2 on M.2_2 socket
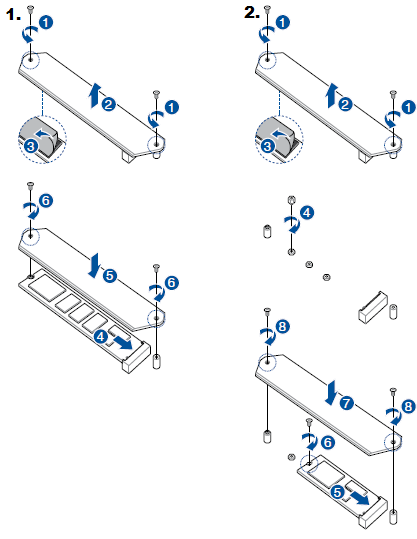
ASUS fan holder installation
To install the ASUS fan holder and fan

WARNING: When using high performance settings whilst overclocking, ensure to install the fan holder for additional fan(s).
NOTE:
- You may install 12V (1A, 12W), 40mm x 40mm fans or 50mm x 50mm fans.
- Ensure to the use the bundled screws that came with your fans.
- Fans are purchased separately.
Motherboard rear and audio connections
Rear I/O connection
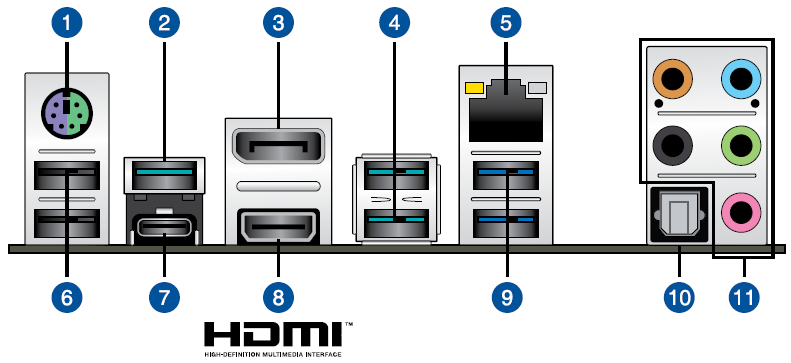
Rear panel connectors |
1. PS/2 mouse/keyboard combo port |
2. USB 3.1 Gen 2 Type-A port3 |
3. DisplayPort |
4. USB 3.1 Gen 2 Type-A ports1 and 2 |
5. LAN (RJ-45) port* |
6. USB 2.0 Type-Aports 13 and 14 |
7. USB 3.1 Gen 2 Type-C™port C4 |
8. HDMI port |
9. Intel® USB 3.1Gen 1 ports 9 and 10 |
10. Optical S/PDIFOUT port |
11. Audio I/O ports** |
* and ** : Refer to the tables on the next page for LAN port LEDs, and audio port definitions.
NOTE
- USB 3.1 Gen 1/Gen 2 devices can only be used as data storage only.
- We strongly recommend that you connect your devices to ports with matching data transfer rate. Please connect your USB 3.1 Gen 1 devices to USB 3.1 Gen 1 ports and your USB 3.1 Gen 2 devices to USB 3.1 Gen 2 ports for faster and better performance for your devices.
- Due to the design of the Intel chipset, all USB devices connected to the USB 3.1 Gen 1 ports are controlled by the xHCI controller. Some legacy USB devices must update their firmware for better compatibility.
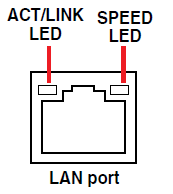
* LAN ports LED indications
Activity Link LED | Speed LED | ||
Status | Description | Status | Description |
OFF | No link | OFF | 10 Mbps connection |
ORANGE | Linked | ORANGE | 100 Mbps connection |
BLINKING | Data activity | GREEN | 1 Gbps connection |
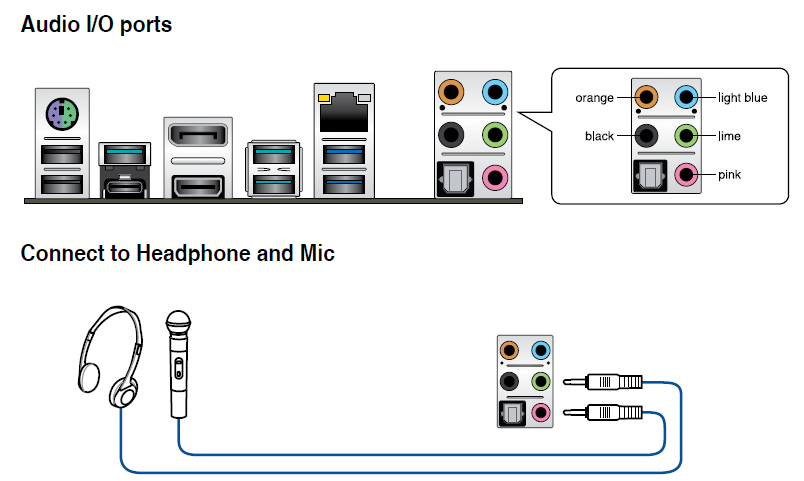
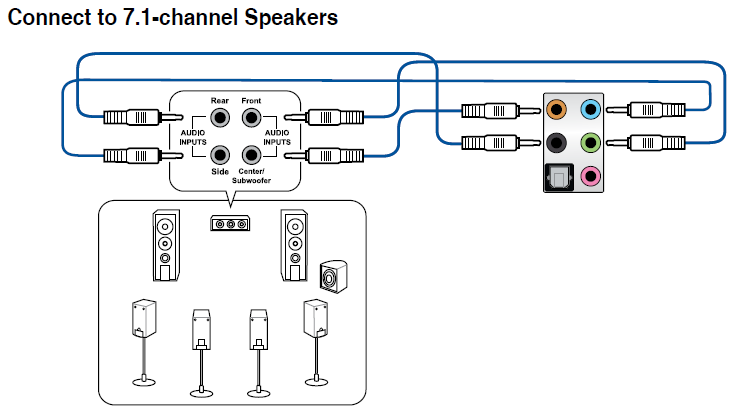
** Audio 2, 4, 5.1 or 7.1-channel configuration
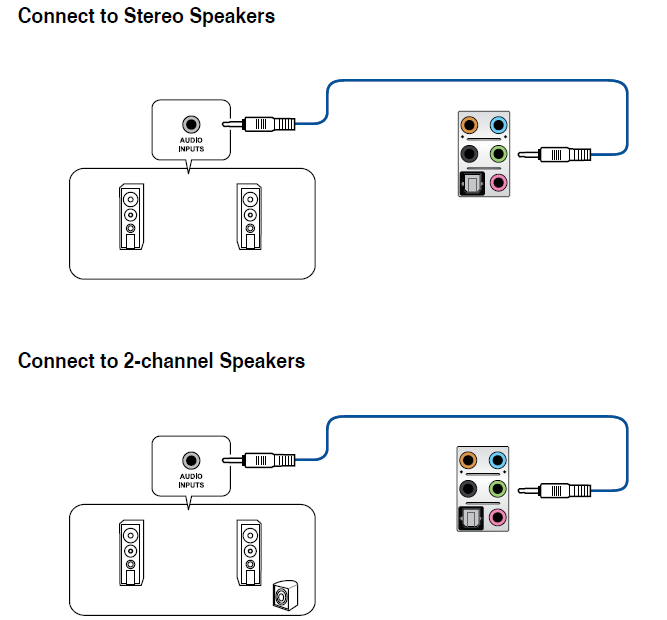
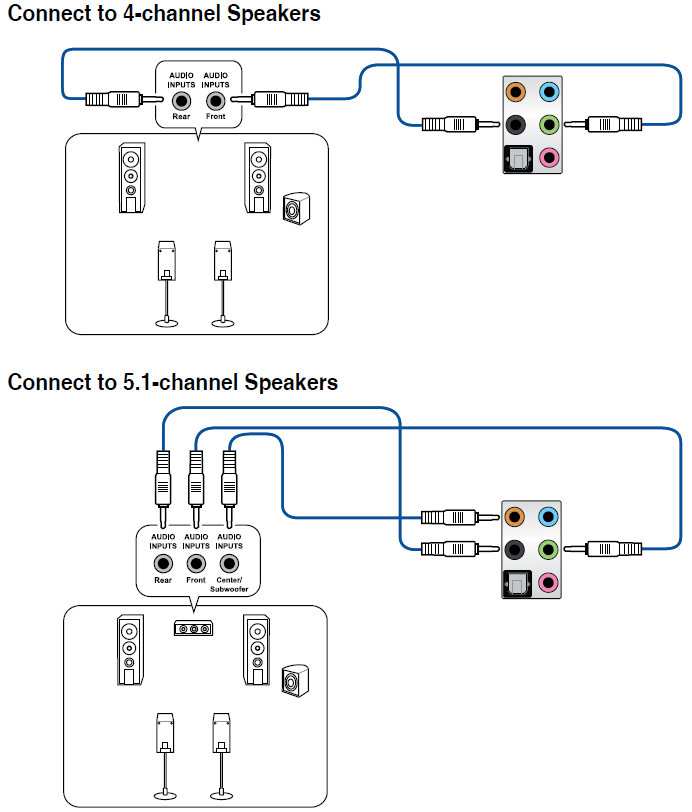
Port | Headset 2-channel | 4-channel | 5.1-channel | 7.1-channel |
Light Blue | Line In | Line In | Line In | Side Speaker Out |
Lime | Line Out | Front Speaker Out | Front Speaker Out | Front Speaker Out |
Pink | Mic In | Mic In | Mic In | Mic In |
Orange | – | – | Center/Sub woofer | Center/Sub woofer |
Black | – | Rear Speaker Out | Rear Speaker Out | Rear Speaker Out |
Audio I/O connections
Starting up for the first time
- After making all the connections, replace the system case cover.
- Ensure that all switches are off.
- Connect the power cord to the power connector at the back of the system chassis.
- Connect the power cord to a power outlet that is equipped with a surge protector.
- Turn on the devices in the following order:
- Monitor
- External storage devices (starting with the last device on the chain)
- System power
After applying power, the system power LED on the system front panel case lights up. For systems with ATX power supplies, the system LED lights up when you press the ATX power button. If your monitor complies with the “green” standards or if it has a “power standby” feature, the monitor LED may light up or change from orange to green after the system LED turns on.
The system then runs the power-on self tests (POST). While the tests are running, the BIOS beeps (refer to the BIOS beep codes table) or additional messages appear on the screen. If you do not see anything within 30 seconds from the time you turned on the power, the system may have failed a power-on test. Check the jumper settings and connections or call your retailer for assistance.BIOS Beep
Description
One short beep
VGA detected
Quick boot setto disabled No keyboard detected
One continuous beep followed by two short beeps then a pause (repeated)
No memory detected
One continuous beepfollowed by three
short beeps
No VGA detected
One continuous beepfollowed by four
short beeps
Hardware component failure
- At power on, hold down the <Delete> key to enter the BIOS Setup. Follow the instructions in Chapter 3.
Turning off the computer
While the system is ON, press the power button for less than four seconds to put the system on sleep mode or soft-off mode, depending on the BIOS setting. Press the power button for more than four seconds to let the system enter the soft-off mode regardless of the BIOS setting.
Setup Guide
To set up the ASUS Prime Z390-A, follow these steps:
- Unpack the motherboard and other components from their packaging.
- Install the CPU onto the motherboard, ensuring proper alignment and secure fastening of the CPU cooler.
- Add the RAM modules into the DIMM slots, making sure they are securely locked in place.
- Connect the storage devices (HDD/SSD) to the SATA and M.2 ports.
- Install the power cables from the power supply unit to the motherboard.
- Connect any additional components such as graphics cards and sound cards to their respective slots.
- Configure the BIOS settings as needed for your specific setup.
ASUS Prime Z390-A Safety information
Electrical safety
- To prevent electrical shock hazard, disconnect the power cable from the electrical outlet before relocating the system.
- When adding or removing devices to or from the system, ensure that the power cables for the devices are unplugged before the signal cables are connected. If possible, disconnect all power cables from the existing system before you add a device.
- Before connecting or removing signal cables from the motherboard, ensure that all power cables are unplugged.
- Seek professional assistance before using an adapter or extension cord. These devices could interrupt the grounding circuit.
- Ensure that your power supply is set to the correct voltage in your area. If you are not sure about the voltage of the electrical outlet you are using, contact your local power company.
- If the power supply is broken, do not try to fix it by yourself. Contact a qualified service technician or your retailer.
Operation safety
- Before installing the motherboard and adding devices on it, carefully read all the manuals that came with the package.
- Before using the product, ensure all cables are correctly connected and the power cables are not damaged. If you detect any damage, contact your dealer immediately.
- To avoid short circuits, keep paper clips, screws, and staples away from connectors, slots, sockets and circuitry.
- Avoid dust, humidity, and temperature extremes. Do not place the product in any area where it may become wet.
- Place the product on a stable surface.
- If you encounter technical problems with the product, contact a qualified service technician or your retailer.
- Your motherboard should only be used in environments with ambient temperatures between 0°C and 40°C.
Troubleshooting
If you encounter issues with your ASUS Prime Z390-A, here are some common problems and solutions:
- No Power: Check if all power cables are properly connected and if the power supply unit is functioning.
- No Display: Ensure that the graphics card is seated correctly and that the display cable is securely connected to both the monitor and the graphics card.
- Verify that all fans are working correctly and that heat sinks are properly installed.
Always refer to the user manual for detailed troubleshooting instructions and warnings.
Pros & Cons
Pros
- Robust power delivery system for stable performance
- Excellent cooling solutions with comprehensive fan controls
- High-quality audio with SupremeFX S1220
- Extensive expansion and storage options
- Durable build quality with high-grade components
Cons
- Higher price point compared to budget motherboards
- Complex setup process for beginners
- Limited RGB lighting compared to some other models
Customer Reviews
Customers have praised the ASUS Prime Z390-A for its solid build quality, excellent performance, and robust feature set. However, some users have noted that the motherboard can be quite expensive and may require a bit of a learning curve for those new to building PCs.
Common complaints include the complexity of the BIOS interface and the lack of extensive RGB lighting options.
Faqs
What is the socket type of the ASUS Motherboard Prime Z390-A?
How much RAM does the support?
What kind of storage options are available on the ASUS Motherboard Prime Z390-A?
Is the Z390-A suitable for overclocking?
What audio technology does the Motherboard Prime use?
How many USB ports does the Motherboard have?
Can I use this motherboard with older Intel processors?
Does the Z390-A come with any additional software?
Is there any warranty offered by ASUS for this motherboard?
Leave a Comment
