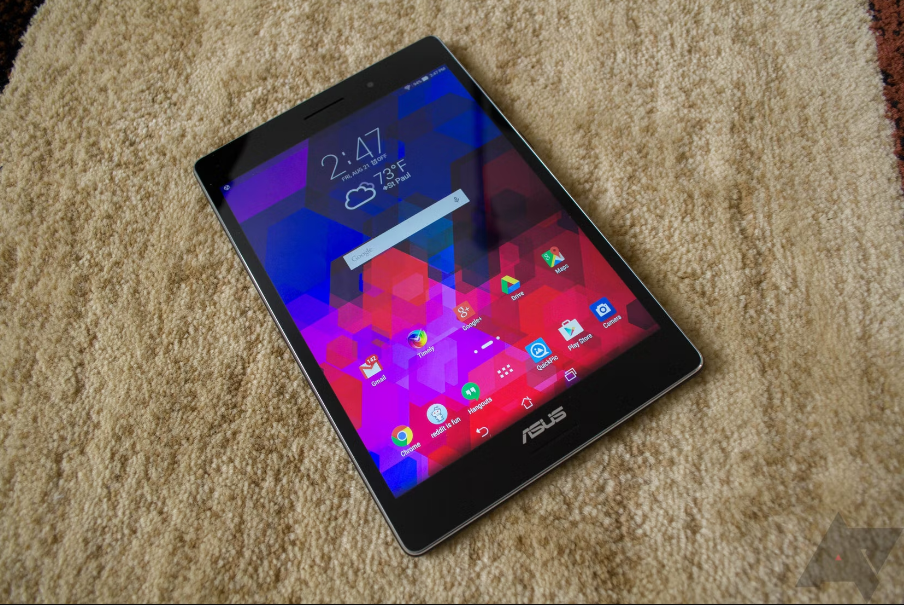
Asus Touch Screen Zenpad Tablet P00A User Guide
Content
Introduction
This adaptable 7-inch tablet, with its svelte form, potent quad-core processor, and expandable storage up to 128GB, offers a combination of flair and use. The ZenPad P00A is an ideal device for both work and pleasure, thanks to its bright display and intuitive UI. It offers smooth, effective performance for daily usage and facilitates seamless connectivity thanks to its front and rear cameras. The ASUS ZenPad P00A offers an exceptional tablet experience whether you're browsing, streaming, or working while on the road.
Specifications
| Standing screen display size | 8 Inches |
|---|---|
| Screen Resolution | 1280 x 800 |
| Max Screen Resolution | 1280*800 Pixels |
| Processor | 1.3 GHz none |
| RAM | 2 GB DDR3L SDRAM |
| Graphics Coprocessor | Intel Quad-Core |
| Card Description | Integrated |
| Wireless Type | 802.11bgn |
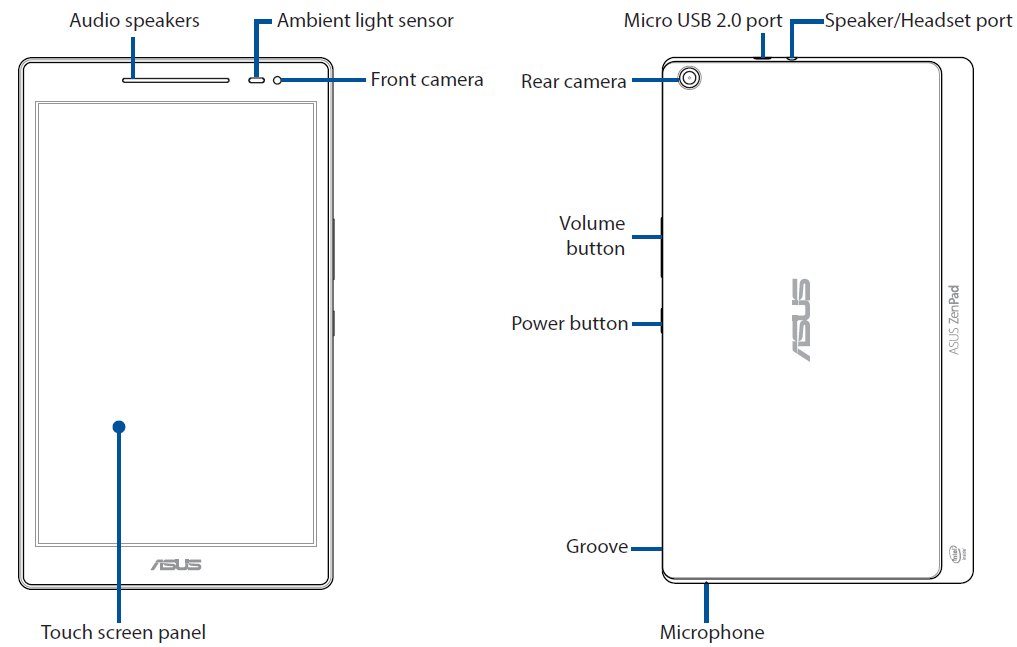
Parts and features
Take a hold of your device and have it up and running in a jiffy.
IMPORTANT!
- Keep the device, particularly the touch screen, dry all the time. Water or other liquids can cause the touch screen to malfunction.
- Avoid covering the ambient light sensor with your screen protector to ensure an accurate detection of ambient light for optimal display effect.
NOTE: The bottom side may vary in appearance depending on model.
Installing a memory card
Your ASUS Tablet supports a microSD, microSDHC, and microSDXC memory card with up to 128 GB of capacity.
NOTE: Some memory cards may not be compatible with your ASUS Tablet. Ensure that you use only compatible memory cards to prevent loss of data, damage to your device, or memory card, or both.
CAUTION! Be extra careful when handling a memory card. ASUS is not responsible for any data loss or damage incurred to your memory card.
To install a memory card:
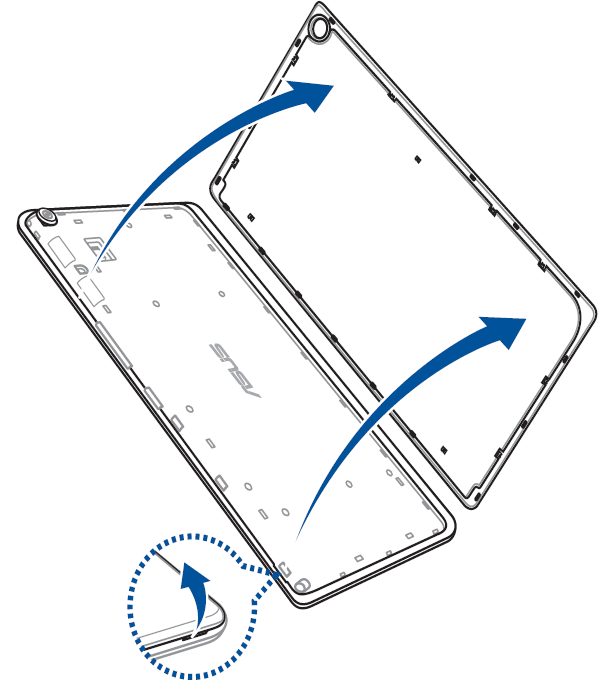
- Locate the groove on the bottom-right corner and pull the back cover outwards until it is removed completely.
CAUTION!- Be careful not to damage the back cover or injure your fingernails when you remove the cover.
Do not forcibly remove, shear, or distort the back cover.
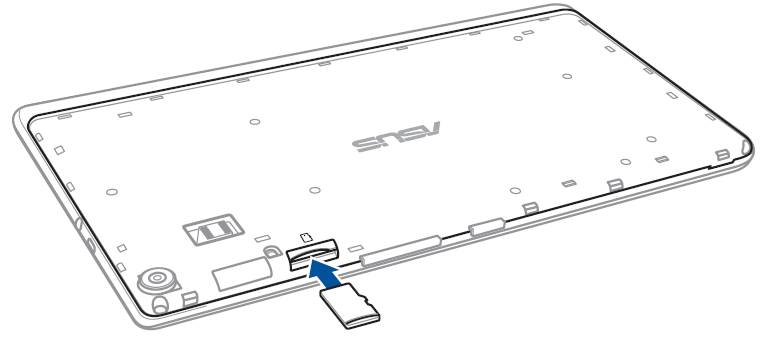
- Align and insert a memory card into the memory card slot.
Push the memory card all the way into the slot until it is seated firmly in place.
Put back the back cover.
NOTE: After installing a formatted memory card, you can access its contents from ASUS > File Manager Internal storage > sdcard.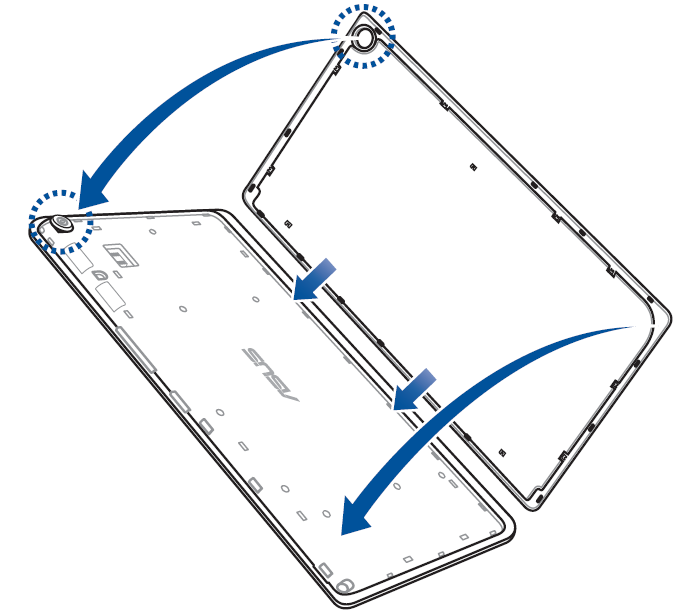
Removing a memory card
CAUTION!
- Be extra careful when handling a memory card. ASUS is not responsible for any data loss or damage incurred to your memory card.
- Eject the memory card properly to safely remove it from device. To eject the memory card, go to Settings > Storage & USB, then tap under Portable storage.
To remove a memory card:
Locate the groove on the bottom-right corner and pull the back cover outwards until it is removed completely.
CAUTION!
Be careful not to damage the back cover or injure your fingernails when you remove the cover.
Do not forcibly remove, shear, or distort the back cover.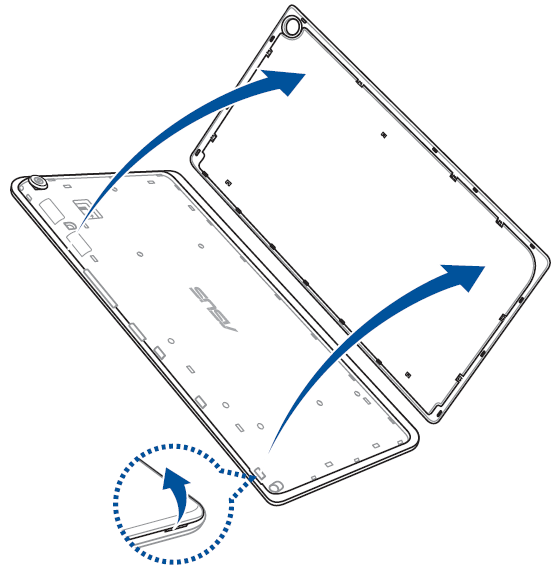
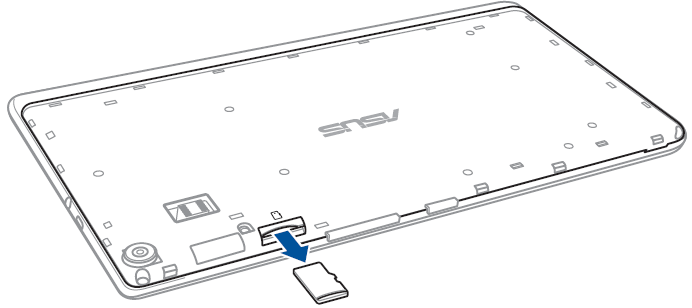
Press the memory card to eject, then pull it out.
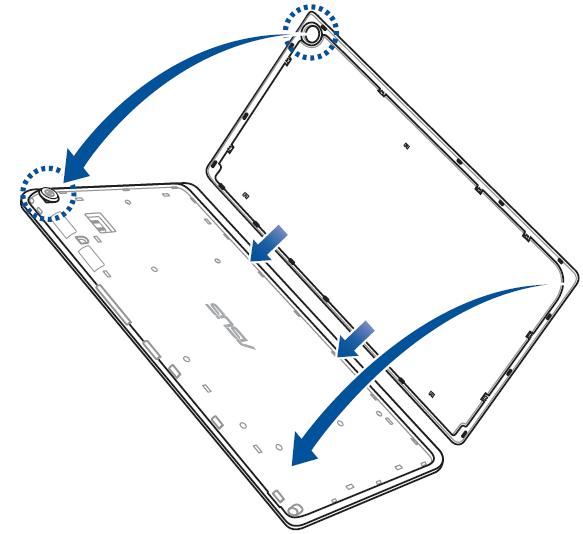
Put back the back cover.
Charging your ASUS Tablet
Your ASUS Tablet comes partially charged but you must charge it fully before using it for the first time. Read the following important notices and cautions before charging your device.
IMPORTANT!
- Use only the bundled AC power adapter and micro-USB cable to charge your ASUS Tablet. Using a different AC power adapter and cable may damage your device.
- Peel off the protective film on the AC power adapter and micro-USB cable before using it with your device.
- Ensure to plug the AC power adapter to a compatible power outlet. You can plug the AC power adapter to any compatible 100~240 V outlet.
- The output voltage of the AC power adapter for this device is DC 5.2V, 1A.
- When using your ASUS Tablet while plugged-in to a power outlet, the power outlet must be near your device and easily accessible.
- Do not use or expose your ASUS Tablet near liquids, rain, or moisture.
- Do not use your ASUS Tablet near heating equipment or in places where there is likelihood of high temperature.
- Keep your ASUS Tablet away from sharp objects.
- Do not place objects on top of your ASUS Tablet.
CAUTION!
- While charging, your ASUS Tablet can become warm. This is normal, however, if your device becomes unusually hot, disconnect the micro-USB cable from your device and send the device, including the AC power adapter and cable to an ASUS-qualified service personnel.
- To prevent any damage to your ASUS Tablet, AC adapter, or micro-USB cable. Ensure that the micro-USB cable, AC adapter, and your device are connected properly before charging.
To charge your ASUS Tablet:
- Connect the micro USB cable to the AC power adapter.
- Plug the AC power adapter to a grounded power outlet.
Connect the micro USB cable to your ASUS Tablet.
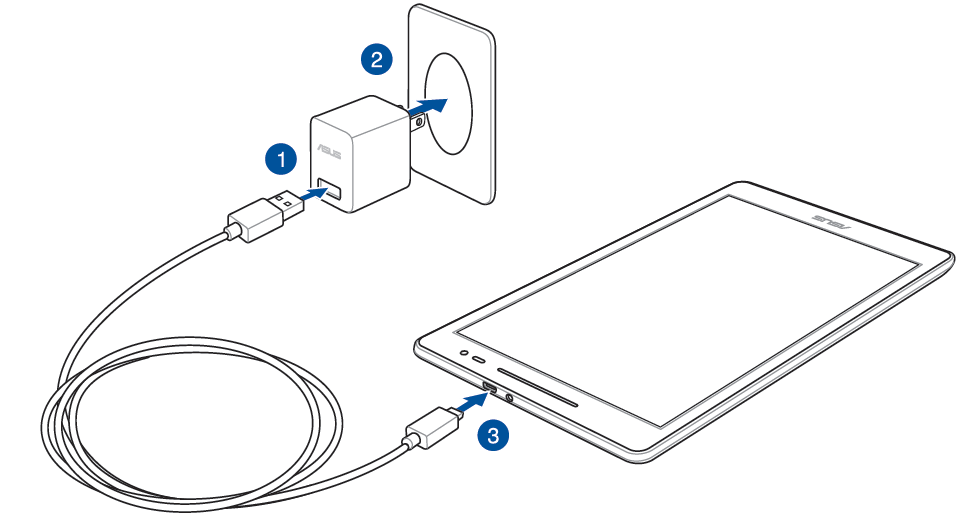
IMPORTANT!Charge your ASUS Tablet for eight (8) hours before using it in battery mode for the first time.

- The status of battery charge is indicated by the following icons:
- When fully-charged, disconnect the USB cable from your ASUS Tablet first before unplugging the AC power adapter from the power outlet.
NOTE:
- You can use your device while charging but it may take longer to fully charge the device.
- Charging your device via USB port of a computer may take longer to fully charge the device.
- If your computer does not provide enough power for charging via USB port, charge your ASUS Tablet using the AC power adapter plugged to a power outlet instead.
Turning your ASUS Tablet on or off
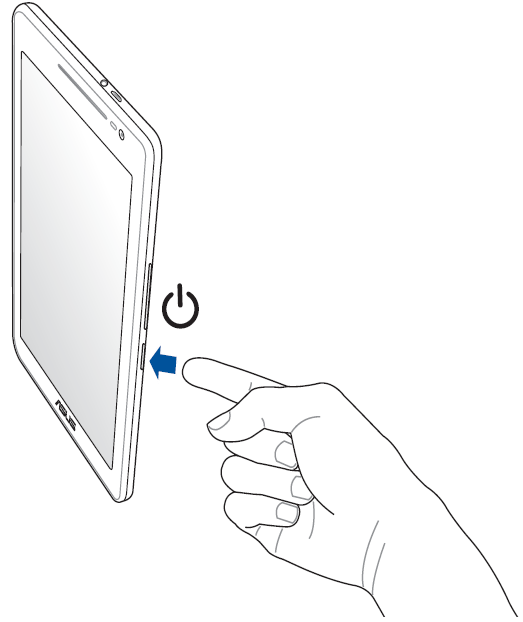
- Turning your device on
To turn your device on, press and hold the power button until your device starts up. - Turning your device off
To turn your device off:- If your screen is turned off, press the power button to turn it on. If your screen is locked, unlock the device screen.
- Press and hold the power button, then when prompted, tap Power off then tap OK.
Sleep mode
To put your device in sleep mode, press the power button once until the screen turns off.
Basics
Explore the intuitive simplicity of ASUS Zen UI!
ASUS Zen UI is a charming and intuitive interface exclusively for ASUS Tablets. It provides you with special apps, which are integrated in or with other apps, to fit your unique individual needs and make your life easier while letting you have fun with your ASUS Tablet.
 ASUS Support
Find answers from FAQs (Frequently Asked Questions) or provide your feedbacks in the user forum.
 Camera
With PixelMaster technology, capture those precious moments in vivid and high-quality photos and videos.
 Do it Later
Get hold and act on your important emails, SMS messages, interesting websites, or other important tasks when it is more convenient for you to do so.
NOTE: Availability of ASUS Zen UI apps vary per region, SKU and ASUS Tablet model. Tap ![]() from your Home screen to check the apps available on your ASUS Tablet.
from your Home screen to check the apps available on your ASUS Tablet.
Starting for the first time
When you turn your ASUS Tablet on for the first time, follow the onscreen instructions to select your language, select input methods, set up your mobile network, Wi-Fi, sync accounts, and configure your location services. Use your Google or ASUS account to set up your device, if you do not have a Google or ASUS account yet, go ahead and create one.
Google Account
Using a Google Account allows you to fully utilize these Android OS features:
- Organize and see all your information from anywhere.
- Automatically backup all your data.
- Leverage Google services conveniently from anywhere.
ASUS Account
Having an ASUS Account gets you to enjoy the following perks:
- Personalized ASUS support service and warranty extension for registered products.
- Free Cloud storage space.
- Receive the latest device and firmware updates.
Battery power conservation tips
The battery charge is the lifeline of your ASUS Tablet. Here are some battery power conservation tips that help preserve the power of your ASUS Tablet’s battery.
- Close all running apps that are not in use.
- When not in use, press the power button to put the device in sleep mode.
- Activate Power Saving in Power Saver app.
- Set AudioWizard to Smart Mode.
- Decrease brightness of display.
- Keep the speaker volume to a low level.
- Disable Wi-Fi feature.
- Disable Bluetooth feature.
- Disable PlayTo feature.
- Disable GPS.
- Disable the screen auto-rotate feature.
- Disable all auto-sync features in your device.
Description
Watching videos, and online browsing because it is sharp, bright, and has good color accuracy. The tablet's 64GB of internal storage offers plenty of room for all of your data and movies, and its quick performance and 4GB of RAM guarantee that it can handle even the most demanding programs and games. The tablet has respectable cameras as well, and you can increase its storage as needed by using the microSD card port.
Using the touchscreen
Use these gestures on the touchscreen to launch apps, access some settings, and navigate your ASUS Tablet.
Launching apps or selecting items
Do any of the following:
- To launch an app, simply tap on it.
- To select an item such as in File Manager app, simply tap on it.

Moving or deleting items
Do any of the following:
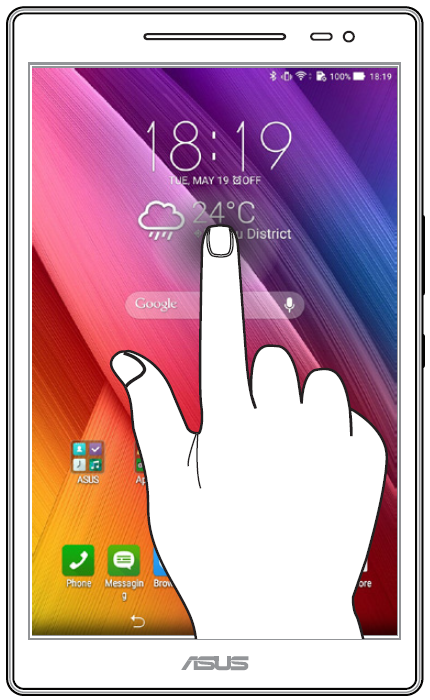
- To move an app or widget, tap and hold then drag it to the location where you want it to be.
- To delete an app or widget from the Home screen, tap and hold then drag it to
 Remove.
Moving through pages or screens
Do any of the following:
- Swipe your finger to the left or to the right to switch between screens or to flip through a Gallery of images.
- Scroll your finger up or down to go through web pages or list of items.

Zooming in
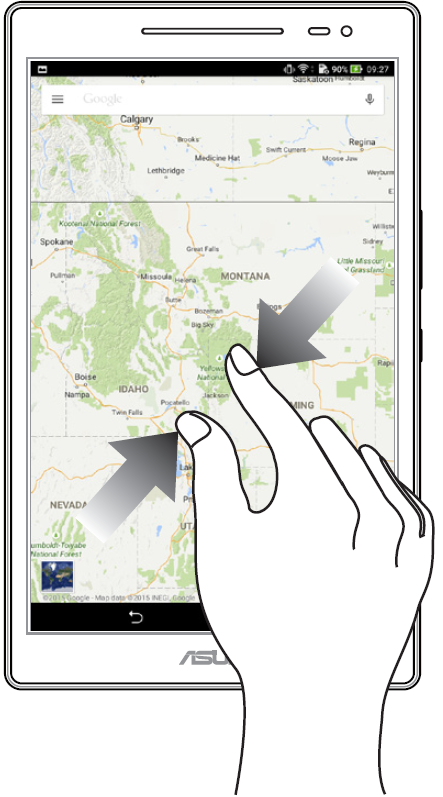
Spread apart your two fingers on the touch panel to zoom in an image in Gallery or Maps, or zoom in a web page.
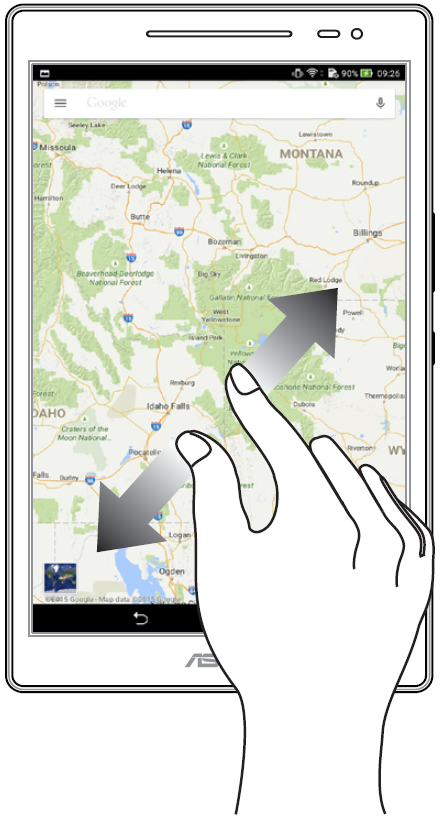
Zooming out
Bring together your two fingers on the touch panel to zoom out an image in Gallery or Maps, or zoom out of a web page.
ZenMotion
When your touch screen panel is off, with these easy and intuitive gestures, you can launch apps on your ASUS Tablet in a snap by simply writing down an alphabet.
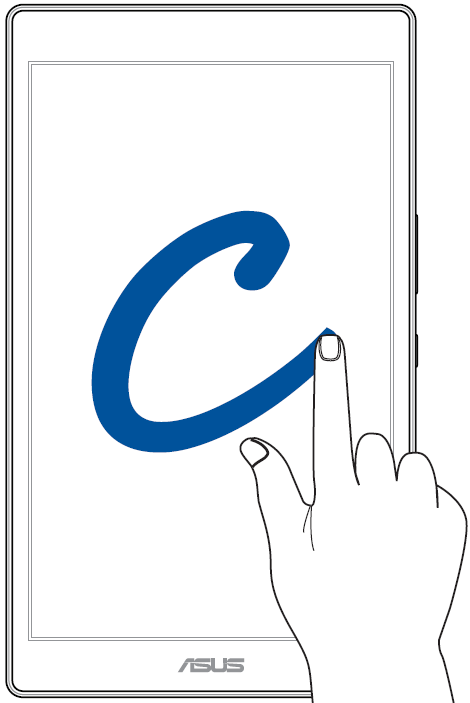
| Gesture | Wi-Fi only models | 3G / LTE (phone function) models |
|---|---|---|
| C | Camera | Camera |
| S | Camera - front lens | Camera - front lens |
| V | Contacts | Dialer |
| W | Weather | Weather |
| Z | Gallery | Gallery |
| e | Clock | Clock |
Setup Guide
Setting up the ASUS Touch Screen ZenPad Tablet P00A is easy.
- First, turn on the tablet by pressing and holding the power button.
- Then, follow the on-screen instructions to set up the tablet's language, Wi-Fi connection, and other settings.
- If you have an ASUS account, you can sign in or create a new account during the setup process.
- Once the setup is complete, you can start using the tablet right away.
- To pair the tablet with other devices, such as Bluetooth headphones or a keyboard, go to the tablet's settings and select the appropriate option.
Maintain your Zen
Keeping your device up-to-date
Keep your ASUS Tablet in the loop of Android system updates and upgraded apps and features.
Updating your system
- Tap
 then tap Settings.
 - On the Settings screen, slide down to display other items then tap About.
- Tap System update then tap Check Update.
NOTE: You can preview the last time your ASUS Tablet’s system was updated in Last check for update.
Storage
You can store data, apps, or files on your ASUS Tablet (internal storage), on an external storage, or on an online storage. You need an internet connection to transfer or download your files on an online storage. Use the bundled USB cable to copy files to or from the computer to your ASUS Tablet.
Backup and reset
Back up data, Wi-Fi passwords, and other settings to Google servers using your ASUS Tablet.
- Tap
 then tap Settings > Backup and reset.
 - From the Backup & reset window, you can:
- Back up my data: This feature backs up your data, Wi-Fi passwords, and other settings to Google servers when enabled.
- Backup account: Allows you to specify the account you wish to be associated when you save your backup.
- Automatic restore: This features facilitates restoration of backed up settings and data when you reinstall an app.
- Network settings reset: This will reset all network settings.
- Factory data reset: Erases all data on tablet.
Securing your ASUS Tablet
Use the security features of your ASUS Tablet to prevent unauthorized access of information.
Unlocking your screen
When the screen is locked, you can open it with the security unlocking options that the ASUS Tablet offers you.
- Tap
 Settings > Lock Screen.
 - Tap Screen lock then select an option to unlock your ASUS Tablet.
NOTE:
- Refer to section Unlock screen options for more information.
- To deactivate the unlock screen option that you set, tap None on Choose screen lock screen.
Unlock screen options
Choose from these options to lock your ASUS Tablet.
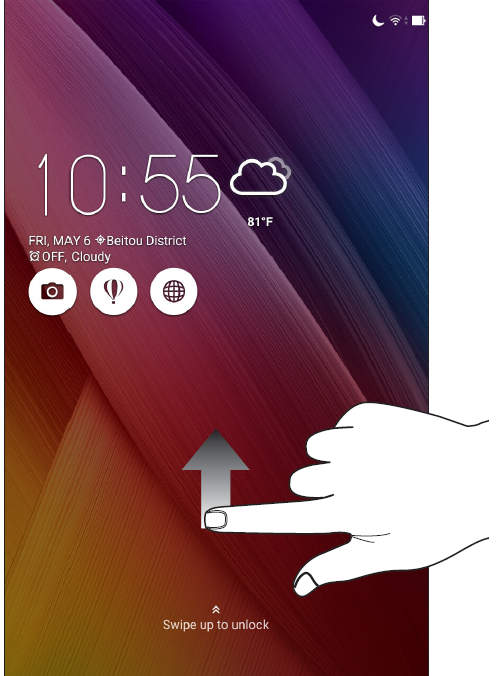
Swipe
Swipe up to unlock your ASUS Tablet.
PIN
Key in at least four numbers to set a PIN.
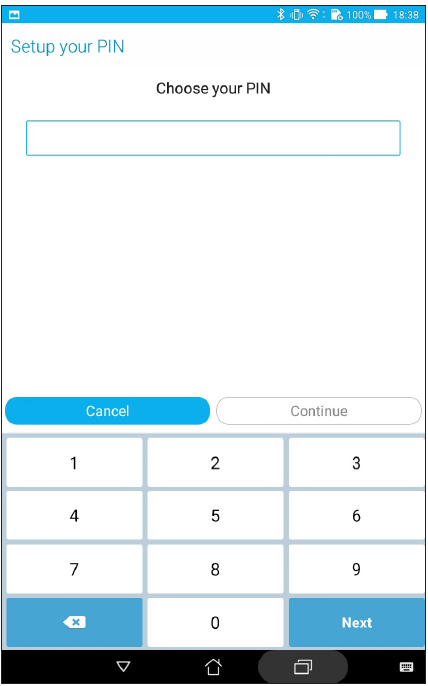
IMPORTANT! Ensure to remember the PIN that you created to unlock your device
Pattern
Slide your finger on the dots and create a pattern.
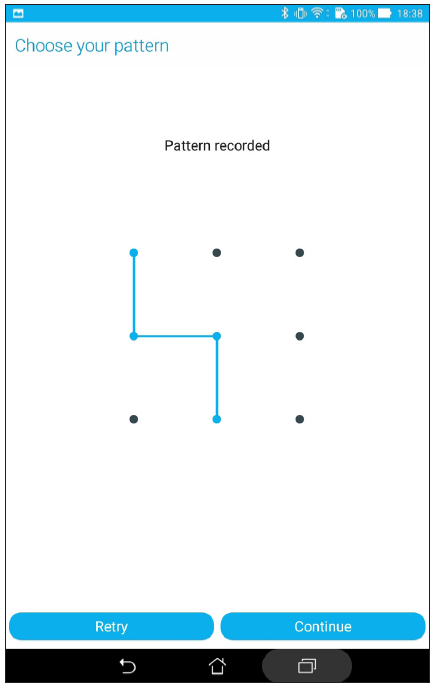
IMPORTANT! You can create a pattern with a minimum of four dots. Ensure to remember the pattern that you created to unlock your device.
Password
Key in at least four characters to create a password.
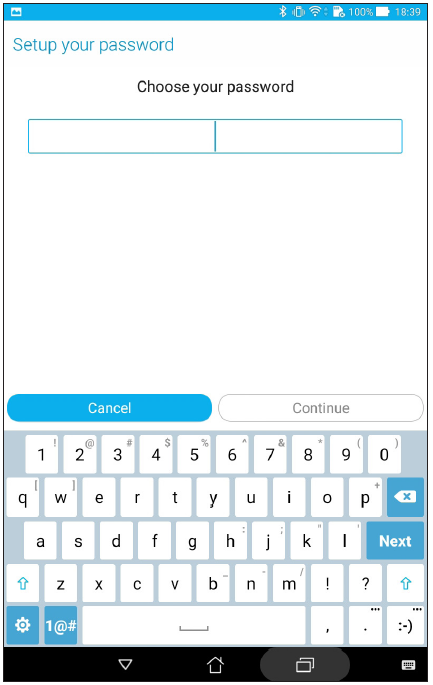
IMPORTANT! Ensure to remember the password that you created to unlock your device.
Configuring the other screen security features
Aside from the mode of screen lock, you can also do the following on the Screen security window:
- Quick access: Tap this to edit Quick access on the lock screen.
- Instant camera: Slide the Instant camera switch to ON to launch the Camera app even if your ASUS Tablet is in idle mode by pressing the volume button twice.
- Lock screen message: Tap this to edit and key in the information that you want to appear even when your screen is locked.
Setting your ASUS Tablet identity
Know your ASUS Tablet’s identity such as serial number, IMEI (International Mobile Equipment Identity) number, or model number. This is important, as when you lose your ASUS Tablet, you can contact your mobile carrier and provide the information to blacklist the unauthorized use of your ASUS Tablet.
To display your ASUS Tablet’s identity:
- Tap
 Settings.
 - On the Settings screen, slide down to display other items then tap About. The About screen displays the status, legal information, model number, operating system version, hardware, and software information of your ASUS Tablet.
- To see the serial number and IMEI of your ASUS Tablet, tap Status.
Troubleshooting
If you encounter any issues with the ASUS Touch Screen ZenPad Tablet P00A, try the following troubleshooting steps:
- If the tablet won't turn on, make sure it's charged. If the battery is completely drained, it may take a few minutes for the tablet to turn on.
- If the tablet is slow or freezing, try closing unnecessary apps or restarting the tablet.
- If the tablet's display is not responding to touch inputs, try restarting the tablet or recalibrating the touchscreen.
- If the tablet's cameras are not working, make sure the camera app is open and the tablet's camera is not blocked.
Pros & Cons
Pros
- Sleek and stylish design
- Bright and sharp display
- Fast performance and plenty of RAM
- Expandable storage via microSD card
- Long battery life
Cons
- Camera quality could be better
- No official water or dust resistance rating
- On the heavier side for a tablet of this size
- Speakers could be louder
Customer Reviews
Customers who have purchased the ASUS Touch Screen ZenPad Tablet P00A generally have positive things to say about it. They praise the tablet's fast performance, bright and sharp display, and long battery life. Some customers have noted that the tablet's camera quality could be better, and a few have reported issues with the touchscreen's responsiveness. However, overall, customers are happy with their purchase and recommend the tablet to others.
Most Common Complaints
The most common complaints about the ASUS Touch Screen ZenPad Tablet P00A are related to the tablet's camera quality and touchscreen responsiveness. Some customers have also reported issues with the tablet's Wi-Fi connectivity. However, these issues are relatively rare, and most customers are satisfied with the tablet's performance and features.
Faqs
How can I get my ASUS ZenPad battery to last longer?
In what ways should I clean and maintain the ASUS ZenPad P00A's screen?
Is there a suggested charging procedure for my ASUS that will extend the life of the battery?
What are some tips for getting the most out of my ASUS ZenPad P00A?
How should I proceed if the ASUS stops responding?
How can I prevent unwanted access to my ASUS ZenPad?
Is it possible to use the ASUS Touch Screen ZenPad Tablet P00A in really cold weather?
Leave a Comment
