Atomberg App - How to Use | Configuration & Setup
Content
Introduction of Atomberg App
Atomberg Technologies has recently launched its new app, the Atomberg , designed to provide a seamless and smart experience for users of Atomberg's energy-efficient fans. The app is available for both iOS and Android devices and can be downloaded for free from the App Store and Google Play Store. The app offers a range of features that allow users to control and monitor their fans remotely, providing convenience and energy savings. The estimated price of the App is free, and it was launched in 2021.
Detailed Specifications
The Atomberg comes with the following key features
- Compatible with all Atomberg fans
- Voice control with Amazon Alexa and Google Assistant
- Schedule a timer for fans
- Real-time energy consumption tracking
- Remote control of fans
- Multiple fan control with a single tap
- Firmware updates for fans
- Smart modes for fans
Getting started
- Launch the Atom berg app and click on 'Signup' if you are a new user or 'Login' if you are an existing user
- New users: Fill in all required information and set your password. A verification code will be sent on your registered mobile number for confirmation.
- Existing users: Enter your mobile number and password. If you have forgotten your password, you can log in using an OTP which will be sent on your registered mobile number.
- You can also login with your Google account.
First, install Google Home or Amazon Alexa on your smartphone or tablet. Using the Atomberg app, you must then set up the fan. If facing an issue with this, kindly remove the fan from your Atomberg app and reset the app.
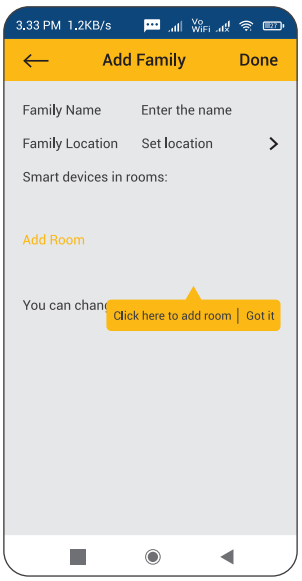
Setting up the user's Smart Home
- Create a smart home by entering your family name and family location.
You can select the number of rooms to be added in your smart home to suit your requirements.
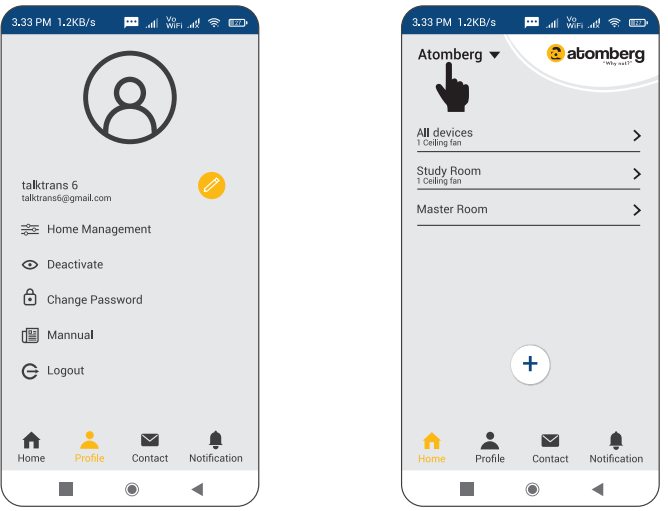
- Once your family has been added, you can now view home page where you can view, control, monitor and/or manage the Atom berg Fan(s) added to your family.
- You can create multiple families and switch between families using the drop down menu at the top left corner of the home screen. Refer Home Management for more details.
Description of Atomberg App
The Atomberg is designed to provide users with a smart and convenient way to control and monitor their Atomberg fans. The app allows users to control their fans remotely, providing convenience and energy savings. With voice control, users can control their fans using Amazon Alexa and Google Assistant. The schedule timer feature allows users to set a timer for their fans, ensuring they are turned off when not in use. The real-time energy consumption tracking feature enables users to monitor their energy usage and make informed decisions about their fan usage. The app also features multiple fan control, allowing users to control multiple fans with a single tap. The firmware updates feature ensures that the fans are always up-to-date with the latest features and improvements. The smart modes feature provides users with different modes to choose from, depending on their comfort level.
Adding a fan
- In case you have connected the App with the Atomberg Fan for the first time, no set up is required, but if the fan's connection needs to be reset, refer to Resetting Fan Connection (5th section).
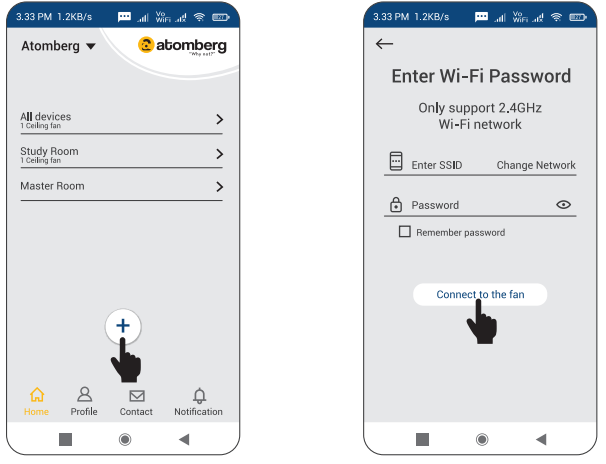
- Make sure a 2.4GHz WiFi network is present and the Atomberg app is installed on your device, which is also connected to the same WiFi network
- Make sure that the fan is powered ON using a wall switch.
- Open the Atomberg app.
- Select the family in which device needs to be added. Click on Plus(+) at the bottom of the screen.
- Enter the SSID and Password of the WiFi network. Click on 'Connect'.
After the connection is established, you will be able to see the list of connected Atomberg Fans.
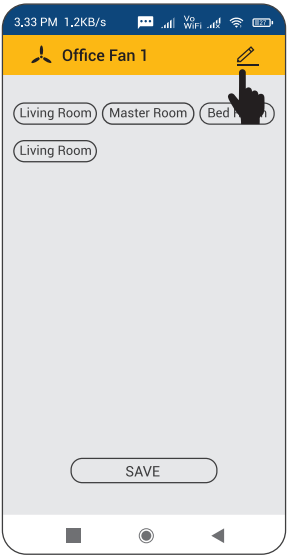
- You can assign the fan a name of your choice, and add it to a room.
- Now you will be able to see the added device on your family home screen, listed under the room or under the 'All Devices' tab.
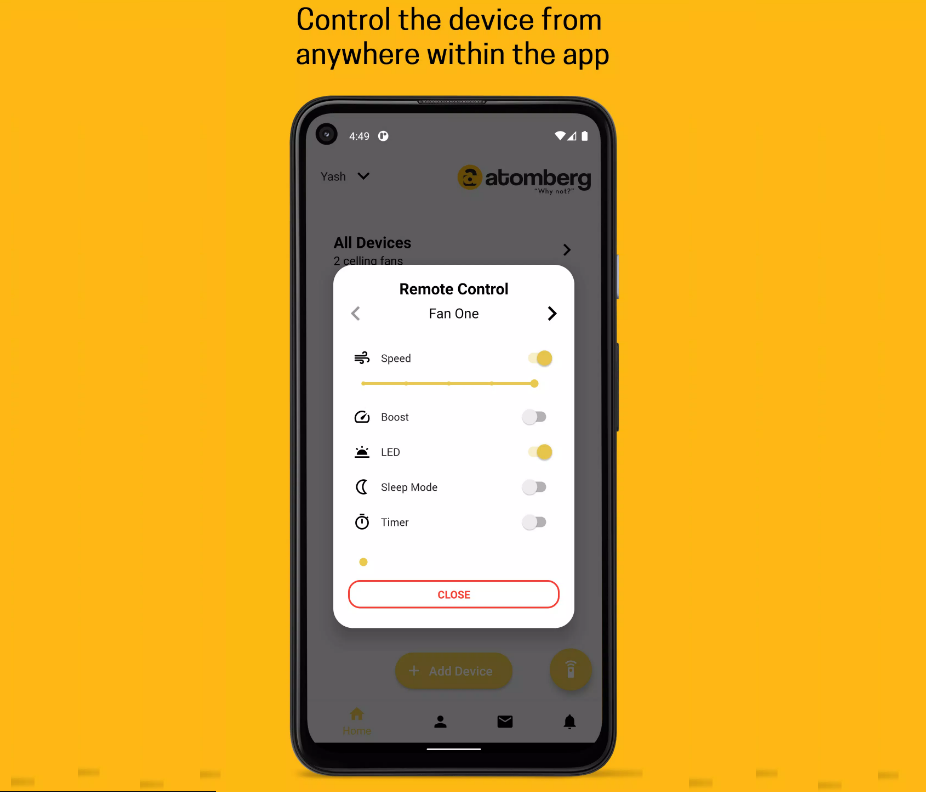
Controlling fan Function and Features
- Go to the home screen and select the room whose fan you wish to control.
- Click on the fan name from the available list of devices.
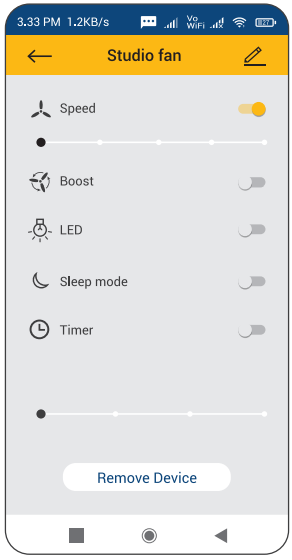
- Now you will be able to view the fan control screen.
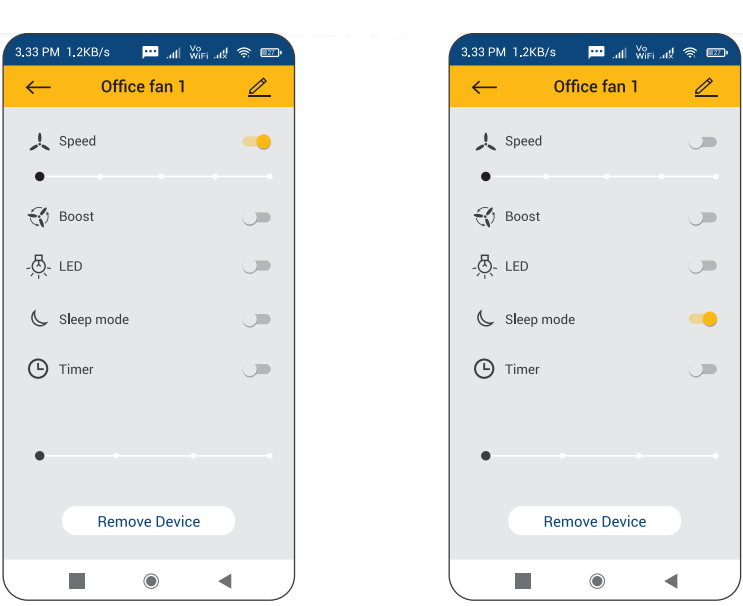
- Turn On/Off: Fan can be turned On/Off using the Button in front of Speed. (refer 4.1)
- Speed: Fan speed can be controlled by using the speed bar.
- Boost Mode: Boost mode can be turned On/Off.
- LEO: You can turn On/Off the LED Buttons.
- Sleep Mode: You can turn On/Off the Sleep Mode. (refer 4.2)
Timer Mode: You can turn On/Off the Timer Mode, and can select the time period of the preset l hour, 2 hours, 3 hours and 6 hours.
To Reset the fan connection
- You must reset the fan in case of facing a connection error, or, in case of change of router/password.
- Fan connection can be reset using the app. Press 'Remove Device' in Device Control to reset the WiFi connection. (refer 5.1)
- To reset the connection manually, use the following sequence using your remote controller.
- First turn off the fan using the remote controller.
- Then press the LED button of the remote controller for 5 seconds until the LEDs blink.
- You will now see a fast rotating LED pattern.
- Now instructions from section 3 (Adding a Fan) can be followed to add your fan in the Atom berg app.
Home management
- The Home Management option can be accessed under the Profile Tab.
- Add Family Members
- You can add or remove family members using Home Management.
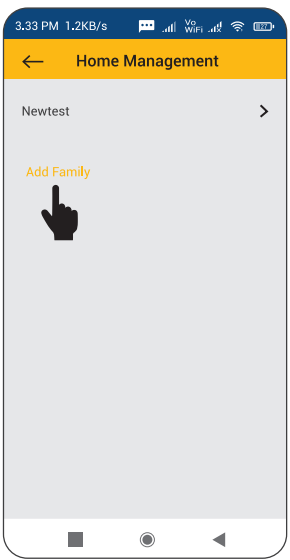
- When Home Management is selected , it will allow you to see a list of family members.
- You can add a new family member by selecting 'Add Family'.
- Remove Family
You can remove a family member by selecting and then choosing the 'Remove Family' option.
- Renaming a Family
- Select a family in the home management tab.
- Click on the family name to rename it.
- Add Room in a Family
- Select the family in which room needs to be added.
- Click on Room Management.
- Room can be added by selecting Add Room.
- Remove a Room
In the Room Management screen, click on edit· Then click on the(-) sign in front of the rooms which need to be removed. Renaming a Room
In the Room Management screen, click on the room name. Edit the room name and click on save.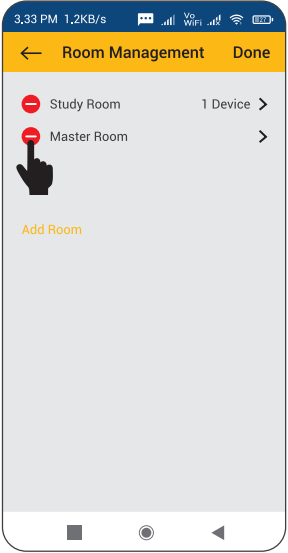
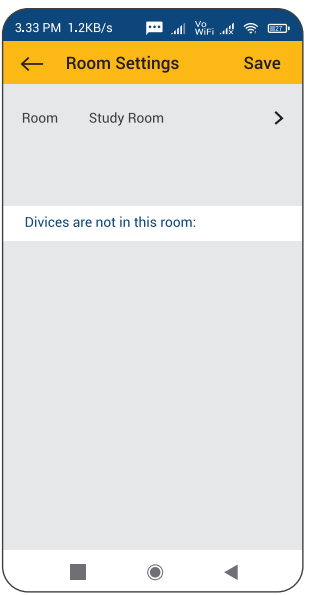
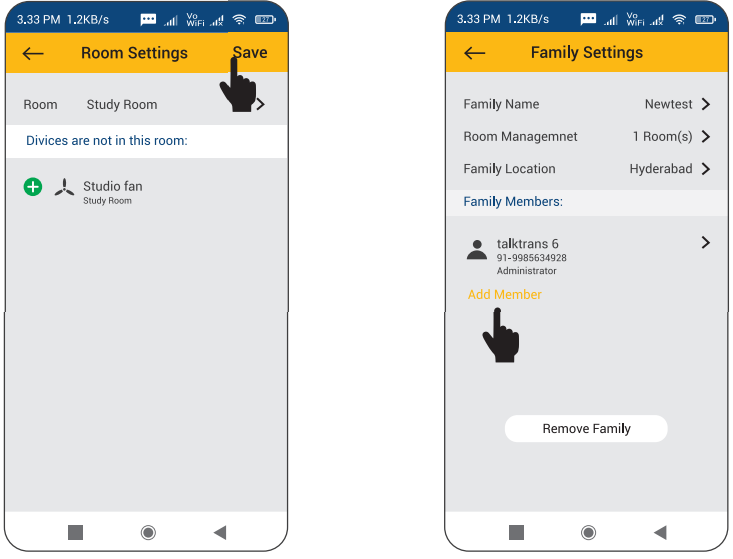
- Add fan in a room
- Select the room in which the fan needs to be added.
- You will be able to see a list of fans present in that room, and another list of fans which are not present in that room.
- Click on Plus(+) in front of the fan's name which needs to be added in the current room.
- Click on save.
- Sharing access with family: Devices in a family can be shared with all family members.
- All family members need to have the Atomberg app installed on their devices.
- Select the home management tab and select a family member who you wish to share the access with.· Click on Add members.
- Enter the name of your family member and their mobile number which is registered on the app.
- All the devices in the family can now be controlled by the newly added family member.
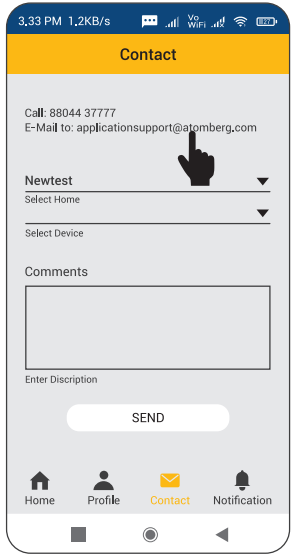
Service Request
- Service requests can be generated under the 'Contact' tab.
- Select home and device.
- Describe your issues in the comment box.
Using Atomberg Fan with Amazon Alexa
The Name: It is best advised to select a simple name for your Atomberg fan, as Google Assistant and Alexa may find it difficult to recognize its name and may end up failing to execute the commands.
Kindly follow these guidelines
- A short name consisting of one or two names is ideal.
- Names consisting of numbers do work, but they may not always be recognized by your home assistant. For example, 'two" can be confused with 'too", and may therefore lead to an invalid command.
- Please try to avoid vernacular names. The language engine in your home assistant may not fully understand the command.
- Please make sure the name is easy to pronounce and understand.
- Atomberg fan works with voice command using Amazon Alexa.
- To set up device with Amazon Alexa, your Amazon Alexa device must be connected to your smartphone using the Amazon Alexa app, and connected to the same network to which your fan is connected.
- Go to the Amazon Alexa app on your smartphone.
- Go to the Devices Tab.
- Select "User Smart Home Skills".
- Click on "Enable Smart Home Skills".
- Search "Smart Life" and enable it.
- Login with the same credentials you used while logging in with the Atom berg app.
- Once authenticated, you will see the device added on the Amazon Alexa app.
- Yout Atom berg fan now is ready to be used with your Amazon Alexa app.
- Sample commands to be used with Amazon Alexa,
Alexa Commands
- ON Commands
- Alexa Switch On <Fan Name> Alexa on <Fan Name>
- Alexa Turn on <Fan Name>
- Off Commands
- Alexa Switch Off <Fan Name> Alexa Turn Off <Fan Name> Alexa Off <Fan Name> Speed Commands
- Alexa Set <Fan Name> on 1 /2/3/ 4/5/6
Using an Atomberg Fan with Google Home Assistant
- Your Atomberg fan can be controlled using voice command.
- To set up your Google Home connection with the Atomberg Fan, kindly check and confirm that your Atomberg Fan and Google Home are connected to the same network and are operating on the same device (smartphone or tablet).
- Activate the service on the Google Home App, and go to the Profile tab.
- Go to Settings.
- Go to the Assistant tab.
- Select Home Control.
- Click on the Add(+) button on the bottom left corner of the screen.
- Search for "Smart Life".
- Enter your user login ID and password which was used in the app for authentication.
- Your Atomberg fan is now set up to be used with Google Home.
- Sample commands to use with Google Assistant.
Google commands
- ON Commands
- Off Commands
OK Google, Switch On <Fan Name> OK Google, Switch Off <Fan Name> OK Google, Turn On <Fan Name> OK Google, Turn Off <Fan Name> - Speed Commands
- OK Google, Set <Fan Name> fan Speed 1/2/3/4/5/6
- Ok Google, Increase <Fan Name>
- Ok Google, Decrease <Fan Name>
- Ok Google, Medium <Fan Name>
Troubleshooting
Here are some common problems and solutions for the Atomberg App
- Problem: The app is not connecting to the fan.
- Solution: Ensure that the fan is within range of the Wi-Fi network and that the Wi-Fi network is working properly. Check if the fan is compatible with the app and that it has the latest firmware version.
- Problem: The app is not responding.
- Solution: Check if the app is up-to-date and that the device is compatible with the app. Restart the app and try again. If the problem persists, try uninstalling and reinstalling the app.
- Problem: The fan is not responding to the app.
- Solution: Check if the fan is compatible with the app and that it has the latest firmware version. Ensure that the fan is connected to the same Wi-Fi network as the device. Try restarting the fan and the app.
Pros & Cons of Atomberg App
Pros
- Compatible with all Atomberg fans
- Voice control with Amazon Alexa and Google Assistant
- Schedule a timer for fans
- Real-time energy consumption tracking
- Multiple fan control with a single tap
- Firmware updates for fans
- Smart modes for fans
Cons
- Only compatible with Atomberg fans
- Some features may not be available for older models
- Dependent on Wi-Fi network and device compatibility
Faqs
Is it possible to use the Atomberg App to programme the on and off times of my Atomberg Efficio pedestal fan?
Why is it that I am unable to use the Atomberg App to link my smartphone to the Atomberg Studio+ fan?
How can I use the Atomberg App to update the firmware on my Atomberg fans?
What should I do if my Atomberg Renesa+'s real-time energy usage is not displayed by the Atomberg App?
Is it possible to use the Atomberg App to control several Atomberg fans from separate rooms?
How can I use the Atomberg App's sleep mode feature on my Atomberg Efficio fan?
Why won't my Atomberg Aire cool wall fan be recognised by the Atomberg App?
How can I use the Atomberg App to return my Atomberg fan settings to their original state?
What security features does the Atomberg App offer to safeguard my smart home appliances?
What warranty protection is included with my Atomberg fan, and how can I use the Atomberg App to make a claim?
Leave a Comment