Beetel Wireless Cloud Camera CC2 User Manual | Installation & Setup
Content

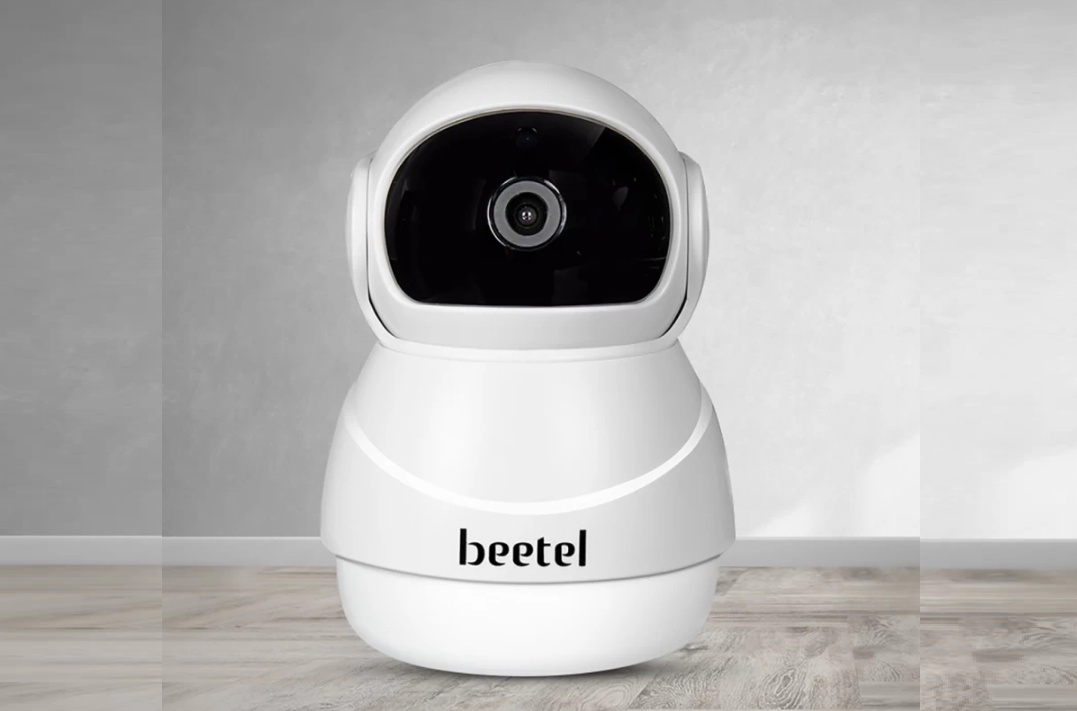
INTRODUCTION OF Beetel Wireless Cloud Camera CC2
The Cloud Camera offers users several functions that help to make it an ideal solution to those looking for added security and peace of mind in both home and office settings. Lets examine some of the biggest benefits you will find now that you have chosen to use this security camera.Traditional IP cameras tends to be difficult to install and use. The Cloud Camera does not have this issue. It is relatively simple to set up and use, as you will see through the course of this manual. It is a plug & play system with multiple additional features.
In addition, it offers
- Remote monitoring for real time control from anywhere
- Panoramic navigation
- Support HD video
- Motion detection function
- Capture and store video and images
- Zoom in to get a better view of a specific area
- Communicate with people or pets in the viewing area
Users will be able to control and use their camera through their mobile phones based on iOS and/or Android platform. We will cover this in the manual how to use them.
Detailed Specifications
The Wireless Cloud Camera CC2 is a feature-packed security camera that offers
- 1080p Full HD resolution for clear and sharp video quality.
- Night vision up to 30 feet for round-the-clock surveillance.
- 120° wide-angle lens to cover more area.
- Two-way audio with built-in microphone and speaker.
- Motion detection with instant alerts.
- Cloud storage and local SD card slot for video recording.
- IP65 weatherproof rating for indoor and outdoor use.
- Wi-Fi and Ethernet connectivity options.
Description of Wireless Cloud Camera CC2
The Beetel Wireless Cloud Camera is a versatile and robust security camera that provides reliable and high-quality video surveillance for your home or office. With its full HD resolution, wide-angle lens, and night vision, you can monitor your premises with ease and confidence. The camera also features two-way audio, motion detection, and instant alerts, allowing you to stay connected and in control, wherever you are. Its weatherproof design and multiple connectivity options make it a perfect choice for both indoor and outdoor use.
CONTENTS IN RETAIL PACKAGE
- Cloud Camera: 1
- AC/DC Power Adaptor: 1
- USB Cable: 1
- Plastic Bracket Assembly: 1
- User Manual: 1
FEATURE LAYOUT
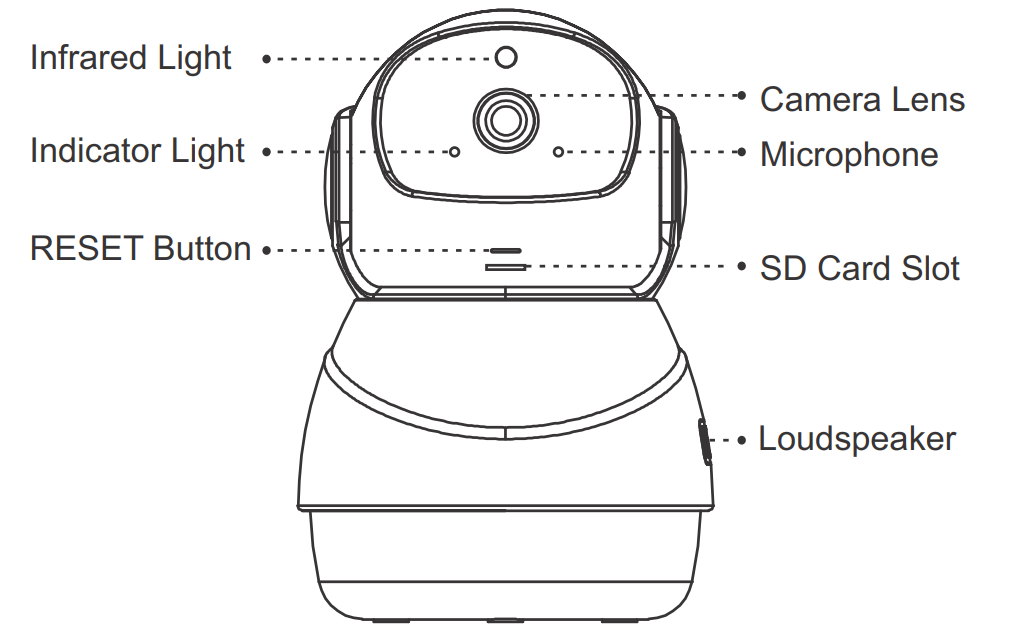
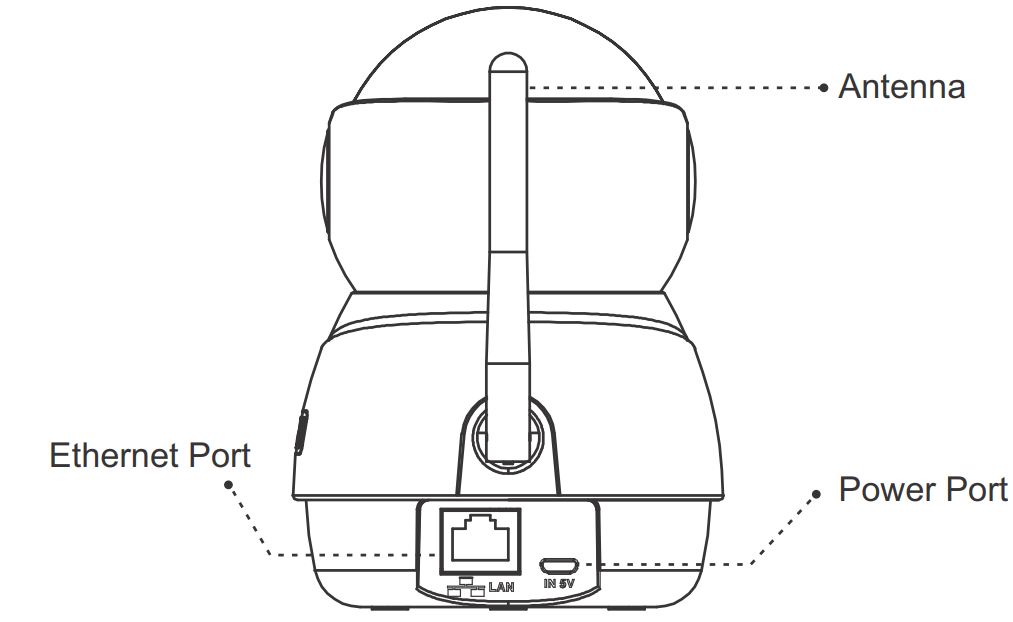
Setup Guide
Setting up the Beetel Wireless Cloud Camera is a straightforward process
- Download and install the Beetel Cloud app on your smartphone or tablet.
- Create an account and log in.
- Power on the camera and connect it to Wi-Fi or Ethernet.
- Add the camera to your account using the app and follow the on-screen instructions.
- Adjust the camera settings and position as needed.
THINGS TO BE TAKEN CARE OF
While Using your equipment, the following basic safety precautions should always be followed to reduce the risk of fire, electric shock and injury to persons and proper utilization of camera features.
- Read and understand all instructions for best performance of the product.
- Do not expose the product in the sun for long time.
- The product should be placed in cool, dry, ventilated, non-toxic place and not near to the computer, TV, refrigerator, bathroom etc.
- Avoid using this unit and adaptor during an electrical storm, move or disconnect the unit, there may be a remote risk of electronic shock from lightning and thunder.
- Adaptor shall be installed near the equipment and shall be easily accessible.
- For the best results operating temperature should be between -10°C ~ + 45°C.
- The adaptor is used as power switch.
- The operating frequency range is between 2412MHz ~ 2472MHz.
- It is recommended to insert an eject the SD card to the camera device only after power off the device otherwise the SD card or device may be damaged.
- Use the power adaptor that comes along with product. Using other make adaptor may deteriorate the performance or damage your product.
- It is recommended to set the Language as English and Time zone as GMT+5:30 for proper functioning of features.
WALL MOUNT INSTALLATION DEVICE
The installation wall should be have a certain thickness and bear at least three times of the weight of the device.
Install the base
Select clean and flat wall. Make the mark of base toward the user and then use the screw to fix the base on the selected position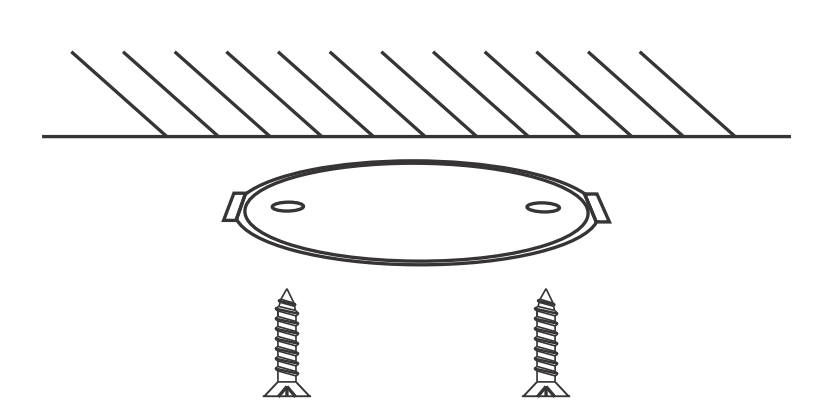
Install the main body
Install the main body of the device on the base and rotate it clockwise for about 90º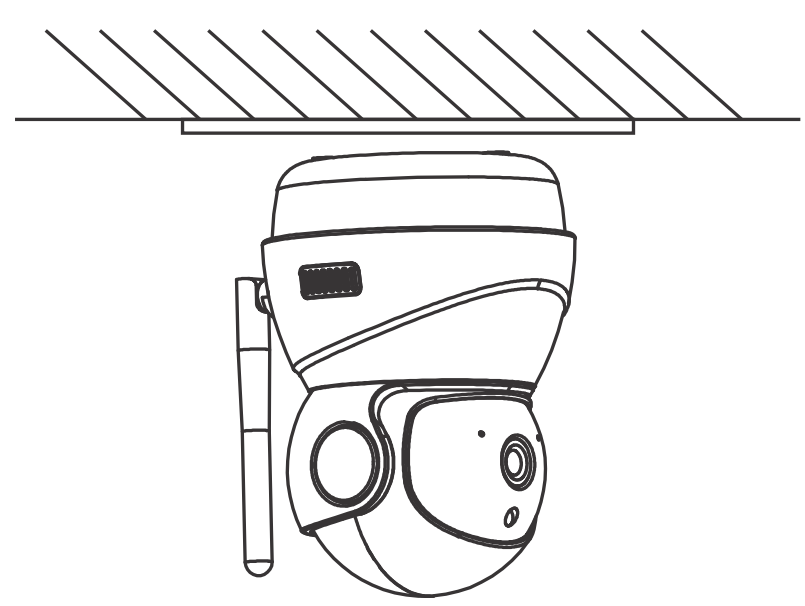
- Connect wires
Connect the power line of the device. After completing the equipment startup.
INSTALL “IPC360” APP
- Scan ‘IPC360' APP QR code from User Manual or Giftbox.
- Download ‘IPC360' APP from APP Store (iOS) or Play Store (Android).
ADD CAMERA TO ACCOUNT
Plug in device, open the APP, select the country name, register an account by entering the active email ID, obtain the Code from your mail and signup, create the password and log in.
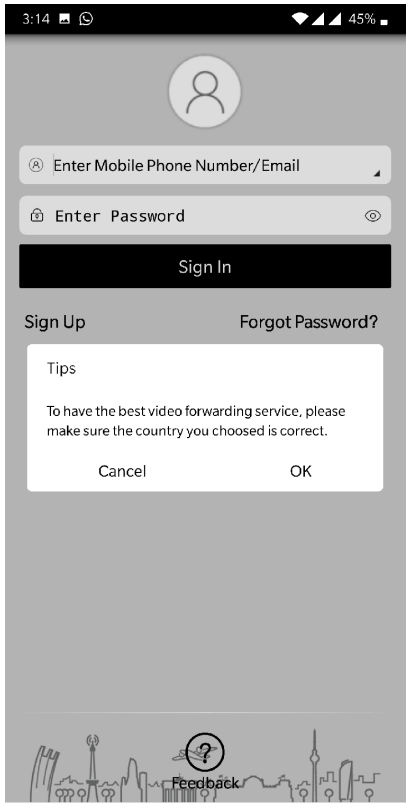
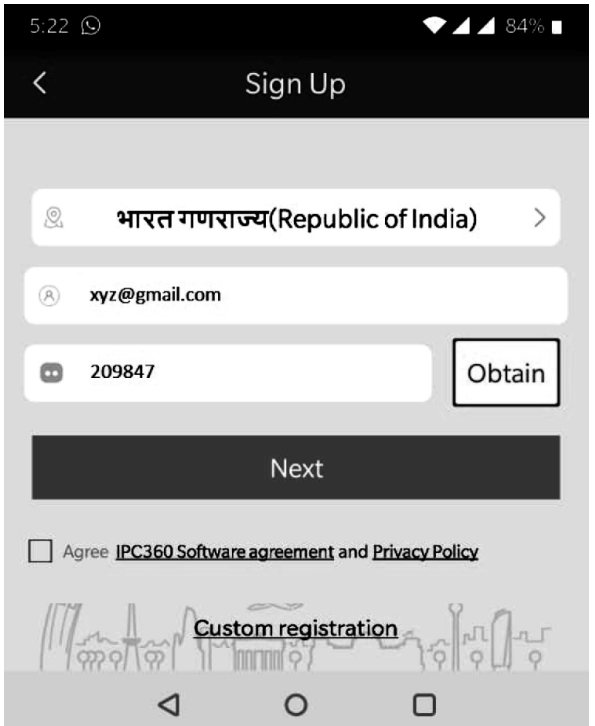
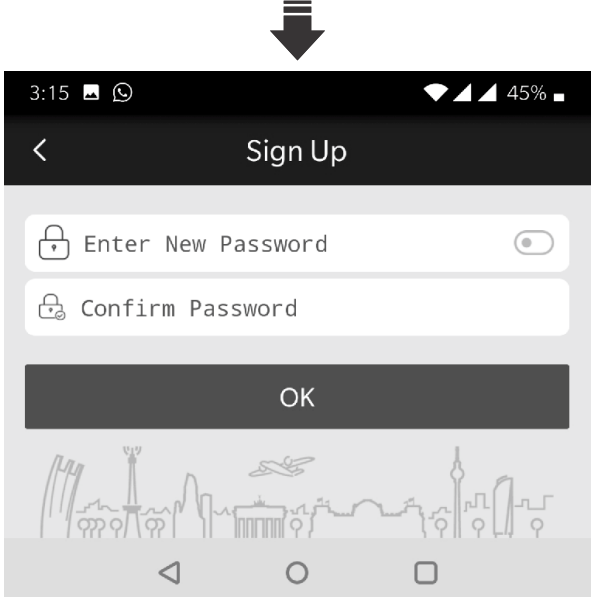
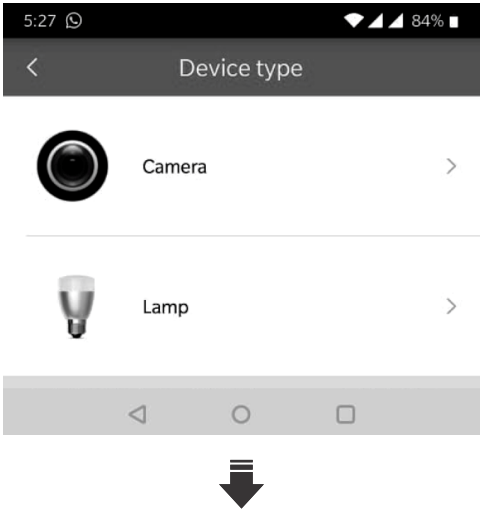
Click on ‘+’ in top right corner, select the camera icon to enter the network connection interface

SELECT THE NETWORK CONNECTION
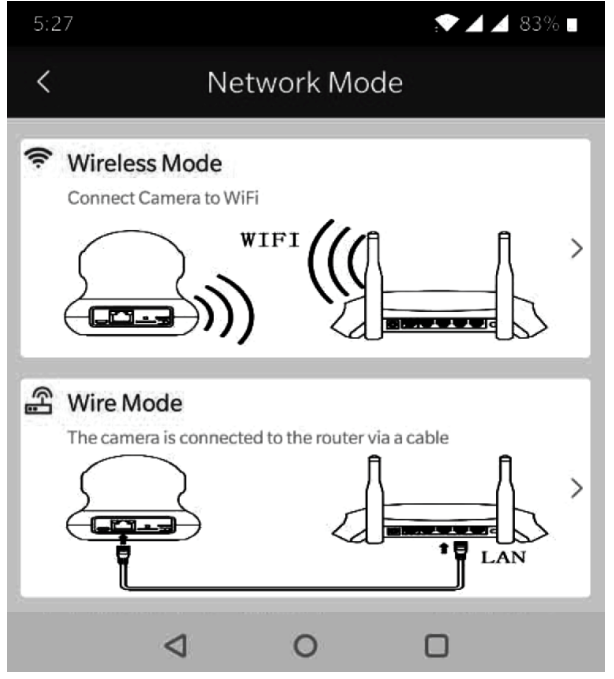
Wi-Fi connection (wireless mode)
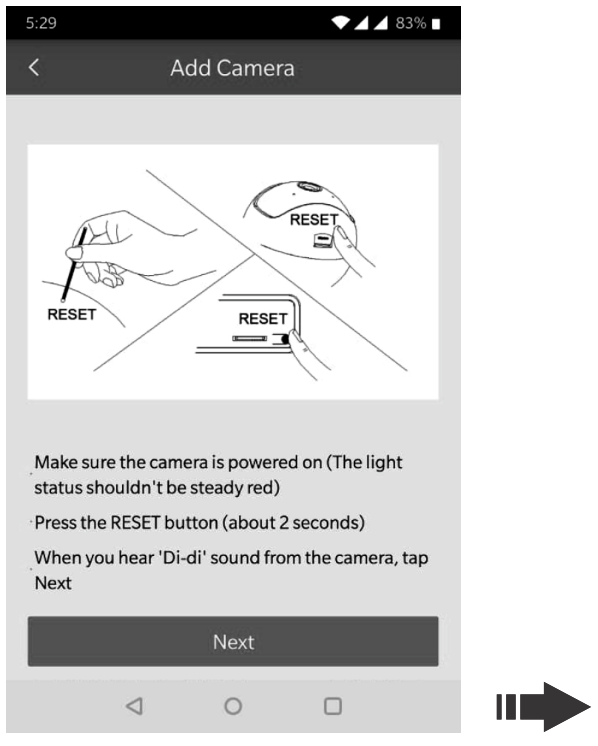
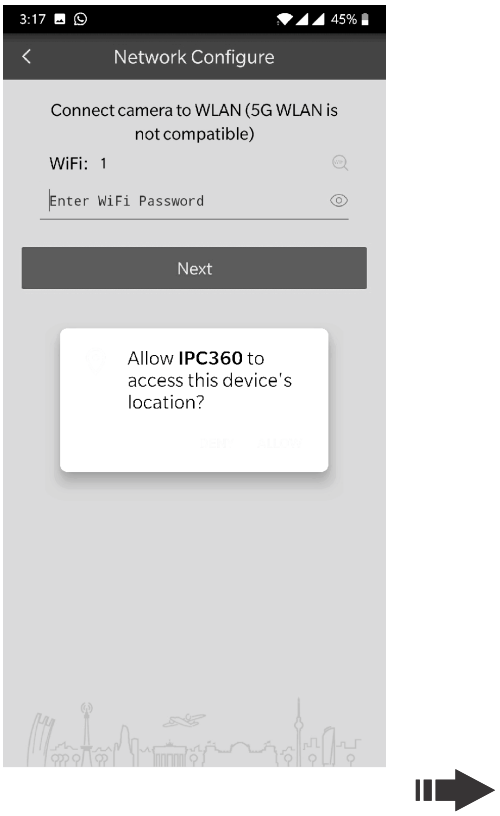
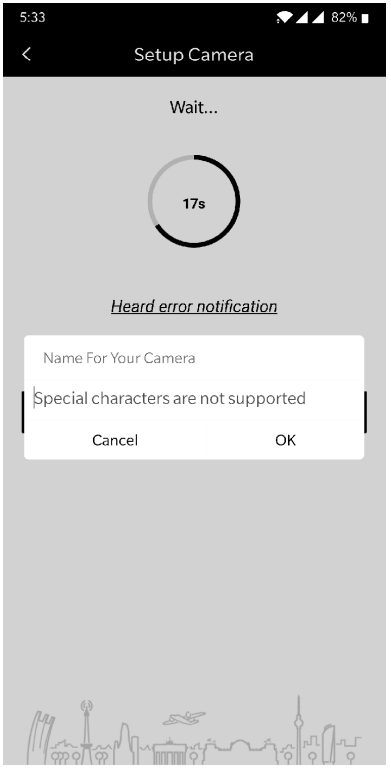
Click the Wireless Mode option and press the RESET button on the camera to enter the Wi-Fi configuration mode. Connect your phone with the desired Wi-Fi, Input the Wi-Fi password and press next, the connection should be successful. Enter the desired name to your Camera.
Note
- Press the RESET key, hold for 5-10 seconds to reset the camera settings.
- If the Wi-Fi configuration fails, try the ethernet connection.
- Please ensure to connect your phone mobile phone with same Wi-Fi network which you wants to use for your camera
Ethernet connection (wire mode)
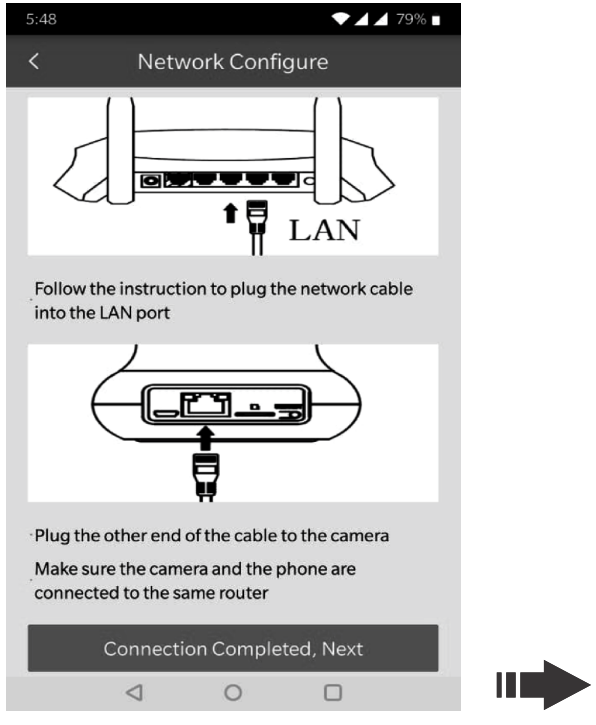
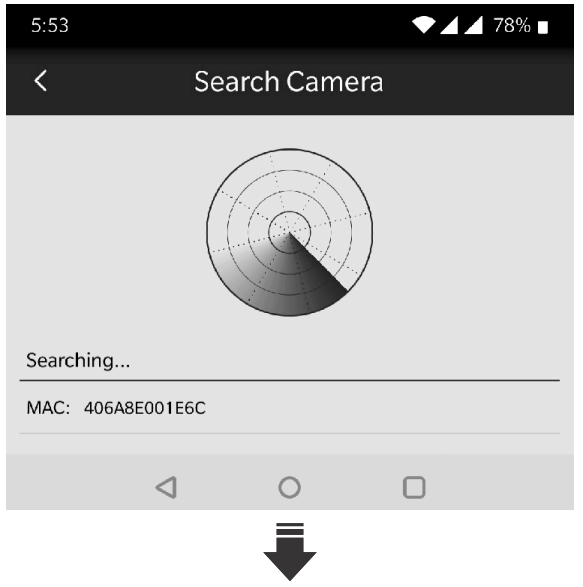
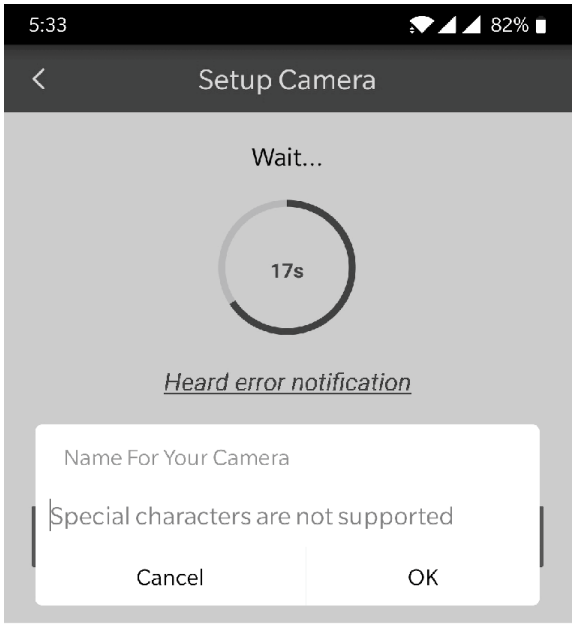
Click the Wire Mode option and connect the network cable, connect your phone with desired Wi-Fi, Input the Wi-Fi password and press next to search the camera device MAC ID, click on the searched MAC ID, the connection should be successful. Enter the desired name to your Camera.
Note
Make sure the Camera and mobile phone should be connected in same Wi-Fi network/router during configuration.
Now the camera will start configuration of Panoramic Navigation View, once complete the downloading of all 15 grids of panoramic navigation picture, the camera is ready to use.
VIDEO RECORDING AND SD CARD SETUP
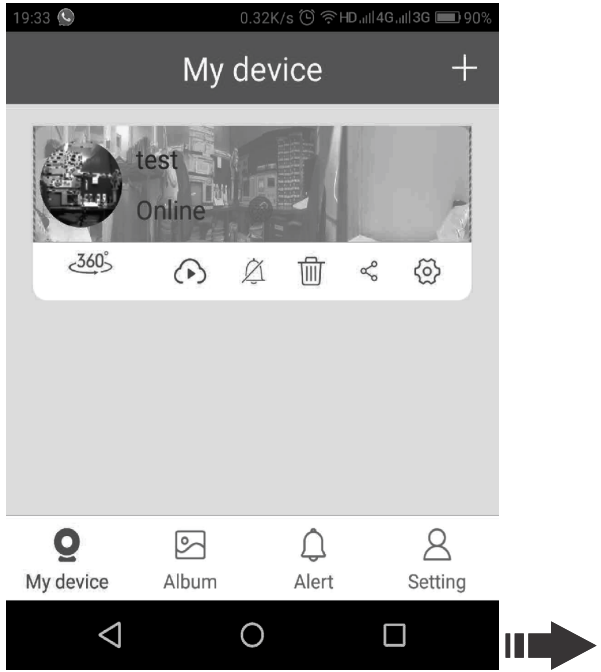
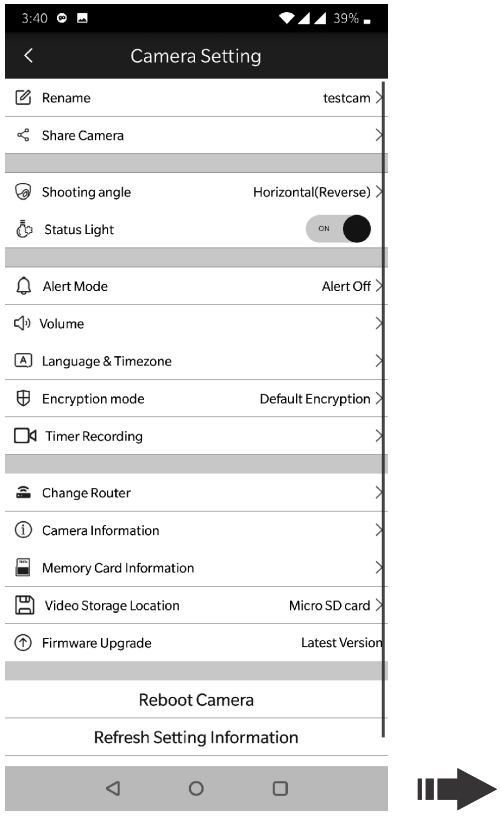
- Enter the Camera setting screen
- Select the Video Storage location as “Micro SD Card”
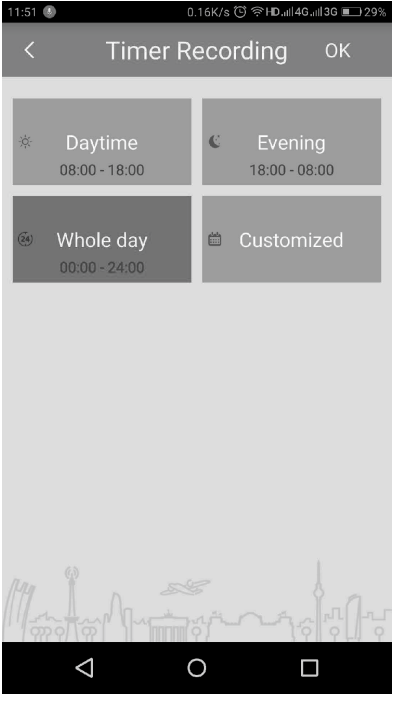
- Select Timer Recording option to select the desired setting
- Press OK after selection and go back to camera view/home screen.
Play back of Recorded Video
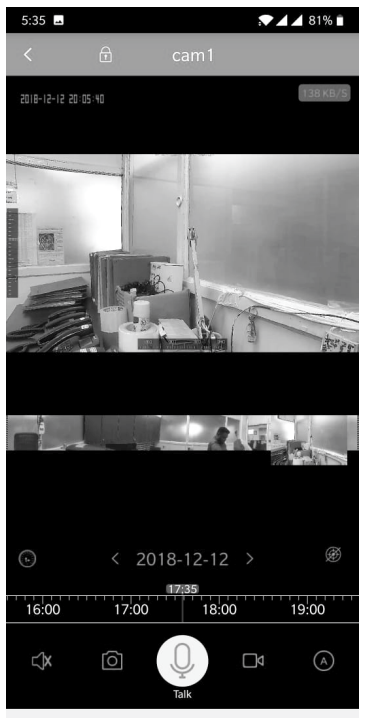
During the camera view, drag the Timer Shaft and select the time point to be played back in the Blue Video file bar.
If the playback is interrupted or there is no playback file at the current position, the next video will be played automatically.
Note
- Use the dedicated SD card for camera as existing data will wipe out.
- Recording and Alert functions need SD card support, without SD card these functions will not work.
- The time zone should be selected as GMT+5:30 for India to proper functioning of Video Record and playback function.
GENERAL SETTING VIEWS
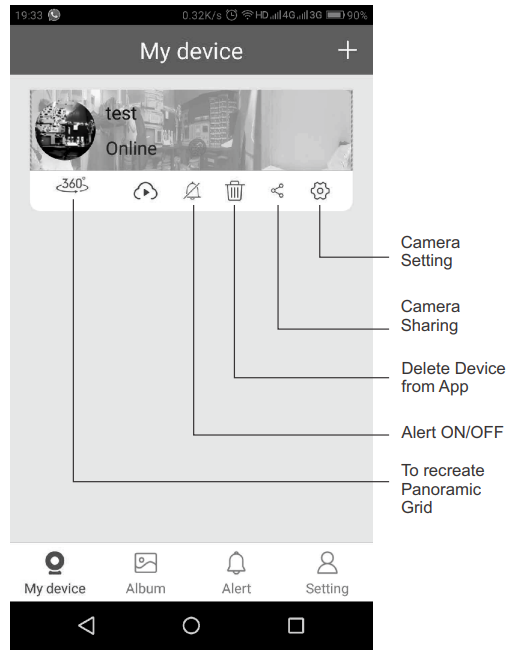
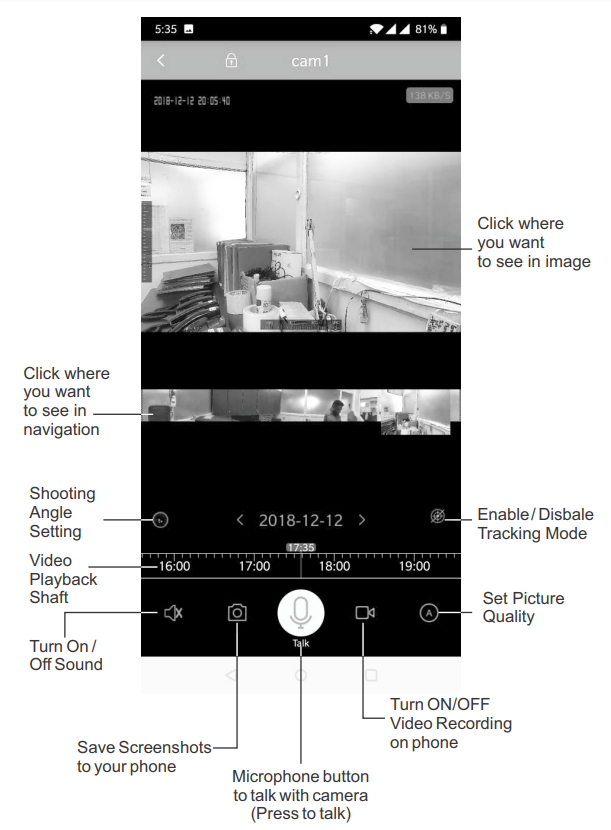
Note
- The realization of some functions (like real time video, remote playback of videos, voice talkback, PTZ control and camera sharing, push of warning information etc.) depends on the internet/network used.
- For audio communication between mobile and camera, keep talk icon pressed on phone to send your voice and release talk icon to listen the other party voice.
- For your safety and your families’ safety, please keep the registration password properly to prevent the leakage of personal information.
Troubleshooting
Here are some common issues and solutions for the Beetel Wireless Cloud Camera
- Camera offline: Check the power source and network connection. Try restarting the camera and reconnecting it to the network.
- Poor video quality: Adjust the camera settings or move it closer to the subject.
- Motion detection not working: Check the motion sensitivity settings and make sure the camera is positioned correctly.
- App not working: Check for updates and try reinstalling the app.
WARRANTY
The beetel Cloud Camera instrument is warranted for a period of 12 months from date of purchase. Warranty for Adaptor/UPS Adaptor(if applicable) is for 06 months from date of purchase.
Pros & Cons of Beetel Wireless Cloud Camera
Pros
- Full HD resolution and wide-angle lens
- Night vision and two-way audio
- Motion detection and instant alerts
- Weatherproof and versatile
Cons
- No local control options (only through the app)
- No audio recording (only two-way talk)
- May require frequent repositioning for optimal coverage
Customer Reviews of Wireless Cloud Cameras
Most customers are satisfied with the Wireless Cloud Camera , praising its clear video quality, easy setup, and reliable performance. Some common complaints include occasional connectivity issues and the need for frequent repositioning. Overall, the camera is a popular choice for those looking for a high-quality and affordable security solution.
Faqs
How should my Beetel CC2 be configured when I initially get it?
How can I view the Beetel CC2 camera stream from a distance?
How can I make sure my Beetel Wireless Cloud Camera CC2 is producing the highest-quality videos?
When the Beetel CC2 camera stops working, what should I do?
How do I make use of the Beetel CC2's motion sensing feature?
Can I store Beetel CC2 video recordings on my computer without utilising the cloud service?
What is the procedure for updating the firmware on a Beetel CC2 camera?
What is the best location and orientation for my home's Beetel CC2?
How can I be sure that the Beetel CC2 camera respects my privacy?
Does the Beetel Wireless Cloud Camera CC2 come with a warranty?
Leave a Comment
