How to Connect: Benq LCD Gaming Monitor EX2710S User Manual
Content
Introduction
The BenQ LCD Gaming Monitor EX2710S is a high-performance monitor designed specifically for serious gamers. With a 27-inch Full HD (1920 x 1080) display, 1 ms response time, and a refresh rate of up to 144Hz, this monitor delivers smooth and seamless gaming experiences. The estimated price of the EX2710S is around $249.99, and it was launched in the market on October 1, 2021.
Getting started
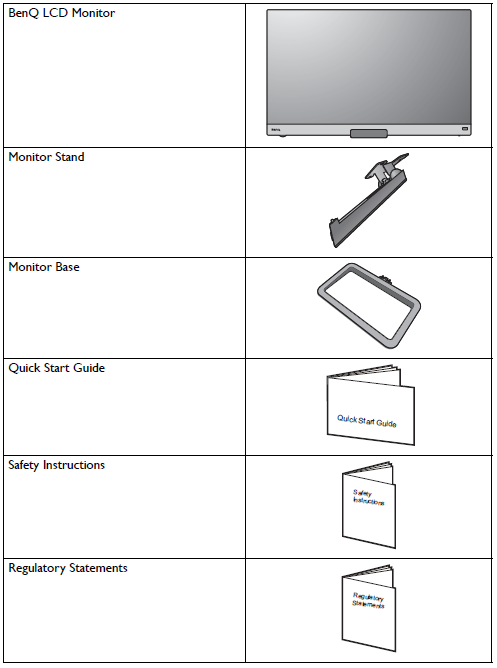
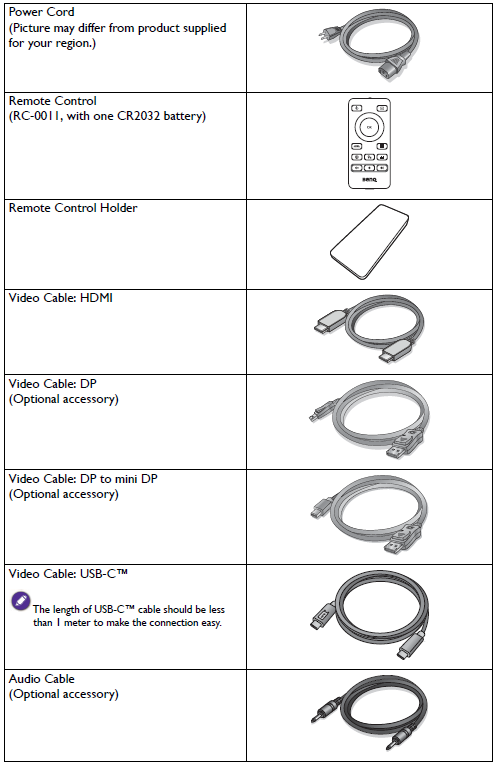
When unpacking please check you have the following items. If any are missing or damaged, please contact the place of purchase for a replacement.
HINTS
- Available accessories and the pictures shown here may differ from the actual contents and the product supplied for your region. And the package contents may subject to change without prior notice. For cables that are not supplied with your product, you can purchase them separately.
- Consider keeping the box and packaging in storage for use in the future when you may need to transport the monitor. The fitted foam packing is ideal for protecting the monitor during transport.
NOTE: Always keep the product and accessories out of reach of small children.
Front view
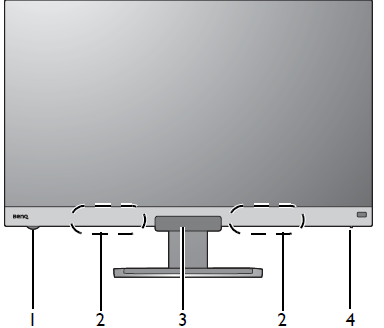
- Volume knob
- Speakers
- Light sensor/proximity sensor / IR receiver (for remote control)
Power indicator
Back view
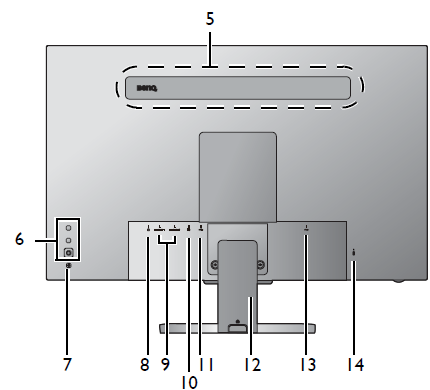
- Speakers
- Control buttons
- Power button
- Headphone jack
- HDMI socket x 2
- DisplayPort socket
- USB-C port (for data transfer only)
- Cable cover
- AC power input jack
- Kensington lock slot
The above diagram may vary depending on the model. The picture may differ from product supplied for your region.
Detailed Specifications
The BenQ EX2710S features a 27-inch IPS panel with a resolution of 1920 x 1080 pixels, a refresh rate of up to 144Hz, and a response time of 1 ms (MPRT). The monitor has a typical brightness of 350 nits, a contrast ratio of 1000:1, and a 178/178 viewing angle. It supports 16.7 million colors and features BenQ's proprietary Brightness Intelligence Plus (B.I.+) technology, which automatically adjusts the monitor's brightness and color temperature based on the ambient light in the room.
Installing the battery
- Turn over the remote control. Remove the battery cover as illustrated.
- Press down the upper part of the battery so you can remove the battery from the lower part as illustrated.
Remove the battery insulation sheet.
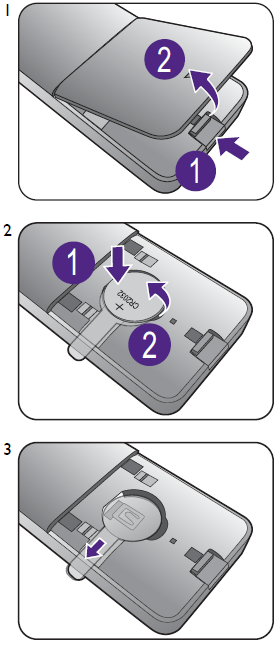
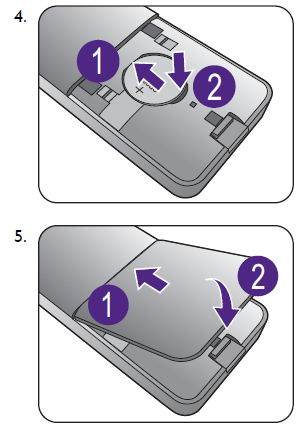
- Replace the provided battery (CR2032) onto the battery holder properly. Make sure that the positive terminal (+) faces upward.
Replace the battery cover. The remote control is ready to use now.
IMPORTANT
- Keep the remote control and the battery out of reach of children.
- The remote control supplied with this product contains a coin / button cell battery. If the coin / button cell battery is swallowed, it can cause severe internal burns in just 2 hours and can lead to death.
- If the remote control will not be used for an extended period of time, remove the battery.
Description
The BenQ EX2710S is a sleek and stylish gaming monitor that features a minimalist design with thin bezels and a sturdy stand. The monitor is easy to assemble and adjust, with a height-adjustable stand that can also tilt, swivel, and pivot for optimal viewing comfort. The EX2710S features BenQ's proprietary Eye Care technology, which reduces eye strain and fatigue during long gaming sessions. It also features built-in speakers, a headphone jack, and multiple ports for connectivity, including HDMI, DisplayPort, and USB.
How to assemble your monitor hardware
NOTE
- If the computer is turned on you must turn it off before continuing.
Do not plug-in or turn-on the power to the monitor until instructed to do so. - The following illustrations are for your reference only. Available input and output jacks may vary depending on the purchased model.
- Avoid finger pressure on the screen surface.
Attach the monitor base
TIP: Please be careful to prevent damage to the monitor. Placing the screen surface on an object like a stapler or a mouse will crack the glass or damage the LCD substrate voiding your warranty. Sliding or scraping the monitor around on your desk will scratch or damage the monitor surround and controls.
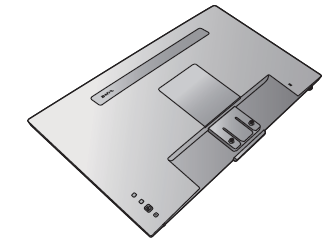
- Protect the monitor and screen by clearing a flat open area on your desk and placing a soft item like the monitor packaging bag on the desk for padding.
Gently lay the screen face down on a flat clean padded surface.
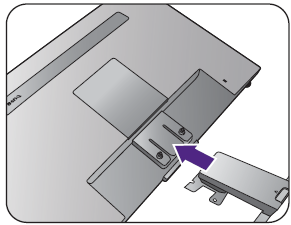
Attach the monitor stand to the monitor base as illustrated until it locks in place.
Raise the thumbscrew lid and tighten the thumbscrew as illustrated. Then push the lid back.
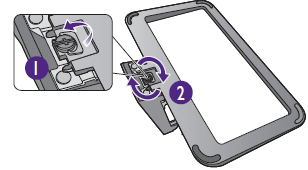
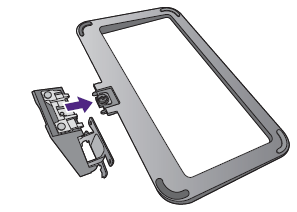
Orient and align the stand arm with the monitor, then push them together until they click and lock into place.
Tighten the screws that fix the stand to the monitor.
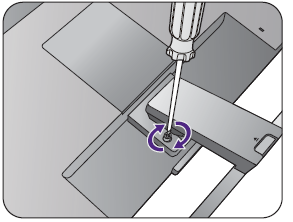
IMPORTANT: To secure or release a screw, a flat-head screwdriver or a coin is required.
TIP: Depending on the monitor size, there may be more than one screw that fixes the stand to the monitor. The illustrations in this document are for your reference only and may look different from the appearance of the product.Carefully lift the monitor, turn it over and place it upright on its stand on a flat even surface.

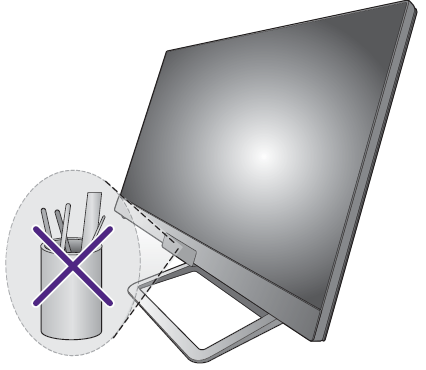
HINT: You should position the monitor and angle the screen to minimize unwanted reflections from other light sources.
NOTE: Your monitor is an edge-to-edge monitor and should be handled with care. Avoid finger pressure on the screen surface. Excessive force on the display is prohibited.
Remove the cover of the cable management system.
The stand arm also works as a cable management system that helps keep the cables neat and clean. Slide the cable cover up to align the marking on the cable cover with the unlock icon on the stand arm. Remove the cover as illustrated. You can have one power cord, two video cables, and one audio cable routed together.
Pass a cable through the cable management hole on the stand arm first while cabling. Start with the ones with bigger connectors.
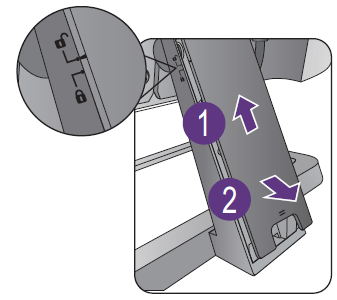
NOTE: Allow enough cable length while cabling to avoid loose connection and to save the pins or socket connectors from being bent or broken.
Connect the power cable to the monitor
- Pass the cable through the cable management hole on the stand arm first.
Plug one end of the power cord into the socket labeled on
.png) the rear of the monitor. Do not connect the other end to a power outlet just yet.
the rear of the monitor. Do not connect the other end to a power outlet just yet.
Connect the PC video cable
HINT: The video cables included in your package and the socket illustrations in this document may vary depending on the product supplied for your region.
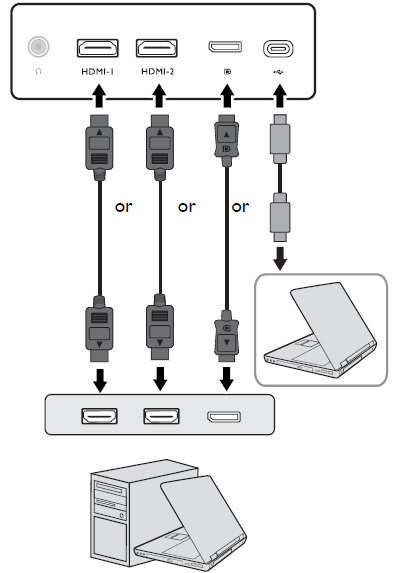
- Connect the plug of the HDMI cable to the HDMI port on the monitor. Connect the other end of the cable to the HDMI port of a digital output device.
- Connect the plug of the DP cable to the monitor video socket. Connect the other end of the cable to the computer video socket.
- Connect the plug of the supplied USB-C™ cable to the USB-C™ port on the monitor. Connect the other end of the cable to the USB-C™ port of a laptop. It allows signal, audio, and data transmission from the laptop to the monitor.
TIP: The USB-C port on the monitor transfers data only and does not support power delivery to the laptop. Additional power supply to the connected laptop is required.
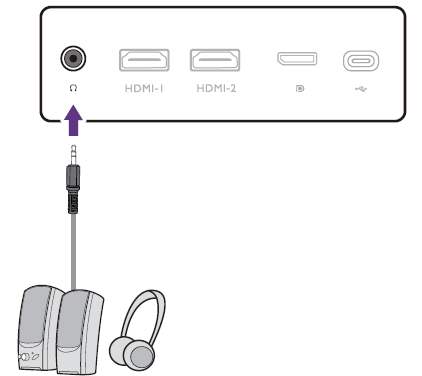
Connect the audio cable
You may connect headphones to the headphone jack found on the back side of the monitor.
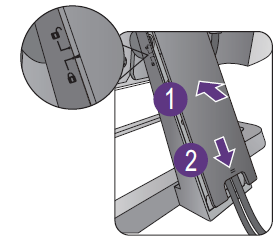
Install the cable cover
After all cables have been connected to the monitor, work with the cable management system to route the cables properly.
Align the marking on the cable cover to the unlock icon on the stand arm. Install the cable cover back to the stand arm, and slide down to lock it into place. The marking on the cable cover should be aligned with the lock icon on the stand arm by now.
Connect-to and turn-on the power
Plug the other end of the power cord into a power outlet and turn it on.
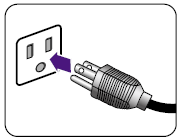
NOTE: Picture may differ from product supplied for your region.
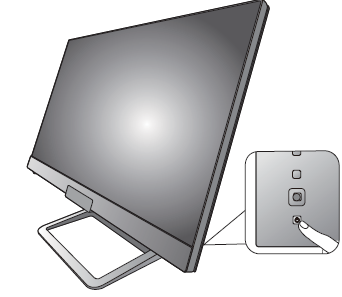
Turn on the monitor by pressing the power button on the monitor.
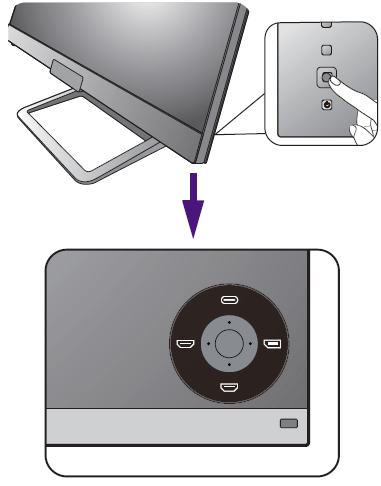
Turn on the computer too, and press the 5-way controller to select an input source. The displayed input icons vary depending on the available video inputs of the purchased model.
IMPORTANT: To extend the service life of the product, we recommend that you use your computer's power management function.
Using the monitor wall mounting kit
(Models with VESA standard mounting holes)
The back of your LCD monitor has a VESA standard mount with 100mm pattern, allowing the installation of a wall mount bracket. Before starting to install a monitor wall mounting kit, please read the precautions carefully.
Precautions
Install your monitor and monitor mounting kit on a wall with flat surface. Ensure that the wall material and the standard wall mount bracket (purchased separately) are stable enough to support the weight of the monitor. Refer to the product specifications on the website for weight information. Turn off the monitor and the power before disconnecting the cables from the LCD monitor.
Remove the monitor stand
Lay the screen face down on a clean and well-padded surface.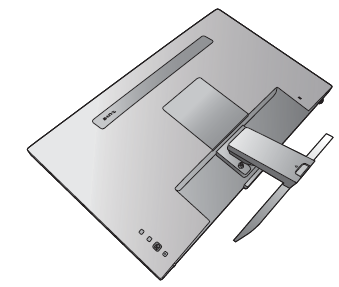
Remove the back cover
Use the finger nail or a flat head screwdriver to lift the back cover up and away from the monitor as illustrated.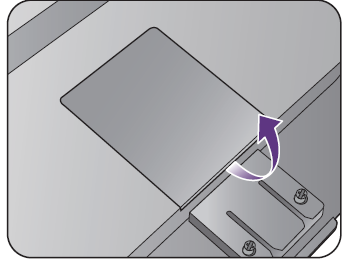
Follow the instruction manuals of the wall mount bracket you purchased to complete the installation
Use four M4 x 10 mm screws to fix a VESA standard wall mount bracket to the monitor. Make sure that all screws are tightened and secured properly. Consult a professional technician or BenQ service for wall mount installation and safety precautions.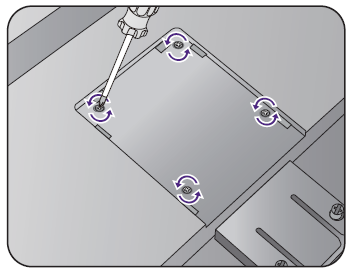
Setup Guide
To set up the BenQ EX2710S, follow these steps:
- Unbox the monitor and attach the base to the stand using the screws provided.
- Attach the stand to the monitor and tighten the screws.
- Connect the monitor to a power source using the included power cable.
- Connect your computer or gaming console to the monitor using an HDMI or DisplayPort cable.
- Turn on the monitor and use the on-screen display (OSD) menu to adjust the settings to your preferences.
Power safety
Please follow these safety instructions for best performance, and long life for your monitor.

- The AC plug isolates this equipment from the AC supply.
- The power supply cord serves as a power disconnect device for pluggable equipment. The socket outlet should be installed near the equipment and be easily accessible.
- This product should be operated from the type of power indicated on the marked label. If you are not sure of the type of power available, consult your dealer or local power company.
- The Class I pluggable equipment Type A must be connected to protective earth.
- An approved power cord greater or equal to H03VV-F or H05VV-F, 2G or 3G, 0.75mm2 must be used.
- Use only the power cord provided by BenQ. Never use a power cord that appears to be damaged or frayed.
For Germany only:
- (If the weight of the product is less than or equal to 3 kg) An approved power cord greater or equal to H03VV-F, 3G, 0.75mm2 must be used.
- (If the weight of the product is more than 3 kg) An approved power cord greater or equal to H05VV-F or H05RR-F, 3G, 0.75mm2 must be used.
- (If a remote control is provided) RISK OF EXPLOSION IF BATTERY IS REPLACED BY AN INCORRECT TYPE. DISPOSE OF USED BATTERIES ACCORDING TO THE INSTRUCTIONS.
Care and cleaning
- Do not place the monitor face down on the floor or a desk surface directly. Otherwise, scratches on the panel surface may occur.
- The equipment is to be secured to the building structure before operation.
- (For models that support wall or ceiling mounting)
- Install your monitor and monitor mounting kit on a wall with flat surface.
- Ensure that the wall material and the standard wall mount bracket (purchased separately) are stable enough to support the weight of the monitor.
- Turn off the monitor and the power before disconnecting the cables from the LCD monitor.
- Always unplug the product from the power outlet before cleaning. Clean the LCD monitor surface with a lint-free, non-abrasive cloth. Avoid using any liquid, aerosol or glass cleaners.
- Slots and openings on the back or top of the cabinet are for ventilation. They must not be blocked or covered. Your monitor should never be placed near or over a radiator or heat sources, or in a built-in installation unless proper ventilation is provided.
- Do not place heavy loads on the monitor to avoid possible personal injury or damage to the monitor.
- Consider keeping the box and packaging in storage for use in the future when you may need to transport the monitor.
- Refer to the product label for information on power rating, manufacture date, and identification markings.
Caution
- The monitor should be 50 ~ 70 cm (20 ~ 28 inches) away from your eyes.
- Looking at the screen for an extended period of time causes eye fatigue and may deteriorate your eyesight. Rest your eyes for 5 ~ 10 minutes for every 1 hour of product use.
- Reduce your eye strain by focusing on objects far way.
- Frequent blinking and eye exercise help keep your eyes from drying out.
Troubleshooting
The image is blurred.
Download Resolution file from the website (see Product support on page 3). Refer to "Adjusting the Screen Resolution". And then select the correct resolution, refresh rate and make adjustments based on these instructions.
Does the blurring only occur at resolutions lower than the native (maximum) resolution?
Download Resolution file from the website. Refer to "Adjusting the Screen Resolution". Select the native resolution.
Pixel errors can be seen.
One of several pixels is permanently black, one or more pixels are permanently white, one or more pixels are permanently red, green, blue or another color.
- Clean the LCD screen.
- Cycle power on-off.
- These are pixels that are permanently on or off and is a natural defect that occurs in LCD technology.
The image has a faulty coloration.
It has a yellow, blue or pink appearance.
Go to Color > Advanced > Reset Color, and then choose YES to reset the color settings to the factory defaults.
If the image is still not correct and the OSD also has faulty coloration, this means one of the three primary colors is missing in the signal input. Now check the signal cable connectors. If any pin is bent or broken off, please contact your dealer to get necessary support.
The image is distorted, flashes or flickers.
Download Resolution file from the website. Refer to "Adjusting the Screen Resolution". And then select the correct resolution, refresh rate and make adjustments based on these instructions.
You are running the monitor at its native resolution, but the image is still distorted.
Images from different input sources may appear distorted or stretched on the monitor running at its native resolution. To have the optimal display performance of each type of input sources, you can use the Display Mode function to set a proper aspect ratio for the input sources.
The image is displaced in one direction.
Download Resolution file from the website. Refer to "Adjusting the Screen Resolution". And then select the correct resolution, refresh rate and make adjustments based on these instructions.
Faint shadow from the static image displayed is visible on the screen.
- Activate the power management function to let your computer and monitor go into a low power "sleep" mode when not actively in use.
- Use a screensaver to prevent the occurrence of image retention.
Power LED indicator
The LED indicator is white or orange.
- If the LED lights up in solid white, the monitor is powered on.
- If the LED is illuminated in white and there is a message Out of Range on the screen, this means you are using a display mode that this monitor does not support, please change the setting to one of the supported mode. Download Resolution file from the website (see Product support on page 3). Refer to "Adjusting the Screen Resolution". And then select the correct resolution, refresh rate and make adjustments based on these instructions.
- If the LED is illuminated in orange, the power management mode is active. Press any button on the computer keyboard or move the mouse. If that does not help, check the signal cable connectors. If any pin is bent or broken off, please contact your dealer to get necessary support.
- If the LED is off, check the power supply mains socket, the external power supply and the mains switch. Turn on the LED indicator from System > LED Indicator.
OSD controls
The OSD controls are inaccessible.
To unlock the OSD controls when it is preset to be locked, press and hold any key for 5 seconds.
OSD messages
A message Out of Range on the screen during computer boot up process.
If there is a message Out of Range on the screen during computer boot up process, this means computer compatibility caused by operating system or graphic card. The system will adjust the refresh rate automatically. Just wait until the operating system is launched.
Audio
No sound can be heard from the built-in speakers.
- Check whether the desired cable to input audio signals is properly connected. See Connect the audio cable. on page 20 for details.
- Increase the volume (volume may be muted or too low).
- Remove your headphone and/or external speakers. (If they are connected to the monitor, the built-in speakers are automatically muted.)
No sound can be heard from the connected external speakers.
- Remove your headphone (if the headphone is connected to the monitor).
- Check whether the headphone jack is properly connected.
- If the external speakers are USB-powered, check whether the USB connection is OK.
- Increase the volume (volume may be muted or too low) on the external speakers.
- If USB-C™ connection is established, make sure the appropriate audio output setting on your laptop has been selected. You may look for options similar to "USB headphone."
Sensors
The light sensor of the monitor does not work well.
The light sensor is located at the front bottom of the monitor. Please check:
- If you have removed the sensor protection sticker.
- If the Bright Intelligence / Bright Intelligence Plus function has been turned on. Check Eye Care > B.I.+ (Bright Intelligence Plus)
- If there are any obstacles in front of the sensor that keep the sensor from detecting the light properly.
- If there are any objects or clothing in bright colors in front of the sensor. Bright colors (especially white and fluorescent colors) reflect light and the sensor cannot detect the main light sources.
HDR
There is a message HDR: Emulated showing on the screen.
This means the input content is not HDR-compatible and the monitor is in HDR-emulated mode. Refer to Working with HDR technology on page 36 to check if a supported player, content, and the certified cable are used.
USB-C connection (models with USB-C ports)
No video or audio output from the laptop with USB-C connection.
Check the cable connections and menu settings in the following order.
- Check if the USB-C cable has been connected to the monitor and the laptop properly. See Connect the PC video cable. on page 20 for more information.
- Check if the input source has been selected to USB-C from Input.
Remote control
The monitor does not respond to the remote control.
- Check if the remote control and the monitor are within the effective range and there are no obstacles between them. See The remote control on page 30 for more information.
- The remote control’s battery is running low. Replace the battery with a new one. See Installing the battery on page 15 for more information.
- Check if the OSD controls are locked. To unlock the OSD controls, press and hold any key on the rear of the monitor for 5 seconds.
Pros & Cons
Pros
- Fast response time and high refresh rate
- Minimalist design with thin bezels
- Built-in Eye Care technology
- Multiple ports for connectivity
- Easy to assemble and adjust
Cons
- Only supports Full HD resolution
- May be too large for some desks
- Speakers may not be sufficient for some users
Faqs
What is the refresh rate of the BenQ EX2710S?
What is the response time of the BenQ EX2710S?
What ports does the BenQ EX2710S have?
What is the resolution of the BenQ EX2710S?
Does the BenQ EX2710S support G-Sync or FreeSync?
How easy is it to assemble the BenQ EX2710S?
Leave a Comment