How to Operate: Benq Digital Projector MX535P User Manual

Content
Introduction
An excellent choice for any setting, whether you're in the office or at home. The MX535P guarantees vivid and clear presentations in any setting thanks to its high brightness, excellent picture quality, and simple setup. This projector's cutting-edge features and intuitive design make it ideal for both business presentations and family movie nights in.
Detailed Specifications
The BenQ Digital Projector MX535P has several key features that make it a great choice for those in need of a high-quality projector. These features include:
- Resolution: 1080p (1920x1080)
- Brightness: 3500 ANSI Lumens
- Contrast Ratio: 10000:1
- Lens Shift: Vertical ±5%
- Zoom Ratio: 1.3x
- Lamp Life: Up to 15000 hours
- Connectivity: HDMI, USB, VGA, RS232, 3.5mm audio
Important safety instructions
Your projector is designed and tested to meet the latest standards for safety of information technology equipment. However, to ensure safe use of this product, it is important that you follow the instructions mentioned in this manual and marked on the product.
Safety Instructions
Please read this manual before you operate your projector. Save it for future reference.

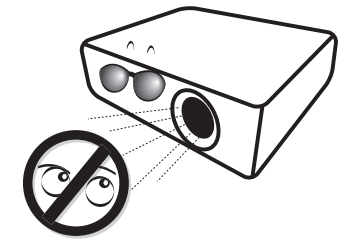
Do not look straight at the projector lens during operation. The intense light beam may damage your eyes.
Refer servicing to qualified service personnel.

Always open the lens shutter or remove the lens cap when the projector lamp is on.

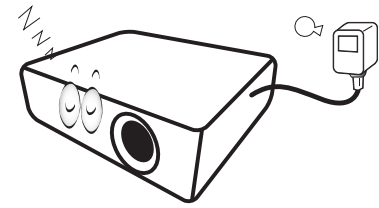
In some countries, the line voltage is NOT stable. This projector is designed to operate safely within a mains voltage between 100 to 240 volts AC, but could fail if power cuts or surges of ±10 volts occur. In areas where the mains voltage may fluctuate or cut out, it is recommended that you connect your projector through a power stabilizer, surge protector or uninterruptible power supply (UPS).
- Do not block the projection lens with any objects when the projector is under operation as this could cause the objects to become heated and deformed or even cause a fire.
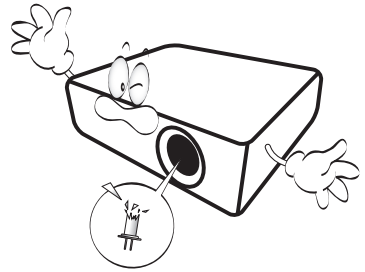
The lamp becomes extremely hot during operation. Allow the projector to cool for approximately 45 minutes prior to removing the lamp assembly for replacement.

Do not operate lamps beyond the rated lamp life. Excessive operation of lamps beyond the rated life could cause them to break on rare occasions.
Projector features
The projector offers the following features: • SmartEco starts your dynamic power saving SmartEco technology saves lamp power consumption depending on the content brightness level when SmartEco mode is selected.
- Longest hours lamp life with SmartEco technology SmartEco technology increases the lamp life hours when selecting SmartEco mode to lower the power consumption.
- ECO BLANK saves lamp power Pressing the ECO BLANK bottom to immediately hide the image, lowering the lamp power at the same time your image is hiding.
- Less than 0.5W in standby condition Less than 0.5W power consumption under standby mode.
- One-key auto-adjustment Pressing AUTO on the keypad or remote control to show the best picture quality immediately.
- Quick Cooling, Auto Power Off, Direct Power On Quick Cooling function speeds up the cooling process when turning off the projector. Auto Power Off function allows the projector to turn off automatically if no input signal is detected after a set period. Direct Power On turns your projector on when the power is fed.
- Instant Restart Selectable Instant Restart function enables you to restart the projector immediately within 90 seconds after turning it off.
- 3D Function supported Various 3D formats make the 3D function more flexible.
- The apparent brightness of the projected image will vary depending on the ambient lighting conditions, selected input signal contrast/ brightness settings, and is proportional to projection distance.
- The lamp brightness will decline over time and may vary within the lamp manufacturer's specifications. This is normal and expected behavior.
Shipping contents
Carefully unpack and verify that you have all of the items shown below. If any of these items are missing, please contact your place of purchase.
Standard accessories
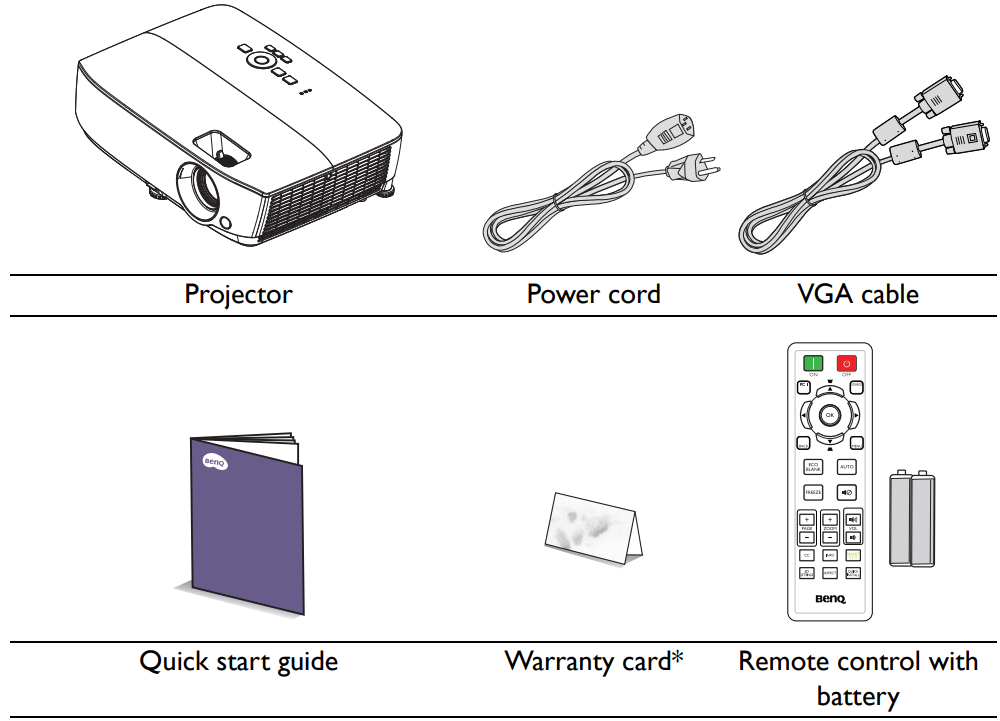
The supplied accessories will be suitable for your region, and may differ from those illustrated. *The warranty card is only supplied in some specific regions. Please consult your dealer for detailed information.
Optional accessories
- Spare lamp kit
- Ceiling mount kit
- Carry bag
- 3D glasses
Projector exterior view
Front/upper side
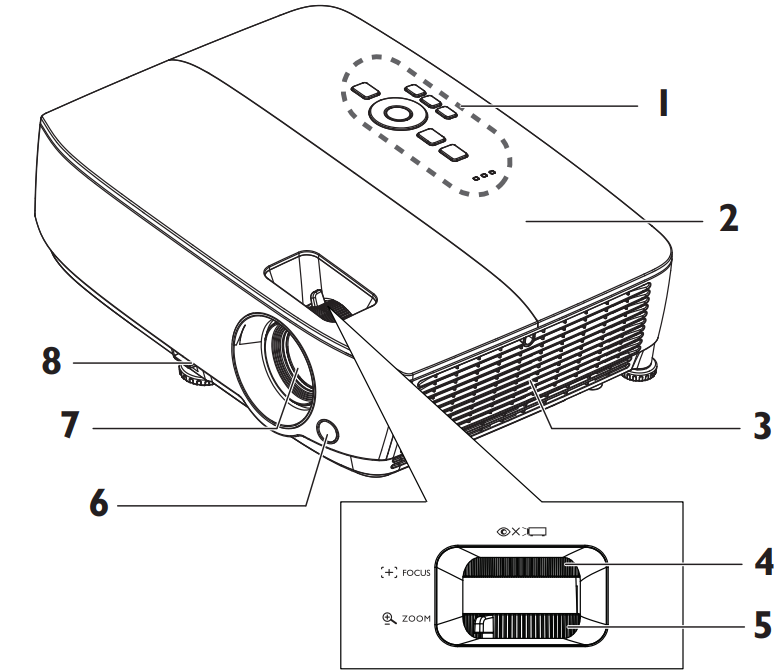
- External control panel
- Lamp cover
- Vent (air inhale)
- Focus ring
- Zoom ring
- Front IR remote sensor
- Projection lens
- Quick-release lever
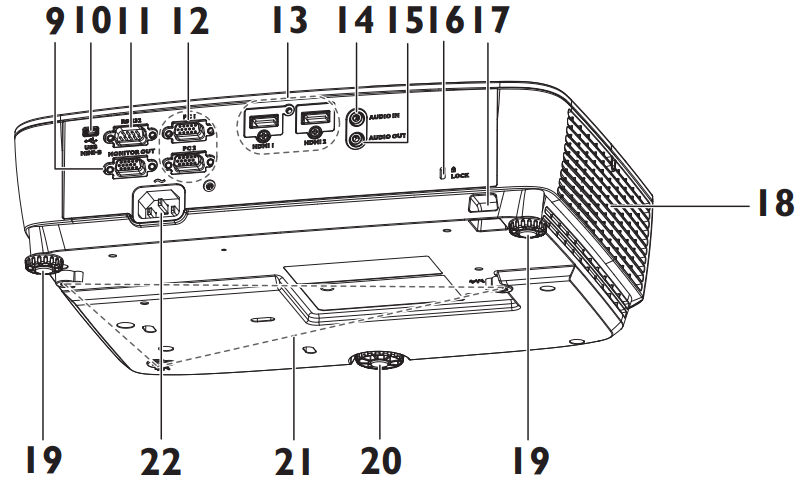
RGB signal output jack
Rear/lower side
- USB mini-B input jack
- RS-232 control port
- RGB (PC) signal input jack
- HDMI input jack
- Audio input jack
- Audio output jack
- Kensington anti-theft lock slot
- Security bar
- Vent (heated air exhaust)
- Rear adjuster foot
- Front adjuster foot
- Ceiling mount holes
- AC power cord inlet
Controls and functions
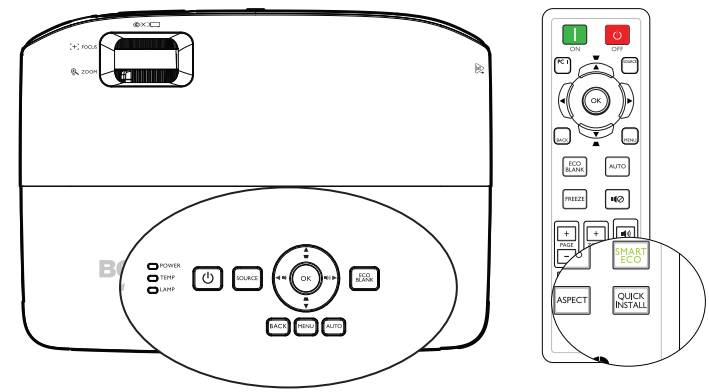
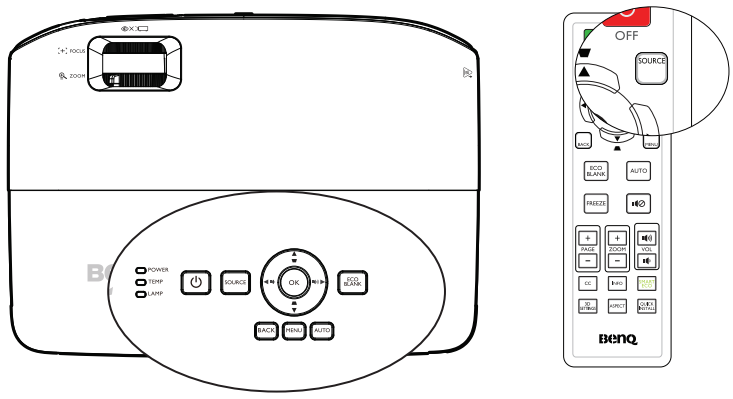
Projector
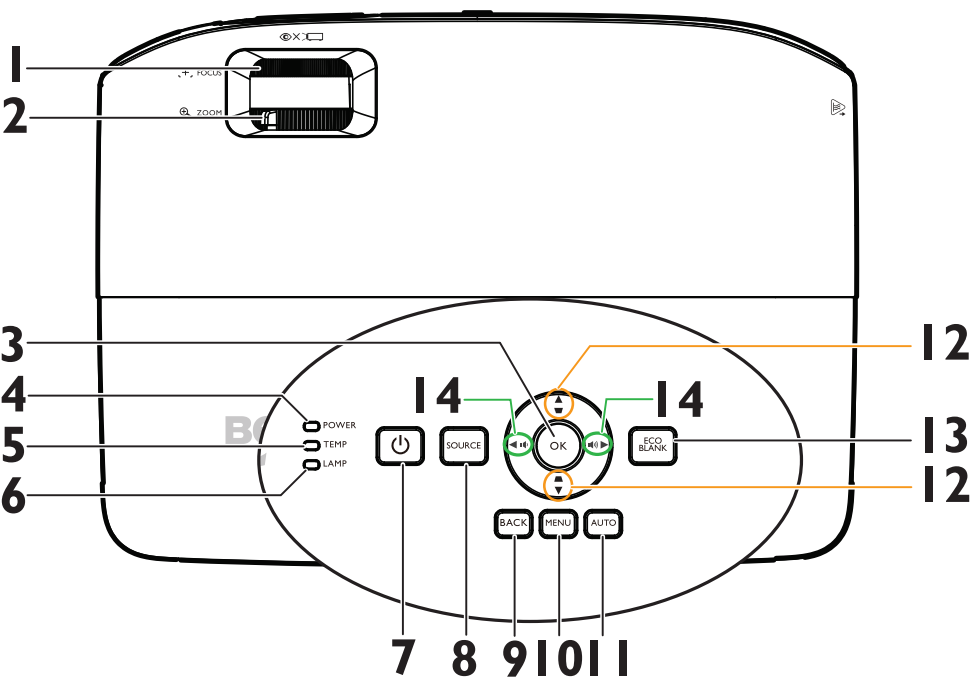
- Focus ring
Adjusts the focus of the projected image. - The zoom ring
Adjusts the size of the image. - OK
Select an available picture setup mode. Activates the selected On-Screen Display (OSD) menu item. - POWER indicator light
Lights up or flashes when the projector is in operation. - TEMP (temperature) warning light
Lights up red if the projector's temperature becomes too high. - LAMP indicator light
Indicates the status of the lamp. Lights up or flashes when the lamp has developed a problem.  POWER
POWER
Toggles the projector between standby mode and on.- SOURCE
Displays the source selection bar. - BACK
Goes back to the previous OSD menu or exits and saves menu settings when it is on the top level of the OSD menu. - MENU
Turns on the On-Screen Display (OSD) menu, exits, and saves menu settings. - AUTO
Automatically determines the best picture timings for the displayed image. - Keystone/Arrow keys (
 / Up,
/ Up, / Down)
Manually corrects distorted images resulting from an angled projection. - ECO BLANK
Used to hide the screen picture. - Volume
 /Arrow keys (
  / Left, / Right)
Adjust the sound level. When the On-Screen Display (OSD) menu is activated, the #12 and #14 keys are used as directional arrows to select the desired menu items and to make adjustments.
Operation
Starting up the projector
Plug the power cord into the projector and into a power outlet. Turn on the power outlet switch (where fitted). Check that the POWER indicator light on the projector lights orange after power has been applied.
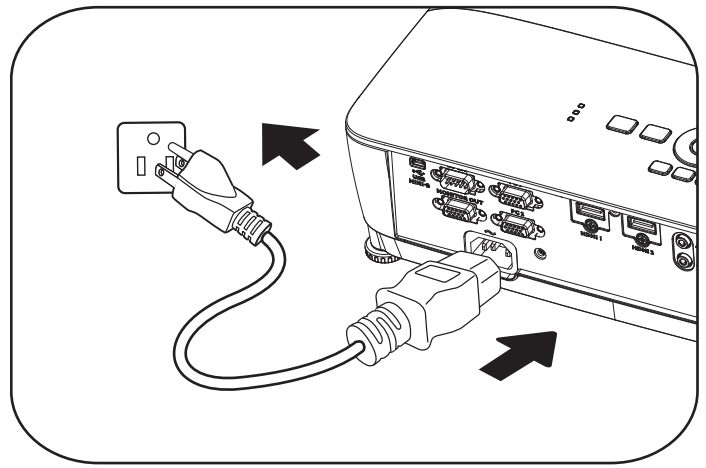
Please use the original accessories (e.g. power cable) only with the device to avoid possible dangers such as electric shock and fire.- If the Direct Power On function is activated in the SYSTEM SETUP: Basic > Operation Settings menu, the projector will turn on automatically after the power cord has been connected and power has been applied.
- If the Signal Power On function is activated in the SYSTEM SETUP: Basic > Operation Settings menu, the projector will turn on automatically when a VGA signal is detected.
Press
on the projector  or ON on the remote control to start the projector. The POWER flashes and stays orange when the projector is on. The startup procedure takes about 30 seconds. In the later stage of startup, a startup logo is projected. (If necessary) Rotate the focus ring to adjust the image's clearness. If the projector is still hot from the previous activity, it will run the cooling fan for approximately 90 seconds before energizing the lamp.
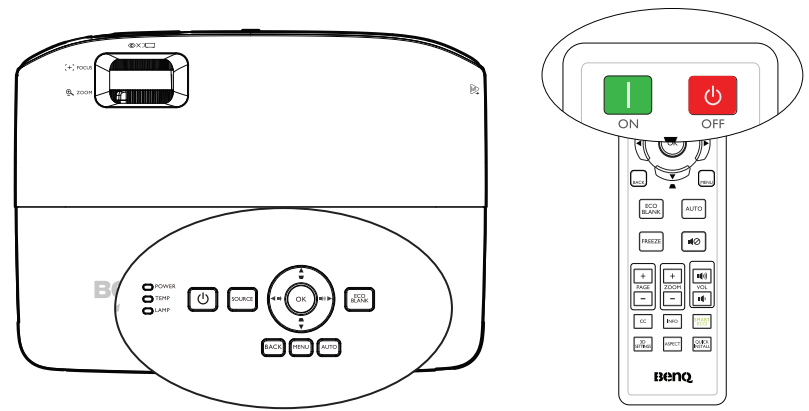
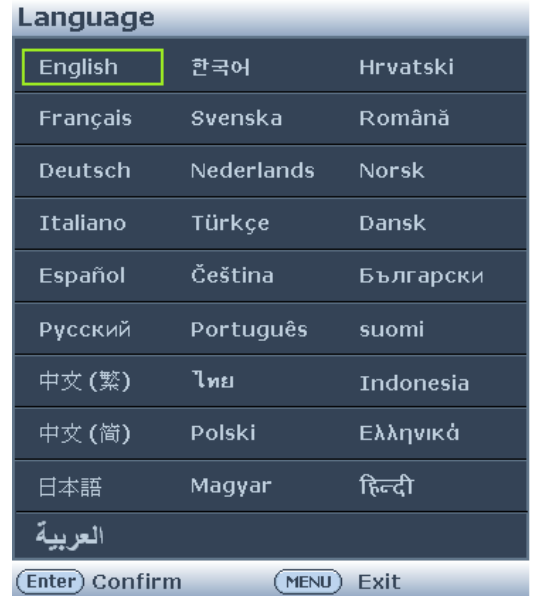
- If the projector is activated for the first time, select your OSD language following the on-screen instructions.
- If you are prompted for a password, press the arrow keys to enter a six-digit password.
- Switch all of the connected equipment on.
The projector will start to search for input signals. The current input signal being scanned displays on the screen. If the projector doesn't detect a valid signal, the message 'No Signal' will continue displaying until an input signal is found. You can also press Source on the projector or remote control to select your desired input signal.
If no signal is detected for 3 minutes, the projector automatically enters ECO BLANK mode.
Description
The BenQ Digital Projector MX535P is a versatile and easy-to-use projector that is suitable for use in a variety of settings. Its high brightness and contrast ratio make it a great choice for presentations and movie nights, while its range of connectivity options ensure that it can be easily integrated into any setup. Additionally, the projector's long lamp life means that it will provide years of reliable use, making it a smart investment for both homes and businesses.
Adjusting the projected image
Adjusting the projection angle
The projector is equipped with 1 front adjuster foot and 2 rear adjuster feet. These adjusters change the image height and projection angle.
To adjust the projector:
- Pull the quick-release lever and lift the front of the projector. Once the image is positioned where you want it, release the quick-release lever to lock the foot in position. You may also screw the front adjuster foot to change the image height.
Screw the rear adjuster feet to fine-tune the horizontal angle.
If the projector is not placed on a flat surface or the screen and the projector are not perpendicular to each other, the projected image becomes trapezoidal.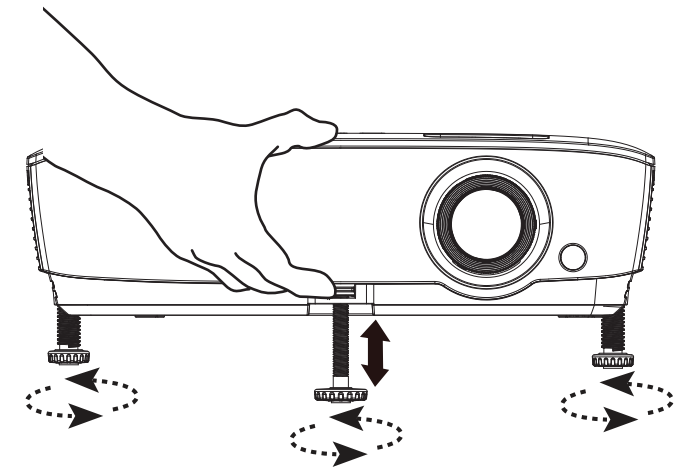
To correct this situation:
- Do not look into the lens while the lamp is on. The strong light from the lamp may cause damage to your eyes.
- Be careful when you press the adjuster button as it is close to the exhaust vent where hot air comes from.
Auto-adjusting the image
In some cases, you may need to optimize the picture quality. To do this, press AUTO on the projector or remote control. Within 3 seconds, the built-in Intelligent Auto Adjustment function will re-adjust the values of Frequency and Clock to provide the best picture quality.
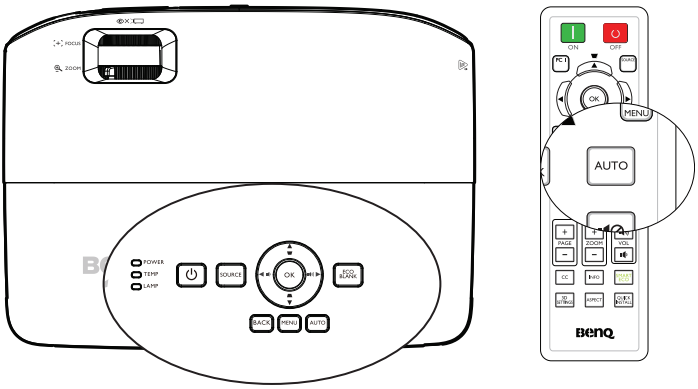
- This function is only available when the PC signal (analog RGB) is selected.
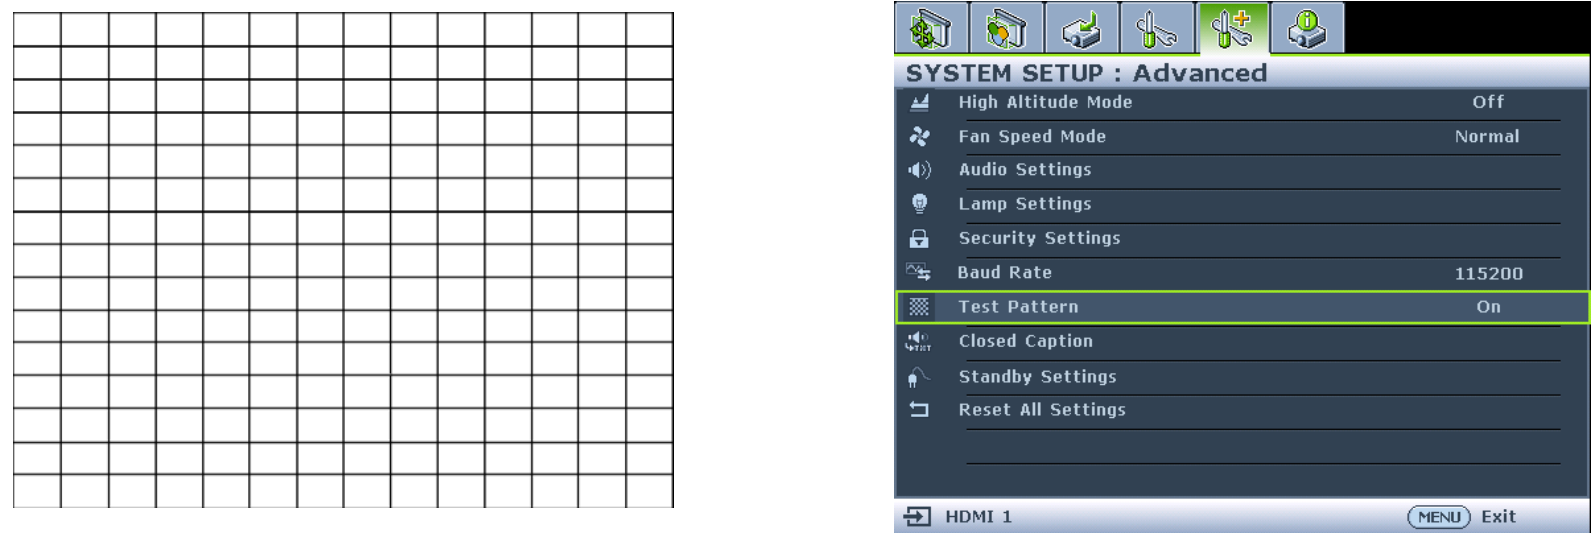
Use built-in test pattern
You can adjust the image shape and focus status by observing the input signal content or using the test pattern built-in OSD manual from OSD or remote control for better observing the shape changed.
Using the remote control: Press Quick Install to display the Quick Install menu, and go to the Test Pattern > On. The Test Pattern displays.
Using the OSD menu: Open the OSD menu and go to the SYSTEM SETUP: Advanced > Test Pattern > On. The Test Pattern displays.
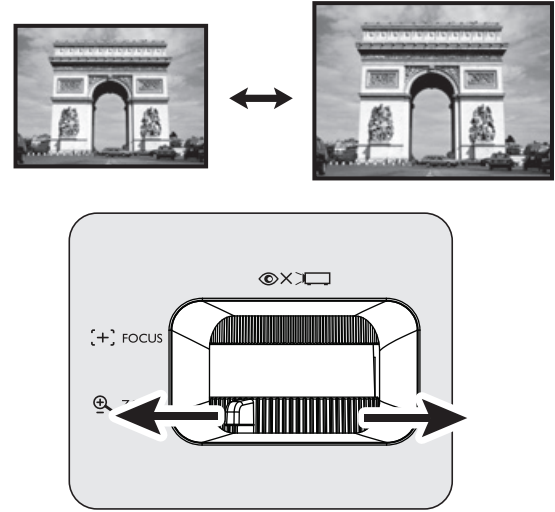
Fine-tuning the image size and clarity
Adjust the projected image to the size that you need using the zoom ring.
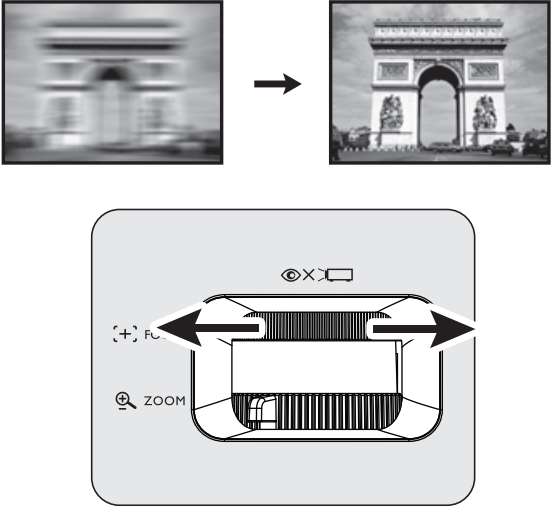
Then sharpen the image by rotating the focus ring.
Correcting keystone
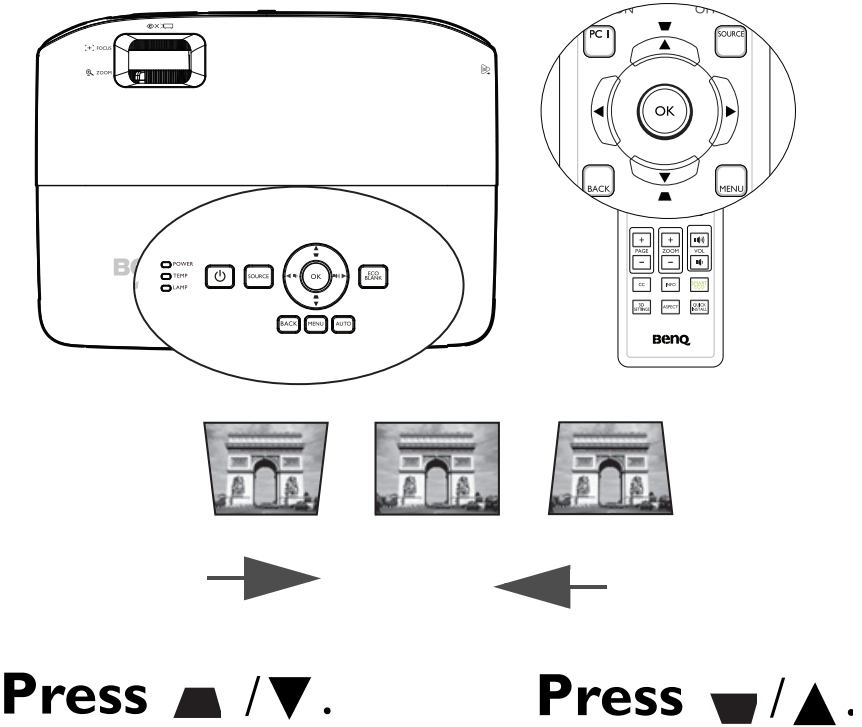
Keystoning refers to the situation where the projected image is noticeably wider at either the top or bottom. It occurs when the projector is not perpendicular to the screen. To correct this, besides adjusting the height of the projector, you will need to manually correct it following one of these steps:
Using the remote control
- Press
 on the projector or remote control to display the Keystone correction page.
 - Press
 to correct keystoning at the top of the image.
 - Press to
 correct keystoning at the bottom of the image.
Using the OSD menu
- Press MENU and then press
 until the DISPLAY menu is highlighted.
 - Press to highlight Keystone and press OK. The Keystone correction page displays.
- Press to correct keystoning at the top of the image or press to correct keystoning at the bottom of the image.
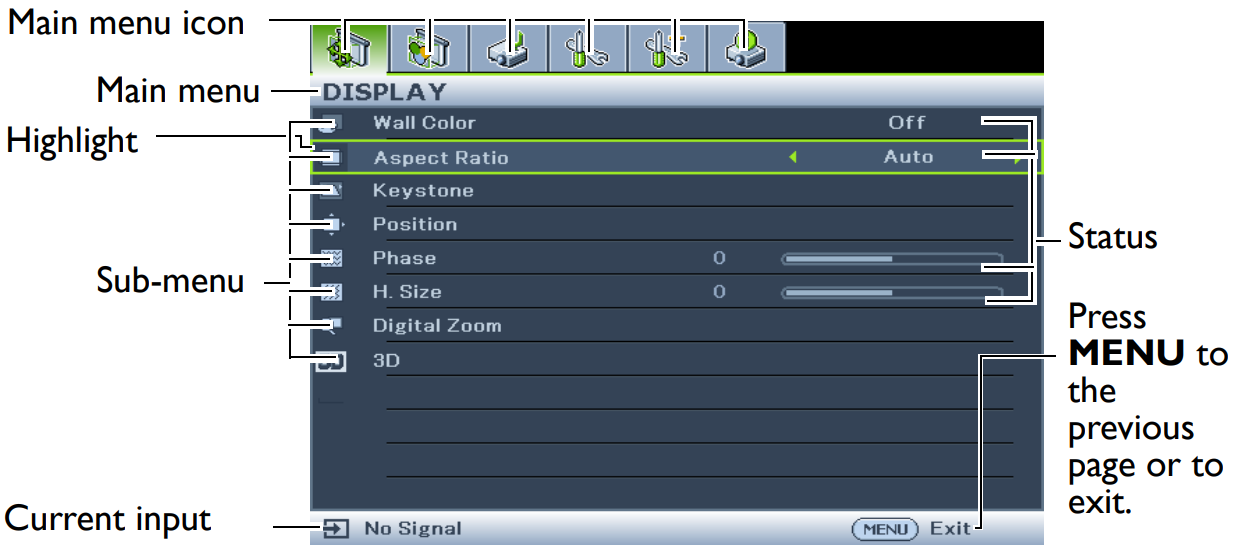
Using the menus
The projector is equipped with On-Screen Display (OSD) menus for making various adjustments and settings. Below is the overview of the OSD menu.
The following example describes how to set the OSD language.
Press MENU on the projector or remote control to turn the OSD menu on.
Use
to highlight the SYSTEM SETUP: Basic menu.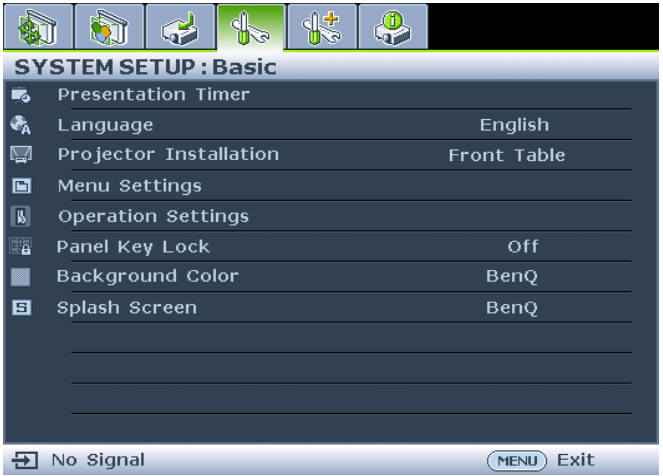
Press
 to highlight Language and press OK.
- Press
 to select a preferred language and press OK to leave and save the settings.
- Press MENU to open and close the OSD menu.
- Press BACK to go back to the previous OSD menu or exit and save menu settings when it is on the top level of the OSD menu.
Securing the projector
Using a security cable lock
The projector has to be installed in a safe place to prevent theft. Otherwise, purchase a lock, such as the Kensington lock, to secure the projector. You can locate a Kensington lock slot on the rear side of the projector. See item 16 on page 10 for details. A Kensington security cable lock is usually a combination of key(s) and the lock. Refer to the lock's documentation for finding out how to use it.
Utilizing the password function
For security purposes and to help prevent unauthorized use, the projector includes an option for setting up password security. The password can be set through the On-Screen Display (OSD) menu. WARNING: You will be inconvenienced if you activate the power-on lock functionality and subsequently forget the password. Print out this manual (if necessary) and write the password you used in this manual, and keep the manual in a safe place for later recall.
Setting a password
Once a password has been set, the projector cannot be used unless the correct password is entered every time the projector is started.
- Open the OSD menu and go to the SYSTEM SETUP: Advanced > Security Settings > Change Security menu. Press OK.
- Enter a new or current password. As pictured to the right, the four arrow keys ( ) respectively represent 4 digits (1, 2, 3, 4). According to the password you desire to set, press the arrow keys to enter six digits for the password.
- Confirm the new password by re-entering the new password. Once the password is set, the OSD menu returns to the Security Settings page with 'Off' shown in the row of Power on lock.
IMPORTANT: The digits being input will display as asterisks on-screen. Write your selected password down here in this manual in advance or right after the password is entered so that it is available to you should you ever forget it.
Password: __ __ __ __ __ __ Keep this manual in a safe place. - Select On by pressing / .
To leave the OSD menu, press MENU.

If you forget the password
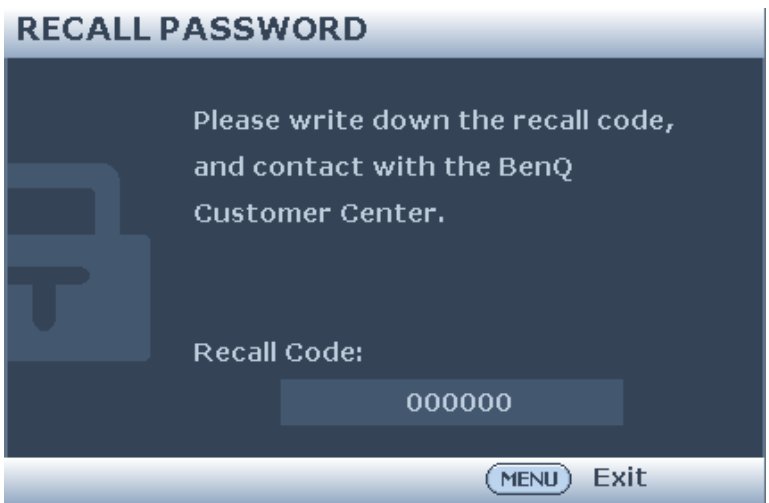
If the password function is activated, you will be asked to enter the six-digit password every time you turn on the projector. If you enter the wrong password, the password error message as pictured to the right displays lasting for three seconds, and the message 'INPUT PASSWORD' follows. You can retry by entering another six-digit password, or if you did not record the password in this manual, and you absolutely do not remember it, you can use the password recall procedure. If you enter an incorrect password 5 times in succession, the projector will automatically shut down in a short time.

Entering the password recall procedure
- Press and hold Auto on the projector or remote control for 3 seconds. The projector will display a coded number on the screen.
- Write down the number and turn off your projector.
Seek help from the local BenQ service center to decode the number. You may be required to provide proof of purchase documentation to verify that you are an authorized user of the projector.
Changing the password
- Open the OSD menu and go to the SYSTEM SETUP: Advanced > Security Settings > Change Password menu.
- Press OK. The message 'INPUT CURRENT PASSWORD' displays.
- Enter the old password.
If the password is correct, another message 'INPUT NEW PASSWORD' displays. • If the password is incorrect, the password error message displays. You can press MENU to cancel the change or try another password. - Enter a new password.
IMPORTANT: The digits being input will display as asterisks on-screen. Write your selected password down here in this manual in advance or right after the password is entered so that it is available to you should you ever forget it.
Password: __ __ __ __ __ __ Keep this manual in a safe place. - Confirm the new password by re-entering the new password.
- You have successfully assigned a new password to the projector. Remember to enter the new password next time the projector is started.
To leave the OSD menu, press MENU.

Disabling the password function
To disable password protection, go back to the SYSTEM SETUP: Advanced > Security Settings > Change Security menu after opening the OSD menu system. The message 'INPUT PASSWORD' displays. Enter the current password.
- If the password is correct, the OSD menu returns to the Security Settings page with 'Off' shown in the row of Power on lock. You will not have to enter the password next time you turn on the projector.
- If the password is incorrect, the password error message displays. You can press MENU to cancel the change or try another password. Though the password function is disabled, you need to keep the old password in hand should you ever need to re-activate the password function by entering the old password.
Switching input signal
The projector can be connected to multiple devices at the same time. However, it can only display one full screen at a time. When starting up, the projector automatically searches for the available signals. Be sure the Quick Auto Search function in the Source menu is On (which is the default of this projector) if you want the projector to automatically search for the signals. You can also manually cycle through the available input signals.
Press Source on the projector or remote control. A source selection bar displays.
Press
 until your desired signal is selected and press OK. Once detected, the selected source information will display on the screen for seconds. If there is multiple equipment connected to the projector, repeat steps 1-2 to search for another signal.
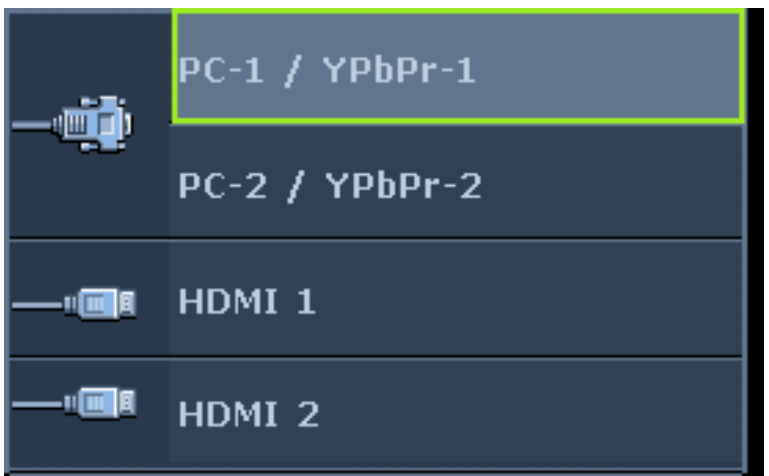
The brightness level of the projected image will change accordingly when you switch between different input signals.
The input signal type affects the options available for the Picture Mode. For best display picture results, you should select and use an input signal which outputs at this resolution. Any other resolutions will be scaled by the projector depending upon the 'aspect ratio' setting, which may cause some image distortion or loss of picture clarity.
Changing Color Space
In the unlikely event that you connect the projector to a device via the projector's HDMI input and the projected picture displays wrong colors, please change the color space to YUV.
- Press MENU and then press until the Source menu is highlighted.
- Press to highlight Color Space Conversion and press to select a suitable color space. This function is only available when the HDMI input port is in use.
Magnifying and searching for details
If you need to find the details on the projected picture, magnify the picture. Use the direction arrow keys for navigating the picture.
Using the remote control:
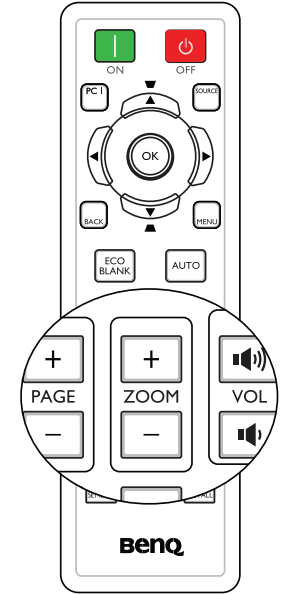
- Press ZOOM +/- to display the Zoom bar.
- Press ZOOM + to magnify the center of the picture. Press the key repeatedly until the picture size is suitable for your need.
- Use the directional arrows ( ) on the projector or remote control to navigate the picture.
- To restore the picture to its original size, press AUTO. You can also press ZOOM -. When the key is pressed again, the picture is further reduced until it is restored to the original size.
Using the OSD menu:
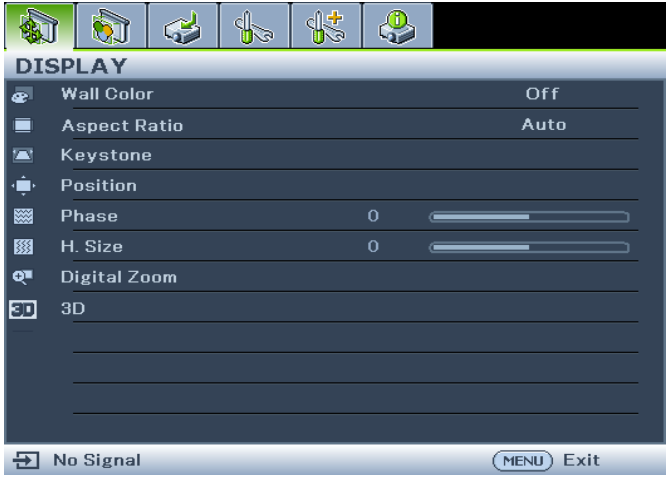
- Press MENU and then press until the DISPLAY menu is highlighted.
- Press to highlight Digital Zoom and press OK. The Zoom bar displays.
- Repeat steps 2-4 in the section of "Using the remote control" above. Or if you are using the projector control panel, continue to the following steps:
- Press
 on the projector repeatedly to magnify the picture to a desired size.
 - To navigate the picture, press OK to switch to the panning mode and press the directional arrows ( ) to navigate the picture.
- Use the directional arrows ( ) on the projector or remote control to navigate the picture.
- To reduce the size of the picture, press OK to switch back to the zoom in/out functionality, and press AUTO to restore the picture to its original size. You can also press repeatedly until it is restored to the original size.
The picture can only be navigated after the picture is magnified. You can further magnify the picture while searching for details.
Selecting the aspect ratio
The 'aspect ratio' is the ratio of the image width to the image height. With the advent of digital signal processing, digital display devices like this projector can dynamically stretch and scale the image output to a different aspect than that of the image input signal. To change the projected image ratio (no matter what aspect the source is):
Using the remote control:
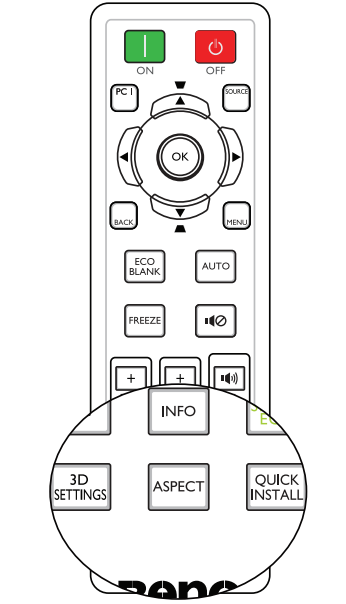
- Press ASPECT to show the current setting.
- Press ASPECT repeatedly to select an aspect ratio to suit the format of your display requirements.
Using the OSD menu:
- Press MENU and then press until the DISPLAY menu is highlighted.
- Press to highlight Aspect Ratio.
- Pressto select an aspect ratio to suit the format of your display requirements.
About the aspect ratio
- Auto: Scales an image proportionally to fit the projector's native resolution in its horizontal or vertical width. This is suitable for the incoming image which is neither in 4:3 nor 16:9 and you want to make most use of the screen without altering the image's aspect ratio.
- Real: The image is projected as its original resolution and resized to fit within the display area. For input signals with lower resolutions, the projected image will display smaller than if resized to full screen. You could adjust the zoom setting or move the projector towards the screen to increase the image size if necessary. You may also need to refocus the projector after making these adjustments.
- 4:3: Scales an image so that it is displayed in the center of the screen with a 4:3 aspect ratio. This is most suitable for 4:3 images like computer monitors, as it displays them without aspect alteration.
- 16:9: Scales an image so that it is displayed in the center of the screen with a 16:9 aspect ratio. This is most suitable for images which are already in a 16:9 aspect, as it displays them without aspect alteration.
- 16:10: Scales an image so that it is displayed in the center of the screen with a 16:10 aspect ratio. This is most suitable for images which are already in a 16:10 aspect, as it displays them without aspect alteration.
Setup Guide
Setting up the BenQ Digital Projector MX535P is a simple process.
- First, connect the projector to a power source and turn it on.
- Next, use the included remote control to navigate the projector's on-screen menu, and select the desired input source.
- Finally, adjust the projector's focus and zoom as needed to achieve the desired image size and clarity.
Troubleshooting
If you experience any issues with the BenQ Digital Projector MX535P, try the following troubleshooting steps:
- Make sure the projector is properly connected to a power source and the desired input source.
- Check the projector's lamp and air filters to ensure they are clean and free of debris.
- If the projector is not producing any image, try restarting it.
- If the image is distorted or not clear, adjust the projector's focus and keystone correction.
- If you are still experiencing issues, consult the projector's user manual or contact BenQ's customer support.
BenQ Digital Projector MX535P Pros & Cons
Pros
- High brightness and contrast ratio
- Easy to use and set up
- Long lamp life
- Range of connectivity options
Cons
- No wireless connectivity options
- No 3D capabilities
Faqs
What is the resolution of the Projector?
How bright is the BenQ Projector?
What is the contrast ratio of the BenQ?
How long is the lamp life of the MX535P?
What input sources does the BenQ Projector MX535P support?
How do I adjust the focus and keystone correction on the BenQ Projector MX535P?
How do I adjust the focus on the BenQ MX535P?
Leave a Comment