Bissell Carpet Cleaner PROHEAT ESSENTIAL 1887,1956 SERIES User Manual
Content
Introduction of Bissell Carpet Cleaner PROHEAT ESSENTIAL 1887,1956 SERIES
The Bissell Carpet Cleaner PROHEAT ESSENTIAL 1887,1956 SERIES is a powerful and efficient cleaning solution designed to help you maintain clean and fresh carpets. Launched in 2021, this innovative product offers a range of features that make it a popular choice for homeowners and pet owners alike. The estimated price of this product is around $200 to $250, making it an affordable option for those looking for a high-quality carpet cleaner.
Detailed Specifications
The Bissell Carpet Cleaner PROHEAT ESSENTIAL 1887,1956 SERIES boasts a number of key features, including:
- Powerful suction and cleaning performance, with a 12-amp motor that delivers exceptional results on all carpet types.
- Dual-tank system that keeps clean and dirty water separate, making it easy to fill and empty the tanks as needed.
- Heat Wave Technology that helps maintain a consistent water temperature, ensuring optimal cleaning performance throughout the entire cleaning process.
- A lightweight and compact design, weighing just 16.5 pounds, making it easy to maneuver around furniture and other obstacles.
- A long 22-foot power cord that provides plenty of reach, allowing you to clean large areas without having to constantly switch outlets.
Product View of PROHEAT ESSENTIAL 1887,1956 SERIES
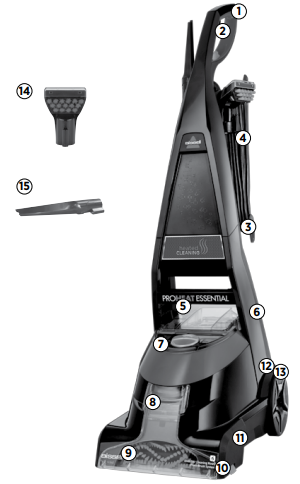

- Ergonomically Designed Handle
- Spray Trigger
- Cord Wrap
- Power Cord
- Integrated Carry Handle
- Tank Carry Handle
- Ready Tools™ Dial
- Removable Nozzle
- Dirt lifter Power Brush
- Edge Sweep Brushes
- Belt Access Door (underside of machine)
- Recline Pedal
- Power Switch (red pedal)
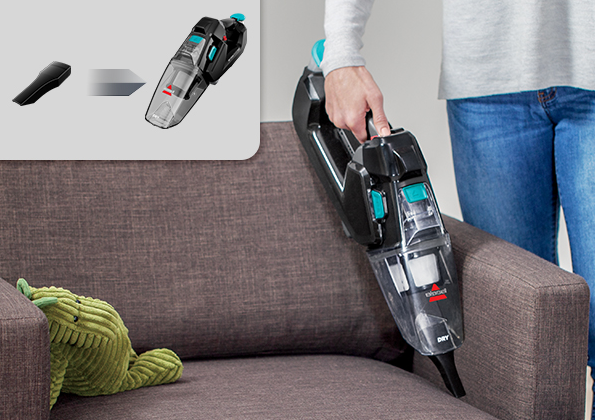
- 3” Tough Stain Tool
- Spraying Crevice Tool
Some models come with a tool holder feature as pictured here. This is an extra place to hold an accessory. We recommend keeping your 3" tool in this pocket when you are not using your hose and tool.
PROHEAT ESSENTIAL Assembly
The only tool you will need to assemble your cleaner is a Phillips head screwdriver.
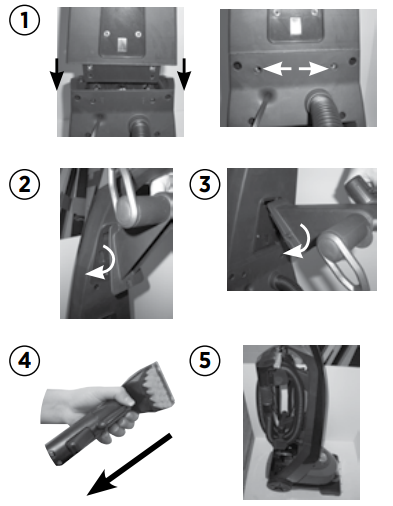
- Slide handle assembly onto lower body and secure with two long screws.
- Attach upper hose rack to back of handle assembly by guiding the hook up into slot location and pressing firmly upward until it is seated flush with the back of the machine. Secure 1 short screw through the hole in the bottom of the upper hose and cord rack.
- Attach lower hose rack by guiding the hook up into slot location and pressing firmly upward until it is seated flush with the back of the machine. Secure 2 short screws through holes on either side of the bottom hose and cord rack.
- Attach Tough Stain tool to end of hose.
- Wrap flex hose around hose and cord rack and secure it into notch on holder and wrap cord around opposite side of hose and cord rack.
- Place tank in the bottom of the machine.
Before you clean
- Plan activities to give your carpet time to dry.
- Move furniture to another area if cleaning an entire room (optional).
- Vacuum area with a dry vacuum cleaner before deep cleaning.
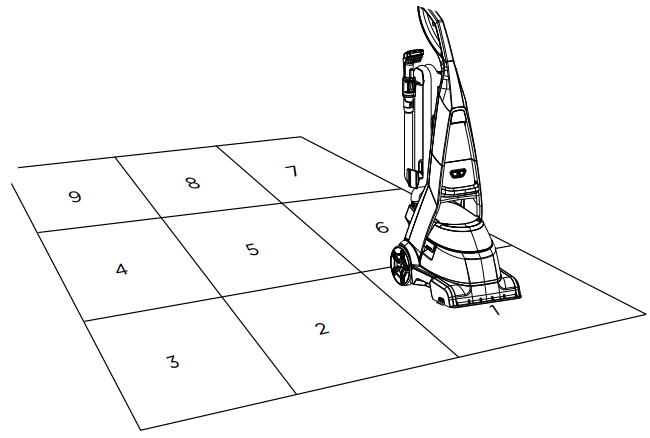
- Plan your cleaning route to leave an exit path. It is best to begin cleaning in the corner farthest from your exit.
- Pretreating (optional)
Pretreating is recommended to improve cleaning effectiveness for heavily soiled carpet in high traffic areas such as entry ways and hallways.
To pretreat
- Using the BISSELL Stain Pretreat, generously spray evenly over soiled area, do not over wet.
- Wait 3-5 minutes before deep cleaning.
- Clean as normal using your BISSELL deep cleaner.
Cleaning Formula

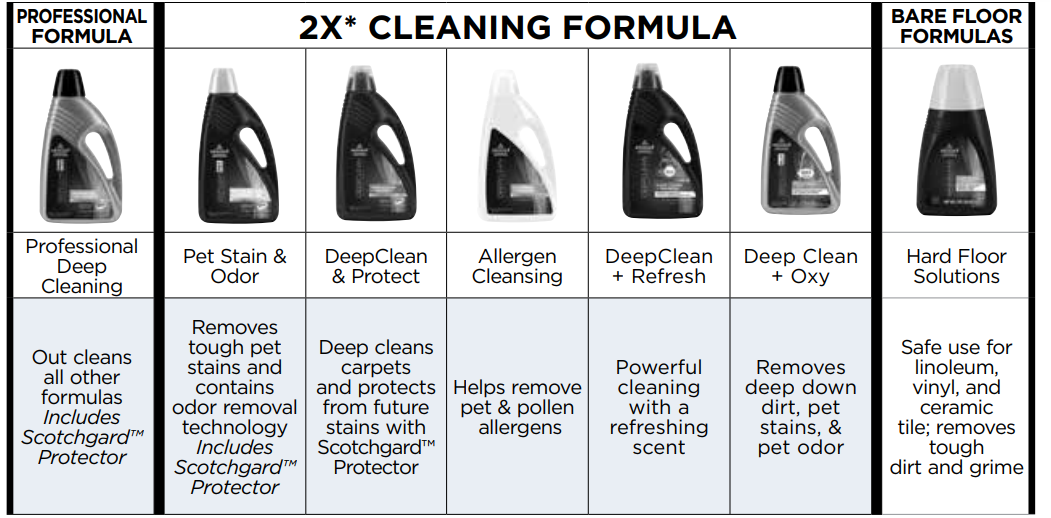
WARNING: To reduce the risk of fire and electric shock due to internal component damage, use only BISSELL cleaning fluids intended for use with the deep cleaner.
- Keep plenty of genuine BISSELL 2X* formula on hand so you can clean and protect whenever it fits your schedule.
- Always use genuine BISSELL deep cleaning formulas. Non-BISSELL cleaning solutions may harm the machine and may void the warranty.
ONLY BISSELL Protects from future stains with Scotchgard™ Protector. Scotchgard™ is a trademark of 3M®. *2.5 fl. oz. of 2X concentrated formula is equivalent to 5.0 fl. oz. of non-concentrated formula.
Tips Before Carpet Cleaning
- If cleaning an entire room, consider moving your furniture to another area.
- Use a dry vacuum cleaner over area before using your deep cleaner.
- Pre-treat stains with BISSELL Pre-Treat to improve performance on coffee stains and ground-in dirt.
Operations of Bissell Carpet Cleaner
Machine prep
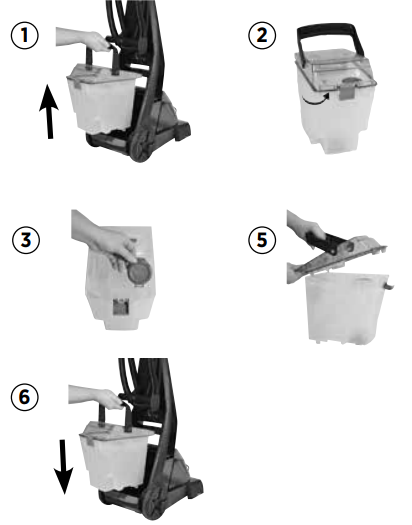
- Remove the tank from the base of the machine by lifting the tank carry handle.
- Carry like a bucket to the sink. Pull upward on bottom edge of the latch in the back of the tank to unhook and remove the lid.
- Pull up on the bladder fill cover that says “Fill Here”. Fill the bladder with clean hot tap water (140°F/60°C MAX). *Do not boil or microwave water as it can destroy the bladder.
- Using the provided measuring cup, fill to the indicated fill line on the measuring cup (2.5 floz) and pour in to the bladder.
- Replace the tank lid by seating the front edge of the tank before the back, then lock the latch in place.
NOTE: Remember to secure the lid and test to make sure it is secure before picking up the tank. - Place tank into machine base, seating firmly in place.
Carpet cleaning

- Plug the deep cleaner into a proper outlet. Set Ready Tools dial to the Floor Cleaning setting. Turn the power on by pressing the red power switch on the back of the unit with your foot.
- With your foot, press the gray handle release lever located on the back of unit below water tank to detent handle.
- While pressing the spray trigger, make one slow forward wet pass and another back. Let the BISSELL deep cleaning formula, and Dirt Lifter Power Brush do the work for you.
Caution: Do not over wet. - Release the spray trigger and make one slow forward and backward pass over the same area to remove any residual dirty water and aid in drying.
- Repeat cleaning passes until solution being suctioned up appears clean. Continue passes without pressing the trigger until you can’t see any more water being suctioned up.
Empty the 2-in-1 water tank/clean removable nozzle

- Turn power switch off. Remove the 2-in-1 water tank from the base using the tank carry handle. Carry the tank like a bucket to a utility sink where you will dispose of the collection water. Pull upward on bottom edge of the latch in the back of the tank to unhook and remove the lid.
- Empty collection water from bottom of tank.
- After each use, remove any debris trapped in the red lint screen on the base of the machine while the tank is still out of the machine.
- If nozzle needs to be cleaned: remove by grasping handle at the top and pulling forward. Clean removable nozzle by rinsing under running water.
- When finished, replace nozzle by slightly raising front of machine to line up slots on the base with the hooks on nozzle. Attach at base first and then click nozzle into place.
NOTE: If nozzle is not attached properly loss of suction will occur. - Check manufacturer’s tag before cleaning. “W” or “WS” on the tag means you can use this deep cleaner. If the tag is coded with “X” or “S” (with a diagonal strike through), or says “Dry Clean Only,” do not proceed. Do not use on velvet or silk. If manufacturer’s tag is missing or not coded, check with your furniture dealer.
- Check for colorfastness in an inconspicuous place.
- If possible, check upholstery stuffing. Colored stuffing may bleed through fabric when wet.
- Plan activities to give upholstery time to dry.
- Vacuum thoroughly to pick up loose debris and pet hair. Use a vacuum with a brush attachment and a crevice tool to clean in fabric folds and tufts.
- Set the Ready Tools dial to the TOOLS setting. This will allow spray and suction from the hose.
- Attach the cleaning tool of your choice to the end of the hose. If using a Deep Reach tool, follow section below.
- Clean by pressing the trigger to spray solution onto the area to be cleaned. Slowly move the tool back and forth over the soiled surface. Release the trigger to suction dirty water. Continue to clean in the area, working in small sections, until dirt is removed. Caution: Do Not Over wet.
- When finished cleaning, remove and rinse tool(s) in clean, running water.
- It is recommended that you suction clean water from the tap to rinse out the hose. Be careful not to over-fill your tank.
- Before wrapping hose onto tool rack, lift end of hose and stretch out to ensure all water is cleared from hose.
- Wrap flex hose around hose and cord rack.
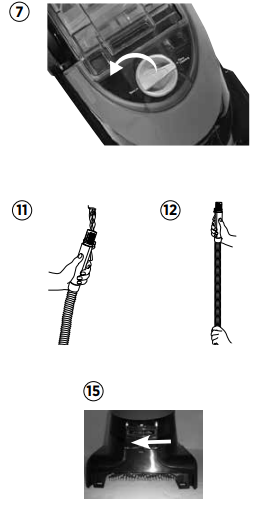
- If the Ready Tools dial becomes difficult to turn, the diverter assembly that holds the dial may need to be cleaned. To clean, first remove nozzle and locate screw that holds the diverter assembly in place. With a Phillips screwdriver, remove the screw and set aside.
- Remove diverter assembly; hold under running water making sure water flows through and around the dial. Turn the dial about 10 times clockwise and 10 more times counter clockwise. This should free up any debris.
- Wipe diverter assembly with a soft cloth and replace back on machine. Replace nozzle.
- Return Ready Tools dial to FLOOR CLEANING setting.
Ready Tools
Your deep cleaner comes equipped with a hose and at least one attachment for cleaning stairs, upholstery, and more. Important! If using the machine to clean upholstery, check upholstery tags.

Cleaning with Deep Reach Tool
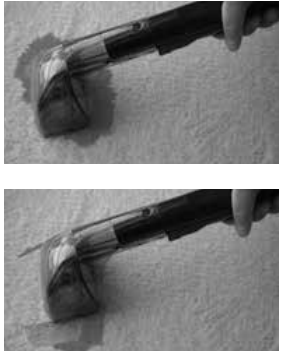
- Set tool on soiled surfaces and press the trigger to spray solution onto the soiled area to be cleaned.
- Slowly move the tool back and forth over the soiled surface, keeping the tool in contact with the carpet.
- Release trigger and move tool slowly over the soiled area to suction up water and dirt.
- Continue to clean the area, working in small sections, until no more dirt can be removed.
Hard Floor Cleaning
Please read instructions for use if you’ve purchased this tool. These products are available for purchase by contacting the BISSELL Consumer Care department by phone or at the website.
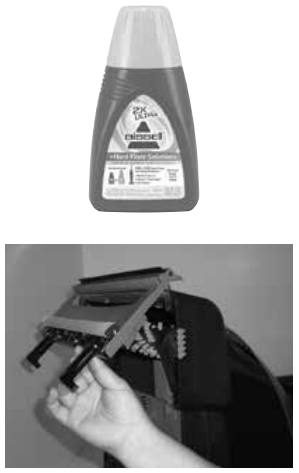
- The hard floor tool pro-vides effective cleaning for linoleum, vinyl, and tile floors.
- Caution: Do not use on unsealed hardwood floors. Thoroughly vacuum or sweep floor to pick up any debris.
- NOTE: Prior to filling with formula and water be sure all carpet cleaning formula is thoroughly rinsed from tank.
- Fill the bladder with clean hot tap water (140°F/60°C MAX) and set aside. Do not boil or microwave water.
- Fill BISSELL 2X Hard Floor Solutions Formula to the indicated fill line in the provided measuring cup (2.5 fl oz) and pour into mouth of bladder. Set tank aside until after hard floor tool is installed.
- Press the Recline Pedal and allow the handle to rest on the floor. Lift machine base so that underside is easily accessible, then attach the hard floor tool to the bottom of the machine by hooking it into the nozzle and swinging it down until it clicks into place.
- Place tank in to machine base, seating firmly in base. Be sure the Ready Tools dial is set to FLOOR CLEANING.
- Plug into an outlet and turn the power on.
- Plan your cleaning route to leave an exit path. Be sure to allow adequate time for floors to dry.
- While pressing the spray trigger, make one slow forward wet pass and another back. Caution: Do Not Overwet.
- Repeat the motion without pressing the trigger using the hard floor tool to squeegee and suction up the dirty water.
- When finished, remove hard floor tool, rinse and let dry before storing. Refer to the Maintenance section on page 12 for machine clean up and storage instructions.
WARNING: To reduce the risk of fire and electric shock due to internal component damage, use only BISSELL cleaning fluids intended for use with the deep cleaner. Non-BISSELL cleaning solutions may harm the machine and void the warranty.
Bissell Carpet Cleaner Description
The Bissell Carpet Cleaner PROHEAT ESSENTIAL 1887,1956 SERIES is a versatile and reliable cleaning solution for all types of carpets. Its powerful suction and cleaning performance make it a great choice for removing tough stains and dirt, while its Heat Wave Technology helps ensure consistent cleaning performance by maintaining a consistent water temperature. The dual-tank system makes it easy to fill and empty the tanks, while its lightweight and compact design make it easy to maneuver around furniture and other obstacles.
Maintenance & Care
Machine care
For best results, a few simple steps can assure your machine is well maintained after cleaning is complete.
- Turn power switch off. Unplug the machine and wrap the power cord.
- After emptying the 2-in-1 water tank, rinse it with running hot tap water, taking care to clean underneath and around the heavy duty bladder. Clean out red lint screen prior to replacing tank. Removable nozzle may be rinsed if necessary.
- Replace the 2-in-1 water tank on the machine.
- Any loose hair or debris can be pulled from the brush roll and thrown away.
- Clean the Ready Tools dial assembly area by following instructions in Step 15-17 on page 9.
- To clean attachments, remove from hose and rinse in clean, running water. Dry before storing. Clean the hose by suctioning clean water from the tap (taking care not to let the tank overflow). Before wrapping back on machine, lift end of hose and stretch out to ensure all water is cleared from hose. Refer to page 9, illustrations 11 and 12.
- Wipe the machine’s exterior with a soft cloth.
- After carpet is dry, you may wish to vacuum again to remove any leftover hair and fuzz the deep cleaner may have brought to the carpet surface.
Machine storage
Put the unit away in a closet or basement for the next use. Store cleaner in a protected, dry area. Since this product uses water, it must not be stored where there is a danger of freezing. Freezing will damage internal components and void the warranty.
Belt Replacement Instructions
- Turn off the machine and unplug it from the outlet. Wrap hose and cord on wraps.
- Remove the 2-in-1 water tank and set aside.
- IMPORTANT: Fully recline handle and turn unit upside down.
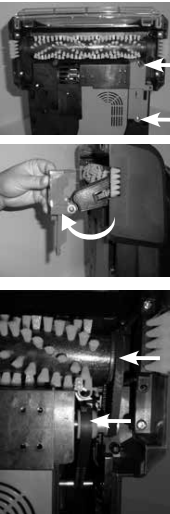
- Locate red Belt Access Door and remove two screws.
NOTE: The dark screw is a long machine screw and will take several turns (approximately 25) to completely remove. The head of the screw will lift from the belt access door so that it can be easily removed. - Pull the belt access door away from the brush and remove the belt access door and end cap and set aside.
- Remove brush belt from end of brush and set aside. Check for wear or damage. Replace if necessary.
- Check motor belt for damage. If necessary, replace the motor belt by pinching the belt at one end to make a large loop then attaching the motor belt to the silver motor shaft first and attaching to the larger red pulley.
NOTE: Spinning the red pulley a few times will help center the belt and ensure correct assembly. - If necessary, the brush may be removed for cleaning. Rotate the brush out of the brush housing and pull the brush off the axle attached to the remaining end cap. The remaining pivot arm can be removed by removing the screw
(this will allow for full access to the brush chamber for cleaning and proper maintenance). Make sure the “keyed” end of the metal rod is aligned with the slot in the pivot arm before reassembly. Rinse the brush under running water and remove any hair, carpet fibers, or other debris that may have become wrapped around the brush or stuck in the bristles. Allow the brush to dry and replace it on the axle, cogged-side last. You may need to rotate the brush to allow it to slide all the way down the axle. - Reattach brush belt.
- Reattach Belt Access Door assembly to end of brush and rotate back into place. Replace screws.
NOTE: Do not over tighten screws.
Troubleshooting
Please do not return this product to the store. Other maintenance or service not included in the manual should be performed by an authorized service representative.
Problem | Possible causes | Remedies |
Reduced spray OR no spray | Bladder may be empty. | Turn power switch off; refill bladder with clean hot tap water and formula. |
2-in-1 tank may not be seated properly. | Turn power switch off; remove tank and reseat tank. | |
Pump may have lost prime. | Turn power switch off; after 1 minute turn on and depress spray release trigger. | |
The motor belt may be broken. | Follow belt replacement instructions on page 13. | |
Dirt Lifter Power Brush does not turn | The brush belt or motor belt is off or broken. | Follow belt replacement instructions on page 13. |
Cleaner not picking up solution | Ready Tools dial may be on the wrong setting for the cleaning job. | Set Ready Tools dial to either floor cleaning or tools. |
Poor tool position. (Hand held attachments only). | Adjust angle; apply more downward pressure. | |
Removable nozzle may not be properly attached. | Make sure nozzle is on correctly by slightly raising front of machine to line up slots on the base of the machine with the hooks on nozzle. Attach at base fir stand then click nozzle into place. | |
2-in-1 tank lidis not properly installed. | Re-install lid; refer to images. | |
2-in-1 tank is not properly seated. | 2-in-1 tank must be firmly seated to function; remove and reseat2-in-1 tank. | |
2-in-1 tank has picked up maximum dirty water. | Empty 2-in-1 tank and refill, refer to the Operation section. | |
The lint screen may be clogged. | Clean out lint screen. Refer to Step3 on page 8. | |
Warranty of Bissell Carpet Cleaner
This warranty gives you specific legal rights, and you may also have other rights which may vary from state to state. If you need additional instruction regarding this warranty or have questions regarding what it may cover, please contact BISSELL Consumer Care by E-mail, telephone, or regular mail as described below.
Limited Two-Year Warranty
Subject to the *EXCEPTIONS AND EXCLUSIONS identified below, upon receipt of the product BISSELL will repair or replace (with new or remanufactured components or products), at BISSELL’s option, free of charge from the date of purchase by the original purchaser, for two years any defective or malfunctioning part.
Pros & Cons
Pros
- Powerful suction and cleaning performance
- Dual-tank system for easy cleaning and maintenance
- Heat Wave Technology for consistent water temperature
- Lightweight and compact design
- Long power cord for added reach and convenience
Cons
- May be too loud for some users
- The hose may be too short for some cleaning tasks
- The cleaning solution may need to be refilled frequently for larger cleaning jobs
Customer Reviews about PROHEAT ESSENTIAL 1887,1956 SERIES
Customers have praised the Bissell Carpet Cleaner PROHEAT ESSENTIAL 1887,1956 SERIES for its powerful suction and cleaning performance, as well as its easy-to-use design and compact size. However, some have noted that the hose may be too short for certain cleaning tasks, and that the cleaning solution may need to be refilled frequently for larger jobs. The most common complaint is that the machine may be too loud for some users.
Faqs
What is the weight of the Bissell Carpet Cleaner PROHEAT ESSENTIAL 1887,1956 SERIES?
How long is the power cord of the Bissell Carpet Cleaner PROHEAT ESSENTIAL 1887,1956 SERIES?
Is there a dual-tank system on the Bissell Carpet Cleaner PROHEAT ESSENTIAL 1887, 1956 SERIES?
What is the Bissell Carpet Cleaner PROHEAT ESSENTIAL 1887, 1956 SERIES water temperature range?
What is the capacity of the Bissell Carpet Cleaner PROHEAT ESSENTIAL 1887,1956 SERIES cleaning solution reservoir?
How much time does it take to put the Bissell PROHEAT ESSENTIAL 1887, 1956 SERIES carpet cleaner together?
Is it possible to use the Bissell Carpet Cleaner PROHEAT ESSENTIAL 1887,1956, series on stairs and upholstery?
How frequently should I replace the filter in my Bissell PROHEAT ESSENTIAL 1887, 1956 SERIES carpet cleaner?
With the Bissell Carpet Cleaner PROHEAT ESSENTIAL 1887,1956 SERIES, can I use any type of cleaning solution?
How long is the Bissell Carpet Cleaner PROHEAT ESSENTIAL 1887,1956 SERIES warranty?
Leave a Comment