Setup Guide: Bissell CLEANVIEW SWIVEL PET Vacuum 2316
Content

Introduction of Bissell Cleanview Swivel Pet Vacuum 2316
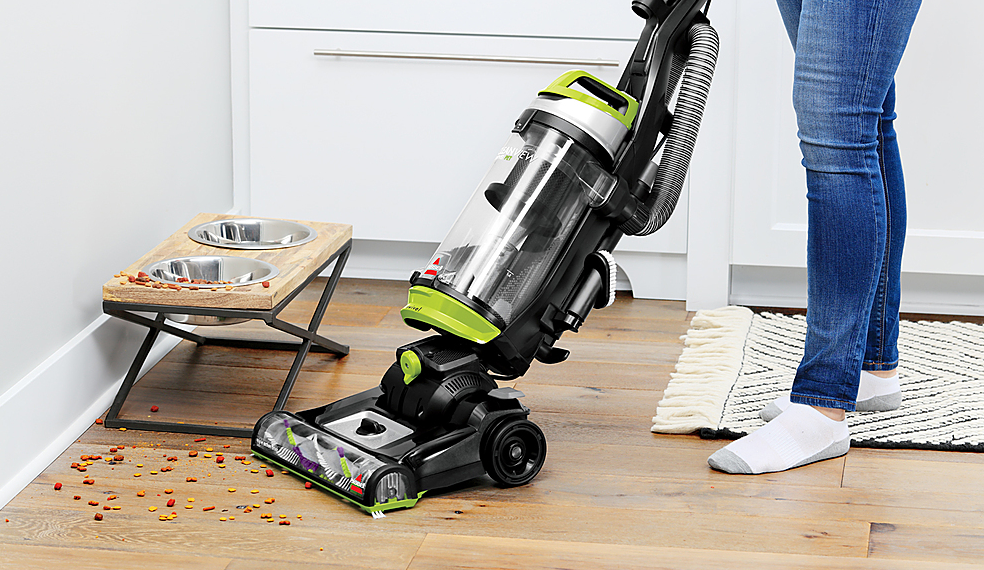
The Cleanview Swivel Pet Vacuum 2316 is a versatile and powerful vacuum cleaner designed specifically for homes with pets. This vacuum is equipped with features that make it easy to clean pet hair and dirt from all surfaces, including hard floors and carpets. The vacuum is priced at around $160 and was launched in 2021.
Detailed Specifications of Cleanview Swivel Pet Vacuum 2316
The Bissell Cleanview Swivel Pet Vacuum is a lightweight and maneuverable vacuum that weighs only 18.2 pounds. It features a swivel head that makes it easy to clean around furniture and other obstacles. The vacuum also has a Triple Action Brush Roll that easily picks up pet hair and dirt from all surfaces. The vacuum has a 1.5-liter dirt cup capacity and comes with a 27-foot power cord.
Description of Cleanview Swivel Pet Vacuum
The Cleanview Swivel Pet Vacuum is a powerful and versatile vacuum cleaner that is designed to make cleaning pet hair and dirt easy and convenient. The vacuum features a swivel head that makes it easy to maneuver around furniture and other obstacles. The Triple Action Brush Roll is designed to pick up pet hair and dirt from all surfaces, including hard floors and carpets. The vacuum also has a scatter-free technology that prevents pet hair and debris from scattering, ensuring a thorough cleaning.
What’s In The Box?
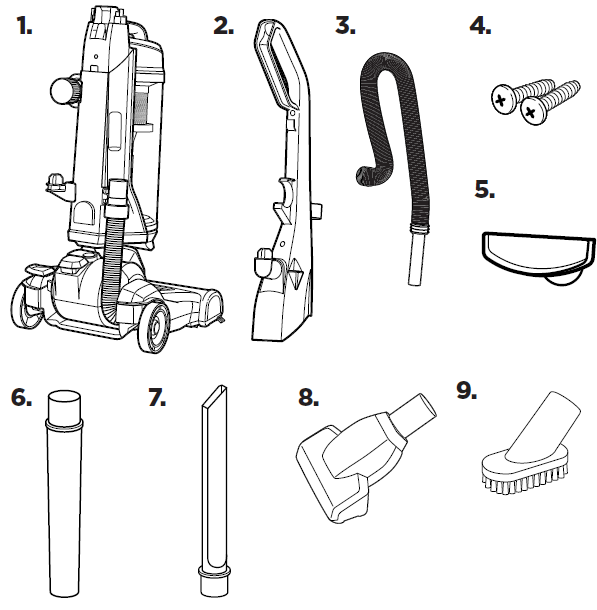
- Vacuum Base
- Handle
- Hose
- 2 Screws (taped to Handle)
- Lower Cord Wrap
- Extension Wand
- Crevice Tool (stored inside Extension Wand)
- Pet TurboEraser Tool
- Dusting Brush
NOTE: Not all accessories come with every model. Be sure to check the carton for additional tools.
Product View of 2316
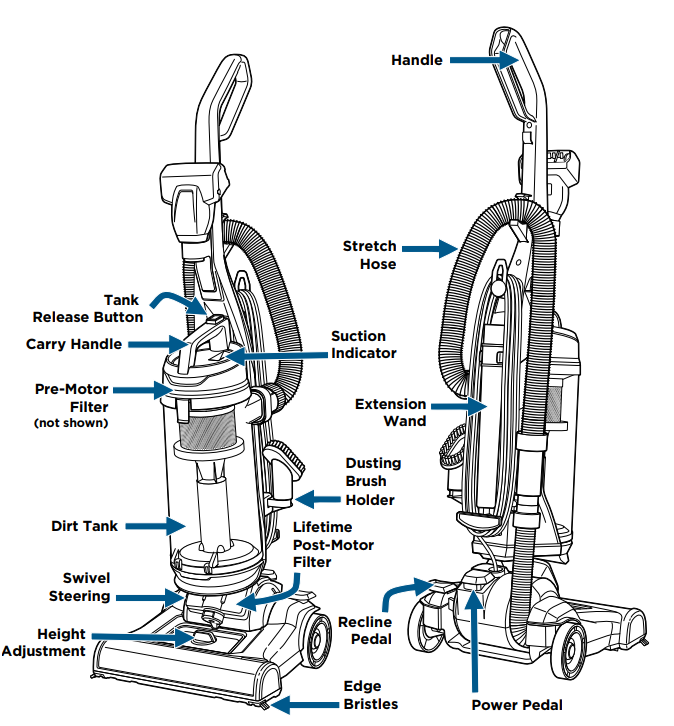
NOTE: The Crevice Tool is stored inside the Extension Wand.
Assembly of Cleanview Swivel Pet Vacuum 2316
- Place the upper handle onto the base and push it down. Then attach the handle with the 2 screws taped to the handle in a plastic bag.
- Insert the lower cord wrap and turn it to the right to lock in place.
- Insert the hose end into the back of the vacuum and twist right to lock in place.
Wrap hose up and around the hose wrap on the handle. Slide end of hose into vacuum base.
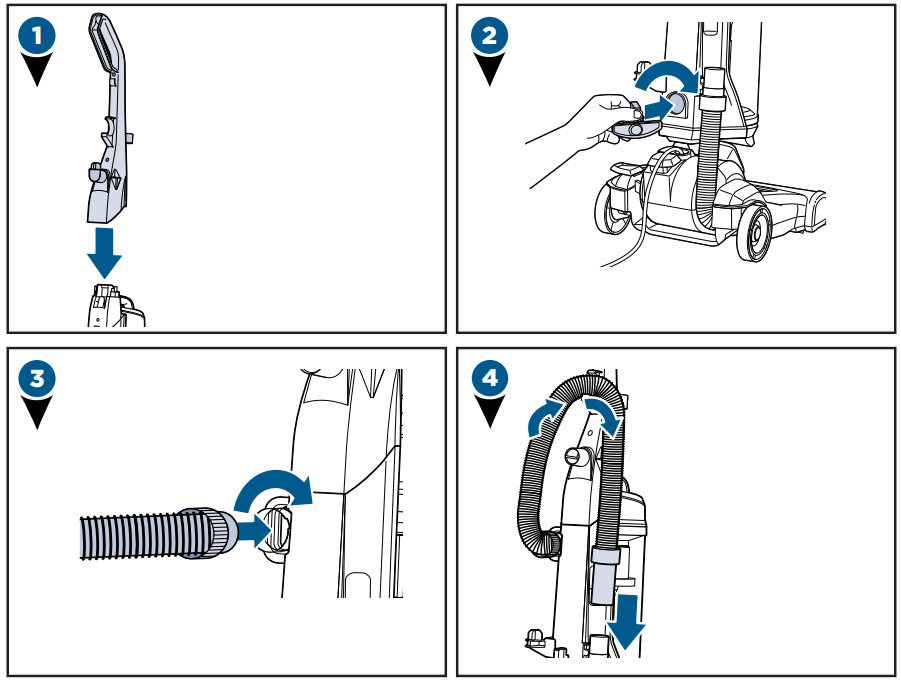
Now, put your accessory tools on the vacuum and you’re ready to go
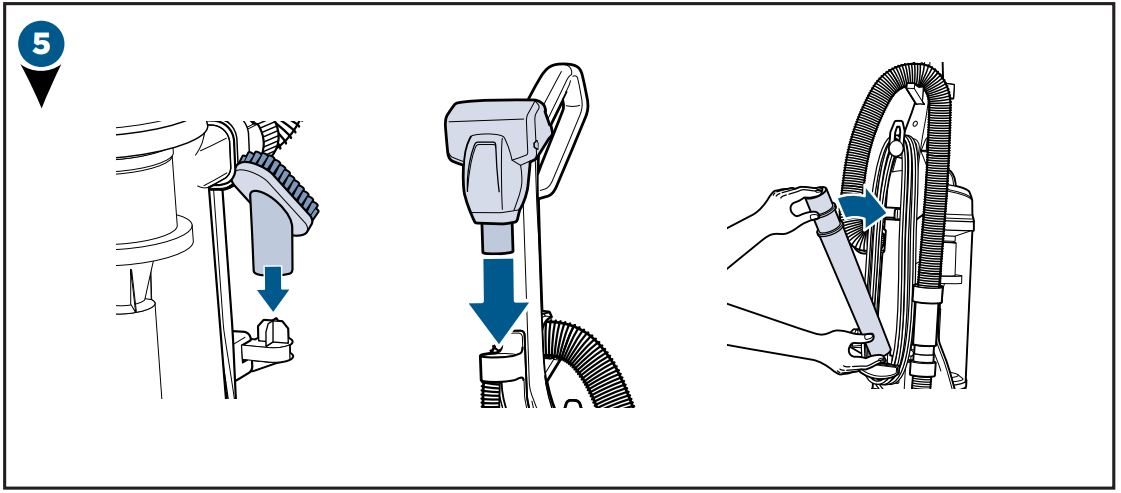
NOTE: The Powerfoot will not suction properly unless the hose is firmly attached.
Power On & Settings
- Press the red power button with your foot to turn the vacuum ON and once again to turn your vacuum OFF
Press the recline pedal and pull handle back towards you.
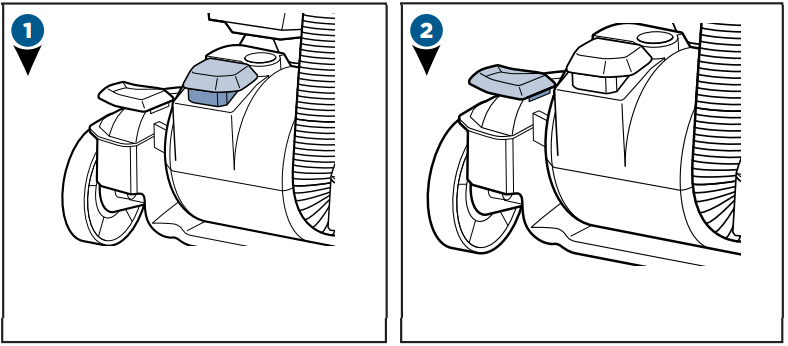
Turn the dial on the foot of the vacuum to the desired setting. If the dial is difficult to turn, tilt the vacuum back slightly to take the weight off the foot while turning.
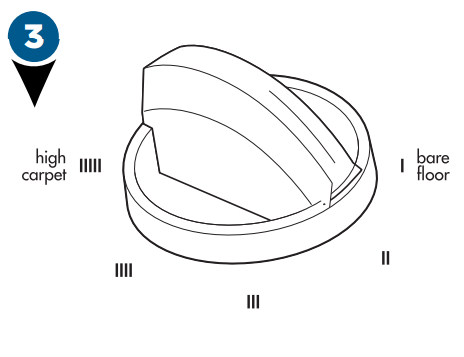
- Lowest setting – For low pile carpet or bare floors.To pick up debris, it may be necessary to move up one setting.
- Medium setting – For medium pile carpet.
- Highest setting – For high pile and most shag carpet.
TIP: For optimal carpet cleaning performance, adjust to the lowest practical setting. If your vacuum is difficult to push, adjust to the next higher setting.
NOTE
- Rotating floor brush continues to rotate while tools are in use. Never place fingers under the vacuum when it is running. Never place Powerfoot on furniture or uneven surfaces. Do not place vacuum close enough to objects to pull into rotating brush.
- Certain carpets and low humidity conditions may generate small static discharges. Static discharges are entirely harmless and are not associated in any way with the main power supply.
Empty the Dirt Tank
WARNING
To reduce the risk of electric shock, turn power switch off and disconnect polarized plug from electrical outlet before performing maintenance or troubleshooting checks.
- Empty once tank is full.
- Press the tank release button out to remove and pull dirt tank.
- Hold the dirt tank over a trash container. Press the bottom release button to empty. Once empty, close the lid.
Twist cyclone left and pull down to remove from tank.
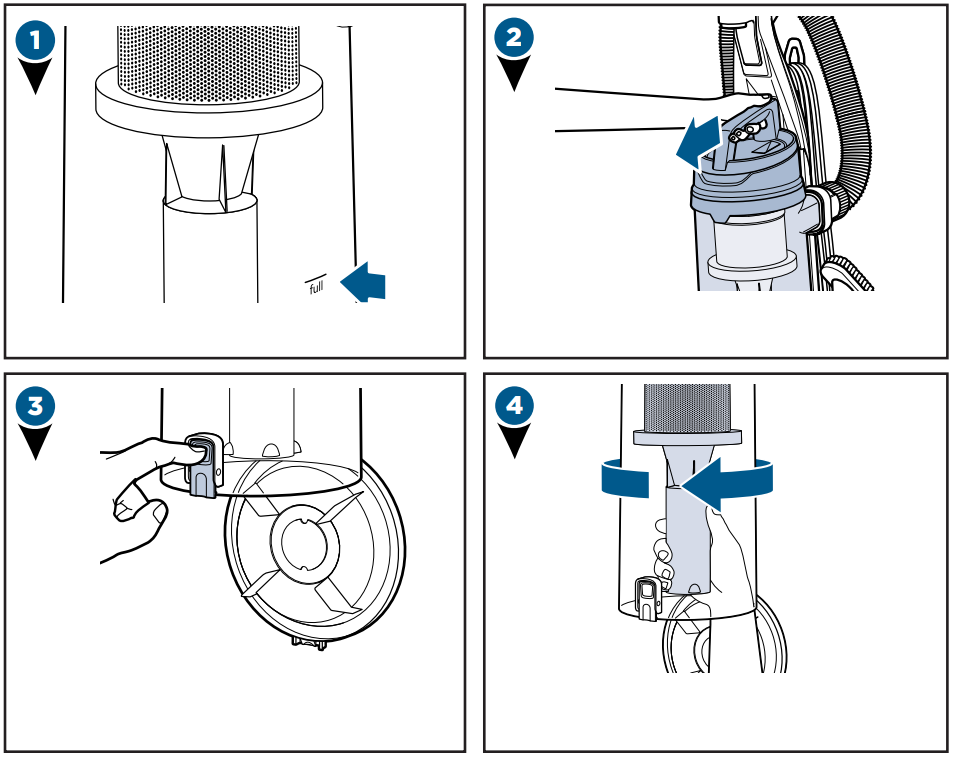
- Clean cyclone with warm water and mild detergent. Let cyclone completely dry before replacing. To replace, fit into place and twist to the right.
After emptied, place tank back on vacuum and press firmly until you hear “click”.
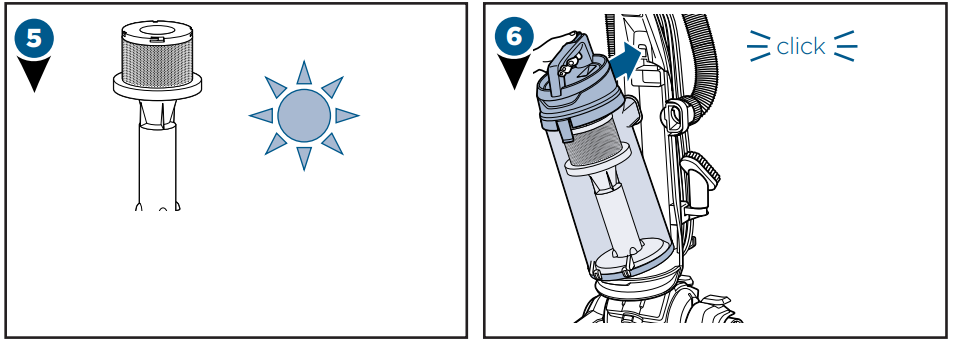
NOTE: The dirt tank may be washed in warm water with a mild detergent. Make sure it is completely dry before replacing.
Clean the Pre-Motor Filter
WARNING
- To reduce the risk of electric shock, turn power switch off and disconnect plug from electrical outlet before performing maintenance or troubleshooting checks.
- Do not operate vacuum with damp or wet filters or without all filters in place.
- Press the tank release button and pull out to remove dirt tank.
- Remove carbon and foam filter from lid. Hand wash in warm water and rinse well; mild detergent may be used if desired.
- Allow filter to air dry completely before placing back into the tank lid. The carbon filter should be on top of the foam filter.
- Return tank back on vacuum and press firmly until you hear “click”.

Maintain the TurboEraser Tool
- Twist gray collar counter clockwise, until slot appears, then separate faceplate.
- Remove brush roll, belt, and paddle wheel. Inspect for damages and replace if necessary.
- To reassemble, align two clips on each end of paddle wheel with belt on and pop back into place. Place brush roll with belt back in. Faceplate will not close properly if all parts are not aligned correctly.
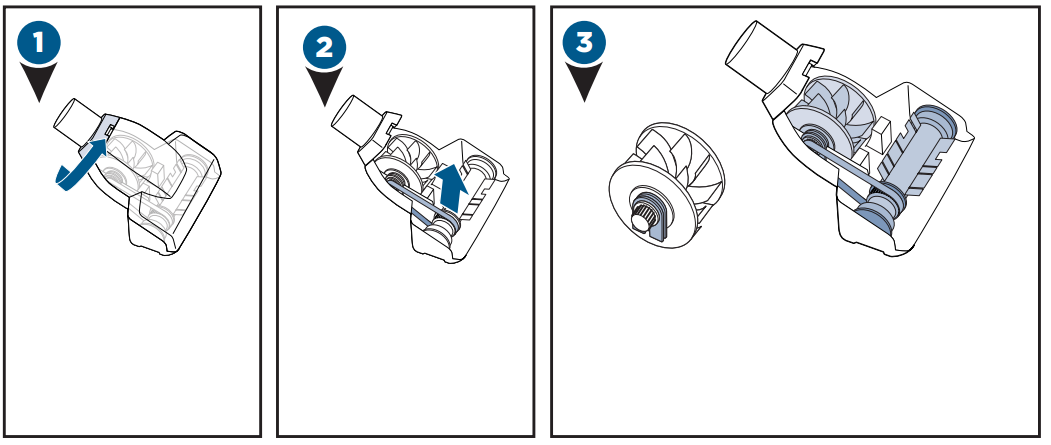
Replace Brush & Belt
WARNING
To reduce the risk of electric shock, turn power switch off and disconnect plug from electrical outlet before performing maintenance or troubleshooting checks.
- Unplug vacuum, turn over and unscrew six (6) Philips head screws to remove the bottom cover. Lift brush straight out.
- Clean debris from brush roll. Inspect by placing on its end and spin. The brush roll should spin freely, multiple times by one flick. If it doesn’t, replace brush roll. Check belt for wear or cuts and replace if necessary.
Replace the brush roll and belt by looping the belt over the motor shaft and the brush roll. Line up the end caps and pull the brush forward into place. This will stretch the belt. Return bottom cover back on and replace the screws.
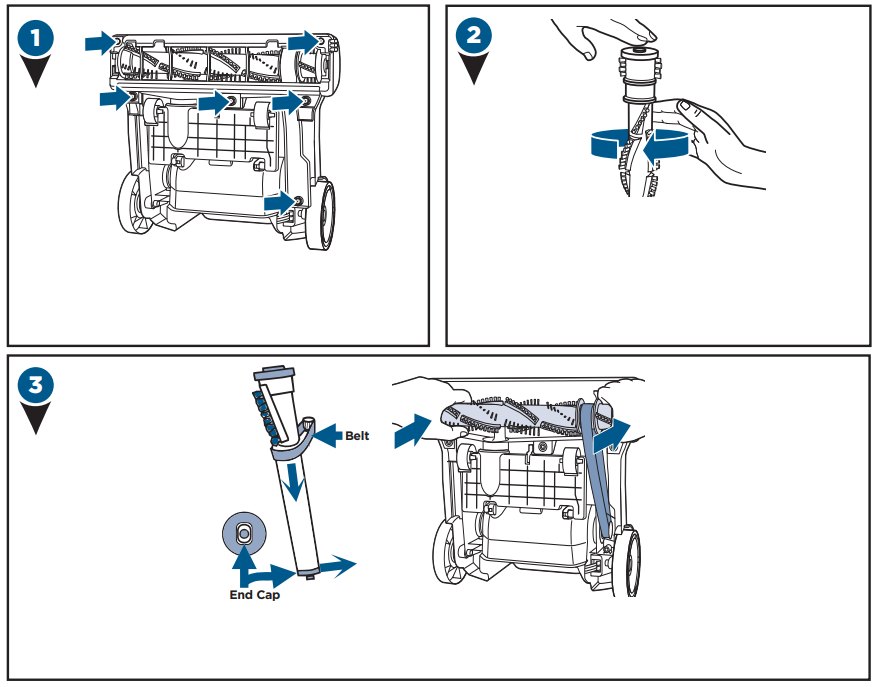
Clearing a Clog
- Remove the hose from the back of the vacuum by twisting it to the left. Remove any debris that may have gotten clogged.
- Check the foot hose on the back of your vacuum down towards the bottom. If necessary, remove the screw from the foot hose and check for clogs.
- Check the air passageway on the bottom of your vacuum. Remove the bottom cover and the brush. Remove any debris.
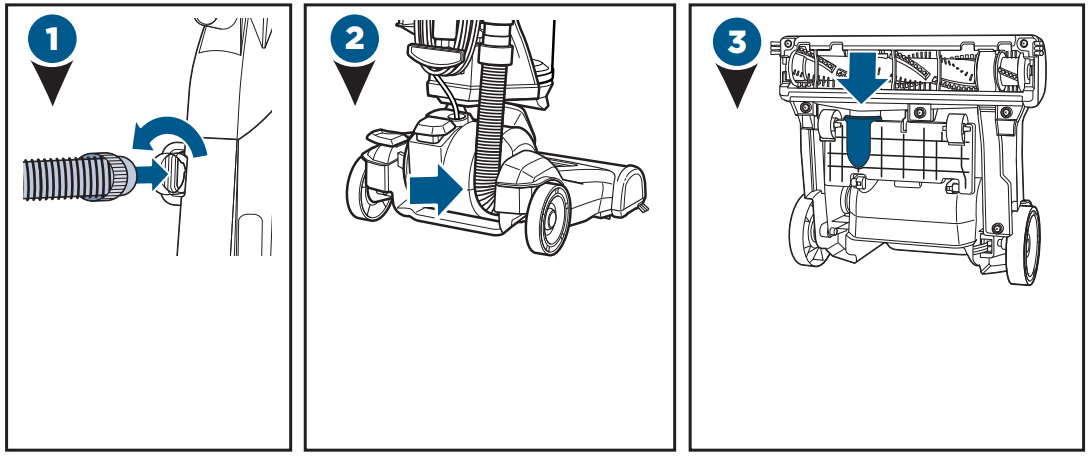
Troubleshooting of Swivel Pet Vacuum 2316
WARNING
To reduce the risk of electric shock, turn power switch off and disconnect plug from electrical outlet before performing maintenance or troubleshooting checks.
| Problem | Possible causes | Remedies |
| Vacuum won’t turn on | Power cord not plugged in | Check electrical plug |
| Blown fuse/tripped breaker | Check/replace fuse or reset breaker | |
| ||
Vacuum won’t pick up dirt | Incorrect height adjustment | Adjust powerfoot tocorrect height setting |
Hose not attached to suction opening | Grasp the hose wand and firmlypush into the hose wand base | |
| Crack or hole in hose | Check hose and replace if needed | |
| Broken or worn drive belt | Replace drive belt, see page 9 | |
| Rotating floor brush jammed | Remove brushand clean debrisfrom brush ends, see page 9 | |
| Clog in vacuum | Check for debris build-up or clogs in the inner tank, hoseand foot/lower hose; See online video for more help | |
| Dirt tank full | Empty dirt tank | |
| Dirt tank or upper tank not installed properly | Position correctly and lock in place, see page 7 | |
| Filters are dirty | Check and clean or replace pre-motor and post-motor filters, see page 8 | |
| ||
Tool won’t pick up | Crack or hole in hose | Check hose and replace if needed |
| Clog in vacuum | Check for debris build-up or clogs in the inner tank, hoseand foot/lower hose; See online video for more help | |
| Dirt tank full | Empty dirt tank | |
| Dirt tank or upper tank not installed properly | Position correctly and lock in place, see page 7 | |
| Filters are dirty | Check and clean or replace pre-motor and post-motor filters, see page 8 | |
| ||
Vacuum difficult to push | Incorrect height adjustment | Adjust powerfoot to correct height setting, see page 6 |
| ||
Visible dirt escaping from vacuum | Dirt tank full | Empty dirt tank |
Filters missing or installed incorrectly | Check pre-motor and post-motor filters for correct installation, see page 8 | |
Warranty of Bissell Cleanview Swivel Pet Vacuum 2316
This warranty gives you specific legal rights, and you may also have other rights which may vary from state to state. If you need additional instruction regarding this warranty or have questions regarding what it may cover, please contact BISSELL Consumer Care by E-mail, telephone, or regular mail as described below.
Three-Year Warranty
Subject to the *EXCEPTIONS AND EXCLUSIONS identified below, upon receipt of the product BISSELL will repair or replace (with new or remanufactured components or products), at BISSELL’s option, free of charge from the date of purchase by the original purchaser, for three years any defective or malfunctioning part.
Pros & Cons of Cleanview Swivel Pet Vacuum 2316
Pros
- Lightweight and maneuverable design
- Triple Action Brush Roll for pet hair and dirt pickup
- Scatter-free technology
- Large dirt cup capacity
- Affordable price
Cons
- Smallish dirt cup capacity
- Short power cord
- Not as powerful as some other vacuums in its class
Customer Reviews about Cleanview Swivel Pet Vacuum
Customers love the Cleanview Swivel Pet Vacuum 2316 for its lightweight and maneuverable design, powerful suction, and Triple Action Brush Roll that makes it easy to pick up pet hair and dirt. However, some customers have complained about the smallish dirt cup capacity and short power cord.
Faqs
What special advantages are available to pet owners with the Bissell Cleanview Swivel Pet 2316?
What is the working mechanism of the Triple Action Brush Roll for various flooring types?
Can allergies be helped by the Bissell Cleanview 2316?
What attachments come with the Bissell Cleanview 2316 for hair from pets?
What is the size of the dirt bin and is it simple to empty?
Does the Bissell Cleanview 2316 have a feature that allows you to modify its height?
Is the Bissell Cleanview 2316's swivel steering feature useful for rearranging furniture?
Is it possible to move furniture around with the Bissell Cleanview 2316's swivel steering feature?
Is the Bissell Cleanview 2316 suitable for use on stairs?
How long is the Bissell Cleanview Swivel Pet Vacuum 2316 warranty valid for?
Leave a Comment
