Black Decker Arctic Twister Ice Cream Mixer IC200 User Guide
Content
Introduction
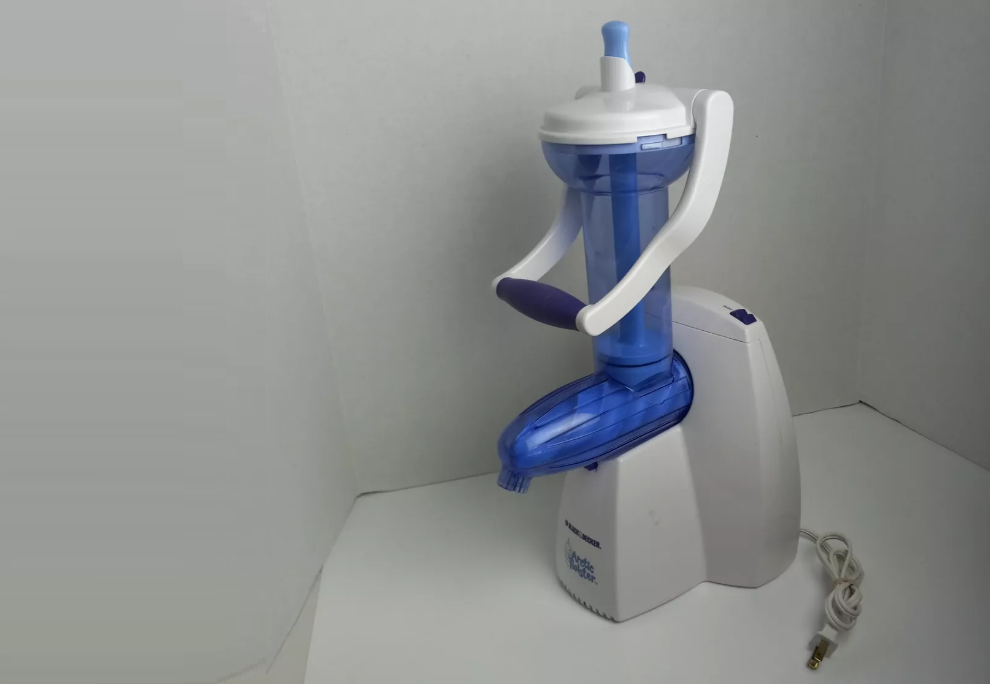
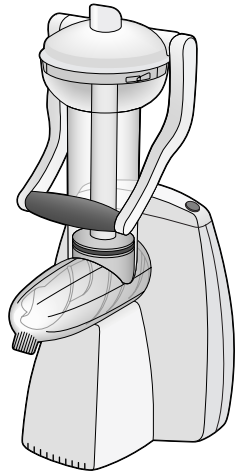
The Black+Decker Arctic Twister Ice Cream Mixer IC200 is a versatile kitchen appliance designed to create delicious homemade ice cream and frozen desserts effortlessly. With its innovative mixing technology, it churns ingredients quickly, ensuring a smooth and creamy texture. The compact design makes it easy to store, while the user-friendly controls allow for customizable recipes. Ideal for families and gatherings, this mixer brings a fun twist to dessert-making. The exact cost of the IC200 is $49.99.
Specifications
- Compact and lightweight design for easy storage
- Quick and easy operation with minimal effort required
- Includes a freezer bowl and various attachments for ice cream, slushies, and other frozen treats
- Non-electric, manual operation ensures safety and portability
- Ergonomic handle for comfortable churning
- Cold-resistant materials ensure optimal performance even at low temperatures
Overview
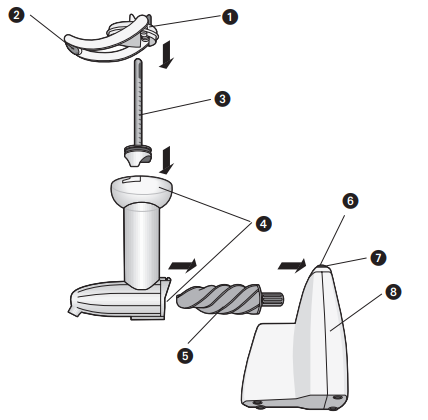
- Lid with Ratchet Clip (Part #178243)
- Handle
- Plunger (smooth in front, ratcheted in back) (Part #178245)
- Chute/Dispenser (Part #178244)
- Twister (Part #178246)
- Power On/Off Switch
- Dispenser Release Button (see A)
- Base
Consumer replaceable
Description
The Black+Decker Arctic Twister Ice Cream Mixer IC200 is designed with user-friendliness in mind. Its compact size makes it ideal for small kitchens or those with limited counter space. The mixer's manual operation eliminates the need for electricity, making it a great option for outdoor events or camping trips.
The freezer bowl is designed to be frozen before use, ensuring that your ice cream churns to the perfect consistency. The ergonomic handle provides comfort while churning, reducing fatigue and making the process enjoyable.
How To Use
Before you use the Ice Cream Mixer for the first time, hand wash the Lid with Ratchet Clip, Plunger, Twister and Chute/Dispenser in hot, sudsy water; rinse with hot water and dry with paper or cloth towel. Do not wash the Base.
To Assemble the Ice Cream Mixer
Insert the Twister firmly into the opening on the Base (A).
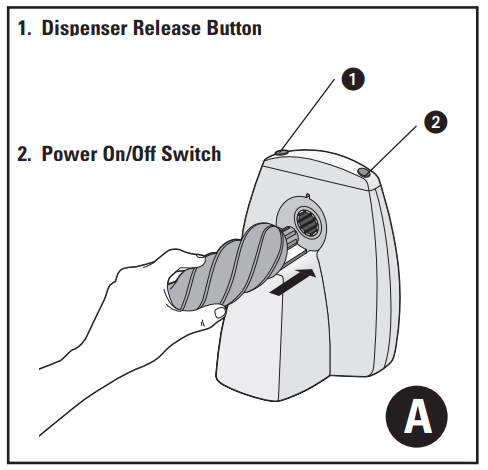
Slide the Chute/Dispenser over the Twister along the runner on the Base (B); it will click into place.

Note: Unit will not operate if Chute/Dispenser does not click into place.
Hold the Lid with Ratchet Clip in one hand with the Handle facing front. With one finger, push the Ratchet Clip on the Lid forward. In other hand, hold the Plunger with smooth side facing front, and from underside of Lid, insert Plunger into Clip opening (C), pushing Plunger up until the Ratchet Clip rests on top of the Plunger base.
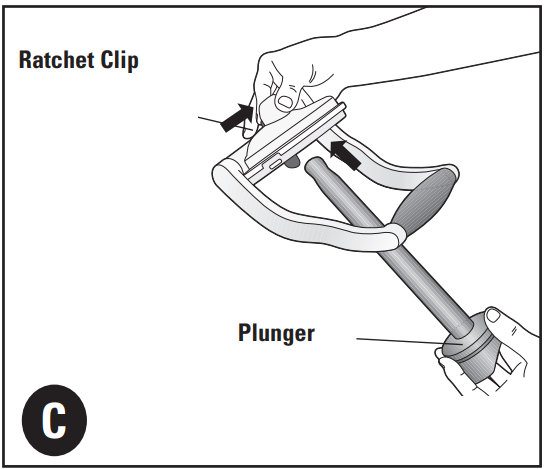
- Set aside the Lid with Plunger in place. Now you're ready to start mixing up some fun and delicious ice cream treats!
To Use the Ice Cream Mixer
- Assemble all ingredients before you begin to make your first batch of twisty treats: Set out an ice cream scoop, the mix-ins you plan to use, ice cream cones, cups or dessert dishes, then bring out the ice cream.
- For best results, use hardened ice cream, frozen yogurt, sorbet or sherbet directly from the freezer.
- You may want to rinse off the Lid, Plunger, Chute/Dispenser and Twister before beginning new ice cream flavors or mix-ins.
- Always wash Lid, Plunger, Chute/Dispenser and Twister between batches, if you have been using ice cream or mix-ins containing peanuts, to prevent accidental peanut consumption by those who may be allergic to them.
- Plug the Cord into a standard 120V wall outlet.
- Position a flat-bottom cone, dessert dish or cup under the spout of the Chute/Dispenser.
- Place 1 scoop of store-bought ice cream into the Chute/Dispenser. Sprinkle in 1-2 tablespoons of the mix-ins (see "About Mix-Ins"); add another scoop of ice cream, and continue layering as above, ending with ice cream, until Chute is filled.
- Fit the Lid with Ratchet Clip and Plunger in place (see assembly instructions #3 above), onto Chute opening, pressing down slightly and turning the Lid to the right to fit into position, then to the left to lock it into place on the Chute.
- Gently pump the Handle up and down a few times to "prime" the Chute.
- Press the On/Off Switch to "on" position, then slowly pump the handle to move ingredients down the Chute. As you pump the handle, the ingredients will automatically be moved into the Twister, then out the spout of the Dispenser.
- When the Chute is empty, turn On/Off Switch to "off" position. Push the Ratchet Clip forward and pull up the Plunger, then use the Handle to move the Lid to the right. Lift the lid with the Plunger in place out of the Chute.
- Repeat steps 2-6 to make as many batches as desired.
About Mix-Ins
A wide variety of mix-ins, alone or in combination can be used to make delicious ice cream treats:
- Candies: Mints, candy-coated chocolate pieces (any flavor), candy tarts, peanut-butter cups, caramel-and-nut candy bars or cookie-candy bars, flavored baking chips, plain or nut chocolate bars, mini marshmallows.
- Cookies: Wafer or sandwich cookies, graham crackers, chocolate covered cookies or crackers, granola or energy bars. Cereal: Fruit-flavored loops, crisped or puffed cereals, flavored puffed or flaked cereals, granola.
- Fruit: Strawberries, raspberries, blueberries, pitted cherries, diced melon or kiwi pieces.
- Nuts: Peanuts, walnuts, pecans, almonds, cashews, hazelnuts, Brazil nuts.
Test Kitchen Tips
- Use sticky candies, such as plain or chocolate-covered caramels or dried fruit, such as raisins or apricots, sparingly.
- For best results, when layering mix-ins and ice cream, use a total of about 2 tablespoons of mix-ins per layer. For example, 1 tablespoon of candy-coated chocolate pieces and 1 graham cracker, broken.
- We do not recommend using gummy candies of any kind.
- Fruit with a high water content, such as oranges, watermelon, and the like, work best when making desserts served in dishes or cups rather than cones.
Suggested Ice Cream and Mix-in Combinations
Start with these, then let your imagination loose to create your own tasty treats!
- Raspberry Razzmatazz: Vanilla frozen yogurt, fresh raspberries, semisweet chocolate chips; serve in cones or dessert dishes.
- Rainbows ‘n Stars: Vanilla ice cream, fruit-flavored charm-shaped breakfast cereal, candy-coated chocolate pieces; serve in cones.
- S’ Mores: Vanilla or chocolate ice cream, milk chocolate bars, graham crackers, mini marshmallows; serve in cones.
- Peanut Butter Passion: Vanilla ice cream, chocolate-peanut butter cups, peanut butter cookies; serve in plain or chocolate cones.
- Coffee-Toffee Crunch: Coffee frozen yogurt, espresso beans, chocolate toffee chips.
- Lemon-Coconut Cake: Vanilla ice cream, lemon wafer cookies, shredded coconut; serve in cones or dessert dishes.
- Three-Cheers for the Red, White and Blue: Vanilla ice cream or frozen yogurt, chopped fresh strawberries, whole fresh blueberries; serve in dessert dishes or cones.
- Strawberry Shortcake: Vanilla ice cream, chopped fresh strawberries, vanilla wafers; serve in dessert dishes; top with a dollop of whipped cream or whipped topping and a strawberry.
- Never Enough Nuts: Butter pecan ice cream, cashews, chocolate-covered peanut-nougat candy bar; serve in cones.
- Beat the Heat: Mango sorbet, canteloupe chunks, kiwi chunks; serve in dessert dishes.
- Triple-Chocolate Treat: Chocolate ice cream, chocolate filled-chocolate sandwich cookies, plain chocolate candy-coated pieces; serve in chocolate cones.
- Midnight Mint Special: Chocolate ice cream, mint-flavored chocolate chips, chocolate covered mint cookies; serve in cones or dessert dishes.
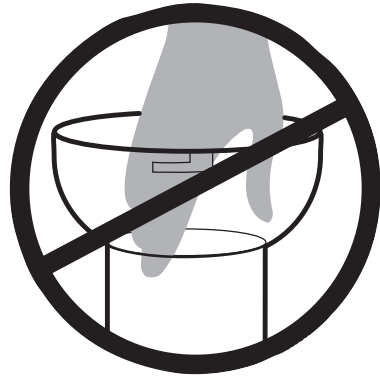
Keep hands, hair, clothing, hand-held spatulas and other utensils away from Chute Dispenser openings when Power Switch is in "on" position.
Setup Guide
To operate the Arctic Twister, start by placing the freezer bowl in the freezer for at least 8 hours or overnight. Once frozen, remove the bowl and attach it to the mixer base. Add your desired ingredients such as cream, sugar, flavorings, etc., and begin churning using the ergonomic handle.
Continue churning until your desired consistency is achieved. The process typically takes about 20-30 minutes depending on the ingredients and temperature of the bowl.
Cleaning & Storage
When you have finished an Arctic Twister session, the Ice Cream Mixer is easy to disassemble and clean:
- Unplug the cord from the wall outlet.
- Detach the Lid and the Plunger from the Chute/Dispenser. Remove the Plunger from the Lid for easy cleaning.
- Place a dishcloth or paper towel over the spout to catch any drips. Press the Dispenser Release Button to remove the Chute/Dispenser and the Twister from the Base.
- Under running water, rinse any ice cream or mix-in residue from the Lid, Plunger, Twister, Chute/Dispenser, and check the spout of the Chute/Dispenser to be sure it is clear of any residue. These parts can be hand-washed in hot, sudsy water or placed in top rack of dishwasher. Dry all parts thoroughly before storing.
- Wipe the Base with a soft, damp cloth or sponge. Do not use abrasive cleaners on the Base or any of the Mixer parts, as they can damage the finish.
- To store, coil the Cord in loops and secure it with a twist tie. Do not wrap the Cord around the Mixer.
IMPORTANT SAFEGUARDS
When using electrical appliances, basic safety precautions should always be followed, including the following:
- Please read all instructions.
- To protect against a risk of electric shock, do not immerse cord, plug, or base unit in water or other liquid.
- WARNING: Close supervision is necessary when any appliance is used by or near children.
- Unplug from outlet when not in use, before putting on or taking off parts, and before cleaning.
- Avoid contacting moving parts. Keep hands, hair, clothing, and handheld spatulas and other utensils away from the chute and dispenser openings during operation to prevent injury and/or damage of the mixer.
- Do not put fingers or objects into the dispenser spout. Do not use with any openings blocked.
- Always be sure the Lid is securely in place before operating.
- Do not operate any appliance with a damaged cord or plug or after the appliance malfunctions or is dropped or damaged in any manner. Return the appliance to the nearest authorized service facility for examination, repair, or electrical or mechanical adjustment. Or, call the appropriate toll-free number listed on the cover of this manual.
- The use of attachments not recommended by the appliance manufacturer may cause injuries.
- Do not use outdoors.
- Do not let cord hang over the edge of table or counter or touch hot surfaces.
- Remove parts from mixer before washing.
- Do not use appliance for other than intended use.
- Mixing flammable non-food substances may be hazardous.
- Do not abuse the cord. Never carry the mixer by the cord or yank the cord to disconnect it from an outlet; instead, grasp the plug and pull to disconnect.
- Do not operate this appliance in the presence of explosive and/or flammable fumes.
SAVE THESE INSTRUCTIONS
TAMPER-RESISTANT SCREW
WARNING: This appliance is equipped with a tamper-resistant screw to prevent removal of the outer cover. To reduce the risk of fire or electric shock, do not attempt to remove the outer cover. There are no user serviceable parts inside. Repair should be done only by authorized service personnel.
POLARIZED PLUG (120V Models Only)
This appliance has a polarized plug--one blade is wider than the other. To reduce the risk of electric shock, this plug will fit into a polarized outlet only one way. If the plug does not fit fully into the outlet, reverse it. If it still does not fit, contact a qualified electrician. Do not attempt to defeat this safety feature by modifying the plug in any way.
FULL ONE-YEAR WARRANTY
(Applies only in U.S. and Canada)
Applica warrants this product against any defects that are due to faulty material or workmanship for a one-year period after the original date of consumer purchase. This warranty does not include damage to the product resulting from accident, misuse, or repairs performed by unauthorized personnel.
Troubleshooting
Common issues with the Arctic Twister include inconsistent churning results and difficulty achieving the desired texture.
- To solve these problems, ensure that the freezer bowl is completely frozen before use. Also, avoid overloading the mixer with too many ingredients at once.
- For safety, always handle the cold freezer bowl with oven mitts or gloves to prevent injury.
- Regularly clean and maintain the mixer to prevent any bacterial buildup.
Black+Decker Arctic Twister Ice Cream Mixer IC200 Pros & Cons
Pros
- Affordable price point
- Compact and lightweight design
- Easy to use and assemble
- Manual operation ensures safety and portability
- Fast churning time
Cons
- Requires pre-freezing of the bowl which can take several hours
- Manual churning can be tiring
- Limited to small batches of ice cream
- No built-in timer or automatic churning feature
Customer Reviews
Customers generally praise the Black+Decker Arctic Twister for its ease of use and the quality of ice cream it produces. Many appreciate its portability and the fact that it does not require electricity. However, some users have noted that manual churning can be tedious and that the mixer is best suited for small batches.
A common complaint is the need to pre-freeze the bowl, which some find inconvenient. Despite this, most users agree that the Arctic Twister offers great value for its price.
Faqs
How long does it take to freeze the bowl?
What materials are used in the construction of the mixer?
How much ice cream can the mixer produce at one time?
Can I use this Black+Decker Arctic Twister Ice Cream Mixer IC200 for other types of frozen treats?
Is the mixer easy to clean?
Why is my ice cream not churning properly?
Is there a warranty on this product?
Where can I purchase replacement parts?
Leave a Comment
