Black Decker Smart Digital Thermostat BDXHTSL1 User Guide
Content
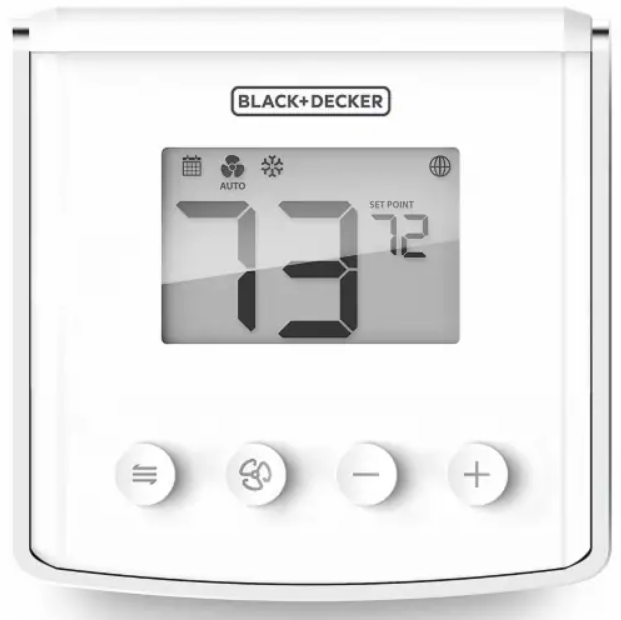
Introduction Black+Decker Smart Digital Thermostat BDXHTSL1
The Black+Decker Smart Digital Thermostat BDXHTSL1 offers a seamless blend of convenience and efficiency for modern homes. With its app-controlled functionality, users can easily manage heating and cooling schedules from anywhere. The device supports a 7-day programmable schedule with up to six intervals per day, ensuring optimal comfort while conserving energy. Its compatibility with smart home systems allows for voice control through platforms like Amazon Alexa and Google Assistant. The exact cost of the BDXHTSL1 is $41.40.
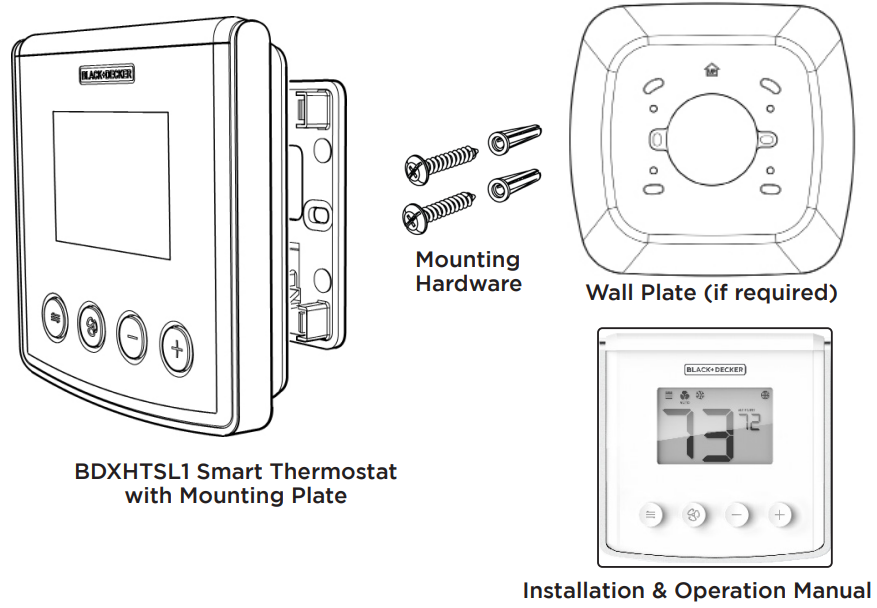
IN THE BOX
Detailed Specifications
Temperature Units | °F or °C |
Operating Temperature | 32°F to 122°F (0°C to 50°C) |
Storage Temperature | 14°F to 140°F (-10°C to 60°C) |
Humidity Range | < 90% RH Non-condensing |
Power Input | 18-30 VAC, 60 Hz |
Load Rating | 24 VAC 1 A per terminal; Max. 2A total |
Dimensions | 3.9” x 4.0” x 0.9” (100 mm x 101 mm x 23 mm) |
Communication Frequency | 802.11 b/g/n |
Approvals | FCC, Industry Canada, RoHS Compliant |
Heating/Cooling Modes | Heat Pump: 2 Heating / 1 Cooling Conventional: 2 Heating / 1 Cooling or 2 Cooling / 1 Heating |
Description
The Black+Decker Smart Digital Thermostat BDXHTSL1 is built with a modern aesthetic that fits seamlessly into any home decor. The device features a large display screen that provides clear and easy-to-read information about the current temperature and settings. It is designed to be energy-efficient, helping homeowners save money on their utility bills by optimizing heating and cooling usage.
The thermostat also includes advanced algorithms that learn your preferences over time, allowing it to make automatic adjustments for optimal comfort and efficiency. Its compact size and lightweight design make it easy to install without requiring extensive technical knowledge.
INSTALLING THE THERMOSTAT
There are 5 steps to install the BDXHTSL1 Smart Thermostat.
- Determine Wiring Configuration
- Remove Old Thermostat
- Install Thermostat Mounting Base
- Connect Wires
- Attach Display
TOOLS REQUIRED (Not included)
The following tools may be required for installation:
- #1 Phillips or flathead screwdriver
- Power drill with 3/16” bit
- Level
- Smartphone/camera to photograph existing wiring (optional)
- Screwdriver to disconnect wires from existing thermostat.
- Pencil
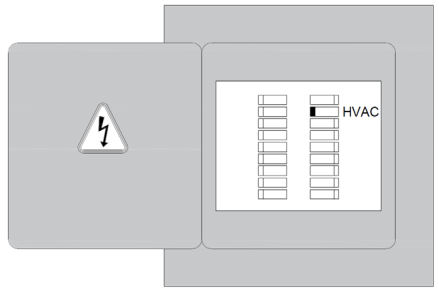
TURN OFF POWER TO HVAC SYSTEM
Locate the HVAC panel breaker and turn OFF the system. Before removing the old thermostat, initiate heating or cooling by changing the temperature setting. Ensure the HVAC system does not respond.
DETERMINE WIRING CONFIGURATION
If the BDXHTSL1 Smart Thermostat is being installed in a new system or if wiring changes are required, refer to Appendix A for the wiring configurations and skip to “Install Mounting Plate”.
When replacing a thermostat and replication of the existing wiring is desired on the BDXHTSL1 Thermostat, the following applies:
- Remove old thermostat to expose the wiring terminals
- Photograph the wiring for reference or,
- Use the Wire Color Record to note the wire color and function of each wire. If the terminals of the existing thermostat are unmarked, determine the wire functions for each color wire at the appliance.
NON-HP | HP | WIRE COLOR/DESCRIPTION |
RC | RC | |
RH | RH | |
C | C | |
G | G | |
Y1 | Y1 | |
N/A | N/A | |
W1 | OB | |
|
| |
N/A | L |
REMOVE OLD THERMOSTAT
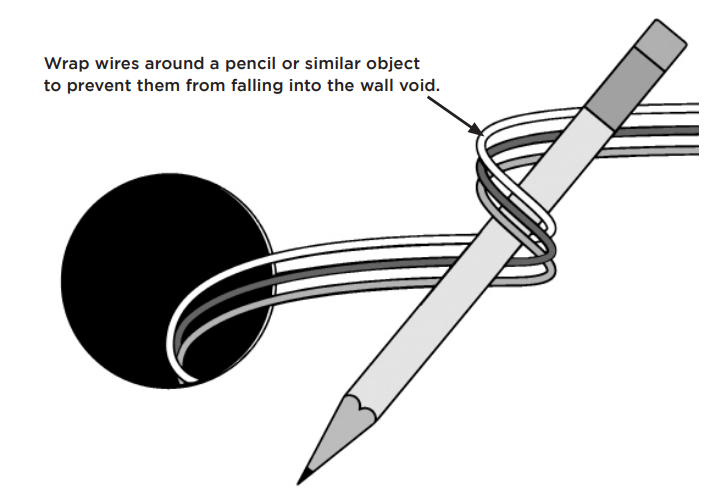
- Remove the old thermostat from the wall, taking care not to allow the wires to fall inside the void.
WARNING: The BDXHTSL1 Thermostat IS NOT COMPATIBLE with supply voltages above 30 VAC. If the old thermostat is connected with thick wire and wire nuts or is labeled for voltages higher than 30 VAC, DO NOT INSTALL the Thermostat.
INSTALL MOUNTING PLATE (with WALL PLATE if required)
Note: Use 3/16” drill for wall anchors if no stud is present.
- Use the included screws and wall anchors (if required) to attach the Mounting Plate to the wall, making sure the wires go through the center opening. Note the correct position indicated by the UP arrows molded into the plastic.
- To cover paint or screw holes on the wall behind the thermostat, insert the Wall Plate between the Mounting Plate and the wall as shown. Both plates are secured with the same screws.
_black+decker_smart_digital_thermostat_bdxhtsl1.png)
ATTACH WIRING
To insert a wire, loosen the screw corresponding to the labeled socket and slide the wire into the socket. Once the wire is inserted, tighten the screw snugly. DO NOT OVERTIGHTEN the screws. Pull gently on each wire after the screw is snug to make sure it is secure. Inspect the wires for oxidation and integrity.
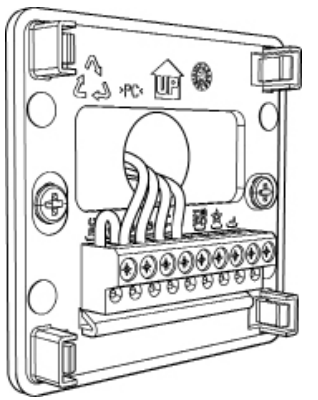
NOTICE: A factory supplied jumper is provided between RC and RH. This should be removed in two transformer systems (See Appendix A).
ATTACH DISPLAY TO MOUNTING PLATE
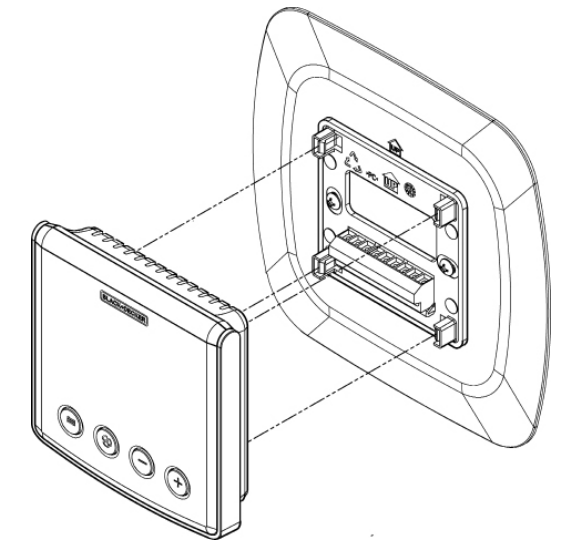
- Slide the display over the Mounting plate and the LCD display will illuminate.
DEVICE OVERVIEW
BDXHTSL1 SMART THERMOSTAT KEYS
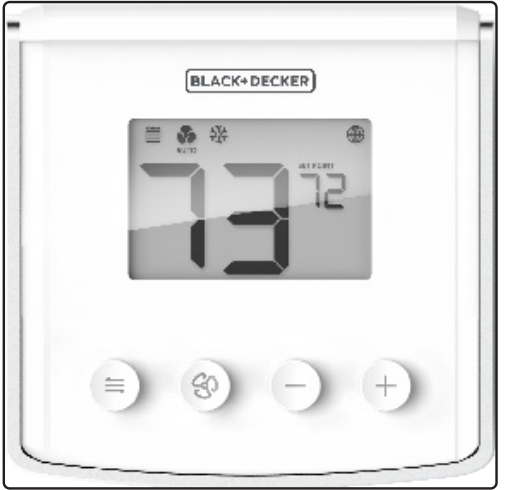
KEY | DESCRIPTION | BUTTON | DESCRIPTION | ||
 |
FAN | Change Fan Speed |  |
INCREASE | Increase Set Point |
 |
MODE | Change System Mode |
DECREASE | Decrease Set Point | |
SPECIAL KEY FUNCTIONS
KEYS | TIME | RESULT | |

|
< 3 seconds | Briefly press + and - keys to switch between Programmable | |
3 seconds | Hold + and – keys for 3 seconds to lock or unlock key pad. | ||
 |  |
3 seconds | Hold the Fan andMode keys for 3 seconds to enter or exit the Parameter Menu. |
 |
5 seconds | Hold the Mode button for 5 seconds to initiate pairing with a Wi-Finetwork and the Black+Decker Application. | |
PARAMETERS AND MENU KEY FUNCTIONS
KEY | DESCRIPTION |
 |
Scroll forward through the Parameter Menu |
Scroll backward through the Parameter Menu | |
 |
Select parameter value in the Parameter Menu |
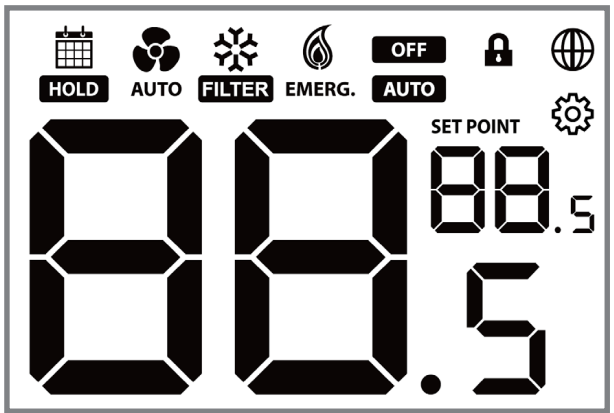
DISPLAY ELEMENTS
 |
Cloud Server/ Internet Connection | Steady = Wi-Fi and Cloud Server connected |
1 Flash = Wi-Fi connected, No Cloud connection | ||
2 Flashes = No Wi-Fi or Cloud Server connection | ||
Thermostat Lock Indicator |
Displayed when thermostat keys are disabled | |
Schedule Indicator | Displayed when thermostat schedule is enabled. | |
Override Indicator | Displayed when scheduled temperature override is active. | |
Filter Warning Indicator |
Displayed when air filter is clogged. |
Heating/Cooling Modes– Press | |||
 | OFF – The SMARTSTAT will not activate heating or cooling* |
| AUTOMATIC CHANGEOVER – The SMARTSTAT will activate heating or cooling appliance based on the room temperature. |
HEAT – The SMARTSTAT will activate heating appliance based on the room temperature. |
| EMERGENCY HEAT – The SMARTSTAT displays this with the | |
 | COOL – The SMART- STAT will activate cooling appliance based on room temperature. | * If freeze protection is active, the heating appliance will be activated to maintain a minimum temperature. | |
Fan Mode | |||
 | FAN – Press | ||
Temperature Displays | |||
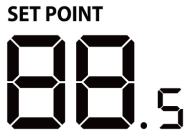 |
SET POINT –Displays the current target set point temperature. | ||
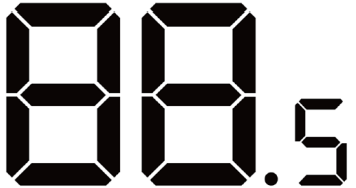 |
Displays the current room temperature. | ||
SMART DEVICE APPLICATION
The BDXHTSL1 Thermostat is designed for remote operation using a smart device application.

Before setting up the thermostat, download the BLACK+DECKER HOME application on your IOS or Android device. After download-ing the application, follow the steps in the BLACK+DECKER Home Application Guide to connect the thermostat.
THERMOSTAT PARAMETERS
To access the BDXHTSL1 Smart Thermostat menu parameters manually, hold down the Mode and Fan buttons for 3 seconds. When a Menu Code is displayed, use the + and – buttons to choose the desired value.
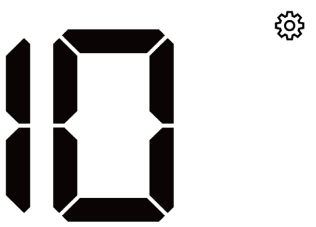
Press Mode ( ) to display Option Values. Once the desired Menu Code and Option Code are displayed, press Mode to accept the value
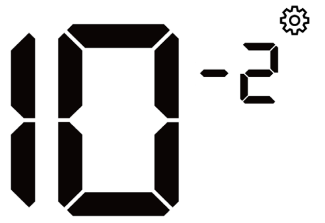
To access the BDXHTSL1 Smart Thermostat menu parameters manually, hold down the Mode and Fan buttons for 3 seconds. The following is a list of the available parameters.
PARAMETER | CODE | DESCRIPTION | |
HVAC Type | 01 1 | Conventional 1H | 1-Stage Heating |
01 2 | Conventional 2H | 2-Stage Heating | |
01 3 | Conventional 1H 1C | 1-Stage Heating & 1-Stage Cooling | |
01 4 | Conventional 2H 1C | 2-Stage Heating & 1-Stage Cooling | |
01 5 | Conventional 1H 2C | 1-Stage Heating & 2 Stage Cooling | |
01 6 | Conventional 1C | 1-Stage Cooling | |
01 7 | Conventional 2C | 2-Stage Cooling | |
01 8 | Heat Pump 1H | 1-Stage Heating | |
01 9 | Heat Pump 1C | 1-Stage Cooling | |
01 10 | Heat Pump 1H1C | 1-Stage Heating & 1-Stage Cooling | |
01 11 | Heat Pump 2H | 2-Stage Heating | |
01 12 | Heat Pump 2H 1C | 2-Stage Heating & 1-Stage Cooling | |
01 13 | Dual Fuel 2H 1C | 2-Stage Heating & 1-Stage Cooling | |
FAN Type | 03 1 | Gas (Gas-fired) | Gas-fired Equipment |
03 2 | Electric (Electric Powered) | Electric Powered Equipment | |
This setting is only available for HVAC Type Conventional (01 1 to 01 8) and Dual Fuel (01 16) | |||
PARAMETER | CODE | DESCRIPTION | |
HP Type | 04 1 | HP o | Changeover valve defaults to Cooling |
04 2 | HP b | Changeover valve defaults to Heating | |
Temp Unit | 07 1 | Fahrenheit | US Customary System of Temperature Units |
07 2 | Celsius | Système international Metric Temperature Units | |
Frost Protection | 09 1 | Disable | When enabled, call for heat will be initiated if room temperature drops below 41.0°F (5.0°C) |
09 2 | Enable | ||
Temp Cal. | 10 -6 | -6.0°F (-3.0°C) |
Calibrate temperature reading by offsetting the display by -6.0°Fto 6.0°F (-3.0°C to 3.0°C) in 1.0°F(0.5°C) increments. Default= 0 |
10 -5 | -5.0°F (-2.5°C) | ||
10 -4 | -4.0°F (-2.0°C) | ||
10 -3 | -3.0°F (-1.5°C) | ||
10 -2 | -2.0°F (-1.0°C) | ||
10 -1 | -1.0°F (-0.5°C) | ||
10 0 | 0.0°F (0.0°C) | ||
10 1 | 1.0°F (0.5°C) | ||
10 2 | 2.0°F (1.0°C) | ||
10 3 | 3.0°F (1.5°C) | ||
10 4 | 4.0°F (2.0°C) | ||
10 5 | 5.0°F (2.5°C) | ||
10 6 | 6.0°F (3.0°C) | ||
PARAMETER | CODE | DESCRIPTION | |
Span | 11 05 | 0.5°F (0.25°C) |
Control variable that affects thermostat response time. A larger number slows response time. |
11 10 | 1.0°F (0.5°C) | ||
11 15 | 1.5°F (0.75°C) | ||
11 20 | 2.0°F (1.0°C) | ||
11 25 | 2.5°F (1.25°C) | ||
11 30 | 3.0°F (1.5°C) | ||
Deadband | 12 2 | 2.0°F (1.0°C) |
Allowable temperature difference, in Auto Mode, between heating and cooling set points. Default = 4.0°F (2.0°C) |
12 3 | 3.0°F (1.5°C) | ||
12 4 | 4.0°F (2.0°C) | ||
Setback Offset | 13 4 | 4.0°F (2.0°C) |
Difference between the non-programmable set point and the setback temperature. |
13 8 | 8.0°F (4.0°C) | ||
13 12 | 12.0°F (6.0°C) | ||
Reduces energy usage when the space is not occupied. | |||
Backlight Timeout | 14 1 | Disable | Backlight always on |
14 2 | Enable | Backlight timeout after 20 seconds | |
PARAMETER | CODE | DESCRIPTION | ||
Auto Recovery | 15 1 | Disable |
Gradually increases setpoint after setback | |
15 2 | Enable | |||
Filter Warning | 16 1 | Disable |
Filter warning ( | |
16 2 | Enable | |||
To reset the filter warning, select Code 16 2 | ||||
Reset |
99 0 |
Power Reset | 99 01 | Abort power reset |
99 02 | Confirm power reset | |||
99 2 |
Factory Reset | 99 21 | Abort reset to factory defaults | |
99 22 | Confirm reset to factory defaults | |||
MANUAL OPERATION
MODE CHANGE
To change the operating mode, press the Mode ( ) button. The following table shows the mode sequence based on the System Type:
Mode Change Sequence
System Type | Sequence | |||
Conventional Heating/Cooling Heat Pump Dual Fuel (Gas/Electric) |  |  | ||
Available Modes Based on HVAC System Setting:
System Type |  |  | ||||
Conventional | Heat Only |
| ||||
Cool Only |
|
| ||||
Heat/Cool |
|
|
|
| ||
Heat Pump | Heat Only |
|
| |||
Cool Only |
|
| ||||
Heat/Cool |
|
|
|
| ||
Heat/Cool + 1 Aux |
|
|
|
|
| |
Dual Fuel | (Gas/Electric) |
|
|
|
|
|
SCHEMATIC WIRING
The following are schematic wiring diagrams based on applicable system types.
WARNING: Failure to correctly wire the BDXHTSL1 Thermostat could result in death or serious injury. The local jurisdiction may require installation by authorized service personnel.
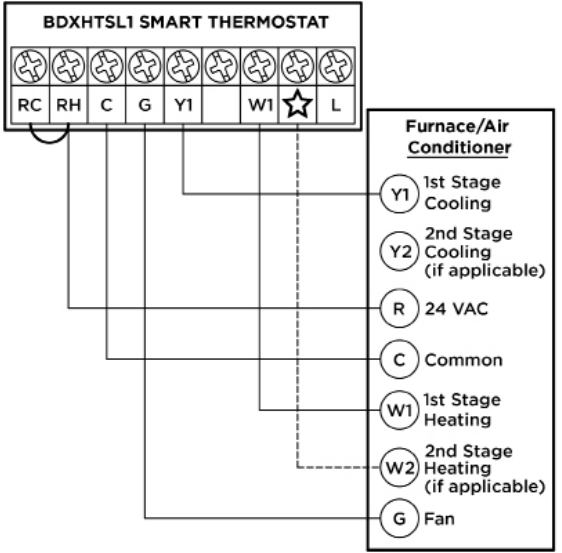
Conventional Furnace/AC 2H/1C (Non-Heat Pump) – 1 Transformer
WARNING:
Failure to correctly wire the BDXHTSL1 Thermostat could result in death or serious injury. The local jurisdiction may require installation by authorized service personnel.
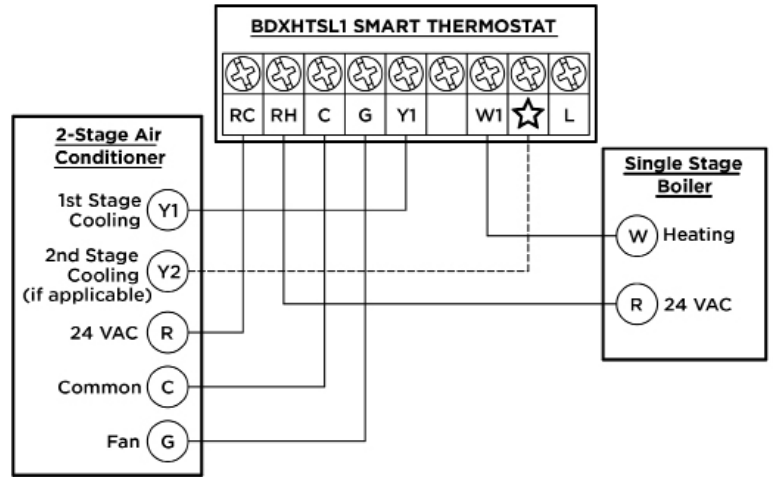
Conventional Boiler/AC (Non-Heat Pump) – 1 Transformer
WARNING: Failure to correctly wire the BDXHTSL1 Thermostat could result in death or serious injury. The local jurisdiction may require installation by authorized service personnel.
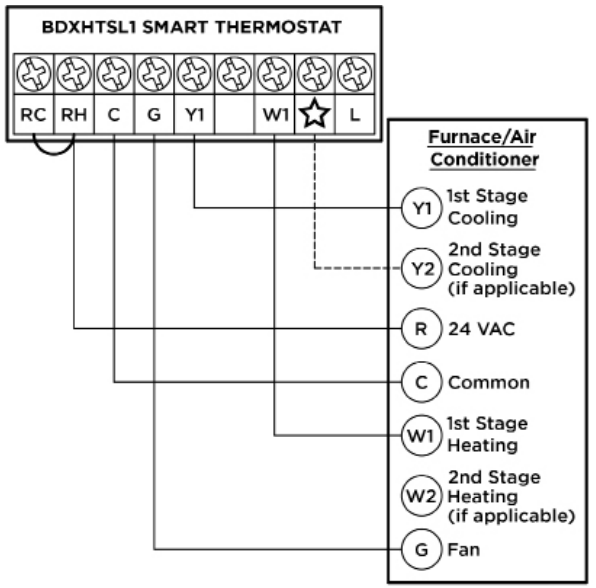
Conventional Boiler/AC (Non-Heat Pump) – 1 Transformer
WARNING: Failure to correctly wire the BDXHTSL1 Thermostat could result in death or serious injury. The local jurisdiction may require installation by authorized service personnel.

Heat Pump – 1 Transformer
Setup Guide
Setting up the Black+Decker Smart Digital Thermostat BDXHTSL1 is relatively straightforward:
- Installation: Replace your existing thermostat with the new unit, ensuring proper wiring connections as per the provided instructions.
- Power On: Turn on the thermostat and follow the on-screen prompts to select your language and connect to Wi-Fi.
- App Configuration: Download and open the Black+Decker Home app, then follow the in-app instructions to pair your thermostat with your smartphone or tablet.
- Scheduling & Settings: Customize your temperature schedules, geofencing settings, and other preferences through the app.
USING THIS MANUAL
BEFORE INSTALLING AND USING THE BDXHTSL1 SMART THERMOSTAT, please read these instructions carefully. This manual is intended as a reference guide for the installation, configuration, and operation of your device. Save all instructions in a safe place for future reference.
SAFETY ALERT SYMBOLS
This instruction manual uses the following safety alert symbols and text to alert installers or users to hazards and risks of personal injury or property damage.
DANGER: Indicates an imminently hazardous situation which, if not avoided, will result in death or serious injury.
WARNING: Indicates an imminently hazardous situation which, if not avoided, could result in death or serious injury.
CAUTION: Indicates a potentially hazardous situation which, if not avoided, may result in minor or moderate injury.
(Used without one of the words above) indicates a safety related message.
NOTICE: Indicates a practice not related to personal injury which, if not avoided, may result in property damage.
IMPORTANT SAFETY INSTRUCTIONS
WARNING: Read all safety warnings and all instructions. Failure to follow the warnings and instructions may result in electric shock, fire and/or serious injury.
WARNING: Never modify this product. Damage or personal injury could result.
WARNING:
- Follow all applicable electrical codes and regulations regarding the installation or replacement of a thermostat in the local jurisdiction. In the absence of local requirements, follow ANSI/NFPA 70, National Electric Code. In some cases, an authorized installer may be required. Consult a qualified electrician or HVAC technician with any questions about the installation of this product.
- DO NOT connect any of the terminals to voltage above 30 VAC. The Thermostat uses 24 VAC nominal power.
- DO NOT cover any of the vents on the thermostat.
- DO NOT install this unit at an altitude of over 6550 feet (2000 meters).
- DO NOT install this unit in a bathroom or area of excessive moisture.
- DO NOT allow the unit to get wet. This temperature control device is intended only for dry, closed living and office spaces.
- DO NOT expose this device to temperatures below 14°F (-10°C) or above 140°F (60°C).
- DO NOT operate or store this thermostat in areas where the relative humidity exceeds 90%.
- DO NOT expose the unit to voltage fluctuations more than +/- 10%.
- DO NOT use solvents or aggressive cleaning agents. A dry, soft cloth is recommended.
The manufacturer does not accept responsibility for any damage caused by not following these instructions.
Troubleshooting
If you encounter issues with your Black+Decker Smart Digital Thermostat BDXHTSL1, refer to these common problems and solutions:
- No Power: Check wiring connections and ensure correct installation. Verify that power is supplied to the thermostat.
- Connection Issues: Restart your router or thermostat and ensure a stable internet connection.
- Temperature Inconsistencies: Verify that the thermostat is properly calibrated and sensors are clean.
Always refer to the user manual for detailed troubleshooting steps, and contact customer support if issues persist.
Warranty
Three-Year Limited Warranty
This limited 3-year warranty is only valid for the original consumer purchaser in limited juris-dictions and is not transferrable. This limited 3-year warranty will automatically terminate if this product is sold or otherwise transferred to another party. The product must be purchased from CT Nova or an authorized dealer or the warranty is void. This limited 3-year warranty is valid only for products purchased and utilized in specific jurisdictions. Please visit our website at www.ctnovatech.com for a list of jurisdictions wherein this 3-year limited warranty is valid.
Black+Decker Pros & Cons
Pros
- Remote Control: Manage your home's temperature from anywhere using the app.
- Energy Efficiency: Optimizes heating and cooling usage to save energy costs.
- User-Friendly Interface: Easy-to-use interface makes it accessible for all users.
- Compatibility with Smart Assistants: Works seamlessly with Amazon Alexa and Google Assistant.
Cons
- Internet Dependency: Requires a stable internet connection for full functionality.
- Compatibility Issues:
Customer Reviews
Customers have generally praised the Black+Decker Smart Digital Thermostat BDXHTSL1 for its ease of use and energy-saving capabilities:
- "This thermostat has been a game-changer for our home. The geofencing feature ensures that our house is always at the perfect temperature when we arrive." - John D.
- "The app is very user-friendly, and I love how it tracks my energy usage. It's definitely helped us save on our utility bills." - Emily K.
A common complaint among some users is occasional connectivity issues, but these are generally resolved by restarting the device or router.
Faqs
How do I connect my Black+Decker Smart Digital to Wi-Fi?
Is the Thermostat BDXHTSL1 compatible with all HVAC systems?
Can I control multiple thermostats using the Black+Decker Home app?
How does geofencing work on this thermostat?
What are the dimensions of the Black+Decker?
Does the Black+Decker Smart Digital Thermostat support voice assistants like Amazon Alexa or Google Assistant?
How do I update the firmware of my Black+Decker Smart Digital Thermostat BDXHTSL1?
Can I use this thermostat without an internet connection?
What kind of sensors does the Black+Decker Smart Digital use?
Is there a battery backup option for this thermostat?
Leave a Comment


