Bosch 300 Series Freestanding Refrigerator B20CS30SNS User Manual
Content
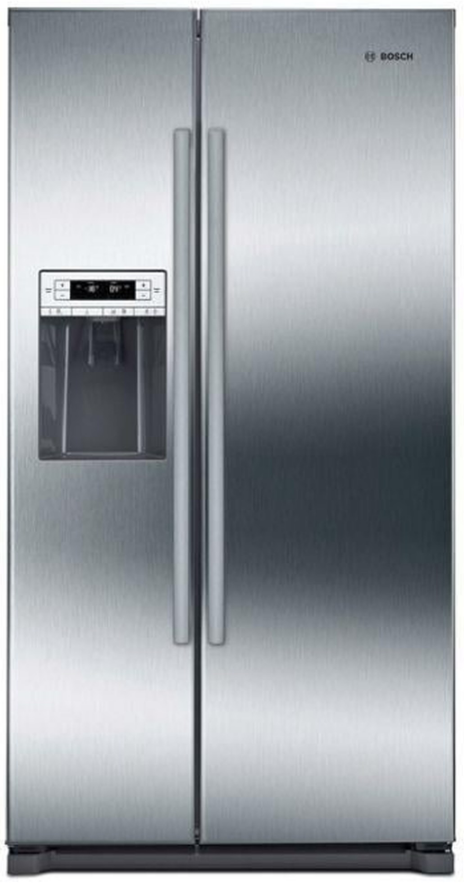
Bosch 300 Series Freestanding Refrigerator B20CS30SNS
The Bosch 300 Series Freestanding Refrigerator B20CS30SNS is a high-end appliance that combines style and functionality in your kitchen. With a sleek, modern appearance and advanced cooling technology, it keeps your food fresher for longer. The B20CS30SNS is an excellent choice for households looking for a dependable and visually appealing refrigeration solution, thanks to its roomy interior, energy efficiency, and easy-to-use controls.
Getting to know the appliance
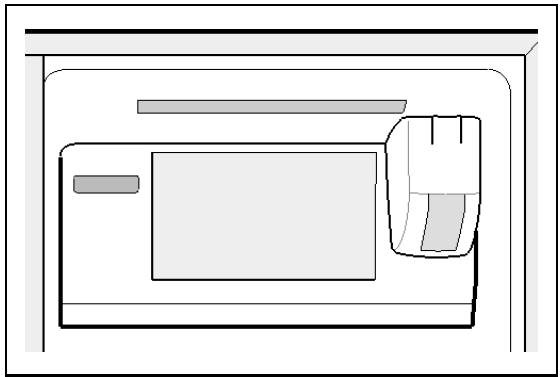
Appliance
The features of the models may vary.
The illustrations may differ from your particular model.
- Fridge compartment
- Freezer compartment

- Door pockets
- Operating controls
- Ice and water dispenser
- Freezer door pockets
- Ice-cube tray
- Ice maker
- Freezer compartment glass shelves
- Freezer compartment drawers
- Shelf
- Water filter
- Fridge compartment glass shelves
- Multi-box drawers
- Fridge door pockets
- Egg tray
Detailed Specifications
The Bosch 300 Series Freestanding Refrigerator B20CS30SNS features a spacious 20.3 cubic foot capacity, with adjustable shelving and door bins that allow for maximum storage flexibility. This refrigerator also boasts an advanced cooling system with separate temperature controls for the fridge and freezer, ensuring optimal food preservation. Other key features include a door-mounted ice and water dispenser, LED lighting, and a built-in alarm system that alerts you if the door is left open.
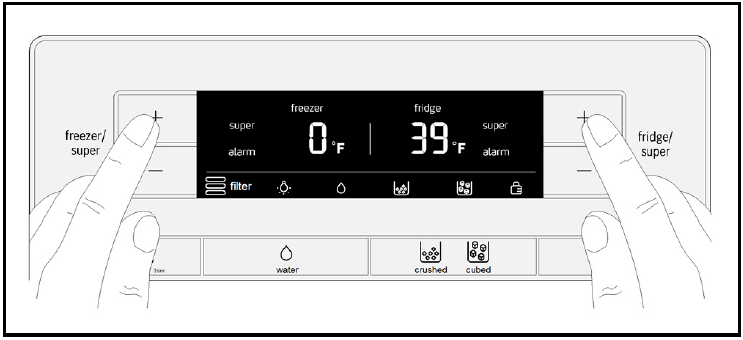
Operating controls
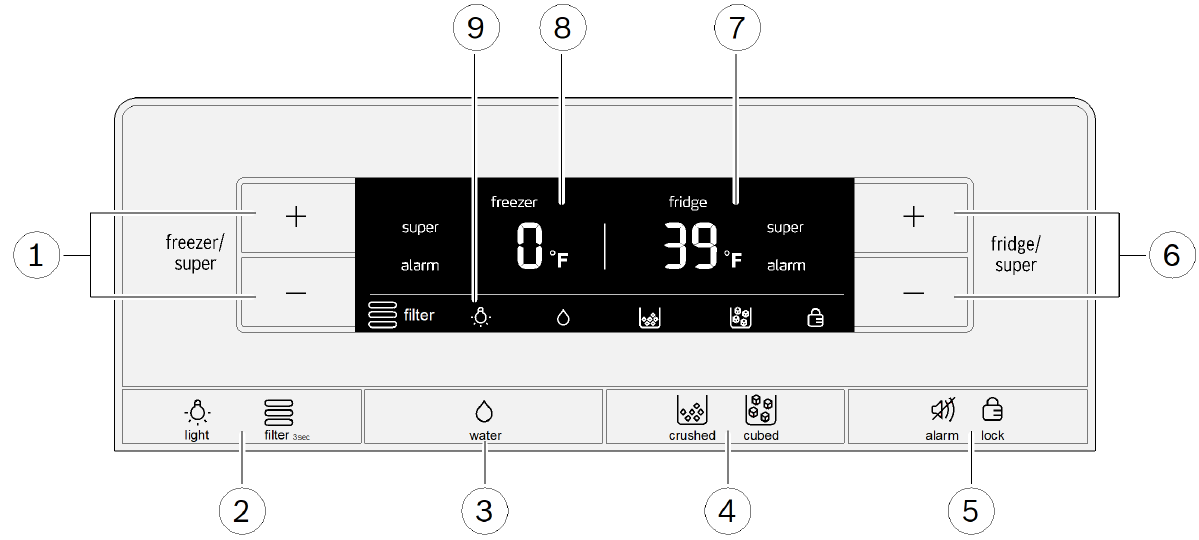
- "freezer/super" buttons
- For setting the temperature in the freezer compartment
- For switching fast freezing function on and off.
- "Light/Filter" button
- Switches the light for the ice/water dispenser on or off.
- Resets the filter indicator.
- "Water" button
- "Ice cubes/Crushed ice" button
- "Alarm off/Lock" button
- Switches off the display of the temperature alarm.
- Switches the panel lock on or off.
- "fridge/super" buttons
- For setting the temperature in the fridge compartment.
- For switching the fast cooling function on and off.
- Fridge compartment display panel
- Fridge compartment temperature.
- "super" symbol shown when fast cooling function is active.
- "alarm" symbol shown when fridge compartment alarm is active.
- Freezer compartment display panel
- Freezer compartment temperature.
- "super" symbol shown when fast freezing function is active.
- "alarm" symbol shown when freezer compartment alarm is active.
- Symbols on the display panel
 Water filter
Condition of filter cartridge. Lighting
Ice and water dispenser light is switched on. Water
Water
Water dispenser function is switched on. Crushed ice
Crushed ice dispenser function is switched on. Ice cubes
Ice-cube dispenser function is switched on. Panel lock
Panel lock is switched on.
Switching on the appliance
- Plug the power plug into the electrical outlet socket.
- The appliance will start cooling.
- When the appliance is switched on for the first time, the alarm function is deactivated until the appliance has reached the set temperature. If the appliance is switched off for an extended period, the temperature alarm may be triggered when it is first switched on again.
- The temperatures flash and the display panels show the "alarm" symbol until the appliance has reached the set temperatures.
- By pressing the "Alarm off/Lock" button the temperature warning is switched off.
- The lights come on when the appliance doors are opened.
- The following temperatures are recommended by the manufacturer and pre-set at the factory:
- Fridge compartment 39 °F (4 °C)
- Freezer compartment 0 °F (-18 °C)
Notes on using the appliance
- After switching on the appliance, it may be several hours before the set temperatures are reached. Do not put any food in the appliance before then.
- Thanks to the fully automatic NoFrost system, the freezer compartment remains free of ice. Defrosting is not required.
- Some of the casing end faces are slightly heated to prevent condensation forming in the door seal area.
- If you cannot open the freezer compartment door again immediately after closing it, wait a moment for the low pressure created to equalize.
Setting the temperature
- Fridge compartment
- The temperature can be adjusted between 33 °F (1 °C) up to 45 °F (7 °C).
Repeatedly press the "fridge/super +" or "fridge/super –" button until the desired fridge compartment temperature is set. The temperature last set is saved. The set temperature is shown on the fridge compartment display panel.
- The temperature can be adjusted between 33 °F (1 °C) up to 45 °F (7 °C).
- Freezer compartment
- The temperature can be adjusted between 4 °F (-16 °C) up to -8 °F (-22 °C).
Repeatedly press the "freezer/super +" or "freezer/super –" button until the desired freezer compartment temperature is set. The temperature last set is saved. The set temperature is shown on the freezer compartment display panel.
- The temperature can be adjusted between 4 °F (-16 °C) up to -8 °F (-22 °C).
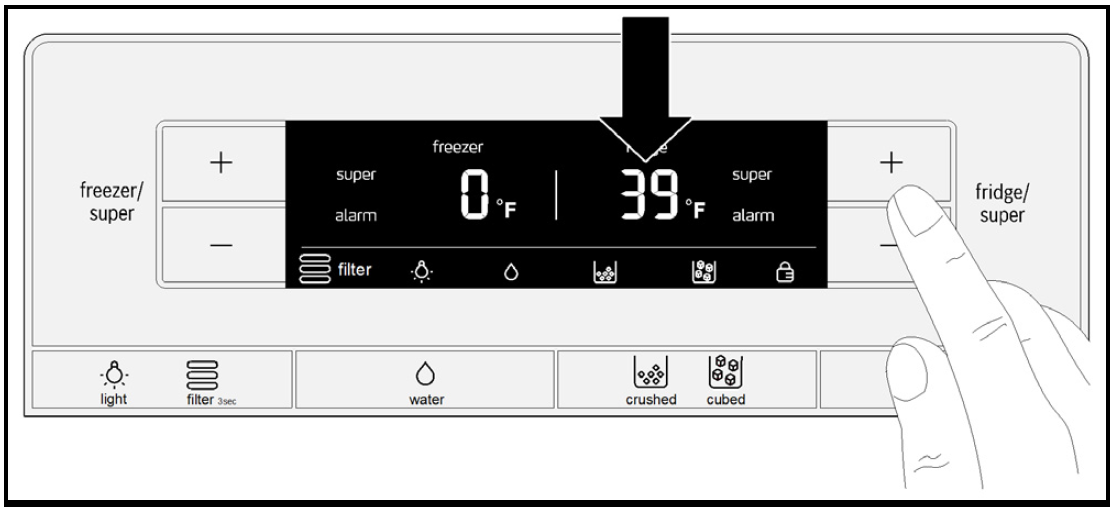
Fast cooling function
Super cooling cools the refrigerator compartment down as low as possible for approximately 40 minutes. The temperature is then automatically reset to 39 °F (4 °C). Super cooling is particularly recommended for the following:
- Before placing large quantities of food in the refrigerator compartment.
- To cool drinks quickly.
Note: When fast cooling is switched on, the appliance may make more noise.
Switching on
Press the "fridge/super -" button until "super" appears on the right on the display panel.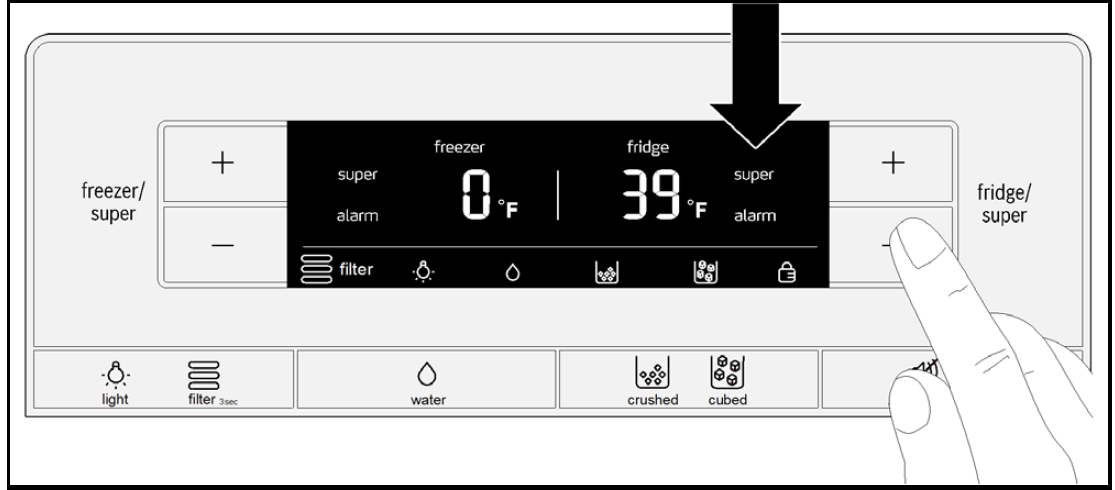
- Switching off
Press the "fridge/super +" button.
Note: The display panel no longer shows "super". The temperature setting automatically reverts to 39 °F (4 °C).
Bosch 300 Series Freestanding Refrigerator B20CS30SNS Fittings
- Glass shelves
The glass shelves can be removed and fitted at different heights. Removing
Lift the glass shelf at the back and pull it out.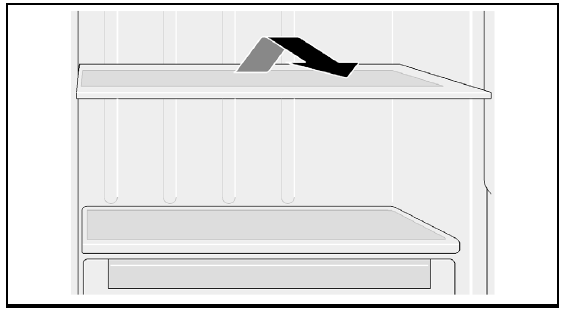
- Inserting
Slide the glass shelf backwards on the guide rails until it snaps downwards into place.
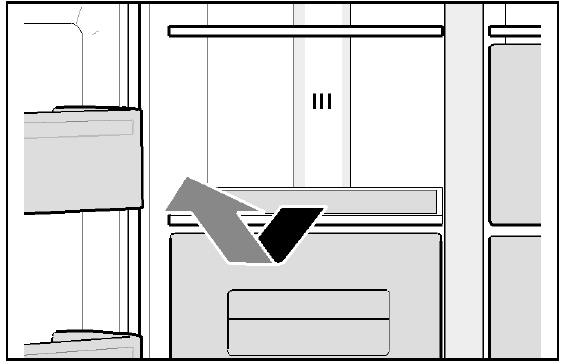
Glass shelves over the drawers
The glass shelves can be removed.
Pull the shelf out and lift it upwards to remove it.
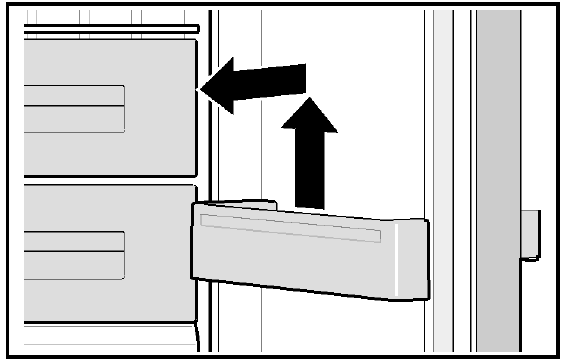
Door pockets
The door pockets can be removed.
Pull the door pockets upwards to remove.
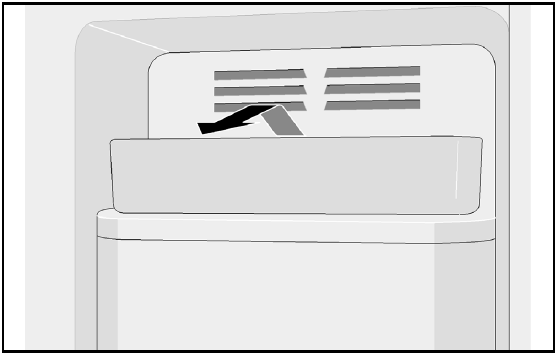
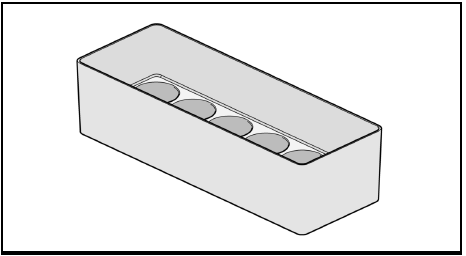
Ice-cube tray
The ice-cube tray is for keeping ice cubes in.
Lift the ice-cube tray slightly at the front and unhook it.
Drawers
The drawers can be removed.
Pull the drawer out as far as the stop, lift it at the front and remove it completely.
Shelf
For holding drinks cans.
Egg tray
Switching off and disconnecting the appliance
Switch off the appliance
- Unplug the appliance from the mains or switch off the circuit breaker.
- The refrigeration system and lights switch off.
- If the appliance is to be switched off but not unplugged (e.g. while you are on holiday):
Press and hold the "freezer/super +" and "fridge/super +" buttons for 5 seconds. When the appliance is off or disconnected, the freezer compartment display will show "o" and the fridge compartment display will show "FF". The rest of the display panel is off.
Switching on the appliance
- Press and hold the "freezer/super +" and "fridge/super +" buttons for 5 seconds.
Disconnecting the appliance
If the appliance is not used for an extended period of time:
- It is imperative that you disconnect the water supply to the appliance for a few hours before switching off the appliance.
- Remove all food from the appliance.
- Unplug the appliance.
- Remove and dispose of the filter cartridge.
- Empty and clean the ice cube container.
- Clean the appliance interior (see section "Cleaning the appliance”).
- To prevent odors, leave the appliance doors open.
Description
The Bosch 300 Series Freestanding Refrigerator B20CS30SNS is a high-end refrigerator that offers superior performance, style, and convenience. With its sleek stainless steel finish and modern design, this refrigerator is sure to make a statement in any kitchen. The spacious interior provides ample storage for all your food and beverage items, while the advanced cooling system ensures that your food stays fresh and flavorful. The door-mounted ice and water dispenser is convenient and easy to use, while the LED lighting and built-in alarm system add to the refrigerator's functionality and safety.
Defrosting
Fridge compartment
While the appliance is in use, drops of condensation or frost form on the back of the fridge compartment. As the rear panel defrosts automatically, it is not necessary to remove the frost or the condensation.
Freezer compartment
Thanks to the fully automatic NoFrost system, the freezer compartment remains free of ice. There is no longer any need to defrost it.
Cleaning the appliance
CAUTION
- Do not use gritty, acidic or chlorine-based cleaning agents or solvents.
- Do not use abrasive cleaning pads or sponges that may scratch surfaces. This may lead to corrosion of the metallic surfaces.
- Never clean the shelves or containers in the dishwasher. The parts may warp.
Proceed as follows:
- Switch off the appliance before cleaning.
- Unplug the appliance from the mains or switch off the circuit-breaker.
- Take out the food and store it in a cool place. Place an ice block (if you have one) on the food.
- Wait until the layer of frost has thawed out.
- Clean the appliance with a soft cloth, lukewarm water, and a little pH-neutral washing-up liquid. The washing-up liquid solution must not be allowed to get into the lights or run into the evaporation tray through the drain hole.
- Only wipe the door seal with clean water and then rub it until it is dry.
- After cleaning, reconnect the appliance to the mains and switch it on.
- Put the food back in.
Fittings
All the variable components of the appliance can be removed for cleaning (see section "Fittings").
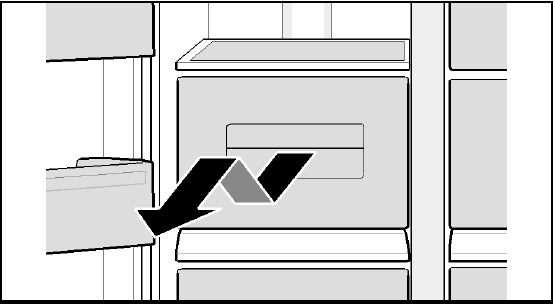
Ice-cube container
If no ice-cubes are dispensed for an extended period, the ice cubes in the container shrink, taste stale and stick together. Therefore, the ice-cube container should be cleaned regularly.
CAUTION: The ice-cube container is heavy when it is full.
- Press and hold the "Ice cubes/Crushed ice" button for 3 seconds.
- Pull out the ice-cube container.
- Empty the ice-cube container and clean it.
- Push the ice-cube container all the way back on the runners until it snaps into place.
Smells
If you notice unpleasant smells:
- Unplug the appliance from the mains or switch off the circuit-breaker.
- Remove all food from the appliance.
- Clean the inside of the appliance (see section "Cleaning the appliance”).
- Clean all packaging.
- Pack strongly smelling food in air-tight containers to prevent odors.
- Switch on the appliance again.
- Arrange the food.
- After 24 hours, check again to see if the smells have reappeared.
LED light
Your appliance features a maintenance-free LED light. These lights may be repaired by customer service or authorized technicians only.
CAUTION: Risk of eye injury from Class 1M laser light (IEC 60825)!
Do not look directly into the light with optical instruments.
Saving energy
- Install the appliance in a dry, well ventilated room. The appliance must be installed out of direct sunlight and away from heat sources (e.g. heating elements, cooker).
Use an insulating plate if necessary. - Allow hot food and drinks to cool before placing them in the appliance.
- Place frozen food in the fridge compartment to defrost and utilize the low temperature of the frozen food to cool other food.
- Only open the appliance doors for as short a time as possible.
- To prevent the food warming up quickly in the event of a power cut or a fault, place blocks of ice in the top compartment directly on top of the food.
- Make sure that the freezer compartment door is always closed.
- The arrangement of the fittings has no effect on the energy consumption of the appliance.
- To prevent increased power consumption, occasionally clean the air vent with a soft brush or vacuum cleaner.
Operating noises
Normal noises
- Humming
The refrigerating unit is running. The fan in the circulating air system is running. - Bubbling, whirring, or gurgling noises
Refrigerant is flowing through the tubing or water is flowing into the ice maker. The motor twists ice cube trays to eject ice cubes into the ice cube container. - Clicking
The motor is switching on or off. The solenoid valve at the water connection is opening or closing. - Rumbling
Ready ice cubes from the ice maker are falling into the ice cube container.
Solving simple noise problems
- The appliance is not level
Align the appliance using a level. Use the height-adjustable feet or place something under the feet. - The appliance is touching adjacent units or appliances
Move the appliance away from adjacent units or appliances. - Loose or sticking drawers, baskets or storage areas
Check the removable parts and, if required, reinsert them. - Receptacles are touching each other
Move bottles or receptacles slightly away from each other.
Rectifying minor faults yourself
Before calling Customer Support:
Check whether you can rectify the fault yourself by using the notes below.
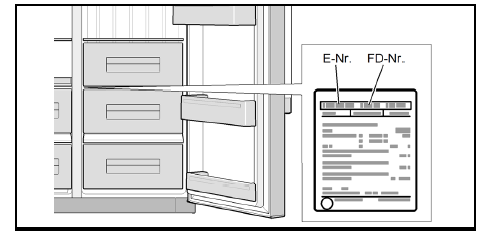
Appliance
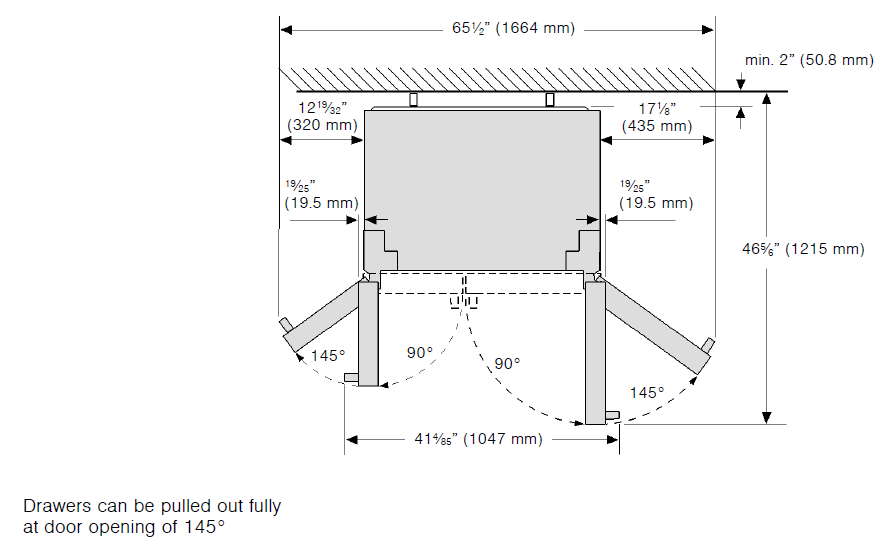
Installation dimensions

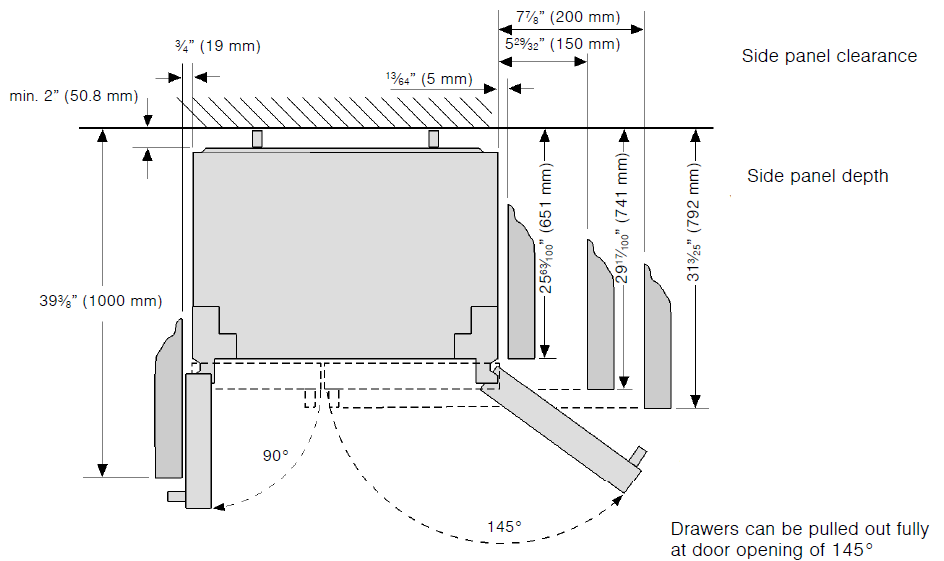
Door opening angle
Connecting the appliance
- Have a technician install and connect the appliance according to the enclosed Installation Instructions.
- Do not remove the transportation protection devices from the shelves and storage compartments until the appliance has been installed and aligned.
- Always connect the water before the power.
- Apart from statutory national regulations, you should comply with all applicable local electricity and water companies' codes and requirements.
- After installing the appliance, wait at least 6 hours before switching the appliance on. During transportation the oil in the compressor may have flowed into the refrigeration system.
- Before switching the appliance on for the first time, clean the interior of the appliance (see section “Cleaning the Appliance”).
Water connection
WARNING: Risk of electric shock and damage to the appliance!
Disconnect the appliance from the power source before performing any work on the water connection. Only a qualified installation technician may connect the appliance to the water supply in accordance with plumbing and relevant water utility company regulations.
Connect the appliance to a drinking water line only:
- Minimum pressure: 14.5 psi (1.0 bar)
- Maximum pressure: 116 psi (8.0 bar)
CAUTION: If the water pressure is more than 80 psi (5.5 bar), a pressure limiter valve must be fitted; otherwise there is a risk of water damage. If the water pressure is below 14.5 psi (1.0 bar), the ice-maker will not function. Contact a plumbing professional if you are uncertain how to check your water pressure.
The water should be connected only by a competent plumber according to the local regulations of the appropriate Water Supply company. The appliance may only be connected to a cold water pipe. A separate Shut-Off-Valve should be installed in the cold-water inflow.
The Shut-Off-Valve should not be located behind the appliance. It is recommended that you mount the Shut-Off-Valve directly next to the appliance or at another place that is easily accessible. When installing the water connection, pay attention to the permissible installation area for the water line. For connection to the drinking water line use only water pipes that are suitable for drinking water. Observe national regulations and the connection conditions of the local Water Supply companies. The taste and smell of the water can be improved by installing the filter cartridge supplied. If doing so, take note of the different connection specifications (see section “Water filter”).
Note: After the appliance has been switched on, water can drip from the water dispenser. After approx. 24 hours, when the appliance has reached its operating temperature, the dripping stops.
Electrical connection
WARNING: Risk of electric shock and fire if electrical connection is not installed properly!
- Plug into a fixed, grounded 3-prong outlet only. The outlet must be installed and grounded according to code by a qualified electrician. If necessary, have the installation inspected by a qualified technician to ensure it is properly grounded.
- Do not use an extension cord or power strip.
- Never connect the appliance to an electronic energy saver plug (such as Ecoboy, Sava Plug, etc.) or to power inverters which convert direct current (DC) to alternating current (AC) (such as for solar equipment, power supplies on ships, etc.).
The outlet for the appliance must be located close the appliance and must be easy to access also after installation. Connect the appliance to a properly installed 115 V/60 Hz AC outlet. The fuse for the outlet must be rated either 15 A or 20 A. If the appliance is to be used in a country other than the U.S., check the rating plate to determine if the specified voltage and current type correspond to the ratings of your power supply. If the voltage and current type do not match, the appliance must not be operated. The power cord may only be replaced by a qualified electrician.
IMPORTANT SAFETY INSTRUCTIONS
READ AND SAVE THESE INSTRUCTIONS!
Children in the household
WARNING: Risk of suffocation from cardboard boxes and plastic film! Keep packaging and packaging components away from children. Do not allow children to play with the appliance! If the appliance features a lock, keep the key out of the reach of children.
General requirements
The appliance is suitable for:
- refrigerating food
- freezing food
- making ice
- dispensing drinking water.
This appliance is intended for use in the home and the home environment. The refrigeration circuit has been tested for leaks before leaving the factory. State of California Proposition 65
Warnings
This product may contain a chemical known to the State of California, which can cause cancer or reproductive harm. Therefore, the packaging of your product may bear the following label as required by California:
STATE OF CALIFORNIA PROPOSITION 65 WARNING https://www.P65Warnings.ca.gov
Troubleshooting
| Problem | Possible Cause | Remedy |
|---|---|---|
| Appliance is not cooling/freezing. | Power cut. | Check whether there is power to the appliance. |
| The lighting is not working. | Circuit-breaker is switched off. | Check circuit-breaker. |
| The display does not light up. | Power plug not properly plugged in. | Check whether the power plug is properly plugged in. |
| Keys do not function correctly. | The surface of the keys is greasy or dirty. | Clean the keys with a soft cloth, lukewarm water, and a little pH-neutral detergent. |
| The refrigeration unit switches on with increasing frequency and for longer periods. | The appliance door is being opened frequently. | Do not open the appliance door unnecessarily. |
| The ventilation openings are covered. | Remove any obstructions. | |
| Placing large quantities of food in the appliance. | Switch on fast cooling/fast freezing function. | |
| The fridge compartment/freezer compartment is too cold. | The temperature setting is too low. | Set a higher temperature. |
| The (LED) lighting does not work. | The LED lighting is faulty. | See section "Lighting (LED)". |
| Light switch is sticking. | Check whether you can move the light switch. | |
| The appliance door was opened for too long. | After closing and opening the appliance door, the lighting is switched on again. | |
| The lighting switches off after approx. 10 minutes. | ||
| Unpleasant smells are noticeable. | Strongly smelling food not packed in air-tight containers. | Clean the appliance. Pack strongly smelling food in air-tight containers (see section "Smells"). |
| Warning beeper sounds or temperature indicator flashes. | Appliance door is open. | See section "Alarm functions". |
| It is too warm in the fridge or freezer compartment. Food is at risk. | Too much food was stored at once. | |
| Fresh food compartment (if existing) does not cool. | Disconnect the appliance from the mains (power failure or power plug pulled). | Reset the desired temperature. |
| Ice-maker not working. | Ice-maker is not connected to the power supply. | Call Customer Support. |
| Ice-maker is not receiving a supply of water. | Make sure that the water supply is properly connected. | |
| The temperature in the freezer compartment is too high. | Check the freezer compartment temperature setting and set it slightly colder if necessary. | |
| Ice-cube tray is not completely filled. | Amount of ice stored in the ice-cube tray depends on various environmental conditions and user behavior. | No error, normal equipment behavior. |
| Ice-maker is not making enough ice or the ice is misshapen. | Appliance or ice-maker has only been switched on for a short time. | It takes roughly 24 hours for ice production to start. |
| A large quantity of ice has been dispensed. | It takes roughly 24 hours for the ice-cube container to be refilled. | |
| Low water pressure. | The appliance should only be connected to a water supply with the specified pressure (see section "Connecting the appliance", subheading "Water connection"). | |
| Water filter clogged or used up. | Replace water filter. | |
| The temperature in the freezer compartment is too high. | Set the freezer compartment temperature lower. | |
| Ice-maker not making any ice. | Ice-maker is switched off. | Switch on the ice-maker. |
| Appliance not being supplied with water. | Contact your installer or water company. | |
| Kinks in the water supply hose. | Turn off the water supply at the isolating valve. Straighten out any kinks or have the hose replaced if necessary. | |
| Low water pressure. | The appliance should only be connected to a water supply with the specified pressure (see section "Connecting the appliance", subheading "Water connection"). | |
| Freezer compartment temperature too high. | Set a slightly colder temperature for the freezer compartment. | |
| Ice-cube container not inserted properly. | Check the position, reinsert if necessary. | |
| Incorrect isolating valve fitted. | Unsuitable valves can reduce the water pressure and cause damage to the appliance. | |
| Ice forms in the feeder hose to the ice-maker. | Low water pressure. | Turn off the water supply at the isolating valve. Straighten out any kinks or have the hose replaced if necessary. |
| Isolating valve not fully open. | Fully open isolating valve. | |
| Water runs out of the appliance. | Water connecting hose is leaking. | Have the hose replaced with a genuine replacement hose from the manufacturer. |
| Incorrect isolating valve fitted. | Unsuitable valves can reduce the water pressure and cause damage to the appliance. | |
| No water comes out of the water dispenser. | The return stop valve has been installed incorrectly. | Check the flow direction, arrows on the return stop valve indicate the flow direction. |
| Sieve is clogged. | Turn off the water supply at the isolating valve. Remove and clean the sieve. |
Pros & Cons
Pros
- Spacious interior with adjustable shelving and door bins
- Advanced cooling system with separate temperature controls
- Door-mounted ice and water dispenser
- LED lighting and built-in alarm system
- Sleek stainless steel finish and modern design
Cons
- Higher price point compared to other refrigerators in its class
- May require professional installation
- Some users may find the ice and water dispenser to be finicky
Customer Reviews
Customers generally have positive reviews for the Bosch 300 Series Freestanding Refrigerator B20CS30SNS, praising its spacious interior, advanced cooling system, and stylish design. However, some users have reported issues with the ice and water dispenser, as well as the refrigerator's higher price point compared to other models. Overall, the Bosch 300 Series Freestanding Refrigerator B20CS30SNS is a high-quality and reliable refrigerator that is well worth the investment for those who want a top-performing cooling solution.
Faqs
What is the capacity of the Bosch 300 Series Freestanding Refrigerator B20CS30SNS?
What is the temperature range for the fridge and freezer?
What is the energy efficiency rating of the refrigerator?
What is the warranty for the refrigerator?
What is the exterior finish of the Bosch Refrigerator B20CS30SNS?
What is the voltage range for the refrigerator?
What is the recommended clearance for the refrigerator?
Leave a Comment