Bosch Built in Steam Convection Oven HSLP451UC User Guide
Content
Introduction
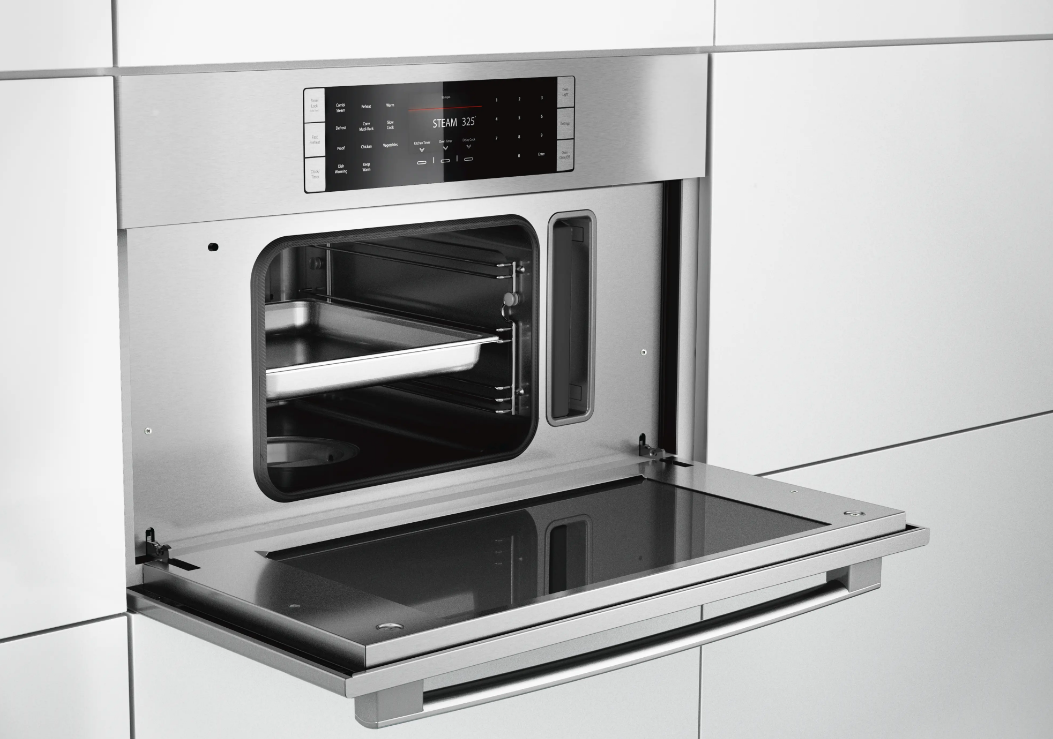
The Bosch Built-in Steam Convection Oven HSLP451UC is a versatile kitchen appliance that combines steam cooking with convection technology, allowing for healthier and more flavorful meals. With a spacious interior, it offers multiple cooking modes, including steam, bake, and broil, ensuring optimal results for various dishes. The intuitive control panel features a digital display for easy operation, while the sleek stainless steel design complements any modern kitchen decor. The cost of the Bosch HSLP451UC typically ranges around $2,199.00, reflecting its advanced features and high-quality construction.
Getting Started
Parts and Accessories
Control Panel
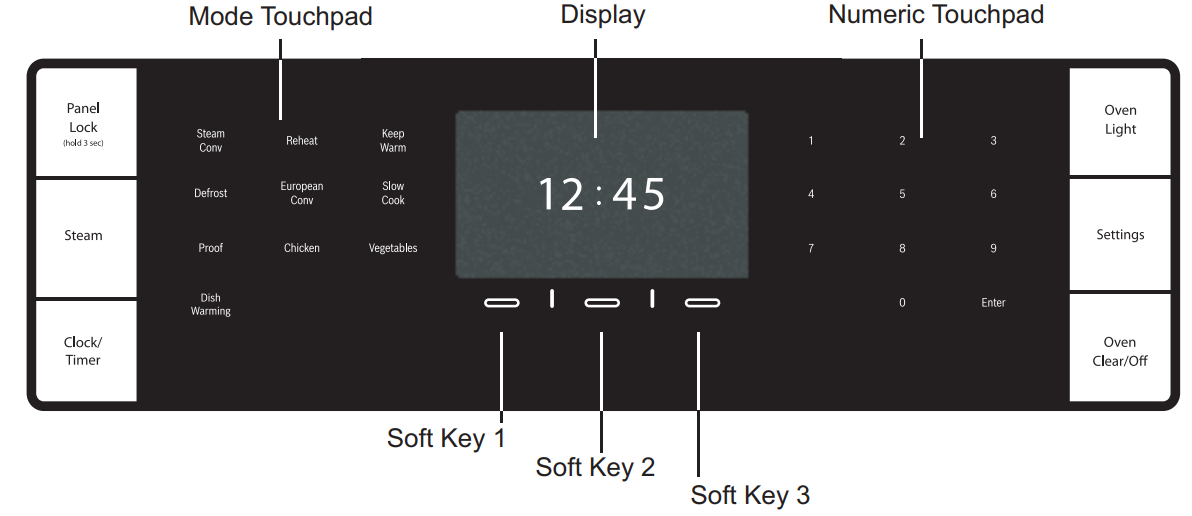
| FUNCTIONS | You only have to press lightly on the touchpads to operate them. The touchpads will not work if you press several of them at once, such as when cleaning them. |
| Panel Lock | Press and hold for three seconds to turn the panel lock on or off. Prevents the oven from being turned on. |
| Clock/Timer | Sets the clock and timer functions. |
| Oven Light | Turns oven light on or off. |
| Settings | User settings are available for the operator to customize the steam oven to their preference. Settings can only be accessed from stand-by state. |
| Oven Clear/Off | Turns the oven off. |
| COOKING MODE | MODE FUNCTION |
| Steam | For vegetables, fish, side dishes, for juicing fruit and for blanching. |
| Steam Conv | Combines steam and convection oven modes. Use for meat, soufflés and baked goods. |
| Defrost | Defrosts fruits, vegetables, meats and fish for cooking or serving. |
| Proof | Proof (raises) yeast dough and sourdough. |
| Dish Warming | Heats and keeps warm oven–safe ovenware, plates and bowls. |
| Reheat | Gently reheats cooked foods in plated dishes and baking dishes. |
| European Conv | Operates as a convection oven, with no steam. Use for moist cakes, sponge cakes and braised meat. |
| Keep Warm | Keeps hot, cooked foods at serving temperature. |
| Slow Cook | Slowly roasts meats so they remain very tender. |
| Chicken | Automatic program setting for cooking chicken. |
| Vegetables | Automatic program setting for cooking vegetables. |
Oven Interior
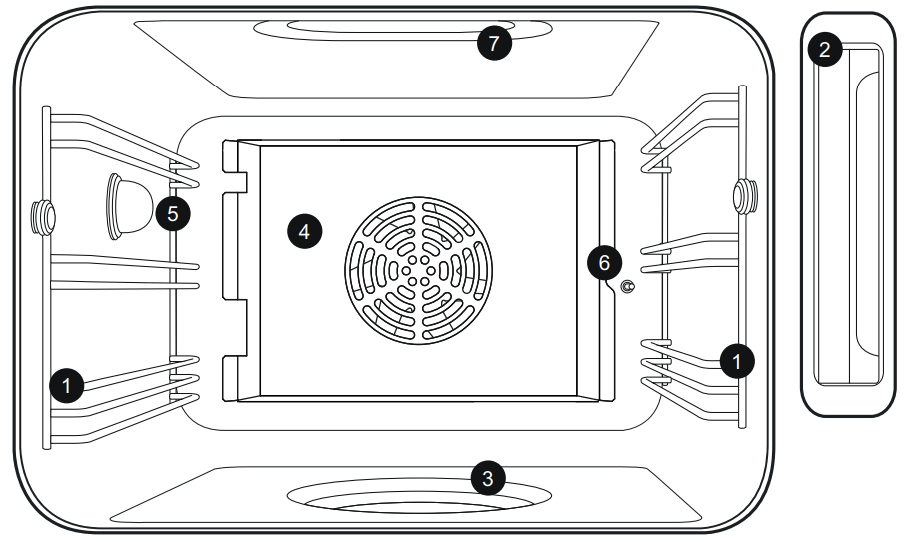
- Rack Guide
- Water Tank
- Evaporator Dish
- Convection Cover
- Oven Light
- Temperature Sensor
- Steam Vent
Oven Accessories
Clean the accessories thoroughly with soapy water and a cloth before initial use. The following steam oven accessories come with your steam oven:
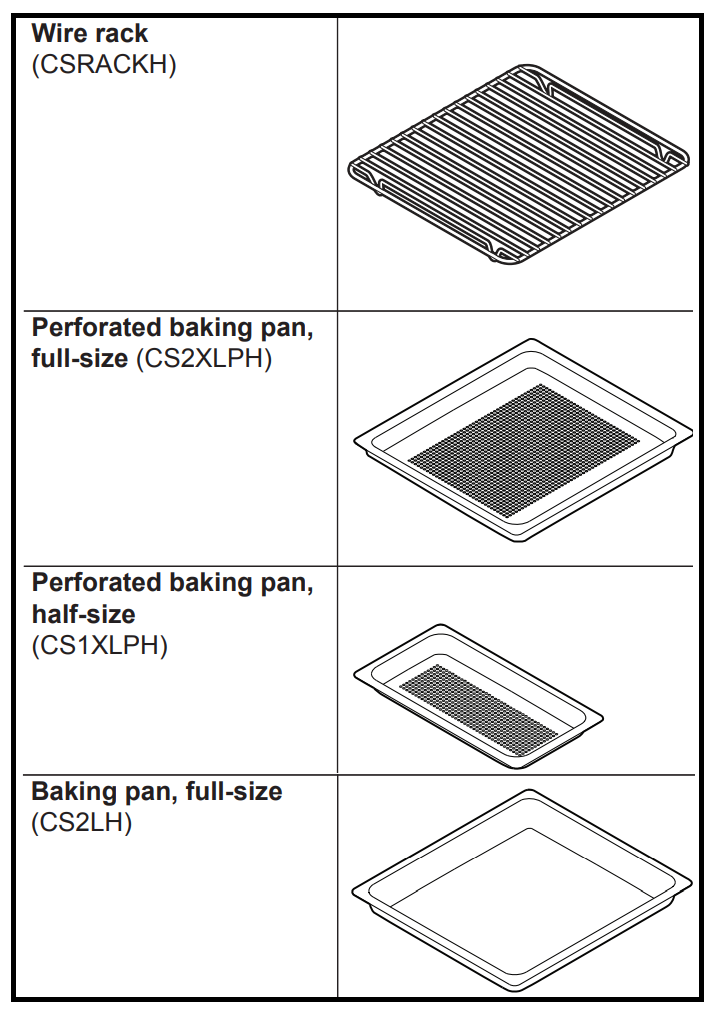
- Wire rack (CSRACKH)
Use for support during baking.
Place meats on the wire rack with the baking pan underneath and insert both together into one level. - Perforated baking pan, full-size (CS2XLPH)
1”5/8 deep
Ideal for steaming fish or large quantities of vegetables, extracting juice from berries, and much more. - Perforated baking pan, half-size (CS1XLPH)
1”5/8 deep
Ideal for steaming fish or vegetables, extracting juice from berries, and much more. - Baking pan, half-size (CS1XLH)
1”5/8 deep
Use for smaller quantities and for rice and cereals. - Baking pan, full-size (CS2LH)
1”5/8 deep
Ideal for baking cakes and catching dripping liquid when steaming.
Additional Accessories
The following additional accessories can be purchased through the e-store at www.bosch-home.com/us/store:
| ACCESSORY | ORDER NUMBER |
| Perforated baking pan, full-size, 1¾'' deep | CS2XLPH |
| Perforated baking pan, half-size, 1¾'' deep | CS1XLPH |
| Baking pan, full-size, 1¾'' deep | CS2XLH |
| Baking pan, half-size, 1¾'' deep | CS1XLH |
| Baking pan, full-size, 1¼'' deep | CS2LH |
| Wire rack | CSRACKH |
| Descaling powder | 00573828 |
Detailed Specifications
- Capacity: 4.6 cu. ft.
- Steam Cooking: Precise steam control for optimal results
- Convection Cooking: Even heat distribution for uniform cooking
- Combination Cooking: Combine steam and convection for enhanced flavors
- Touch Control: Intuitive interface with high-resolution display
- Self-Cleaning: Pyrolytic cleaning feature for easy maintenance
- Smart Home Integration: Compatible with Home Connect app for remote control
- Multi-Function Rack: Adjustable rack for various cooking tasks
Before Using the Appliance for the First Time
- The appliance must be properly installed by a qualified technician before use.
- Remove all packing materials from inside and outside the oven.
- While cool, wipe with a clean, damp cloth and dry. There may be a slight odor during first uses; this is normal and will disappear.
- Read and understand all safety precautions and Use and Care Manual information.
- Execute the following sections prior to operating:
Water tank
The water tank is on the right side of the steam oven. It holds 1.4 quarts (1.3 L) of water. The water tank is not dishwasher safe.
Important notes about the water used to fill the tank:
- Moisten the seal in the tank lid with some water before using it for the first time.
- Use only fresh tap water or, if necessary, plain non-carbonated purchased water to fill water tank
CAUTION
Use of inappropriate liquids can damage the appliance! Do not fill the water tank with distilled water or any other liquids.
- If your water is very hard (10 grains per gallon or higher), we recommend using softened water.
- If your tap water is highly chlorinated (>40 mg/L), use plain non-carbonated purchased water with a low amount of chlorine.
Fill the Water Tank
- Open door and remove water tank (picture A).
- Moisten the seal in the tank lid with some water prior to initial use.
Fill the water tank to the “MAX” line with cold water (picture B).
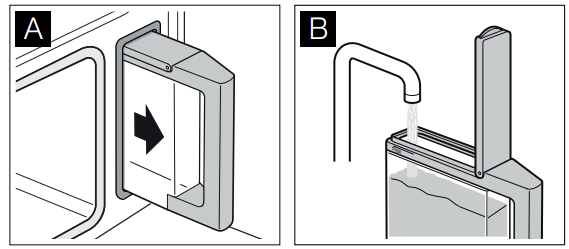
- Close tank lid until it snaps.
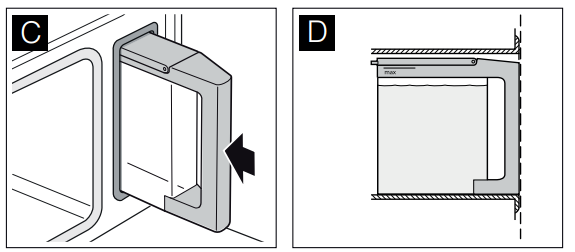
- Insert water tank completely (picture C).
The tank must be flush with the tank funnel (picture D).
EMPTY THE WATER TANK AFTER EACH USE
- Keep the water tank level while slowly pulling it out of the appliance to ensure that no remaining water drips down and out through the vent.
- Pour out the water.
- Thoroughly dry the seal of the tank lid and the slot where the tank resides in the appliance. Prolonged dampness could lead to a musty odor in the tank.
Water Level Warnings
The water tank must have enough water to generate the steam needed for the cooking mode and time you are using. As the water is converted to steam, the tank level will drop during cooking. There are three different water levels that are monitored by the control:
- NONE: Tank Full
- Full tank, any oven mode can be run.
- The steam oven can operate at 100% steam for 150 minutes without the need to refill the water tank.
- WATER LEVEL IS LOW: Tank with water
- Tank less than full but not empty.
- TANK IS EMPTY: Tank is without water.
- A heating mode cannot be run without adding sufficient water.
- Refill water tank to run a cooking mode.
Set the Clock
The clock may only be set/edited from stand-by state.
To Set the Clock
- Press CLOCK/TIMER button on the control panel.
- Input the desired time using the numeric key pad.
- Press the SET CLOCK (Soft Key 1).
- Choose either AM or PM with the appropriate soft key.
- Display transitions to stand-by with the new clock time.
For Daylight Savings Time Followers
The clock may be set up or back in a single hour increment by doing the following:
- Press CLOCK/TIMER button on the control panel.
- Press SOFT KEY 2.
- Select either -1 HOUR (Soft Key 1) or +1 HOUR (Soft Key 3).
- The display immediately reverts to stand-by state.
Setting the Water Hardness Level
Check the water hardness using the test strip provided or ask your water utility company.
- Select the SETTINGS button on the control panel.
- Press the SOFT KEY 2 to scroll through the options to WATER HARDNESS.
- Press ENTER.
- Using the NUMERIC TOUCHPAD, input the hardness level for your water type. The factory setting is 3.
- = SOFTENED (0 – 17 mg/L)
- = SOFT (18 – 60 mg/L)
- = MEDIUM (61 – 120 mg/L)
- = HARD (121 – 180 mg/L)
- = VERY HARD (over 180 mg/L)
- Press ENTER.
Unless you use softened water, you will need to descale your steam oven at regular intervals.
If you move or if your water source changes, you will need to reset the water hardness value.
Clean With STEAM Mode Before First Use
Before using the steam oven for the first time, heat it once while it is empty:
- Fill and slide in the water tank. Close the oven door.
- Select STEAM on the control panel.
- Press ENTER.
- Press the SOFT KEY 2 (Oven Timer).
- Using the Numeric Touchpad, set the oven time for 20minutes (0:20, in HR/MIN format).
- Press ENTER.
- The oven will heat for 20 minutes and then stop.
- An audible tone will indicate the completion of the function.
- Press OVEN OFF/CLEAR or open the oven door.
- Leave the door opened slightly until the oven cools. See “After Oven Operation” on page 11.
This initial cleaning will also calibrate the steam oven to the air pressure at your location.
Automatic Calibration
The steam oven automatically calibrates to adjust to the pressure conditions in your area the first time steam is used at 212°F (100°C).
Calibrating the Steam Oven
- Select the SETTINGS button on the control panel.
- Press the SOFT KEY 2 to scroll through the options to CALIBRATE.
- Press ENTER.
- START CYCLE will flash on the display.
- Select YES (Soft Key 2) to confirm. Select NO (Soft Key 3) to return to the main menu.
- DONE will flash on the display screen.
- Press ENTER.
Recalibrate the appliance manually if you should move to ensure that the steam oven automatically adjusts to your new location. Recalibration is not necessary after a power failure.
Clean the Accessories
Wash the accessories thoroughly with soapy water and a cloth before using them. Rinse well before use.
Basic Oven Settings
User settings are available for the customer to customize the appliance to their liking. Many of these features should be adjusted when the oven is first installed or after a move to a new location. User settings can only be accessed from stand-by state. If the Settings button is pressed while the appliance is not in stand-by, the display will sound an error tone.
Adjust Settings
- Select the SETTINGS button on the control panel.
Press the SOFT KEY 2 to advance through the menu options. The following table lists the available setting options and their values.
ITEM DESCRIPTION OPTIONS °F/°C (Temperature Units) °F °C Brightness
Low Med High Volume
Low Med High Off Clock 12 hr 24 hr Stand-by Clock On Off Language English French Weight Unit Type lbs Kg Customer Service Contact information only Demo Mode On Off Steam Clean See page 27. Descale See page 28. Calibrate See page 7. Water Hardness See page 7. - Press SOFT KEY 1 or the ENTER button on the control panel to edit the setting that is in field.
- Press SOFT KEY 3 in order to cycle through the submenu options.
- Set the option by pressing the ENTER key on the control panel or by pressing SOFT KEY 1.
Setting Options
- °F/°C (TEMPERATURE UNITS): The temperature units setting allows the user to switch between fahrenheit and celsius units of temperature. The default temperature unit setting is “Fahrenheit”.
- BRIGHTNESS: The brightness setting allows the user to adjust the brightness of the display. Switching between values adjusts the backlighting of the display. The default brightness setting is “High”.
- VOLUME: The volume setting allows the user to adjust the sound level of button presses. The default volume setting is “High”.
- CLOCK: The clock mode setting allows the user to select a 12 hour or 24 hour based clock. The default clock mode setting is “12 hour”.
- STAND-BY CLOCK: The stand-by clock setting allows the user to disable the clock whenever the user interface goes into stand-by state. The default stand-by clock display setting is “On”.
- LANGUAGE: The language setting allows the user to select either English or French operating languages. The default language setting is “English”.
- WEIGHT UNIT TYPE: The weight unit setting allows the user to switch between pounds (lbs.) and kilograms (Kg) units of measure. The default weight unit setting is “lbs”.
- DEMO MODE: Demo mode consists of 6 images cycled at timed intervals. If any button is pressed, the user interface appears to work as normal for the pressed button. However, no real cooking mode information is passed to the appliance. Therefore the oven will not heat up, preheat will never end, self clean will not start, etc. After 30 seconds with no input from the user, the display resumes the image slide show.
- STEAM CLEAN: You may use steam to dissolve food residues and spills so that they can be easily wiped up. Running the steam clean cycle takes 30 – 35 minutes. The oven cannot be used for any other purpose while steam cleaning is underway. Detailed instructions for steam cleaning the oven are provided in the “Cleaning and Maintenance” section of this manual starting on page 26. The oven cannot be used for any other purpose while steam cleaning is in progress.
Steam Cleaning requires 3 start/stop cycles to complete its operation. Once started, the Steam Cleaning operation cannot be aborted. The appliance will not operate again until after the first and second rinse cycle to ensure that no cleaning agent remains inside. - DESCALE: Descale the appliance at regular intervals. This can prevent damage to the appliance. The appliance automatically informs you when descaling is required.
Detailed instructions for descaling the steam oven are provided in the “Cleaning and Maintenance” section of this manual starting on page 26. The oven cannot be used for any other purpose while descaling is in progress.
Descaling requires 3 start/stop cycles to complete its operation. Once started, the Descaling operation cannot be aborted. The appliance will not operate again until after the first and second rinse cycle to ensure that no cleaning agent remains inside.
Note: If you use softened water, you will not need to descale the steam oven. - WATER HARDNESS: The hardness of the tap or bottled water (NEVER distilled water) you put in the water tank should be determined and entered with this setting when the appliance is installed. As explained on page 7, you may either use water hardness strips or contact your local water utility to find out the hardness of your tap water.
If you move or if your water source changes, you will need to reset the water hardness value. - CALIBRATE: The boiling point depends on the air pressure. The higher the altitude, the lower the air pressure, and also the boiling point. The steam oven automatically calibrates to adjust to the pressure conditions in your area the first time steam is used at 212°F (100°C).
Description
The Bosch HSLP451UC is engineered with precision and innovation in mind. Its steam cooking function allows for healthier meal preparation by retaining nutrients and flavors. The convection mode ensures even heat distribution, making it perfect for baking and roasting. The combination cooking feature lets you blend steam and convection to achieve unique culinary outcomes. The oven's interior is spacious enough to accommodate large dishes, while the exterior boasts a sleek design that fits seamlessly into any kitchen layout.
Operation
Start Cooking
Using nine of the eleven modes available in your steam oven requires similar steps. Using CHICKEN or VEGETABLES automatic programs is somewhat different and is described separately starting on page 13.
Preheating the Oven
Place food in steam oven before preheat unless using KEEP WARM, SLOW COOK or EUROPEAN CONV modes. In KEEP WARM, SLOW COOK or EUROPEAN CONV modes, place food in oven after the oven has been preheated. Food needs to be in the oven during preheat for steam modes because if the door is opened to put food inside after the preheat cycle the steam will leave the cavity, lowering the temperature, which may cause the food to be undercooked
CAUTION
Exercise caution when opening the appliance. Standing to the side, open the door slowly and only slightly to let hot air and/or steam escape. Keep your face clear of the opening and make sure there are no children or pets near the unit. After the hot air and/or steam is released, proceed with your cooking. Keep doors shut unless necessary for cooking or cleaning purposes. Do not leave open doors unattended.
Rack Positions
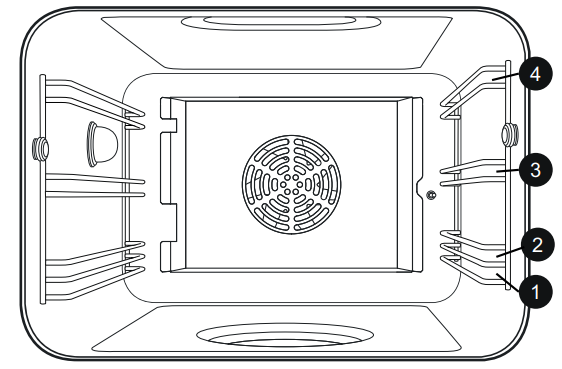
The oven has four rack levels. The rack levels are numbered bottom to top as shown in the figure below.
To Operate the Oven by Setting the Mode First
- Select the desired cooking mode.
- The display transitions to the mode setting screen with the mode and the default temperature. The temperature flashes, indicating that it may be edited and that the mode has not yet started.
- The display will revert to stand-by state if a selection is not made within 5 seconds.
- Press buttons on the numeric keypad to set a temperature.
- The display transitions to the temperature setting screen flashing “--x” in the display, where x is the numeric key pressed by the user.
- If the temperature in the display is outside the allowable limits for the selected mode and ENTER is pressed, an error tone will sound and the allowed temperature range for that mode is shown below the set temperature.
- Temperature control is not possible with DEFROST, PROOF, KEEP WARM, and DISH WARM, which have preselected temperatures. When one of these modes is selected, the temperature will appear on the display.
- Press ENTER.
- If ENTER is not pressed after setting a temperature other than the default temperature, the oven will automatically start the cooking mode after 5 seconds at the entered temperature. If no input is made to the default temperature, the display screen will transition back to stand-by state after 5 seconds of inactivity.
Display will indicate that the oven is preheating.
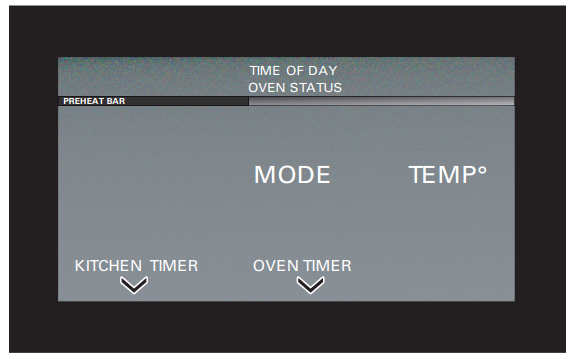
To Operate the Oven by Setting the Temperature First
- From stand-by state, press the numeric touchpad buttons to enter a desired temperature.
- The display transitions to the mode setting screen flashing “--x” in the display, where x is the numeric key pressed by the user.
- The display screen prompts the user to select a mode.
- The display transitions to the mode setting screen flashing “--x” in the display, where x is the numeric key pressed by the user.
- Select the desired cooking mode.
- Press ENTER.
- If the temperature in the display is outside the allowable limits for the selected mode and ENTER is pressed, an error tone will sound.
- For the modes with one dedicated temperature (DEFROST, PROOF, KEEP WARM, DISH WARM), once the error tone has sounded and the default temperature appears on the display, the user can initiate that particular mode by pressing ENTER.
- The display will revert to stand-by state if a selection is not made within 5 seconds.
- Once a selection has been made, the display will indicate that the oven is preheating.
To Edit Oven Settings During Operation
Change to a New Cooking Mode During Operation
- Press the touchpad for the new desired cooking mode.
- The current running mode is immediately ended and the display enters editing mode.
- Press ENTER.
Change to a New Temperature During Operation
- Press the button for the current running mode.
- The current mode continues to run, but the display enters editing mode.
- Press the numeric touchpad to enter a desired temperature.
- Press ENTER.
Door Operation During a Cooking Mode If the door is opened during a mode that uses the steam function, the cooling fan will cycle on and off five-six times in succession to purge the excess steam. If the oven is in an operation mode that uses the convection fan, the convection fan will shut off automatically. Operation will resume once the door is shut. The display screen will prompt the user to close the oven door.
Automatic operation of the cooling blower
The cooling blower activates immediately for any of the oven modes. If steam oven modes that use steam areswitched off (STEAM, STEAM CONV, REHEAT, etc.), the cooling blower stays on for 10 minutes independent from the oven temperature before shutting off. If heating modes without steam are turned off, the cooling blower goes off when the oven temperature falls below 230°F (110°C).
Oven Clear/Off
- Press the OVEN CLEAR/OFF button to cancel the cooking mode and return to the stand-by state screen.
- The temperature and mode clear from the display screen. The cooling fan will continue to run.
After Oven Operation
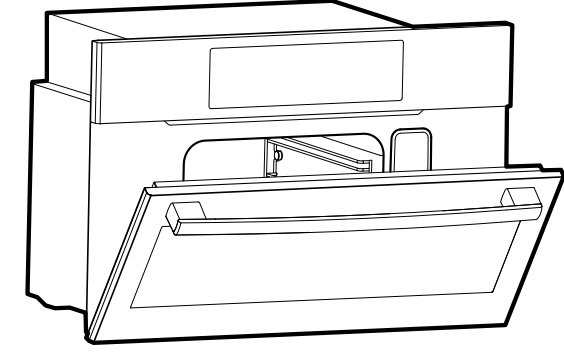
- After each use, leave the oven door open in the “atrest” position, until the interior has cooled down. Refer to the illustration below.
- When cool, use a cleaning sponge to remove any water remaining in the evaporator dish. Wipe down the oven using the cleaning sponge and dry afterwards using a soft cloth before closing the door.
IMPORTANT:- Wipe down the oven cavity and the evaporator dish with the sponge provided and dry well with a soft cloth after each use.
- Remove food residue and spills from the oven immediately after the appliance has cooled down. Burned on residue is very difficult to remove at a later time.
- Salts are very abrasive and can cause rust spots. The steam oven cavity can rust if not properly cared for.
Panel Lock
The Panel Lock is a child safety mechanism to prevent children from accidentally turning on the oven or changing an oven setting. The Panel Lock feature can only be turned on from stand-by state. If the Panel Lock button is pressed in any state other than stand-by, the display sounds a key error tone.
To Execute Panel Lock
- Press and hold the PANEL LOCK button on the touchpad for three seconds (press and hold for another three seconds to deactivate).
- PANEL LOCKED will appear in the display.
Setting the Timers Kitchen Timer
The kitchen timer can be used whether the oven is in operation or not and it does not affect oven heating.
A kitchen timer may be set from the following states:
- any running cooking or heating mode.
- stand-by state.
Setting the Kitchen Timer in Stand-by State
- Press the CLOCK/TIMER touchpad on the control panel.
- Enter the desired time using the numeric touchpad to set the time in the format HH:MM.
- Press SOFT KEY 3 (Set Timer).
- Once started, the display shows the timer countdown.
- When the timer reaches zero, the display shows a 0:00 and sounds an alarm tone every 10 seconds for 2 minutes.
- After the timer has finished, it may be reset by pressing the SOFT KEY 1 (Timer Off) or by opening the door.
Editing the Kitchen Timer
- Press SOFT KEY 3 (Edit Kitchen Timer).
- Set the new time using the numeric touchpad or SOFT KEY 1 (Clear) to clear and exit the timer.
- Press ENTER.
Oven Timer
The Oven Timer is intended to mechanically shut the oven off when the desired cooking time is complete. The maximum oven time is 11 hours and 59 minutes. An oven timer may start from any mode editing or running state. These instructions assume you have placed food in the cooking space and have already selected a mode and temperature.
NOTE: Oven Timer is not available for Chicken or Vegetables Automatic Programs.
Setting the Oven Timer
- Press SOFT KEY 2 (Oven Timer).
- Enter the desired time using the numeric touchpad to set the time in the format HH:MM.
- Press ENTER.
Once started, the display shows the timer countdown.
When the timer reaches zero, the display indicates “0:00” on its screen and sounds an alarm tone every 10 seconds for 2 minutes. - After the timer has finished, it may be reset by pressing the OVEN CLEAR/OFF or by opening the door.
Editing the Oven Timer
- Press SOFT KEY 2 (Edit Oven Timer).
- Set the new time using the numeric touchpad.
- Press ENTER.
Multiple Timers
It is possible to set a combination of both a Kitchen Timer and an Oven Timer.
Set and edit the timers individually as instructed previously.
Both timers are displayed on the screen.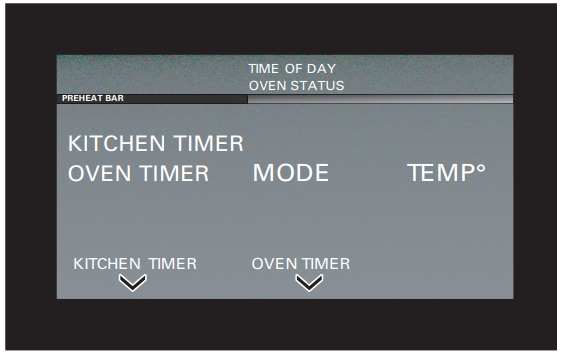
Setup Guide
To set up your Bosch Built-in Steam Convection Oven HSLP451UC, follow these steps:
- Ensure the oven is properly installed by a certified professional to avoid any safety hazards.
- Read the user manual thoroughly to understand the various features and cooking modes.
- Configure the oven using the touch control interface. Select your desired cooking mode and set the necessary parameters such as temperature, time, and steam levels.
- If integrating with smart home systems, download and install the Home Connect app to enable remote control and monitoring.
- Perform an initial self-cleaning cycle to ensure the oven is free from any manufacturing residue.
Cleaning and Maintenance
Cleaning
NOTICE:
- Remove food residue and spills from the cavity immediately after the appliance has cooled down. Burned-on residue is very difficult to remove at a later time.
- Salts are very abrasive and can cause rust spots. Remove residue left by strong sauces (ketchup, mustard) or salted foods immediately after the oven has cooled down.
WARNING
RISK OF BURNS — Wait until the appliance has cooled before cleaning.
When Cleaning this Appliance:
- For general care, wipe the outside of the stainless steel with mild, lukewarm, soapy water. Always wipe and dry in the direction of the stainless steel grain. Rinse thoroughly.
- Always rub metal finishes in the direction of the polish lines for maximum effectiveness and to avoid marring the surface.
- Use only clean soft cloths, sponges, paper towels, or fibrous brushes for cleaning and scouring, as recommended in the chart on page 27.
- DO NOT use abrasive products such as steel wool.
- DO NOT use cellulose sponges. Some sponges are processed with salt and can cause corrosion by leaving salt deposits on the metal.
- DO NOT allow any cleaning compounds to remain in contact with stainless steel for extended periods.
- DO NOT USE CHLORINE-BASED CLEANERS.
- To remove fingerprints and produce added shine, use a stainless steel cleaner or conditioner. The BOSCH Stainless Steel Conditioner can be purchased online (US only) at: www.bosch-eshop.us (order part number 00576696).
- Always wipe dry immediately to avoid water marks.
IMPORTANT:
- Never use abrasives to clean the steam oven.
- Remove all traces of cleaners used in the steam oven by carefully following all instructions for wiping out the oven and running rinse cycles. Cleaner residues can bond to the glass in the oven door. They can also adversely affect the flavor of foods cooked in the steam oven.
- Never use steel wool or abrasive pads to clean the steam oven. The oven cavity can rust if not properly cared for.
Cleaning Sponge
- Use the cleaning sponge to remove any water remaining in the evaporator dish. Wipe down the oven using the cleaning sponge and dry afterwards using a soft cloth.
- The cleaning sponge provided is very absorbent. Use the cleaning sponge only to clean the oven cavity and to remove any remaining water from the evaporator dish.
- Wash the cleaning sponge thoroughly before initial use. The cleaning sponge can be washed in a dishwasher.
Cleaners
Appliance exterior Stainless steel front trim; door handle | Soapy water, use a soft cloth to dry. Always remove lime deposits, grease, oil, starch and egg white stains immediately after the appliance has cooled down. Special stainless steel cleaners are available through customer service or at retail stores. Do not use corrosive or abrasive cleaners, which dull the surface. In the event that one of these products comes into contact with the oven, immediately clean it using a damp cloth. |
| Control Panel | To avoid damage to the control panel, do not use abrasive cleaners, steel-wool pads, gritty washcloths or abrasive paper towels. Apply glass cleaner to soft cloth or sponge, not directly on panel. |
| Oven interior | Warm soapy water or vinegar and water mixture. Use the cleaning sponge provided or a soft dishwashing brush. NOTICE: NEVER USE STEEL WOOL OR ABRASIVE PADS! The oven cavity can rust. If heavily soiled, use an all-purpose cleaner, such as Simple Green. Follow package directions for mixing. Spray on soils, allow to work for 15 – 30 minutes, then wipe the entire cavity with paper towels or cloth. Run Steam Clean cycle so the cavity is rinsed thoroughly. NOTICE: Do not allow the oven light, bulb or door gaskets to come in contact with the cleaner. |
| Evaporator dish | Warm soapy water or vinegar and water mixture. |
| Outer gasket on oven | Warm soapy water. |
| Water tank | Warm soapy water. DO NOT CLEAN IN DISHWASHER! |
| Tank slot | Wipe dry after each use. |
| Lid seal | Dry well after each use. |
| Rack rails | Use warm soapy water or wash in dishwasher. |
| Glass in door | Glass cleaner. |
| Accessories | Soak in warm soapy water. Clean with a brush or kitchen sponge or wash in dishwasher. Use a water and vinegar mixture for stains or discoloration caused by starchy foods (such as rice). |
Troubleshooting
If you encounter a problem, it often will merely be something minor. Before you call customer service, consider the suggestions and instructions below.
| PROBLEM | POSSIBLE CAUSE | TIP/SOLUTION |
| Appliance is not working | Cord is not plugged in | Connect appliance to power. |
| Power outage | Check if other kitchen appliances are working. | |
| Circuit breaker may be tripped. | Reset breaker. | |
| Faulty operation | Turn off power to the appliance at the main power supply (fuse or breaker box) and turn it back on after approximately 10 seconds. | |
| Appliance does not start | Appliance door is not closed all the way. | Close the appliance door. |
| Water tank empties without any apparent reason. Evaporator dish is overflowing. | Water tank was not closed properly. | Close the tank lid until it clearly snaps into place. |
| Tank lid seal is dirty. | Clean the seal. | |
| Tank lid seal is not functioning. | A new water tank may be purchased through customer service. | |
| Evaporator dish has been boiled dry even though the water tank is full | Water tank was not inserted correctly. | Slide in the water tank until it locks into place. |
| Supply line is clogged. | Descale appliance. | |
| A "plop" noise can be heard when cooking | Temperature change affecting frozen food and caused by water vapor. | This is normal. |
| Steam escapes from the vent openings when cooking | This is normal. | |
| Appliance no longer produces steam correctly | The appliance needs to be descaled. | Descale appliance. |
Pros & Cons
Pros
- Advanced Cooking Modes: Combines steam, convection, and combination cooking for versatile culinary options.
- Ease of Use: Intuitive touch control interface makes operation simple.
- Smart Home Compatibility: Integrates with Home Connect app for remote control and monitoring.
- Self-Cleaning Feature: Pyrolytic cleaning makes maintenance easy.
Cons
- High Price Point: Priced around $3,000, which may be out of budget for many users.
- Complex Installation: Requires professional installation to ensure safety and proper function.
- Steep Learning Curve: Multiple features can be overwhelming for some users.
Customer Reviews about Bosch Built-in Steam Convection Oven HSLP451UC
Customers have praised the Bosch for its exceptional performance and versatility. Many reviewers appreciate the ease of use and the variety of cooking modes available. However, some users have mentioned that the high price point is a significant drawback. Common complaints include complexity in initial setup and occasional issues with the steam function.
Warranty
How Long the Warranty Lasts
BSH warrants that the Product is free from defects in materials and workmanship for a period of three hundred sixty-five days (365) days from the date of purchase. The foregoing timeline begins to run upon the date of purchase, and shall not be stalled, tolled, extended, or suspended, for any reason whatsoever.
This Product is also warranted to be free from cosmetic defects in material and workmanship (such as scratches of stainless steel, paint/porcelain blemishes, chips, dents, or other damage to the finish of the Product), for a period of thirty (30) days from the date of purchase or closing date for new construction.
Faqs
What is the capacity of the Bosch?
How do I clean the Bosch Built-in Steam?
Can I integrate the Steam Oven with my smart home system?
What types of cooking modes does the Bosch offer?
What safety precautions should I take when using the Bosch oven?
Can I adjust the rack positions in the Bosch oven?
How does the steam function work in the Built-in Steam Convection Oven HSLP451UC?
Is there a warranty available for the Bosch oven?
Leave a Comment
