Bosch Freezer Refrigerator B36IT905NP Instruction Manual
Content
Bosch Freezer Refrigerator B36IT905NP
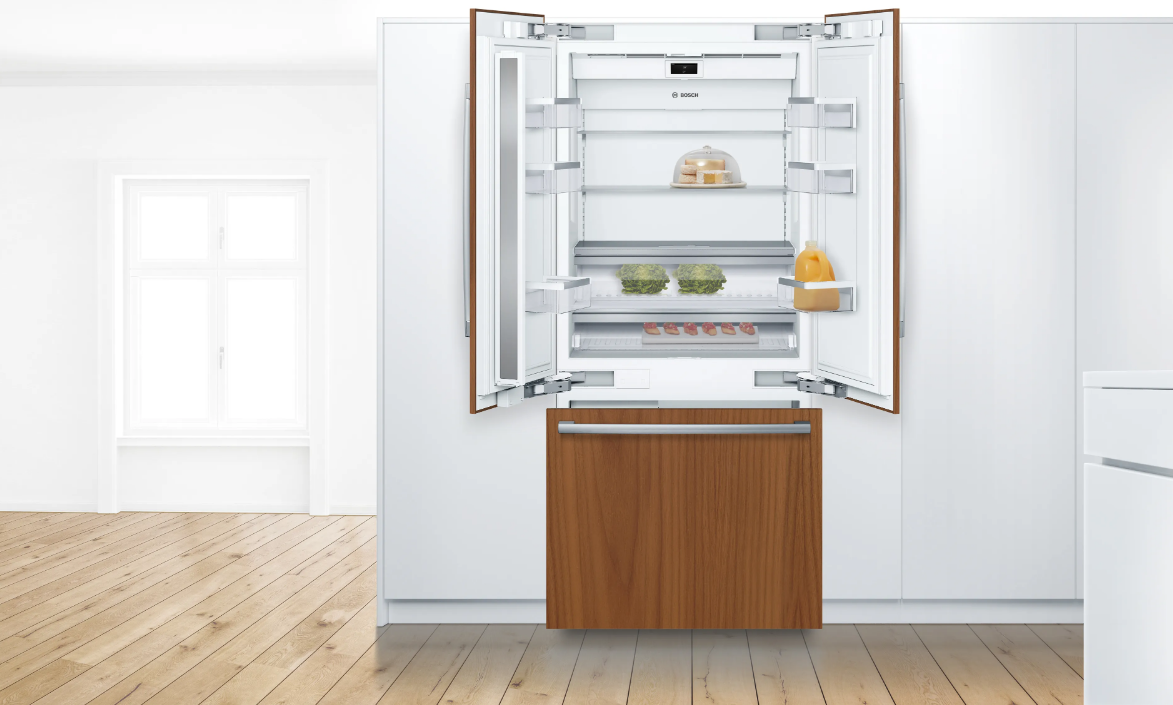
Introducing the Bosch Freezer Refrigerator B36IT905NP is a high-end built-in appliance that combines sophisticated design with advanced cooling technology. With a total capacity of 19.4 cu. ft., it features a French door layout for easy access to both fresh and frozen items. The refrigerator utilizes dual evaporators to maintain optimal humidity levels and prevent odor transfer, while the LED lighting illuminates the interior beautifully. Its sleek design and smart features make it an ideal addition to any modern kitchen.The cost of the Bosch B36IT905NP typically ranges around $4,199.00, reflecting its premium quality and innovative features.
Getting to Know Your Appliance
These Operating Instructions refer to several models.
The diagrams may differ.
2 door model
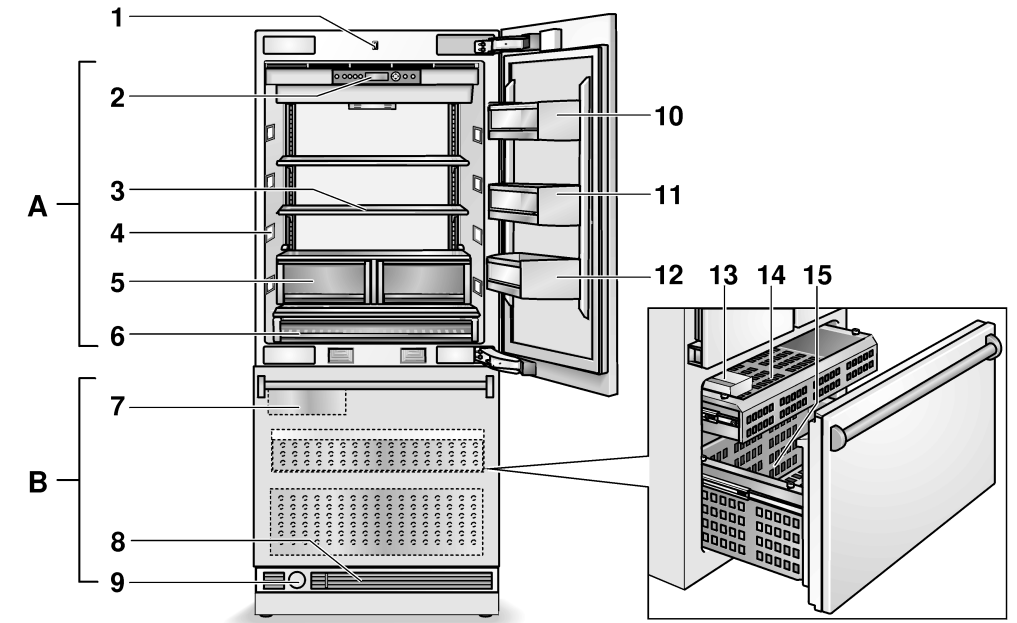
- A Refrigerator Compartment
- B Freezer Compartment
- Light Switch
- Controls
- Glass Shelf
- Light (LED)
- Fruit and Vegetable Container
- “Cool-fresh” Container
- Ice Maker
- Ventilation
- Water Filter
- Butter and Cheese Compartment
- Door Shelf
- Storage Compartments for large Bottles
- Ice Cube Container
- Tray
- Door Drawer
Controls

- A POWER Button
Serves to switch the whole appliance On and Off. - B ICE Button
Serves to switch the Ice Maker On and Off. See chapter “Ice Maker”. - C ALARM Button
Serves to switch the warning signal Off. See chapter “Alarm function”. - D COOL SUPER Button (Refrigerator Compartment)
Serves to switch the Super Cooling On and Off. - E FREEZER SUPER Button (Freezer Compartment)
Serves to switch the Super Freezing On and Off. - F Display panel
The temperatures in the Refrigerator Compartment and in the Freezer Compartment are shown on the Display Panel. Activated special functions are shown via “symbol”. The menus and setting options which are available are represented on the Display Panel in the Setup Mode. - G Selection Buttons
The temperature setting is activated using the Selection Buttons, see chapter “Setting the Temperature”.
For selecting a menu in the Setup Mode. - H Setting Buttons
The temperature can be changed using the Setting Buttons, see chapter “Setting the Temperature”.
More settings can be selected in the Setup Mode. - I SETUP Button
This button starts and ends the Setup Mode. If the Setup Mode is ended using the SETUP Button, the changes which have been made are stored. - J VACATION Button
This button is used to switch Vacation Mode On and Off, see chapter “Special Functions”, section “Vacation Mode”.
Note: A sound can be heard every time a button is pushed if this function is selected in the “Sound” menu during the Setup Mode.
Symbols in the display panel
 Refrigerator compartment display.
 Freezer compartment display.
- SUPER: Super Cooling or Super Freezing is active (see chapter “Super Cooling” and “Super Freezing”).
- VACATION: Vacation Mode is active (see chapter “Special Functions”).
- ON-OFF: For the setting options in the Setup Mode (see chapter “Special Functions”).
- ALARM: A warning message is displayed (see chapter “Alarm function”).
- ICE: Ice Maker is switched on (see chapter “Ice Maker”).
- FILTER: Signal to the Water Filter is displayed (see chapter “Water Filter”).
Switching the Appliance On
Switch the appliance On with the POWER Button. The appliance begins to cool. Light turns on when the door is open.
The factory has recommended the following temperatures:
- Refrigerator Compartment: +37 °F (3 °C)
- Freezer Compartment: 0 °F (-18 °C)
CAUTION
- Keep hands and fingers away from front and rear openings of the refrigerator door when closing. Risk of injury to hands or fingers.
- Never allow children to climb on or play with the refrigerator door.
Operating Tips
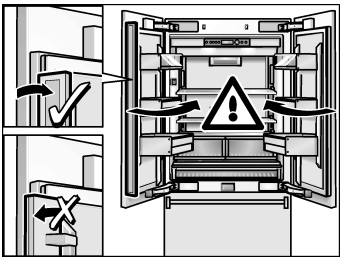
The appliance features a mullion which is fitted to the left door. The door of the Refrigerator Compartment can be opened without having to first open the right door. A heating element is integrated into the mullion in order to avoid condensation. This can be switched On and Off (see chapter “Special Functions“, section “Door Rail Heater“).
CAUTION: To prevent damage to the appliance or the furniture fronts, fold the mullion when closing the door.
Setting the Language
The Display Languages can be changed according to the table in the chapter “Special Functions”, section “Setup Mode”.
To change the Display Language:
- Press the SETUP Button.
- Press the
 Selection Button, until the set language is displayed.
 - Press the + or - Setting Button, until the desired language is displayed.
- Press the SETUP Button, in order to store the settings.
The set temperature is displayed again on the Display Panel.
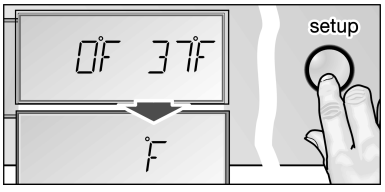
Setting the Temperature Unit
The temperature can be displayed in degrees Celsius (°C) or degrees Fahrenheit (°F).
- Press the SETUP Button.
The first menu (Temperature Unit) is displayed. - Press the + or - Setting Button in order to switch between degrees Fahrenheit (°F) and degrees Celsius (°C).
- Press the SETUP Button, in order to store the settings.
The set temperature is displayed again on the Display Panel.
Setting the temperature
Refrigerator Compartment
(can be selected from +35 °F (2 °C) to +46 °F (8 °C)) We recommend a setting of +37 °F (3 °C). Perishable food should not be stored above +37 °F.
- Activate the Setup Mode with the Selection Button
 . The symbol
  is displayed.
 - Set the temperature with the +(warmer) or - (cooler) Setting Buttons.
Freezer Compartment
(can be selected from +7 °F (-14 °C) to –9 °F (-23 °C)) We recommend a setting of 0 °F (-18 °C).
- Activate Setup Mode with the Selection Button
 . The symbol
  is displayed.
 - Set the temperature with the + (warmer) or - (cooler) Setting Buttons.
Special Functions
The following Special Functions can be selected or displayed:
Setup Mode
In Setup Mode you can make your personal settings.
Switching On
Press the SETUP Button.
The first menu (temperature unit) is displayed on the Display Panel.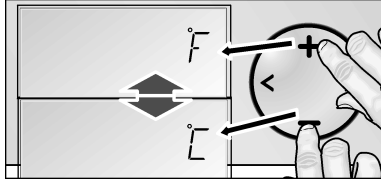
Making Settings- Switch on Setup Mode.
- Press the Selection Button
 .
.
The next menu is displayed and its current setting (mostly ON or OFF). Press the Setting Button + or -.
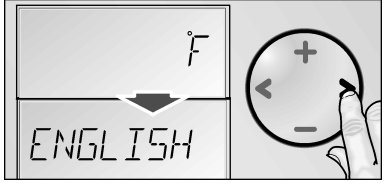
- Press the Selection Button
 to save and move to the next menu.
Switching Off
Press the SETUP Button.
All of the changed settings are stored.
Note: If no button is selected within 20 seconds, the Setup Mode ends automatically. All of the changed settings are stored. The set temperature is displayed again on the Display Panel.
Menus in the Setup Mode
The following settings can be made.
Menu Possible Settings Temperature Unit °C (degrees Celsius) °F (degrees Fahrenheit) Language English French Spanish Sound On Off Energy Saving Mode (Eco Function) On Off Door Rail Heater (DRY DOOR) On Off
Vacation Mode
If leaving the appliance for a long period of time, you can switch the appliance over to the energy-saving Vacation Mode.
When Vacation Mode is switched On, the following settings are made:
- The appliance operates in Energy-Saving Mode.
- The light is switched Off.
- The “Super Freezing” function is ended (if activated).
Switching On
- Press the VACATION Button.
The “VACATION” symbol is displayed on the Display Panel.
Switching Off
- Press the VACATION Button.
The previous settings and temperature values are restored.
Sabbath Mode
When Sabbath Mode is switched On, the following settings are switched Off:
- Ice Maker
- Acoustic Signal
- Interior Light
- Messages in the Display Panel
- The background illumination of the Display Panel is reduced
- Buttons are locked.
Switching On
- Press and hold down the COOL SUPER Button.
- Press the VACATION Button.
- Press the COOL SUPER Button and hold down for afurther 3seconds.
The “VACATION” symbol flashes on the Display Panel and “SABBATH” is displayed.
Switching off
Press the VACATION Button.
The previous settings and temperature values are once again activated.
Energy Saving Mode
If the Energy Saving Function (Eco Function) is activated, the appliance switches to the Energy Saving Operation. This Energy Saving Function is preset at the factory in order to reduce energy consumption. The background illumination of the Display Panel is likewise reduced.
Switching On
- Press the SETUP Button.
- Press the Selection Button
 , until “ECO MODE” and the current setting (OFF) is displayed.
 - Press the Setting Button +, in order to reset the setting.
- Press the SETUP Button, in order to store the setting. “ECO” is displayed on the Display Panel.
Switching Off
- Press the SETUP Button.
- Press the Selection Button
 , until “ECO MODE” and the current setting (ON) is displayed.
 - Press the Setting Button -, in order to reset the setting.
- Press the SETUP Button, in order to store the setting.
Door Rail Heater
To prevent condensation, the door rail heater can be switched On and Off as required.
Switching On
- Press the SETUP Button.
- Press the Selection Button
 , until “DRY DOOR“ and the current setting (OFF) is displayed.
 - Press the Setting Button +, in order to reset the setting.
- Press the SETUP Button, in order to store the setting.
Switching Off
- Press the SETUP Button.
- Press the Selection Button
 , until “DRY DOOR“ and the current setting (ON) is displayed.
 - Press the Setting Button -, in order to reset the setting.
- Press the SETUP Button, in order to store the setting.
Description
The Bosch B36IT905NP features a spacious interior with adjustable shelves and drawers, allowing you to customize the storage according to your needs. The French door design provides easy access to both the refrigerator and freezer compartments without having to open the entire unit. The bottom freezer drawer is designed for easy access to frequently used items.
The exterior is finished in a sleek stainless steel that not only looks modern but also resists fingerprints and smudges. The LED lighting inside ensures that every corner of the fridge is well-lit, making it easier to find what you need.
Alarm Function
Door Alarm
The Door Alarm switches On if an appliance door is left open for longer than three minutes. Close the door to switch Off the Warning Signal.
Temperature Alarm
- The Temperature Alarm switches On if the Freezer Compartment is too warm and the frozen food is at risk of thawing.
- The set temperature of the Freezer Compartment flashes and “ALARM” is displayed on the display panel. When the ALARM button is pressed, the temperature display for the Freezer Compartment indicates for five seconds the warmest temperature reached in the Freezer Compartment.
- Then this value is deleted. The temperature display for the Freezer Compartment indicates the set Freezer Compartment temperature without flashing. Henceforth the “warmest temperature” will be redefined and saved.
- The alarm display goes out as soon as the set temperature has been reached again.
- The alarm may switch on without any risk to the frozen food:
- when the appliance is switched On,
- when large quantities of fresh food are placed in the appliance,
- if the Freezer Compartment Door is open too long.
Switching Off the Alarm
Press the ALARM button to switch Off the Warning Signal.
Refrigerator Compartment
WARNING: Refrigerator Compartment
WARNING: The Refrigerator Compartment is the ideal storage location for ready meals, cakes and pastries, preserved food, condensed milk, hard cheese, fruit and vegetables sensitive to cold as well as tropical fruit.
When Purchasing Food, Please Note:
- The freshness at point of purchase is important for the shelf-life of your food.
- In principle, the fresher the produce when placed in the “Cool-Fresh” Container, the longer it stays fresh. Therefore, when buying food, always pay attention to the degree of freshness.
- Observe the expiration date specified by the manufacturer for ready products and bottled products.
Arranging Food in the Appliance
- Wrap or cover food before placing in the appliance. This will retain the aroma, color and freshness of the food. In addition, flavors will not be transferred between foods and the plastic parts will not become discolored.
Allow warm food and drinks to cool down before placing in the appliance. - Do not block air outlet openings with food in the refrigerator compartment, otherwise the air circulation will be impaired.
Food which is stored directly in front of the air outlet openings may be frozen by the cold air flowing out. - Avoid contact of oil and fat with the plastic parts and door seal.
Super Cooling
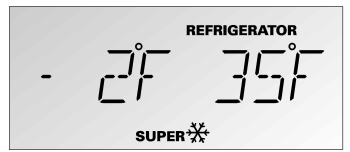
Super cooling cools the Refrigerator Compartment as cold as possible for approx. 6 hours. Then the appliance automatically switches to the temperature set prior to super cooling mode. Switch on super cooling mode, e.g.
- Before placing large quantities of food in the refrigerator compartment
- For fast cooling drinks:
Switching On
Press the COOL SUPER Button.
The display panel indicates the symbol “SUPER¾” and the compartment for which the function was switched On.
Switching Off
Press the COOL SUPER Button.
“Cool-Fresh” Container
The “Cool-Fresh” Container has a temperature of almost 32 °F (0 °C). Ideal for storing fish, meat, sausage, cheese and milk. The temperature in the “Cool-Fresh” Container can be reduced slightly with the slide control.
We recommend the following controller position:
- COLD: Meat, sausage and poultry
COLDER: Fish

Freezer Compartment
WARNING: Do not store explosive substances in the appliance. Risk of explosion!
CAUTION: Do not refreeze thawing or thawed food. Before freezing the food, first boil or fry it. Never keep frozen food longer than the maximum storage duration.
Using the Freezer Compartment
- To store deep-frozen food.
- To make ice cubes.
- To freeze food.
Note:
Ensure that the Freezer Compartment door has been closed properly. If the door is open, the frozen food will thaw. The Freezer Compartment will become covered in thick ice. Also, energy is wasted due to high power consumption!
Freezing and Storing Food
Purchasing Frozen Food
- Packaging must not be damaged.
- Use by the “expiration” date.
- Temperature in the supermarket freezer must be 0 °F (-18 °C) or lower.
- If possible, transport deep-frozen food in an insulated bag and place immediately in the Freezer Compartment.
Freezing Fresh Food
Freeze fresh and undamaged food only.
To retain the best possible nutritional value, flavor and color, vegetables should be blanched before freezing. Eggplants, peppers, zucchini and asparagus do not require blanching. Literature on freezing and blanching can be found in bookshops.
Note:
Keep food that is to be frozen away from food that is already frozen.
- The following foods are suitable for freezing: Cakes and pastries, fish and seafood, meat, game, poultry, vegetables, fruit, herbs, eggs without shells, dairy products such as cheese, butter and quark, and ready meals and leftovers such as soups, stews, cooked meat and fish, potato dishes, soufflés and desserts.
- The following foods are not suitable for freezing: Types of vegetables that are usually consumed raw such as lettuce or radishes, eggs in shells, grapes, whole apples, pears and peaches, hard-boiled eggs, yogurt, soured milk, sour cream, crème fraîche and mayonnaise.
Packing Frozen Food
To prevent food from losing its flavor or drying out, place in airtight containers.
- Place food in packaging.
- Remove air.
- Seal the wrapping.
- Label packaging with contents and date of freezing.
Suitable Packaging:
- Cling wrap, tubular film made of polyethylene, aluminum foil, freezer containers.
- These products are available from specialist outlets.
Unsuitable Packaging:
- Wrapping paper, greaseproof paper, cellophane, bin liners and used shopping bags.
- Items Suitable for Sealing Packaged Food: Rubber bands, plastic clips, string, cold-resistant adhesive tape, etc.
- Bags and tubular film made of polyethylene can be sealed with a film heat sealer.
Shelf Life of Frozen Food
Depends on the type of food. At a temperature of 0 °F (-18 °C):
- Fish, sausage, ready meals and cakes and pastries: up to 6 months
- Cheese, poultry and meat: up to 8 months
- Vegetables and fruit: up to 12 months
Super Freezing
Food should be frozen solid as quickly as possible in order to retain vitamins, nutritional value, appearance and flavor.
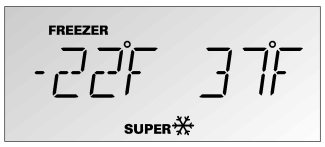
To prevent an undesirable temperature rise when placing fresh food in the Freezer Compartment, switch On super freezing several hours beforehand. As a rule, 4–6 hours is adequate. 24 hours are necessary when using the maximum freezer capacity fully. After 2 days the temperature set before super freezing is automatically restored.
Switching On
Press the FREEZER SUPER Button.
The Display Panel indicates the symbol “SUPER¾” and the compartment for which the function was switched On.
Switching Off
Press the FREEZER SUPER Button.
Thawing Frozen Food
Depending on the type and application, select one of the following options:
- at room temperature,
- in the refrigerator,
- in an electric oven, with/without convection,
- in the microwave.
Note:
- Do not refreeze thawing or thawed food. Only ready meals (boiled or fried) may be refrozen.
- Do not store the frozen produce for the maximum storage period.
Ice Maker
- The Ice Maker makes ice cubes.
- The Ice Maker starts to make ice cubes as soon as the appliance has reached the set temperature. If the Ice Cube Container is full, the Ice Maker automatically switches Off.
CAUTION: Do not place bottles or food in the Ice Cube Container in order to cool them quickly. The Ice Maker may be blocked and could be damaged.
Switching On
Note:
If the Ice Maker is used for the first time and/or after a long period of not being used, do not use the ice that is produced in the first day for hygienic reasons. Throw the ice cubes away and clean the Ice Cube Container.
- Make sure that Ice Cube Container is in its place and locked into position.
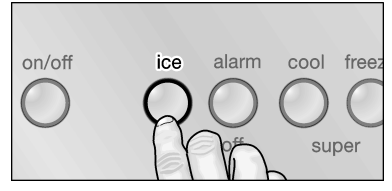
Press the ICE button. The symbol “ICE” is lit on the Display Panel.
Switching Off
Note:
Before switching the Ice Maker Off, it is most important that you switch the Water Supply to the appliance Off for a few hours. Press the ICE button.
Setup Guide
To set up your Bosch B36IT905NP,
- Sart by ensuring the installation site is level and clear of any obstructions. Follow the manufacturer's instructions for built-in installation, which may require professional assistance.
- Once installed, plug in the appliance and allow it to reach the optimal temperature before loading it with food.
- Configure the Home Connect app by downloading it from the app store, following the in-app instructions to connect your appliance.
- Make sure to register your product on the Bosch website to activate the warranty and receive any software updates.
Water Filter
WARNING: Do not use the appliance in places where the water quality is risky or not sufficiently known about without suitable disinfection, before and after filtering. A Filter Cartridge for filtering particles can be obtained from Customer Service or a specialist dealer.
CAUTION:
- After installing a new Filter Cartridge, always discard the ice produced within the first 24 hours after switching On the Ice Maker.
- If the ice has not been used for a prolonged period, pour all ice cubes out of the Ice Cube Container and also discard the ice produced within the next 24 hours.
- If the appliance or the ice has not been used actively for several weeks or months or if the ice cubes have an unpleasant taste or odor, change the Filter Cartridge.
- Air trapped in the system may cause water to escape and the Filter Cartridge to be ejected. Caution when removing.
- The Filter Cartridge must be changed at least every 6 months.
Important Information Concerning the Water Filter
After use, the water system is subject to low pressure. Be careful when removing the Filter Cartridge!
Exchanging the filter cartridge
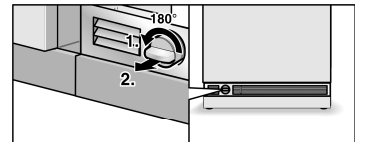
- Turn the Filter Cap on the base of the appliance by 90–180° anti-clockwise.
Pull out the Filter Cartridge.
- Take a new Filter Cartridge from the packet and remove the protective cap.
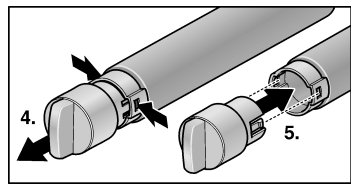
- Take the Filter Cap off of the used Filter Cartridge.
Place the Filter Cap on the fresh Filter Cartridge.
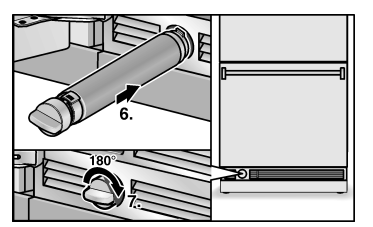
- With the Filter Cap in a horizontal position, feed the Filter Cartridge into the opening on the appliance base as far as it will go.
- Turn the Filter Cartridge 90–180° in a clockwise direction.
Pour water out of the used Filter Cartridge. The Filter Cartridge can be disposed of in the household trash.
Note:
The appliance could be used without a Water Filter.
If you select this option, replace the Water Filter with a Particle Cartridge. In this case the Filter Display can be deactivated to prevent the Filter Change Display. To purchase a Water Filter Replacement Cartridge, contact your local dealer or call 1-800-944-2904.
Troubleshooting
Pros & Cons
Pros
- Sleek design that integrates seamlessly into modern kitchens
- Advanced features like Home Connect for remote monitoring and control
- Energy-efficient with Energy Star certification
- Spacious interior with adjustable storage options
- Quiet operation at 39 dBA
Cons
- Higher price point compared to standard refrigerators
- Requires professional installation for built-in design
- Some users report connectivity issues with the Home Connect app
- Limited availability of replacement parts compared to other brands
Customer Reviews
Customers praise the Bosch B36IT905NP for its sleek design and advanced features. Many appreciate the Home Connect integration, which allows them to monitor their appliance remotely. However, some users have reported initial setup challenges and occasional connectivity issues with the app.
A common complaint is the higher price point, but most agree that the benefits and performance justify the investment.
Faqs
What is the energy efficiency rating of the Bosch?
Can I operate the Refrigerator B36IT905NP remotely?
How do I troubleshoot uneven cooling in my Refrigerator?
Is professional installation required for the Bosch Freezer Refrigerator?
What is the noise level of the Bosch?
How do I configure the Home Connect app for my B36IT905NP?
What are some common issues with the ice maker in the Freezer?
Does the Refrigerator come with a warranty?
Can I adjust the shelves in my Bosch Freezer Refrigerator?
Is the exterior of the Bosch B36IT905NP resistant to fingerprints and smudges?
Leave a Comment
