Bosch Microwave 800 Series HMV8053U User Guide | Operations
Content
Introduction
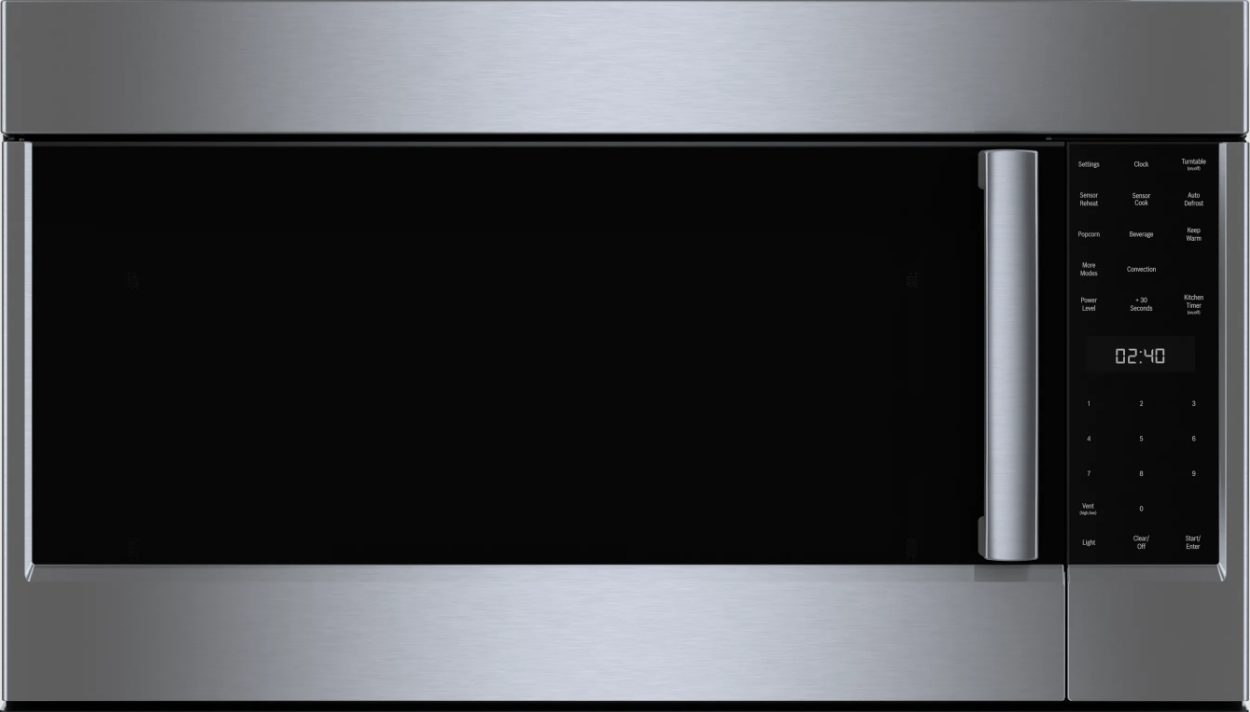
The Bosch Microwave 800 Series HMV8053U is a sleek and versatile over-the-range appliance designed to enhance your kitchen experience. With a powerful 1,000 watts of cooking power and a spacious 1.8 cu. ft. capacity, it offers multiple cooking modes, including convection and sensor cooking for optimal results. The intuitive LCD touchscreen simplifies operation, while the multi-speed vent efficiently removes smoke and odors from your kitchen. Its modern stainless steel design seamlessly integrates into any decor. The cost of the Bosch HMV8053U typically ranges around $1,099.00, reflecting its advanced features and quality construction.
Getting Started
Parts
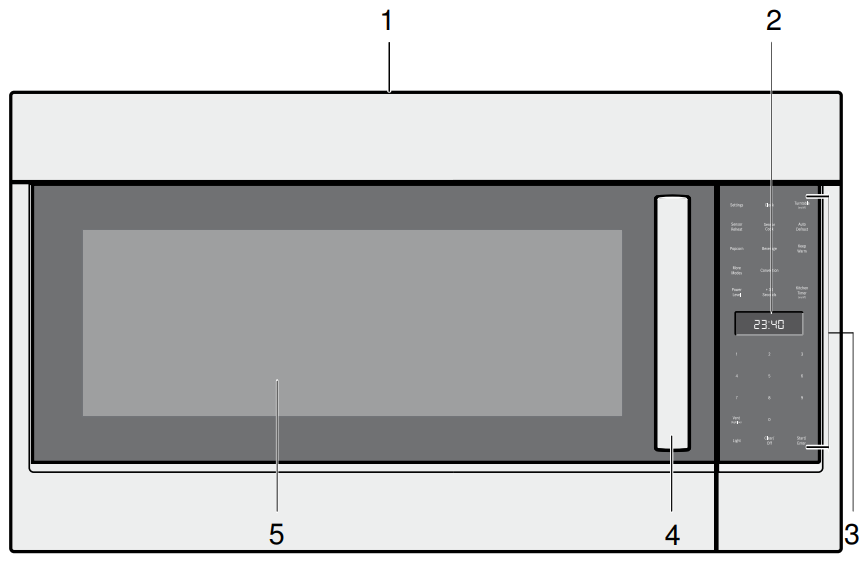
Front view
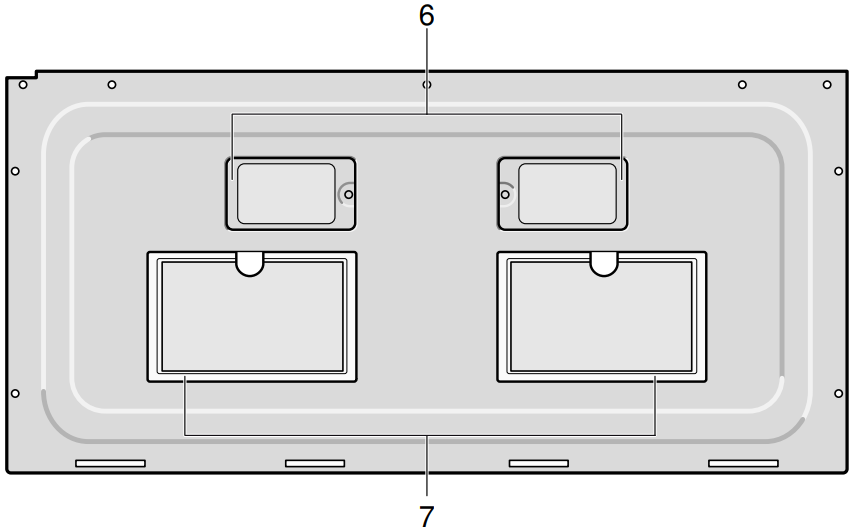
Bottom view
- Top vent grill
- Display
- Control panel
- Door handle
- Window
- Surface lights (LED)
- Ventilation filters
Cooling Fan
The cooling fan runs during all cooking modes. The fan can be heard when it is running, and warm air may be felt as it is released from the oven vent. The fan may also run after the oven is off.
Oven Vent
The oven vent is located at the top of the unit. Warm air may be released from the vent before, during and after cooking. It is normal to see steam escaping from the vent, and condensation may collect in this area. This area may be warm when the oven is in use. Do not block the vent, since it is important for air circulation.
Convection Fan
The convection fan operates during all convection modes. When the oven is operating in a convection mode, the fan turns off automatically when the door is opened.
Oven light (LED)
The oven light turns off to save energy after two minutes with the door open. To turn the light back on close the door and open it again.
Control Panel
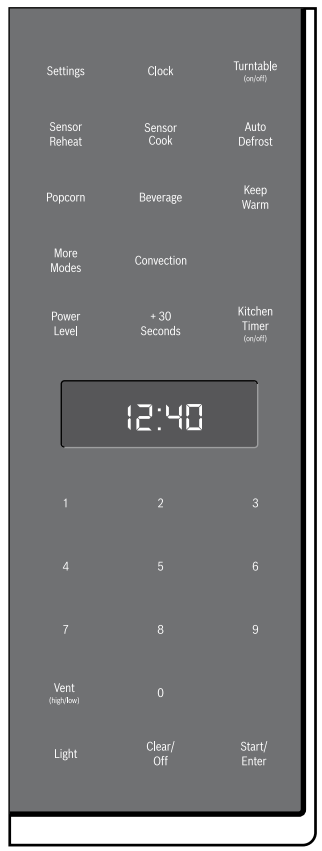
Touch keys
You can activate a function by briefly touching the corresponding touch key. Each time you touch a key a short beep will sound. A long beep will tell you that you have made an invalid input.
| Touch Key | Function |
|---|---|
| Settings | Change basic settings |
| Clock | Set time of day |
| Turntable (on/off) | Switches turntable on or off |
| Sensor Reheat | Reheat food with automatic settings |
| Sensor Cook | Cook food with automatic settings |
| Auto Defrost | Defrost food with automatic settings |
| Popcorn | Select popcorn bag size |
| Beverage | Heat beverages, select beverage size |
| Keep Warm | Set Keep Warm feature |
| More Modes | Enter more modes for convenience cooking |
| Convection | Set Convection mode |
| Power Level | Set power level for microwave operation |
| +30 Seconds | Add 30 seconds to microwave timer |
| Kitchen Timer | Set kitchen timer |
| 0 - 9 | Use the number keys to enter customized values |
| Vent (high/low) | Turn kitchen ventilation feature on/off |
| Light | Turn surface light on/off |
| Clear/Off | Clear entered value/turn appliance off |
| Start/Enter | Confirm input, start operation |
Display elements
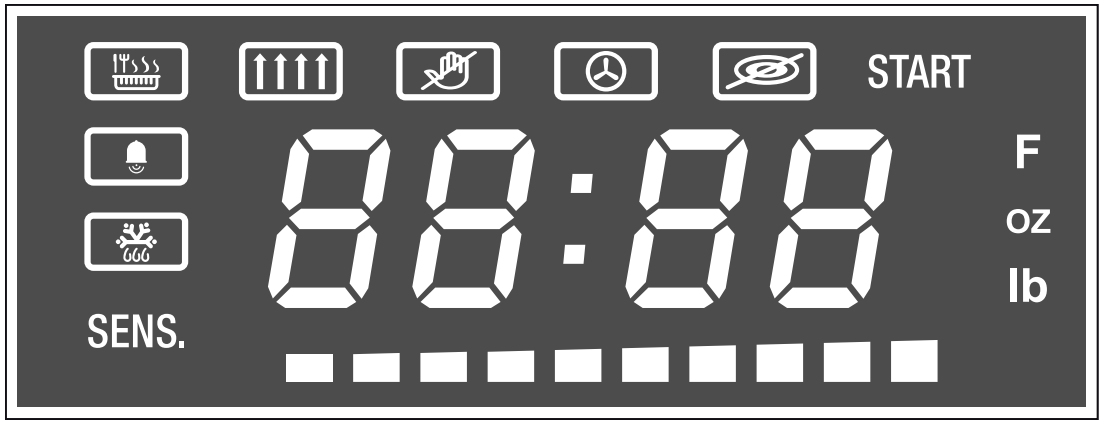
Function
 Keep Warm mode
 Vent
Vent Panel lock-on
 Convection
 Turntable off
 Kitchen timer
 Defrost
- START: Confirmation with Start/Enter key required when blinking
- SENS. Sensing in progress
- F: Temperature in °F
- oz lb: Numeric display shows weight in Ounces/Pounds
 Status bar for preheating/microwave power level
 Numeric display for time, temperature or weight
Detailed Specifications
The Bosch Microwave 800 Series HMV8053U comes with several key features that set it apart from other microwaves:
- 2.0 cu. ft. interior capacity
- Sensor cooking with 11 power levels
- Convection cooking for even heat distribution
- Defrost by weight or time
- Keep Warm function to maintain food temperature
- Child Safety Lock for added safety
- Touch control panel with LCD display
Accessories
How to fit the turntable
- Place the roller rest a in the recess in the oven cavity.
Let the turntable b slot in place in the drive c in the center of the floor of the oven cavity.
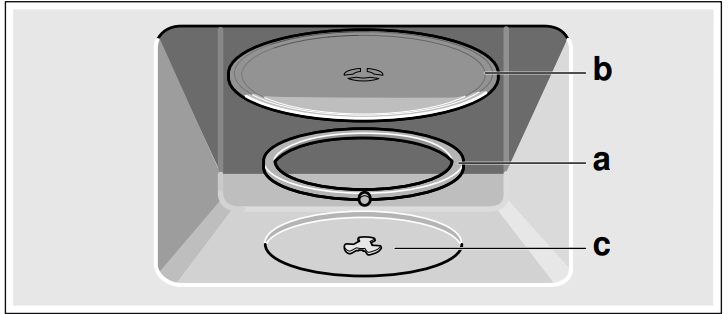
Note: Do not use the appliance if the turntable is not in place. Ensure that it is properly slotted into place and rotates freely when the microwave is operated.
Using the metal rack
The metal rack gives you extra space when cooking in more than one container at the same time.
Place rack securely in the four plastic supports.
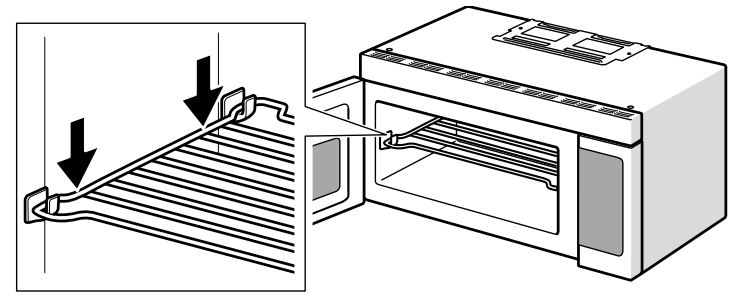
Note: Rack must not touch metal walls or back of microwave.
- Place equal amounts of food both above and below rack.
Note: Amount of food must be approximately the same in both containers to balance out cooking energy.
CAUTION
- Do not use the rack to pop popcorn.
- The rack must be on the four plastic supports when used.
- Use the rack only when cooking food on two positions.
- Do not cook with rack on the floor of the microwave oven.
- The rack can get hot during microwaving. Allow the rack to cool down before handling.
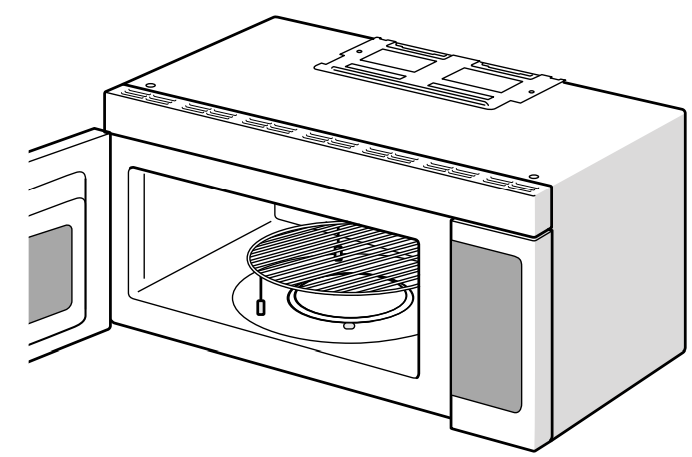
Using the convection rack
The convection rack gives you best cooking results for convection baking.
Notes
- Never use the convection rack for microwave cooking or heating.
- Place the convection rack in the oven when the oven is preheated.
To use the convection rack:
- Place convection rack securely on the center of the glass turntable.
- Place food directly on the convection rack.
Microwave utensil guide Suitable ovenware
- Heat-resistant glass, glass ceramic and earthenware:
Utility dishes, loaf dishes, pie plates, cake plates, liquid measuring cups, casseroles and bowls without metallic trim (e.g. Pyrex®, Anchor Hocking™, Corning Ware®, Emile Henry, etc.). - China:
Bowls, cups, serving plates and platters without metallic trim. - Plastic films and wraps:
Plastic wrap (as a cover) - lay the plastic wrap loosely over the dish and press it to the sides. Vent plastic wrap by turning back one edge slightly to allow excess steam to escape. The dish should be deep enough so that the plastic wrap will not touch the food. - Microwave-safe plastics:
Microwave-safe plastic dishes, cups, semi-rigid freezer containers and plastic bags for short cooking times. Use these with care because the plastic may soften from the heat of the food. - Paper products:
Paper towels, wax paper, parchment paper, paper napkins and paper plates with no metallic trim or design. Look for the manufacturers label for any special instructions for use in the microwave oven.
Unsuitable ovenware
- Metal utensils and cookware:
Metal shields the food from microwave energy and produces uneven cooking. Also, avoid metal skewers, thermometers or foil trays. Metal utensils can cause arcing, which can damage your microwave oven. - Metal decoration:
Bowls, cups, serving plates and platters with metallic trim. - Aluminum foil:
Avoid large sheets of aluminum foil because they hinder cooking and may cause harmful arcing. Use small pieces of foil to shield poultry legs and wings. Keep ALL aluminum foil at least 1 inch (25 mm) from the side walls of the oven cavity and door of the microwave. - Wood:
Wooden bowls and boards will dry out and may split or crack when you use them in the microwave oven. Baskets made of wood will react in the same way. - Tightly covered cookware:
Be sure to leave openings for steam to escape from covered cookware. Pierce plastic pouches of vegetables or other food items before cooking. Tightly closed pouches may explode. - Brown paper:
Avoid using brown paper bags. They absorb heat and can burn. - Flawed or chipped cooking utensils:
Any utensil that is cracked, flawed or chipped may break in the oven. - Metal twist ties:
Remove metal twist ties from plastic or paper bags. They become hot and could cause a fire.
Ovenware test
Do not turn on the microwave unless there is food inside. The following ovenware test is the only exception to this rule.
Perform the following test if you are unsure whether your ovenware is suitable for use in the microwave:
- Heat the empty ovenware at maximum power for ½ to 1 minute.
- Check the temperature occasionally during that time. The ovenware should still be cold or warm to the touch.
The ovenware is unsuitable if it becomes hot or if sparks are generated.
Before Using the Appliance for the First Time
- Appliance must be properly installed by a qualified technician before use.
- Remove all packing materials from inside and outside the oven.
- While cool, wipe with a clean, damp cloth and dry.
- There may be a slight odor from your new appliance; this is normal and will disappear after a short time.
- Optimum cooking results depend on proper cookware being used.
- Read and understand all safety precautions and Use and Care Manual information.
Execute the following sections prior to operating: The appliance must be completely fitted and connected.
Cleaning accessories
Before using accessories for the first time, thoroughly clean them with hot soapy water and a soft dish cloth.
Applying the program label
Apply the included program label in the desired language to the lower frame of the oven cavity, as indicated on the leaflet that carries the label.
Description
The Bosch Microwave 800 Series HMV8053U is built with a stainless steel exterior and a durable interior that resists scratches and stains. Its convection cooking feature allows for even heat distribution, making it ideal for baking, roasting, and broiling. The sensor cooking technology ensures that your food is cooked perfectly every time by automatically adjusting cooking time and power level. The large 14-inch turntable accommodates bigger dishes comfortably.
The microwave also features a keep warm function that maintains the temperature of cooked food until you're ready to serve. Additionally, the child safety lock provides peace of mind by preventing accidental start-ups.
Operation
Setting the clock
The clock can be set in 12-hour mode.
- Touch Clock once.
- Enter the time using the number keys.
Example: To set the clock to 12:41 type in 1 2 4 1. - Touch Clock to confirm.
The time of day is displayed.
Setting the Kitchen Timer
You can set a timer value of up ot 99 minutes and 99 seconds.
- Touch Kitchen Timer.
The symbol lights up and ‹‹:‹‹ is blinking.
 - Enter the desired time using the number keys.
- Touch Kitchen Timer to confirm.
The Kitchen Timer starts counting down.
Once the set time has elapsed 4 beeps will sound. To stop the beep, touch Kitchen Timer.
To cancel the kitchen timer, touch Kitchen Timer again or open the appliance door.
Operating the Ventilation Fan
- The Vent feature moves steam and other cooking vapors from the cooking surface of the range below the microwave oven.
- You can set four different vent speeds.
- Set the vent feature by touching Vent (high/low). The ventilation symbol
 will light up on the display.
| Vent level | Touch Vent (high/ low) key | Display |
| 4 (high) | once | |
| 3 | twice | |
| 2 | 3 times | |
| 1 (low) | 4 times | –‹ |
| OFF | 5 times | OFF |
Note: If the temperature gets too hot around the microwave oven, the fan of the vent feature will automatically turn on at the lowest setting to cool the oven. The fan will automatically turn off when the internal parts are cool. When this occurs, the vent cannot be manually turned off.
Turning the Surface Light on/off
The appliance is equipped with a cooking surface light, to light the surface underneath the appliance. With the Light key you can set two brightness levels.
| Brightness | Touch Light Key |
|---|---|
| High | Press once |
| Low | Press twice |
| Off | Press three times |
Turning the turntable on / off
For best cooking results, leave the turntable on. It can be turned off for large dishes.
To turn the turntable off, touch the Turntable (on/off) once. The ![]() symbol and OFF light up briefly. Touch the key again to turn the turntable on. The
symbol and OFF light up briefly. Touch the key again to turn the turntable on. The ![]() symbol and ‹Ÿ lights up briefly.
symbol and ‹Ÿ lights up briefly.
CAUTION
- Sometimes the turntable can become hot. Be careful touching the turntable during and after cooking.
- Do not run the oven empty.
- Do not operate the oven without the turntable in place.
Convection
Convection cooking circulates hot air through the oven cavity with a fan. The constantly moving air surrounds the food to heat the outer portion quickly, creating even browning and sealed-in flavor by the constant motion of hot air over the food surfaces.
CAUTION
The oven door and exterior and the wire rack will become hot during Convection. Always use oven mits.
Cookware tips for Convection
Metal Pans:
Recommended for all types of baked products, especially where browning is important. Dark or dull finish metal pans are best for breads and pies because they absorb heat and produce crisper crust. Shiny aluminum pans are better for cakes, cookies or muffins because they reflect heat and help produce a light tender crust.
Glass or glass-ceramic casseroles or baking dishes: Best suited for egg and cheese recipes due to the cleanability of glass.
Note: Always use the convection rack when using the Convection mode.
Setting Convection mode
Convection cooking temperature ranges from 200° F (93°C) to 450° F (232°C).
- Touch Convection. 350° F and START are blinking, the
 symbol lights up in the display.
 - Enter the desired temperature using the number keys.
Touch Start/Enter. The preheat bar appears in the display. The oven starts preheating.
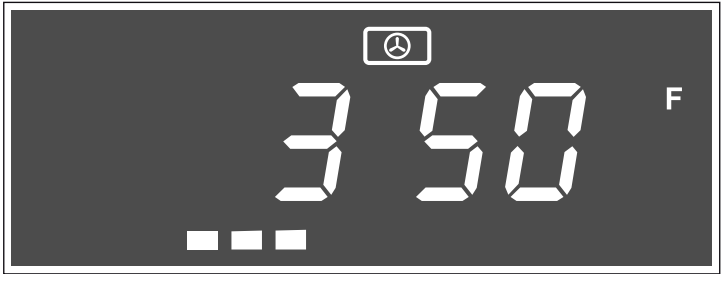
Note: Do not open the appliance door during preheating.
When preheating is completed, the oven will beep twice briefly, and the preheat bar goes away.- Open the door, place convection rack and food in the oven. Close the door quickly in order to maintain oven temperature.
Note: During convection cooking, the vent fan can automatically turn on at the lowest speed setting to cool the oven components.
To end convection cooking, touch Clear/Off.
Opening appliance door during operation
Opening the appliance door during operation will interrupt the current mode. When you close the appliance door, operation will be resumed.
Cancel operation
Touch Clear/Off to cancel the active oven mode. The appliance turns off and the clock is displayed. The cooling fans may continue to run for awhile and then switch off automatically.
Convection cooking suggestions
Most baked items require preheating the oven.
| Food Dish | Temperature | Cook Time (minutes) |
|---|---|---|
| Brownies (square pan 9") | 325°F (163°C) | 25 - 35 |
| Biscuits (baking pan Ø 11") | 350 - 375°F (176 - 190°C) | 7 - 17 |
| Cookies (baking pan Ø 11") | 325 - 350°F (163 - 176°C) | 8 - 16 |
| Puff pastry (baking pan Ø 11") | 375°F (190°C) | 30 - 40 |
| Fresh fruit pie (dark coated pie pan Ø 8") | 350 - 400°F (176 - 205°C) | 45 - 60 |
| Dinner rolls (baking pan Ø 11") | 325 - 350°F (163 - 176°C) | 15 - 22 |
| Chicken pieces (baking pan Ø 11") | 375°F (190°C) | 25 - 35 |
| Fish steak, 1/2" - 1" thick (baking pan Ø 11") | 350°F (176°C) | 15 - 25 |
| Pork chops, 1/2" thick (baking pan Ø 11") | 400 - 425°F (205 - 218°C) | 15 - 20 |
| Frozen pizza, crisp crust (convection rack) | 375 - 425°F (190 - 218°C) | 14 - 25 |
| Frozen pizza, soft crust (pizza pan 12") | 400 - 425°F (205 - 218°C) | 18 - 25 |
Setup Guide
To set up your Bosch Microwave 800 Series HMV8053U, follow these steps:
- Unpack the microwave and remove all packaging materials.
- Place the microwave on a flat surface, ensuring it is level.
- Plug in the microwave and set the clock using the touch control panel.
- Refer to the user manual for detailed instructions on operating specific features like convection cooking and sensor cooking.
Assembly is minimal as it comes pre-assembled; however, ensure all accessories such as the turntable are properly installed before first use.
Maintenance
Charcoal filter replacement
The charcoal filter, which was included with your microwave oven, is used for nonvented, recirculated installation (Room Venting). The filter should be replaced every 6 to 12 months depending on use.
- Disconnect power to the microwave oven at the circuitbreaker panel or by unplugging.
- Remove the vent grill mounting screws.
- Pull the vent grill away from the unit.
- Change the charcoal filter.
- Carefully push the vent grill back into place and replace the screws removed in Step 2.
Note: If no charcoal filter is installed, it is not possible to bind the odorous substances in the cooking vapors.
Troubleshooting
| Problem | Suggestion |
|---|---|
| Neither the microwave’s display nor oven operates. | ▯ Properly insert the plug into a grounded power outlet. |
| ▯ Remove the plug from the outlet, wait 10 seconds, then plug the microwave in again. | |
| ▯ Reset the household circuit breaker or replace any blown fuses. | |
| ▯ Plug a different appliance into the power outlet. If the other appliance will not operate, have a qualified electrician repair the outlet. | |
| ▯ Plug the microwave into a different power outlet. | |
| Oven display works, but the oven will not operate. | ▯ Make sure the oven door is closed securely and completely. |
| ▯ Check to see if packing material or other materials are stuck to the door seal. | |
| ▯ Check for damage to the oven door. | |
| ▯ Press the Clear/Off key twice and attempt to re-enter cooking instructions. | |
| Power goes off before the cook time has elapsed. | ▯ If there has been a power interruption, remove the plug from the outlet; wait 10 seconds, then plug the microwave in again. If there was a power outage, the time indicator in the display will show 00:00. |
| ▯ Reset the clock and any cooking instructions. | |
| ▯ Reset the household circuit breaker or replace any blown fuses. | |
| ▯ Press the Clear/Off key twice and attempt to re-enter cooking instructions. | |
| ▯ Plug a different appliance into the power outlet. If the other appliance will not operate, have a qualified electrician repair the outlet. | |
| ▯ Plug the microwave into a different power outlet. | |
| Food is cooking too slowly. | Make sure the oven is on a separate 20 amp circuit line. Operating another appliance on the same circuit can cause a voltage drop. If necessary, move the microwave to its own circuit. |
| Microwave is sparking, arcing occurs. | Remove any metallic utensils, cookware, or metal ties from the oven cavity. If using aluminum foil, use only narrow strips and allow at least one inch between the foil and the interior oven walls. |
| Turntable makes noises or sticks. | ▯ Clean the turntable, roller ring, and oven cavity bottom. |
| ▯ Make sure the turntable and roller ring are positioned correctly. | |
| Using the microwave causes TV or radio interference. | This is similar to the interference caused by other small appliances, such as hair dryers. Move your microwave further away from other appliances, like your TV or radio. |
| LED lights are not working. | Please contact Customer Service. |
Note: If the oven is set to cook for more than 30 minutes at 100% power level, it will automatically adjust itself to a 80% power level after 30 minutes to avoid overcooking.
Warranty
How Long the Warranty Lasts
BSH warrants that the Product is free from defects in materials and workmanship for a period of three hundred sixty-five (365) days from the date of purchase. The foregoing timeline begins to run upon the date of purchase, and shall not be stalled, tolled, extended, or suspended, for any reason whatsoever.
This Product is also warranted to be free from cosmetic defects in material and workmanship (such as scratches of stainless steel, paint/porcelain blemishes, chip, dents, or other damage to the finish of the Product), for a period of thirty (30) days from the date of purchase or closing date for new construction.
Bosch Microwave 800 Series HMV8053U Pros & Cons
Pros
- Advanced sensor cooking technology for precise results
- Convection cooking capability for versatile meal preparation
- Large interior capacity and turntable
- Stylish stainless steel exterior
- Child safety lock for added security
Cons
- Higher price point compared to other models
- Complex interface may require some learning curve
- Noisy operation during certain modes
Customer Reviews
Customer reviews of the Bosch Microwave 800 Series HMV8053U generally praise its performance and features. Many users appreciate its ease of use despite its advanced features. However, some users mention that it can be noisy during convection mode and that the price is steep compared to other microwaves on the market.
Common complaints include difficulties with navigating the touch control panel initially and occasional uneven heating issues.
Faqs
What is the interior capacity of the Bosch?
Does the Bosch Microwave 800 Series HMV8053U have convection cooking?
How do I defrost food in the HMV8053U?
Is there a child safety lock on the Microwave?
What type of display does the Microwave have?
Can I use the Bosch Microwave for baking?
How do I set up my Bosch Microwave?
Why is my Bosch HMV8053U not turning on?
How do I clean my Microwave?
Is there a keep warm function on the Bosch Microwave?
Leave a Comment

