Bose T8S ToneMatch Audio Mixer Owners Manual | System Setup
Content
Introduction
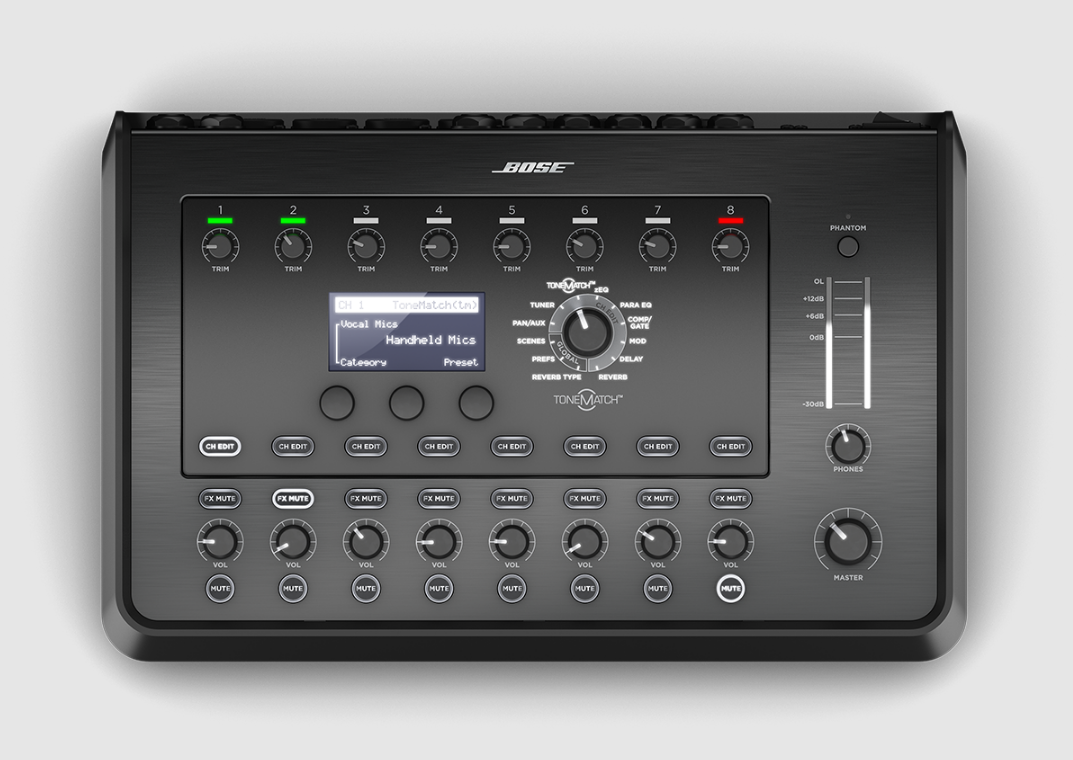
The Bose T8S ToneMatch Audio Mixer is a compact and powerful 8-channel mixer designed for live performers and audio professionals. Engineered with advanced digital signal processing, it offers studio-quality EQ, dynamics, and effects to enhance sound quality. The intuitive touchscreen interface and tactile controls allow for seamless adjustments during performances, while its rugged design ensures durability on stage. Priced at approximately $699.00, the T8S is an essential tool for achieving professional-grade audio in any setting.
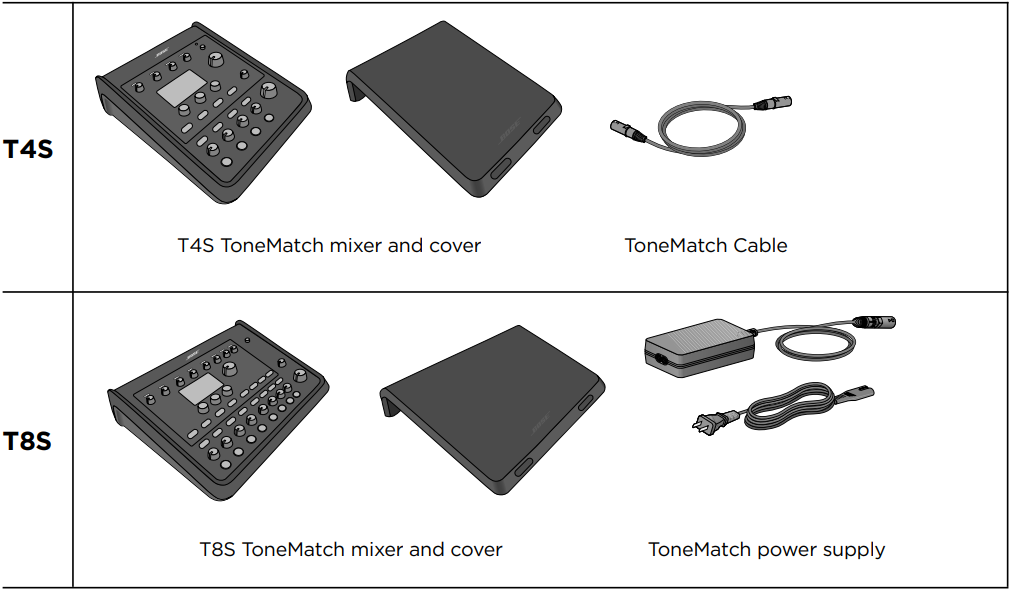
Bose T8S ToneMatch Audio Mixer Unpacking
T4S ToneMatch Mixer Control Panel
Detailed Specifications
- Channels: 8 channels with XLR/TRS combo connectors
- EQ and Processing: Built-in ToneMatch processing, zEQ, and customizable scenes
- Outputs: 8 independent analog outputs, 1/4” TRS aux output, 1/4” TRS monitor output
- Effects: Integrated effects including reverb, delay, and modulation
- Controls: Simple and intuitive interface with LCD
- Compatibility: Compatible with Bose L1, S1, and F1 systems
Product Overview
Take control of your music with T4S and T8S ToneMatch mixers, compact 4 and 8-channel interfaces designed for performers. Engineered with powerful DSP engines and intuitive user controls, they offer studio-quality EQ, dynamics, and effects processing. Sound great with integrated Bose ToneMatch processing and zEQ, especially when connected to a Bose L1 or F1 system for full end-to-end tonal control. Play confidently on stage with these rugged ToneMatch mixers using tactile controls, easy-to-read LED displays, and scene recall. ToneMatch mixers are the ultimate on-stage companions for performing artists.
Product Features
Powerful Audio Processing
- Updated, studio-quality effects with advanced digital audio processing
- Effects include compressor, limiter, de-esser, noise gate, chorus, flanger, phaser, tremolo, delay, and reverb
- Bose ToneMatch processing for natural-sounding vocals and instruments
- zEQ focuses the sound of ToneMatch presets for effective adjustments on the fly
- Independent ToneMatch, EQ, dynamics, and effects per channel
- Dedicated reverb for Aux sends and a global shared reverb for use across all channels
- Master output EQ helps compensate for venue acoustics
- Full end-to-end tonal optimization when used with Bose L1 and F1 systems
Seamless Live Control
- Tactile controls and indicators designed for live on-stage use by musicians and DJs
- Fast-learning user interface
- Built-in tap tempo delay, chromatic tuner, and recallable scenes
- LED display and illuminated controls are easy to read and use, even on dimly lit stages
High-Density Connectivity
- Unprecedented connectivity and control in a small digital stereo mixer
- Four (T4S) or eight (T8S) high-quality audio preamps with XLR-combo jacks for microphones or instruments, and switchable phantom power
- Two Aux inputs for additional sources two (T4S) or four (T8S) Aux sends
- USB-A and -B for USB drive playback or PC/Mac interfacing
- ToneMatch outputs for digital audio and power (T4S only)
- Balanced ¼” TRS and XLR (T8S only) stereo outputs
- Independent headphone output
Convenient Gig-Ready Features
- Rugged enclosure with a protective magnetic cover to protect controls and connectors
- Includes a ToneMatch cable for connecting to a Bose L1 Model II or L1 Model 1S system for digital audio and power (T4S), or includes a universal power supply (T8S)
- The bottom insert allows you to use standard camera mounting accessories to keep your ToneMatch mixer within reach
Description
The Bose T8S ToneMatch Audio Mixer boasts a sleek and durable design, making it suitable for both studio and live performance environments. Each channel features a dedicated XLR/TRS combo connector, allowing for flexibility in connecting various types of microphones and instruments. The mixer also includes an LCD display for easy navigation and customization of settings. The T8S integrates seamlessly with other Bose products such as the L1, S1, and F1 systems, making it an excellent choice for those already invested in the Bose ecosystem. Its advanced processing capabilities ensure that the sound output is always crisp and well-balanced, even in challenging acoustic environments.
Control Panel
Figure 1. T4S Control Panel
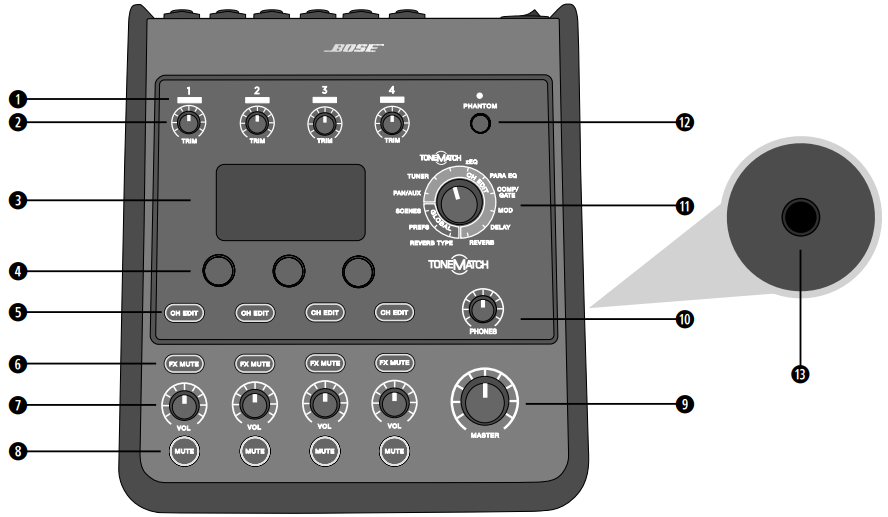
- INPUT SIGNAL/CLIP LEDs (1-4)
Displays the input signal status in color:
Green: Indicates the presence of an input signal
Red: Indicates input source clipping - TRIM CONTROLS (1-4)
Adjusts the input sensitivity for the respective channel. - DISPLAY
Provides function menus and system information. - EDITING CONTROLS
- These three rotary/push-button controls allow you to select or adjust items/values appearing on the display.
- CH EDIT BUTTONS (1-4)
- Selects the channel you want to modify.
- FX MUTE BUTTONS (1-4)
- Bypasses the Mod, Delay, and Reverb effects on the selected channel.
- VOLUME CONTROLS (1-4)
- Adjusts the volume level for the respective channel.
- MUTE BUTTONS (1-4)
- Silences the audio output for the respective channel.
- MASTER VOLUME CONTROL
- Adjusts the overall output level.
- HEADPHONE VOLUME CONTROL
- Adjusts the volume level of the headphone output.
- ROTARY SELECTOR
- Allows access to both global and channel-related parameters, which are adjusted using the editing controls.
- PHANTOM POWER SWITCH
- Applies +48V power to input channels 1-4. A red LED indicates that phantom power is on.
- HEADPHONE JACK
- For use with headphones only, with a minimum impedance of 24Ω.
Connection Panel
Figure 2. T4S Connection Panel
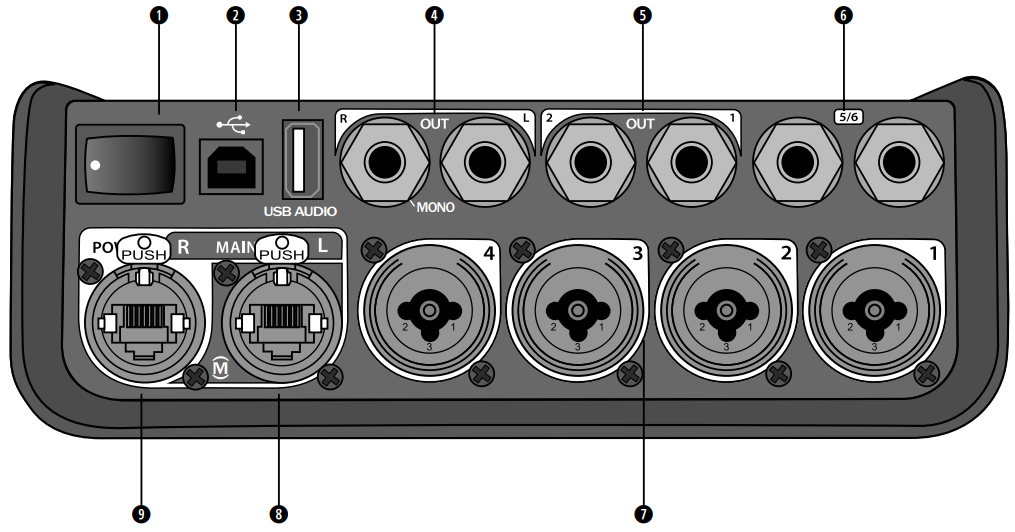
- POWER SWITCH
Turns the mixer on or off. - USB 2.0 TYPE-B
A USB interface that allows you to connect the mixer to your computer. - USB 2.0 TYPE-A
A USB interface that allows you to stream audio from your flash drive. - ANALOG L/R OUTPUT
Main analog output. Accepts 1/4" TRS balanced and TS unbalanced cables. - AUX OUTPUT
Four user-definable analog outputs. Can be configured for a pre-fader, post-EQ, and effects, or post-fader output. Accepts 1/4" TRS balanced or TS unbalanced cables. - AUX IN
Analog input channels 9/10. Accepts 1/4" TRS balanced or TS unbalanced cables for line-level inputs. Can be used for stereo input signals. - INPUTS 1-8
Analog input channels 1-8. Accepts XLR balanced cables for microphones or 1/4" TRS balanced or TS unbalanced cables for high-impedance inputs, such as guitars. - XLR STEREO OUTPUT
Stereo analog output. Accepts XLR balanced cables for stereo output. - DIGITAL POWER PORT
For use with ToneMatch power supply
Note: The T8S is NOT designed to connect digitally to the L1 Model 1S/II.
CAUTION: Although the ToneMatch port accepts a standard RJ-45 connector, do NOT connect the T8S to a computer or phone network.
T8S ToneMatch Mixer Control Panel
Figure 3. T8S Control Panel
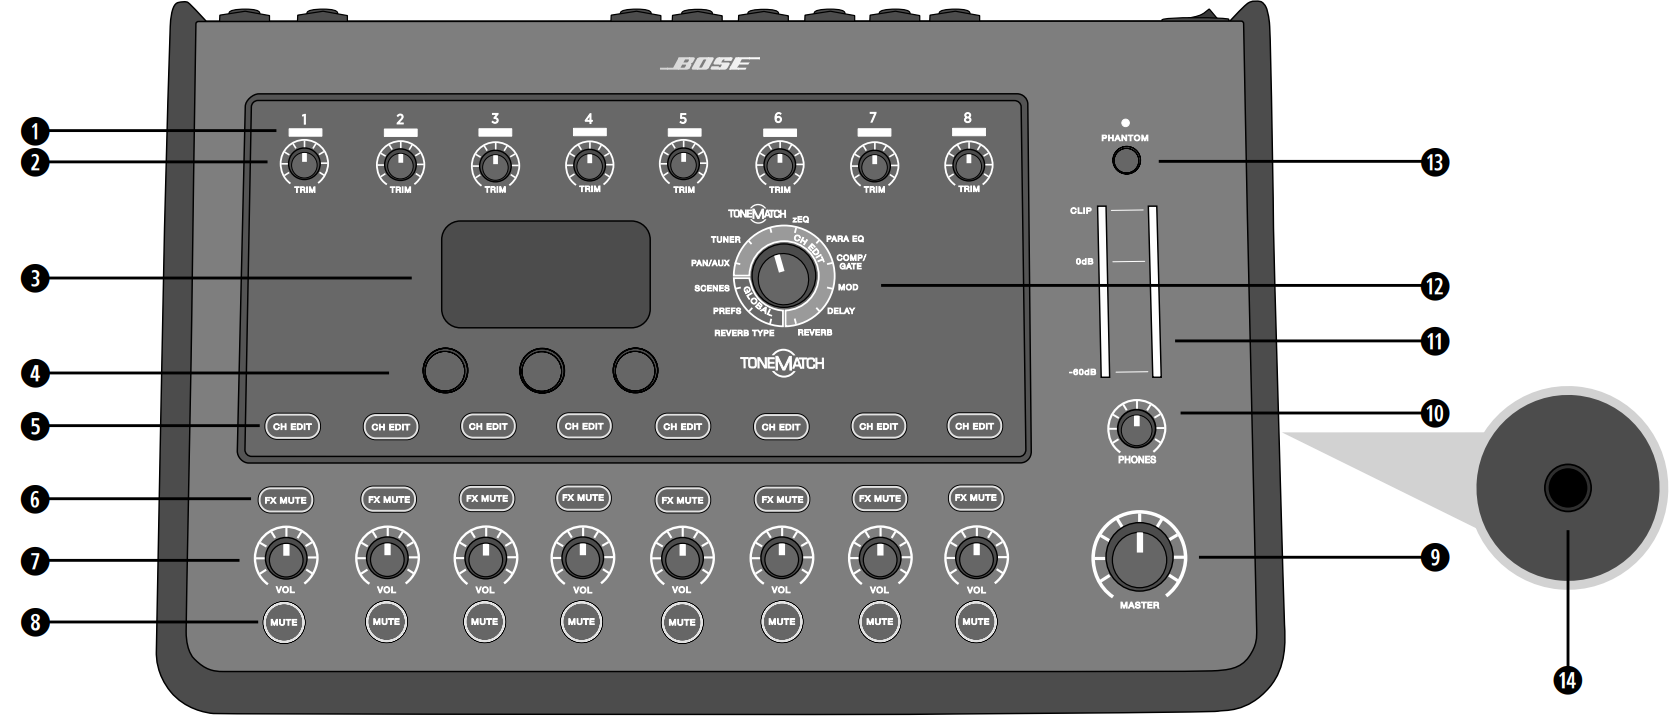
Figure 3. T8S Control Panel
- INPUT SIGNAL/CLIP LEDs (1-8)
Displays the input signal status in color:- Green: Indicates the presence of an input signal
- Red: Indicates input source clipping
- TRIM CONTROLS (1-8)
Adjusts the input sensitivity for the respective channel. - DISPLAY
Provides function menus and system information. - EDITING CONTROLS
These three rotary/push-button controls allow you to select or adjust items/values appearing on the display. - CH EDIT BUTTONS (1-8)
Selects the channel you want to modify. - FX MUTE BUTTONS (1-8)
Bypasses the Mod, Delay, and Reverb effects on the selected channel. - VOLUME CONTROLS (1-8)
Adjusts the volume level for the respective channel. - MUTE BUTTONS (1-8)
Silences the audio output for the respective channel. - MASTER VOLUME CONTROL
Adjusts the overall output level. - HEADPHONE VOLUME CONTROL
Adjusts the volume level of the headphone output. - STEREO OUTPUT METER
Allows you to visually measure your output level. - ROTARY SELECTOR
Allows access to both global and channel-related parameters, which are adjusted using the editing controls. - PHANTOM POWER SWITCH
Applies +48V power to input channels 1-8. A red LED indicates that phantom power is on. - HEADPHONE JACK
For use with headphones only, with a minimum impedance of 24Ω.
Figure 4. T8S Connection Panel
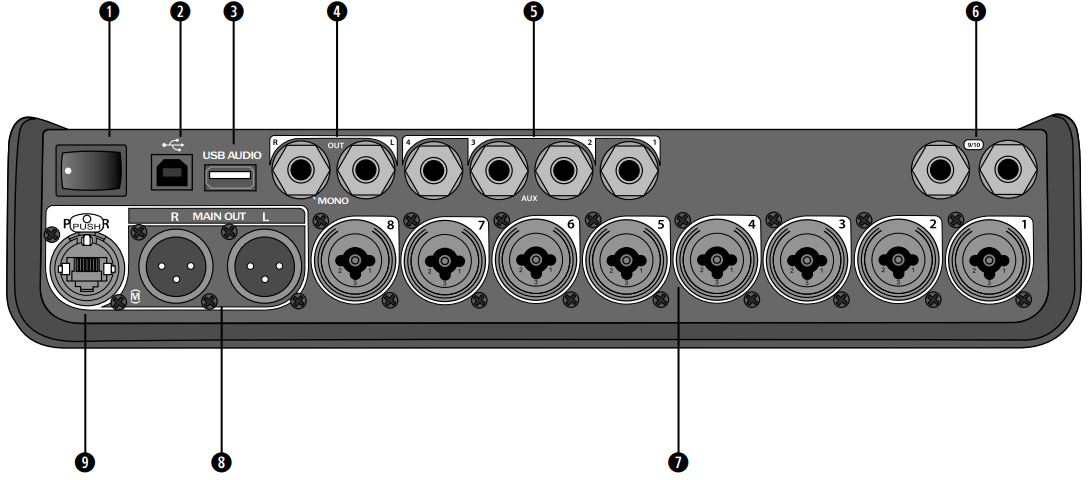
- POWER SWITCH
Turns the mixer on or off. - USB 2.0 TYPE-B
A USB interface that allows you to connect the mixer to your computer. - USB 2.0 TYPE-A
A USB interface that allows you to stream audio from your flash drive. - ANALOG L/R OUTPUT
Main analog output. Accepts 1/4" TRS balanced and TS unbalanced cables. - AUX OUTPUT
Four user-definable analog outputs. Can be configured for a pre-fader, post-EQ, and effects, or post-fader output. Accepts 1/4" TRS balanced or TS unbalanced cables. - AUX IN
Analog input channels 9/10. Accepts 1/4" TRS balanced or TS unbalanced cables for line-level inputs. Can be used for stereo input signals. - INPUTS 1-8
Analog input channels 1-8. Accepts XLR balanced cables for microphones or 1/4" TRS balanced or TS unbalanced cables for high-impedance inputs, such as guitars. - XLR STEREO OUTPUT
Stereo analog output. Accepts XLR balanced cables for stereo output. - DIGITAL POWER PORT
For use with ToneMatch power supply
Note: The T8S is NOT designed to connect digitally to the L1 Model 1S/II.
CAUTION: Although the ToneMatch port accepts a standard RJ-45 connector, do NOT connect the T8S to a computer or phone network.
Setup Guide
To set up the Bose T8S ToneMatch Audio Mixer:
- Connect Input Sources: Plug your microphones or instruments into the corresponding channels using XLR/TRS cables.
- Power On: Turn on the mixer and ensure all connections are secure.
- Configure Channels: Use the intuitive interface to set gain levels, adjust EQ settings, and apply effects as needed.
- Pair with Bose Systems: Connect the T8S to your Bose L1, S1, or F1 system via the provided cables.
- Customize Scenes: Use the LCD display to save and recall custom scenes tailored to your performance needs.
System Setup
Removing/Attaching the Cover
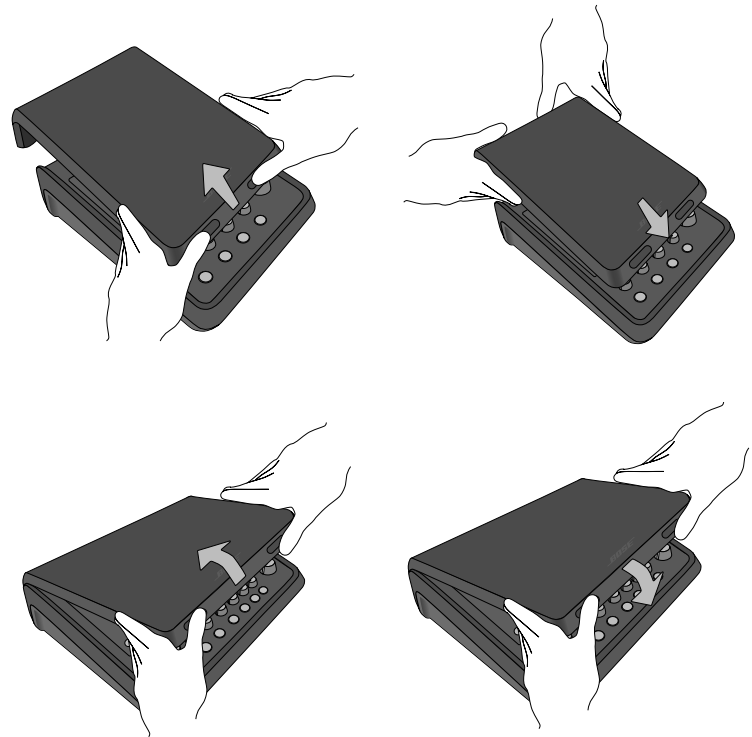
The T4S/T8S ToneMatch mixer comes out of the carton with a cover installed on the top panel. The cover is designed to protect the control panel while transporting or storing the mixer.
To remove the cover:
- Place thumbs on notches on front of cover and slide cover forward.
- Grab cover by the back and lift to remove it.
To attach the cover:
- Slide cover over the mixer, from back to front.
- The magnetized cover will engage on its own and secure itself to the mixer.
Figure 5. Removing and attaching the cover
Mounting Options
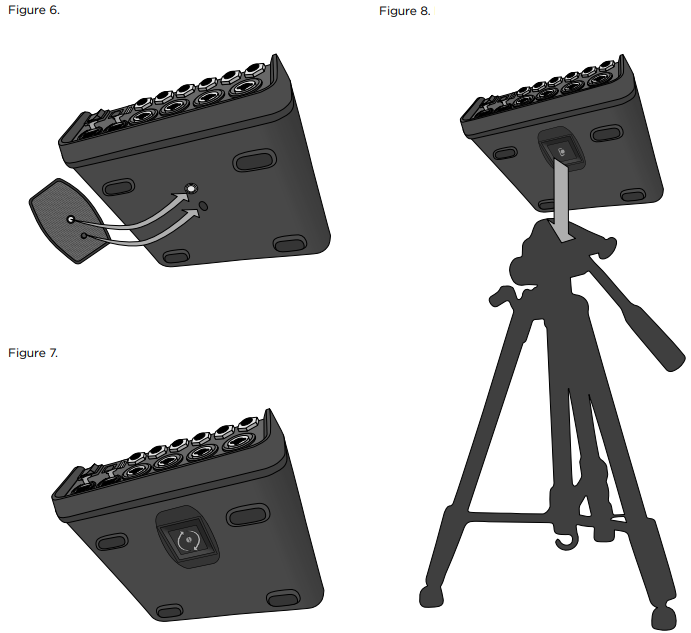
The T4S/T8S comes with a 1/4" (6 mm) mounting screw insert. This enables it to be mounted onto a number of available products that include a 1/4" (6 mm) mounting screw, including a camera tripod stand.
Mounting the T4S/T8S on a Camera Tripod Stand
- Extend the camera tripod legs and secure at desired height.
- Remove the bracket from the top of the camera tripod stand and secure the bracket to the bottom of the T4S/T8S with the screw. Make sure the small indentation on the T4S/T8S and the bump on the bracket are aligned. See Figure 6.
- Secure the bracket with the T4S/T8S back onto the camera tripod stand. See Figure 8.
WARNING: Do not use the ToneMatch T4S/T8S mixer with a tripod/stand that is unstable. The mixer is only designed for use on a 1/4" screw (6 mm), and the tripod/stand must be capable of supporting a device with a minimum weight of 1.9 kg (4.1 lbs) and an overall size of 214 x 311 x 83 mm (8.4 x 12.25 x 3.25 inches). Using a tripod/stand that is not designed to support the size and mass of the T4S/T8S mixer may lead to an unstable and hazardous condition that could result in injury.
Connecting the T4S via Digital Connection
- Make sure the L1 Model 1S/II and T4S are powered off and the T4S Master volume control is set to minimum.
- Plug one end of the ToneMatch cable into the Power port/Digital Main Output R on the T4S. Plug the other end of the ToneMatch cable into the ToneMatch port on the power stand.
Note: To connect the T4S to two L1 Model 1S/II power stands, connect a second power stand to the Digital Main Output L port on the T4S using a ToneMatch cable.
- Turn on the mixer and then turn on the L1 Model 1S/II power stand.
- Connect your instruments and adjust levels.
Figure 9. Two L1 model II systems connected to a T4S via digital connection

Note: The T8S cannot be connected digitally and cannot be powered by the L1 Model 1S/II.
Connecting the T4S/T8S via Analog Connection
- Make sure the device you are connecting to and the T4S/T8S are powered off and the T4S/T8S Master volume control is set to minimum.
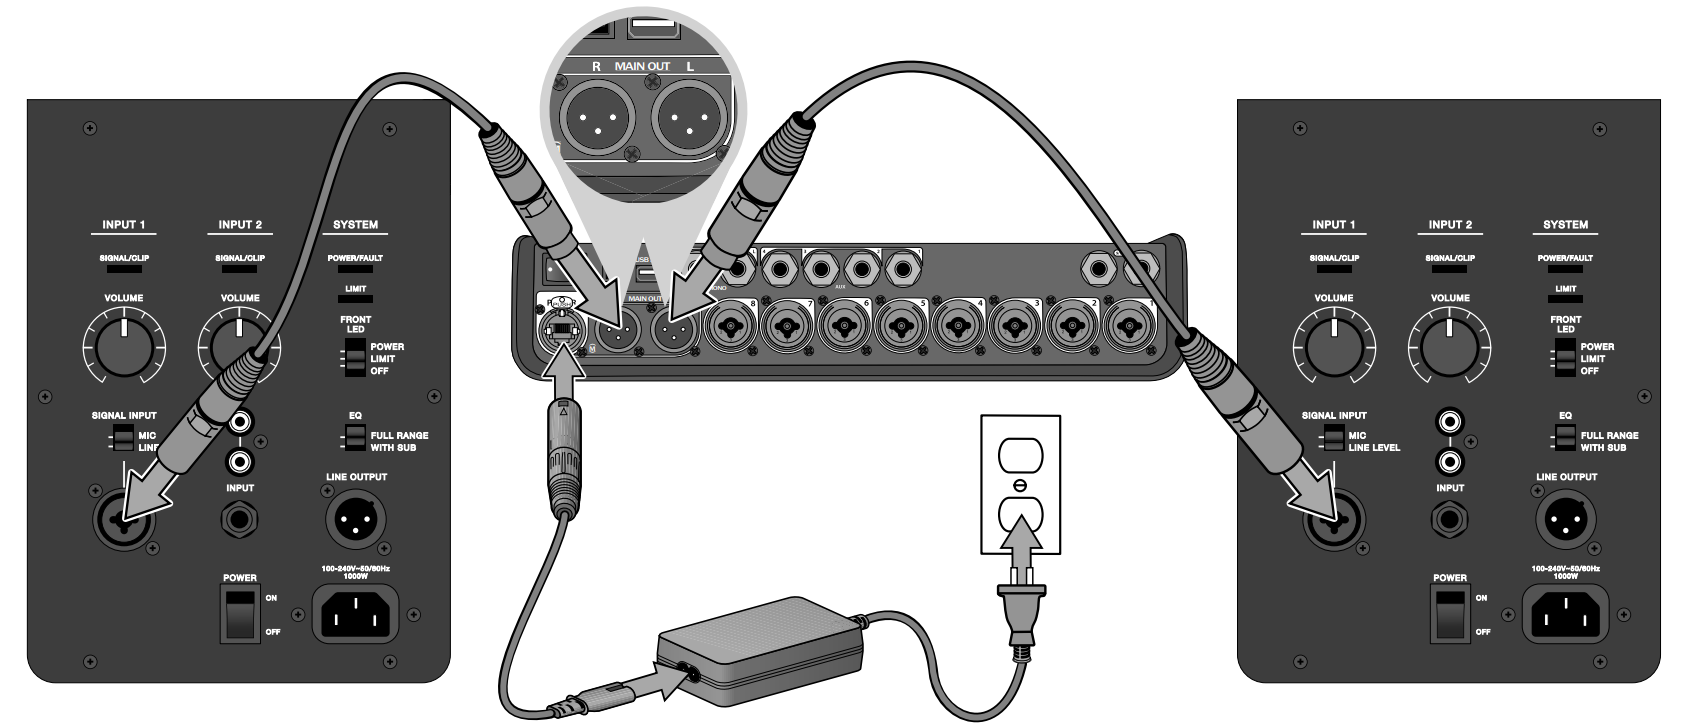
- Using XLR balanced cables, connect one or two devices to the XLR Stereo Outputs of your T8S (see Figure 10).
Note: The T4S/T8S can be connected to a device via the Analog R Output port using a 1/4" TRS cable (sold separately). Plug the other end of the TRS cable into the Analog Input port of the device. To connect the T4S/T8S to two devices, connect a second device to the Analog L Output port on the T4S/T8S using a 1/4" TRS cable.
- Connect a ToneMatch power supply to the Power port of the T4S/T8S and plug it into a live AC outlet.
- Turn on the T4S/T8S mixer and then turn on the device.
- Connect your instruments and adjust levels. Refer to “Optimizing Input Gain and Output Volume” on page 17.
Figure 10. Two F1 systems connected to a T8S via analog connection
Connecting the ToneMatch Power Supply
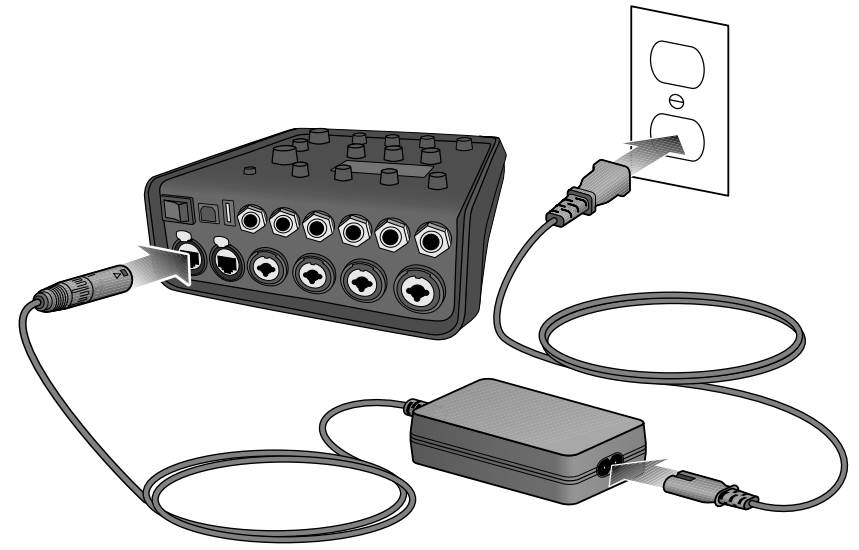
The ToneMatch power supply provides power for the T4S/T8S mixer.
- Plug the power supply cable into the T4S/T8S Power port.
- Plug one end of the AC power cord into the power supply.
- Plug the other end of the power cord into a live AC power outlet.
- Switch the T4S/T8S power switch to the ON position.
Note: Power supply included with T8S is required for operation of the T8S. Power supply is not included with the T4S and is not required for operation of the T4S.
Figure 11. Connecting T4S to power supply
Connecting the ToneMatch Power Supply
The T4S/T8S provides a USB port for connecting it to a computer. This allows you to download performance scenes to a computer or install system updates. Visit www.Bose.com/livesound for details on updating your system.
When connected to a computer, you also can use the T4S/T8S as a general-purpose USB audio device for recording/playback.
Note: The T4S/T8S operates at 48 kHz/24-bit. When using the T4S/T8S with recording software, you may need to configure the software settings for 48 kHz/24-bit operation. Note: Connecting the T4S/T8S to your computer requires a USB cable (Type A to Type B, not supplied).
- Connect the mixer to a power source (ToneMatch power supply for T4S/T8S or an L1 Model 1S/II for T4S only).
- Plug one end of the USB cable into the mixer's USB 2.0 Type-B port (Figure 12).
- Plug the other end of the USB cable into a USB port on your computer.
- Turn on the mixer.
Figure 12. T4S-to-USB connection

Connecting a Flash Drive to the T4S/T8S
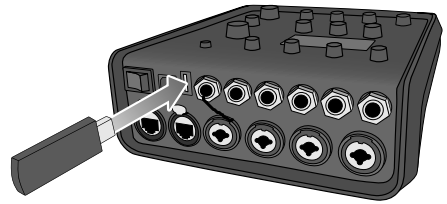
Plug in a USB 2.0/3.0 flash drive loaded with WAV/MP3 files into the USB 2.0 Type-A port to playback audio tracks to your mixer.
Figure 13. Connecting a flash drive to the T4S
Factory Settings
This section describes the settings in the T4S/T8S mixer when it left the factory. To restore your T4S/T8S at any time to these factory settings, load the Bose Factory Settings scene.
Comp/Gate Factory Settings
Type | Thresh | Gain |
| Compressor 1: Light | –16.0 dB | 3.0 dB |
| Compressor 2: Medium | –16.0 dB | 5.0 dB |
| Compressor 3: Heavy | –16.0 dB | 8.0 dB |
| Limiter | –10.0 dB | 0 dB |
| De-Esser | –10.0 dB | 0 dB |
| Thresh | Speed |
| Noise Gate | –70.0 dB | 50% |
| Thresh | Tight |
| KickGate1: Regular | –20.0 dB | 100% |
| KickGate2: Fast | –20.0 dB | 100% |
Modulator Factory Settings
Type | Thresh | Gain | Speed |
| Chorus 1: Brite | 50% | 50% | 0.50 Hz |
| Chorus 2: Warm | 70% | 100% | 0.15 Hz |
| Chorus 3: Dark | 25% | 25% | 3.0 Hz |
| Flanger 1: Tape | 50% | 50% | 1.00 Hz |
| Flanger 2: Feedback | 50% | 100% | 2.00 Hz |
| Speed | Feedback |
|
| Phaser 1: Stomp | 0.50 Hz | 0% |
|
| Phaser 1: Rack | 0.50 Hz | –75% |
|
| Phaser 1: Warm | 1.00 Hz | –26% |
|
| Phaser 1: Bright | 0.50 Hz | –76% |
|
| Speed | Depth |
|
| Tremolo | 5.00 Hz | 50% |
|
Delay Factory Settings
Type | Mix | Time | Feedback |
| Digital | 30% | 150 ms | 30% |
| Analog | 30% | 275 ms | 20% |
| Tape | 30% | 350 ms | 30% |
Reverb Type Factory Settings
Type | Bal. | Time | Time Range |
| Plate | 50% | 20% | 0-4.6 s |
| Small | 50% | 15% | 0-0.8 s |
| Medium | 50% | 25% | 0-1.9 s |
| Large | 50% | 50% | 0-3.5 s |
| Cavern | 50% | 100% | 0-7.0 s |
Troubleshooting
If you experience problems while using this product, try the following solutions. If you still cannot solve the problem, seek online help at https://www.Bose.com/livesound If you cannot find answers to your questions there, please call the Bose Product and Technical Support Team directly at (877) 335-2673.
Problem | What to do |
T4S/T8S is plugged in, power switchis on, but no power. |
If using the T4S with an L1 Model II or 1S system:
|
T4S/T8S is on,but thereis no sound. |
If using the T4S withan L1 ModelII or 1S system:
|
Poor quality sound from a microphone or instrument connected to the T4S/T8S. |
|
| Not hearing any effects. |
|
| T4S/T8S not responding to control knobs. |
|
| Master volumecontrol has no effect. |
|
| With nothing plugged into the T4S/T8S input connectors, a slight hum or buzz is heard from the L1 system. |
|
Too much (or not enough) bass, mid-range, or high frequencies. |
|
| Poor-sounding playback of a stereo recording using a CD player, MP3 player, or other such device. |
48 kHz/24-bit operation. |
| Microphone is encountering feedback. |
|
| Aux output does not sound right. |
|
Unable to send T4S/T8S audio to a computer through a USB connection. |
48 kHz/24-bit operation. |
| T4S/T8S is not responding to flash drive. |
|
Unable to sendaudio from a computer to the T4S/T8S via USB connection. |
48 kHz/24-bit operation. |
Cleaning
- You may clean the product enclosure using only a soft dry cloth.
- Do not use any solvents, chemicals, or cleaning solutions containing alcohol, ammonia, or abrasives.
- Do not use any sprays near the product or allow liquids to spill into any openings.
Technical Information
| Mechanical | ||
| T4S | T8S |
| Dimensions (L x W x H) | 8.4" x 7.25" x 3.25" (214 mm x 184 mm x 83 mm) | 8.4" x 12.25" x 3.25" (214 mm x 311 mm x 83 mm) |
| Weight | 2.1 lbs (1.0kg) | 4.1 lbs (1.9 kg) |
| Electrical | ||
| A/D and D/A Conversion | 24 bits | |
| Sampling Rate | 48 kHz | |
| USB | 2.0 or higher, Type-Ato Type-B cable,Type-A port and Type-B port | |
| PC Requirements | Microsoft Windows 7 or higher; Mac OS 10.5 or higher | |
Pros & Cons
Pros
- High-Quality Sound: Advanced processing ensures consistent and clear sound.
- User-Friendly Interface: Intuitive controls make setup and operation easy.
- Versatility: Compatible with multiple types of input sources and Bose systems.
- Durable Design: Built to withstand regular use in various environments.
Cons
- High Price Point: May be out of budget for some users.
- Complex Features: Some users might find the array of features overwhelming.
- Limited Built-In Effects: While the effects are high-quality, some users might prefer more options.
Customer Reviews
The Bose T8S ToneMatch Audio Mixer has received rave reviews from professionals and hobbyists alike. Many users praise its ease of use, robust build quality, and exceptional sound performance. However, some users have noted that the price is quite steep for those on a budget. Common complaints include the learning curve associated with its advanced features and the lack of additional built-in effects.
Faqs
How do I connect my microphone to the Bose T8S ToneMatch Audio Mixer?
Can I use the Bose T8S with other non-Bose speakers?
How do I customize scenes on the T8S mixer?
What type of effects does the Bose T8S offer?
Is the Bose T8S suitable for outdoor events?
Can I use multiple microphones simultaneously on different channels?
How do I update the firmware of my Bose T8S mixer?
What kind of power supply does the Bose T8S require?
Is there an app available for remote control of the T8S mixer?
Does the Bose T8S have a built-in compressor?
Leave a Comment
