Brother Laser Printer Toner MFC-7860DW User Guide
Content
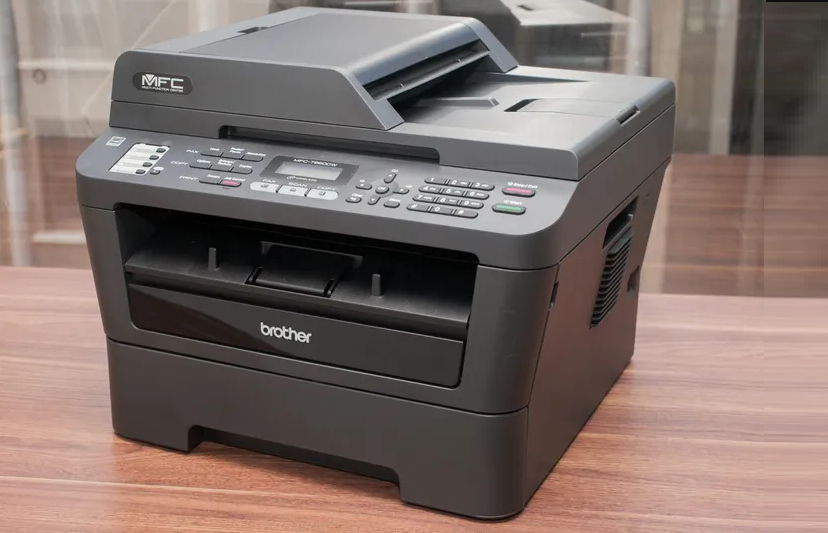
Brother Laser Printer Toner MFC-7860DW Introduction
The Brother Laser Printer Toner MFC-7860DW is a dependable all-in-one solution for effective and superior printing, copying, scanning, and faxing that will be covered in this article. This toner is perfect for use at home or in the office because it is designed to produce papers that are clear and professional. The Brother MFC-7860DW guarantees smooth operations with its strong performance, wireless networking, and automated duplex printing, assisting you in remaining productive while keeping costs low.
General information
Using the documentation
Thank you for buying a Brother machine! Reading the documentation will help you make the most of your machine.
Symbols and conventions used in the documentation
The following symbols and conventions are used throughout the documentation.
- Bold
The bold style identifies keys on the machine control panel or computer screen. - Italics
The italicized style emphasizes an important point or refers you to a related topic. Courier - New
Courier New font identifies the messages shown on the LCD of the machine.
WARNING: WARNING indicates a potentially hazardous situation which, if not avoided, could result in death or serious injuries.
CAUTION: CAUTION indicates a potentially hazardous situation which, if not avoided, may result in minor or moderate injuries.
IMPORTANT: IMPORTANT indicates a potentially hazardous situation that, if not avoided, may result in damage to property or loss of product functionality.
- Electrical Hazard icons alert you to a possible electrical shock.
- Hot Surface icons warn you not to touch machine parts that are hot.
- Notes tell you how you should respond to a situation that may arise or give tips about how the current operation works with other features.
Accessing the Advanced User's Guide, Software User's Guide, and Network User's Guide
This Basic User's Guide does not contain all the information about the machine such as how to use the advanced features of Fax, Copy, Printer, Scanner, PC-Fax and Network. When you are ready to learn detailed information about these operations, read the Advanced User's Guide, Software User's Guide, Network Glossary, and Network User's Guide that are on the Documentation CD-ROM.
Viewing Documentation
- Turn on your computer. Insert the Documentation CD-ROM into your CD-ROM drive.
Note: (Windows users) If the screen does not appear automatically, go to My Computer (Computer), double-click the CD-ROM icon, and then double-click index.html. - (Macintosh users) Double-click the Documentation CD-ROM icon, and then double-click index.html.
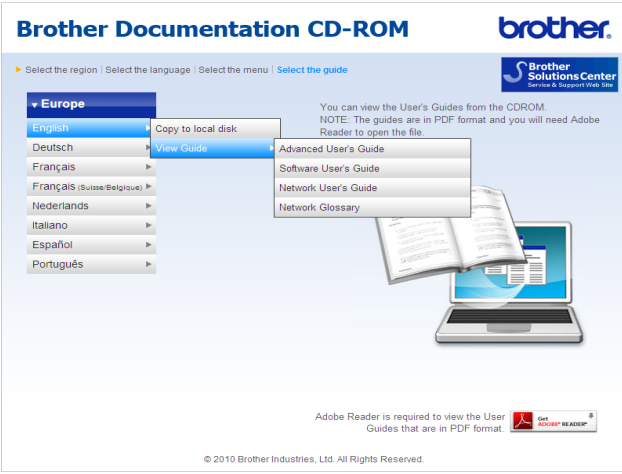
Click your country.
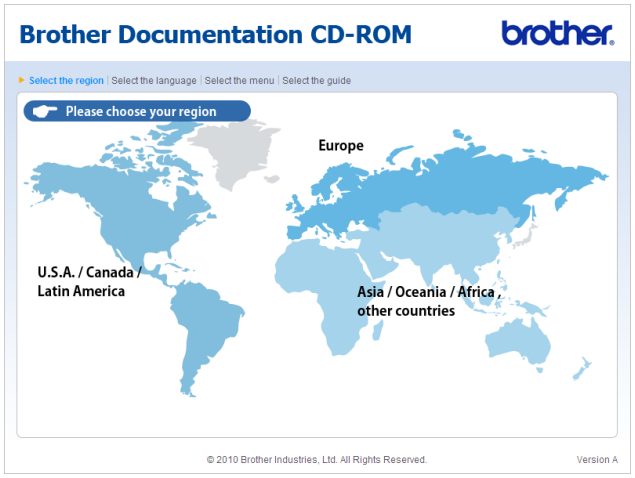
Point to your language, point to View Guide, and then click the guide you want to read.

Note
- (Windows users only) Your web browser may display a yellow bar at the top of the page that contains a security warning about Active X controls. For the page to display correctly you must click on the bar, click Allow Blocked Content, then click Yes in the Security Warning dialog box.
- (Windows users only) 1 For faster access, you can copy all user documentation in PDF format to a local folder on your computer. Point to your language, then click Copy to local disk.
Microsoft Internet Explorer 6.0 or greater.
How to find Scanning instructions
There are several ways you can scan documents. You can find the instructions as follows:
Software User's Guide
- Scanning
- ControlCenter
- Network Scanning
ScanSoft PaperPort12SE with OCR How-to-Guides (Windows)
The complete ScanSoft™ PaperPort12SE with OCR How-to-Guides can be viewed from the Help selection in the ScanSoft PaperPort12SE application.
Presto! PageManager User’s Guide (Macintosh)
Note: Presto! PageManager must be downloaded and installed before use.
The complete Presto! PageManager User’s Guide can be viewed from the Help selection in the Presto! PageManager application.
How to find Network setup instructions
Your machine can be connected to a wireless or wired network. You can find basic setup instructions in the Quick Setup Guide. If your wireless access point or router supports Wi-Fi Protected Setup or AOSS™, you can also follow the steps in the Quick Setup Guide. For more information about network setup please see the Network User's Guide.
Accessing Brother Support (Windows)
You can find all the contacts you will need, such as Web support (Brother Solutions Center) on the Installation CD-ROM.
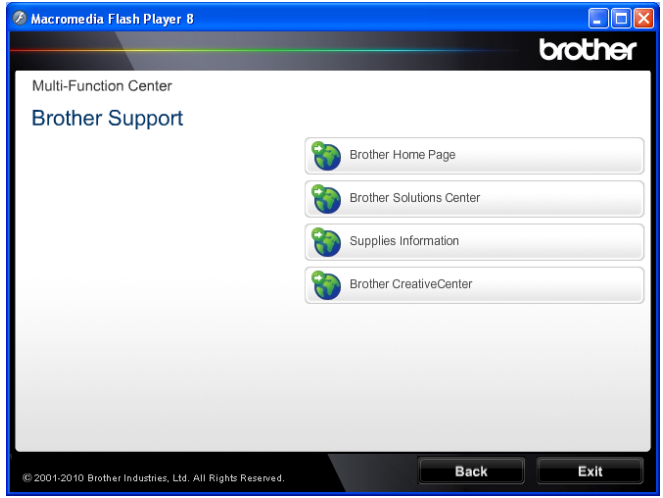
- Click Brother Support on the main menu. The following screen will appear:
- To access our website (http://www.brother.com/), click Brother Home Page.
- For the latest news and product support information (http://solutions.brother.com/), click Brother Solutions Center.
- To visit our Website for original genuine Brother Supplies (http://www.brother.com/original/), click Supplies Information.
- To access the Brother CreativeCenter (http://www.brother.com/creativecenter/) for FREE photo projects and printable downloads, click Brother CreativeCenter.
- To return to the main page, click Back or if you have finished, click Exit.
Accessing Brother Support (Macintosh)
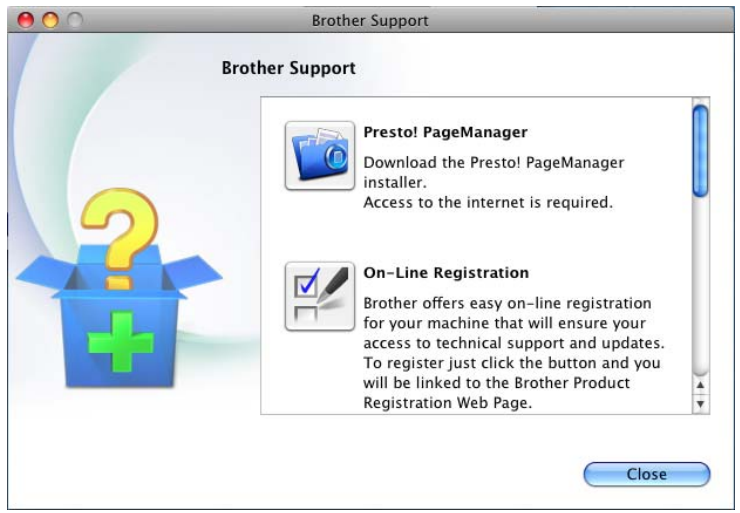
You can find all the contacts you will need, such as Web support (Brother Solutions Center) on the Installation CD-ROM. Double-click the Brother Support icon. The following screen will appear:
- To download and install Presto!PageManager, click Presto!PageManager.
- To register your machine from the Brother Product Register Page (http://www.brother.com/registration/), click On-Line Registration.
- For the latest news and product support information (http://solutions.brother.com/), click Brother Solutions Center.
- To visit our website for original Brother Supplies (http://www.brother.com/original/), click Supplies Information.
Detailed Specifications
A monochrome laser printer that can print up to 24 pages per minute (ppm) is the Brother MFC-7860DW. With the addition of supplementary paper trays, the regular 250-sheet paper capacity can be increased to 800 sheets. A 50-sheet automated document feeder (ADF) is another feature of the printer that makes scanning, copying, and faxing multi-page documents simple. With a maximum monthly duty cycle of 15,000 pages and a resolution of up to 2400 x 600 dpi, the MFC-7860DW produces text and graphics that are clear and sharp.
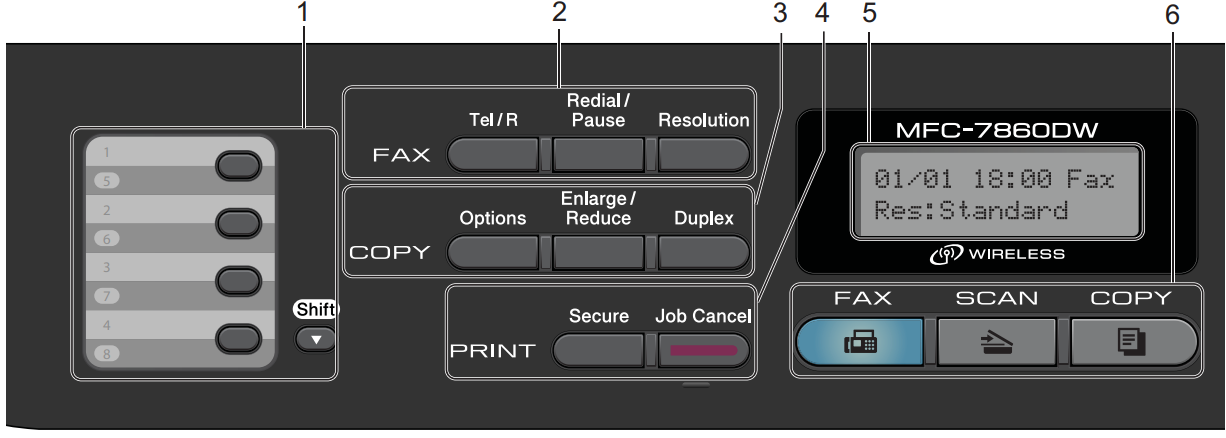
Control panel overview
MFC-7460DN and MFC-7860DW have the same keys.
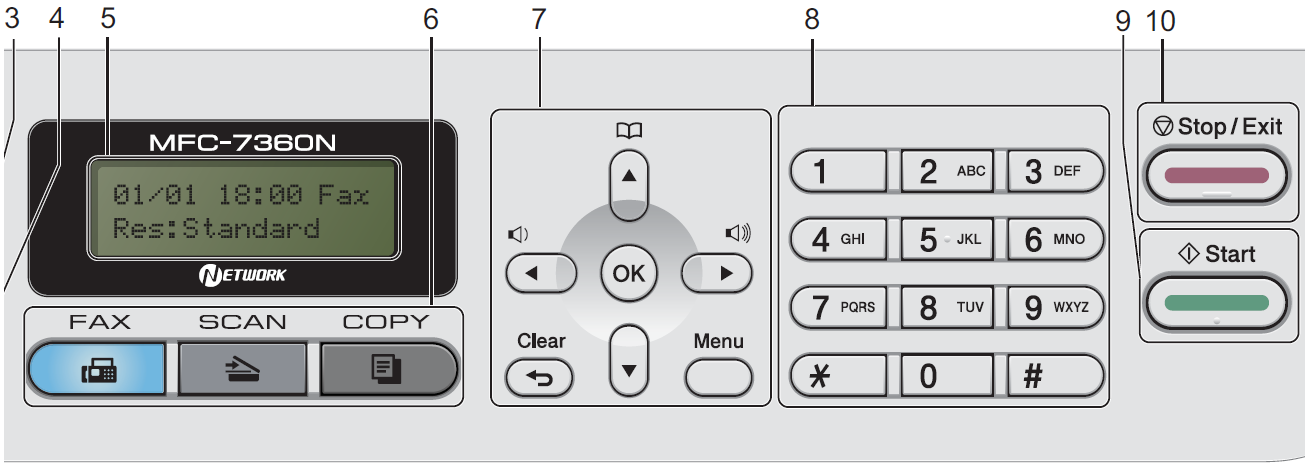
MFC-7360N

One Touch Keys
These 4 keys give you instant access to 8 previously stored numbers.
- Shift
Lets you access One Touch numbers 5 to 8 when held down.
FAX Keys
- Tel/R
This key is used to have a telephone conversation after picking up the external handset during the F/T fast double-ring.
When connected to a PBX, you can use this key to gain access to an outside line, to recall an operator, or to transfer a call to another extension. - Redial/Pause
Redials the last number called. It also inserts a pause when programming quick dial numbers or when dialing a number manually. - Resolution
Sets the resolution when sending a fax.
COPY Keys
- Options
You can quickly and easily choose temporary settings for copying. - Enlarge/Reduce
Reduces or enlarges copies. - Duplex
(For MFC-7460DN and MFC-7860DW)
You can choose Duplex to copy on both sides of the paper.
PRINT Keys
- Secure
(For MFC-7460DN and MFC-7860DW)
You can print data saved in the memory when you enter your four-digit password.
(For details about using the Secure key, see the Software User's Guide.)
When using Secure Function Lock, you can switch restricted users by holding down Shift as you press Secure. (See Secure Function Lock 2.0 in Chapter 2 of the Advanced User's Guide.) - Job Cancel
Cancels a programmed print job and clears it from the machine’s memory. To cancel multiple print jobs, hold down this key until the LCD shows Job Cancel (All).
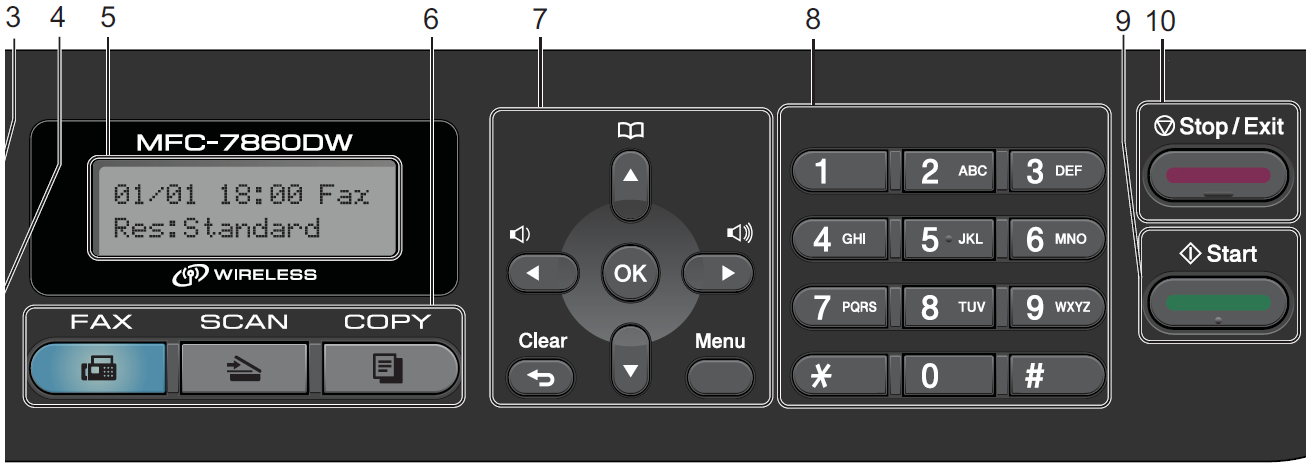
LCD
Displays messages to help you set up and use your machine.
(MFC-7860DW)
In FAX mode and SCAN mode, a four-level indicator shows the current wireless signal strength if you are using a wireless connection.

Mode Keys
 FAX
FAX
Puts the machine in Fax mode. SCAN
SCAN
Puts the machine in Scan mode. COPY
COPY
Puts the machine in Copy mode.
Menu Keys
- Clear
Deletes entered data or lets you cancel the current setting. - Menu
Lets you access the Menu to program your settings on this machine. - OK
Lets you store your settings on the machine. - Volume Keys:

Press to scroll backward or forward through menu selections. Press to change the volume when in fax or standby mode. 
Press to scroll through the menus and options. Address Book
Lets you access speed dial numbers directly.
Dialpad
- Use these keys to dial telephone and fax numbers and as a keyboard for entering information into the machine.
- The # key temporarily switches the dialing mode from Pulse to Tone during a telephone call.
Start
- Lets you start sending faxes or making copies.
Stop/Exit
- Stops an operation or exits from a menu.
Volume Settings
Ring Volume
You can choose a range of ring volume levels, from High to Off. While in Fax mode, press d or c to adjust the volume level. The LCD will show the current setting, and each key press will change the volume to the next level. The machine will keep the new setting until you change it.
You can also change the ring volume through the menu:
- Press Menu, 1, 3, 1.
- Press a or b to choose Off, Low, Med, or High. Press OK.
- Press Stop/Exit.
Beeper Volume
When the beeper is on, the machine will beep when you press a key, make a mistake, or after you send or receive a fax. You can choose a range of volume levels, from High to Off.
- Press Menu, 1, 3, 2.
- Press to choose Off, Low, Med, or High. Press OK.
- Press Stop/Exit.
Speaker Volume
You can choose a range of speaker volume levels, from High to Off.
- Press Menu, 1, 3, 3.
- Press to choose Off, Low, Med, or High. Press OK.
- Press Stop/Exit.
Description
The Brother MFC-7860DW is a lightweight, portable printer that is simple to assemble and operate. Its 2.7-inch color touchscreen display and user-friendly interface make it simple to access the printer's various capabilities. Along with a variety of connectivity choices, the MFC-7860DW supports mobile printing with Brother's iPrint&Scan app, Google Cloud Print, Apple AirPrint, and Ethernet. The printer is a flexible option for any business setting because it works with Windows, Mac, and Linux operating systems.
Setup Guide
- To set up the Brother MFC-7860DW, first remove it from the box and plug in the power cord.
- Turn on the printer and wait for it to initialize. Next, install the toner cartridge by lifting the scanner unit and opening the toner door.
- Remove the protective tape from the toner cartridge and insert it into the printer.
- Close the toner door and wait for the printer to align the toner.
- Finally, install the drivers and software on your computer or mobile device and connect to the printer via Wi-Fi, Ethernet, or USB.
Cleaning the Machine
Clean the outside and inside of the machine regularly with a dry, lint-free cloth. When you replace the toner cartridge or the drum unit, make sure to clean the inside of the machine. If printed pages are stained with toner, clean the inside of the machine with a dry, lint-free cloth.
WARNING: DO NOT use any flammable substances, spray, or organic solvents/liquids containing alcohol/ammonia to clean the outside or inside of the machine. Doing so may cause a fire or electrical shock. Refer to the "To use the product safely" section in the Safety and Legal booklet for detailed instructions on how to clean the machine.

Cleaning the Outside of the Machine
Turn off the machine. Unplug the telephone line cord first, disconnect all cables, and then unplug the power cord from the electrical socket.
Note: (For MFC-7360N and MFC-7460DN) To prevent losing any important messages,
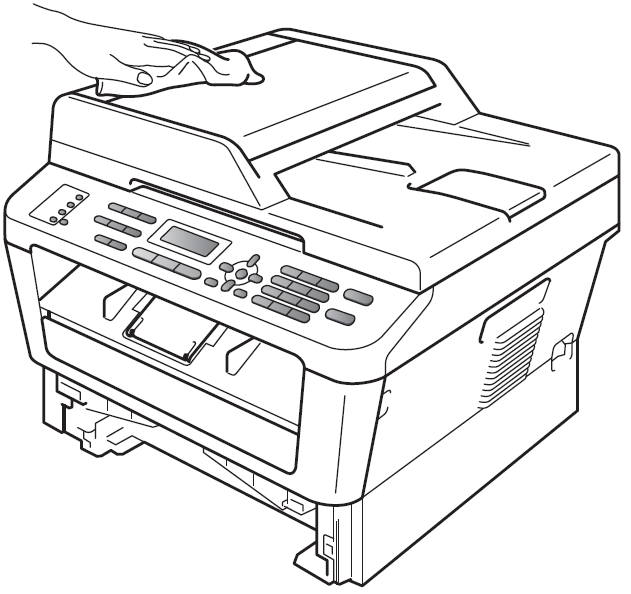
Pull the paper tray completely out of the machine.
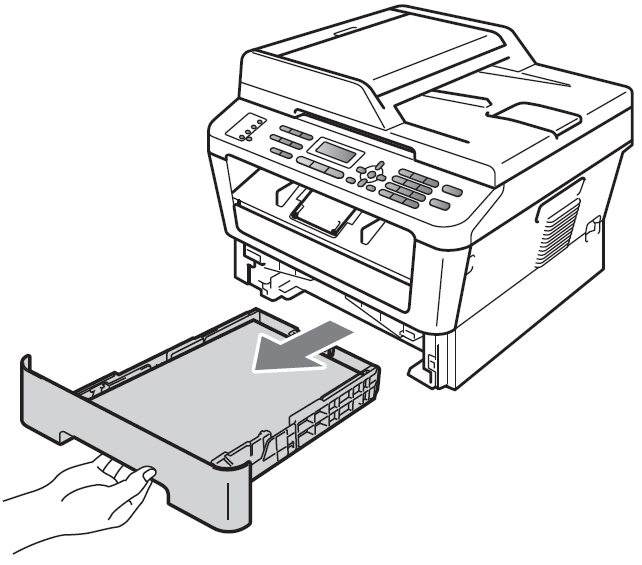
Wipe the outside of the machine with a dry, lint-free soft cloth to remove dust.
- Remove any paper that is in the paper tray.
Wipe the inside and outside of the paper tray with a dry, lint-free soft cloth to remove dust.
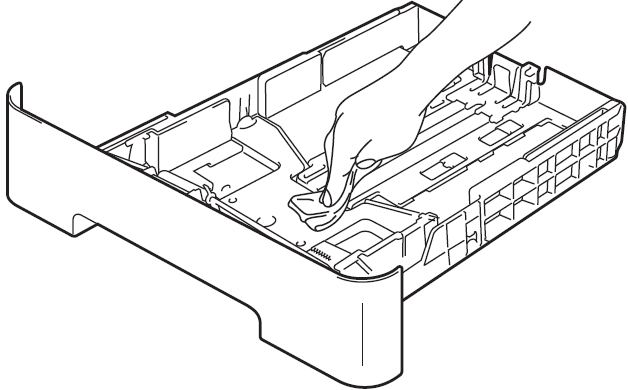
- Re-load the paper and put the paper tray firmly back in the machine.
- Plug the machine’s power cord back into the electrical socket first, connect all cables, and then plug in the telephone line cord. Turn on the machine.
Cleaning the Scanner Glass
Turn off the machine. Unplug the telephone line cord first, disconnect all cables, and then unplug the power cord from the electrical socket.
Note: (For MFC-7360N and MFC-7460DN) To prevent losing any important messages
Lift the document cover (1). Clean the white plastic surface (2) and scanner glass (3) underneath it with a soft lint-free cloth moistened with water.

In the ADF unit, clean the white bar (1) and the scanner glass strip (2) underneath it with a soft lint-free cloth moistened with water.
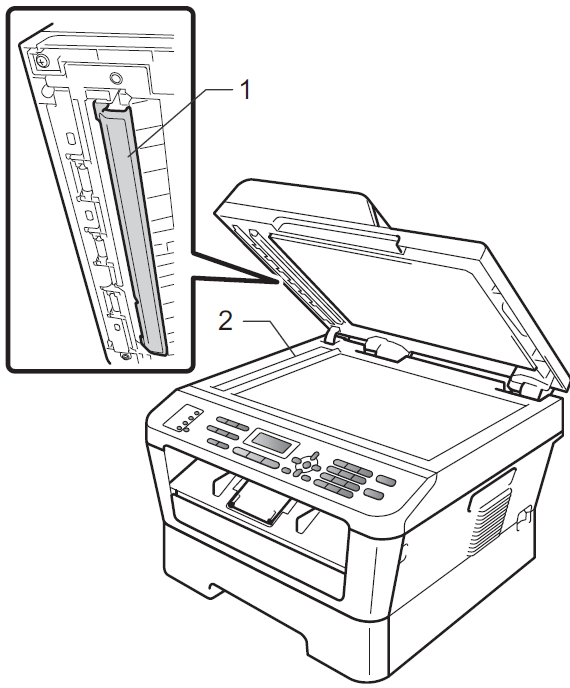
Note: In addition to cleaning the scanner glass and glass strip with a soft lint-free cloth moistened with water, run your fingertip over the glass to feel for any dirt or debris. If you feel dirt or debris, clean the glass again, concentrating on that area. You may need to repeat the cleaning process three or four times. To test, make a copy after each cleaning.
- Plug the machine’s power cord back into the electrical socket first, connect all cables, and then plug in the telephone line cord. Turn on the machine.
Cleaning the Corona Wire
If you experience print quality problems, clean the corona wire as follows:
Open the front cover and leave the machine turned on for 10 minutes to cool down.
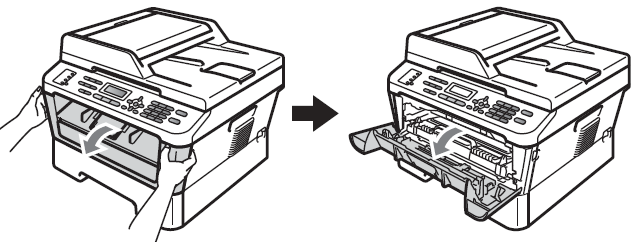
CAUTION: HOT SURFACE
After you have just used the machine, some internal parts of the machine will be extremely hot. Wait for the machine to cool down before you touch the internal parts of the machine.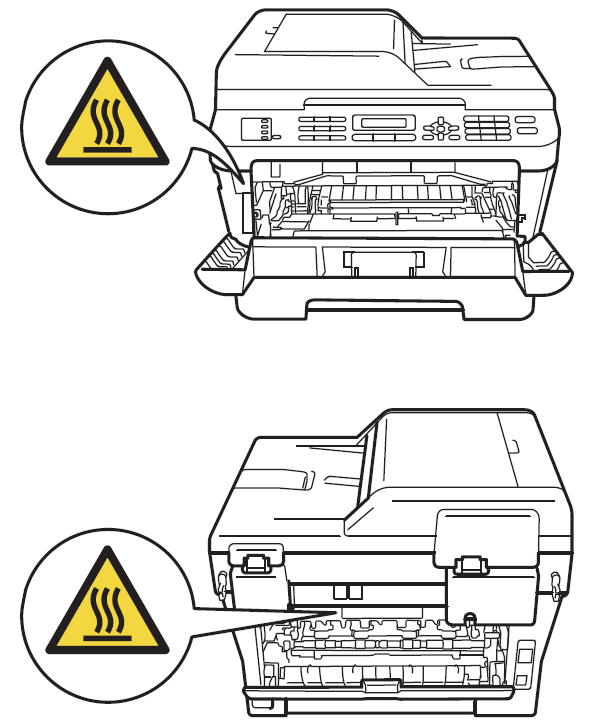
Slowly take out the drum unit and toner cartridge assembly.
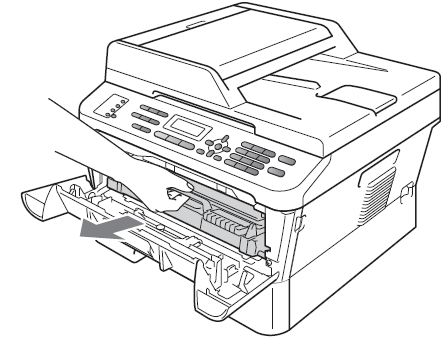
CAUTION: We recommend placing the drum unit and toner cartridge assembly on a clean, flat surface with a sheet of disposable paper or cloth underneath it in case the toner is accidentally spilled or scattered.
- Handle the toner cartridge carefully. If toner scatters on your hands or clothes, wipe or wash it off with cold water immediately.
To prevent damage to the machine caused by static electricity, DO NOT touch the electrodes shown in the illustration.
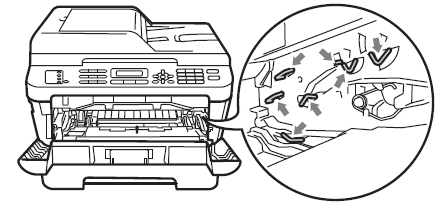
Clean the corona wire inside the drum unit by gently sliding the green tab from right to left and left to right several times.
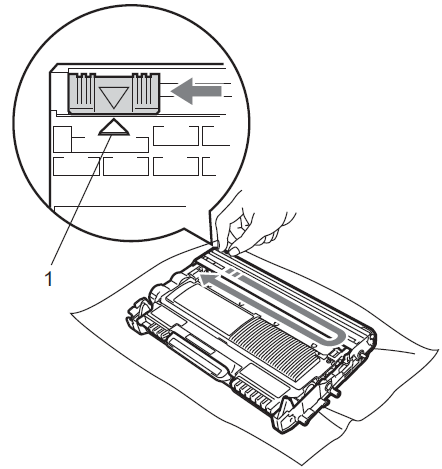
Note: Be sure to return the tab to the home position (
.png) ) (1). If you do not, printed pages may have a vertical stripe.
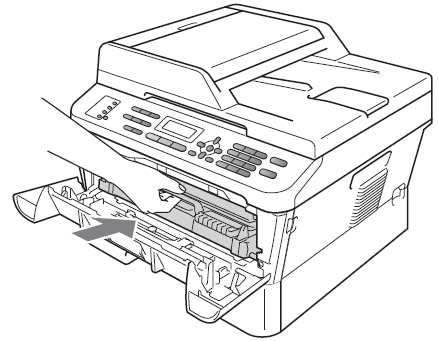
) (1). If you do not, printed pages may have a vertical stripe.Put the drum unit and toner cartridge assembly back into the machine. Close the front cover.
Troubleshooting
Error and maintenance messages B
As with any sophisticated office product, errors may occur and consumable items may need to be replaced. If this happens, your machine identifies the error or required routine maintenance and shows the appropriate message. The most common error and maintenance messages are shown below.
You can clear most errors and perform routine maintenance messages by yourself. If you need more help, the Brother Solutions Center offers the latest FAQs and troubleshooting tips: Visit us at http://solutions.brother.com/
Error Message | Cause | Action |
Access Denied | The function you want to use is restricted by Secure Function Lock. | Contact your administrator to check your Secure Function Lock Settings. |
BT Call SignOn (U.K. only) | BT Call Signis set to On. You cannot change the Receive Mode from Manual to another mode. | Set BT CallSign to Off. See BT Call Sign (U.K. only) in Chapter 5 of the Advanced User's Guide. |
CartridgeError | The toner cartridge is not installed correctly. | Pull out thedrum unit andremove the toner cartridge, then re-install the tonercartridge in the drum unit. |
Comm.Error | Poor telephone line quality caused a communication error. | Try sending the fax again or try connecting the machine to another telephone line. If the problem continues, call the telephone company and ask them to check yourtelephone line. |
ConnectionFail | You tried to poll a fax machine that is not in Polled Waiting mode. | Check the other fax machine’s polling setup. |
Cooling Down Wait for a while | The temperature of the drumunit or toner cartridge is too hot. The machine will pause its current print job and go into cooling down mode. During the cooling down mode, you will hear the cooling fan runningwhile the LCD shows Cooling Down, and Wait for a while. | Make surethat you canhear the fan in the machine spinning and that the exhaust outlet is not blocked by something. If thefan is spinning, remove any obstacles that surround the exhaust outlet, and then leave the machine turned on butdo not use it for several minutes. If the fan is not spinning do one of the following: (For MFC-7360N andMFC-7460DN ) See Transferring your faxesor Fax Journal report on page 81 before disconnecting the machine so you will not lose any important messages. Then, disconnect the machine from the power for several minutes and then reconnect it. (For MFC-7860DW) Disconnect the machine from the powerfor several minutes, then reconnect it. |
Cover is Open | The frontcover is not completely closed. | Close the front coverof the machine. |
Cover is Open | The ADF cover is not completely closed. | Close theADF cover of the machine. |
The ADFis open whileloading a document. | Close the ADF coverof the machine, then press Stop/Exit. | |
Cover is Open | The fusercover is not completely closed or paper was jammed in the back of the machine when you turned on the power. |
|
Disconnected | The other person or other person’s fax machine stopped the call. | Try to send or receive again. |
DocumentJam | The document was not inserted or fed correctly, or the document scanned from the ADF was too long. | See Document is jammed in the top of the ADF unit on page82 or Using the automatic document feeder (ADF) on page 22. |
Drum Error | The coronawire on the drum unit needs to be cleaned. | Clean the corona wire on the drum unit. (See Cleaningthe corona wire on page67.) |
Drum Stop | It is timeto replace the drum unit. | Replace the drumunit. (See Replacing the drum unit on page 61.) |
Duplex Disabled | The duplextray is removed or is not properly installed. | Carefully putthe duplex tray into the machine until it clicks into place. |
The backof the machineis not closed completely. | Close theback cover of the machine. | |
EL Error | The machine has a mechanical problem. | Open the frontcover and closeit again. |
Fuser Error | The temperature of the fuserunit does not rise to a specified temperature within the specified time. | (For MFC-7360N and MFC-7460DN ) Received fax messages stillin memory will be lost when the machine is turned off.See Transferring your faxes or Fax Journal report on page 81 beforedisconnecting the machine so you will not lose any important messages. Then, turnthe power switchoff, wait a few seconds, and then turn it on again. Leave the machine for 15 minutes with the power on. (For MFC-7860DW) Turn the power switch off, wait a few seconds, and then turn it on again. Leave the machinefor 15 minuteswith the power on. |
Init Unable XX | The machine has a mechanical problem. |
(For MFC-7860DW) Disconnect the machine fromthe power for several minutes, then reconnect it.
|
Jam Duplex | The paper is jammed in the duplex tray at the back of the machine. | (See Paper is jammed in the DuplexTray (MFC-7460DN and MFC-7860DW) on page92.) |
Jam Inside | The paperis jammed insidethe machine. | (See Paper is jammed insidethe machine on page 87.) |
Jam Rear | The paperis jammed in the back of the machine. | (See Paper is jammed at the backof the machine on page 85.) |
Jam Tray | The paper is jammed in the paper tray of the machine. | (See Paper is jammed in the standard paper tray on page 84.) |
Limit Exceeded | The Page Limit set in Secure Function Lock 2.0 for your ID was reached. | Contact your administrator to check your Secure Function Lock Settings. |
Manual Feed | Manual Feed was selected as the papersource when therewas no paper in the manualfeed slot. | Place a sheet of paper in the manual feed slot. (See Loading paperin the manualfeed slot on page 12.) |
No Paper | The machine is out of paper or paper is not correctly loaded in the paper tray. | Do one of the following:
on page 74.) |
No Response/Busy | The numberyou dialled does not answer or is busy. | Verify the numberand try again. |
No Toner | The toner cartridge is not installed correctly. | Pull out the drum unit. Take out the toner cartridge and thenput it backinto the drum unit. |
Not Available | This function is not permitted to all IDs by Secure Function Lock 2.0. | Contact your administrator to check your Secure Function Lock Settings. |
Out of Memory | The machine’s memoryis full. | Fax sending or copy operation in progress Do one of the following:
Print the faxes that are stored in the memory to restore the memory to 100%. Then turn off Fax Storage to avoid storing more faxes in the memory.(See Printing a fax from the memory in Chapter 4 of the Advanced User's Guide and Fax Storage in Chapter 4 of the Advanced User's Guide.) Print operation in process Do one of the following:
|
Print Unable XX | The machine has a mechanical problem. | Do one of the following:
(For MFC-7860DW) Disconnect the machine fromthe power for several minutes, then reconnect it.
|
Replace Drum | It is time to replacethe drum unit. | Replace the drumunit. (See Replacingthe drum uniton page 61.) |
The drum unit counterwas not reset when a new drum was installed. | Reset thedrum unit counter. (See Replacingthe drum uniton page 61.) |
Replace Toner | The machine will stop printing until you replace the toner cartridge. | If you have set the Toner setting to Stop, replace the toner cartridge with a new and unusedoriginal Brother toner cartridge. This will reset the Replace Toner mode. (See Replacing the toner cartridge on page 56.) If you have set the Toner setting to Continue, the machine will continue to print data until the LCD shows Toner Ended. For how to operate the machine in Continue mode, see Toner Settings in Chapter 1 of the Advanced User's Guide. |
Scan Unable XX | The machine has a mechanical problem. |
(For MFC-7860DW) Disconnect the machine fromthe power for several minutes, then reconnect it.
|
Size Error DX | The paper in the tray is not a suitable size for automatic duplex printing. | Load A4 paper for automatic duplex printing, and then press Start. (See Print media on page 139.) |
Size mismatch | The paperin the trayis not a correct size. | Load an appropriate size of paper in the tray, and re-setthe “Paper Size”(Menu, 1, 2, 2). (See Paper Size on page 17.) |
Toner Ended | It is time to replace thetoner cartridge. | Replace the toner cartridge with a new one. (See Replacing the toner cartridge on page 56.) |
Toner Low | The toner is low. | Buy a new tonercartridge before you get a Replace Toner message. |
Pros & Cons
Pros
- Fast printing speed
- Excellent print quality
- Wide range of connectivity options
- Low cost per page
- User-friendly interface
Cons
- Monochrome only
- No automatic duplex printing
- Small paper capacity
Faqs
What is the print speed of the Brother?
What is the maximum monthly duty cycle of the Brother Laser Printer Toner?
How do I check the toner levels on the Toner MFC-7860DW?
What is the resolution of the Brother?
How do I connect the Brother Laser Printer Toner to my wireless network?
What kind of toner cartridge does the Brother use?
How do I clear a paper jam in the Laser Printer?
Leave a Comment