Brother Printing & Scanning MFC-J895DW User Guide
Content
Brother Printing & Scanning MFC-J895DW Introduction
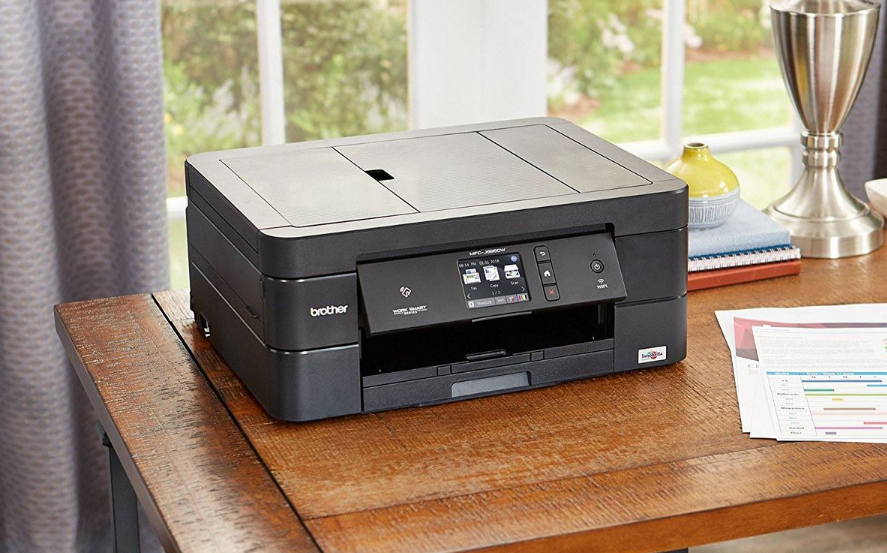
Designed to satisfy needs for home and small business users, the Brother MFC-J895DW is an all-in-one inkjet printer Combining print, scan, copy, and faxing features, this small tool provides flexibility and simplicity. It allows flawless mobile printing and scanning by including Wi-Fi and NFC, wireless connectivity choices. The MFC-J895DW offers a quick and easy way for a range of chores with its 2.7-inch color touchscreen, automated duplex printing, and high-quality output.
Supply Specifications
| Ink | The machineuses individual Black,Yellow, Cyan and Magenta ink cartridges that are separate from the print head assembly. |
Service Life of Ink Cartridge | The first time you install the ink cartridges, the machine will use extra ink to fill the ink delivery tubes. This is a one-time process that enables high- quality printing. Replacement ink cartridges will print the number of pages specified laterin this table.Starter cartridge yieldis approximately the same as that of the LC3011 replacement cartridges. |
| Replacement Supplies | <Standard Yield Black> LC3011BK <Standard Yield Yellow> LC3011Y <Standard Yield Cyan> LC3011C <Standard Yield Magenta> LC3011M Black, Yellow, Cyanand Magenta - Approximately 200 pages 1 |
<High Yield Black> LC3013BK <High Yield Yellow> LC3013Y <High Yield Cyan> LC3013C <High Yield Magenta> LC3013M Black, Yellow, Cyanand Magenta - Approximately 400 pages 1 | |
For moreinformation about replacement supplies, visit us at www.brother.com/pageyield | |
| What is Innobella? | Innobella is a range of genuine supplies offered by Brother. The name "Innobella" derives from the words "Innovation" and "Bella" (meaning "Beautiful" in Italian) and is a representation of the "innovative" technology providing you with "beautiful" and "long lasting" print results. When you print photoimages, Brother recommends Innobella glossy photo paper (BP71 series) for high quality. Brilliant prints are made easier with Innobella Ink and paper. |
General Information
Control Panel Overview
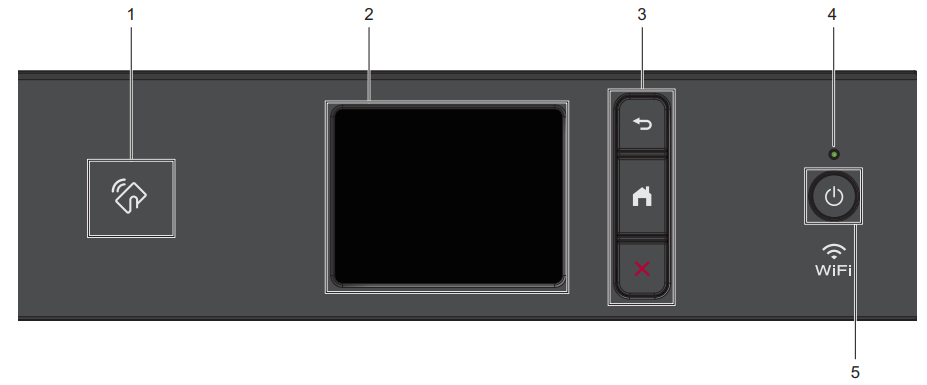
 NFC (Near Field Communication) Symbol (MFC-J895DW)
- If your Android™ device supports the NFC feature, you can print from your device or scan documents to your device easily.
- Touchscreen Liquid Crystal Display (LCD)
- Access menus and options by pressing them on the touchscreen.
- Menu Buttons
 Back: Press to go back to the previous menu.
 Home: Press to return to the Home screen.
 Cancel: Press to cancel an operation.
- LED Power Indicator
- The LED lights up depending on the machine’s power status.
- When the machine is in Sleep Mode, the LED blinks.
 Power On/Off
- Press to turn on the machine.
- Press and hold down to turn off the machine. The touchscreen displays [Shutting Down] and stays on for a few seconds before turning itself off. If you have connected an external telephone or TAD, it is always available.
- If you turn off the machine using the power button, it will still clean the print head periodically to maintain print quality. To prolong print head life, provide better ink efficiency, and maintain print quality, keep your machine connected to a power source at all times.
- Press
Touchscreen LCD Overview
You can switch Home screens by pressing ![]() left or right
left or right![]() .
.
From the Home screens, you can access Wi-Fi setup, Shortcuts, Ink levels, and Settings screens.
Home Screen

This screen shows the machine’s status when the machine is idle. When displayed, it indicates that your machine is ready for the next command.
- Date & Time
- Displays the date and time set on the machine.
 Quiet Mode
- This icon appears when the [Quiet Mode] setting is set to [On].
- The Quiet Mode setting can reduce printing noise. When Quiet Mode is turned on, the print speed becomes slower. For more detailed information, see the Online User's Guide.
 Shortcuts
- Create Shortcuts for frequently-used operations, such as sending a fax, copying, scanning, Web Connect, and Apps services.
- There are three Shortcuts screens. You can program four shortcuts on each screen.
- To display the other Shortcuts screens, press left or right.
 Wireless Status
Each icon shows the wireless network status.

You can configure wireless settings by pressing the Wireless Status button.
 Settings
- Press to access the [Settings] menu.
 Ink
Ink- Displays the available ink volume. Press to access the [Ink] menu.
- When an ink cartridge is near the end of its life or having a problem, an error icon is displayed on the ink color.
- Modes
- Press to switch to each mode: [Fax], [Copy], [Scan], [Photo], [Web], [Apps].
- For more information on [Web] and [Apps], see the Online User's Guide.
- Information Icon
- New information from Brother appears in the information bar when the notification settings such as [Message from Brother] and [Firmware Auto Check] are set to [On]. (Internet connection is needed, and data rates may apply.)
Press
 to view the details.
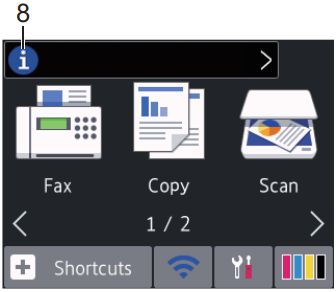
 Warning Icon
The warning icon
appears when there is an error or maintenance message; press to view the details, and then press  to return to the Home screen.
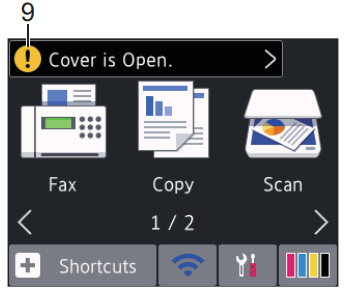
Navigate the Touchscreen
- Press your finger on the LCD to operate it. To display and access all the options, press left, right, up, or down on the LCD to scroll through them.
IMPORTANT: DO NOT press the LCD with a sharp object such as a pen or stylus. It may damage the machine.
NOTE
- This product adopts the font of ARPHIC TECHNOLOGY CO., LTD.
- DO NOT touch the LCD immediately after plugging in the power cord or turning on the machine. Doing this may cause an error.
Paper Handling
Load Paper
- Load the Paper
- Fan the stack of paper well.
The paper size determines the orientation when loading paper.
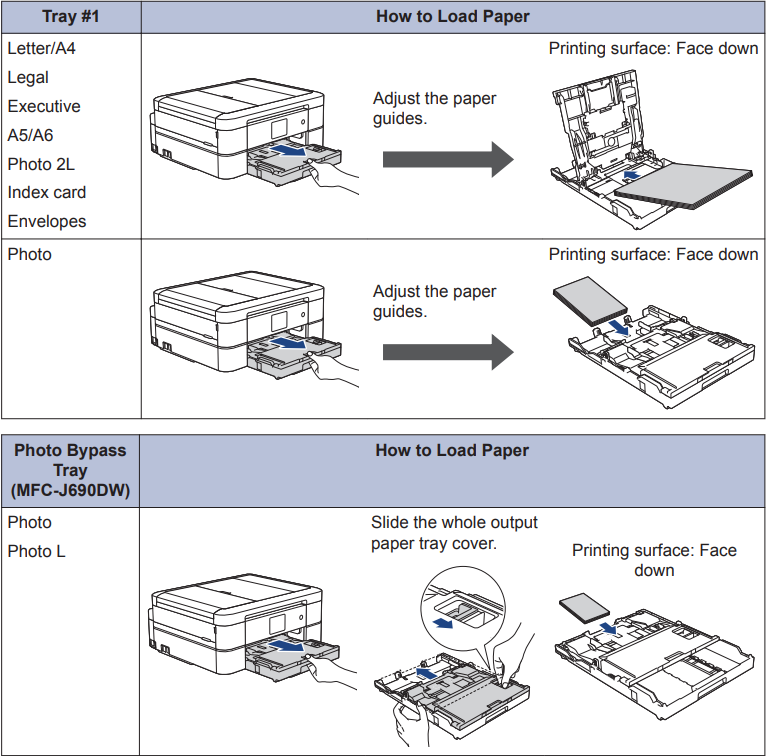
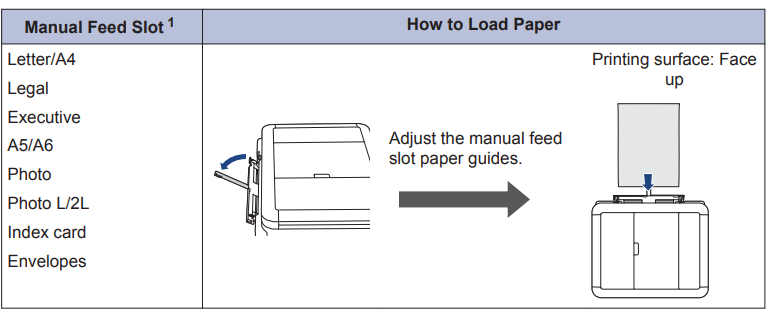
- You can load only one sheet of paper into the manual feed slot at a time.
- For more detailed information, see the Online User's Guide: Load Paper.
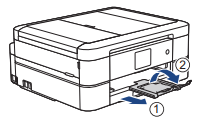
- Unfold the Paper Support Flap
Change the paper size setting in the machine's menu, if needed.
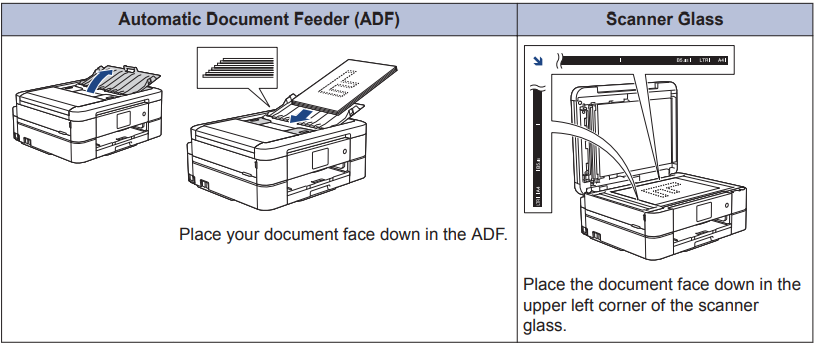
Load Documents
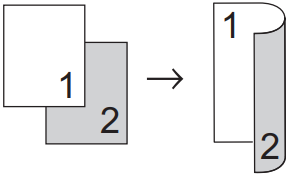
Place the document in the ADF or on the scanner glass as shown in the illustration.
Description
Easy to use and producing excellent quality, the Brother MFC-J895DW is a small and elegant all-in-one printer. While the automatic document feeder and automatic duplex printing make managing more large printing tasks simpler, the touchscreen display makes it simple to explore the several functions and settings. Printing from your smartphone or tablet is simple with the printer's selection of mobile printing options, which include AirPrint, Google Cloud Print, and Brother iPrint & Scan.
Print from Your Computer
Before attempting any printing operation, confirm the following:
- Make sure you have installed the Brother software and drivers.
- Make sure the USB or network cable is connected correctly, or that you are connected to the network using your wireless access point/router.
Print a Document (Windows)
- Select the print command in your application.
- Select Brother MFC-XXXX Printer (where XXXX is the name of your model).
- Click Print.
- Complete your print operation.
Print a Document (Mac)
- From an application, such as Apple TextEdit, click the File menu, and then select Print.
- Select Brother MFC-XXXX (where XXXX is the name of your model).
- Click Print.
- Complete your print operation.
Various Printing Features
To use the various printing features, click the printing properties or preferences button to change the printer setting:
Print on Both Sides of the Paper Automatically
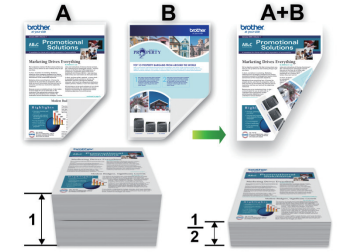
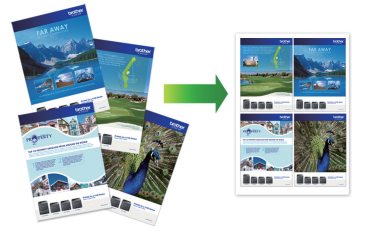
Print More Than One Page on a Single Sheet of Paper (N in 1)
For detailed information
- Windows Users: See the Online User's Guide: Print from Your Computer (Windows).
- Mac Users: See the Online User's Guide: Print from Your Computer (Mac).
Copy
Copy a Document
- Make sure you have loaded the correct size paper in the paper tray.
- Load your document.
- Press [
 ].
].The touchscreen displays
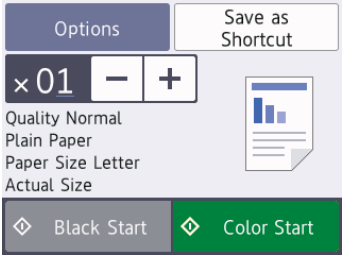
- Change the copy settings, if needed.
- When you load paper other than Letter size Plain Paper, you must change the [Paper Size] and [Paper Type] settings by pressing [Options].
 (No. of Copies)
- Press to display the keyboard on the touchscreen, and then enter the number of copies using the touchscreen keyboard. Press [OK].
- You can also press [-] or [+] on the touchscreen.
- Press
- [Options]
- Press OPTIONS to change the copy settings for the next copy only. When finished, press [OK].
- After you have finished choosing new options, you can save them by pressing the [Save as Shortcut] button.
- Press [Black Start] or [Color Start].
- To stop copying, press [].
- To stop copying, press [
Other Copy Options
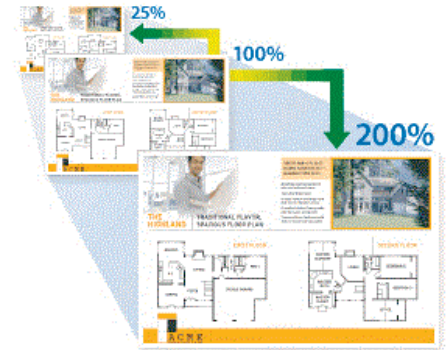
Enlarge or Reduce Copied Images
2-sided Copy
Setup Guide
Use these instructions to set up the Brother MFC-J895DW:
- Unpack the printer and cut off any wrapping.
- Turn on the printer then install the ink cartridges.
- Either connect to your network with the Ethernet wire or Wi-Fi, or the printer to your computer with the USB cable.
- Install the computer's printer program.
- Finish the setup process according on-screen directions.
Routine Maintenance
Check the Print Quality
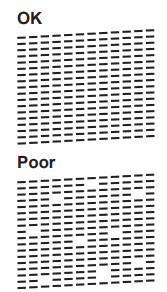
If faded or streaked colors and text appear or if text is missing on your printouts, the print head nozzles may be clogged. Print the Print Quality Check Sheet and look at the nozzle check pattern.
- Press [] > [Maintenance] > [Improve Print Quality] > [Check Print Quality].
- Press [Start]. The machine prints the Print Quality Check Sheet.
- Check the quality of the four color blocks on the sheet.
- The touchscreen asks about the print quality. Do one of the following:
- If all lines are clear and visible, press [No], and then press
 to finish the Print Quality check.
 If lines are missing (see Poor), press [Yes].
- If all lines are clear and visible, press [No], and then press
- The touchscreen asks you to check the print quality of each color. Press the number of the pattern (1–4) that most closely matches the printing result.
- Do one of the following:
- If print head cleaning is needed, press [Start] to start the cleaning procedure.
- If print head cleaning is not needed, the Maintenance screen reappears on the touchscreen. Press .
- After the cleaning procedure is finished, the touchscreen asks if you want to print the Print Quality Check Sheet again. Press [Yes], and then press [Start]. The machine prints the Print Quality Check Sheet again. Check the quality of the four color blocks on the sheet again.
If you clean the print head and the print has not improved, try installing a Genuine Brother Brand replacement ink cartridge for each problem color. Try cleaning the print head again. If the print has not improved, contact Brother Customer Service.
IMPORTANT: DO NOT touch the print head. Touching the print head may cause permanent damage and may void the print head's warranty.
When a print head nozzle is clogged, the printed sample looks like this.
After the print head nozzle is cleaned, the lines are gone.
Check the Print Alignment from Your Brother Machine
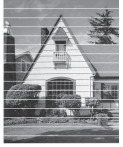
If your printed text becomes blurred or images become faded after transporting the machine, adjust the print alignment.
- Press [Settings] > [Maintenance] > [Improve Print Quality] > [Alignment].
- Press [Next].
- Press [Yes] after a confirmation message if a print quality check has been completed appears on the LCD.
- Press [Auto] or [Manual].
- Select the paper size to print the alignment check sheet on.
- Load specified size paper in the tray, and then press [Start]. The machine prints the Alignment Check Sheet.
- Follow the instructions on the LCD.
- If you are selecting the [Auto] mode, the print alignment is automatically adjusted by scanning the alignment check sheet.
- If you are selecting the [Manual] mode, you need to input information printed on the alignment check sheet manually.
When the print alignment is not adjusted correctly, text looks blurry or crooked, like this.

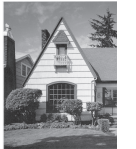
After the print alignment is adjusted correctly, text looks like this.

Troubleshooting
Identify the Problem
Even if there seems to be a problem with your machine, you can correct most problems yourself. First, check the following:
- The machine's power cord is connected correctly and the machine's power is on.
- All of the machine's orange protective parts have been removed.
- The ink cartridges are installed correctly.
- The Scanner Cover and the Jam Clear Cover are fully closed.
- Paper is inserted correctly in the paper tray.
- The interface cables are securely connected to the machine and the computer, or the wireless connection is set up on both the machine and your computer.
- (For network models) The access point (for wireless), router, or hub is turned on and its link button is blinking.
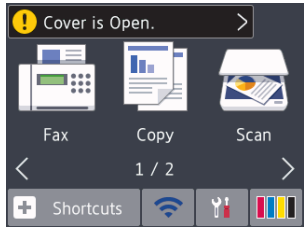
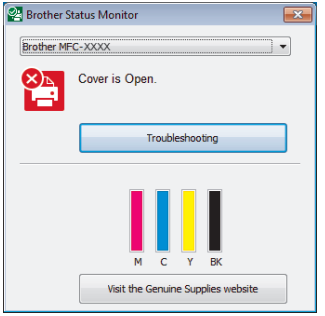
To find the error and the solution, check the LCD or the machine's status in Status Monitor on your computer.
| Using the LCD | Using the StatusMonitor |
|
 |
Error and Maintenance Messages
The most common error and maintenance messages are shown in the table. For more detailed information, see the Online User's Guide.
You can correct most errors and perform routine maintenance yourself. If you need more tips, go to your model's FAQs & Troubleshooting page on the Brother Solutions Center at support.brother.com.
(MFC-J895DW) If the touchscreen displays error messages and your Android™ device supports the NFC feature, touch your device to the NFC symbol on the control panel to access the Brother Solutions Center and browse the latest FAQs from your device. (Your mobile telephone provider's message and data rates may apply.)
Make sure the NFC settings of both your Brother machine and your Android™ device are set to On.
| Error Message | Action |
| B&W PrintOnly Replace ink. | One or moreof the colorink cartridges havereached the end of their lives. Replace the inkcartridges. For more detailed information, see the Online User's Guide: Replace the Ink Cartridges. The machine maystop all printoperations and you may not be able to use the machine until you install a new ink cartridge in the following cases:
|
| Cannot Detect | Remove the usedink cartridge andinstall a newone. |
Use a new GenuineBrother Ink Cartridge. If the erroris not cleared, call Brother Customer Service. | |
Take out the new inkcartridge and reinstall it slowly and firmly untilit locks into place. For more detailed information, see the Online User's Guide: Replace the Ink Cartridges. | |
| Slowly turn theink cartridge so that theink supply portis pointing downward, and then reinstall the cartridge. | |
Check the model numbers of the ink cartridges and install the correct ink cartridges. See Related Information: Supply Specifications at the end of this section. | |
| Cannot DetectInk Volume | Use a new GenuineBrother Ink Cartridge. If the erroris not cleared, call Brother Customer Service. |
Jam A Inside/ Front Repeat JamA Inside/Front | Remove thejammed paper. For more detailed information, see the Online User's Guide: Printer Jam or Paper Jam. |
Make surethe paper guidesare set to the correctpaper size. DO NOT extend the paper traywhen you loadA5 or smallersize paper. | |
| Do not putmore than one sheet of paper in the manualfeed slot at any one time. Wait until the touchscreen prompts you to loadanother sheet of paper before you feed the next sheet of paper in the manual feed slot. | |
JamB Front Repeat Jam B Front | Remove thejammed paper. For more detailed information, see the Online User's Guide: Printer Jam or Paper Jam. |
Make surethe paper guidesare set to the correctpaper size. DO NOT extend the paper traywhen you loadA5 or smallersize paper. | |
| JamC Rear | Remove thejammed paper. For more detailed information, see the Online User's Guide: Printer Jam or Paper Jam. |
Make surethe paper guidesare set to the correctpaper size. DO NOT extend the paper traywhen you loadA5 or smallersize paper. | |
Clean the paper pick-uprollers. For more detailed information, see the Online User'sGuide: Clean the Paper Pick-up Rollers. | |
| LowTemperature | After warming the room, allowthe machine to warm up to room temperature. Try again when the machine has warmed up. |
| Media is Full. | Your machine can only saveto your memorycard or USBflash drive if it contains fewer than 999 files. Delete unused files and try again. |
| Delete unused filesfrom your memorycard or USB flash driveto make some free space, and then try again. | |
| NoCaller ID | There is no incoming callhistory. You did not receivecalls or you have not subscribed to the Caller ID service from your telephone company. To use the Caller ID feature, callyour telephone company. For more detailed information, see theOnline User's Guide: Caller ID. |
| NoInk Cartridge | Remove the new ink cartridge and re-install it slowly and firmly untilit locks into place. For more detailed information, see the Online User's Guide: Replace the Ink Cartridges. |
| Tray Settings | This message is displayed when the setting to confirm thepaper type and size is enabled. To not displaythis confirmation message, change the setting to Off. For more detailed information, see the Online User's Guide: Change the Check Paper Size Setting. |
Unable to Clean XX Unable to Initialize XX Unable to Print XX | A foreign object, such as a paperclip or a piece of ripped paper,is in the machine. Open the scanner cover and remove any foreign objects and paper scraps from inside the machine. If the error message continues, disconnect the machinefrom the powerfor several minutes, and then reconnect it. If you cannot printreceived faxes, transfer them to anotherfax machine or to your computer. For more detailed information, see the Online User'sGuide: Transfer Your Faxes or Fax Journal Report. |
| Unable to Scan XX | Disconnectthe machine from the powerfor several minutes, and then reconnect it. If you cannot printreceived faxes, transfer them to anotherfax machine or to your computer. For more detailed information, see the Online User'sGuide: Transfer Your Faxes or Fax Journal Report. |
Unusable Device Disconnect device from front connector & turn machine off & then on | A brokendevice is connected to the USB direct interface. Unplug the device from the USB direct interface, then press to turn the machine off and then on again. |
Unusable Device Please disconnect USB device. | A USB deviceor USB flashdrive that is not supported has been connected to the USB direct interface. Unplug the devicefrom the USB direct interface. Turn the machineoff and then on again. |
Wrong Ink Cartridge | The ink cartridge modelnumber is not compatible withyour machine. Verify whetherthe cartridge modelnumber will work with your machine. See Related Information: Supply Specifications at the end of this section. |
| Wrong Ink Color | Check which ink cartridges are not matchedby color to their ink cartridge positions and move them to their correct positions. |
Pros & Cons
Pros
- Fast printing speeds
- Excellent print quality
- Compact and stylish design
- Range of convenient features
- Mobile printing options
Cons
- Ink cartridges may need to be replaced frequently
- Paper capacity could be larger
Faqs
How should my Brother MFC-J895DW printer be first set up?
The Brother Printing & Scanning MFC-J895DW uses what kind of ink?
How can I connect Wi-Fi to my Brother MFC-J895DW?
Can I print from my Brother MFC-J895DW from a mobile device?
How should I replace the Brother MFC-J895DW's ink cartridges?
Which paper kinds and sizes would fit the Brother MFC-J895DW?
Does the Brother MFC-J895DW provide duplex printing capability?
Q: Should my brother MFC-J895DW fail to print correctly, what should I do?
How do I change the firmware on my Brother MFC-J895DW?
Does the Brother MFC-J895DW print borderless images?
Leave a Comment