Canon Digital Camera PowerShot SX50 HS User Guide
Content
Introduction
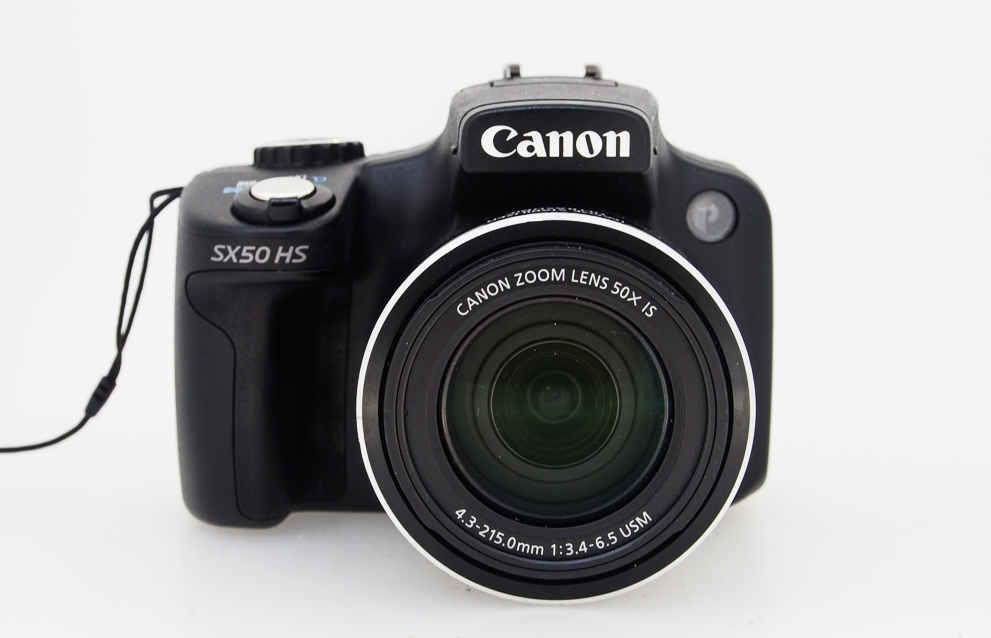
Digital Camera PowerShot is a versatile compact camera renowned for its impressive 50x optical zoom, equivalent to a focal length of 24-1200mm. With a 12.1-megapixel CMOS sensor and DIGIC 5 processor, it delivers high-quality images and full HD video recording capabilities. Designed for both amateur and experienced photographers, it features a vari-angle LCD screen and advanced shooting modes. Priced at approximately $600, it offers exceptional zoom versatility for capturing distant subjects.
Specifications
SX50 HS comes with several key features that make it a compelling choice:
- 50x Optical Zoom Lens: Extends from 24mm to 1200mm (35mm equivalent), allowing for wide-angle shots and extreme telephoto capabilities.
- 12.1-Megapixel CMOS Sensor: Combined with the DIGIC 5 image processor, this sensor delivers high-quality images and excellent low-light performance.
- Full HD Video Recording: Capture videos at 1080p resolution at 24fps.
- 3.0-Inch Vari-Angle LCD: Offers flexible viewing angles, making it easier to compose shots from different perspectives.
- Smart AUTO Mode: Automatically detects scenes and adjusts settings accordingly for optimal results.
Package Contents
Before use, make sure the following items are included in the package. If anything is missing, contact your camera dealer.
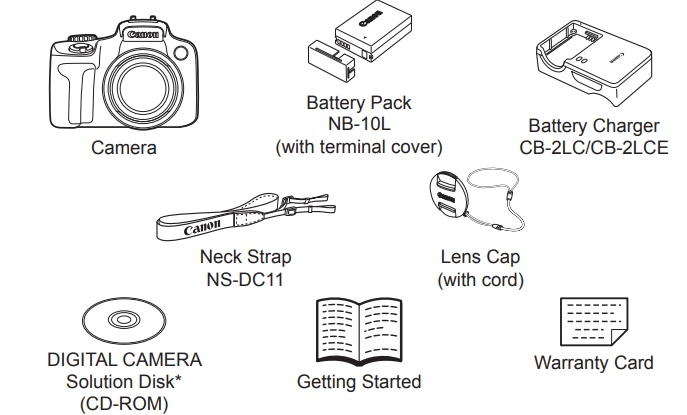
Contains software and PDF manuals (= 28).
A memory card is not included (see below).
Compatible Memory Cards
The following memory cards (sold separately) can be used, regardless of capacity.
- SD memory cards*
- SDHC memory cards*
- SDXC memory cards*
- Eye-Fi cards
Conforms to SD specifications. However, not all memory cards have been verified to work with the camera.
About Eye-Fi Cards
This product is not guaranteed to support Eye-Fi card functions (including wireless transfer). In case of an issue with an Eye-Fi card, please check with the card manufacturer.
Also note that an approval is required to use Eye-Fi cards in many countries or regions. Without approval, use of the card is not permitted. If it is unclear whether the card has been approved for use in the area, please check with the card manufacturer.
Preliminary Notes and Legal Information
- Take and review some test shots initially to make sure the images were recorded correctly. Please note that Canon Inc., its subsidiaries and affiliates, and its distributors are not liable for any consequential damages arising from any malfunction of a camera or accessory, including memory cards, that results in the failure of an image to be recorded or to be recorded in a way that is machine readable.
- Images recorded by the camera are intended for personal use. Refrain from unauthorized recording that infringes on copyright law, and note that even for personal use, photography may contravene copyright or other legal rights at some performances or exhibitions, or in some commercial settings.
- The camera warranty is valid only in the area of purchase. In case of camera problems while abroad, return to the area of purchase before contacting a Canon Customer Support Help Desk.
- Although the LCD monitor and viewfinder are produced under extremely high-precision manufacturing conditions and more than 99.99% of the pixels meet design specifications, in rare cases some pixels may be defective or may appear as red or black dots. This does not indicate camera damage or affect recorded images.
- The LCD monitor may be covered with a thin plastic film for protection against scratches during shipment. If covered, remove the film before using the camera.
- When the camera is used over an extended period, it may become warm. This does not indicate damage.
Digital Camera PowerShot Initial Preparations
Prepare for shooting as follows.
Attaching Accessories
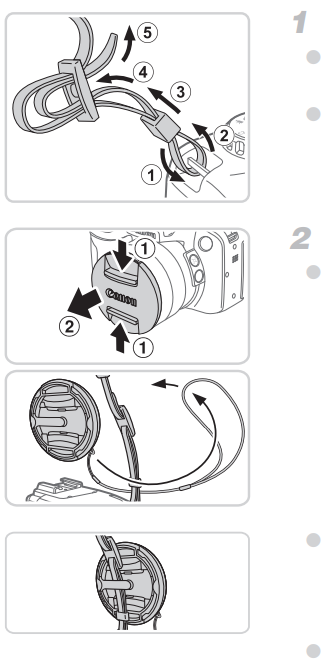
- Attach the strap.
- Attach the included strap to the camera as shown.
- On the other side of the camera, attach the strap the same way.
- Attach the lens cap to the strap.
- Remove the lens cap from the camera and attach the lens cap cord to the strap.
- Always remove the lens cap before turning the camera on. Try clipping the lens cap to the neck strap when the cap is not in use.
- Keep the lens cap on the lens when the camera is not in use.
Holding the Camera
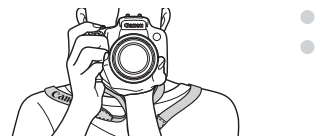
- Place the strap around your neck.
- When shooting, keep your arms close to your body and hold the camera securely to prevent it from moving. If you have raised the flash, do not rest your fingers on it.
Charging the Battery
Before use, charge the battery with the included charger. Be sure to charge the battery initially, because the camera is not sold with the battery charged.
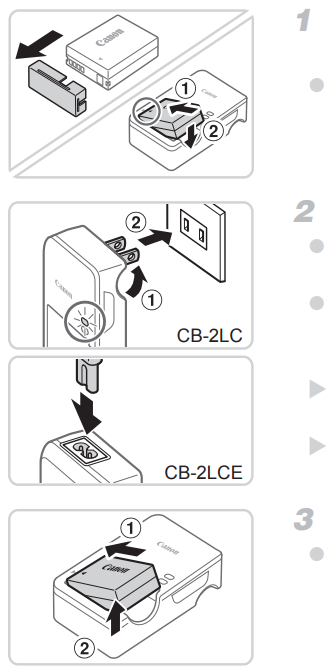
- Remove the battery cover and insert the battery in the charger.
Remove the cover from the battery, align the ▲ marks on the battery and charger, and insert the battery by pushing it in (1) and down (2). - Charge the battery.
CB-2LC: Flip out the plug (1) and plug the charger into a power outlet (2).
CB-2LCE: Plug the power cord into the charger, then plug the other end into a power outlet.- The charging lamp turns orange and charging begins.
- When the charging is finished, the lamp turns green.
- Remove the battery.
After unplugging the battery charger, remove the battery by pushing it in (1) and up (2).
NOTE
- To protect the battery and keep it in optimal condition, do not charge it continuously for more than 24 hours.
- For battery chargers that use a power cord, do not attach the charger or cord to other objects. Doing so could result in malfunction or damage to the product.
Description
Canon is built with a sturdy design and ergonomic grip, making it comfortable to hold and use over extended periods. The vari-angle LCD screen allows for creative shooting angles, while the electronic viewfinder provides an alternative way to frame your shots. This camera also features built-in Wi-Fi connectivity for easy image transfer and sharing. With its robust set of features, the PowerShot SX50 HS is well-suited for photographers who want flexibility without the bulk of a DSLR system.
Setting Menu
Customize or adjust basic camera functions for greater convenience
Adjusting Basic Camera Functions
Silencing Camera Operations
Silence camera sounds and movies as follows.
- Choose [Mute], and then choose [On].
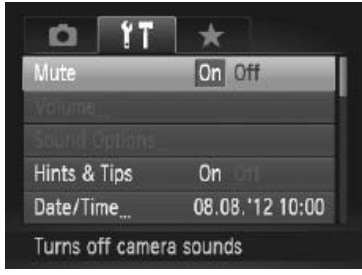
TIP
- Operation can also be silenced by holding down the ▲ button as you turn the camera on.
- Sound is not played during movies if you mute camera sounds (= 160). To restore sound during movies, press the <o> button. Adjust volume with the
 buttons, as needed.
Adjusting the Volume
Adjust the volume of individual camera sounds as follows.
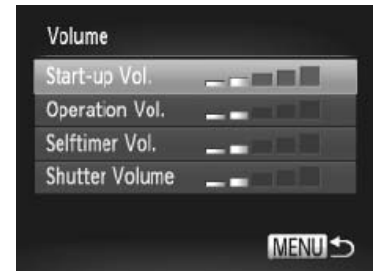
- Choose [Volume], and then press the
 button.
 - Choose an item, and then press the
 buttons to adjust the volume.
Customizing Sounds
Customize camera operating sounds as follows.
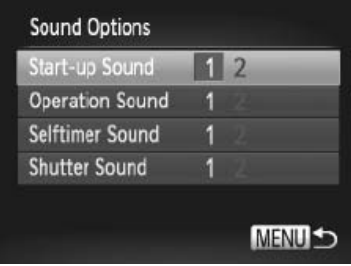
- Choose [Sound Options], and then press the
 button.
 - Choose an item, and then press the
 buttons to choose an option.
- Preset sounds (cannot be modified)
- Preset sounds
Can be changed by using the included software.
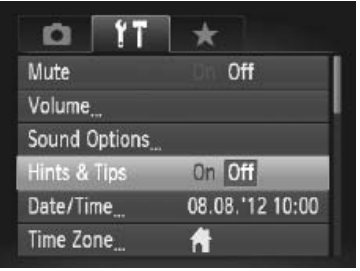
Hiding Hints and Tips
- Choose [Hints & Tips], and then choose [Off].
Date and Time
Adjust the date and time as follows.
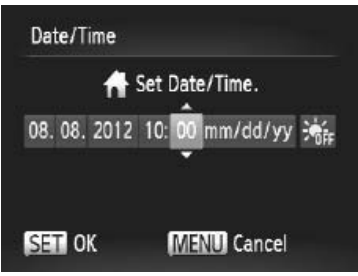
- Access the [Date/Time] screen.
Choose [Date/Time], and then press the button.
 - Configure the setting.
Press the buttons to choose an option, and then adjust the setting, either by pressing the
 buttons or turning the
 dial.
dial.
World Clock
To ensure that your shots will have the correct local date and time when you travel abroad, simply register the destination in advance and switch to that time zone. This convenient feature eliminates the need to change the Date/ Time setting manually.
Before using the world clock, be sure to set the date and time and your home time zone.
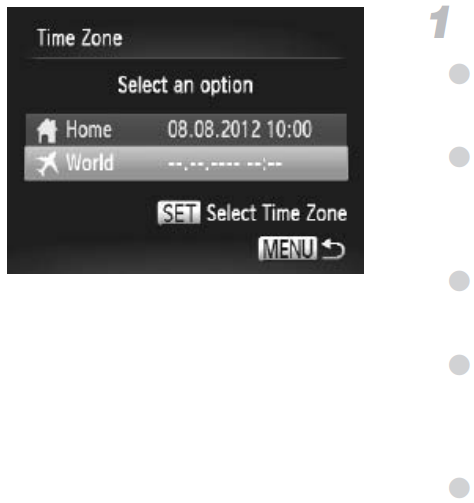
- Specify your destination.
- Choose [Time Zone], and then press the
 button.
 - Press the
 buttons or turn the
  dial to choose
  ], and then press the
 button.
 - Press the <q><r> buttons or turn the
 dial to choose the destination.
 - To set daylight saving time (1 hour ahead), press the <o><p> buttons to choose
 .
. Press the
 button.
- Choose [Time Zone], and then press the
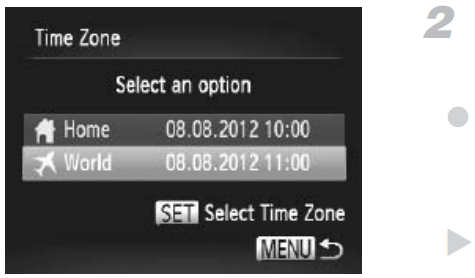
- Switch to the destination time zone.
- Press the
 buttons or turn the <5> dial to choose
 ], and then press the
 button.
[
 ] is now shown on the shooting screen
- Press the
Screen Brightness
Adjust screen brightness as follows. Screen and viewfinder brightness can be set separately. Activate the desired display in advance by pressing the <l> button.
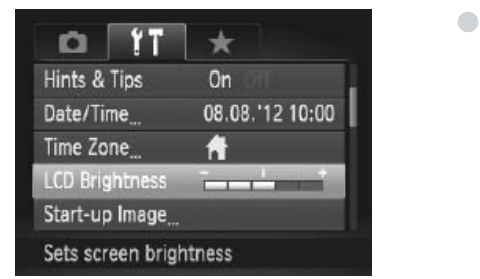
- Choose [LCD Brightness], and then press the
 buttons to adjust the brightness.
For maximum brightness, press and hold the <DISP> button for at least one second when the shooting screen is displayed or when in a single-image display. (This will override the [LCD Brightness] setting on the tab.) To restore the original brightness, press and hold the <DISP> button again for at least one second or restart the camera.
Setup Guide
To get started with your SX50 HS:
- Insert the battery and memory card into their respective slots.
- Turn on the camera by pressing the power button.
- Set your language and date/time settings using the screen menu.
- Configure any additional settings such as auto-focus mode or white balance as needed.
- Pair the camera with your smartphone or computer via Wi-Fi for image transfer if desired.
Safety Precautions
- Before using the product, please ensure that you read the safety precautions described below. Always ensure that the product is used correctly.
- The safety precautions noted on the following pages are intended to prevent injuries to yourself and other persons, or damage to the equipment.
- Be sure to also check the guides included with any separately sold accessories you use.
Warning Denotes the possibility of serious injury or death.
- Do not trigger the flash in close proximity to people’s eyes. Exposure to the intense light produced by the flash could damage eyesight. In particular, remain at least 1 meter (39 inches) away from infants when using the flash.
- Store this equipment out of the reach of children and infants. Strap: Putting the strap around a child’s neck could result in asphyxiation.
- Use only recommended power sources.
- Do not attempt to disassemble, alter or apply heat to the product.
- Avoid dropping or subjecting the product to severe impacts.
- To avoid the risk of injury, do not touch the interior of the product if it has been dropped or otherwise damaged.
- Stop using the product immediately if it emits smoke, a strange smell, or otherwise behaves abnormally.
- Do not use organic solvents such as alcohol, benzine, or thinner to clean the product.
- Do not let the product come into contact with water (e.g. sea water) or other liquids.
- Do not allow liquids or foreign objects to enter the camera.
- This could result in electrical shock or fire.
- If liquids or foreign objects come into contact with the camera interior, immediately turn the camera off and remove the battery.
- If the battery charger becomes wet, unplug it from the outlet and consult your camera distributor or a Canon Customer Support Help Desk.
- Do not look through the viewfinder at bright light sources (such as the sun on a clear day).
- This could damage your eyesight.
- Use only the recommended battery.
- Do not place the battery near or in direct flame.
- Unplug the power cord periodically, and using a dry cloth, wipe away any dust and dirt that has collected on the plug, the exterior of the power outlet, and the surrounding area.
- Do not handle the power cord with wet hands.
- Do not use the equipment in a manner that exceeds the rated capacity of the electrical outlet or wiring accessories. Do not use if the power cord or plug are damaged, or not fully plugged into the outlet.
- Do not allow dirt or metal objects (such as pins or keys) to contact the terminals or plug.
- The battery may explode or leak, resulting in electrical shock or fire. This could cause injury and damage the surroundings. In the event that a battery leaks and the battery electrolyte contacts eyes, mouth, skin or clothing, immediately flush with water.
- Turn the camera off in places where camera use is prohibited.
The electromagnetic waves emitted by the camera may interfere with the operation of electronic instruments and other devices. Exercise adequate caution when using the camera in places where use of electronic devices is restricted, such as inside airplanes and medical facilities. - Do not play the supplied CD-ROM(s) in any CD player that does not support data CD-ROMs.
It is possible to suffer hearing loss from listening with headphones to the loud sounds of a CD-ROM played on an audio CD player (music player). Additionally, this could damage the speakers.
Caution Denotes the possibility of injury.
- When holding the camera by the strap, be careful not to bang it, subject it to strong impacts or shocks, or let it get caught on other objects.
- Be careful not to bump or push strongly on the lens.
This could lead to injury or damage the camera. - Be careful not to subject the screen to strong impacts.
If the screen cracks, injury may result from the broken fragments. - When using the flash, be careful not to cover it with your fingers or clothing. This could result in burns or damage to the flash.
- Avoid using, placing or storing the product in the following places:
- Places subject to strong sunlight
- Places subject to temperatures above 40 °C (104 °F)
- Humid or dusty areas
- These could cause leakage, overheating or an explosion of the battery, resulting in electrical shock, fire, burns or other injuries.
High temperatures may cause deformation of the camera or battery charger casing. - The slideshow transition effects may cause discomfort when viewed for prolonged periods.
Troubleshooting
Common issues and their solutions:
- Blank Screen: Check if the battery is fully charged or replace it if necessary.
- Focus Issues: Ensure that autofocus mode is selected and try cleaning the lens if it's dirty.
- Memory Card Errors: Format the memory card in-camera or replace it if it's corrupted.
- Wi-Fi Connectivity Problems: Restart both your camera and device, then retry connecting.
PowerShot Pros & Cons
Pros
- Powerful Zoom Lens: The 50x optical zoom offers unparalleled reach in its class.
- High-Quality Images: Excellent image quality thanks to the 12.1-megapixel CMOS sensor and DIGIC 5 processor.
- Versatile Shooting Options: Multiple shooting modes including Full HD video recording.
Cons
- Bulkier Design: Compared to smaller point-and-shoot cameras, it may be less portable due to its zoom lens.
- No RAW Image Capture: Limited to JPEG format which might not be ideal for professional editing needs.
Customer Reviews
Customers praise the PowerShot for its impressive zoom capabilities and good low-light performance. However, some users find it slightly bulky compared to other point-and-shoot cameras. Common complaints include occasional autofocus delays and limited manual controls compared to DSLRs.
Faqs
What is the maximum optical zoom of the Canon?
What is the resolution of video recording on the PowerShot SX50 HS?
Is there an electronic viewfinder on the Canon PowerShot?
What type of sensor does the SX50 use?
How do I format a memory card in my Canon?
Can I use external flash units with my SX50 HS?
What are some common shooting modes available on this camera?
Is there any image stabilization feature available in this camera?
Leave a Comment
