Brother P-Touch PT-P300BT Electronic Labeling System User Guide
Content
Introducing the Brother P-Touch PT-P300BT Electronic Labeling System
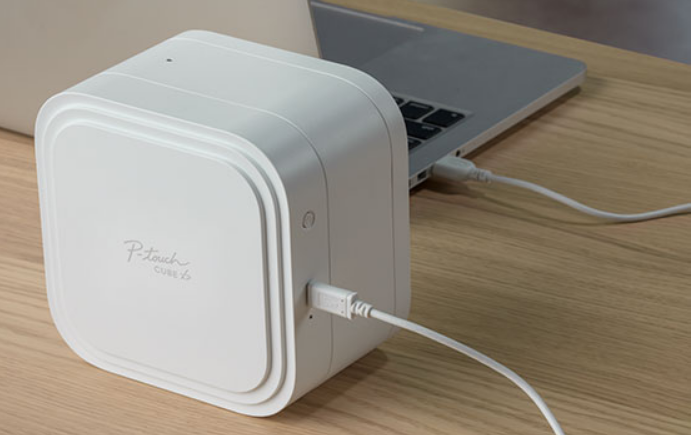
Designed for both home and workplace use, the Brother P-Touch PT-P300BT is a small and multifunctional electronic labeling device. With the P-touch Design&Print app, you can design and print personalized labels straight from your tablet or smartphone thanks to Bluetooth connectivity. With so many typefaces, symbols, and frame options, the PT-P300BT makes it simple to arrange and customize your environment with long-lasting, premium labels. It's a great option for effective and imaginative labeling because of its compact size and user-friendly design.
Parts and Components
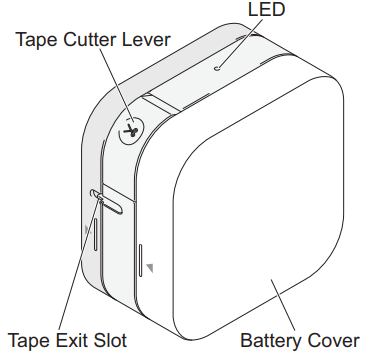
Front
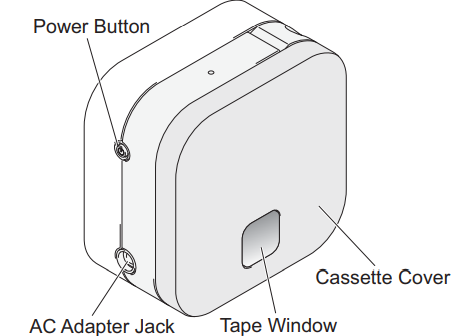
Rear
- Feeding Tape
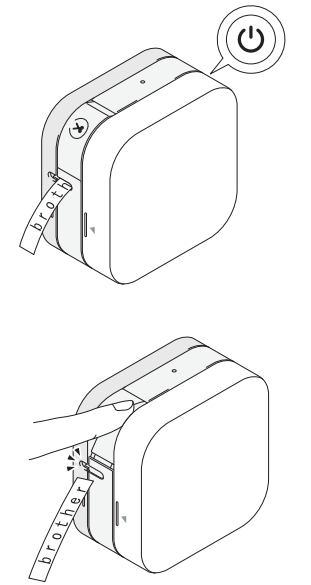
Power on the label printer and press the Power Button twice quickly to automatically feed the tape. - Cutting Tape
When your label finishes printing, press the Tape Cutter Lever to cut the tape.
Unpack the PT-P300BT
Check that the package contains the following before using the label printer. If any item is missing or damaged, contact your Brother reseller.
PT-P300BT
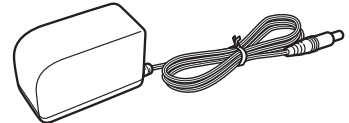
AC Adapter (AD-24ES/AD-24ESA/AD-24ESAW/AD-24ESA-01/AD-24ESAW-01)
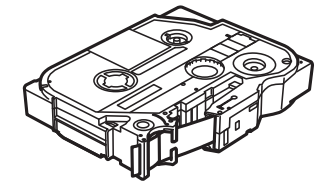
Starter Tape Cassette
Specifications
- Dimensions (W × D × H): Approximately 4.5" (W) × 2.4" (D) × 4.5" (H) (115 mm (W) × 61 mm (D) × 115 mm (H))
- Weight: Approximately 0.8 lb (380 g) (without batteries and Tape Cassette)
- Power Supply
- AC Adapter (AD-24ES/AD-24ESA/AD-24ESAW/AD-24ESA-01)
- Six AAA Alkaline batteries (LR03)*
- Rechargeable six AAA Ni-MH batteries (HR03)*
- Interface: Bluetooth Ver 2.1 + EDR Class2
- Compatible Tape: Brother TZe Tape Cassette
- Compatible widths: 0.13", 0.23", 0.35", 0.47" (3.5 mm, 6 mm, 9 mm, 12 mm)
Note
- The information provided in this document is subject to change without notice.
- Unauthorized duplication or reproduction of any or all content of this document is prohibited.
- Although this document has been written with extreme care, if you notice something questionable or incorrect, please contact Brother.
- Please note that we cannot assume any responsibility for any damage or lost profit arising from the use of this label printer or the label created with this label printer or the disappearance or change of data due to failure, repair, or supplies using battery, or any claim from a third party.
Description
For those in need of a high-quality printer who don't have a lot of space, consider the Brother P-Touch PT-P300BT Electronic Labeling System. The printer makes use of thermal transfer technology to print labels that are crisp, long-lasting, and resistant to dirt, grime, and other environmental hazards. Even the most taxing printing jobs will be no match for this printer's 30 labels per minute print speed. The PT-P300BT's built-in Wi-Fi makes it possible to print wirelessly from virtually any location or device.
Install Batteries or Connect the AC Adapter
Caution : Always use the specified voltage and the AC Adapter (AD-24ES/AD-24ESA/AD-24ESAW/AD-24ESA-01) for the label printer to prevent any damage or failure. This label printer requires six (6) AAA alkaline batteries or six (6) fully-charged AAA Ni-MH batteries, not included. As an alternative, use the AC Adapter included with this machine and plug the label printer into an AC outlet.
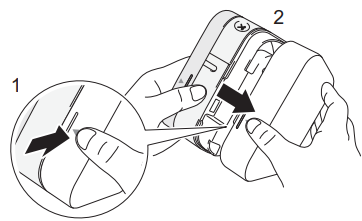
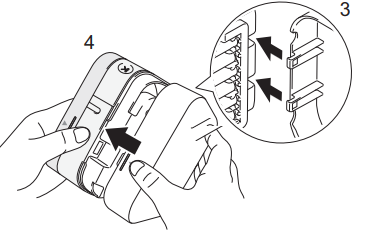
Hold the label printer as shown in the illustration. Open the Battery Cover by pressing the mark on its side (1) and pulling in the direction of the arrow (2).
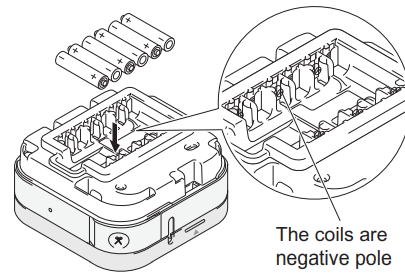
Insert six batteries following the drawing marked inside the case. Alternate positive and negative poles, making sure to match the negative battery end with the coil in the battery slot.
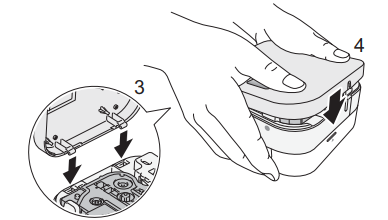
Insert the two hooks at the rear of the Battery Cover into the slots on the label printer (3). Push the Battery Cover closed (4), making sure it locks into place.
Caution Using a combination of different batteries (such as alkaline with Ni-MH) may result in an explosion. Dispose of used batteries according to the instructions.
- Remove the batteries if you do not intend to use the label printer for an extended period of time.
- Dispose of batteries at an appropriate collection point, not in the general waste stream. Be sure to observe all applicable federal, state, and local regulations.
- When storing or discarding a battery, wrap it with cellophane tape to prevent it from short-circuiting (see illustration).
- Cellophane tape
Alkaline or Ni-MH battery

Note Do not set together old and new batteries. Replace all six batteries at the same time.
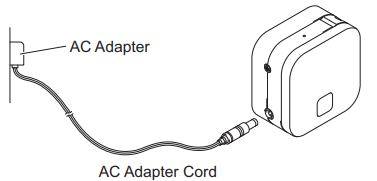
Connecting the AC Adapter
If you use the included AC Adapter:
- Insert the AC Adapter Cord into the AC Adapter Jack on the side of the machine.
Insert the AC Adapter into an AC electrical outlet.
Inserting the Tape Cassette
Make sure your Tape Cassettes display the TZe mark ( ). Use only tape widths of 3.5 mm, 6 mm, 9 mm, or 12 mm. If there is a stopper on the TZe Tape Cassette, remove it before installation.
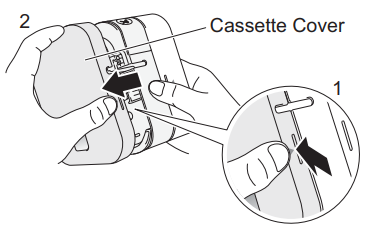
Hold the label printer as shown in the illustration. Open the Cassette Cover by pressing the mark on its side (1) and pulling in the direction of the arrow (2).
Insert the Tape Cassette following the drawing marked inside the case. Confirm that the tip of the tape is pointed at the Tape Exit Slot.
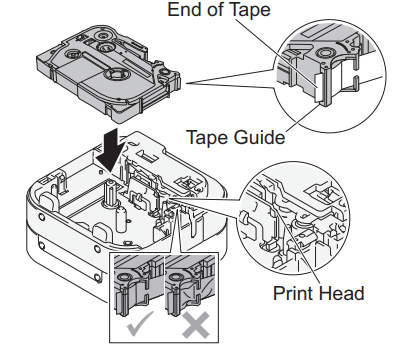
Press the Tape Cassette into the label printer until it snaps into place.
Note
- After the tape passes under the Tape Guide, pull the tip to remove any slack in the tape.
- Make sure the tape is not caught in the unit when inserting or removing the Tape Cassette.
- Insert the two hooks at the rear of the Cassette Cover into the slots on the label printer (3). Push the Cassette Cover closed (4), making sure it locks into place.
Turn the Label Printer On or Off
Press the Power Button to power on. Hold the Power Button for 0.5 seconds to power off.
LED Indications
The label printer's LED indicates the label printer's status.
| LED Condition | Status Description |
|---|---|
| Not lit | Power Off |
| Steady green light | Connecting to your mobile device, Feeding or cutting tape, Printing |
| Flashing green light (Lit for 3 seconds, then off for 1 second) | Standby |
| Flashing green light (0.5 second intervals) | Receiving data from your mobile device |
| Flashing orange light (1 second intervals) | Insufficient charge or battery failure |
| LED | Condition | How to Clear an Error | Solution |
|---|---|---|---|
| Steady red light | Booting | Transfer the program again. If the problem is still not resolved, contact Brother Customer Service. | |
| Flashing red light | 1 second intervals | ||
| • No Tape Cassette installed. | Lightly press the Power Button. | Insert the correct Tape Cassette. | |
| • Incorrect Tape Cassette installed. | |||
| • Incompatible Tape Cassette installed. | |||
| The machine failed to communicate with your mobile device. | Restart the label printer. | Connect via Bluetooth and try sending the label from your mobile device to the machine again. | |
| Cutter error | Lightly press the Power Button. | ||
| Incompatible AC Adapter used | Use the correct AC Adapter. | ||
| Flashing red light | 0.5 second intervals | ||
| System error | Please contact Brother Customer Service. |
Pair the Label Printer with Your Mobile Device
On your mobile device:
- In Settings, access the Bluetooth option, and turn it ON.
When the list of discovered Bluetooth devices appears, tap PT-P300BT**** (where **** is the last four digits of your label printer’s serial number. Alternatively, you can find your machine number on the sticker below the Power Button). The unit's serial number is located where the TZe Tape Cassette is set inside the Cassette Cover.

- If asked to enter a PIN Code, enter “0000”.
Note
- Pairing instructions may differ slightly, depending on the smartphone or tablet you are using.
- If your machine is not discovered by your mobile device via Bluetooth, check the following and then try to connect again:
- The machine may be connected to another mobile device. If so, turn off Bluetooth on that device, or turn off your machine and then on again.
- Check that the machine is not in sleep mode.
- Place your mobile device as close to the machine as possible.
- Make sure there are no obstacles or items that emit radio waves, such as a microwave oven, between the machine and your mobile device. If such obstacles or items are present, use the label printer away from them.
- If using a Smart Cover on your tablet, ensure that the cover remains open while you are creating or printing labels. Closing the Smart Cover may interrupt data communication, and your labels will not print.
Print Labels
Connect your mobile device to the label printer via Bluetooth.
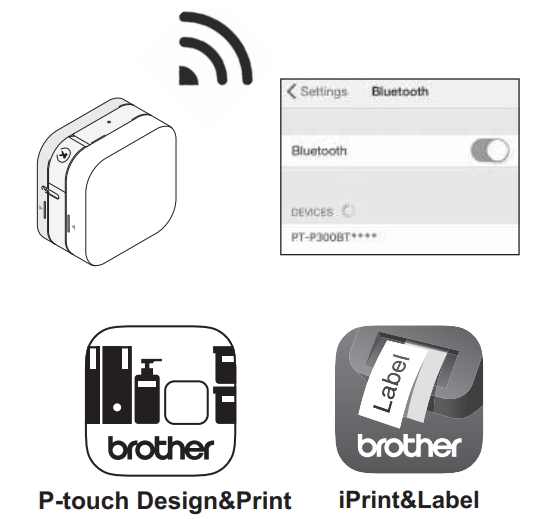
- Create a label design in the app. You can also create and save label data and print the labels later.
Note To save tape, change these settings in each app:
P-touch Design&Print
Turn Cut the last label: OFF
Turn Special Tape: OFF
iPrint&Label - Turn Chain Printing: ON
- Tap “Print”.
Cut the label with the Tape Cutter Lever. If not all printed labels have been ejected, quickly press the Power Button twice to eject them.
Setup Guide
You won't have any trouble getting the Brother P-Touch PT-P300BT Electronic Labeling System up and running. Here is what you need to do:
- After receiving the printer, carefully remove it from its package.
- After plugging in the power cord, switch on the printer.
- Download and install the driver software on your desktop, laptop, tablet, or phone.
- Use your mobile device's Wi-Fi, Bluetooth, or USB port to link the printer to your computer.
- Put the roll of labels into the printer and choose the size and kind of labels you want.
- It is now time to begin printing.
Performing Routine Maintenance
Note Before performing any maintenance, power off the label printer. If you use batteries, remove the batteries, and if you use the AC Adapter, unplug the AC Adapter.
Cleaning the label printer case Wipe the case with a soft, dry cloth to remove dirt or dust. If the case is heavily soiled, wipe it with a cloth dampened with some water.
Note: Do not use solvents or agents such as benzene, paint thinner, or alcohol, which may damage the label printer’s surface.
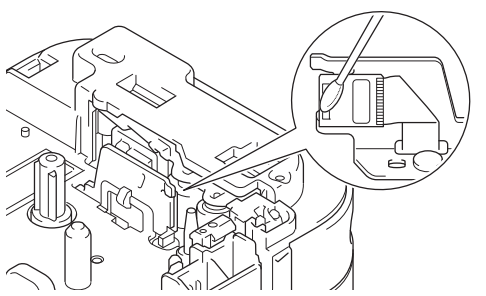
Cleaning the Print Head
Dirt on the Print Head may cause blank lines, faint type, or missing characters. Use an optional dedicated Head Cleaning Cassette (TZe-CL3) or use a cotton swab to gently wipe dirt from the Print Head.
Note: Insert the Head Cleaning Cassette in the machine, and press the Power Button twice quickly. Cut the Cleaning Tape after it is fed. If the problem is not solved after repeating this process three times, contact Brother Customer Services.
Warning: Do not touch the Print Head. It is very hot and you may get burned.
Accessories
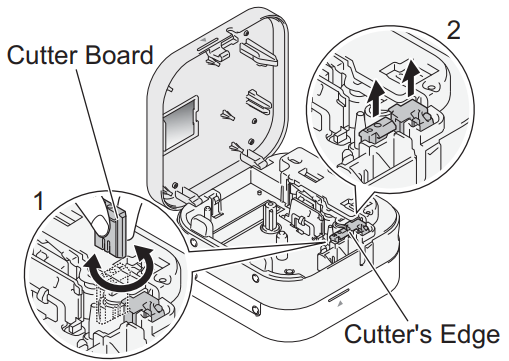
Over time, the Cutter Blade may become blunt from repetitive use. If the Cutter does not cut tape cleanly, rotate and reset the Cutter Board as shown in the illustration (1). If you still have difficulties, replace the Cutter Unit (2). Contact your local authorized Brother reseller or visit brothermall.com to order item TC4, the Cutter Unit.
Replacing the Cutter Unit
- Remove the two sections of the Cutter Unit (green) in the direction of the arrows shown in the illustration (2).
Install the new Cutter Unit by pressing the two new pieces down until they lock into place.
Safety Precautions
Warning: Indicates A potentially hazardous situation which, if not avoided, could result in death or serious injuries. Follow these guidelines to avoid the risk of fire, burns, injury, electric shocks, rupture, overheating, abnormal odors, or smoke.
- Always use the specified voltage and the AC Adapter (AD-24ES/AD-24ESA/AD-24ESAW/AD-24ESA-01/AD-24ESAW-01) for the label printer to prevent any damage or failure.
- Do not touch the label printer during a lightning storm.
- Do not use the label printer or AC Adapter in places of high humidity such as bathrooms.
- Do not overload the power cord.
- Do not place heavy objects on, or damage the label printer, power cord, or plug.
- Do not forcibly bend or pull the power cord. Always hold the AC Adapter when disconnecting from the power outlet.
- Make sure that the plug is fully inserted in the power outlet. Do not use an outlet that is loose.
- Do not allow the label printer, AC Adapter, power plug, or batteries to get wet, for example, by handling them with wet hands or spilling beverages on them.
- Do not disassemble or modify the label printer, AC Adapter, or batteries.
- Do not allow a metal object to contact both the plus and minus ends of a battery.
- Do not use sharp objects, such as tweezers or a metallic pen, to change the batteries.
- Do not throw the batteries into fire or expose them to heat.
- Disconnect the AC Adapter, remove batteries immediately, and stop using the label printer if you notice abnormal odor, heat, discoloration, deformation, or anything unusual while using or storing it.
- Do not use a damaged or leaking battery.
- Do not use a deformed or leaking battery or one whose label is damaged. There is a possibility of damaging the label printer.
- Since loss of eyesight may result if leaked fluid from batteries gets into your eyes, immediately rinse your eyes with a large amount of clean water, and then seek medical attention.
Caution Indicates a potentially hazardous situation which, if not avoided, may result in minor or moderate injuries. Follow these guidelines to avoid personal injury, liquid leakage, burns, or heat.
- When the label printer is not being used, store it out of the reach of children. In addition, do not allow children to put any label printer parts or labels in their mouths. If any object has been swallowed, seek medical attention.
- Do not touch metal parts around the Print Head immediately after printing.
- Do not touch the cutter blade.
- If leaked fluid from batteries gets on your skin or clothes, immediately rinse them with clean water.
- Remove the batteries and disconnect the AC Adapter if you do not intend to use the label printer.
- Do not use any batteries other than those specified. Do not use combinations of old and new batteries or combinations of different types, different charging levels, different manufacturers, or different models. Do not insert a battery with its plus and minus ends reversed.
- Do not drop or hit the label printer or AC Adapter.
- Do not put your finger inside the label printer when you close the Cassette Cover and the Battery Cover.
- Make sure you use only six AAA Alkaline batteries or rechargeable six AAA Ni-NH batteries.
- Before using Ni-MH rechargeable batteries, carefully read the instructions for the batteries and battery charger, and be sure to use them correctly.
- When using Ni-MH rechargeable batteries, charge the batteries with a specialized battery charger before using the batteries.
- Do not put your finger inside the Tape Exit Slot. You could be injured by the cutter blade.
General Precautions
- Depending on the location, material, and environmental conditions, the label may unpeel or become irremovable, the color of the label may change or be transferred to other objects. Before applying the label, check the environmental conditions and the material.
- Do not use the label printer in any way or for any purpose not described in this guide. Doing so may result in accidents or damage to the label printer.
- Use only Brother TZe Tape Cassettes with the label printer. Do not use tapes that do not have the mark.
- Only use a soft, dry cloth to clean the label printer; never use alcohol or other organic solvents.
- Use a soft wipe to clean the Print Head; never touch the Print Head with your fingers.
- Do not put any foreign objects into the Tape Exit Slot, the AC Adapter connector, or battery compartment, etc.
- Do not place the label printer, AC Adapter, or batteries in direct sunlight or rain, near heaters or other hot appliances, in any location exposed to extremely high or low temperatures (e.g., on the dashboard or in the back of your car), high humidity, or in dusty locations.
- Do not try to print if the cassette is empty; it will damage the Print Head.
- Do not pull the tape while printing or feeding; it will damage the tape and the label printer.
- The label printer is not equipped with a charging feature for rechargeable batteries.
- The length of the printed label may differ from the displayed label length on the smartphone or tablet.
- When printing multiple copies of a label, the label printer will not detect the end of the tape cassette and will continue operating.
- Printed characters may look different than previewed on your device, as your device's screen may have a higher resolution than the label printer.
- Printed small text may not be as clear as it is displayed on your device.
- White and Gold text may not print clearly if you use thin characters.
Troubleshooting
Problem: I cannot turn on my machine.
- Solution: Check to see that the batteries are installed correctly, or that the optional AC Adapter is securely connected.
Problem: A horizontal space runs through the middle of printed labels.
- Solution: Streaks or poor-quality characters on printed labels generally indicate that the Print Head is dirty. For instructions on how to clean the Print Head, see the Performing Routine Maintenance section in this guide.
Note: Do not touch the Print Head with your hands.
Problem: My machine does not print, or the characters are printed incorrectly.
- Solution:
- Check that the Tape Cassette is inserted correctly.
- If the Tape Cassette is empty, replace it.
- Check that the Cassette Cover is securely closed.
- Check that the charge is not low.
- Check that the label printer is on.
- Check that the mobile device is not in sleep mode.
- Check that the printer and mobile device are connected via Bluetooth.
Problem: My machine powers off when I try to print.
- Solution:
- The batteries may be weak. Replace them.
- Check that the batteries are correctly inserted. For instructions, see the Install Batteries or Connect the AC Adapter section in this guide.
- You are using an incompatible adaptor. Use only the recommended adapter: the AD-24ES/AD-24ES-01.
Problem: The tape does not feed correctly, or the tape gets stuck inside the machine.
- Solution:
- Check that the end of the tape feeds under the tape guides.
- You may have tried to use the Cutter while printing. Do not try to cut a label while it is printing.
Problem: The tape stops halfway. The tape is not fully ejected.
- Solution: Your machine may be configured not to cut the last label. Press the Power Button twice quickly to feed the tape, and then press the Tape Cutter Lever to cut the tape. You can also use your app to configure the machine to always cut the last label.
Problem: I cannot print from my mobile device.
- Solution:
- Check that your machine and your mobile device are connected via Bluetooth. See the Pair the Label Printer with Your Mobile Device section in this guide.
- Check that the label printer is selected in the P-touch app.
- Check that the label printer is not paired with another device.
- Make sure the label printer and your mobile device are close enough to communicate.
Problem: A blank space (approx. 25 mm) is added to the left margin of each label.
- Solution: To prevent a blank space from being added on the second and subsequent labels, use the following cut option settings:
- P-touch Design&Print
- Cut the last label: OFF
- Special Tape: OFF
- iPrint&Label
- Chain Printing: ON You must eject and cut the last label manually. Press the Power Button twice to feed the tape, and then press the Tape Cutter Lever to cut the tape.
- P-touch Design&Print
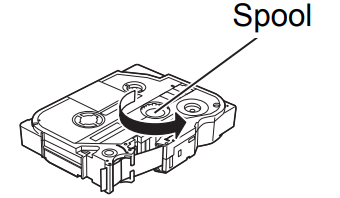
Problem: The ink ribbon has separated from the ink roller.
Solution: If the ink ribbon is broken, replace the tape cassette. If not, leave the tape uncut and remove the tape cassette, then wind the loose ink ribbon back onto the spool.
Problem: The label is difficult to cut.
- Solution: Rotate the Cutter Board. For a description of how to do so, see the Accessories section in this guide.
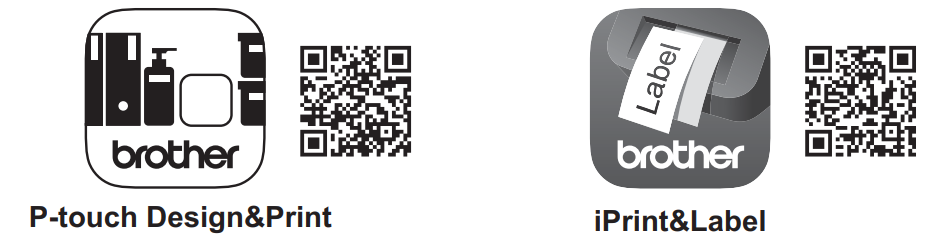
To start printing, download one of our Brother mobile apps:
- iPad/iPhone/iPod touch: Download P-touch Design&Print or iPrint&Label from the App Store.
Android: Download P-touch Design&Print or iPrint&Label from Google Play.
Pros & Cons
- Pros
- Compact and portable design
- High-quality thermal transfer printing
- Wireless connectivity options
- Easy to set up and use
- Cons
- May be too small for some printing tasks
- Does not support dual-sided printing
Customer Reviews
Customers love the Brother PT-P300BT for its compact design and high-quality printing. The wireless connectivity options are also a big hit, making it easy to print from any device. However, some customers have reported issues with the label roll not loading correctly.
Faqs
Can you tell me about the Brother P-Touch PT-P300BT Electronic Labeling System?
How do I connect the Brother P-Touch PT-P300BT Electronic Labeling System to my Wi-Fi network?
Can I print from my mobile device with the Brother Electronic Labeling System?
How do I replace the label roll in the Brother P-Touch PT-P300BT Electronic Labeling System?
What is the warranty on the Brother Electronic Labeling System?
Is it possible to use the Brother Electronic Labeling Systemwith both Apple and Google products?
How do I install the driver software for the Brother Electronic Labeling System?
How does the Brother Electronic Labeling System get its power?
Are a variety of typefaces and symbols printable on the Brother P-Touch PT-P300BT Electronic Labeling System?
How do I troubleshoot connectivity issues with the Brother Electronic Labeling System?
Leave a Comment