Bryton Rider 750 GPS Navigation User Manual | Specifications
Content
Introduction
The Bryton Rider 750 GPS Navigation is a feature-rich cycling computer designed to enhance your riding experience with advanced navigation capabilities. It boasts a vibrant 2.8-inch color touchscreen and supports multiple satellite systems, including GPS, GLONASS, and Galileo, ensuring accurate positioning. With a battery life of up to 20 hours, it can easily handle long rides. Priced at approximately $229.99, the Rider 750 is an excellent investment for cyclists seeking reliable navigation and performance data.
Specification
Rider 750
Item Description | |
| Display | 2.8” Transflective Color TFT LCD Capacitive Touch Screen |
| Physical Size | 92.5 x 49.7 x 23.8 mm |
| Weight | 93g |
| Operating Temperature | -10°C ~ 60°C |
| Battery Charging Temperature | 0°C ~ 40°C |
| Battery | Li-polymer rechargeable battery |
| Battery Life | Up to 20 hours with open sky |
| ANT+™ | Featuring certified wireless ANT+™ connectivity. Visit www.thisisant.com/directory for compatible products.
|
| GNSS | Integrated high-sensitivity GNSS receiver with embedded antenna |
| BLE Smart | Bluetooth smartwireless technology withembedded antenna; 2.4GHz band 0dBm |
| Water Resistant | Water resistant to a depth of 1 meter for up to 30 minutes |
| Barometer | Equipped with barometer |
Wireless Local Area Network | IEEE 802.11 b/g/n; 2.4GHz band 8dBm |
Smart Speed Sensor (Optional)
Item Description | |
| Physical Size | 36.9 x 34.8 x 8.1 mm |
| Weight | 6 g |
| Water Resistance | Incidental exposure to water of up to 1meter for up to 30mins |
| Transmission Range | 3 m |
| Battery Life | Up to 1 year |
| Operating Temperature | -10°C ~ 60°C |
| Radio Frequency/protocol | 2.4GHz / Bluetooth 4.0 and Dynastream ANT+ Sport wireless communications protocol |
NOTE: Accuracy may be degraded by poor sensor contact, electrical, magnectic interference and distance from the transmitter. To avoid magnetic interference, it is recommended that you change location, clean or replace chain.
Smart Cadence Sensor (Optional)
Item Description | |
| Physical Size | 36.9 x 31.6 x 8.1 mm |
| Weight | 6 g |
| Water Resistance | Incidental exposure to water of up to 1 meterfor up to 30 minutes |
| Transimission Range | 3 m |
| Battery Life | Up to 1 year |
| Operating Temperature | -10°C ~ 60°C |
| Radio Frequency/protocol | 2.4GHz / Bluetooth 4.0 and Dynastream ANT+ Sport wireless communications protocol |
NOTE: Accuracy may be degraded by poor sensor contact, electrical, magnectic interference and distance from the transmitter.
Smart Heart Rate Monitor (Optional)
Item Description | |
| Physical Size | 63 x 34.3 x 15 mm |
| Weight | 14,5 g (sensor) / 31,5 g (correa) |
| Water Resistance | Incidental exposure to water of up to 1 meterfor up to 30 minutes |
| Transimission Range | 3 m |
| Battery Life | Up to 2 years |
| Operating Temperature | 0°C ~ 50°C |
| Radio Frequency/ protocol | 2.4GHz / Bluetooth 4.0 and Dynastream ANT+ Sport wireless communications protocol |
Description
The Bryton Rider 750 GPS Navigation features a robust build with a sleek and compact design. It boasts a 3.0-inch high-resolution display that is easy to read in any lighting condition. The device supports Bluetooth, ANT+, and Wi-Fi connectivity, enabling seamless data transfer and synchronization with other devices. It includes advanced navigation features such as turn-by-turn directions, breadcrumb trails, and alerts for speed limits, traffic lights, and road closures. The Rider 750 also supports Strava Live Segments, Shimano Di2 integration, and compatibility with popular fitness apps like Training Peaks and Strava.
The device comes with a rechargeable battery that lasts up to 20 hours on a single charge and is IPX7 water-resistant, making it durable and reliable for various riding conditions. It also includes a microSD card slot for expanding storage capacity and supports multiple languages for global users.
How to Charge Bryton Rider 750
- Step 1: Charge your Rider 750
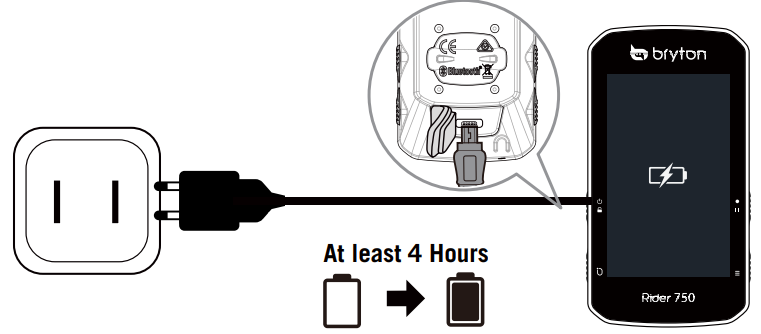
Charge the Rider 750 battery for at least 4 hours. Unplug the device when it is fully charged.- You may see the battery icon
 blinking when the battery is very low. Keep the device plugged in until properly charged.
 The temperature suitable for charging battery is 0°C ~ 40°C. Beyond this temperature range, charging will be terminated and the device will draw power from battery.
- You may see the battery icon
- Step 2: Turn On Rider 750
Press to turn on the device. - Step 3: Initial Setup
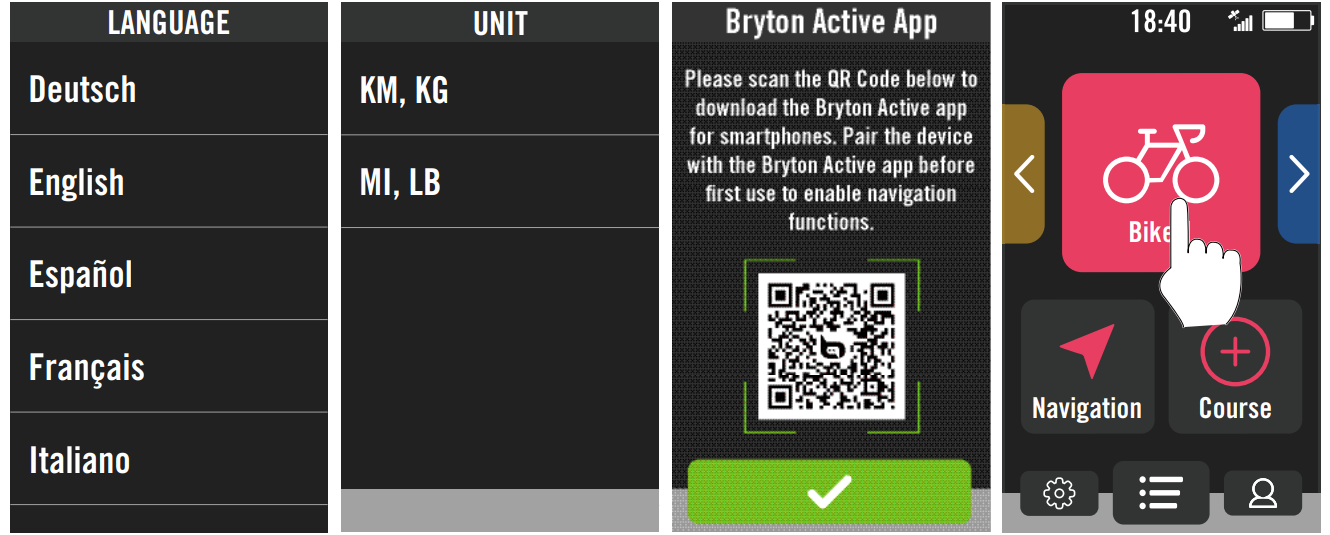
When powering on the Rider 750 for the first time, follow the instruction to complete setup.- Select the display language.
- Choose the units of measurement.
- Download Bryton Active app and pair the Rider 750 with your cellphone.
Go through the starting tutorial before riding.
Step 4: Acquire Satellite Signals
Once the Rider 750 is turned on, it will automatically search for satellite signals. It may take 30 to 60 seconds to acquire signals for first time use.- The GPS signal Icon (
 ) appears when GPS is fixed.
 - If GPS signal is not fixed, an icon
 appears on the screen.
 - If GPS function is disable, a icon
 shows on the screen.
Please avoid obstructed environments since they might affect GPS reception.

- The GPS signal Icon (
Step 5: Ride with Rider 750
After the “Satellite Acquired” message pops up, enter the Bike 1, Bike 2 or Bike 3 cycling page and enjoy your ride in free cycling mode.
Free ride (without recording):
In cycling mode, measurement starts and stops automatically in sync with the movement of the bicycle.
Start an exercise and record your data:- In cycling mode, press
 to start recording, press
  again to pause recording.
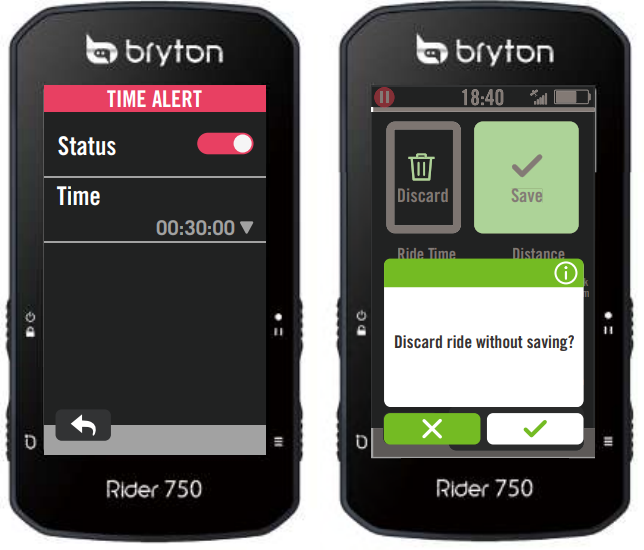
 - Choose to Discard or Save the result to end riding.
- Choose
 to go to the meter page to see your cycling data. Then tap
  on to go back to the previous page.
 - Tap
 on or press
  to continue recording.
- In cycling mode, press
Step 6: Share Your Records
Connect Rider 750 to PC- Connect Rider 750 to PC by using Bryton’s original USB cable.
- The folder will popup automatically or find the “Bryton” disk in the computer.
Share Your Tracks to Brytonactive.com
- Sign up on Brytonactive.com
- Go to https://active.brytonsport.com
- Register for a new account.
- Connect to PC
- Turn on your Rider 750 and connect it to a computer by USB cable.
- Share Your Records
- Click “+” in the right upper corner.
- Drop FIT, BDX, GPX file(s) here or Click “Select files” to upload tracks.
- Click “Activities” to check uploaded tracks.
Share Your Tracks to Strava.com
- Sign up / log in on Strava.com
- Go to https://www.strava.com
- Register for a new account or use your current Strava account to log in.
- Connect to PC
- Turn on your Rider 750 and connect it to your computer by USB cable.
- Share Your Records
- Click “+” on the top right corner of the Strava page and then click “File”.
- Click “Select Files” and select FIT files from Bryton device.
- Enter information about your activities and then click “Save & View”.
Getting Started
This section will guide you through basic preparations before the first use with your Rider 750.
Rider 750 Key Functions
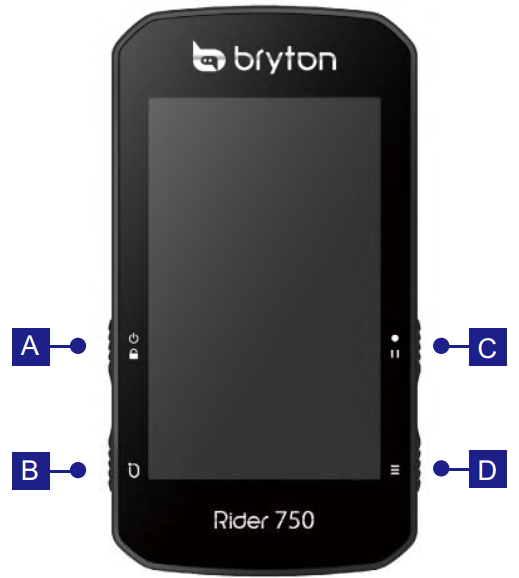
- POWER/LOCK (
 )
)
Press to turn the device ON.
Long Press to turn the device OFF.
Press to lock or unlock the screen. - LAP (
 )
)
When recording, press to mark the lap. - RECORD (
 )
)
In Cycling mode, press to start recording.
When recording, press to pause recording and enter the Menu. - PAGE (
 )
)
In Cycling mode, press to switch meter screen pages.
Reboot Rider
Press ( ![]() /
/![]() /
/![]() /
/ ![]() ) at the same time to reboot the device.
) at the same time to reboot the device.
Accessories
The Rider 750 comes with the following accessories:

Optional items:

Touch Screen of Bryton Rider 750 GPS Navigation
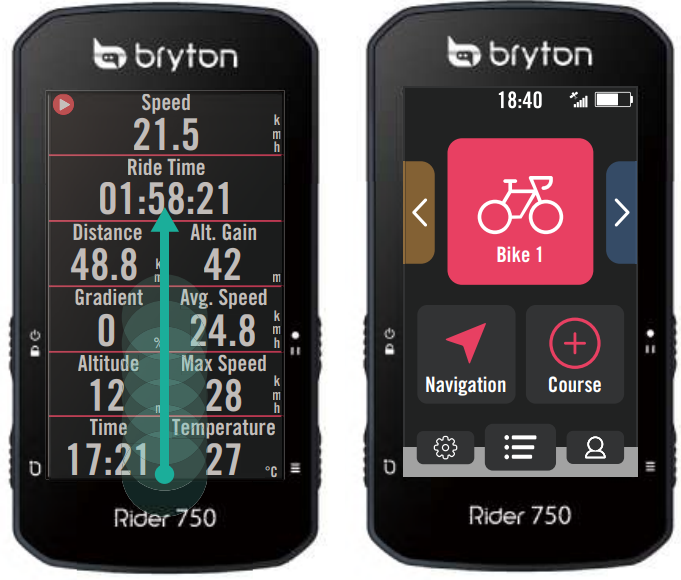
- Swipe up steadily from the very bottom of the screen to return to the Home Page from any screen.
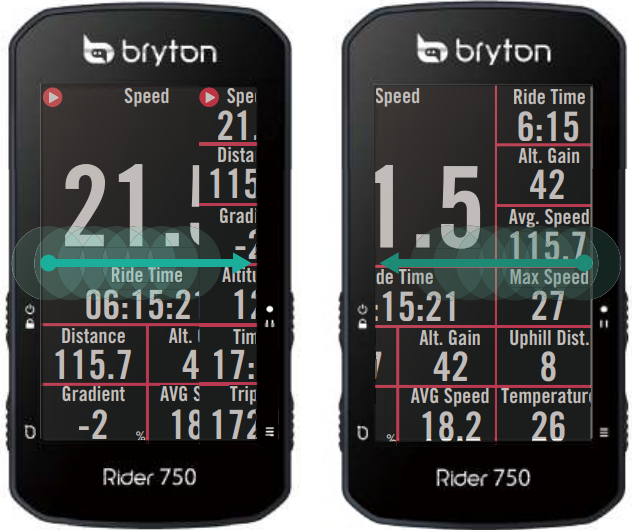
On the Lock screen, swipe up to unlock and return to the Home Page. Swipe left or right to switch data pages.
In Cycling mode, swipe left or right to switch data pages.
In cycling mode, single tap to go to the Quick Status page.
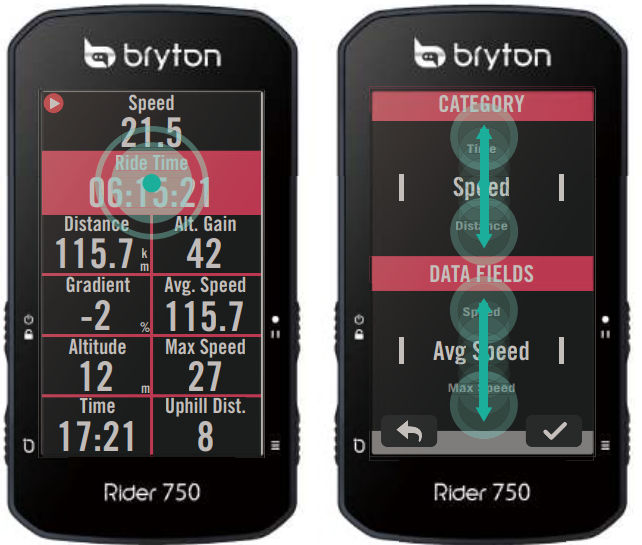
In cycling mode, long press to edit the cycling grid and scroll up and down to view cycling data.
- Select to
 confirm selection.
 - Select to
 cancel selection.
 Select to
 return to the previous page.
- Select to
Setup Guide
- Charging:
- Charge the device using the provided USB cable.
- Power On:
- Once charged, turn on the device and follow the on-screen instructions to select your language and unit preferences.
- Account Setup:
- Create a Bryton account or log in if you already have one to access full features.
- Device Pairing:
- Pair the device with your smartphone via Bluetooth or Wi-Fi to enable notifications, data synchronization, and online route planning.
- Sensor Pairing:
- If you have additional sensors like heart rate or cadence monitors, pair them using ANT+ technology.
- Mounting:
- Mount the device on your bike using the included bike mount or aero mount for optimal viewing angles.
- Configuration:
- Configure settings by navigating through the intuitive menu system to customize display screens, set up training plans, and adjust other preferences according to your needs.
Basic Care For Your Rider 750
Taking good care of your device will reduce the risk of damage to your device.
- Do not drop your device or subject it to severe shock.
- Do not expose your device to extreme temperatures and excessive moisture.
- The screen surface can easily be scratched. Use the non-adhesive generic screen protectors to help protect the screen from minor scratches.
- Use diluted neutral detergent on a soft cloth to clean your device.
- Do not attempt to disassemble, repair, or make any modification to your device. Any attempt to do so will make the warranty invalid.
Troubleshooting
If you encounter issues with your Bryton Rider 750 GPS Navigation, here are some common problems and solutions:
- Device Not Turning On: Check if the battery is fully charged or if there is an issue with the charging cable. Try resetting the device by holding down the power button for 10 seconds.
- GPS Signal Weak or Lost: Ensure that you are in an open area away from tall buildings or dense foliage. Restart the device if necessary.
- Pairing Issues with Sensors: Check that both devices are in pairing mode and that there is no interference from other devices in close proximity.
Always refer to the user manual for detailed troubleshooting steps and ensure you follow all safety instructions when using the device.
Wheel Size and Circumference
The wheel size is marked on both sides of the tires.
| Wheel Size | L (mm) |
| 12x1,75 | 935 |
| 12x1,95 | 940 |
| 14x1,50 | 1020 |
| 14x1,75 | 1055 |
| 16x1,50 | 1185 |
| 16x1,75 | 1195 |
| 16x2,00 | 1245 |
| 16 x 1-1/8 | 1290 |
| 16 x 1-3/8 | 1300 |
| 17x1-1/4 | 1340 |
| 18x1,50 | 1340 |
| 18x1,75 | 1350 |
| 20x1,25 | 1450 |
| 20x1,35 | 1460 |
| 20x1,50 | 1490 |
| 20x1,75 | 1515 |
| 20x1,95 | 1565 |
| 20x1-1/8 | 1545 |
| 20x1-3/8 | 1615 |
| 22x1-3/8 | 1770 |
| 22x1-1/2 | 1785 |
| 24x1,75 | 1890 |
| 24x2,00 | 1925 |
| 24x2,125 | 1965 |
| 24 x 1 (520) | 1753 |
| Tubular 24 x 3/4 | 1785 |
| 24x1-1/8 | 1795 |
| 24x1-1/4 | 1905 |
| 26 x 1 (559) | 1913 |
| 26x1,25 | 1950 |
| 26x1,40 | 2005 |
| 26x1,50 | 2010 |
| 26x1,75 | 2023 |
| 26x1,95 | 2050 |
| 26x2,10 | 2068 |
| 26x2,125 | 2070 |
| 26x2,35 | 2083 |
| 26x3,00 | 2170 |
| 26x1-1/8 | 1970 |
| 26x1-3/8 | 2068 |
| 26x1-1/2 | 2100 |
650C Tubular 26 x7/8 | 1920 |
| 650x20C | 1938 |
| 650x23C | 1944 |
650 x 25C 26 x1 (571) | 1952 |
| 650x38A | 2125 |
| 650x38B | 2105 |
| 27 x 1 (630) | 2145 |
| 27x1-1/8 | 2155 |
| 27x1-1/4 | 2161 |
| 27x1-3/8 | 2169 |
| 27,5x1,50 | 2079 |
| 27,5x2,1 | 2148 |
| 27,5x2,25 | 2182 |
| 700xl8C | 2070 |
| 700xl9C | 2080 |
| 700x20C | 2086 |
| 700x23C | 2096 |
| 700x25C | 2105 |
| 700x28C | 2136 |
| 700x30C | 2146 |
| 700x32C | 2155 |
| 700C Tubular | 2130 |
| 700x35C | 2168 |
| 700x38C | 2180 |
| 700x40C | 2200 |
| 700x42C | 2224 |
| 700x44C | 2235 |
| 700x45C | 2242 |
| 700x47C | 2268 |
| 29x2,1 | 2288 |
| 29x2,2 | 2298 |
| 29x2,3 | 2326 |
Data Field
Category DataField Description of Data Fields | ||
Energy | Calories | The number of total calories burned. |
Kilojoules | The accumulated power output in kilojoules for the current activity. | |
Altitude | Altitude | The height of your current location above or below sea level. |
Max Altitude | The highest height of your current location above or below sea level which the rider achieved for the current activity. | |
Alt. Gain | The total altitude distance gained during this current activ- ity. | |
Alt. Loss | The total altitude lost during this current activity. | |
Grade | The calculation of altitude over distance. | |
Uphill Dist. | The total distance traveled while ascending. | |
Downhill Dist. | The total distance traveled while descending. | |
Distance | Distance | The distance travelled for current activity. |
ODO | The accumulated total distance until you reset it. | |
LapDistance | The distance traveled for the current lap. | |
LLapDist. | The distance traveled for the last finished lap. | |
Trip 1/Trip 2 | Cumulative mileage recorded before you reset it. They are 2 separate tripmeasurements. You are freeto use Trip 1 or Trip 2 to record,for example, weekly total distance and use another to record, for example, monthly total dis- tance. | |
Speed | Speed | The current rate of change in distance. |
Avg Speed | The average speed for current activity. | |
Max Speed | The maximum speed for current activity. | |
LapAvgSpd | The average speed for the current lap. | |
LapMaxSpd | The maximum speed for the current lap. | |
LLapAvgSpd | The average speed for the last finished lap. | |
Time | Time | Current GPS Time. |
Ride Time | The time spent on riding for current activity. | |
Trip Time | Total time spent for current activity. | |
Sunrise | The time of sunrise based on your GPS location. | |
Sunset | The time of sunset based on your GPS location. | |
LapTime | The stopwatch time for the current lap. | |
LLapTime | The stopwatch time for the last finished lap. | |
Lap Count | The number of laps finished for the current activity. | |
Cadence | Cadence | The current rate at which rider is pedalling the pedals. |
Avg CAD | The accumulated poweroutput in kilojoules for the current activity. | |
Max CAD | The maximum cadence for current activity. | |
LapAvgCad | The average cadence for the current lap. | |
LLapAvCad | The average cadence for the last finished lap. | |
HR |
Heart Rate | The number of times your heart beats per minute. It re- quires compatible HR sensor pairing connection to your device. |
Avg HR | The average heart rate for current activity. | |
Max HR | The maximum heart rate for current activity. | |
MHR % | Your current heart rate divided by Maximum Heart Rate. MHR means that the maximum number of beats made by your heart in 1 minute of effort. (MHR is different from Max HR. You will need to set MHR in User Profile) | |
LTHR% | Your current heart rate divided by Lactate Threshold Heart Rate. LTHR means thatthe average heartrate while in the intense exercise at which the blood concentration of lac- tate begins to exponentially increase. (You will need to set LTHR in User Profile) | |
HR Zone | The current range of your Heart Rate (Zone 1 to Zone 7). | |
MHR Zone | The current range of your Maximum Heart Rate Pecentage heart rate (Zone 1 to Zone 75). | |
LTHR Zone | The current range of your Lactate Threshold Heart Rate Percentage (Zone 1 to Zone 7). | |
LapAvgHR | The average heart rate for the current lap. | |
LLapAvgHR | The average heart rate for the last finished lap. | |
Lap MHR% | The average of MHR% for the current lap. | |
Lap LTHR% | The average of LTHR% for the current lap. | |
Power | Power Now | Current Power in Watt. |
Avg Power | The average power for the current activity. | |
Max Power | The maximum power for the current activity. | |
LapAvgPw | The average power for the current lap. | |
LapMaxPw | The maximum power for the current lap. | |
3s power | 3 seconds average of power | |
10s power | 10 seconds average of power | |
30s power | 30 seconds average of power | |
NP (Normalized Power) | An estimate of the power that you could have maintained for the same physiological “cost” if your power had been perfectly constant, such as on an ergometer, instead of variable power output. |
Power |
TSS (Training Stress Score) | Training Stress Score is calculated by taking into account both the intensity such as IF and the duration of the ride. A way of measuring how much stress is put on the body from a ride. |
IF (Intensity Factor) | Intensity Factor is the ratio of the normalized power(NP) to your Functional Threshold Power(FTP). An indication of how hard or difficult a ride was in relation to your overall fitness. | |
SP (Specific Power) | Power-to-weight ratio | |
FTP Zone | The current rangeof your Functional Threshold Power Per- centage (Zone1 to Zone 7). | |
MAP Zone | The current rangeof your MaximumAerobic Power Pecent- age (Zone 1 to Zone 7). | |
MAP% | The current power divided by your Maximum Aerobic Pow- er. | |
FTP% | The current power divided by your functional threshold power. | |
Lap NP | Normalized power of the current lap | |
LLapAvgPw | The average power output for the last finished lap. | |
LlapMaxPw | The maximum power for the last finished lap. | |
Left Power | The Left-side power meter value. | |
Right Power | The Right-side power meter value. | |
Pedal Analysis | CurPB-LR | The current left/right power balance. |
AvgPB-LR | The average left/right power balance for the current activity. | |
CurTE-LR | The currentleft/right percentage of how efficiently a rider ispedaling. | |
MaxTE-LR | The maximumleft/right percentage of how efficiently a rider is pedaling. | |
AvgTE-LR | The average left/right percentage ofhow efficiently a rider ispedaling. | |
CurPS-LR | The current left/right percentage of how evenly a rider is applying forceto the pedalsthroughout each pedalstroke. | |
MaxPS-LR | The maximumleft/right percentage of how evenlya rider is applying forceto the pedalsthroughout each pedalstroke. | |
AvgPS-LR | The average left/right percentage of how evenlya rider is applying force to the pedals throughout each pedal stroke. | |
Heading | Heading | Heading function informs you which direction you are currently heading. |
Temperature | Temp | The current temperature. |
Graph | SPD Ring | The current speed ratedisplays in dynamiccoloured graph- ical mode. |
SPD Bar | ||
CAD Ring | The current cadence rate displays in dynamic coloured graphical mode. | |
CAD Bar | ||
HR Ring | The current heart rate displays in dynamic coloured graph- ical mode. | |
HR Bar | ||
PW Ring | The currentpower rate displays in dynamic coloured graph- ical mode. | |
PW Bar | ||
3s PW Ring | 3 seconds average of power displays in dynamic coloured graphical mode. | |
10s PW Ring | 10 seconds average of power displays in dynamic coloured graphical mode. | |
30s PW Ring | 30 seconds average of power displays in dynamic coloured graphical mode. | |
Ebike | Ebike Battery | The battery status of the conneted ebike. |
Travel Range | The possible distance that a rider could ride with the ebike. | |
Assist Mode | Various modes provided by the ebike with assigned levels of assistance. | |
Assist Level | The level of electronic assistance provided by the ebike in a given power mode. | |
Ebike Rear Gear | The gear position of the rear derailleur of Ebike displayed by the graphic. | |
Assist Mode & Level | The current ebike assist mode and level of electronic assistance. | |
Follow Track | Dist to POI | Distance to next point of interest. |
Dist to Peak | Distance to next peak. | |
Turn Info | Inform the rider the information of every turn. | |
Dist to Destination | The remaining distance to the destination. | |
Electronic Gear-Shifting Systems | ESS/Di2 Battery Level | The remaining battery power of the ESS/Di2 system. |
Front Gear | The gear position of the front derailleur displayed by the graphic. | |
Rear Gear | The gear position of the rear derailleur displayed by the graphic. | |
Gear Ratio | The ratio of the current teeth of the front gear to that of the rear gear. | |
Gears | The front and rear bike gears position displayed by num- bers. | |
Gear Combo | The current gear combination of the frontgear and the rear gear. |
Pros & Cons
Pros
- High-Resolution Display: Clear visibility in all lighting conditions.
- Advanced Navigation Features: Turn-by-turn directions, breadcrumb trails, and real-time alerts.
- Multi-Sensor Compatibility: Supports heart rate, cadence, power meters, and more.
- Long Battery Life: Up to 20 hours on a single charge.
- IPX7 Water Resistance: Durable against various weather conditions.
Cons
- Complex Setup Process: Requires time to configure all features and settings.
- No Built-In Maps for Some Regions: Requires downloading maps or using online services for certain areas.
- No Touch Screen Functionality: Navigation is done via buttons which can be less intuitive for some users.
Customer Reviews
Customers have generally praised the Bryton Rider 750 for its robust feature set, user-friendly interface, and reliable performance. Many appreciate the high-resolution display and long battery life. However, some users have noted that the setup process can be overwhelming due to the numerous features available.
A common complaint is related to the lack of built-in maps for certain regions which may require additional steps to download or access online maps.
Faqs
What is the screen size of the Bryton Rider 750?
How long does the battery of the Bryton last?
Is the Bryton water-resistant?
Does the Bryton support Strava Live Segments?
Can I pair my Shimano Di2 system with the Bryton?
How do I update the software of my Bryton Rider 750?
Can I use the Bryton Rider 750 without a smartphone?
What types of sensors does the Bryton Rider 750 support?
Is the Bryton available in different languages?
How do I reset my Bryton Rider 750 if it freezes or malfunctions?
Leave a Comment

