How to Charge: Bryton Sensor Device Rider 320 Owners Manual
Content
Introduction
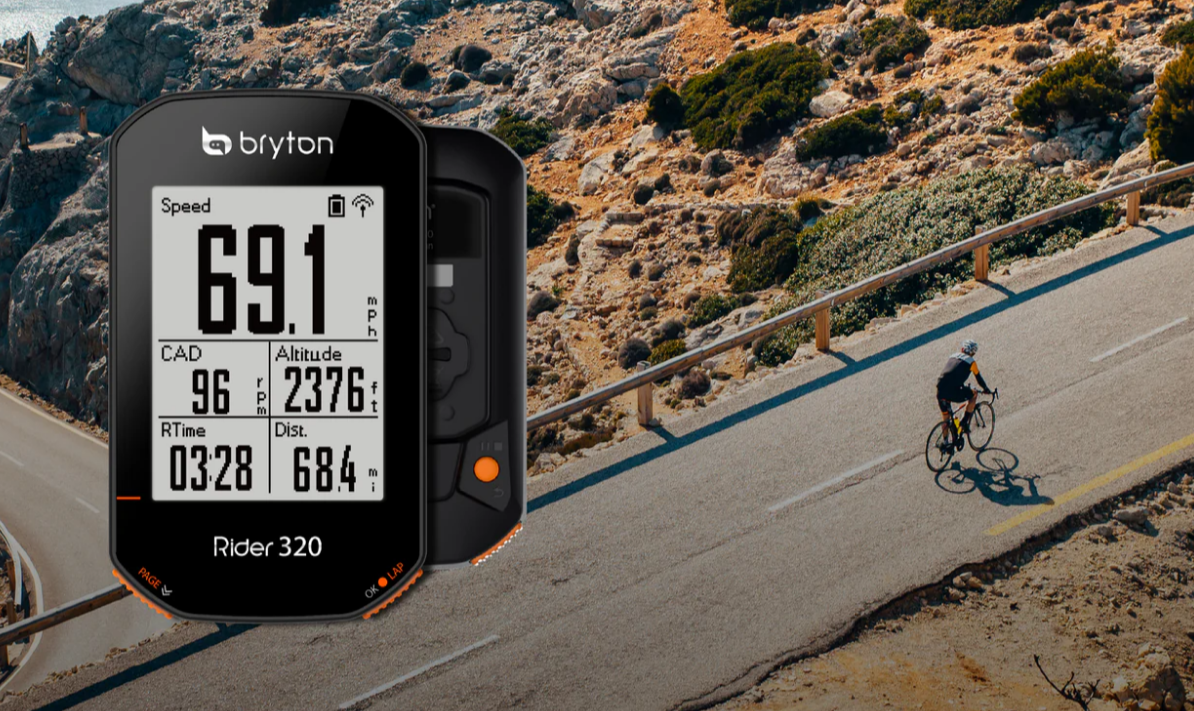
The Bryton Sensor Device Rider 320 is a comprehensive package for cyclists looking to track and an
Accessories
The Rider 320 comes with the following accessories:
- USB cable
- Bike mount
Optional items:
- Smart Heart Rate Sensor
- Smart Cadence Sensor
- Race Mount-Rider
- Smart Speed Sensor
- Smart Speed / Cadence Dual Sensor
- Sport Mount
Status Icons
NOTE: Only the active icons are displayed on the screen.
Specifications Rider 320
Item Description | |
Display | 2.3” FSTN positive transflective dot-matrix LCD |
Physical Size | 49.9 X 83.9 X 16.9mm |
Weight | 67g |
Operating Temperature | -10°C ~ 60°C |
Battery Charging Temperature | 0°C ~ 40°C |
Battery | Li polymer rechargeable battery |
Battery Life | 35 hours with open sky |
ANT+™ | Featuring certified wireless ANT+TM connectivity.
|
GNSS | Integrated high-sensitivity GNSS receiver with embedded antenna |
BLE Smart | Bluetooth smart wireless technology with embedded antenna; 2.4GHz band 0dBm |
Water Resistant | Water resistant to a depth of 1 meter for up to 30 minutes. |
Barometer | Equipped with barometer |

Smart Speed Sensors
Item Description | |
Physical size | 36.9 x 34.8 x 8.1 mm |
Weight | 6 g |
Water Resistance | Incidental exposure to water ofup to 1 meter forup to 30 minutes. |
Transmission range | 3m |
Battery life | Up to 1 year |
Operating temperature | -10°C ~ 60°C |
Radio frequency/protocol | 2.4GHz / Bluetooth 4.0 and Dynastream ANT+ Sport wireless communications protocol. |
NOTE: Accuracy may be degraded by poor sensor contact, electrical, magnectic interference and distance from the transmitter. To avoid magnetic interference, it is recommended that you change location, clean or replace chain
Smart Cadence Sensor
Item Description | |
Physical size | 36.9 x 31.6 x 8.1 mm |
Weight | 6 g |
Water Resistance | Incidental exposure towater of upto 1 meterfor up to30 minutes. |
Transmission range | 3m |
Battery life | Up to 1 year |
Operating temperature | -10°C ~ 60°C |
Radio frequency/protocol | 2.4GHz / Bluetooth 4.0 and Dynastream ANT+ Sport wireless communications protocol |
NOTE: Accuracy may be degraded by poor sensor contact, electrical, magnetic interference and distance from the transmitter
Smart Heart Rate Monitor
Item Description | |
Physical size | 63 x 34.3 x 15 mm |
Weight | 14.5 g (sensor) / 31.5g (strap) |
Water Resistance | Incidental exposure to water of up to 1 meterfor up to 30 minutes. |
Transmission range | 3m |
Battery life | Up to 2 years |
Operating temperature | 0°C ~ 50°C |
Radio frequency/protocol | 2.4GHz / Bluetooth 4.0 and Dynastream ANT+ Sport wireless communications protocol |
NOTE: Accuracy may be degraded by poor sensor contact, electrical, magnectic interference and distance from the transmitter.
Getting Started
This section will guide you through the basic preparations before you start using your Rider 320.
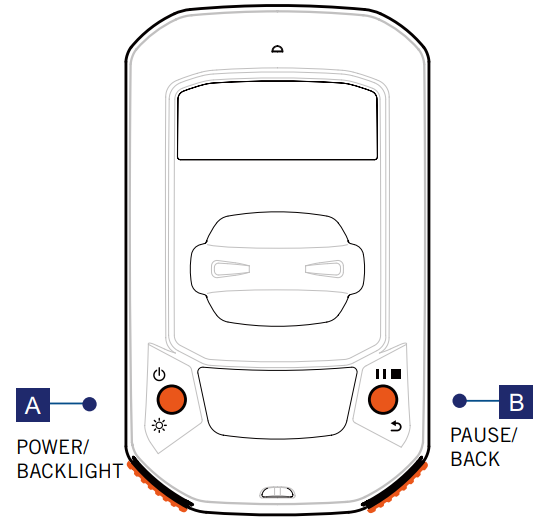
Your Rider 320
- Power/Backlight (
 )
)- Press to turn the device on.
- Press to turn on/off the backlight while the device is on.
- Long press to turn the device off .
- B BACK (
 )
)- In Cycling mode, press to enter Menu page.
- In Menu, press to return to the previous page or cancel an operation.
When recording, press to pause recording and enter the Menu.
- C OK/LAP(
 )
)- In Menu, press to enter submenu or confirm a selection.
- In Cycling mode, press to start recording. When recording, press to mark the lap.
- D PAGE (
 )
)- In Cycling mode, press to switch meter screen pages.
In Menu, press to scroll through the menu options.

How to Charge
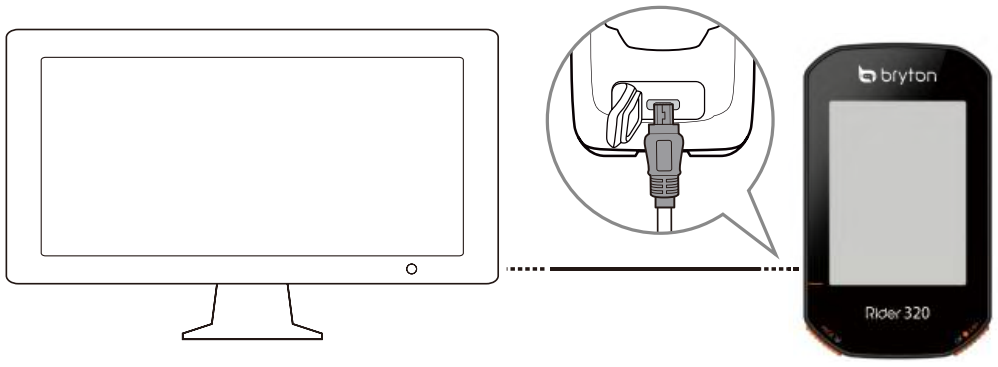
- Step 1: Charge your Rider 320
Connect Rider 320 to a PC to charge the battery for at least 4 hours. Unplug the device when it is fully charged.- You may see a white screen when the battery is really low. Keep the device plugged in for several minutes, it will automatically turn on after the battery is properly charged.
The temperature suitable for charging the battery is 0˚C~40˚C. Beyond this temperature range, charging will be terminated and the device will draw power from the battery.
- Step 2: Turn On Rider 320
Press to turn on the device. - Step 3: Initial Setup
When turning Rider 320 on for the first time, you will need to follow on-screen instructions to complete the setup.- Select the display language.
- Select the unit of measurement.
NOTE
Only when you choose English for the display language, you will need to select the unit of measurement. Otherwise, the default would be metric units.
To change the device language, pair your device with the Bryton Active App, and in the app navigate to Settings > General> System Language.
- Step 4: Acquire Satellite Signals
Once the Rider 320 is turned on, it will automatically search for satellite signals. It may take 30 to 60 seconds to acquire signals. Please make sure you acquire the satellite signal for the first time use.
The GPS signal icon ( ) appears when the GPS is fixed.
- If the GPS signal is not fixed, an
 icon appears on the screen.
 Please avoid the obstructed environments since they might affect the GPS reception.

NOTE: To improve the GPS accuracy, you can set 1 sec mode as your recording frequency.
- If the GPS signal is not fixed, an
- Step 5: Ride Your Bike with Rider 320
Free ride:
In meter view, measurement starts and stops automatically in sync with the movement of the bicycle.
Start an exercise and record your data:
In meter view, press to start recording, press to pause recording and enter the Menu. Then, choose to save your workout data.
NOTE: If you continue to proceed without pressing to record, Rider 320 would pop up a reminder to ask you to record when motion of bike is detected. To set the frequency of start reminder.
Reboot Rider 320
To reboot the Rider 320, press two keys (![]() /
/![]() ) at the same time.
) at the same time.
Share Your Records
- Sign up/log in to https://Brytonactive.com
- Go to https://active.brytonsport.com.
- Register a new account or use your current account to log in.
- Connect to PC
- Turn on your Rider 320 and connect it to your computer by USB cable.
- Share Your Records
- Click "+" on the upper right corner.
- Drop FIT, BDX, GPX file(s) here or Click “Select files“ to upload tracks.
- Click “Activities” to check uploaded tracks.
Share Your Tracks
- Sign up/log in on Strava.com
- Go to https://www.strava.com.
- Register a new account or use your current account to log in.
- Connect to PC
- Turn on your Rider 320 and connect it to your computer by USB cable.
- Share Your Records
- Click “+” on the top right corner of the Strava page and then click “File”.
- Click “Select Files” and select FIT files from Bryton device.
- Enter information about your activities and then click “Save & View”.
Battery Information
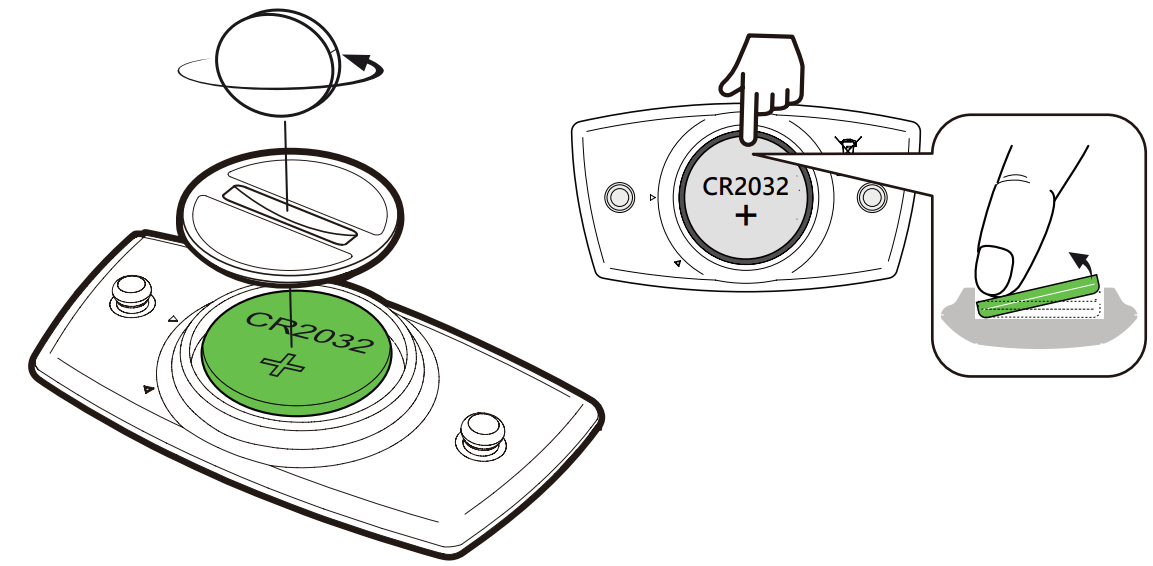
Smart Speed Sensor and Smart Cadence Sensor Both sensors contain a user-replaceable CR2032 battery.
Before using sensors:
alyze their rides. This bundle includes the Bryton Rider 320 GPS bike computer, a speed sensor, and a heart rate monitor. The estimated price for this bundle is $150, making it an affordable option for serious cyclists. The launching date for this product is not yet announced.
- Locate the circular battery cover on the back of sensors.
- Use your finger to press and twist cover counter-clockwise so the indicator on the cover points to unlock icon (
 ).
). - Remove the cover and battery tab.
Use your finger to press and twist cover clockwise so the indicator on the cover points to locked icon (
 ).
)..png)
To replace the battery:
- Locate the circular battery cover on the back of sensors.
- Use your finger to press and twist cover counter-clockwise so the indicator on the cover points to unlock icon ().
- Remove the battery and insert new battery with positive connector first into the battery chamber.
Use your finger to press and twist cover clockwise so the indicator on the cover points to locked icon (
).
NOTE:
- When installing a new battery, if the battery is not placed with the positive connector first, the positive connector will easily deform and malfunction.
- Be careful not to damage or lose the O-ring gasket on the cover.
- Contact your local waste disposal department to properly dispose of used batteries.
Smart Heart Rate Monitor
The heart rate monitor contains a user-replaceable CR2032 battery.
To replace the battery:
- Locate the circular battery cover on the back of the heart rate monitor.
- Use a coin to twist the cover counter-clockwise.
- Remove the cover and battery.
- Insert the new battery, with the positive connector facing upward and lightly press it.
Use a coin to twist the cover clockwise.
NOTE
- Be careful not to damage or lose the O-ring gasket.
- Contact your local waste disposal department to properly dispose of used batteries.
Description
The Bryton Sensor Device Rider 320 is a complete package for cyclists who want to track and analyze their rides. The Rider 320 GPS bike computer is easy to use and features a bright, clear display. The device supports up to 72 functions and is compatible with both ANT+ and Bluetooth sensors. The speed sensor and heart rate monitor are also easy to install and provide accurate data. This bundle is perfect for cyclists who want to improve their performance and track their progress over time.
Install Rider 320
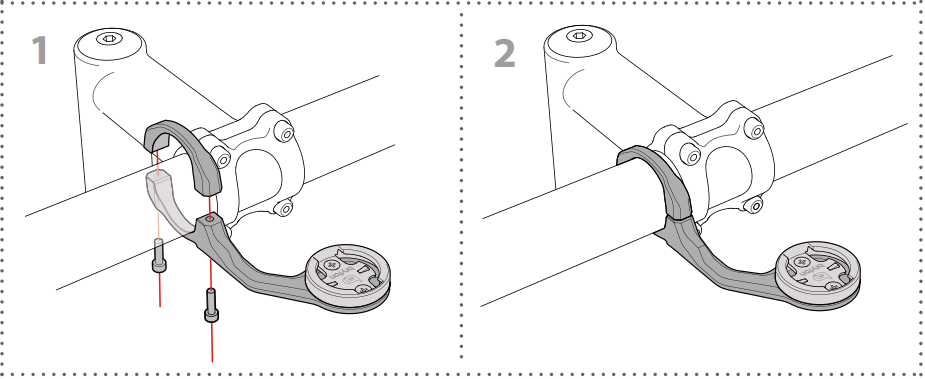
Use Bike Mount to Mount Rider 320
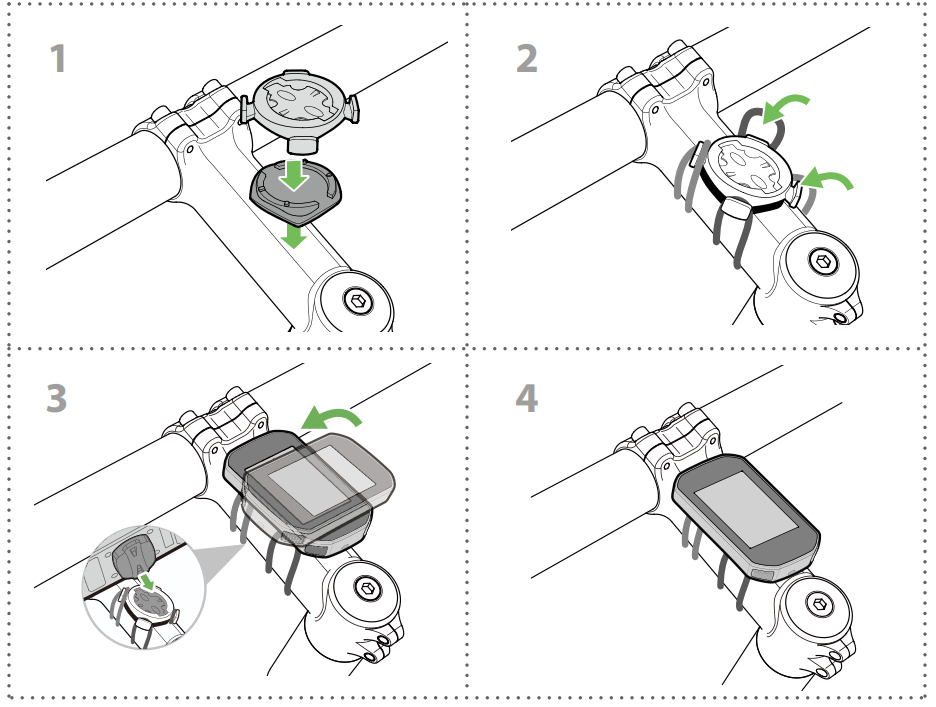
Optional
Install Speed/Cadence/Dual Sensor (Optional)
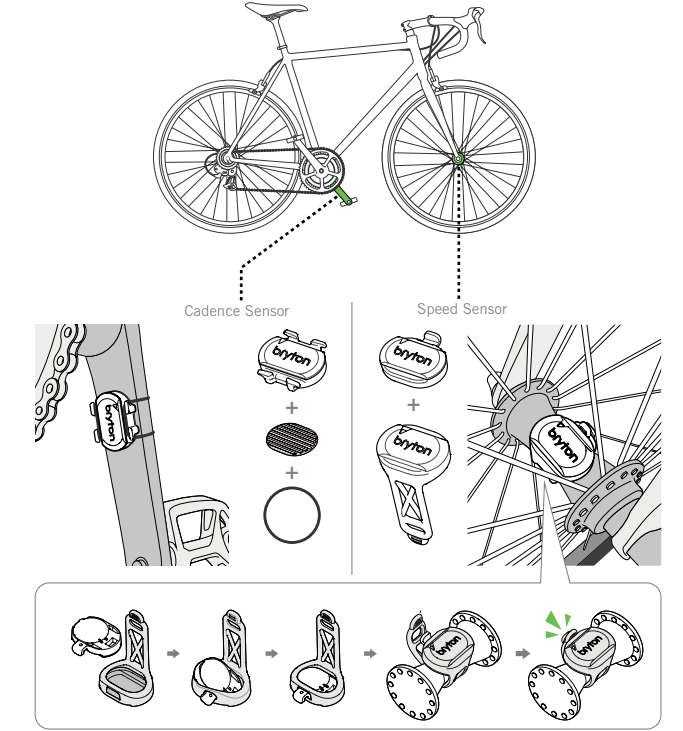
NOTE: Once sensors waken, the LED blinks twice. The LED continues to blink when you continue to pedal for pairing. After around 15 blinks, it will stop blinking. If not used for 10 minutes, sensor would go into sleep mode to preserve power. Please complete the pairing during the time the sensor is awake.
Install Heart Rate Belt (Optional)
_bryton_sensor_bundle_rider_320.png)
NOTE
- In cold weather, wear appropriate clothing to keep the heart rate belt warm.
- The belt should be worn directly on your body.
- Adjust the sensor position to the middle part of the body (wear it slightly below the chest). The Bryton logo shown on the sensor should be facing upward. Tighten the elastic belt firmly so that it will not turn loose during the exercise.
- If the sensor cannot be detected or the reading is abnormal, please warm up for about 5 minutes.
- If the heart rate belt is not used for a period of time, remove the sensor from the heart rate belt.
NOTE: Improper battery replacement may cause an explosion. When replacing a new battery, use only the original battery or a similar type of battery specified by the manufacturer. Disposal of the used batteries must be carried out in accordance to the regulations of your local authority.
For better environmental protection, waste batteries should be collected separately for recycling or special disposal.
Wheel Size and Circumference
Wheel Size | L (mm) |
12x1.75 | 935 |
12x1.95 | 940 |
14x1.50 | 1020 |
14x1.75 | 1055 |
16x1.50 | 1185 |
16x1.75 | 1195 |
16x2.00 | 1245 |
16x1-1/8 | 1290 |
16x1-3/8 | 1300 |
17x1-1/4 | 1340 |
18x1.50 | 1340 |
18x1.75 | 1350 |
20x1.25 | 1450 |
20x1.35 | 1460 |
20x1.50 | 1490 |
20x1.75 | 1515 |
20x1.95 | 1565 |
20x1-1/8 | 1545 |
20x1-3/8 | 1615 |
22x1-3/8 | 1770 |
22x1-1/2 | 1785 |
24x1.75 | 1890 |
24x2.00 | 1925 |
24x2.125 | 1965 |
24x1(520) | 1753 |
24x3/4 Tubular | 1785 |
24x1-1/8 | 1795 |
24x1-1/4 | 1905 |
26x1(559) | 1913 |
26x1.25 | 1950 |
26x1.40 | 2005 |
26x1.50 | 2010 |
26x1.75 | 2023 |
26x1.95 | 2050 |
26x2.10 | 2068 |
26x2.125 | 2070 |
26x2.35 | 2083 |
26x3.00 | 2170 |
26x1-1/8 | 1970 |
26x1-3/8 | 2068 |
26x1-1/2 | 2100 |
650C Tubular 26x7/8 | 1920 |
650x20C | 1938 |
650x23C | 1944 |
650x25C 26x1(571) | 1952 |
650x38A | 2125 |
650x38B | 2105 |
27x1(630) | 2145 |
27x1-1/8 | 2155 |
27x1-1/4 | 2161 |
27x1-3/8 | 2169 |
27.5x1.50 | 2079 |
27.5x2.1 | 2148 |
27.5x2.25 | 2182 |
700x18C | 2070 |
700x19C | 2080 |
700x20C | 2086 |
700x23C | 2096 |
700x25C | 2105 |
700x28C | 2136 |
700x30C | 2146 |
700x32C | 2155 |
700C Tubular | 2130 |
700x35C | 2168 |
700x38C | 2180 |
700x40C | 2200 |
700x42C | 2224 |
700x44C | 2235 |
700x45C | 2242 |
700x47C | 2268 |
29x2.1 | 2288 |
29x2.2 | 2298 |
29x2.3 | 2326 |
The wheel size is marked on both sides of the tires.
Basic Care For Your Rider 320
Taking good care of your device will reduce the risk of damage to your device.
- Do not drop your device or subject it to severe shock.
- Do not expose your device to extreme temperatures and excessive moisture.
- The screen surface can easily be scratched. Use the non-adhesive generic screen protectors to help protect the screen from minor scratches.
- Use diluted neutral detergent on a soft cloth to clean your device
- Do not attempt to disassemble, repair, or make any modifications to your device. Any attempt to do so will make the warranty invalid.
Data Fields
Category Data Fields Description of Data Fields | ||
Energy | Calorie | The number of total calories burned. |
Kilojoules | The accumulated poweroutput in kilojoules for the current activity. | |
Altitude | Altitude | The height ofyour current location above or belowsea level. |
Max Altitude | The highest heightof your currentlocation above or below sea levelwhich the riderachieved for thecurrent activity. | |
Alt. Gain | The total altitude distance gained during this current activity. | |
Alt. Loss | The total altitude lost during this current activity. | |
Gradient | The calculation of altitude over distance. | |
Uphill | The total distance traveled while ascending. | |
Downhill | The total distance traveled while descending. | |
Distance | Distance | The distance travelled for current activity. |
Odometer | The accumulated total distance until you reset it. | |
LapDistance | The distance traveled for the current lap. | |
LLapDist. | The distance traveled for the last finished lap. | |
Trip 1/Trip 2 | Cumulative mileage recorded before you reset it.They are 2 separate tripmeasurements. You are freeto use Trip 1 or Trip 2 to record,for example, weekly totaldistance and use another to record, forexample, monthly totaldistance. | |
Speed | Speed | The current rate of change in distance. |
Avg Speed | The average speed for current activity. | |
Max Speed | The maximum speed for current activity. | |
LapAvgSpd | The average speed for the current lap. | |
LapMaxSpd | The maximum speed for the current lap. | |
LLapAvgSpd | The average speed for the last finished lap. | |
Time | Time | Current GPS Time. |
Ride Time | The time spent on riding for current activity. | |
Trip Time | Total time spent for current activity. | |
Sunrise | The time of sunrise based on your GPS location. | |
Sunset | The time of sunset based on your GPS location. | |
LapTime | The stopwatch time for the current lap. | |
LLapTime | The stopwatch time for the last finished lap. | |
Lap Count | The number of laps finished for the current activity. | |
Cadence | Cadence | The current rate at which rider is pedalling the pedals |
Avg CAD | The average cadence for current activity. | |
Max CAD | The maximum cadence for current activity. | |
LapAvgCad | The average cadence for the current lap. | |
LLapAvgCad | The average cadence for the last finished lap. | |
HR | Heart Rate | The number of times yourheart beats perminute. It requires compatible HRsensor pairing connection to your device. |
Avg HR | The average heart rate for current activity. | |
Max HR | The maximum heart rate for current activity. | |
MHR % | Your current heart rate divided by Maximum Heart Rate. MHR means thatthe maximum numberof beats madeby your heart in1 minute ofeffort. (MHR isdifferent from Max HR. You will need to set MHR in User Profile) | |
LTHR% | Your currentheart rate divided by Lactate Threshold Heart Rate. LTHR means thatthe average heartrate while in the intense exercise at which theblood concentration of lactate begins to exponentially increase. (You will needto set LTHR in User Profile) | |
MHR Zone | The current range of your Maximum Heart Rate Pecentage heart rate (Zone 1 to Zone 75). | |
LTHR Zone | The current rangeof your Lactate Threshold Heart Rate Percentage (Zone 1 to Zone7). | |
LapAvgHR | The average heart rate for the current lap. | |
LLapAvgHR | The average heart rate for the last finished lap. | |
Lap MHR% | The average of MHR% for the current lap. | |
Lap LTHR% | The average of LTHR% for the current lap. | |
Temp | Temp. | The current temperature. |
Power | Power | Current Power in Watt. |
Avg Power | The average power for the current activity. | |
Max Power | The maximum power for the current activity. | |
LapAvgPw | The average power for the current lap. | |
LapMaxPw | The maximum power for the current lap. | |
3s power | 3 seconds average of power | |
10s power | 10 seconds average of power | |
30s power | 30 seconds average of power | |
NP (Normalized Power) | An estimate of the powerthat you couldhave maintained for thesame physiological "cost" if your powerhad been perfectly constant, suchas on an ergometer, instead of variable power output. | |
TSS (Training Stress Score) | Training Stress Score is calculated by taking intoaccount both the intensity such as IFand the duration of the ride.A way of measuring howmuch stress isput on thebody from a ride. | |
IF (Intensity Factor) | Intensity Factor is the ratioof the normalized power(NP) to your Functional Threshold Power(FTP). Anindication of how hard or difficult a ride was in relation to your overallfitness. | |
SP (Specific Power) | Power-to-weight ratio | |
FTP Zone | The current rangeof your Functional Threshold Power Percentage (Zone1 to Zone 7). |
Power | MAP Zone | The current rangeof your MaximumAerobic Power Pecentage (Zone 1 to Zone 7). |
MAP% | The current power divided byyour Maximum Aerobic Power. | |
FTP% | The currentpower divided by your functional threshold power. | |
Lap NP | Normalized power of the current lap | |
Last Lap NP | Normalized power of the last lap | |
LLapAvgPw | The average power output for the last finished lap. | |
LlapMaxPw | The maximum power for the last finished lap. | |
Left Power | Current left leg power | |
Right Power | Current right leg power | |
3s Left Power | 3 seconds average of left leg power | |
10s Left Power | 10 seconds average of left leg power | |
30s Left Power | 30 seconds average of left leg power | |
3s Right Power | 3 seconds average of right leg power | |
10s Right Power | 10 seconds average of right leg power | |
30s Right Power | 30 seconds average of right leg power | |
Pedal Analysis | 3s Avg PB | 3 seconds average power balance. |
CurPB-LR | The current left/right power balance. | |
AvgPB-LR | The average left/right power balance for the current activity. | |
CurTE-LR | The current left/right percentage of howefficiently a rideris pedaling. | |
MaxTE-LR | The maximum left/right percentage of how efficiently a rider is pedaling. | |
AvgTE-LR | The average left/right percentage of how efficiently a rider is pedaling. | |
CurPS-LR | The current left/right percentage of howevenly a rideris applyingforce to thepedals throughout eachpedal stroke. | |
MaxPS-LR | The maximum left/right percentage of how evenly a rider is applying forceto the pedalsthroughout each pedalstroke. | |
AvgPS-LR | The average left/right percentage of howevenly a rideris applyingforce to thepedals throughout eachpedal stroke. |
Setup Guide
- First, charge the Rider 320 GPS bike computer and the heart rate monitor. To charge, use the included USB cable and plug it into a USB port on your computer or a USB wall charger.
- Next, install the speed sensor on your bike. To do this, attach the sensor to the spoke of your rear wheel and secure it with the included zip ties. Make sure the sensor is aligned with the magnet on your wheel.
- After that, put on the heart rate monitor and make sure it is securely fastened. The monitor should be tight enough to stay in place but not so tight that it is uncomfortable.
- Now, turn on the Rider 320 and go to the settings menu. Select "Pair Sensor" and then select "Speed." The device will search for the speed sensor and pair with it. Do the same thing for the heart rate monitor.
- Once the sensors are paired, you can start your ride. The Rider 320 will track your speed, cadence, distance, and heart rate in real-time.
Troubleshooting
- Problem: The Rider 320 is not detecting the speed sensor or heart rate monitor.
Solution: Make sure the sensors are turned on and within range of the Rider 320. If they still are not being detected, try resetting the sensors and then pairing them again. - Problem: The data on the Rider 320 is not accurate.
Solution: Make sure the sensors are installed correctly and are securely fastened. If the data is still not accurate, try calibrating the sensors according to the manufacturer's instructions.
Pros & Cons
- Pros:
- Affordable price
- Easy to use
- Accurate data tracking
- Compatible with both ANT+ and Bluetooth sensors
- Cons:
- The display is not as bright as some other GPS bike computers
- The heart rate monitor may not be comfortable for some users
Customer Reviews
Customers generally have positive things to say about the Bryton Sensor Device Rider 320. They like the affordable price and the easy-to-use interface. They also appreciate the accuracy of the data tracking. However, some customers have complained that the display is not as bright as they would like. Others have said that the heart rate monitor can be uncomfortable to wear for long periods. Overall, though, customers are happy with their purchase and recommend this bundle to other cyclists.
Faqs
The Rider 320: What is it?
In what way can I charge the Rider?
What is the sensors' range?
In what way do I connect the sensors to the Rider?
How are the sensors calibrated?
How should I mount the speed Bryton Sensor Device?
What is the battery life?
What is the Bryton Sensor Bundle Rider warranty?
Leave a Comment