Burcam Grinder Pump 400700 User Guide

Content
Burcam Grinder Pump 400700
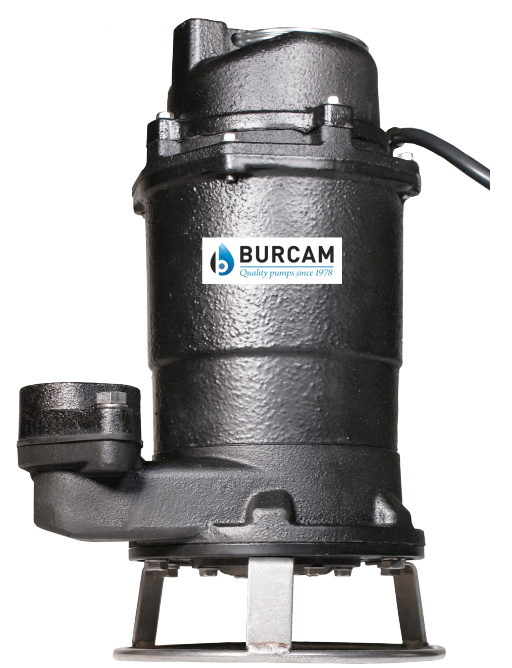
The Burcam Grinder Pump is a heavy-duty, powerful pump designed for wastewater management in residential and commercial settings. With an estimated retail price of $1,500 and a launch date set for late 2023, this pump is a game-changer in the world of wastewater management.
Detailed Specifications
The Burcam Grinder Pump boasts a 1 HP motor, with a max flow rate of 130 GPM and a total dynamic head of 105 feet. Its cutter system includes a 3/4 inch diameter cutting blade, capable of grinding solid waste up to 2 inches in diameter. This pump is designed for use in both residential and commercial applications, and is built to last with a corrosion-resistant, glass-filled polypropylene housing.
TOOLS
Screwdrivers, hacksaw to cut pipe, knife to assist in pipe cutting, round file to smooth pipe ends, pipe wrench, adjustable wrench, 1/4’’ drill bit and drill. Ensure that you have a gas tight cover for your sewage basin and 3’’ ABS/DWV vent piping.
NOTICE
This unit have been designed to pump water only. This unit is not designed for applications involving salt water, brine or any other liquids including petroleum products. Use with salt, brine or any other liquids including petroleum products will void the warranty.
Setup Guide of Burcam Grinder Pump
Setting up the Burcam Grinder Pump 400700 is a simple process. Begin by selecting a suitable location for the pump, ensuring that it is level and well-drained. Next, connect the pump to your wastewater system using the provided piping, and secure it in place using the included mounting bracket. Once the pump is in place, plug it in and turn it on. The pump will automatically begin to manage your wastewater, providing years of reliable service.
INITIAL START-UP PROCEDURES
- Inspect the pump and the sewage tank for any obvious condition that may necessitate cleaning, correction, adjustement or repair.
- Assure that the pump is secure and vertical for proper operation.
- Assure that there is adequate clearance from any combustible materials or structure. Stored materials must be kept away from the pump. Shelves or cabinet structures must not be in close proximity over the pump.
- Assure that the motor is securely plugged into a proper ‘GFCI’ electrical outlet.
- T est the ‘GFCI’ outlet by pressing its test switch. This should prove that the outlet is energized and will trip off to protect against a ground fault. Be sure to reset the ‘GFCI’ by pressing its reset switch.(Repeat this step monthly)
- Lift the float to assure that the pump will start when required. (Step 7 below will test submersible pumps with enclosed floats).
- Pour pails of water in the sewage tank to turn the pump on. Assure that any check valve present will permit the sewage to flow.
- Observe that the plumbing can pump the sewage safely out of the residence.(Repeat this step monthly)
Description of Grinder Pump
The Burcam Grinder Pump is a top-of-the-line wastewater management solution, perfect for homes, businesses, and municipalities. Its powerful motor and cutting system make it capable of handling even the toughest wastewater, while its corrosion-resistant housing ensures long-lasting durability. This pump is easy to install and maintain, with simple controls and a user-friendly interface. Whether you're managing wastewater for a single-family home or a large commercial complex, the Burcam Grinder Pump 400700 is the perfect choice.
APPLICATIONS
Designed for a permanent installation for homes and cottage applications.
CAPACITIES
| HEAD | US GPH | HEAD | LPH |
|---|---|---|---|
| 3.0 m | 7100 | 10' | 1875 |
| 6.0 m | 6200 | 20' | 1635 |
| 9.0 m | 4200 | 30' | 1100 |
| 10.5 m | 1900 | 35' | 500 |
IMPORTANT NOTICE
The following are minimum requirements in order to protect your residence from flooding. It is a small investment but it is your personal responsibility to protect your home, family and valuables. Failure to comply with the following requirements will also void your warranty
- Two (2) pumps have to be installed in the sewage pit. The first pump as a primary pump and the second pump as the backup unit.
- An Alarm system model 450455 has to be installed to advise you of any malfunctions. Pump selection, proper and adequate installation are a must to comply with local by-laws and need to be adhered to.
INSTALLATION STEPS
WARNING
As per the safety instructions described on page 2: always unplug the power cord from the receptacle prior to inspecting and servicing the pump. Do not simply unscrew the fuse or trip the breaker. Do not operate the pump unless it is in a basin and kept at a safe distance away from you. The blade on the bottom rotates at high velocity and can cause serious injury if you do not follow these safety guidelines.
We recommend that you install your pump and basin in a clean location where there is adequate room for servicing at a later date. Protection from freezing temperatures and good ventilation should be considered as well, to provide the pump an environment for long life.
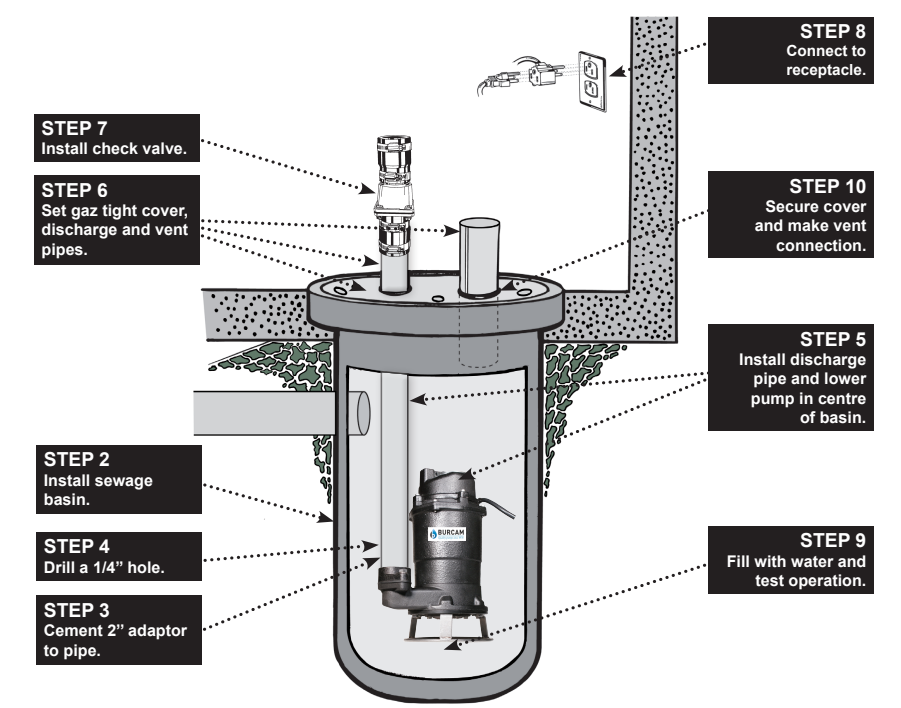
- Assuming that you have a sump pit located in your basement floor... Your sump pit should be constructed from concrete, brick, tile or more recently a sump basin made from plastic and/or fiberglass. The minimum size of your sump pit must be 18” in diameter and no less than 25” deep. When pit is ready, proceed to next step.
Friction losses in the discharge pipe must be taken into consideration when many elbows and fittings are installed in the discharge line. Each elbows and fittings must be considered as 1 feet of head. Never run the pump dry. Damage to the seal may occur. The run of the pipe from the check valve to the existing waste or drain line must never be slooping downward except when connecting to same. - For a new installation, install your sewage basin in the excavation you have provided in the basement floor of your home. Connect the necessary piping from your shower trap, toilet, etc., to the inlet of your sewage basin, with the proper pipe and fittings.
- Cut a length of 40” to 42” of 2” ABS/DWV pipe. Cement the 1 1/4” male adaptor to 2” slip to one end of this pipe.
- With your drill, make a 1/4” hole in the adaptor previously glued. This hole will prevent any air locking wich might occur.
- Screw the pipe with the male adaptor into the 2” discharge opening in the pump. Lower pump with piping attached into the sewage basin. Make sure that the pump is as close as possible to the centre of the basin. Adjusting the pump in centre of basin will keep mechanical float switch from rubbing on side of basin.
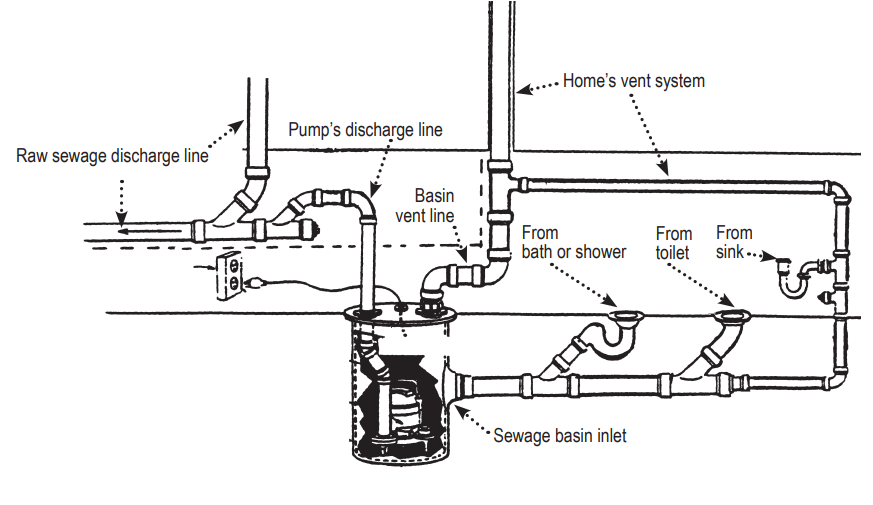
- When you are pumping raw sewage, you must have a gas tight cover on the basin and a vent pipe from basin, connecting to home’s vent system (see diagram). Feed the 2” riser pipe from pump’s discharge, through the 2” opening in the cover. Secure a 3” vent pipe to the cover and bring the switch and pump motor power cables through the opening in the cover provided.
- Install a 2” check valve (model 450457) union type to the 2” discharge riser pipe coming out of the cover, to a lenght of 2” ABS/DWV pipe, and run the discharge line as short as possible to the home’s waste sewer line. Secured the check valve with the provided clamps. Be sure that the arrow on valve are pointing away from pump.
- Connect the 3 prong plug of the switch in a receptacle. Insert the motor 3 prong plug into female receptacle on exposed piggyback of switch plug. The mechanical switch provided for automatic operation is preset to pump. No adjustments are necessary.
- Fill the sewage basin with water to test the operation of the submersible sewage pump and switch operation. Pump should start pumping when the water level reaches 12” to 15” above the bottom of the basin and above the pump. Allow the pump to go several “ON-OFF” cycles to assure satisfactory operation.
- Secure the gas tight cover and the plug for electrical cords with the gaskets and screws provided with the cover. Make vent connection to home’s vent system.
SEWAGE SYSTEM TYPICAL PIPING

SEWAGE PUMP APPLICATION

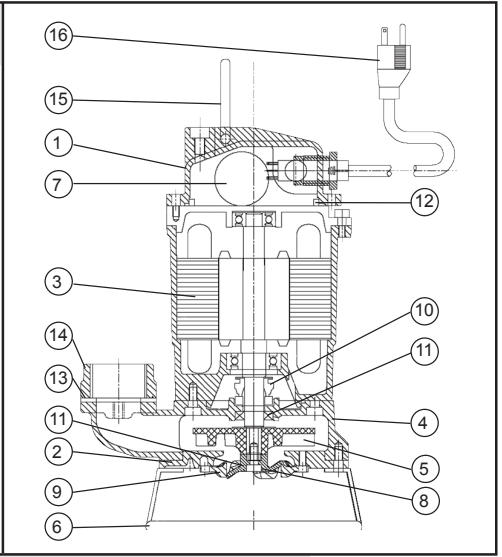
REPAIR PARTS

| # | REF. | DESCRIPTION |
|---|---|---|
| 1 | 311130 | Motor Cover |
| 2 | 311131 | Suction Cover |
| 3 | 311145 | Motor |
| 4 | 311132 | Pump Body |
| 5 | 311133 | Impeller |
| 6 | 311134 | Base support |
| 7 | 311135 | Capacitor |
| 8 | 311136N | Cutter |
| 9 | 311137N | Cutter plate |
| 10 | 311138 | Mech. Seal |
| 11 | 311139 | Oil Seal |
| 12 | 311140 | O-Ring (Top Cover) |
| 13 | 311141 | Packing (Flange) |
| 14 | 311142 | Flange |
| 15 | 311143 | Handle |
| 16 | 311144 | Cable |
SAFETY INSTRUCTIONS
Before installation and operation, follow these procedures
- Check with your local electrical and plumbing codes to ensure you comply with the regulations. These codes have been designed with your safety in mind. Be sure you comply with them.
- A separate circuit must be lead from the home electrical distribution panel properly protected with a fuse or a circuit breaker. We also required that a ground fault circuit be used as well as a ‘GFCI’ receptacle. Consult a licensed electrician for all wiring.
- The ground terminal on the three-prong plugs should never be removed. They are supplied and designed for your protection.
- Never make adjustments to any electrical appliance or product with the power connected.
- Do not only unscrew the fuse or trip the breaker, remove the power plug from the receptacle.
ELECTRICAL CONNECTION
For pumping systems using more than one pump, each pump needs to be connected to a separate dedicated circuit protected by a fuse or breaker. This way, the power supply of one pump will not stop operating if the fuse of one of the pumps burns or if the breaker of one of the pumps trips.
MATERIAL REQUIRED FOR SEWAGE PUMP APPLICATION
- Desired length of ABS/DWV 2’’ pipe, to link up from pump discharge to waste or drain existing pipe.
- Required quantities of 2’’ ABS/DWV elbow (s) and/or other fitting (s) to run the discharge line.
- 1 only 1 1/4’’ male adaptor to 2’’ slip, to connect the discharge pipe to the pump.
- Desired length of ABS/DWV 3’’ pipe and required quantities of 3’’ ABS/DWV elbow (s) and/or other fitting (s) to run the vent line.
- 1 only 2’’ union check valve # 450457.
- 1 only 18’’ X 30’’ minimum size sewage basin like # 400420.
- Teflon tape and ABS cement.
TROUBLE SHOOTING GUIDE CHECKLIST
NEVER MAKE ADJUSTMENTS TO ANY ELECTRICAL APPLIANCE OR PRODUCT WITH THE POWER CONNECTED. DON’T JUST UNSCREW THE FUSE OR TRIP THE BREAKER, REMOVE THE POWER FROM THE RECEPTACLE.
| TROUBLE | PROBABLE CAUSE | ACTION |
|---|---|---|
| Motor does not run. | Switch is 'OFF' position | Turn switch to ‘ON’ position |
| Blown fuse | Replace | |
| Tripped breaker | Reset | |
| Disconnected plug | Re-install | |
| Corroded plug | Clean | |
| Float stuck | Check movement | |
| Defective switch | Replace | |
| Defective motor | Replace | |
| Motor runs but no water is delivered. | Improper voltage | Check voltage |
| Pump may be airlocked | Check drilled hole in discharge pipe | |
| Pump discharge head too high | Wrong pump selection (over 15') | |
| Clogged inlet/impeller | Clean | |
| Pump does not deliver to full capacity. | Improper voltage | Check voltage |
| Pump may be airlocked | Check drilled hole in discharge pipe | |
| Pump discharge head too high | Wrong pump selection (over 15') | |
| Clogged inlet/impeller | Clean | |
| Pump does not shut off. | Defective switch | Replace |
| Missing check valve | Install valve | |
| Clogged check valve in open position | Clean debris | |
| Float obstruction | Check for movement |
Pros & Cons
- Pro: Powerful 1 HP motor capable of handling even the toughest wastewater
- Pro: Corrosion-resistant, glass-filled polypropylene housing for long-lasting durability
- Pro: Easy to install and maintain, with simple controls and a user-friendly interface
- Con: May be too powerful for small-scale residential applications
- Con: Higher price point compared to some other wastewater management solutions
Customer Reviews of Burcam Grinder Pump 400700
“The Grinder Pump is a beast of a machine! I've been using it for several months now, and it's been handling all of my wastewater with ease. The setup was straightforward, and the pump has been running smoothly ever since. Highly recommended!” "I've had a few issues with clogs in my wastewater system, but the Burcam Grinder Pump 400700 has been a lifesaver. Its powerful cutting system easily grinds up any solids, and I haven't had a single clog since I installed it. It's a little pricey, but it's worth every penny."
Faqs
How should the Burcam Grinder Pump 400700 be installed correctly?
Is it possible to utilise the Burcam Grinder Pump 400700 for commercial purposes?
What kinds of wastes are suitable for the Burcam Grinder Pump 400700?
How frequently should maintenance be performed on the Burcam Grinder Pump 400700?
When the Burcam Grinder Pump 400700 begins to make strange noises, what should I do?
Does the Burcam Grinder Pump 400700 have an alarm system, and if so, how does it work?
How can I fix a Burcam Grinder Pump 400700 that won't start?
Which safety measures need to be followed when using the Burcam Grinder Pump 400700?
Is there anything environmental that the Burcam Grinder Pump 400700 has to worry about?
What is covered by the Burcam Grinder Pump 400700 warranty, and how long is it valid for?
Leave a Comment
