Cable Matters USB 3.0 Data Transfer Cable User Manual
Content
Introduction
Your Cable Is Crucial USB 3.0 Data Transfer Cable is a high-speed solution for transferring files and data between two computers. With a transfer rate of up to 5 Gbps, it ensures quick and efficient data movement. Compatible with both Windows and Mac operating systems, this cable is ideal for synchronizing files, transferring large folders, and even migrating system settings and applications. Its plug-and-play design requires minimal setup, making it a convenient tool for users looking to streamline their data transfer processes.
Package Contents
Please check that the following items are contained in the package:
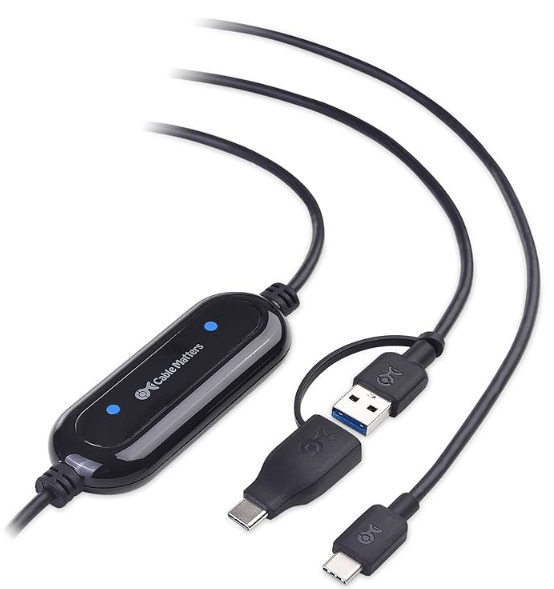
- 1 x USB-A 3.0 Data Transfer Cable – 2 Meters / 6.5 Foot
- 1 x Card with Easy Computer Sync and PCLinq5 software (Download from cablematters.com/downloads)
- 1 x QuickStart guide
Technical Specifications
| Feature | Specification |
|---|---|
| Data Transfer Cable Connectors | 2 x USB Type A - Male |
| OS Support USB Host | Windows XP, Vista, 7, 8, 8.1, 10, Mac OS X |
| LED Indicators | Blue |
| Cable Length | 2 Meters / 6.5 Foot |
| Model No | 202067 |
| Warranty | Limited One-Year |
Note: Specifications are subject to change without notice.
Product Description
The Cable Matters USB-A 3.0 Data Transfer Cable is the perfect choice for migrating your files when upgrading to a new Laptop or PC. The included Easy Computer Sync & PCLinq5 software will also efficiently synchronize files between two computers in much less time than using a network or cloud-based solution.
Product Features
- Supports Windows XP, Vista, 7, 8, 8.1, 10, Mac OS X (Not Compatible with Windows 10 S Mode)
- Fast data transfer with High Speed USB 3.0 up to 5 Gbps
- Migrate personal data directly without using a network or the internet
- Post transfer report with log of files transferred and any errors
- Off-line Help guide is integrated into the program
- Complimentary Easy Computer Sync software license key
System Requirements (Each PC)
- Supported OS system: Windows XP, Vista, 7, 8, 8.1, 10, Mac OS X
- Available USB Port: USB Type A 2.0/3.0
- Processor: 700 MHz or higher
- System Memory: 128 MB or greater
- Hard Disk Space: 200MB or higher
- User Accounts with Administrator Rights in the same language
- Internet access to download and update drivers
Connection and Operating Instructions
Quick Start Instructions
- Install the Easy Computer Sync or PCLinq5 software on both computers. Use the Registration Code (a 16-character alphanumeric code) printed on the product for Easy Computer Sync software.
- Run the program from the Setup Wizard or click on the Easy Computer Sync or PCLinq5 desktop icon to start the program.
- Connect the Data Transfer Cable to a USB port on both computers.
- Follow the instructions on the pop-up menus.
- Install the software for the Data Transfer Cable BEFORE connecting the cable.
NOTES: The Easy Computer Sync software only supports Windows system while PCLinq5 supports both Windows and Mac OS systems.
Getting Started Cable Is Crucial USB 3.0 Data Transfer Cable
Installation Checklist
- The Registration Code (Printed on the product) is required to install the Easy Computer Sync software and allows the software to be installed on 4 computers.
- Install the Easy Computer Sync software first! Both the source and target computers require 200 MB of hard disk space to install the software.
- Check for sufficient hard disk space on both computers for transferring files.
- Most transfers require Administrator access on both computers.
- Close all unnecessary programs and run a fresh virus scan before transferring data.
- Temporarily close your anti-virus software if it prevents the software installation.
- Backup files or setup a restore point before any major migration of data.
- Both computers should be connected to a power source since transfer times can vary.
- Programs installed on the source computer cannot be transferred, they must be reinstalled.
- Do not connect the Data Transfer Cable through a USB hub
- Operating systems on each computer must be using the same language.
- Verify that the USB ports on both computers are functioning and will transfer at a minimum USB 2.0 rate.
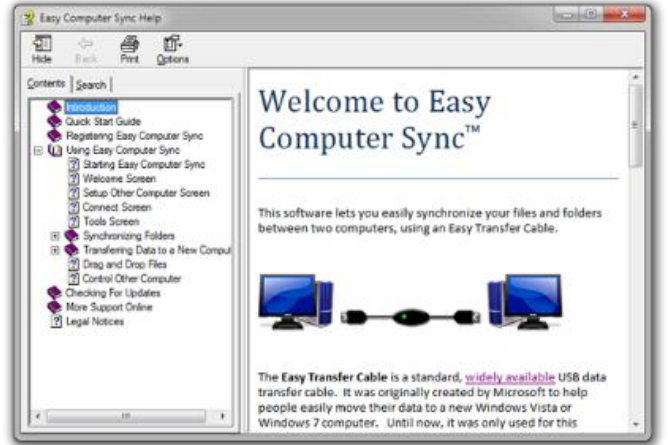
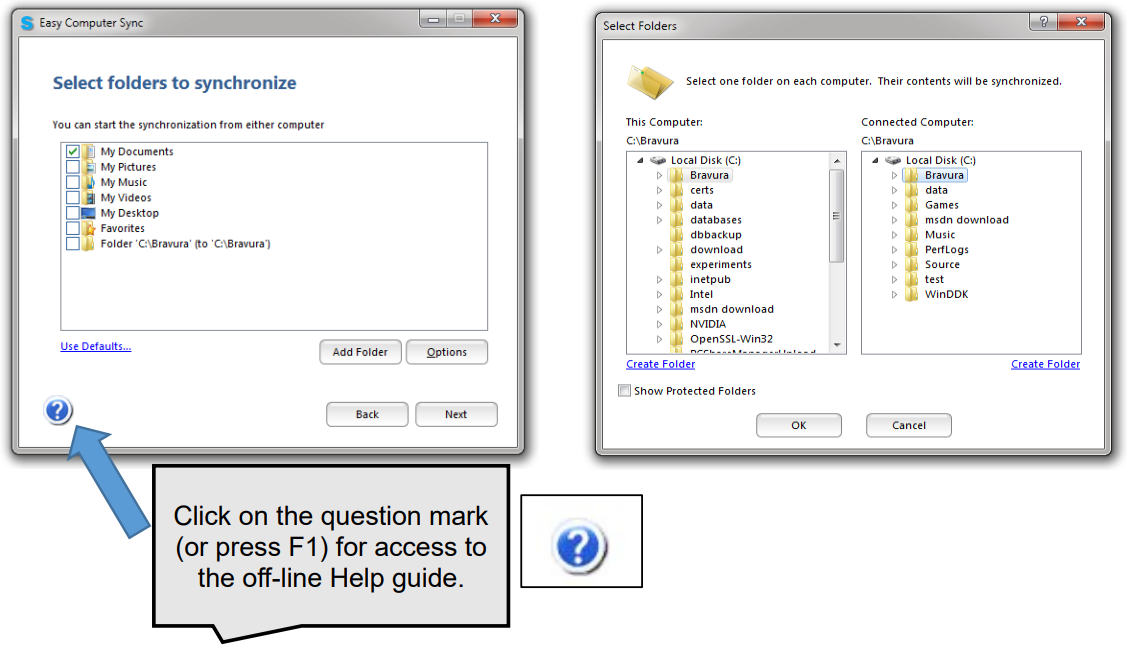
Click on the question mark (or press F1) for access to the off-line Help guide.
Easy Computer Sync Software Installation
Install the software BEFORE connecting the cable
- Download the Easy Computer Sync Software from www.cablematters.com/downloads
- Install the Easy Computer Sync software.
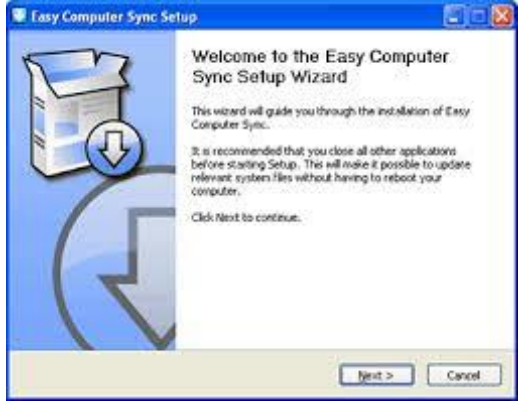
When prompted, click ‘YES’ to allow the program to be installed and start the Easy Computer Sync Setup Wizard.
- License Agreement: Click ‘I Agree’.
- Choose Components: Create a Desktop Icon and allow updates. (Recommended)
- Choose Install Location: Keep the default location and click ‘Install’. (Recommended)
- Click ‘Finish’ and check the box to allow the program to run.
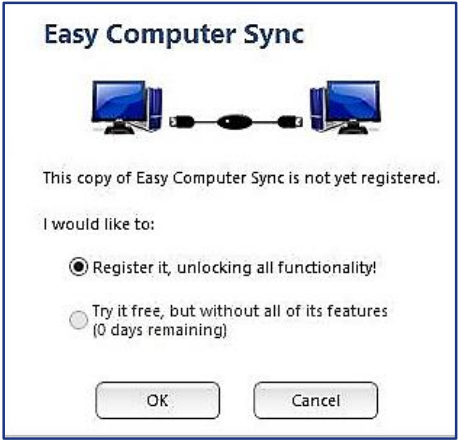
- Enter the Registration Code printed on the product.
- 200MB of Hard Disk space is required on both computers.
- The Registration Code looks like XXXX-XXXX-XXXX-XXXX and allows the software to be installed on 4 computers.
Keep the registration code safe for future reference.
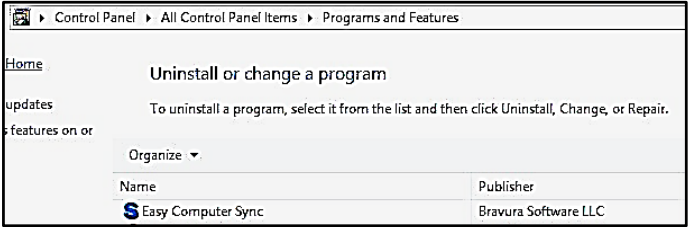
The software can be uninstalled from the Control Panel > Programs.
Data Transfer Cable Installation and Use
(Easy Computer Sync - Windows only)
Start the Easy Computer Sync Software
There are 3 ways to start the software on BOTH computers:
- Double-click the Easy Computer Sync desktop icon on source and target computers to start the program. Click ‘Yes’ and connect the cable.
- Use the program from the Start Menu, Click ‘Yes’ and connect the cable.
- Windows XP, Vista: Start Menu > All Programs > Easy Computer Sync
- Windows 7, 8, 8.1, 10: Start Menu > Search for Easy Computer Sync
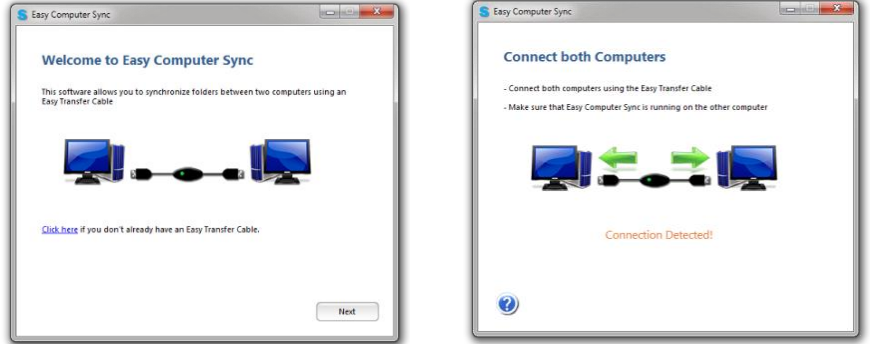
Connect the Data Transfer Cable to the USB ports of both computers: Click ‘Next’ until you see ‘Connection Detected!’
- XP and Vista Users: If your computer does not recognize the Data Transfer Cable you may need to update Windows drivers and check that your computer has the latest updates.
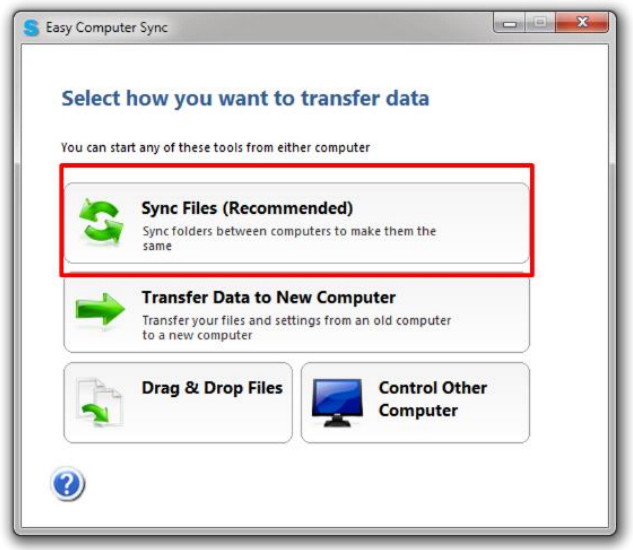
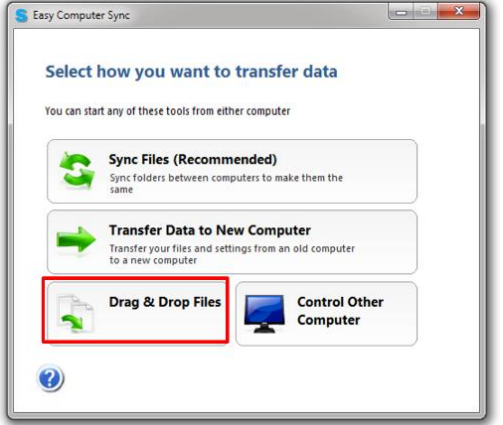
Mode: Synchronizing Files
- Select Sync Files in the Tools screen to synchronize files BETWEEN computers.
Choose a folder or create a new one to synchronize files for one-time use or on an ongoing basis.
- Choose the folders to synchronize between both computers.
‘Add Folder’ button: Select to add or create additional folders.
- ‘Options’ Button: Changes default settings:
- Choose the file transfer direction
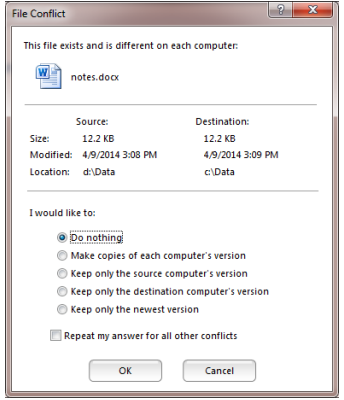
Manage file conflicts
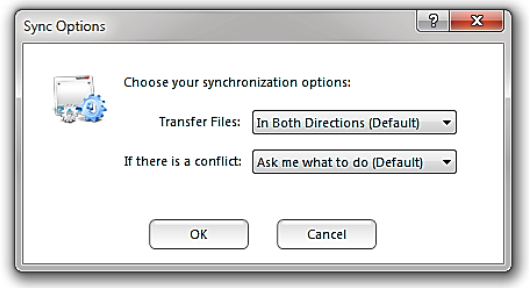
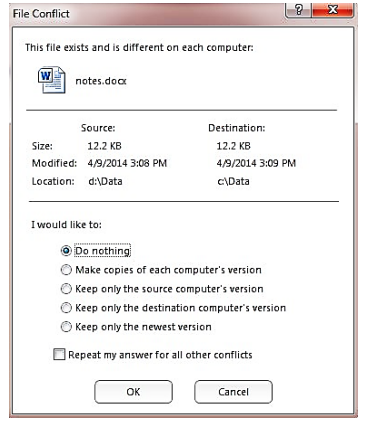
- Select ‘Next’ to start the synchronization:
If ‘Ask me what to do’ was selected from the Sync Options Menu, a ‘File Conflict’ screen will prompt for a choice.
- A synchronization screen will appear followed by the ‘Finished’ screen.
A list of files sent and received is presented.
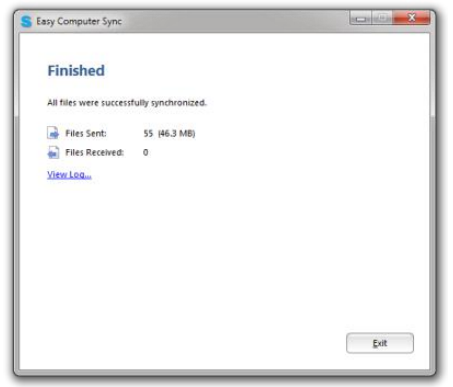
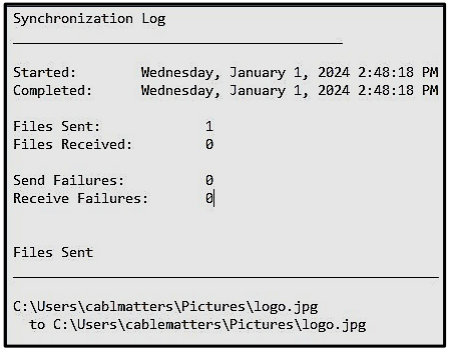
- Click ‘View Log’ to receive a detailed report of the files transferred, including any errors.
Click ‘Exit’ to finish.
- The software will automatically close on both computers.
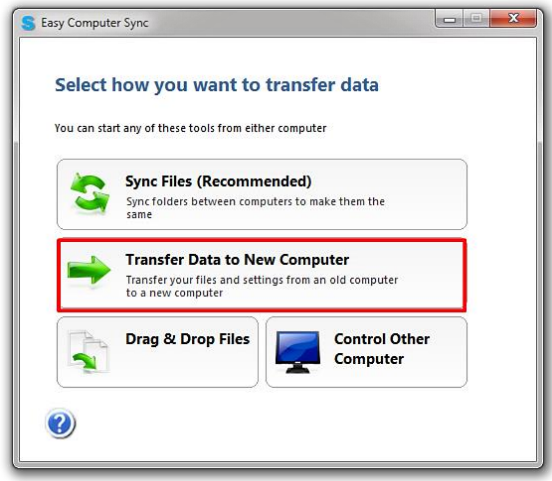
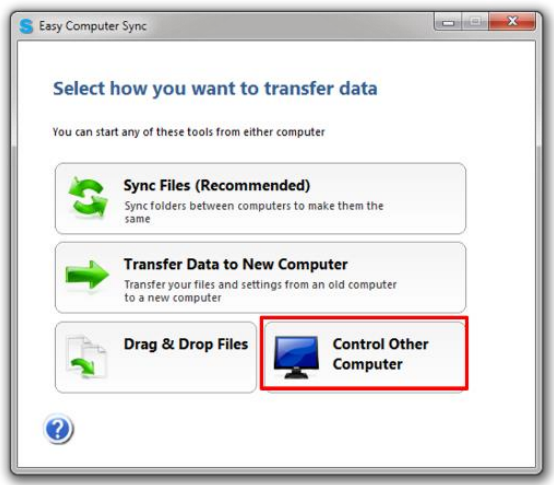
Mode: Transfer Data to a New Computer
- Select Transfer Data to a New Computer in the Tools screen to migrate data from an old to a new computer.
The software automatically chooses default folders to transfer or you can customize the selections.
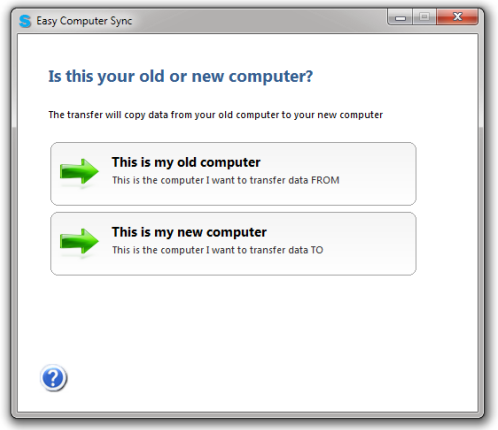
- Select Old or New computer to tell the software where to transfer the data FROM and TO.
- The software will search for items to transfer and present a screen of folders.
The old computer displays a screen indicating ‘Transfer in Progress’.
- Select the items to be transferred.
Click ‘Add Folder’ to select or create additional folders.
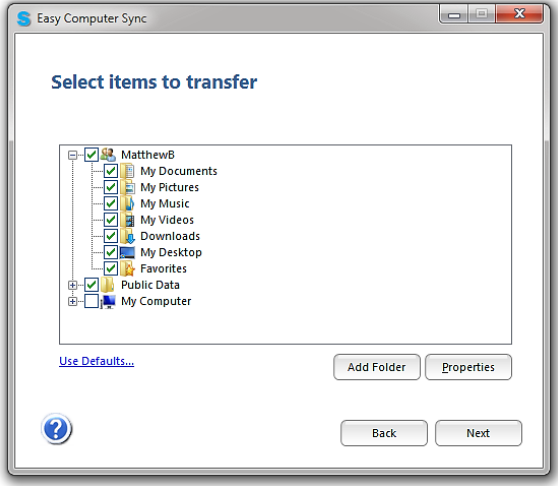
- Moving or modifying ‘Protected Folders’ can damage your computer.
- Choose only the necessary folders to be transferred to save disk space on the target computer and minimize the time needed for the file transfer.
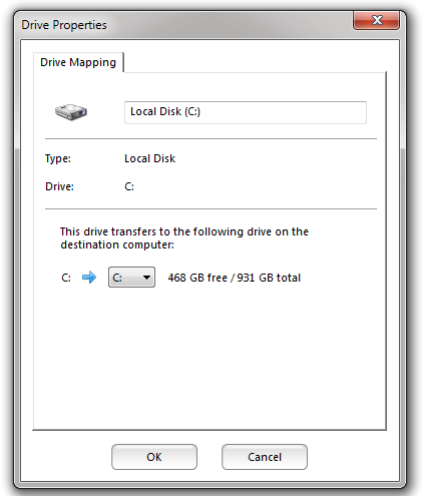
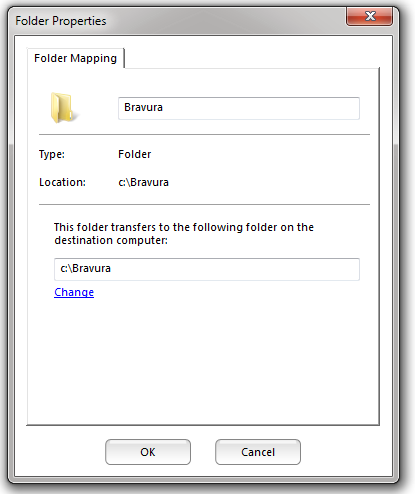
Click on a drive and hit 'Properties' to open the screen for choosing a different drive on the target computer.
Click on a folder and select ‘Properties’ to open the screen for mapping the location of a folder on the target computer.
- Select ‘Next’ to start the synchronization:
If there is a conflict a ‘File Conflict’ screen will prompt for a choice.
A synchronization screen will appear followed by the ‘Finished’ screen.
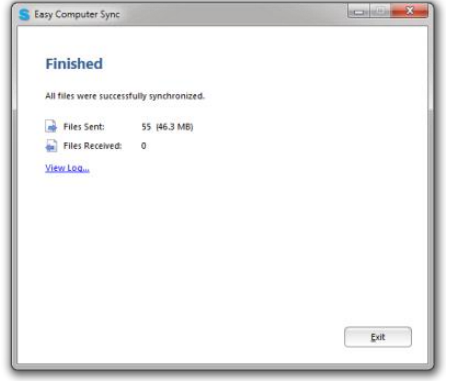
- A list of files sent and received is presented.
- Click ‘View Log’ to receive a detailed report of the files transferred including any errors.
- Click ‘Exit’ to finish.
- The software will automatically close on both computers.
Mode: Drag & Drop Files
Select Drag & Drop Files in the Tools screen to manually transfer files and folders BETWEEN computers.
Choose files or folders and simply drag them to the desired location.
- Use caution in ‘Show’ System Folders or Hidden Files. Improper use could make your computer unusable!
Press ‘Return to Sync’ to return to the Main Menu.
Mode: Remote Computer Access
- Selecting Control Other Computer allows you to view the connected computer from your computer for convenience or when you only have one monitor.
Connect the remote computer to the monitor to start the Easy Computer Sync software and then switch it back to the controlling computer.
- Control most non-security functions with your keyboard and mouse.
When finished, use ‘Back to Tools’ or ‘Exit’ on the pull-down menu on the top left of the Remote Connection screen.
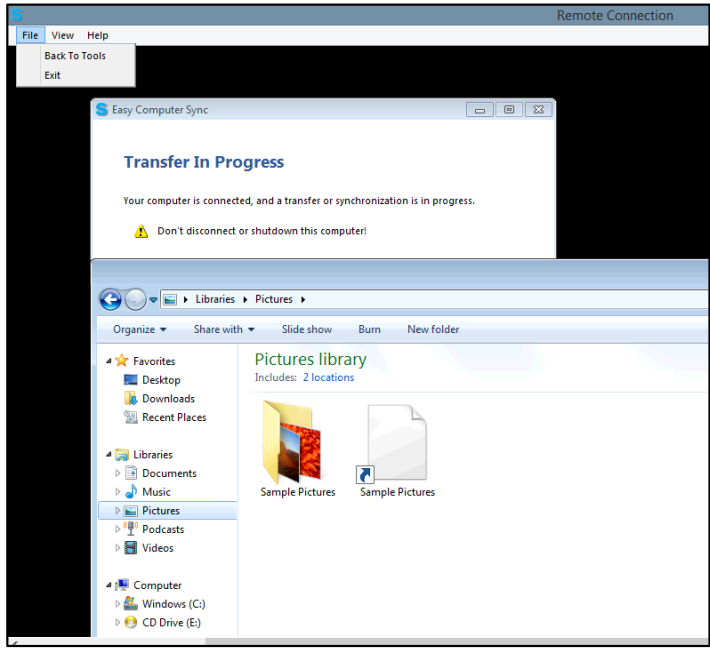
Access the Remote Connection with the ‘S’ icon on the Taskbar.

Data Transfer Cable Installation and Use (PCLinq5 – Windows & Mac)
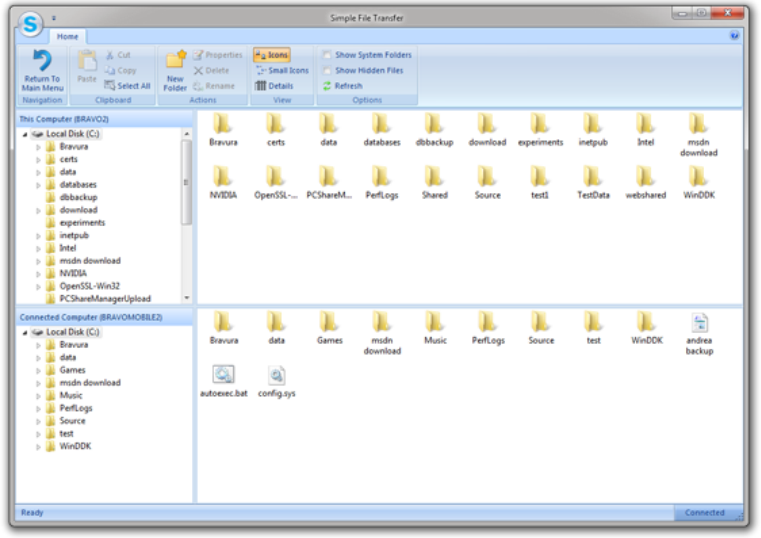
PCLinq5 is a user-friendly file manager software that allows you to see and control file directories on both computers at the same time. You can easily drag-and-drop or cut-and-paste files and folders between computers as well as creating new folders and changing file attributes. You can also open any files, including photos and videos.
PCLinq5 Software Installation
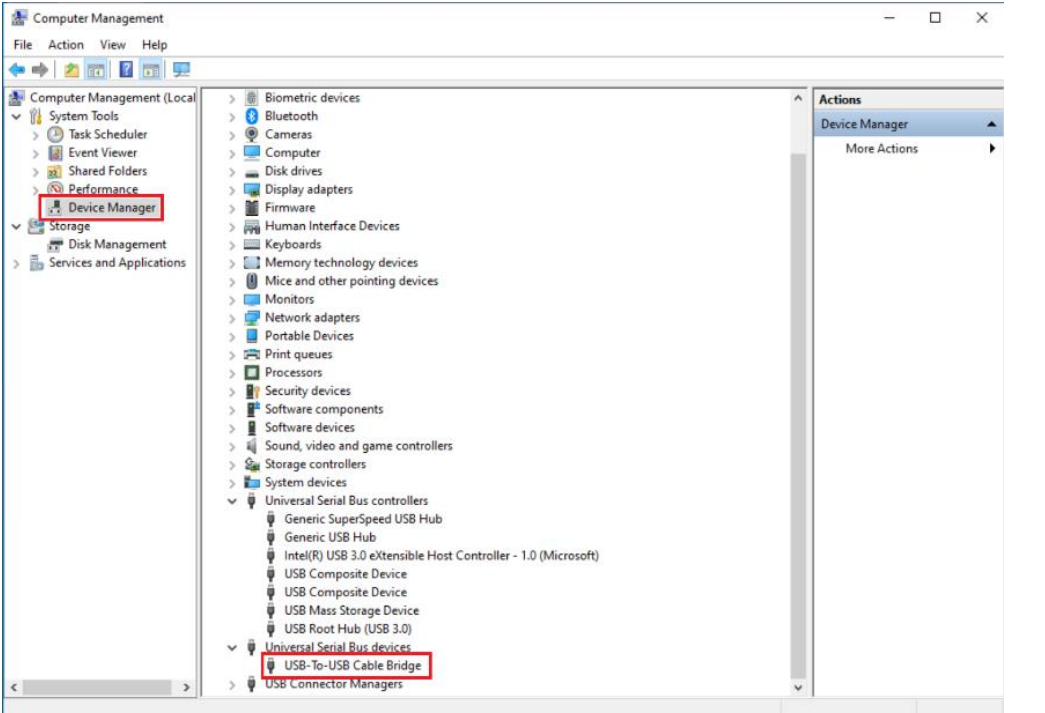
Connect the USB-A 3.0 Data Transfer Cable to the USB ports of both computers. You can go to the Control Panel–System–Device Manager to view the device properties. You should see “USB-To-USB Cable Bridge” device under the Universal Serial Bus Devices. PCLinq5 Software installer is stored within the cable, or can be downloaded from www.cablematters.com/downloads.
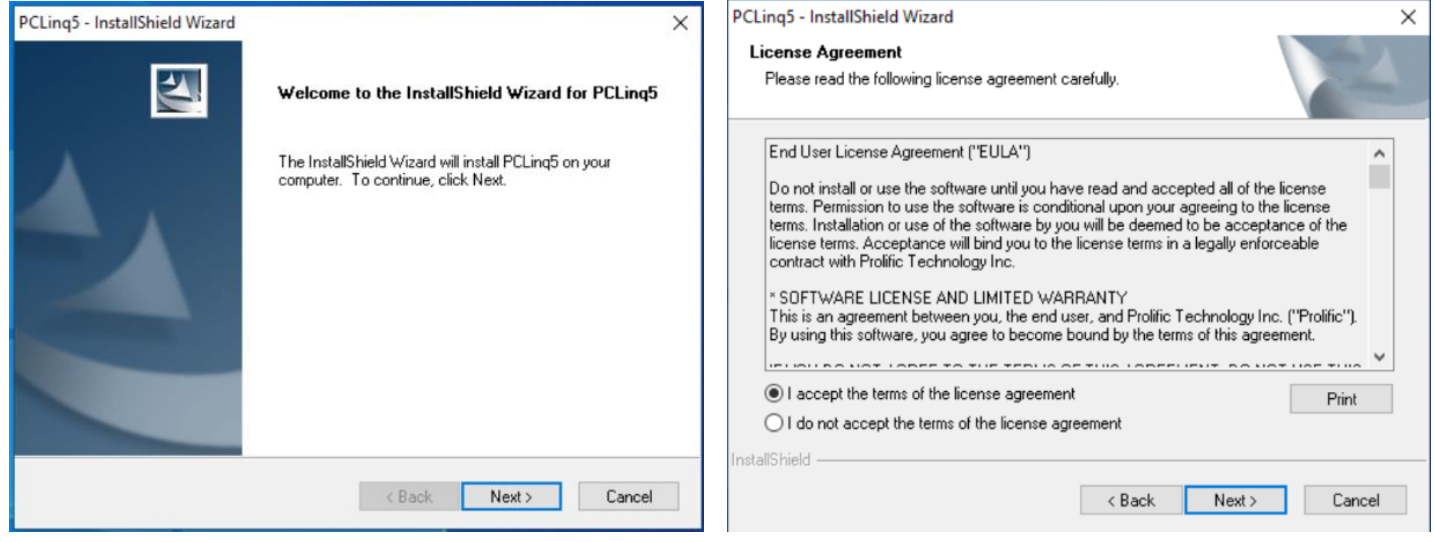
- Install the PCLinq5 Software on both computers. The installation process starts from the InstallShield Wizard that will guide you through the rest of the setup process.
License Agreement: Click ‘I accept the terms of the license agreement’. Follow the instructions and click Next to continue until installation is complete.
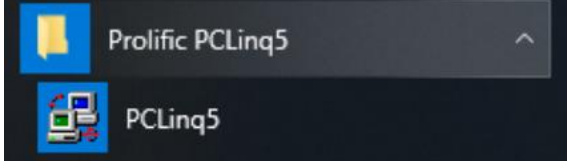
After installation, click Start and Program Files and check whether the Prolific PCLinq5 folder was created.
Start the PCLinq5 Software
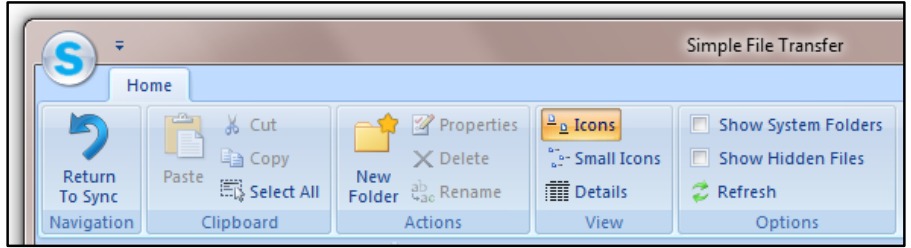
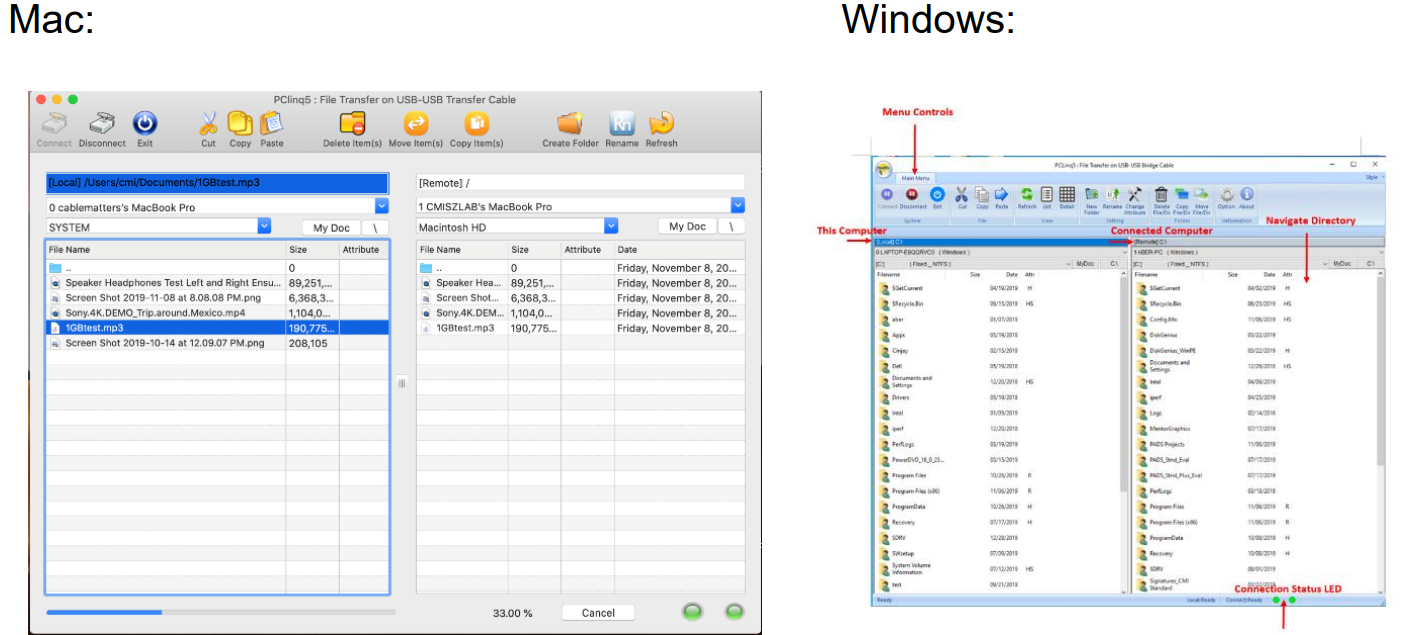
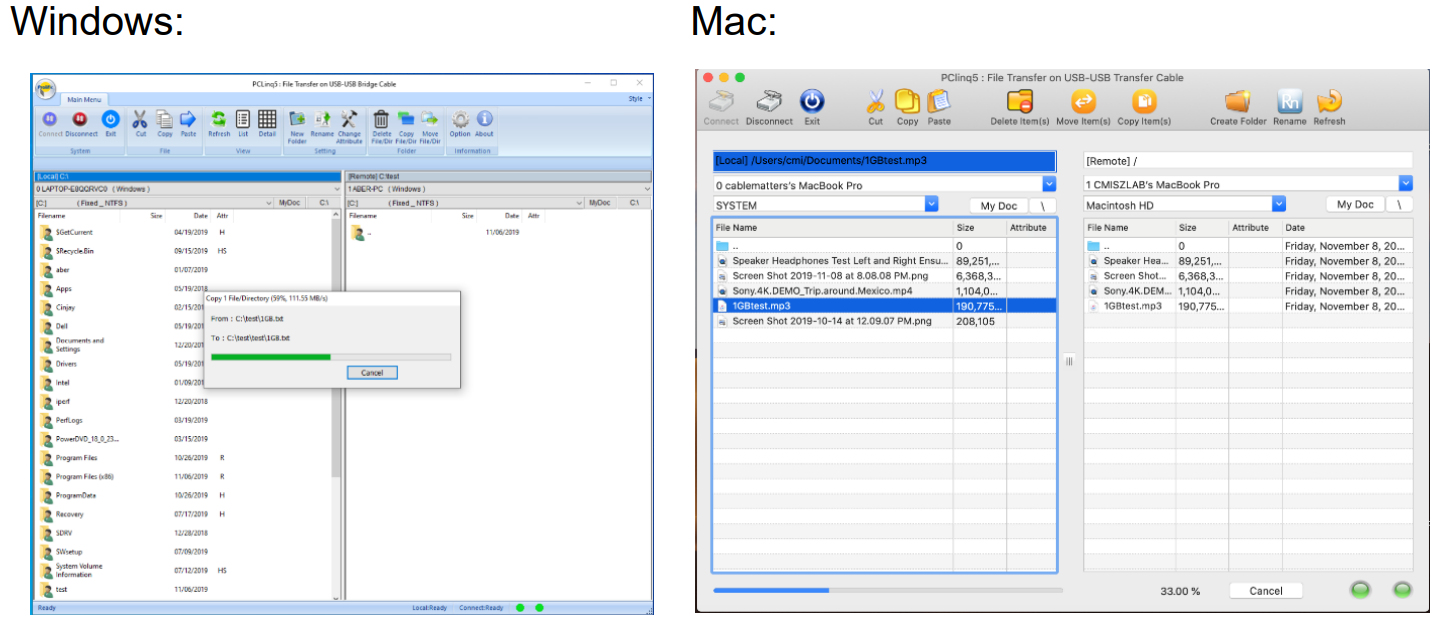
PCLinq5 is an application used to control the file sharing and data transfer of the linked computers (also known as the local PC and the remote PC). After you have successfully completed the PCLinq5 installation and connected the Data Transfer cable, you simply click and start PCLinq5 in both computers. The PCLinq5 File Transfer program will appear as follows:
Using PCLinq5, you can control both the local and remote computers and do the following:
- Display files/folders
- Open files/folders
- Create files/folders
- Delete files/folders
- Copy/Cut/Paste files/folders
- Move files/folders
- Change file/folder names/attributes
Start PCLinq5
- Run PCLinq5 on both computers.
- Connect 2 computers using the USB-A 3.0 Data Transfer cable.
Wait for Windows to detect the cable on each computer and check whether it is properly installed. Check the Connection Status LED on the bottom right. Make sure that the program shows two green LEDs to indicate a linked connection.

Once connected, you simply drag-and-drop the files or folders you want to transfer to the other computer. You can change disk drives or directories by clicking on the Navigate directory menu. Use the Menu Controls for other functions of the program.
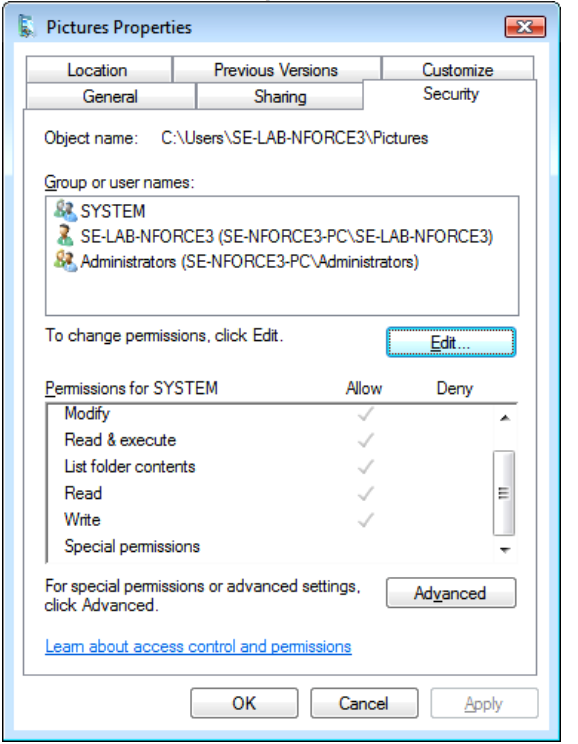
- NOTE: You may not be able to drag-and-drop some folders and files from Windows Vista/7/8 to Windows XP due to Windows Vista/7/8 permission security feature. Permissions are rules associated with objects on a computer or network, such as files and folders. You would need to grant permission or ownership first to those files/folders for you to be able to transfer them from your Windows Vista/7/8 to XP computer if needed. Another solution to this problem is to use your Windows XP computer to drag the files/folders from Windows Vista/7/8 to XP.
Right-click the file or folder (example: Pictures) in Windows Vista/7/8 PC, and then click Properties. Click the Security tab and click Edit to change permissions.
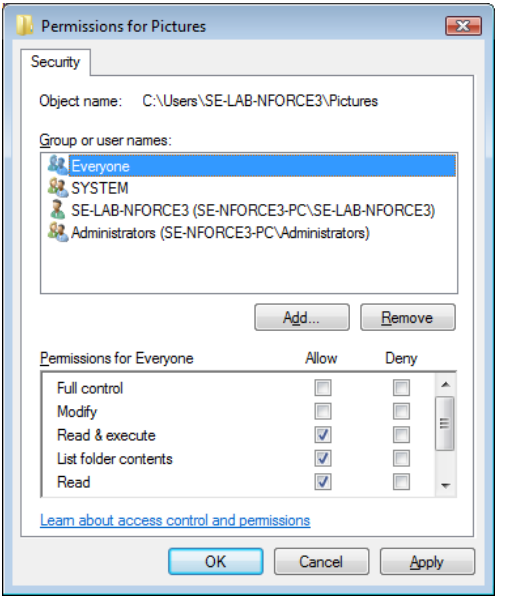
Click Add button to add user.

Type “Everyone” user name to add to the group.
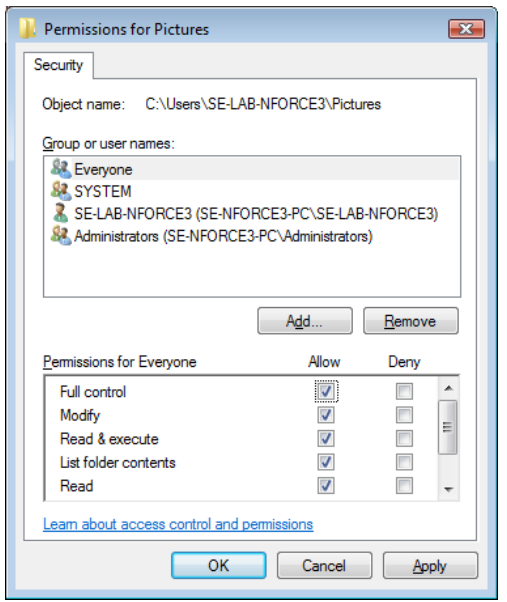
Click on the Allow boxes to grant Full control and Modify permissions. Click OK to confirm. You can now drag-and-drop this folder from Windows Vista or 7 or 8 to XP using PCLinq5 software.
PCLinq5 also allows you open/run files found in the connected PC without copying the files to this PC. You can directly play movie files located in the remote PC.
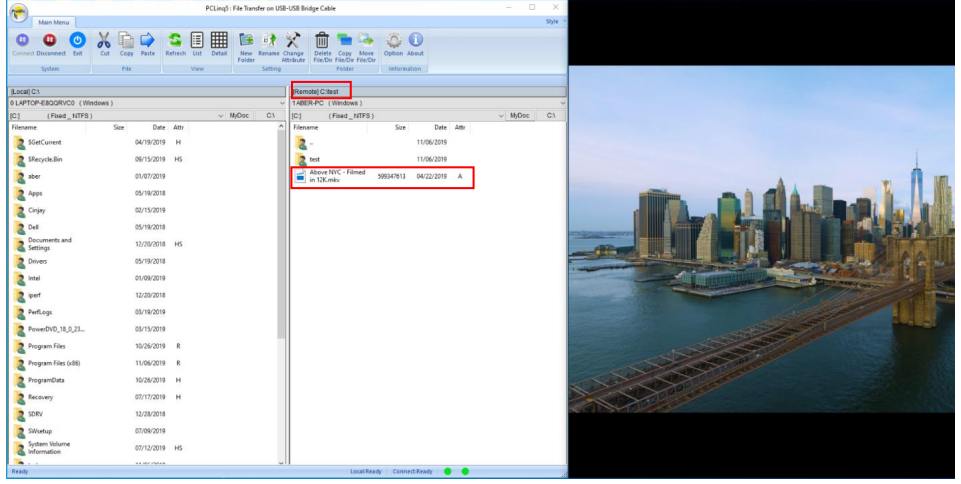
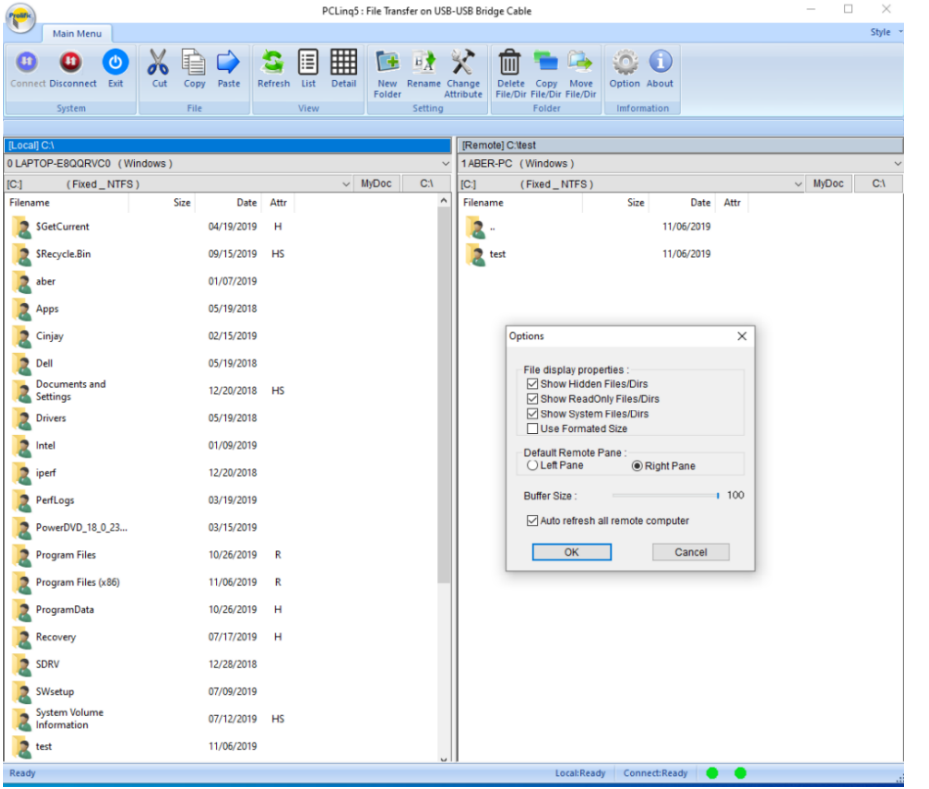
PCLinq5 also provides Options to show hidden, read-only, system files and directories.
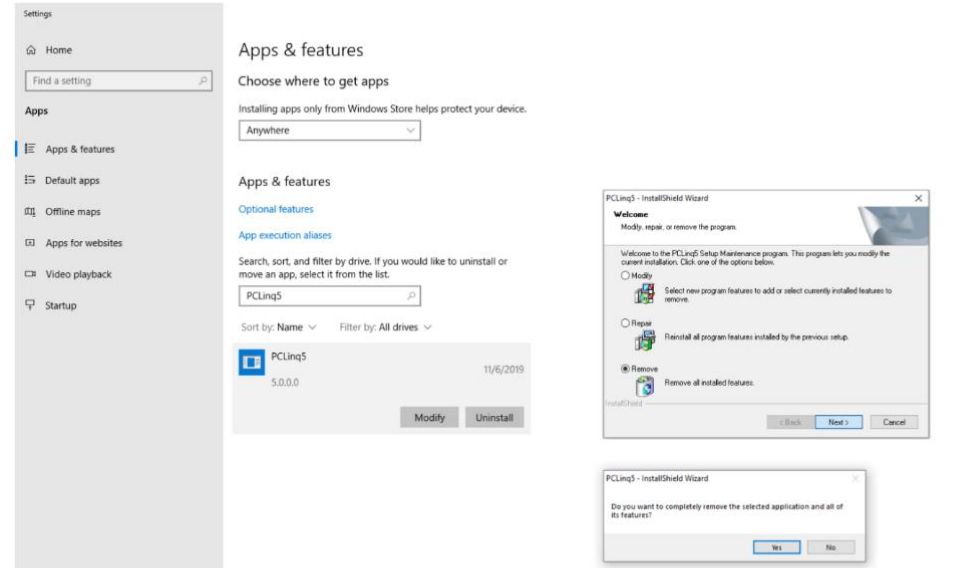
Uninstalling the PCLinq5 Program
It is easy to uninstall the PCLinq5 program:
- Unplug the Data Transfer cable and close the PCLinq5 program.
- Go to Apps & features. Find the PCLinq5 program and click Uninstall button.
- The PCLinq5 InstallShield Wizard program will appear. Click the Remove button and select to remove all installed features. Make sure that you have unplugged the Data Transfer cable and click Next to continue.
The PCLinq5 InstallShield Wizard program will confirm with you if you really want to completely remove the application and features. Click Yes to uninstall.
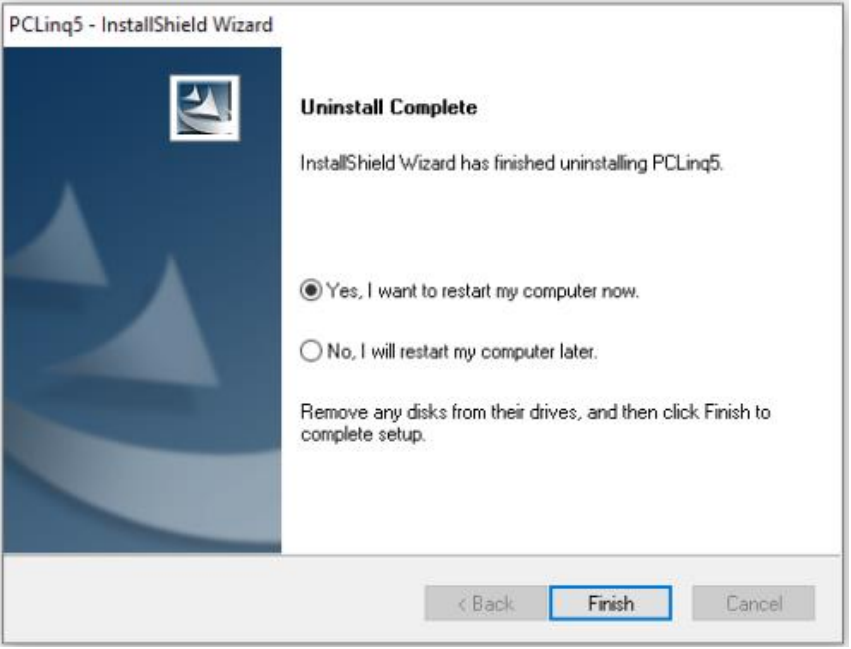
Wait for the InstallShield Wizard program to complete uninstallation.
Setup Guide
Simply connecting the Cable Matters USB 3.0 Data Transfer Cable to two devices that are equipped with USB 3.0 is all that is required to use the cable. The connection will be recognized by the devices instantly, and you will be able to start sharing digital information. If you are using the cable with a device that is compatible with USB 2.0 or 1.1, the cable is backward compatible and will function just fine; however, the speed at which data is sent will be slower.
Troubleshooting Notes
My computer does not recognize the Data Transfer Cable
- Make sure that you have downloaded and installed both the Easy Computer Sync software and the latest drivers from Windows.
- Check that both LED’s are lit. Switch ends to test.
- Check that the USB ports are functioning by plugging in another USB device.
Remove all other USB devices and find ‘USB-To-USB Cable Bridge’ in the Device Manager:

- It should NOT have a “question” or “exclamation” mark.
The file transfer speed is too slow
- Check that the computer port supports USB 3.0.
Having problems getting Easy Computer Sync to move past the connection screen
- Check that both computers have Easy Computer Sync installed.
- Check that both computers connected with the Data Transfer Cable.
- Plug the Easy Transfer Cable directly into your computers (not through a hub).
- If the cable is connected, but you are stuck on the connection screen on both computers, recheck the connection, or try using a different port on each computer.
- If you are still having problems establishing the connection, unplug all non-essential USB devices (such as printers, scanners, external drives) from each computer.
Warranty Information
This product is backed by a limited one-year warranty. In addition, Cable Matters warrants its products against defects in materials and workmanship for the periods noted, following the initial date of purchase. During this period, the products may be returned for repair, or replaced with equivalent products at our discretion. The warranty covers parts and labor costs only. Cable Matters does not warrant its products from defects or damages arising from misuse, abuse, alteration, or normal wear and tear.
Pros & Cons
- Pros
- Fast data transfer speeds of up to 5Gbps
- Gold-plated connectors for superior conductivity and corrosion resistance
- Reinforced cable design for durability and flexibility
- Backward compatible with USB 2.0/1.1 devices
- Data transfer distance up to 16.4 feet (5 meters)
- Cons
- May experience slower data transfer speeds with USB 2.0/1.1 devices
- Cable may be too short for some applications
Customer Reviews
"I've been using this cable for a few months now, and it works great. I use it to transfer large video files between my computer and external hard drive, and the data transfer speed is incredibly fast. The cable is well-made and feels durable, and I appreciate the extra length." - John Smith
"I was a little skeptical about the price, but this cable has been well worth it. I use it to transfer files between my work and home computers, and it has saved me so much time. The cable is easy to use and has held up well over time." - Jane Doe
"I wish I had bought this cable sooner. I used to spend hours transferring files between my computer and external hard drive, but now it only takes a few minutes. The cable is well-made and the extra length is really useful." - Bob Johnson
Faqs
Can I use this Cable Is Crucial USB 3.0 Data Transfer Cable with a USB Hub?
Can both computers share a monitor?
How do I get updates for the software?
How long will file Cable Is Crucial USB 3.0 Data Transfer Cable take?
Can I install the software before plugging in the cable?
Which operating systems are compatible with the Cable Is Crucial USB 3.0 Data Transfer Cable that is offered by Cable Matters products?
Would it be possible to use this cable to transfer data between a Mac and a Windows computer?
Are there any software programs that I need to install before I can use the Cable Is Crucial USB 3.0 Data Transfer Cable?
Am I able to transfer programs that have been installed using the Cable Is Crucial USB 3.0 Data Transfer Cable?
If my computer does not recognize the Cable Is Crucial USB 3.0 Data Transfer Cable, what steps should I take to fix the problem?
Leave a Comment