Epson Battery Charger EPA1205 User Manual
Content
Introduction
A flexible and effective charger for Ni-MH (Nickel-Metal Hydride) AA and AAA batteries is the Epson Battery Charger EPA1205. It may be used anywhere in the world because of its broad input voltage range of 100-240V AC. The charger has LED indications to show the charging status and an automatic shut-off mechanism to prevent overcharging. The EPA1205, which is small and easy to use, guarantees dependable performance to keep your batteries charged and prepared for usage in a variety of devices.
SPECIFICATIONS
- Input Voltage: 100-240VAC, 50/60Hz
- Input Current: 0.5A (RMS) @ 220VAC
- Back Current Drain: 1.3mA
- Charge Voltage Rating: 12V, Bulk Limited Voltage: 14.7V
- Ripple Current: Current ripple: <= 0.12A rms
- Bulk Charge Current: 5.0A
- Operating Temperature: -5°F ~ 120°F
- Cooling: Natural convection, do not cover the charger
- Charging Process: Auto 4 stages: Ud-Im-Uo-Up
- Battery Type: All types of 12V AGM, GEL, Flooded (Wet), Calcium type deep cycle, VRLA maintenance-free lead-acid batteries
- Battery Capacity: 12-100Ah
- Size: 5.90 x 2.78 x 2.20 inches
- Starting Voltage: 4.5 Volts
- Weight: 15.87 oz
Description
A top-notch charger made specifically for Epson battery packs is the EPA12005 Epson Battery Charger. It is lightweight and portable, making it simple to transport. Your batteries are safe while being charged thanks to the charger's overcharge prevention mechanism. Additionally, it charges quickly, cutting down on the amount of time you have to wait to use your gadgets. If you use Epson battery packs and want to make sure they last a long time, you need the EPA1205 accessory.
72 HOURS SAFETY FEATURES
A 72-hour safety timer will commence anytime the charger is on to protect marginal batteries from overcharging. If the battery voltage reaches the proper level within 72 hours, the charger will automatically switch to maintenance mode. Please check the battery condition as it could indicate that a very large (high capacity) but good battery is simply not yet fully charged. When this happens, the bad battery indicator will flash. In this case, please contact your local dealer and have the battery tested.
PRODUCT AND ACCESSORIES

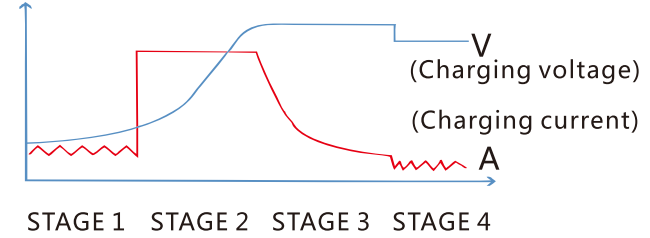
FOUR-STAGE CHARGER
- Stage 1: Desulfating the battery through 18V pulse. The charger enters this stage if it detects battery sulfation or severe discharge. Once the battery is rejuvenated, the charger moves to the Bulk stage (LEDs: 1 ON, 2-4 OFF).
- Stage 2: Bulk charge using the charger’s highest rated current for the type of battery in use until it reaches 80% capacity (LEDs: 1-4 Blinking Sequentially).
- Stage 3: Absorption, the output voltage is limited to 14.7V while current declines as the battery charges to its full capacity without overheating (LEDs: 1-3 ON, 4 Blinking).
Stage 4: Float, at this stage, the battery is fully charged and the charger maintains the battery through pulse charging (LEDs: 1-4 ON).
Note: Do not turn your battery charger on and off repeatedly (plug and unplug) within a short period. If this happens, unplug the battery charger from AC power, wait for one minute, and then connect the charger again to restart the charging cycle.
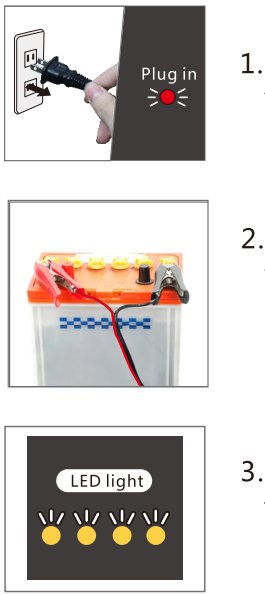
HOW TO USE
- Connect the AC cord to the socket. The "POWER" LED (red) will light solid.
- Connect the red clip to the positive battery terminal and the black clip to the negative terminal. Depending on the battery capacity and charging time, the "25%~100%" LEDs will light in sequence.
When the lights are ON, it indicates the battery is fully charged. You can disconnect manually, or it will automatically switch to float mode.
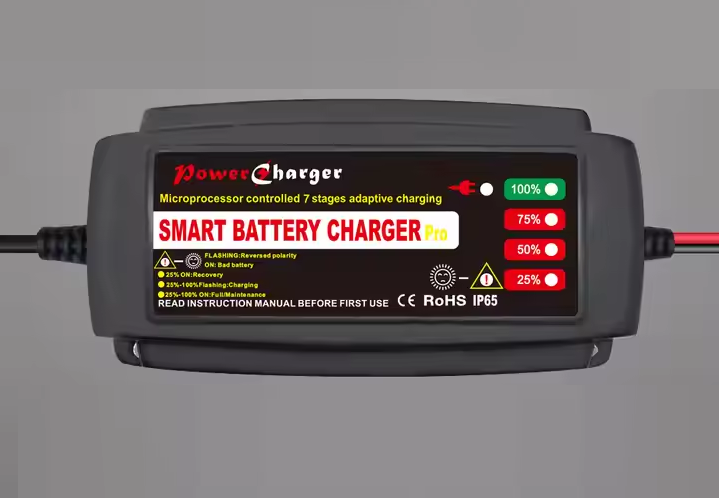
NOTICE: If the battery polarity is reversed or the output is shorted, the fault light will flash. Please DISCONNECT & CHECK.
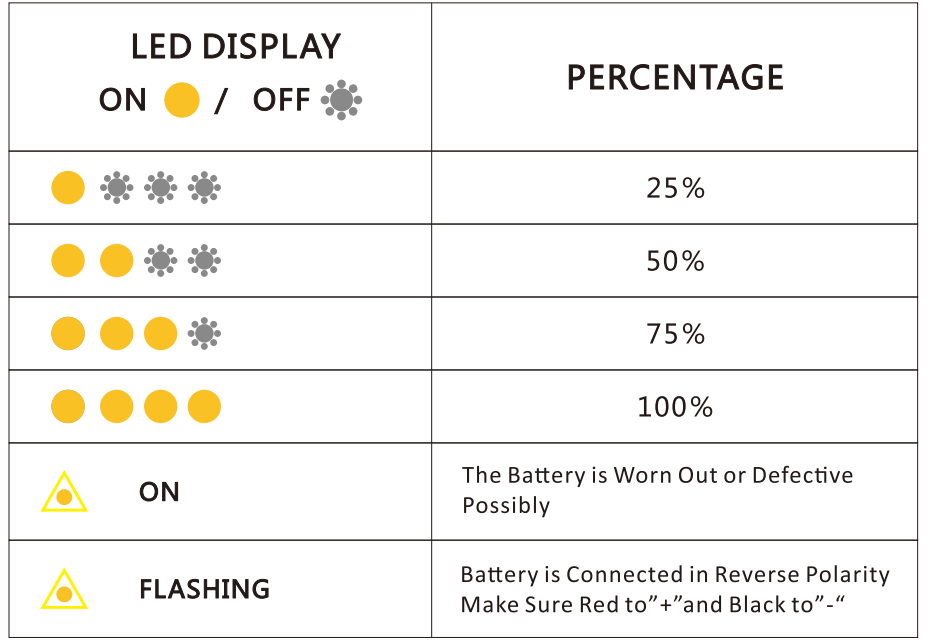
LED LIGHT DISPLAY
CHARGING TIME
Battery type(Ah ) | EPA1205 (hours) |
12 | 2.5 |
20 | 5 |
40 | 9 |
60 | 13 |
100 | 22 |
WARNING
- This charger is designed for charging AGM, GEL, Flooded (Wet), Calcium type deep cycle, VRLA maintenance-free lead-acid batteries from 12 to 100Ah. Do not use it for any other purpose.
- Since batteries may emit explosive gases, always provide good ventilation and avoid any source of flames or sparks when charging.
- To reduce the risk of damage to the electric plug and cord, pull by the plug rather than by the cord when disconnecting the charger.
- Use of an improper extension cord could result in a risk of fire and electric shock.
- Do not operate the charger if you notice any signs of damage to the charger or cords.
- Do not disassemble the charger; take it to a qualified serviceman when service or repair is required. Incorrect reassembly may result in a risk of electrical shock or fire.
- To reduce the risk of electric shock, unplug the charger from the AC outlet before attempting any maintenance/cleaning.
IMPORTANT WARNING: Before charging, make sure the correct battery voltage matches the device voltage.
Setup Guide
To set up the Epson Battery Charger EPA1205, follow these steps:
- Insert the Epson battery pack into the charger.
- Plug the charger into a power outlet.
- The charger's LED indicator will turn on, indicating that it is charging.
- Once the battery is fully charged, the LED indicator will turn off.
- Unplug the charger from the power outlet and remove the battery pack.
IMPORTANT SAFETY INSTRUCTIONS
- Do not expose the charger to rain or snow.
- Use of an attachment not recommended or sold by the battery charger manufacturer may result in fire, electric shock, or injury to persons.
- To reduce the risk of damage to the electric plug and cord, pull by the plug rather than the cord when disconnecting the charger.
- An extension cord should not be used unless absolutely necessary. Use of an improper extension cord could result in fire and electric shock.
- Do not operate the charger with a damaged cord or plug. Replace the cord or plug immediately.
- Do not operate the charger if it has received a sharp blow, been dropped, or otherwise damaged in any way; take it to a qualified serviceman.
- Do not disassemble the charger; take it to a qualified serviceman when service or repair is required. Incorrect reassembly may result in electric shock or fire.
- To reduce the risk of electric shock, unplug the charger from the outlet before attempting any maintenance or cleaning. Turning off controls cannot reduce this risk.
WARNING - RISK OF EXPLOSIVE GASES
PREPARING TO CHARGE
- If necessary to remove the battery from the vehicle to charge, always remove the grounded terminal from the battery first. Make sure all accessories in the vehicle are off to avoid causing an arc.
- Ensure the area around the battery is well ventilated while charging.
- Clean battery terminals. Be careful to keep corrosion from contacting your eyes.
- Add distilled water in each cell until the battery acid reaches the manufacturer’s recommended level. Do not overfill.
- Study all battery manufacturer’s specific precautions such as removing or not removing cell caps while charging and recommended rates of charge.
- Determine the voltage of the battery by referring to the car owner’s manual. Do not charge the battery unless the voltage matches the output voltage rating of the charger.
CHARGER LOCATION
- Never place the charger directly above the battery being charged; gases from the battery will corrode and damage the charger.
- Never allow battery acid to drip on the charger when reading electrolyte specific gravity or filling the battery.
- Do not operate the charger in a closed-in area or restrict ventilation in any way.
- Do not set a battery on top of the charger.
DC CONNECTION PRECAUTIONS
- Connect and disconnect DC output clips only after setting any charger switches to the off position and removing the AC cord from the electric outlet.
- Position AC and DC cords to reduce damage by hood, door, or moving engine parts.
- Stay clear of fan blades, belts, pulleys, and other parts that can cause injury.
- Check the polarity of battery posts. The POSITIVE (POS, P, +) battery post usually has a larger diameter than the NEGATIVE (NEG, N, -) post.
- Determine which post of the battery is grounded (connected) to the chassis. If the negative post is grounded to the chassis (as in most vehicles):
- For a negative grounded vehicle, connect the POSITIVE (RED) clip to the POSITIVE (POS, P, +) ungrounded post of the battery.
- Connect the NEGATIVE (BLACK) clip to the vehicle chassis or engine block away from the battery. Do not connect the clip to the carburetor, fuel lines, or sheet-metal body parts. Connect to a heavy gauge metal part of the frame or engine block.
- For a positive-grounded vehicle, connect the NEGATIVE (BLACK) clip from the battery charger to the NEGATIVE (NEG, N, -) ungrounded post of the battery. Connect the POSITIVE (RED) clip to the vehicle chassis or engine block away from the battery. Do not connect the clip to the carburetor, fuel lines, or sheet-metal body parts. Connect to a heavy gauge metal part of the frame or engine block.
- When disconnecting the charger, disconnect the AC cord, remove the clip from the vehicle chassis, and then remove the clip from the battery terminal.
O-RINGS ADAPTER PRECAUTIONS
- Must be used in conjunction with the charger. Accessory wires used for other purposes may cause fire or short circuit.
- Ensure that the terminal is in good contact with the battery or charger, and the insulation cover is not detached or damaged.
- Ensure that the ring connectors are in good condition (no damage or bare copper) before use.
- The fittings and wires are prone to aging, do not touch any chemical liquids, and check the insulation of the wire regularly. If they are aging, replace them promptly.
- Do not leave the ring connector connected to the battery if not in use, or it may cause fire or short circuit when using the battery in your vehicle.
FOLLOW THESE STEPS WHEN THE BATTERY IS OUTSIDE THE VEHICLE. A SPARK NEAR THE BATTERY MAY CAUSE A BATTERY EXPLOSION.
TO REDUCE THE RISK OF A SPARK NEAR THE BATTERY
- Check the polarity of battery posts. The POSITIVE (POS, P, +) battery post usually has a larger diameter than the NEGATIVE (NEG, N, -) post.
- Attach at least a 24-inch-long 6-gauge (AWG) insulated battery cable to the NEGATIVE (NEG, N, -) battery post.
- Connect the POSITIVE (RED) charger clip to the POSITIVE (POS, P, +) post of the battery.
- Position yourself and the free end of the cable as far away from the battery as possible, then connect the NEGATIVE (BLACK) charger clip to the free end of the cable.
- Do not face the battery when making the final connection.
- When disconnecting the charger, always do so in reverse order of the connecting procedure and break the first connection while as far away from the battery as possible.
- A marine (boat) battery must be removed and charged onshore. Charging it on board requires equipment specially designed for marine use.
- Children should be supervised to ensure that they do not play with the appliance.
- This appliance is not intended for use by persons (including children) with reduced physical, sensory, or mental capabilities, or lack of experience and knowledge unless they have been given supervision or instruction concerning use of the appliance by a person responsible for their safety.
DEFECTIVE BATTERY RECOGNITION
If your battery is totally discharged (Below 3 volts), the battery charger circuitry will not start due to its internal safety circuit. The fault light will turn on, and the charger will return to standby mode.
NOTE: Unless the battery was rapidly discharged (lights left on overnight), most 12-volt lead acid batteries that are at a state of charge that is less than 9 volts are likely to be worn out or defective.
TROUBLESHOOTING
| PROBLEM | ERROR CODE | POSSIBLE CAUSES | SUGGESTED SOLUTION |
|---|---|---|---|
| Charger does not work | NO LED lights on | Check AC connections and make sure the power point is switched ON | Check DC connection between charger and battery and make sure they are not short-circuited |
| No DC Output | 4 LEDs flashing simultaneously | OUTPUT is short-circuited | Check that the crocodile clips/ring terminals are connected to the correct polarity |
| No Charging Current | 4 LEDs flashing simultaneously | Battery is severely sulfated or Battery Voltage is under 1.5 Volts | Battery is defective. Move the battery |
2 STEPS TO DETECT THE CHARGER
- No-Load Test
Connect the AC plug of the charger into power to observe the power light.
If the power light turns red instantly, the 25%-100% lights flashing in sequence, and the power light stays on, then the charger is normal. - Short Circuit Test
Connect the AC plug of the charger into power.
Connect the positive and negative clip to each other to observe the fault light.
If the fault light is flashing, then the charger is normal.
Tips: If the indicator light does not perform as described in these two steps, the charger might be defective. Please contact us to solve your problems.
Epson Battery Charger EPA1205 Pros & Cons
Pros
- Fast charging times
- Compact and lightweight design
- Overcharge protection
- Energy-efficient
Cons
- Only compatible with Epson battery packs
- No indicator for charging progress
Customer Reviews
Customers have praised the Epson Battery Charger EPA1205 for its fast charging times and compact design. Many have noted that it is a convenient accessory for Epson users, ensuring that their battery packs are always charged and ready to use. However, some have criticized the charger for only being compatible with Epson battery packs, limiting its versatility.
Faqs
Which kinds of batteries can be charged by the Epson EPA1205?
What is the Epson EPA1205 charger's input voltage range?
How long does the Epson EPA1205 take to fully charge its batteries?
Can I use the Epson EPA1205 to charge batteries of different sizes?
Is there an automated shut-off feature on the Epson EPA1205?
Is it okay to use the Epson charger overnight?
Is it possible to use the Epson EPA1205 to simultaneously charge batteries with varying capacities?
Is there an LED indicator on the Epson EPA1205 charger?
What does it imply if the Epson LED indicator is blinking?
Are rechargeable alkaline batteries compatible with the Epson charger?
Leave a Comment