Casio Portable Keyboard CT-X9000IN User Manual | Specifications
Content
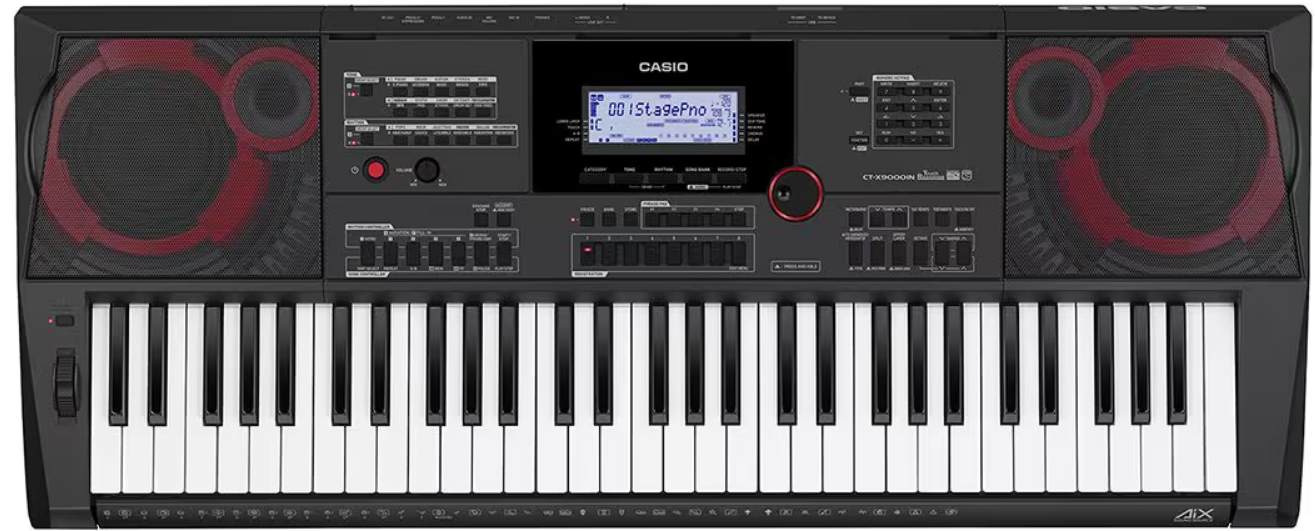
Introducing the Casio Portable Keyboard CT-X9000IN
Casio is a versatile and feature-rich instrument designed for both beginners and experienced musicians. It boasts 61 touch-responsive keys and utilizes Casio's innovative AiX Sound Source technology, providing an impressive array of 800 tones and 250 rhythms, including a selection of traditional Indian sounds. With built-in speakers delivering 15W each, this keyboard is ideal for live performances. The CT-X9000IN is priced at around $899.
Specifications
Model | CT-X9000IN | CT-X8000IN |
Keyboard Touch Response | 61 standard size keys Sensitivity: 3 types, Off | |
Maximum Polyphony | 64 notes (32 for certain tones) | |
Tones | ||
Preset Tones | 800 | |
User Tones | 100 (See “Tone Editing” item of these specifications.) | |
Other | Layer, split (configurable split point, lower point, chord point settings) | |
System Effects | ||
Reverb | 32 types, Off | 24 types, Off |
Chorus | 16 types, Tones | 12 types, Tones |
Delay DSP | 20 types, Tones 100 types*1, DSP tones | 15 types, Tones 100 types*1, DSP tones |
Master Effects | Equalizer (10 presets) 4-band User Equalizer | Equalizer (10 presets) |
External Input Effects | Center cancel (vocal cut) for input from the Audio In jack | |
Metronome Beat Tempo |
0 (accented tone off), 1 to 16 Tempo value: 20 to 255 | |
Demo Songs | 3 | |
Song Bank | ||
Built-in Songs | 30 | |
User-recorded Songs | 10 (See the “MIDI Recorder” item of these specifications.) | |
USB Memory Songs | Playback of standard MIDI files (SMF format 0/1), CASIO MIDI files (CMF format) on a USB flash drive is supported. | |
USB Audio Playback Supported File Formats Other Functions | Playback of audio files on a USB flash drive is supported. WAV format, 44.1 kHz 16 bit Center Cancel (Vocal Cut) | |
Auto Accompaniment | ||
Built-in Rhythms | 250 | 250 |
User Rhythms | 100 (See the “Rhythm Editing” item of these specifications.) | 50 (See the “Rhythm Editing” item of these specifications.) |
One Touch Presets | 250 | 250 |
Music Presets | 310 (With chord progressions) | |
Phrase Pads | ||
Number of Pads | 4 | |
User Phrases | 100 (4 phrases × 25 pads) | |
Memory Capacity | Approximately 1,000 notes (per phrase) | |
Editing Mode | Copy, delete, phrase editing | |
Mixer function Affected Parts Parameters |
Sound source parts, microphone input part Part on/off, volume, pan, reverb send, chorus send, delay send | |
Registration | Maximum 128 setups (8 setups × 16 banks), registration sequence | |
Tone Editing | Preset tone editing, DSP editing Memory for storage of edited tones (up to 100) | |
Rhythm Editing | New rhythm creation, rhythm editing Memory for storage of created/edited rhythms (CT-X9000IN: Up to 100, CT-X8000IN: Up to 50) | |
MIDI Recorder | Real-time recording, playback | |
Keyboard Performance Recording | 10 songs, 17 tracks (1 system track, 16 solo tracks) | |
Memory Capacity | Approximately 40,000 notes (per song) | |
Editing Mode | Song editing, track editing, event editing, step input | |
Other Functions | Overdubbing, punch-in recording | |
Pedals | Sustain, sostenuto, soft, rhythm/song, expression | |
Controllers | Pitch bend wheel, TOUCH ON/OFF button, PORTAMENTO button, MODULATION/ ASSIGNABLE button | Pitch bend wheel, TOUCH ON/OFF button, PORTAMENTO button |
Other Functions | ||
Transpose | ±1 octaves (–12 to 0 to +12 semitones) | |
Octave Shift | Upper 1/Upper 2/Lower 1/Lower 2, ±3 octaves | |
Tuning | A4 = 415.5 to 465.9 Hz (Initial Default: 440.0 Hz) | |
Part coarse tune | For each keyboard part, ±2 octaves (–24 to 0 to +24 semitones) | |
Part fine tune | For each keyboard part, ±99 cents | |
Scales | 17 preset scales, scale fine tuning | |
Auto Harmonize | 12 types | |
Arpeggiator | 150 types | |
MIDI | 16ch multi-timbre received, GM Level 1 standard | |
Inputs/Outputs | ||
USB Flash Drive Port | Type A | |
USB Port | Type B | |
Pedal 1 Jack | Standard jack (6.3 mm) | |
Pedal 2, Expression Jack | Standard jack (6.3 mm) | |
Headphones Jack | Stereo standard jack (6.3 mm) | |
Audio Input Jack | Stereo mini jack (3.5 mm) Input impedance: 9 kΩ; Input sensitivity; 200 mV | |
Line Out Jack (CT-X9000IN) | Standard jacks (6.3 mm) × 2 Output impedance: 2.3 kΩ; Output voltage: 1.9 V (RMS) MAX | |
Microphone Input Jack (CT-X9000IN) | Standard jack (6.3 mm) (Connect a dynamic microphone.) Input impedance: 3 kΩ; Input sensitivity; 10 mV | |
Power Jack | DC 24V | DC 12V |
Power Supply | AC adaptor only | 2-way |
AC Adaptor | AD-E24250LW | AD-A12150LW |
Batteries | – | 6 D-size alkaline batteries |
Battery Life | – | Approximately 10 hours continuous operation on alkaline batteries |
Auto Power Off | Approximately 30 minutes after last operation; Can be disabled. | Approximately 30 minutes after last operation; Can be disabled. |
Speakers | 10cm× 2 (Output: 15W + 15W) | 10cm× 2 (Output: 6W + 6W) |
Power Consumption | 24V = 15 W | 12V = 8 W |
Dimensions | 94.8 × 38.4 × 11.6 cm (37 5/16 × 15 1/8 × 4 9/16 inch) | |
Weight | Approximately 7.0 kg (15.4 lbs) | Approximately 6.9 kg (15.2 lbs) (without batteries) |
General Guide
All of the illustrations in this manual show the CT-X9000IN.
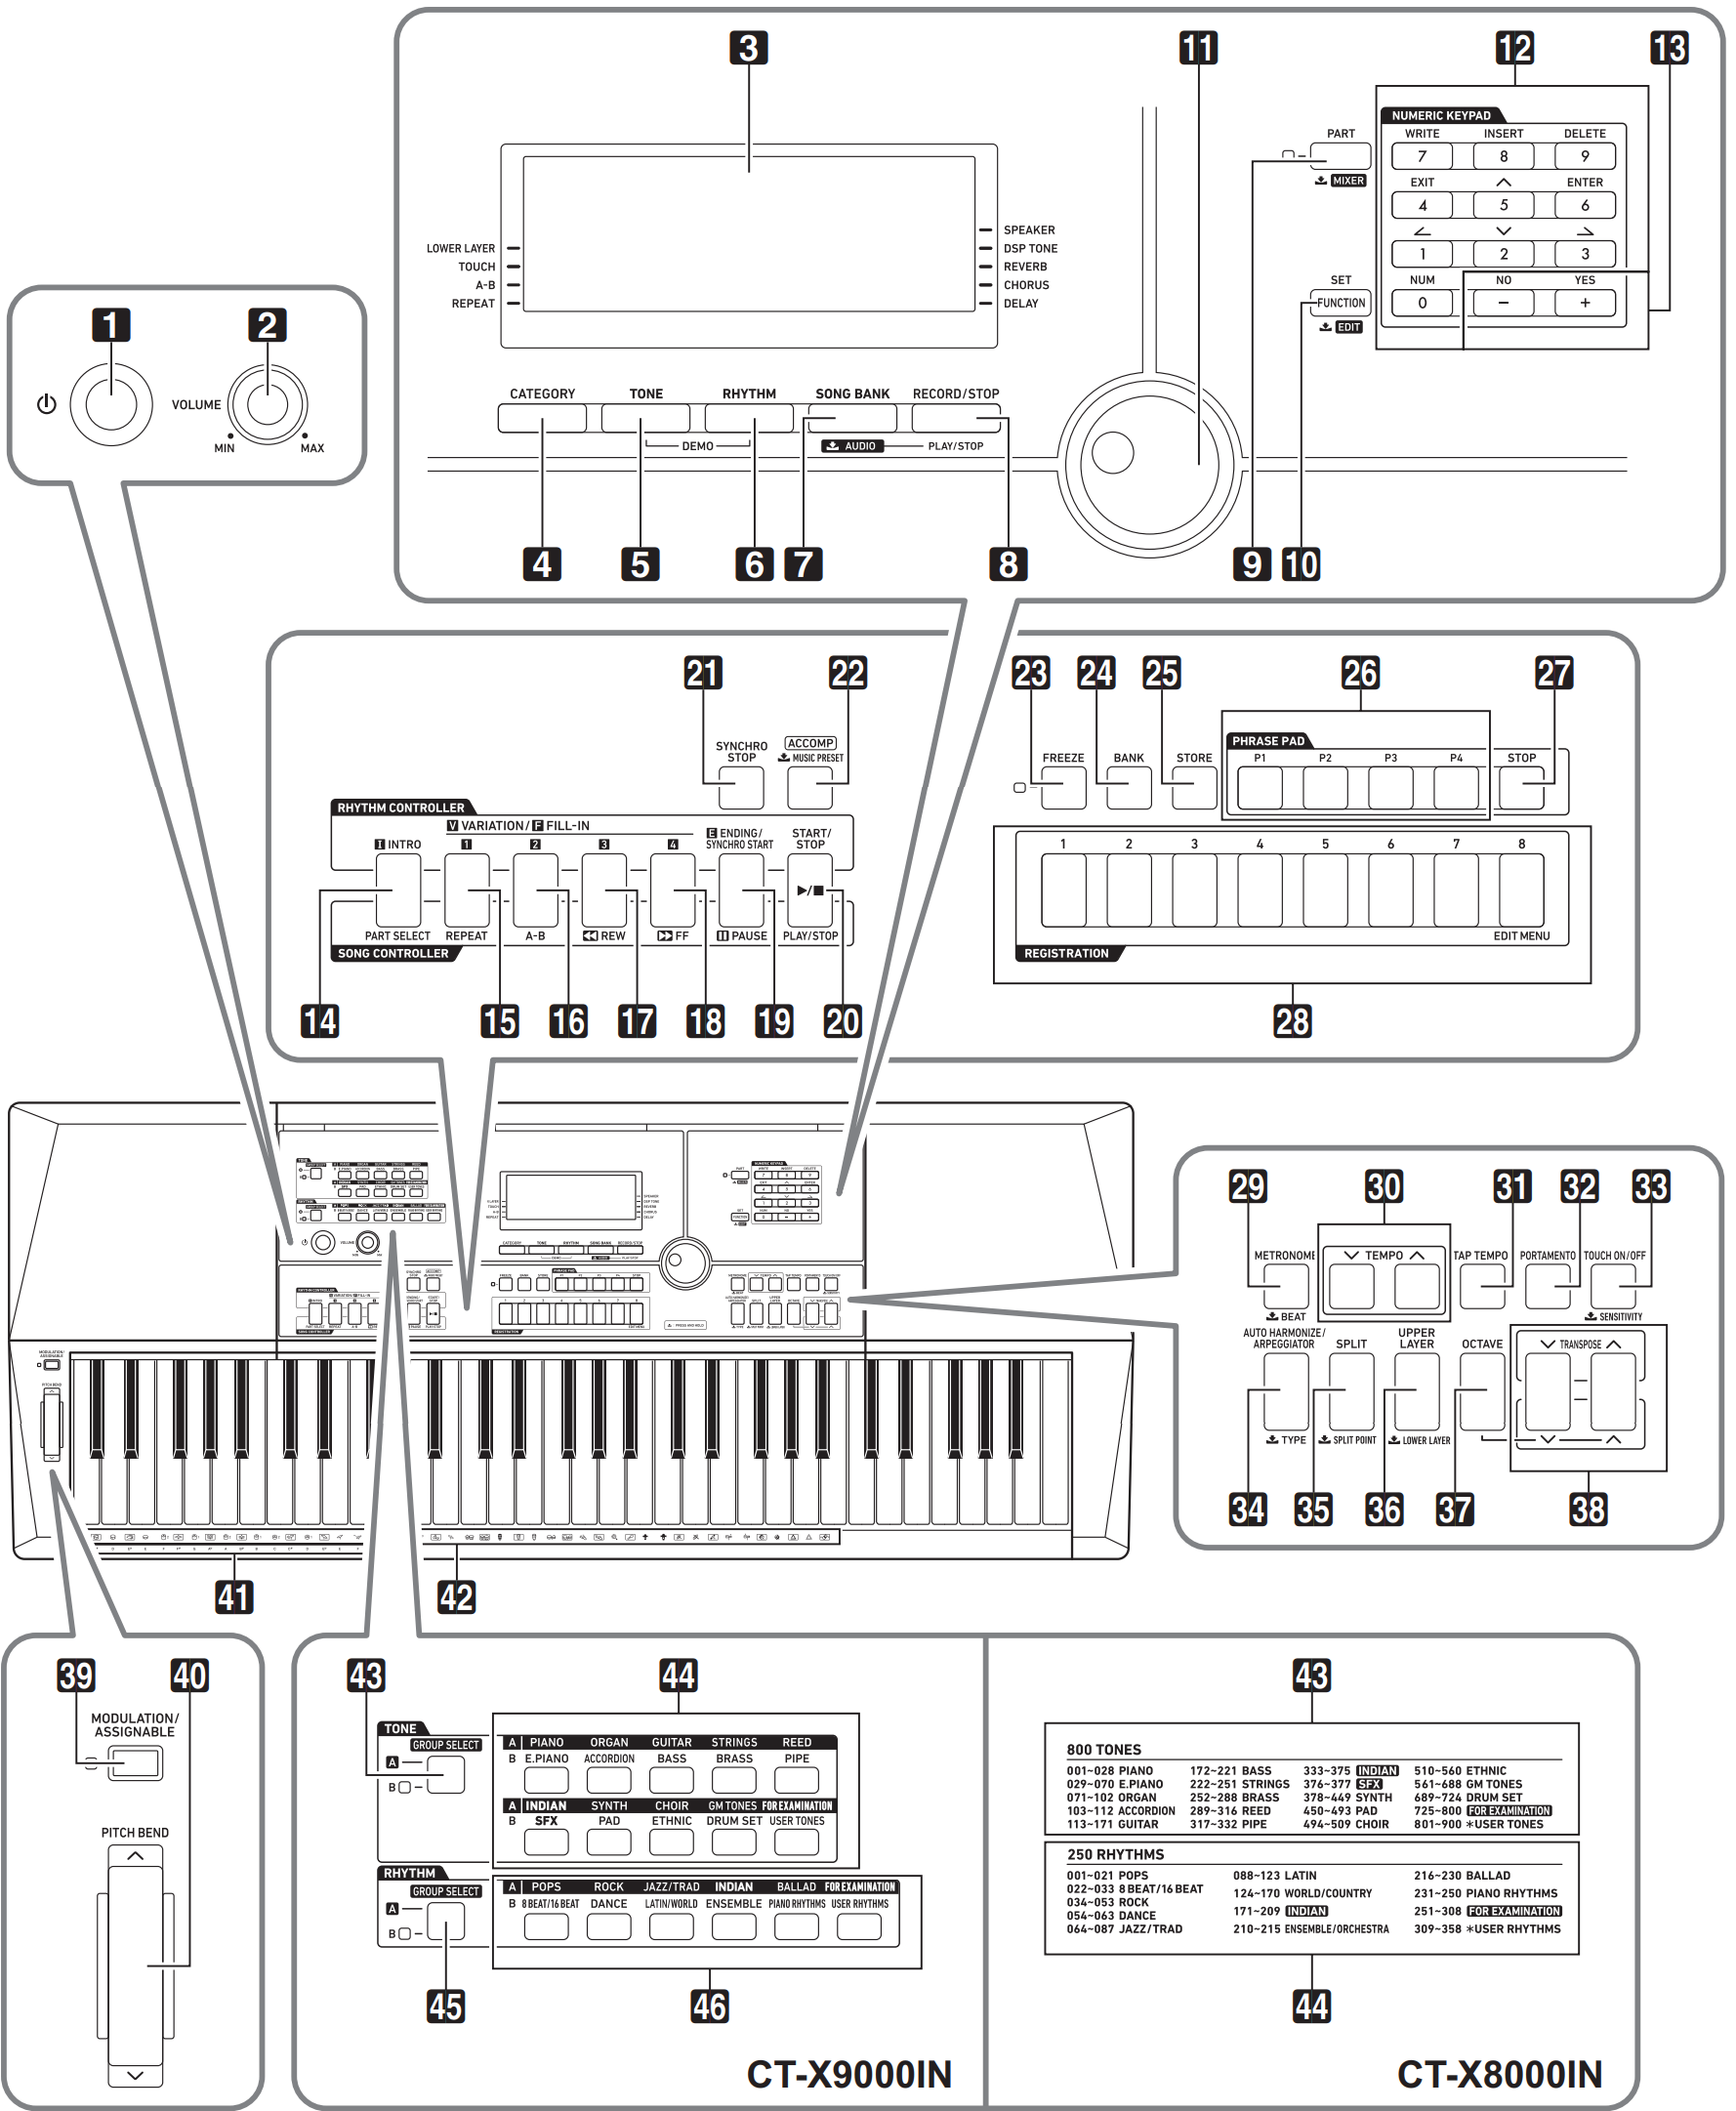
Some of the button names shown here include the ![]() mark. This indicates that you need to long-press the button to perform its operation.
mark. This indicates that you need to long-press the button to perform its operation.
This manual uses the numbers and names below to refer to buttons, keys, and controllers.
 (Power) button
- VOLUME knob
- Display
- CATEGORY button
- TONE button
- RHYTHM button
- SONG BANK,
 AUDIO button
 - RECORD/STOP, AUDIO PLAY/STOP button
- PART,
 MIXER button
 - FUNCTION, SET,
 EDIT button
 - Dial
- Number keys
- [–], [+] keys
- INTRO, PART SELECT button
- VARIATION/FILL-IN 1, REPEAT button
- VARIATION/FILL-IN 2, A-B button
- VARIATION/FILL-IN 3,
 REW button
 - VARIATION/FILL-IN 4,
 FF button
 - ENDING/SYNCHRO START,
 PAUSE button
 - START/STOP, PLAY/STOP button
- SYNCHRO STOP button
- ACCOMP,
 MUSIC PRESET button
 - FREEZE button
- BANK button
- STORE button
- PHRASE PAD buttons
- STOP button
- REGISTRATION buttons
- METRONOME,
 BEAT button
 - TEMPO buttons
- TAP TEMPO button
- PORTAMENTO button
- TOUCH ON/OFF,
 SENSITIVITY button
 - AUTO HARMONIZE/ARPEGGIATOR,
 TYPE button
 - SPLIT,
 SPLIT POINT button
 - UPPER LAYER, LOWER LAYER button
- OCTAVE button
- TRANSPOSE buttons
- MODULATION/ASSIGNABLE button (CT-X9000IN only)
- PITCH BEND wheel
- CHORD root names
- Percussion instrument list (CT-X9000IN only)
- TONE GROUP SELECT button
- TONE Category buttons
- RHYTHM GROUP SELECT button
RHYTHM Category buttons
Back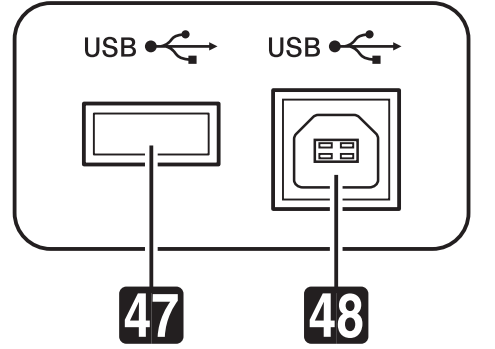
- USB flash drive port
USB port

- LINE OUT R, L/MONO jacks (CT-X9000IN only)
- PHONES jack (CT-X9000IN) / PHONES/OUTPUT jack (CT-X8000IN)
- MIC IN jack (CT-X9000IN only)
- MIC VOLUME knob (CT-X9000IN only)
- AUDIO IN jack
- PEDAL1 jack
- PEDAL2/EXPRESSION jack
- DC 24V terminal (CT-X9000IN) / DC 12V terminal (CT-X8000IN)
Note: In this manual, the PHONES/OUTPUT jack on the CT-X8000IN is referred to as the PHONES jack.
In this manual, this jack is referred to as the fk PHONES jack.
Display
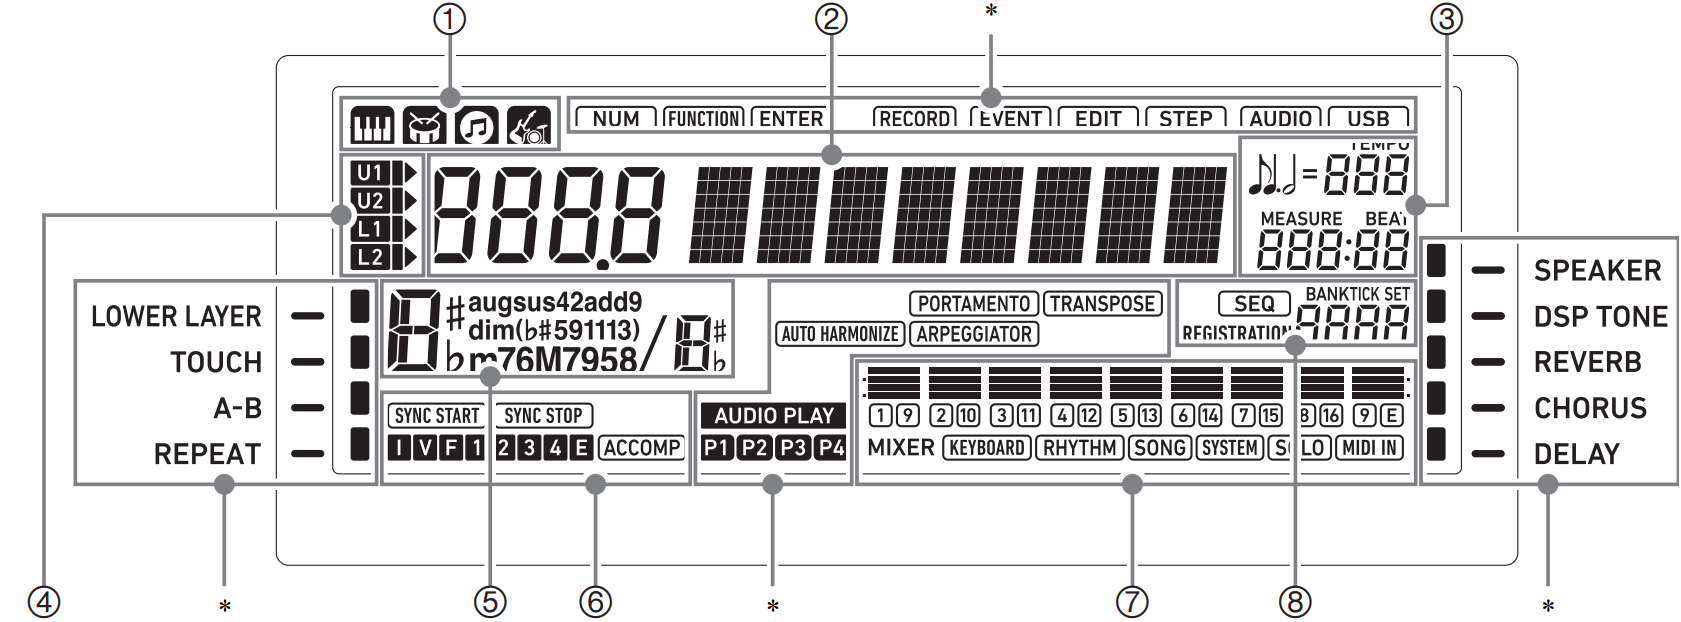
 Tone indicator
 Rhythm indicator
 Song Bank indicator
 Music Preset indicator
- Number/setting value display (left), name display (right)
- Tempo, measure, beat
- Keyboard part indicators
- Chord name
- Auto Accompaniment indicators
- Mixer info display area
- Registration display, event edit display
Other Indicators
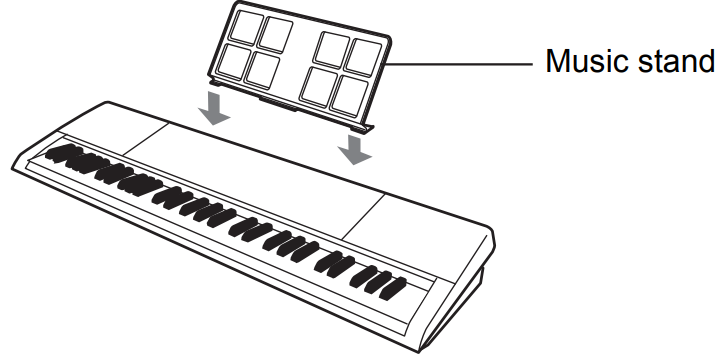
Preparing the Music Stand
Returning the Digital Keyboard to Its Factory Default Settings
There are two ways to reset the Digital Keyboard to its default settings: a “setting reset” that initializes settings only without deleting data, and a “factory reset” that initializes settings and deletes all data, returning the Digital Keyboard to the state it was in when it left the factory.
Preparing a Power Supply
Your Digital Keyboard uses an AC adaptor for power.
Using the AC Adaptor
Make sure that you use only the AC adaptor specified for this Digital Keyboard. Use of a different type of AC adaptor can cause malfunction.
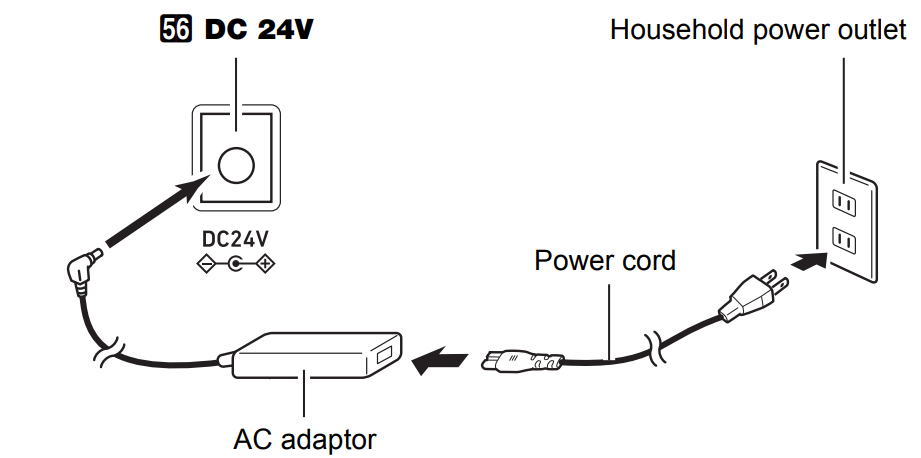
Connecting the AC Adaptor
Specified AC Adaptor: AD-E24250LW (JEITA Standard plug)
Important
- Never connect the AC adaptor (JEITA Standard, with unified polarity plug) that comes with this Digital Keyboard to any other device besides this Digital Keyboard. Doing so creates the risk of malfunction.
- Be sure to turn off Digital Keyboard power before connecting or disconnecting the AC adaptor.
- The AC adaptor will become warm to the touch after very long use. This is normal and does not indicate malfunction.
- Note the following important precautions to avoid damage to the power cord.
During Use
- Never pull on the cord with excessive force.
- Never repeatedly pull on the cord.
- Never twist the cord at the base of the plug or connector.
During Movement
- Before moving the Digital Keyboard, be sure to unplug the AC adaptor from the power outlet.
During Storage
- Loop and bundle the power cord, but never wind it around the AC adaptor.
- Never insert metal, pencils, or any other objects into the product’s DC24V (CT-X9000IN) or DC12V (CT-X8000IN) terminal. Doing so creates the risk of accident.
- Do not try to use the power cord that comes with the product with another device.
- Use the AC adaptor so its label surface is pointed downwards. The AC adaptor becomes prone to emitting electromagnetic waves when the label surface is facing upwards.
- Plug the AC adaptor into a power outlet that is close to the Digital Keyboard. This lets you immediately unplug from the power outlet should any problem occur.
- The AC adaptor is intended for indoor use only. Do not leave it in a location where it can become wet. Also, do not place a vase or any other container of liquid on the AC adaptor.
- Make sure that the AC adaptor does not become covered with a newspaper, table cloth, curtain, or any other type of fabric.
- If you do not plan to use the Digital Keyboard for a long time, unplug the AC adaptor from the power outlet.
- The AC adaptor cannot be repaired. If your AC adaptor malfunctions or becomes damaged, you need to purchase a new one.
- AC Adaptor Usage Environment
- Temperature: 0 to 40°C
- Humidify: 10% to 90%RH
- Output Polarity: &
Adjusting Display Contrast
- Press

Press the
 number key to display “Other”.
- Press the
 number key.
 Use the
 and
and  number keys to display “Contrast”.
- Use
 [–] and [+] or the
  dial to change the setting value.
 - When the setting is the way you want, long-press the
 (EXIT) 12 number key to exit the setting screen.
Connecting to Audio Equipment
Digital Keyboard Audio Output
Your Digital Keyboard outputs audio from its built-in speakers and/or the PHONES jack. (CT-X9000IN: Also outputs audio from the LINE OUT jacks.)
There will be an indicator mark next to [SPEAKER] while built-in speaker output is enabled.
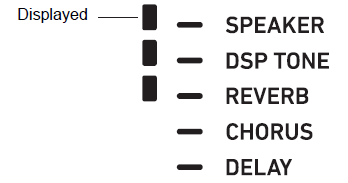
- There will be no indicator mark next to [SPEAKER] while built-in speaker output is disabled.
- Built-in speaker output is disabled in the cases described below.
- When there is a plug in the PHONES jack.*
- When the following setting is disabled (Off): Speakers
- (Speaker) 3 Speaker on/off (Enabled) (page EN-112).
- Built-in speaker output is disabled in the cases described below.
- The Digital Keyboard automatically adjusts the sound to make it suitable for headphones (or, in the case of the CT-X9000IN, the LINE OUT jacks) while speaker output is disabled, and for speakers while speaker output is enabled.
When the following setting is disabled (Off): Speakers (Speaker) 3 Enabled when PHONES connected (PhoneSpk)
IMPORTANT
If there is no sound output even though there is an indicator mark next to [SPEAKER], check the current settings of the 2 VOLUME knob and/or volume related settings.
To enable and disable speaker output
Perform the procedure under “To configure function settings with the ![]() button” and configure the following setting: Speakers (Speaker) 3 Speaker on/off (Enabled)
button” and configure the following setting: Speakers (Speaker) 3 Speaker on/off (Enabled)
To output from the speakers while headphones are connected
Perform the procedure under “To configure function settings with the ![]() button” and enable the following setting: Speakers (Speaker) 3 Enabled when PHONES connected (PhoneSpk). This will leave speaker output enabled even if there is a plug in the phone jack.
button” and enable the following setting: Speakers (Speaker) 3 Enabled when PHONES connected (PhoneSpk). This will leave speaker output enabled even if there is a plug in the phone jack.
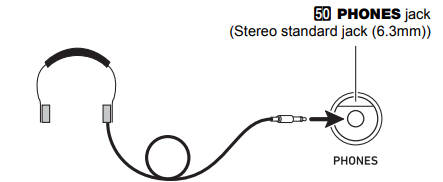
Using Headphones
Using headphones normally cuts off* output from the built-in speakers, which means you can practice playing even late at night without disturbing others.
When the following setting is disabled (Off): Speakers (Speaker) 3 Enabled when PHONES connected (PhoneSpk)
IMPORTANT
- Before connecting headphones, be sure to use 2 VOLUME to turn the volume down to a low level. After connecting, you can adjust the volume to the level you want.
- Do not listen to very high volume output over headphones for long period. Doing so creates the risk of hearing damage.
- If you are using headphones that require an adaptor plug, make sure you do not leave the adaptor plugged in when removing the headphones.
NOTE
Headphones do not come with the Digital Keyboard. Use commercially available headphones.
Outputting Keyboard Notes to Audio Equipment
You can connect audio equipment or a music amplifier to the Digital Keyboard and then play through external speakers for more powerful volume and better sound quality.
- Turn off the external device when making connections. After connecting, turn down the Digital Keyboard and external device volume levels whenever turning power on or off.
- After connecting, turn on the Digital Keyboard and then the external device.
- If keyboard notes sound distorted when they are sounded from external audio equipment, lower the Digital Keyboard’s volume setting.
To connect an external device to the Digital Keyboard’s PHONES jack
Connection requires commercially available connecting cords, supplied by you.
The connecting cords should have a stereo standard plug on one end and a plug that matches the configuration of the external device on the other end.

50 PHONES jack (Stereo standard jack (6.3mm)
To connect an external device to the Digital Keyboard’s LINE OUT jacks
Connection requires commercially available connecting cords, supplied by you.

Connecting to Audio Equipment (Figure 1)
Use commercially available cables to connect the external audio equipment to the Digital Keyboard’s LINE OUT jacks as shown in Figure 1. LINE OUT R jack output is right channel sound, while LINE OUT L/MONO jack output is left channel sound. It is up to you to purchase connecting cables like the ones shown in the illustration for connection of audio equipment. Normally in this configuration you must set the audio equipment’s input selector to the setting that specifies the terminal (such as AUX IN) to which the Digital Keyboard is connected.
Connecting to a Musical Instrument Amplifier (Figure 2)
Use commercially available cables to connect the amplifier to the Digital Keyboard’s LINE OUT jacks as shown in Figure 2. LINE OUT R jack output is right channel sound, while LINE OUT L/MONO jack output is left channel sound. Connecting to the LINE OUT L/MONO jack only outputs a mixture of both channels. It is up to you to purchase a connecting cable like the one shown in the illustration for connection of the amplifier.
Description
The CT-X9000IN is more than just a keyboard; it's an all-in-one musical solution. With its extensive library of tones and rhythms, you can explore a wide range of musical styles. The keyboard's user-friendly interface makes it easy to navigate and select different sounds and settings. The built-in effects and DSP capabilities allow for advanced sound manipulation, giving you the flexibility to create unique and professional-sounding music.
The keyboard's sturdy construction and lightweight design make it perfect for both home practice and live performances. The inclusion of MIDI and USB ports ensures seamless connectivity with other musical equipment and software, enhancing your overall music production experience.
Configuring Function Settings
Use the procedures in this section to configure master Digital Keyboard settings. The procedure uses the ![]() button.
button.
IMPORTANT
When power is turned off by pressing 1 (power) or by triggering of Auto Power Off (page EN-9) while Auto Resume (page EN-10) is turned off, all settings, except for those below, are returned to their initial defaults. Equalizer, Tuning, Registration Memory Freeze Target, Pedal 2 type, Expression pedal calibration, Tap rhythm start, Examination Mode, Display contrast
To configure function settings with the ![]() button
button
Press
 .
.
This displays the [FUNCTION] indicator and the main menu item.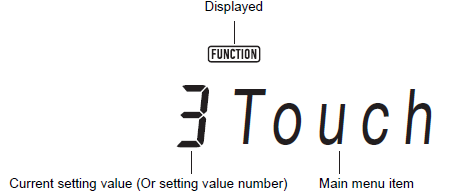
The display shown here is one example for explanatory purposes. The actual display that appears when you press
 is different.
- Use the [1] (
 ) and [3] (
 ) 12 number keys to display the menu item you want to change.
- If the [ENTER] 12 indicator is displayed, execute the steps below. If it is not displayed, advance to step 3.
- Press the [6] (ENTER) bm number key. This changes to the sub-menu item display.
- Use the [1] (
 ) and [3] (
 ) keys to display the sub-menu for the changes you want to make.
- After the sub-menu item appears, advance to step 3.
- To return to a main menu item from a sub-menu item, press the [4] (EXIT) 12 number key.
- If the [ENTER] indicator is displayed while a sub-menu item is displayed, it means there is another sub-menu under the currently displayed one. In this case, repeat steps (1) and (2).
- If the [ENTER] 12 indicator is displayed, execute the steps below. If it is not displayed, advance to step 3.
- Use 13 [–] and [+] or the 11 dial to change the setting value.
- Pressing the [0] (NUM) 12 number key displays the [NUM] indicator, indicating that numeric input with the 12 number keys is enabled (page EN-14). However, a setting item that inputs a value with a decimal part, only the integer part can be input using the 12 number keys. The decimal part must be specified using 13 [–] and [+] or the 11 dial.
- When the setting is the way you want, long-press the [4] (EXIT) 12 number key to exit the setting screen. This causes the [FUNCTION] indicator to disappear.
Setup Guide
To get started with the Casio Portable Keyboard CT-X9000IN, follow these steps:
- Unbox the keyboard and ensure all components, including the music stand and power adapter, are included.
- Insert batteries or connect the AC adapter to power the keyboard.
- Adjust the stand to a comfortable height and secure the keyboard.
- Connect any external devices such as headphones, speakers, or MIDI interfaces via the appropriate ports.
- Familiarize yourself with the control panel and start exploring the various tones, rhythms, and effects.
Troubleshooting
Symptom | Action | |
Included Accessories | ||
I can’t find something that should be here. | Carefully check inside all of the packing materials. | |
Power Requirements | ||
Power will not turned on. |
| |
The display lightsup momentarily butpower does not turnon when I press the 1P (power) button. | Press 1P (power) firmly and completely to turn on power. | |
The Digital Keyboard outputs a loud sound and then suddenly powers down. | CT-X8000IN: Replace the batteries with new ones (page EN-9) or switch over to AC adaptor power (page EN-8). | |
The Digital Keyboard suddenly powers down after about 30 minutes. | This happens when Auto Power Off (page EN-9) is triggered. | |
Display | ||
The display keeps going out or are flashing. | CT-X8000IN: Replace the batteries with new ones (page EN-9) or switch over to AC adaptor power (page EN-8). | |
Screen contents are visible only from straight ahead. | This is dues to production limitations. It does not indicate malfunction. | |
Sound | ||
Nothing happens when I press any keyboard key. |
| |
Nothing happensor notes do not play normally when I play notes on the left side of the keyboard. | Press cm to disable chord input in the accompaniment keyboard area (page EN-43). | |
Nothing happens when I start an Auto Accompaniment. |
| |
Nothing happens when I start playback of a built-in song. |
| |
The metronome does not sound. |
| |
Notes keep sounding, without stopping. |
| |
Symptom | Action | |
Some notes are cut off while they are playing. | Notes are cut off whenever the number of notes being sounded exceeds the maximum polyphony value of 64 (32 for some tones). This does not indicate malfunction. | |
The volume or tone setting I made has changed. |
| |
Output volume does not change even though I change my keyboard touch. |
| |
In certain keyboard ranges, the volume and tone quality sound are slightly different from those in other keyboard ranges. | This is due to system limitations. It does not indicate malfunction. | |
With some tones, octaves do not change at the far ends of the keyboard. | This is due to system limitations. It does not indicate malfunction. | |
The pitch of the notes does not match other accompanying instruments or sounds strange when played long with other instruments. |
| |
The reverb of notes seems to change suddenly. |
| |
Operation | ||
Tone, rhythm, and other settings revert to their initial defaults whenever you turn on the Digital Keyboard. | Though Digital Keyboard settings reset when you turn off the Digital Keyboard (page EN-9), you can save setups to registration memory for instant recall whenever you need them (page EN-65). If Auto Resume function (page EN-10) is turned on, most settings are saved while power is turned off. | |
Computer Connection | ||
I can’t exchange data between the Digital Keyboard and a computer. |
| |
Error Messages
Display | Cause | Action |
Err Limit | You are attempting to record more than 999 measures. | Make your recordings up to 999 measures long. |
Err Mem Full | You are attempting a recording that exceeds the allowable per-song limit. | Keep song recordings with the allowable per-song limit. |
You are attempting a recording that exceeds the allowable per-phrase limit. | Keep phrase recordings with the allowable per-phrase limit. | |
You are attempting a recording that exceeds the allowable per-user-rhythm limit. | Keep user rhythm recordings with the allowable per- user-rhythm limit. | |
Err DataFull | You are attempting to record more than 10 songs. | Delete some of the songs in memory. |
You are attempting to store user tones that cause the maximum allowable limit to be exceeded. | Delete unneeded user tones. | |
You are attempting to store user rhythms that cause the maximum allowable limit to be exceeded. | Delete unneeded user rhythms. | |
Err No Media | The USB flash drive is not plugged correctly into the USB flash drive port. | Correctly plug the USB flash drive into the USB flash drive port. |
The USB flash drive was removed while some operation was in progress. | Do not remove the USB flash drive while any operation is in progress. | |
The USB flash drive is write-protected. | Write-enable the USB flash drive. | |
The USB flash drive is protected by anti-virus software. | Use a USB flash drive that is not protected by anti- virus software. | |
Err No File | There is no loadable or playable file in the MUSICDAT folder. | Move the file you want to load into the “MUSICDAT” folder or the file you want to play into the “MUSICDAT” folder (page EN-118). |
Err No Data | You are selecting a user data item that does not have any data stored to it. | Select a user data item that has data stored to it. |
Err ReadOnly | A read-only file with the same name you are trying to use is already stored on USB flash drive. |
|
Err MediaFul | There is not enough space available on the USB flash drive. | Delete some of the files on the USB flash drive to make room for new data or use a different USB flash drive. |
Err ManyFile | There are too many files on the USB flash drive. | Delete some of the files on the USB flash drive to make room for new data. |
Err NotSMF01 | You are attempting to play back SMF Format 2 song data. | Playback of SMF Format 0 or Format 1 only is supported. |
Err Large Sz | The SMF file on the USB flash drive cannot be played because it is too big | Playback of SMF files up to approximately 320 KB in size is supported. |
The data you are trying to import cannot be imported because it is too big. | The maximum data size (per data item) when loading data into Digital Keyboard memory is shown below. Rhythms: Approximately 64 KB Phrases: Approximately 8 KB |
Err WrongDat | The USB flash drive data is corrupted. | – |
USB flash drive contains data that is not supported by this Digital Keyboard. | – | |
Err Format | The USB flash drive format is not compatible with this Digital Keyboard. |
|
USB flash drive memory is corrupted. | Use a different USB flash drive. |
Casio Portable Keyboard CT-X9000IN Pros & Cons
Pros
- Extensive library of tones and rhythms
- High-quality sound production with advanced effects
- Portable and lightweight design
- User-friendly interface
- MIDI and USB connectivity for versatile use
Cons
- No built-in speaker (requires external speakers or headphones)
- No touch screen; navigation relies on physical buttons
- Battery life could be longer for extended use
Customer Reviews
Customers have praised the Casio Portable Keyboard CT-X9000IN for its rich sound quality, extensive feature set, and durability. Many users appreciate its portability and the variety of sounds available, making it suitable for different musical genres. However, some users have noted that the lack of a built-in speaker and limited battery life are minor drawbacks.
Common complaints
Include the need for external speakers or headphones and the lack of a touch screen interface. Despite these, the overall consensus is that the CT-X9000IN offers excellent value for its price.
Faqs
What is the weight of the Casio Portable?
How many tones and rhythms does the Casio offer?
Is the Casio battery-powered?
Can I connect the Casio Portable Keyboard CT-X9000IN to my computer?
What kind of effects does the Casio Portable Keyboard CT-X9000IN offer?
Is the Casio Portable Keyboard suitable for beginners?
How do I update the firmware of my Portable Keyboard?
Can I use the Casio with music learning apps?
What is the polyphony of the Portable Keyboard?
Leave a Comment
