
Setup: Celestron Travel Scope 70 DX User Manual
Content
Celestron Travel Scope 70 DX
Introduction
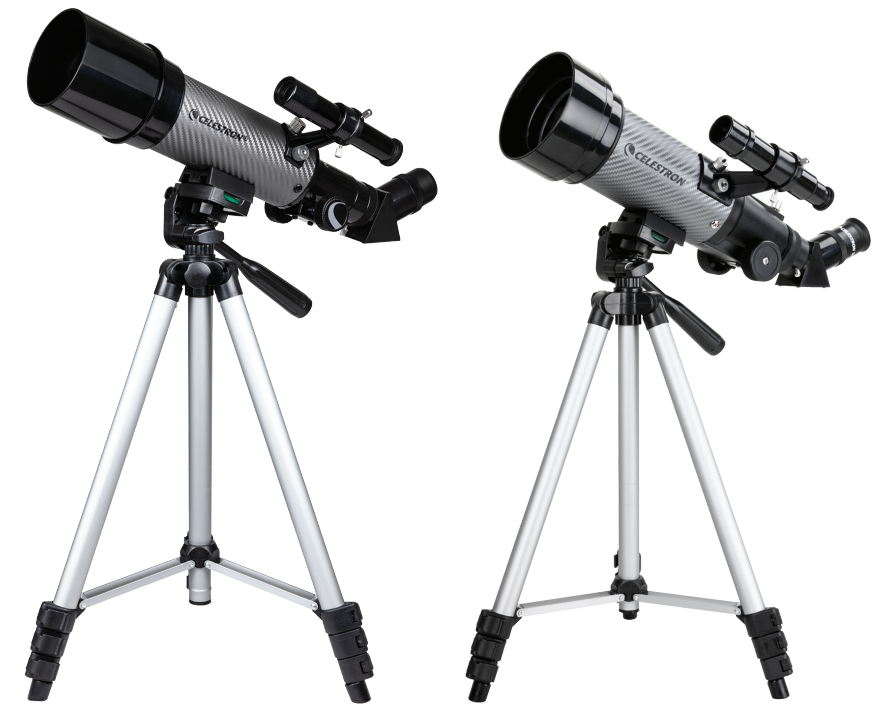
The **Celestron Travel Scope 70 DX** is a versatile and portable refractor telescope designed for both day and night use. This telescope is perfect for beginners and experienced observers alike, offering a great balance between portability and viewing quality. With its 70mm aperture and 400mm focal length, it provides excellent views of the Moon, planets, star clusters, and brighter deep-sky objects like the Orion Nebula and Andromeda Galaxy. During the day, it doubles as a spotting scope for observing wildlife or distant objects. The kit includes essential accessories such as a tripod, backpack, smartphone adapter, Bluetooth shutter release, two eyepieces (20mm and 10mm), a 2x Barlow lens, a Moon filter, and a finderscope.
The Travel Scope 70 DX is ideal for camping trips, backyard stargazing, or observing nature. It is lightweight, weighing only 3.3 lbs, making it easy to transport. The estimated price range is around $129.95, and it is available for purchase in the contiguous USA. With its quick and easy setup, this telescope is perfect for anyone looking to explore the night sky or observe wildlife without extensive astronomical knowledge.
WHAT’S IN THE BOX
We recommend saving your telescope box so it can be used to store the telescope when it is not in use. Unpack the box carefully, as some parts are small. Use the parts list below to verify that all parts and accessories are present.
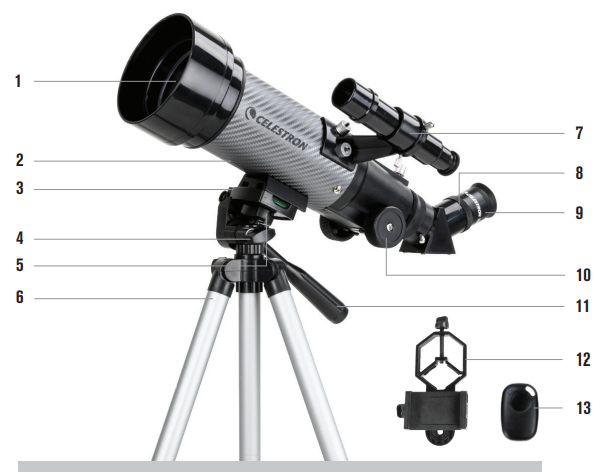
PARTS LIST
- Objective Lens
- Telescope Optical Tube
- Tripod Head Platform
- Azimuth Locking Knob
- Central Column Locking Knob
- Tripod
- Finderscope
- Erect Image Diagonal
- Eyepiece
- Focus Knob
- Pan Handle
- Smartphone Adapter
- Bluetooth Remote
SETTING UP THE TRIPOD
- The tripod comes preassembled, so that the setup is very easy.
- Stand the tripod upright and pull the tripod legs outward until each leg is fully extended (Figure 3).
- You can raise the tripod legs to the height you desire. At the lowest level , he height is about 16” (41 cm) and extends to about 49” (125 cm).
- To raise the height of the tripod, you unlock the tripod leg lock clamps at the bottom of each tripod leg (Figure 4) by opening the clamp for each section by pulling outward. Once a clamp is unlocked, then pull the tripod leg out as far as it will go, and then close the leg lock to secure it. Continue doing this for each tripod leg and each section to raise the height to the level you desire. A fully extended tripod looks similar to the image in Figure 5. With all the legs raised up on all sections, the height will be about 42” (107 cm).
- If you want to raise the tripod height up further, you must use the central column locking knob, which is the knob located at the bottom left in Figure 6. Turn the locking knob counterclockwise until loose. Then, pull up on the head of the tripod,d and the central column will move up. Continue pulling to the height you desire and then tighten the locking knob. When the central column is raised up as far as it will go, then the maximum height possible is achieved – 49” (125 cm).
ATTACHING THE TELESCOPE TUBE TO THE TRIPOD
The telescope optical tube attaches to the tripod by using the mounting bracket on the bottom of the optical tube and the mounting platform of the tripod. Before starting, make sure all of the knobs on the tripod are locked.
- Remove the protective paper covering the optical tube.
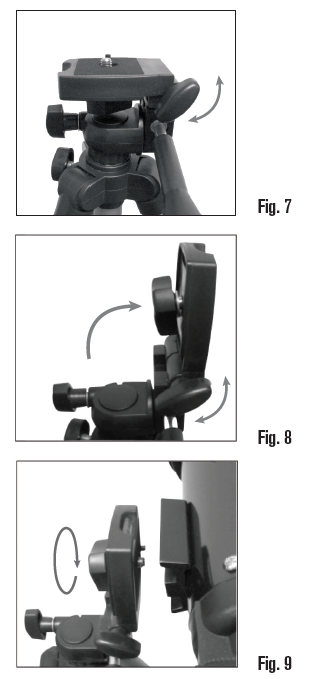
- Loosen the top right knob (Figure 7) by turning it counterclockwise. This allows you to tilt the tripod platform up 90° as shown in Figure 8. After tilting the platform up, tighten the knob to secure it in place.
- Figure 9 shows the bottom of the optical tube, the tripod platform, and where they will attach to each other.
- Under the center of the tripod platform, you will see a knob (Figure 9) that contains a ¼ x 20 screw to attach the platform to the telescope optical tube.
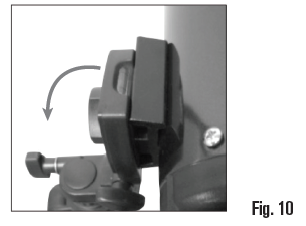
- Align the ¼ x 20 screw with the threaded hole on the telescope’s mounting bracket (NOTE: there are 2 threaded holes on the Travel Scope 70 , and it doesn’t matter which one you use). Hold the optical tube with one hand while threading the screw clockwise until tight with the other hand. Now the assembly will look like Figure 10. Hold the optical tube with one hand while threading the screw clockwise until tight with the other hand. Now the assembly will look like Figure 10.
- Lastly, loosen the knob for the tripod platform and lower the platform down to the level position. Then, tighten the knob securely.
USING THE SMARTPHONE ADAPTER
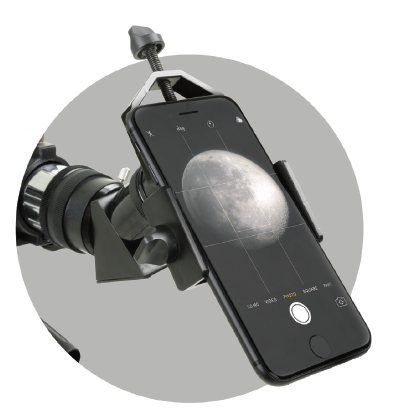
- Open the eyepiece clamp and place it around the body of the eyepiece. Tighten the clamp until it’s secure.
- Use the phone clamp knob to open the phone holder so that your phone fits inside. Tighten it to secure your phone in place.
- Turn on the phone and open your camera app. Make sure the flash is turned off.
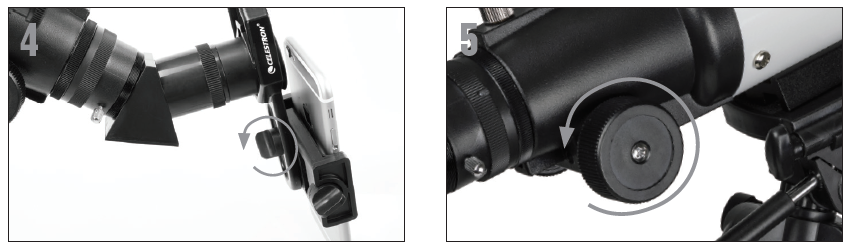
- Loosen the knob on the bottom of the adapter that secures the phone clamp to the eyepiece clamp. Slide the phone clamp up and down and rotate it left and right until your camera is looking down through the eyepiece of the telescope. Tighten the knob on the bottom of the adapter to secure it in place.
- Use the telescope’s focuser to adjust the focus of your camera. Snap the image using your app.

USING THE BLUETOOTH REMOTE
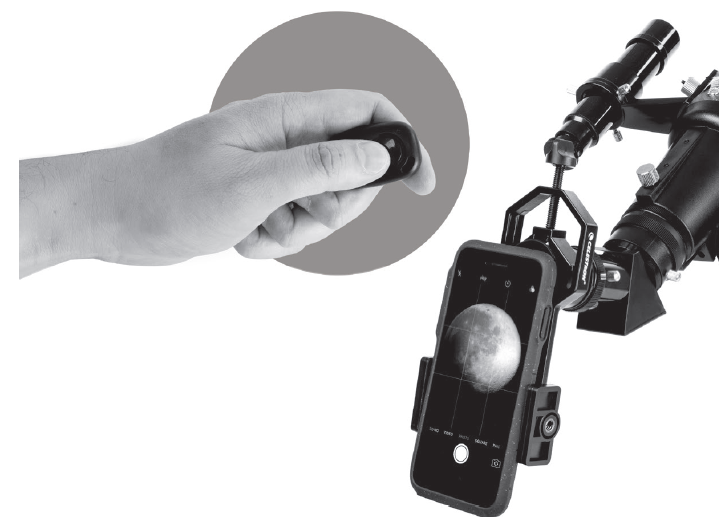
- To insert or replace the battery, place your thumb in the center of the back cover, pressing inward and sliding downward to remove the battery door. The CR2032 battery should be inserted with the positive (+) side facing upward. Replace the cover.
- Press and hold the button on the remote for 5 seconds. A blue light will turn on and, after a few seconds, start to blink. The remote is now in pairing mode.
- Using the Bluetooth settings on your phone, pair the device called “GBshutter”.
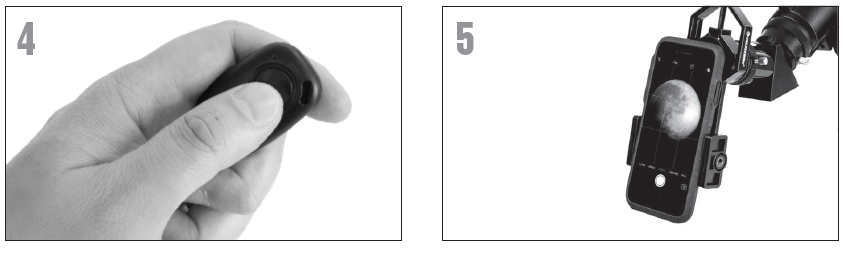
- Open your camera app. Press the button on the remote to trigger the shutter on your phone.
- If your camera is in video mode, you can press the button once to start recording and again to stop the recording.

TELESCOPE MAINTENANCE
While your telescope requires little maintenance, there are a few things to remember that will ensure your telescope performs at its best.
CARE AND CLEANING OF THE OPTICS
- Occasionally, dust and/or moisture may build up on the objective lens of your telescope. Special care should be taken when cleaning any instrument so as not to damage the optics.
- If dust has built up on the optics, remove it with a brush (made of camel’s hair) or a can of pressurized air. Spray at an angle to the glass surface for approximately two to four seconds. Then, use an optical cleaning solution and white tissue paper to remove any remaining debris. Apply the solution to the tissue and then apply the tissue paper to the optics. Low-pressure strokes should go from the center of the lens (or mirror) to the outer portion. Do NOT rub in circles!
- You can use a commercially made lens cleaner or mix your own. A good cleaning solution is isopropyl alcohol mixed with distilled water. The solution should be 60% isopropyl alcohol and 40% distilled water. Or, liquid dish soap diluted with water (a couple of drops per one quart of water) can be used.
- Occasionally, you may experience dew build-up on the optics of your telescope during an observing session. If you want to continue observing, the dew must be removed, either with a hair dryer (on low setting) or by pointing the telescope at the ground until the dew has evaporated.
- If moisture condenses on the inside of the optics, remove the accessories from the telescope. Place the telescope in a dust-free environment and point it down. This will remove the moisture from the telescope tube.
- To minimize the need to clean your telescope, replace all lens covers once you have finished using it. Since the cells are NOT sealed, the covers should be placed over the openings when not in use. This will prevent contaminants from entering the optical tube.
- Internal adjustments and cleaning should be done only by the Celestron repair department. If your telescope needs internal cleaning, please call the factory for a return authorization number and price quote.
TECHNICAL SPECIFICATIONS
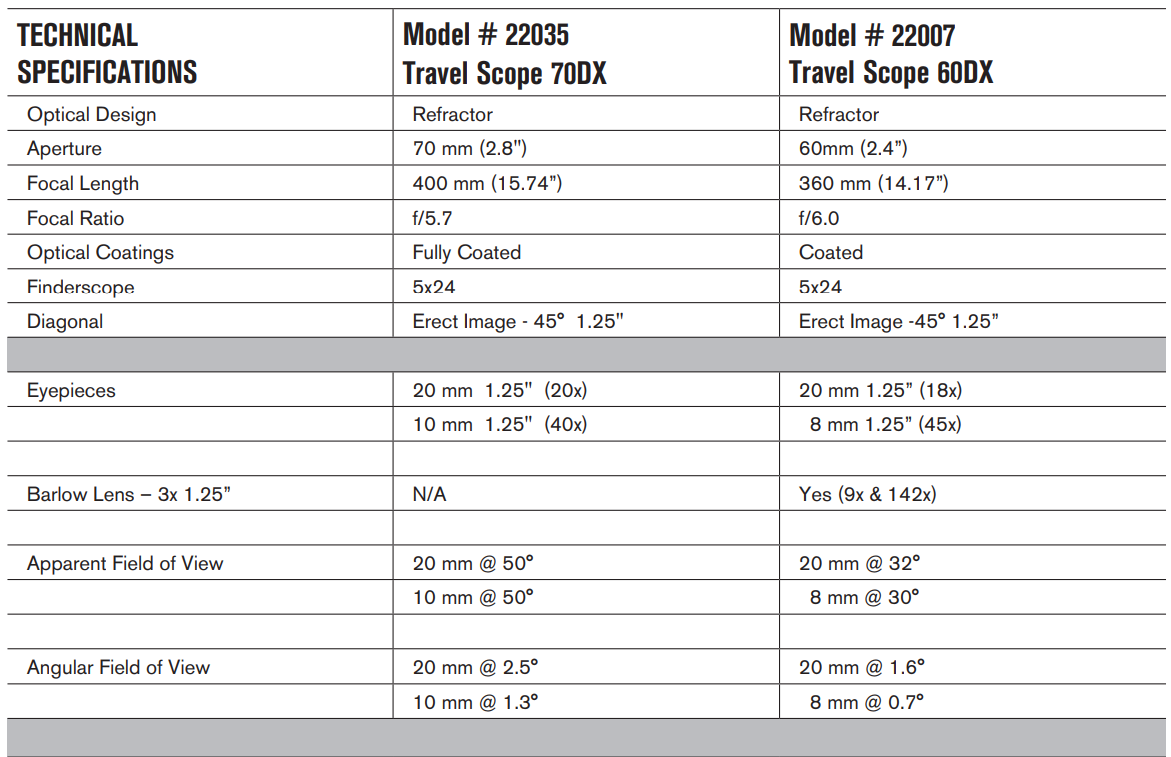
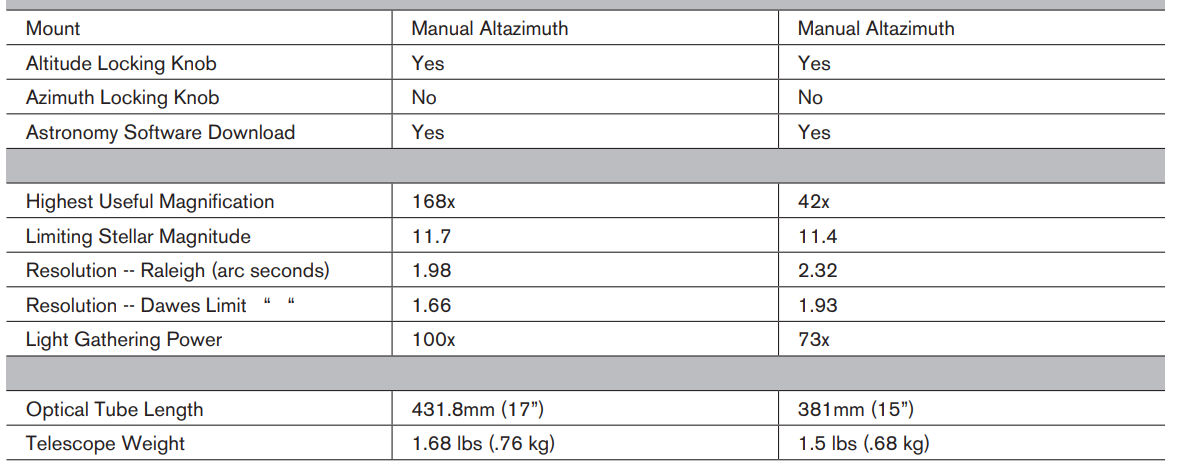
CELESTRON TWO-YEAR LIMITED WARRANTY
A. Celestron warrants this telescope to be free from defects in materials and workmanship for two years. Celestron will repair or replace such product or part thereof which, upon inspection by Celestron, is found to be defective in materials or workmanship. As a condition to the obligation of Celestron to repair or replace such product, the product must be returned to Celestron together with proof of purchase satisfactory to Celestron.
B.The Proper Return Authorization Number must be obtained from Celestron in advance of return. Please submit your request to Celestron’s online technical support center to receive the number to be displayed on the outside of your shipping container.
- All returns must be accompanied by a written statement setting forth the name, address, and daytime telephone number of the owner, together with a brief description of any claimed defects. Parts or products for which replacement is made shall become the property of Celestron.
- The customer shall be responsible for all costs of transportation and insurance, both to and from the factory of Celestron, and shall be required to prepay such costs.
- Celestron shall use reasonable efforts to repair or replace any telescope covered by this warranty within thirty days of receipt. In the eventthat eprepairrr replacement shall require more than thirty days, Celestron shall notify the customer accordingly.
- Celestron reserves the right to replace any product that has been discontinued from its product line with a new product of comparable value and function.
- This warranty shall be void and of no force or effect in the event a covered product has been modified in design or function, or subjected to abuse, misuse, mishandling, or unauthorized repair. Further, product malfunction or deterioration due to normal wear is not covered by this warranty.
- CELESTRON DISCLAIMS ANY WARRANTIES, EXPRESSED OR IMPLIED, WHETHER OF MERCHANTABILITY OR FITNESS FOR A PARTICULAR USE, EXCEPT AS EXPRESSLY SET FORTH HEREIN. THE SOLE OBLIGATION OF CELESTRON UNDER THIS LIMITED WARRANTY SHALL BE TO REPAIR OR REPLACE THE COVERED PRODUCT, IN ACCORDANCE WITH THE TERMS SET FORTH HEREIN. CELESTRON EXPRESSLY DISCLAIMS ANY LOST PROFITS, GENERAL, SPECIAL, INDIRECT, T OR CONSEQUENTIAL DAMAGES WHICH MAY RESULT FROM BREACH OF ANY WARRANTY, OR ARISING OUT OF THE USE OR INABILITY TO USE ANY CELESTRON PRODUCT. ANY WARRANTIES WHICH ARE IMPLIED AND WHICH CANNOT BE DISCLAIMED SHALL BE LIMITED IN DURATION TO A TERM OF TWO YEARS FROM THE DATE OF ORIGINAL RETAIL PURCHASE.
- Some states do not allow the exclusion or limitation of incidental or consequential damages or limitation on how long an implied warranty lasts, so the above limitations and exclusions may not apply to you.
- This warranty gives you specific legal rights, and you may also have other rights which vary from state to state. Celestron reserves the right to modify or discontinue, without prior notice to you, any model or style telescope.
Troubleshooting
Common issues with the Celestron Travel Scope 70 DX include misaligned optics, blurry images at high magnification, and smartphone adapter compatibility. Solutions include adjusting the focus, checking the lens cell for tightness, and ensuring the smartphone fits properly in the adapter. For more serious issues, Celestron offers a warranty and support options. Users can contact Celestron customer service for assistance.
To prevent problems, ensure all parts are securely attached, and the telescope is properly set up. Regularly check the lens cell for optimal tightness to avoid "pinched optics" that can distort images.
Pros & Cons
Pros
- Portability and Ease of Use: Lightweight and easy to set up, making it perfect for beginners and travel.
- Value for Money: Offers excellent viewing quality and numerous accessories at an affordable price.
- Day-to-Night Versatility: Suitable for both celestial viewing and terrestrial observation.
Cons
- Mechanical Design Limitations: Non-collimatable lens cell can lead to blurry images if overly tightened.
- Optical Quality: While good for its price, it doesn't match more advanced telescopes like apochromats.
Customer Reviews
Users praise the Celestron Travel Scope 70 DX for its ease of use and value for money, with many noting it's a great starter telescope. The smartphone adapter and Bluetooth shutter release are particularly appreciated for capturing high-quality images. Some users mention that the mechanical design can be improved, especially regarding the lens cell's tightness. Overall, it has a rating of 4.2 out of 5 stars, with many recommending it for beginners or casual observers.
Faqs
How do I properly set up my celestron Travel Scope 70 DX for first-time use, and what accessories are essential for getting started?
What are common troubleshooting steps if my celestron Travel Scope 70 DX images appear blurry or out of focus?
Can I use my celestron Travel Scope 70 DX for both astronomy and terrestrial viewing, and how do I switch between these modes?
How do I capture photos or video with my smartphone using the celestron Travel Scope 70 DX, and what accessories are required?
What maintenance steps should I follow to keep my celestron Travel Scope 70 DX in optimal condition?
What celestial objects can I realistically observe with the celestron Travel Scope 70 DX, and what are its limitations?
Is the celestron Travel Scope 70 DX compatible with additional eyepieces or accessories, and how do I choose the right ones?
How portable is the celestron Travel Scope 70 DX, and what makes it a good choice for travelers or beginners?
Tags
More celestron manuals
Leave a Comment