Chefman AIR FRYER OVEN+ Auto-Stir RJ38-12-AS User Manual
Content
Introducing the Chefman Air Fryer Oven+ Auto-Stir RJ38-12-AS
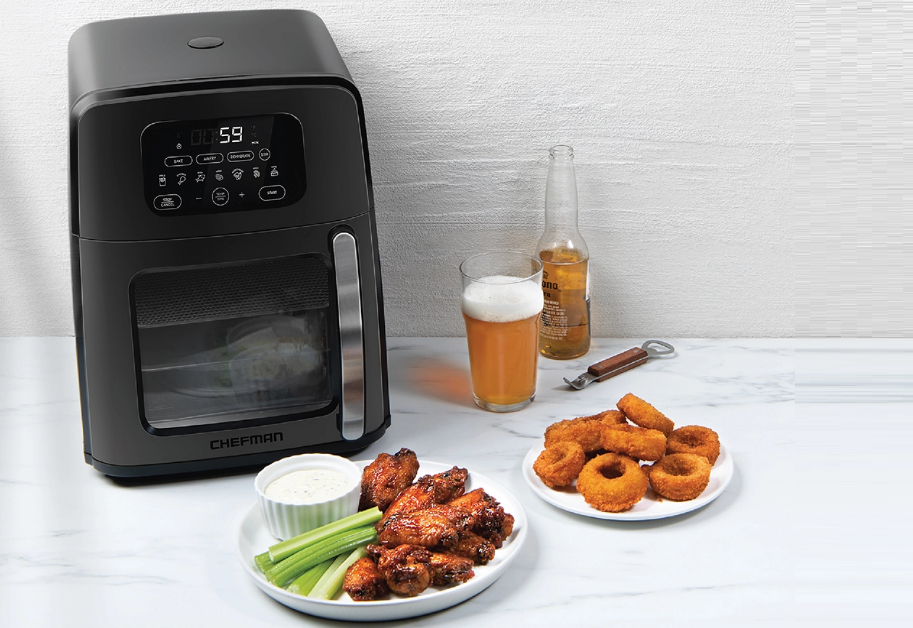
The Air Fryer Oven+ Auto-Stir RJ38-12-AS is a revolutionary kitchen appliance designed to simplify the cooking process while delivering delicious, healthier meals. With an impressive 11.6-quart capacity, this versatile air fryer oven features advanced auto-stir technology, ensuring even cooking without the need for manual shaking. Equipped with 14 presets and dual heating elements, it allows users to prepare a variety of dishes effortlessly. The intuitive capacitive touch control makes operation straightforward, whether cooking for one or the entire family. Priced at $199.98, the Chefman Air Fryer Oven+ is an ideal choice for anyone looking to elevate their home cooking experience.
WHAT’S IN THE BOX
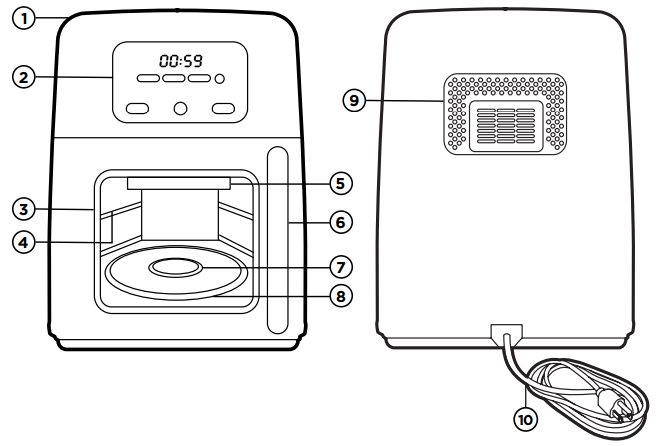
- Unit
- Control Panel
- Viewing Window
- Rack Slots
- Fan and Infrared Heating Housing
- Handle
- Rotator
- Bottom Heating Coil
- Venting Fan
Plug Outlet

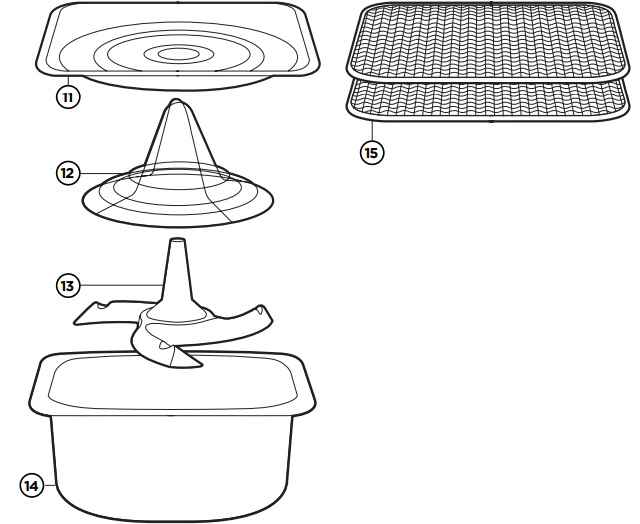
- Nonstick Drip Tray
- Wire Chicken Roasting Rack
- Stir Attachment
- Fry Basket (5.5L)
- Wire Racks (2)
Power Cord

Detailed Specifications
- The Chefman Air Fryer Oven+ Auto-Stir features:
- 1700 watts of cooking power
- 8 preset cooking functions, including air fry, bake, roast, and dehydrate
- A spacious 10-quart capacity that can accommodate a whole chicken or up to 6 slices of bread
- A durable stainless steel build that is both stylish and easy to clean
- An auto-stir feature that ensures even cooking and crisping
GETTING STARTED
Put food on wire racks, pan or in a fry basket.
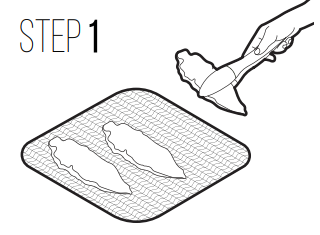
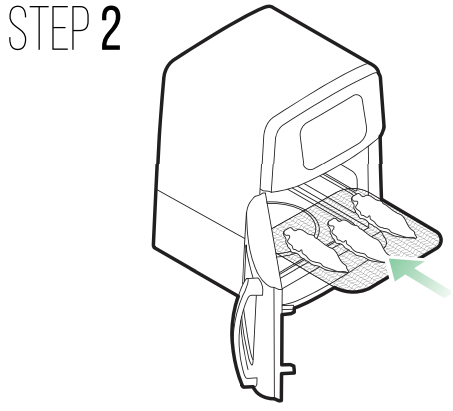
Insert racks or baskets into the Air Fryer Oven + and shut the door. If using the fry basket with the stir attachment, insert the basket into the lowest possible position so that its base will connect to the rotator.
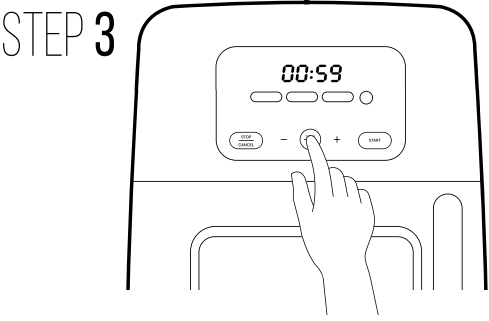
Select the cooking function you would like to use and use the TIME/TEMP controls to adjust the parameters if desired.
Press Start.
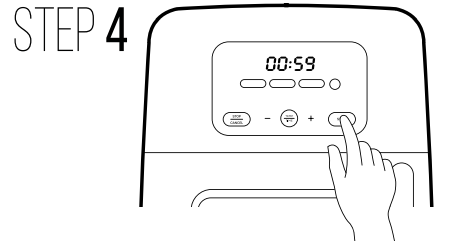
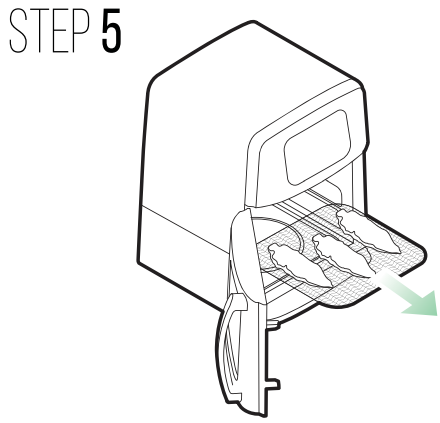
When cooking time expires, carefully remove food and enjoy!
FEATURES
- Unit
- Control Panel
- Viewing Window
- Rack Slots
- Fan and Infrared Heating Housing
- Handle
- Rotator
- Bottom Heating Element
- Venting Fan
Power Cord
- Nonstick Drip Tray
- Wire Chicken Roasting Rack
- Stir Attachment
- Fry Basket (5.5L)
Wire Racks (2)
CONTROL PANEL
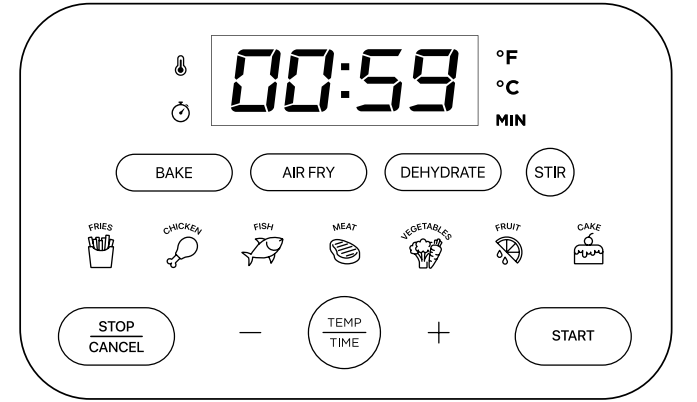
Temperature/Time Display
Automatically alternates. Hold the Temp/Time button for 5 seconds to choose between Fahrenheit and Celsius.Bake, Air Fry, Dehydrate
Sets cooking functionStir
Initiates rotator when using fry basket with stir attachmentFood Pre-Set Icons
Sets suggested time and temperature for favorite foodsStop/Cancel
Stops heating and fanMinus Sign
Reduces time and lowers temperature settingTemp/Time Set
Sets time and temperature (press to toggle between the two)Plus Sign
Adds time and increases the temperature setting
Detailed Description
The Chefman Air Fryer Oven+ Auto-Stir RJ38-12-AS is designed to make cooking and meal preparation a breeze. Its 8 preset cooking functions allow you to quickly and easily cook a variety of foods, from crispy fries and chicken wings to tender roasts and homemade pizza. The auto-stir feature ensures that your food is evenly cooked and crispy, while the large capacity allows you to cook for the whole family. Plus, the stainless steel build not only looks great on your countertop but is also easy to clean and maintain.
OPERATING INSTRUCTIONS
The multi-functional Air Fryer Oven + requires no preheating and cooks faster than a traditional oven, which means you can enjoy your favorite hot foods in mere minutes. The touch-screen control panel is intuitive, and customized accessories help guarantee delicious results.
BEFORE FIRST USE
- Remove all packaging materials, such as plastic bags and foam inserts.
- Read and remove all stickers on the unit.
- Check to ensure that all parts and accessories are accounted for.
- Wipe down the exterior with a damp cloth.
- Wash the fry basket, wire roasting rack, stirring attachment, wire racks, and drip tray with warm, soapy water. Dry thoroughly.
NOTE: On first use, the unit may emit a slight odor, which is normal and will dissipate with use.
HOW TO AIR FRY IN THE AIR FRYER OVEN +
The Air Fryer Oven + works by moving hot air around to create a crisp exterior just like you get from deep frying but with little to no oil required. The Air Fryer Oven + offers more capacity than many conventional air fryers, but thanks to its high-speed fan and two heat sources, it still cooks food quickly.
With the Air Fryer Oven +, you have two options for air frying: on wire racks that allow air to circulate around the foods (perfect for fried chicken!) or in a metal fry basket with an auto-stir function that gently tosses foods during cooking so all pieces turn out uniformly cooked and crisped with no need to manually shake the basket. (Hello French fries!)
CAUTION: Never fill the fry basket with oil. Unlike deep fryers, air fryers require little to no oil to produce crispy results. If you choose to use oil, toss foods with just a little in a separate bowl before cooking in the Air Fryer Oven +.
- Prepare food for air-frying.
- If using wire racks: Position the drip tray in the bottom slot of the Air Fryer Oven + just above the heating element. If using a fry basket with an auto-stir option: Insert a stir attachment into the fry basket.
- Plug in the Air Fryer Oven +. The control panel will illuminate. (If the unit was already plugged in, the control panel may only show Start; press Start to illuminate the control panel.)
- Put food on wire racks or in a fry basket, then insert racks or basket into the Air Fryer Oven + and shut the door. If using the fry basket with the stir attachment, insert the basket into the lowest possible position so that its base will connect to the rotator.
-
- 5a. If air frying with pre-set cooking parameters: Press Air Fry then choose the icon that best represents the food you’re cooking and press the icon. This will set the pre-programmed time and temperature as well as the auto-stir function if applicable. The settings will illuminate blue. If you would like to turn off the auto-stir function, press Stir until white.
- 5b. If air frying with custom cooking parameters: Press Air Fry. Adjust the time and temperature by pressing Time/Temp. Press Stir if using the fry basket with the auto-stir function. The chosen settings will illuminate blue.
- Press Start; it will illuminate red. Air frying will begin immediately. (No need to preheat unit.) The fan will begin blowing, the heating element on top will alight, and the clock will begin to count down.
- Attend to foods as necessary. To check on cooking, simply open the door. The until will turn off. With protective mitts, switch rack position or flip foods as desired. When the door is shut, air frying, timing, and auto-stir, if used, will continue.
- Finish cooking and check for doneness. When the timer reaches 0, the unit will beep, and the word End will appear on the control panel; the heater will turn off, but the fan will continue to run for about 30 seconds. With protective mitts, remove the racks or the basket and check food for doneness. Return the food to the unit for additional cooking if necessary.
- Serve and enjoy!
CAUTION: The basket, racks, drip tray, and contents will be HOT after cooking.
Place hot basket or rack(s) on a wire rack or trivet to cool.
HOW TO BAKE IN THE AIR OVEN FRYER +
With its larger interior capacity, the Air Fryer Oven + can be used just like an oven to bake and roast. For most baking, use the wire baking racks, either on their own, lined with parchment, or with oven-safe bakeware.
- Prepare food for baking.
- If necessary, position a drip tray in the bottom slot in the Air Fryer Oven + so that it sits just above the heating element. (Use drip tray if there’s a danger of fillings leaking or batter overflowing or if roasting on wire racks.)
- Plug-in Air Fryer Oven +. The control panel will illuminate. (If the Air Fryer Oven + was already plugged in, the control panel may only show Start; press Start to illuminate the control panel.)
- Put food on a wire rack(s) or in a baking dish on a wire rack. Put into Air Fryer Oven +, then shut the door.
-
- If baking with pre-set cooking parameters: Press Bake, then choose the icon that best represents the food you’re baking and press the icon. This will set the pre-programmed time and temperature. The auto-stir function will not come on. The chosen settings will illuminate blue.
- If baking with custom cooking parameters: Press Bake. Adjust the time and temperature by pressing Time/Temp. The chosen settings will illuminate blue.
- Press Start; it will illuminate red. Baking will begin immediately. (No need to preheat unit.) The fan will begin blowing, the heating element on top will alight, and the clock will begin to count down.
- Attend to foods as necessary. To check on cooking, simply open the door. The until will turn off. With protective mitts, switch rack positions or flip or turn foods as desired. When the door is shut, baking and timing will continue.
- Finish cooking and check for doneness. When the timer reaches 0, the unit will beep, and the word End will appear on the control panel; the heater will turn off, but the fan will continue to run for about 30 seconds. With protective mitts, remove the rack(s) and check food for doneness. Return the food to the unit for additional cooking if necessary.
- Serve and enjoy!
CAUTION: The racks, drip tray, and contents will be HOT after cooking. Place hot racks(s) on a wire rack or trivet to cool.
HOW TO DEHYDRATE WITH THE AIR-FRY OVEN +
With its fan, wire racks, and a lower temperature setting than found on most conventional ovens, the Air Fryer Oven + makes a great dehydrator, perfect for drying herbs, creating healthy veggie and fruit chips, and making foods lighter for backpacking. When dehydrating, use the wire baking racks to allow air to flow around the food.
- Prepare food for dehydration.
- Position the drip tray in the bottom slot of the Air Fryer Oven + so that it sits above the heating element.
- Plug-in Air Fryer Oven +. The control panel will illuminate.
(If Air Fryer Oven + was already plugged in, the control panel may only show Start; press Start to illuminate the control panel.) - Put food on a wire rack(s). Put into Air Fryer Oven +, then shut the door.
-
- If dehydrating pre-set cooking parameters: Press Dehydrate, then choose the icon that best represents the food you’re dehydrating. This will set the pre-programmed time and temperature; the auto-stir function will not come on. The chosen settings will illuminate blue.
- If dehydrating with custom cooking parameters: Press Dehydrate. Adjust the time and temperature by pressing Time/Temp. The chosen settings will illuminate blue.
- Press Start; it will illuminate red. Dehydration will begin immediately. (No need to preheat unit.) The fan will begin blowing, the heating element on top will alight, and the clock will begin to count down.
- Attend to foods as necessary. To check on cooking, simply open the door. The until will turn off. With protective mitts, switch rack positions or flip or turn foods as desired. When the door is shut, dehydrating and timing will continue.
- Finish cooking and check for doneness. When the timer reaches 0, the unit will beep, and the word End will appear on the control panel; the heater will turn off, but the fan will continue to run for about 30 seconds. Open door. With protective mitts, remove the rack(s) and check food for doneness. Return the food to the unit for additional cooking if necessary.
- Serve and enjoy!
CAUTION: The racks, baking dishes or pans, drip tray, and contents will be HOT after cooking. Place hot racks(s) on a wire rack or trivet to cool.
HOW TO ROAST A WHOLE CHICKEN IN THE AIR OVEN FRYER +
With its even heating, auto-stir function, and unique wire chicken roasting rack, the Air Fryer Oven + can roast a chicken to crisp, juicy perfection with a method that’s part rotisserie, part “beer can,” and totally delicious. You’ll get the best results with a chicken between 3½ and 4 lb. and can go as high as 5 lb. (Any larger will be too big to spin.)
- Insert the stir attachment into the fry basket. Fit wire chicken roasting rack over stir attachment; its outer ring should align with grooves on stir attachment blades.
- Prepare the chicken. Remove any giblets and season chicken inside and out with salt and pepper plus whatever other seasonings you desire.
- Position chicken on rack. Holding the chicken neck up, lower the cavity of the chicken over the roasting rack. Position the legs to stabilize the chicken.
- Insert the fry basket with chicken in the Air Fryer Oven + in the lowest position possible so that it connects with the rotator.
- Plug-in Air Fryer Oven +. The control panel will illuminate. (If Air Fryer Oven + was already plugged in, the control panel may only show Start; press Start to illuminate the control panel.)
- Press Air Fry. The temperature will be set to 400˚F. Press Time/Temp to adjust the time to 1 hour. Press Stir. The chosen settings will illuminate blue.
- Finish cooking and check for doneness. When the timer reaches 0, the unit will beep, and the word End will appear on the control panel; the heater will turn off, but the fan will continue to run for about 30 seconds. Open door. With protective mitts, remove the rack and check the chicken for doneness (165˚F in the thickest part of the thigh). Return the chicken to the unit for additional cooking if necessary.
- Use protective mitts to transfer the basket to a heat-proof surface and let the chicken rest for 15 minutes.
- Transfer chicken to a cutting board, carve, and serve.
COOKING TIPS
- Unless you’re using the fry basket, which fits into the bottom of the unit, use the drip tray when cooking with the Air Fryer Oven + to keep the heating coil and the area around it clean.
- For the easiest clean-up, wrap the drip tray in foil before using it.
- For best results, bake cake layers, brownies, and muffins are positioned as far as possible from the high-speed fan, which can inhibit rising. Bake cake layers one at a time. Smaller items, such as cookies, biscuits, and turnovers, may be baked on two racks at one time; for best results, alternate the position of the racks halfway through baking.
- Any oven-safe cooking vessel that can fit in the Air Fryer Oven + may be used with it.
- When baking on two wire racks at one time, switch positions halfway through baking for most even results.
- Depending on the size of the food, two racks may not fit at one time; if this is the case, cook in batches.
- Though you can see foods through the unit’s window, the interior light cycles on and off with the heating element during cooking. To check on foods, you may need to open the door. Cooking and time countdown will recommence when door is shut.
- Do not rely on pre-set times for doneness as variables in food size and temperature will affect cooking times; follow proper food safety guidelines for doneness, especially with meat, chicken, and fish.
- When removing the fry basket, lift it up before pulling it out to disengage it from the rotator
CLEANING AND MAINTENANCE
- Before cleaning, ensure the Air Fryer Oven + is unplugged and cool. Once cool, remove any accessories, if necessary.
- The fry basket, stir attachment, wire racks and drip tray are all top-rack dishwasher safe.
- Never use harsh cleaning products, which could damage the surfaces.
- Never immerse the Air Fryer Oven +, or its plug, in water or any other liquid.
- Dry all parts thoroughly before storage and store the Air Fryer Oven+ in a cool, dry place.
- Cleaning the Air Fryer Oven + between uses is important to keep it running well.
- Before cleaning, ensure the Air Fryer Oven + is unplugged and cool. Once cool, remove any accessories, if necessary.
- The fry basket, stir attachment, and drip tray are all top-rack dishwasher safe. Their nonstick surface means they’ll also come clean easily with a sponge and soapy water. Do not use abrasive cleaners on these accessories, however, or you may damage the nonstick surface.
- The wire racks are also top-rack dishwasher safe. Alternatively, wash racks with a sponge or a nylon brush and hot soapy water. To remove stubborn stuck-on foods, soak racks in hot soapy water. Be sure to dry promptly and thoroughly to prevent rusting.
- The wire chicken roasting rack may be hand-washed and is top-rack dishwasher safe.
- Prevent grease buildup by regularly wiping the entire interior of the Air Fryer Oven + cleaning with a damp cloth and a mild soap solution. Never use harsh cleaning products, which could damage the surfaces.
- Gently wipe down the exterior of the unit with a damp cloth or paper towel and dry. Do not use abrasive cleaners on the exterior or the finish may be damaged.
- Never immerse the Air Fryer Oven +, or its plug, in water or any other liquid.
- Dry all parts thoroughly before storage and store the Air Fryer Oven + in a cool, dry place.
SAFETY INSTRUCTIONS
IMPORTANT SAFEGUARDS
This appliance is for HOUSEHOLD USE ONLY.
WARNING: When using electrical appliances, basic safety precautions should always be followed including the following:
- Read all instructions.
- Do not touch hot surfaces. Use handles or knobs.
- To protect against electrical shock do not immerse the cord or plug in water or other liquid.
- Close supervision is necessary when any appliance is used by or near children.
- Unplug from the outlet when not in use and before cleaning. Allow to cool before putting on or taking off parts.
- Do not operate any appliance with a damaged cord or plug or after the appliance malfunctions or has been damaged in any manner. Contact Chefman® Customer Support.
- The use of accessory attachments not recommended by the appliance manufacturer may cause injuries.
- Do not use outdoors.
- Do not let the cord hang over the edge of the table or counter, or touch hot surfaces.
- Do not place on or near a hot gas or electric burner, or in a heated oven.
- Extreme caution must be used when moving an appliance containing hot oil or other hot liquids.
- To disconnect, turn any control to “off”, then remove the plug from the wall outlet.
- Do not use the appliance for other than intended use.
- Use extreme caution when removing the tray or disposing of hot grease.
- Do not clean with metal scouring pads. Pieces can break off the pad and touch electrical parts, creating a risk of electric shock.
- Place the Air Fryer Oven + on a flat, sturdy, heat-resistant surface. Do not place the Air Fryer Oven + near or on any type of heat source, such as a gas or electric burner, stove, or oven. Do not use near an open flame or flammable materials.
- The Air Fryer Oven + will emit some heat. Allow sufficient space around Air Fryer Oven + when in use and do not place near other items or appliances.
- Never operate the Air Fryer Oven +, or any appliance, on a gas or electric stovetop, even if the stovetop is off and completely cool.
- Appliances may emit heat or steam when in use; do not block inlets or outlets.
- Check that your home power supply corresponds with the intended voltage of the Air Fryer Oven +.
- Never wrap the cord tightly around the appliance during use or storage; this may cause the wire to fray and break.
- This product is not a deep fryer. It is NOT meant to be filled with oil. Never fill any parts of the Air Fryer Oven + with oil. If you choose to use oil, toss food with oil in a separate bowl and then transfer food to the removable racks or fry basket.
- Do not leave uncooked ingredients in the Air Fryer Oven + for more than a short period before cooking; raw meat, poultry, fish, fruits, and vegetables can spoil.
- Do not move the Air Fryer Oven + while it is full of food.
- Do not move the Air Fryer Oven + during use. During initial use, you may notice some smoke and/or a slight odor. This is normal and should quickly dissipate. It should not happen after the appliance has been used a few more times.
RECIPE BOOK
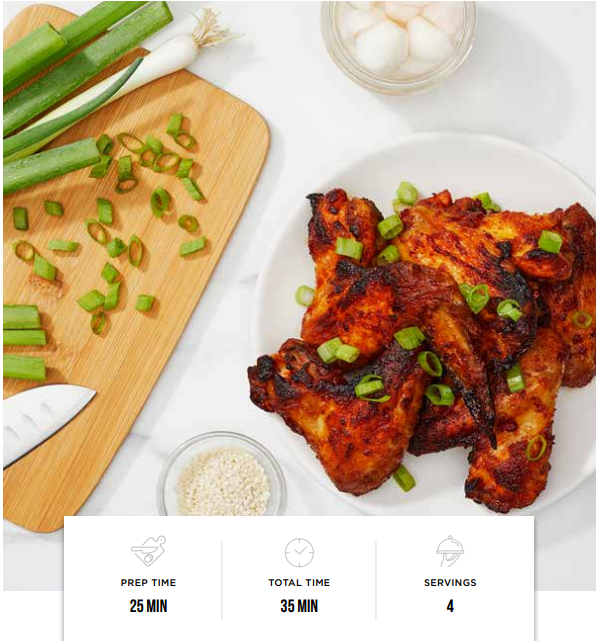
Spicy Sesame Chicken Wings
INGREDIENTS
- 2 lb chicken wings (if using whole wings, cut off wing tip)
- 1 Tbsp vegetable oil
- 1 tsp salt
- 2 Tbsp gochujang
- 2 Tbsp toasted sesame oil
- 1 tsp garlic powder
- Thinly sliced scallions, for serving
- Sesame seeds, for garnish (optional)
SPECIAL EQUIPMENT
- 4½-inch round cookie cutter
- Pastry brush
Gochujang (a red fermented chili paste from Korea) adds spicy, sweet, and savory flavors to these irresistible wings. Many supermarkets now carry this versatile condiment; if you can’t find it, substitute your favorite red chile paste.
- In a large bowl, toss the wings with the oil and salt until evenly coated.
- Insert the drip tray into the lowest position in the air oven. Divide the wings between the two wire racks and slide the racks into the air oven.
- Set to air fry at 375°F for 15 minutes, then press Start. After 7 minutes, carefully switch racks to ensure even cooking.
- Meanwhile, in a large bowl, stir the gochujang, sesame oil, and garlic powder together.
- When the time expires, carefully transfer the wings (they will not be fully cooked at this point) to the large bowl. Toss the wings in the sauce until evenly coated, then return them to the wire racks and the air oven.
- Set to air fry at 375°F for 8 minutes, switching rack positions after 4 minutes to ensure even cooking.
- Serve immediately sprinkled with the scallions and sesame seeds, if using.
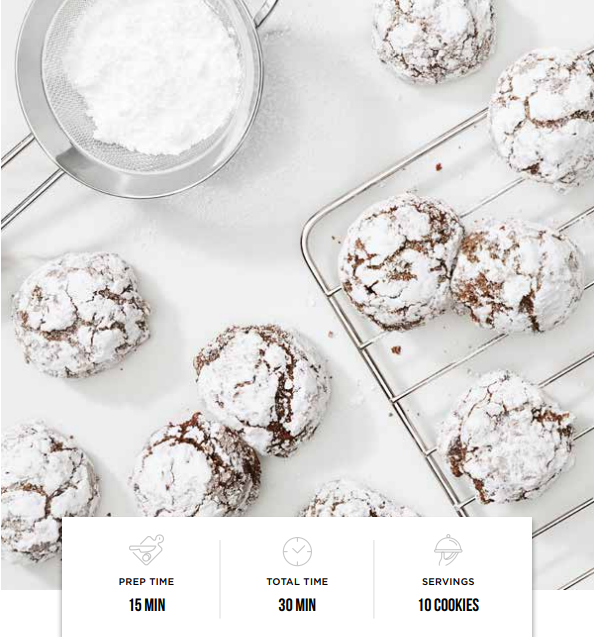
Chocolate Crinkle Cookies
INGREDIENTS
- ½ cup all-purpose flour
- ¼ cup cocoa powder
- ½ tsp baking powder
- ¼ tsp salt
- ⅓ cup granulated sugar
- 2 Tbsp vegetable oil
- 1 large egg
- ⅓ tsp vanilla extract
- ½ cup powdered sugar
SUPPLIES NEEDED
- Electric mixer with whisk attachment
- Parchment paper
These classic cookies are a breeze to make. Want more than ten? Simply double the recipe and bake in batches.
- In a medium bowl, whisk the flour, cocoa powder, baking powder, and salt.
- In a separate bowl and using an electric mixer with the whisk attachment, beat the sugar and oil on medium speed until well combined, about 3 minutes. Add the egg and vanilla and beat on medium until completely incorporated. With the mix-er running, add the flour mixture a little at a time; continue beating until a ball of dough forms.
- Cover the dough and refrigerate for 2 hours.
- Cut parchment paper to fit the wire racks and line the racks with the paper.
- Using your hands, form the dough into ten 1-inch balls. Roll each ball in the powdered sugar, place on the prepared racks, and slide the racks into the air oven.
- Set to bake at 350˚F for 11 minutes, then press Start.
- When the time expires, remove the racks from the air oven and cool the cookies on the racks for 3 minutes.
- Serve immediately or cool completely, then store in an airtight container for up to 2 days.
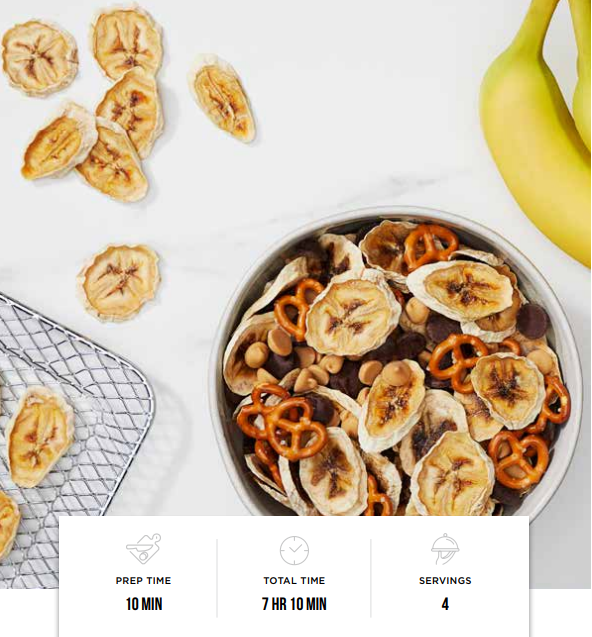
Banana Chip Trail Mix
INGREDIENTS
- 2 bananas, peeled and sliced crosswise ¼ inch thick
- ¼ cup dark chocolate chips
- ¼ cup peanut butter chips
- ¼ cup mini pretzels
Take this snack mix on the hiking trail or enjoy it at home; either way, the homemade banana chips add a welcome fruit flavor.
- Arrange banana slices in a single layer on the two wire racks and insert racks into the air oven.
- Set to Dehydrate at 165°F for 7 hours, and then press Start.
- When the time expires, check that the bananas are crisp. If so, remove it. If not, continue to dehydrate.
- In a large bowl, mix banana chips, chocolate chips, peanut butter chips, and pretzels.
- Enjoy right away or store in an airtight container.
Troubleshooting
If you experience any issues with your Chefman Air Fryer Oven+ Auto-Stir RJ38-12-AS, here are some common problems and solutions:
- Problem: The air fryer oven is not heating up.
Solution: Check to make sure that the appliance is properly plugged in and that the temperature dial is set to the desired cooking temperature. - Problem: The auto-stir feature is not working.
Solution: Make sure that the food basket is properly inserted and that the auto-stir function is turned on.
Warning: Do not overfill the air fryer basket, as this can cause uneven cooking and potentially damage the appliance.
Warranty
Our products are backed by a limited 1-year warranty. To register, follow the instructions on the Chefman Warranty Registration page in this User Guide.
We offer a limited 1-year warranty from the date of purchase. This warranty is void without proof of purchase within the USA, Canada, or Mexico. Service centers and retail stores do not have the right to alter or change the Terms and Conditions of this warranty.
CHEFMAN WARRANTY REGISTRATION
Register your product to add an additional 3 months to your warranty.
How Do I Register My Product?
Visit https://chefman.com/register
Pros & Cons
Pros
- 8 preset cooking functions for a variety of dishes
- Large 10-quart capacity
- Durable stainless steel build
- Easy-to-clean design
- Auto-stir feature for even cooking and crisping
Cons
- Higher price point than some other air fryer models
- May take up more counter space than smaller air fryers
Faqs
What is the capacity of the Chefman?
How does the auto-stir feature work?
What materials is the Oven+ Auto-Stir made from?
What is the power output of the Air Fryer?
What is the warranty on the Chefman RJ38-12-AS?
How do I clean the Chefman Air Fryer Oven+ Auto-Stir?
What is the launch date of the Chefman Air Fryer?
What cooking functions does the Chefman Air Fryer Oven+ Auto-Stir have?
Leave a Comment
