Installation: Creality Ender-3 3D Printer User Manual
Content
Introduction of Creality Ender-3 3D Printer
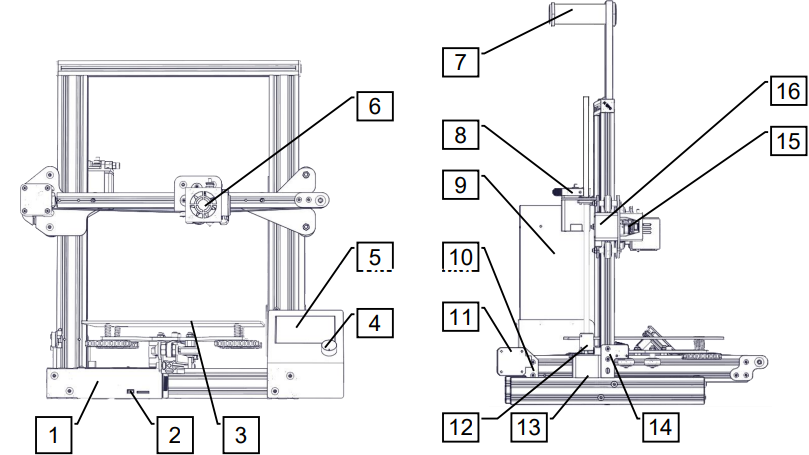
- Control Box
- TF Slot and USB Port
- Print Surface
- Control Knob
- Display
- Nozzle Assembly
- Spool Holder
- Extruder (E) Stepper
- Power
- Y Limit Switch
- Y Stepper
- Coupling
- Z Stepper
- Z Limit Switch
- X Limit Switch
- X Stepper
Detailed Specifications
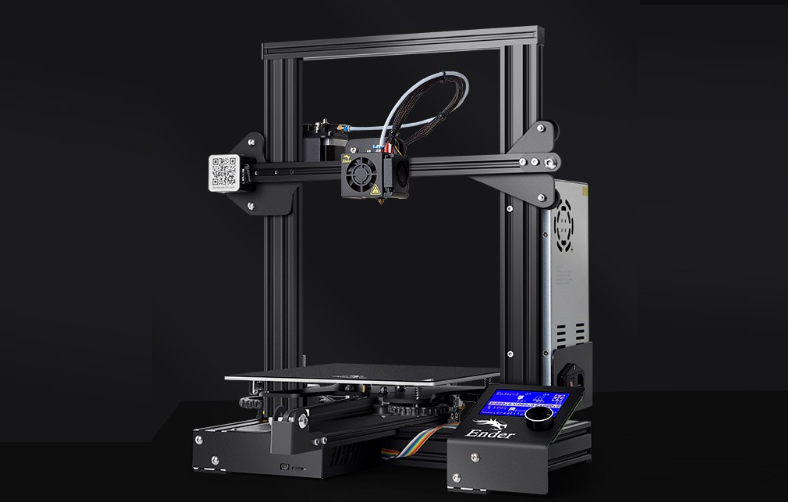
The Creality Ender-3 3D Printer is a high-precision, versatile, and easy-to-use 3D printer that is perfect for both beginners and professionals. Here are its key features:
- Print technology: FDM (Fused Deposition Modeling)
- Print speed: 180 - 250 mm/s
- Print accuracy: 0.1 - 0.4 mm
- Print volume: 220 x 220 x 250 mm
- Filament diameter: 1.75 mm
- Nozzle diameter: 0.4 mm
- Operating temperature: 160 - 260°C (nozzle), 40 - 60°C (heated bed)
- Connectivity: SD card, USB
- Frame: Aluminum extrusion
- Control interface: 4.3-inch touchscreen
- Power supply: DC 12V/24V, 300W
- Weight: 17.6 lbs (8 kg)
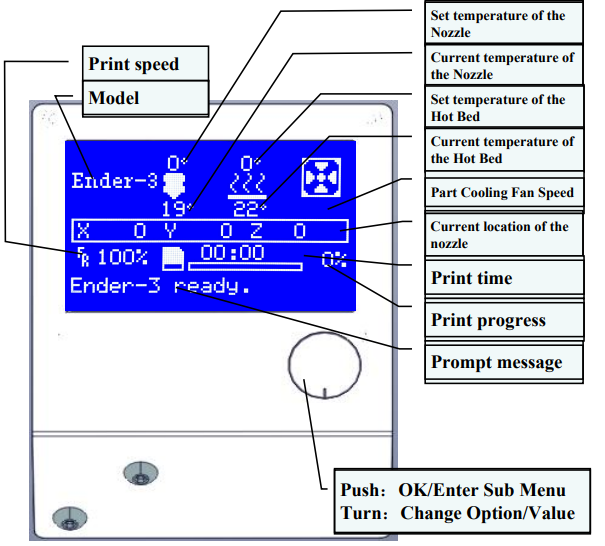
Screen Infromation
Information Displayed
| Menu | Sub Menu | Explanation |
|---|---|---|
| Info Screen | ↑ main ↑ | Return |
| Move axis → | Moving X, Y, Z axis or Extruder by a given value | |
| Auto home | Return to the origin | |
| Set home offsets | - | |
| Prepare → | Disable steppers | Moving X, Y, Z axis by hand |
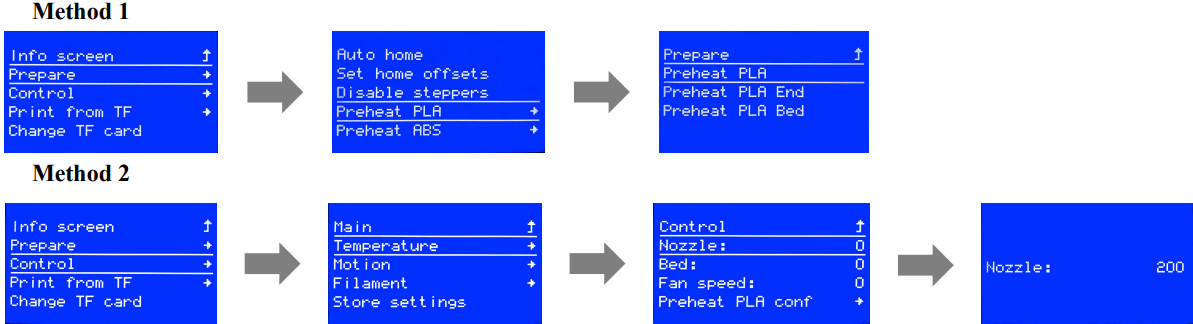
| Preheat PLA | - | |
| Preheat ABS | - | |
| Cooldown | Close and cooldown the nozzle | |
| Control → | Temperature → | Heat the nozzle and bed or change fan speed by a given value |
| No TF Card | / Print from TF | Select the printing model |
| Init. TF-Card / Change TF-Card | - | |
| About Printer | - | - |
| Printing | - | - |
| Tune → | Speed | Change printing speed by a given value |
| Nozzle | Change the temperature by a given value | |
| Bed | Change the temperature by a given value | |
| Fan Speed | Change fan speed by a given value | |
| Flow | Change filament flow by a given value | |
| Pause Print | - | - |
| Stop Print | - | - |
Creality Ender-3 3D Printer Loading Filament
Preheat
Feeding
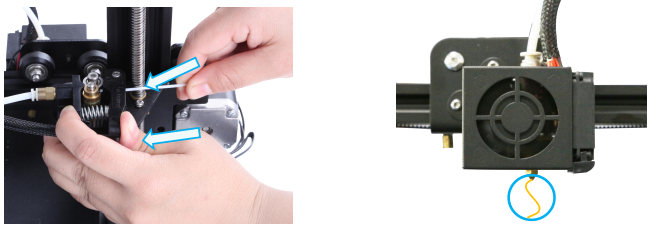
Press and hold the extruder lever then insert 1.75mm filament through the small hole of the extruder. Continue feeding until you see filament out of the nozzle.
Tip:Replacing the Filament
- Cutting filament near the Extruder and slowly feed new filament until the new filament get into the PTFE tube.
- Preheating the nozzle,Press and hold the extruder, extract the filament, then feed the new filament.
Description
The Creality Ender-3 3D Printer is a compact, reliable, and high-performance 3D printer that is ideal for creating detailed and accurate 3D models. Its build volume of 220 x 220 x 250 mm provides enough space for printing large objects, while its print speed of up to 250 mm/s ensures fast and efficient printing. The printer features a heated build plate, which helps to prevent warping and ensures that your prints stick securely to the build surface. The Ender-3 has a sturdy aluminum extrusion frame, which ensures stability during printing and reduces vibrations. This, in turn, leads to better print quality and more accurate results. The printer also features a Bowden extrusion system, which reduces the weight of the print head and improves print accuracy.
Setup Guide ofCreality Ender-3 3D Printer
Setting up the Printer is easy, even for beginners. Here are the steps for assembling and configuring the printer:
- Unpack the printer from its box and remove all the protective packaging.
- Assemble the printer by following the instructions in the user manual. This involves attaching the control box, the print bed, and the extruder.
- Level the print bed by adjusting the screws underneath it. You can use the paper test to ensure that the nozzle is at the correct distance from the bed.
- Insert the SD card and select the pre-installed test print from the touchscreen interface.
- Wait for the printer to heat up and start the test print. This will help you to check that everything is working correctly.
- Once the test print is complete, you can start printing your own 3D models.
Bed Levelling

Prepare →Auto Home. Wait for the nozzle to move to the left/front of the platform.
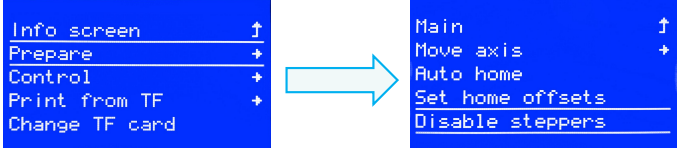
Prepare→Disable Steppers

- Move the nozzle to the front/left leveling screw and adjust the platform height by turning the knob underneath. Use a piece of A4 paper (standard printer paper) to assist with the adjustment, making sure that the nozzle lightly scratches the paper.
- Complete the adjustment on all 4 corners
Repeat above steps 1-2 times if necessary.

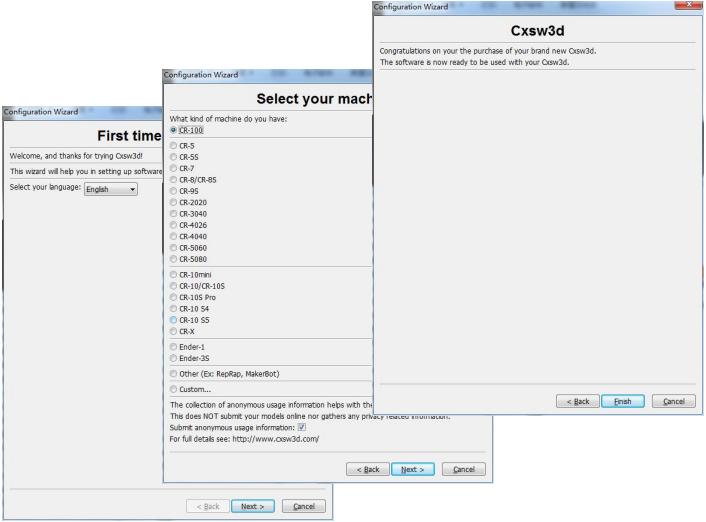
Software Installation
- Double click to install the software.
- Double click to open the software.
Select language →Next →Select your machine →Next →Finish.
Preparing to Print
- Slicing
Open the software → Load → Select the file →Wait for slicing to finish ,and save the gcode file to TF card.

- Printing
Insert the TF card→ Int. TF-Card → Print from TF→ Select the file to be printed.

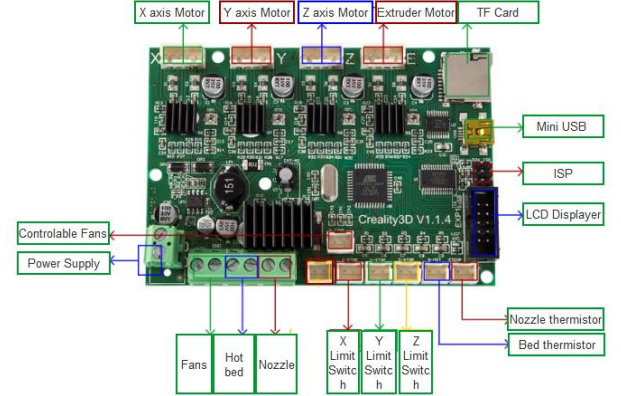
Circuit Wiring Diagram
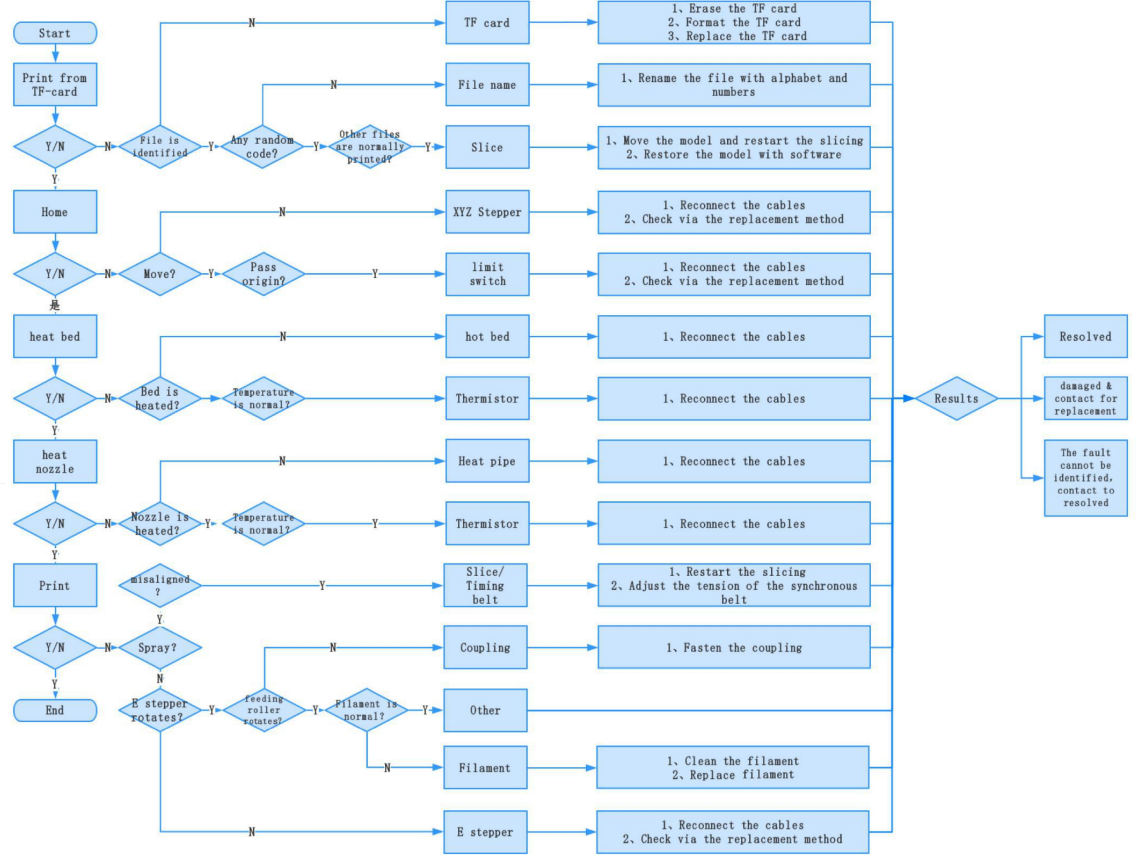
Troubleshooting of Creality Ender-3 3D Printer
Pros & Cons about Creality Ender-3 3D Printer
Pros
- High-quality printing: The Ender-3 produces accurate and detailed prints, which are ideal for both prototyping and creating finished products.
- Easy to use: The printer is easy to assemble and configure, and the touchscreen interface is intuitive and user-friendly.
- Versatile: The Ender-3 is compatible with a wide range of filament types, including PLA, ABS, TPU, and PETG.
- Affordable: The printer is relatively inexpensive compared to other 3D printers in its class.
- Large build volume: The Ender-3's build volume of 220 x 220 x 250 mm is larger than many other 3D printers in its class.
Cons:
- No enclosure: The Ender-3 does not come with an enclosure, which means that it may not be suitable for printing with certain materials, such as ABS.
- Some assembly required: Although the Ender-3 is relatively easy to assemble, some users may find the process time-consuming.
- Limited connectivity: The Ender-3 does not have Wi-Fi or Ethernet connectivity, which means that you need to use an SD card or USB to print your models.
Faqs
Does the Creality Ender-3 3D Printer include an LCD screen for control?
What filament types does the Creality Ender-3 3D Printer support ?
How do I level the print bed on the Creality Ender-3 3D Printer?
Does the Creality Ender-3 3D Printer come with an enclosure?
How long does it take to assemble the Creality Ender-3 3D Printer?
What is the recommended print speed for the Creality Ender-3 3D Printer?
What is the warranty period for the Creality Ender-3 3D Printer?
Can I use third-party filament with the Creality Ender-3 3D Printer?
What is the build volume of the Creality Ender-3 3D Printer?
How do I update the firmware on the Creality Ender-3 3D Printer?
Leave a Comment